typora-root-url: imgtypora-copy-images-to: img
第2章 预约管理-检查项、检查组管理
学习目标:
掌握新增检查项实现过程
掌握检查项分页查询实现过程
掌握删除检查项实现过程
掌握编辑检查项实现过程
掌握新增检查组实现过程
掌握检查组分页查询实现过程
掌握删除检查组实现过程
掌握编辑检查组实现过程
1. 新增检查项
本章节完成的功能开发是预约管理功能,包括检查项管理(身高,体重)、检查组管理(外科)、体检套餐管理(公司健康体检)、预约设置等(参见产品原型)。预约管理属于系统的基础功能,主要就是管理一些体检的基础数据。
【目标】
新增检查项
【路径】
- checkitem.html, 新建按钮绑定事件,弹出新增窗口,填写内容,点击确定绑定事件 提交(前要校验一下,成功后才能提交(axios)) formData,对返回的结果提示信息,如果成功,则要关闭新增窗口,且刷新列表数据
- CheckItemController, 用checkitem来接收formData, 调用服务添加add,返回result给页面
- CheckItemService与实现 add 方法, 调用dao
- CheckItemDao与映射文件 添加add方法,insert into t_checkitem () values(…)
【讲解】
1.1. 前台代码
检查项管理页面对应的是checkitem.html页面,根据产品设计的原型已经完成了页面基本结构的编写,现在需要完善页面动态效果。
1.1.1. 弹出新增窗口
页面中已经提供了新增窗口,只是处于隐藏状态。只需要将控制展示状态的属性dialogFormVisible改为true就可以显示出新增窗口。
新建按钮绑定的方法为handleCreate,所以在handleCreate方法中修改dialogFormVisible属性的值为true即可。同时为了增加用户体验度,需要每次点击新建按钮时清空表单输入项。
// 重置表单resetForm() {this.formData = {};},// 弹出添加窗口handleCreate() {this.resetForm();this.dialogFormVisible = true;},
1.1.2. 输入校验
rules: {//校验规则code: [{ required: true, message: '项目编码为必填项', trigger: 'blur' }],name: [{ required: true, message: '项目名称为必填项', trigger: 'blur' }]}
1.1.3. 提交表单数据
点击新增窗口中的确定按钮时,触发handleAdd方法,所以需要在handleAdd方法中进行完善。
//添加handleAdd () {//校验表单输入项是否合法this.$refs['dataAddForm'].validate((valid) => {if (valid) {//表单数据校验通过,发送ajax请求将表单数据提交到后台axios.post("/checkitem/add.do",this.formData).then((res)=> {//隐藏新增窗口this.dialogFormVisible = false;//判断后台返回的flag值,true表示添加操作成功,false为添加操作失败if(res.data.flag){this.$message({message: res.data.message,type: 'success'});}else{this.$message.error(res.data.message);}})} else {this.$message.error("表单数据校验失败");return false;}});},//分页查询findPage() {},
1.2. 后台代码
1.2.1. Controller
在health_web工程中创建CheckItemController
package com.itheima.health.controller;import com.alibaba.dubbo.config.annotation.Reference;import com.itheima.health.constant.MessageConstant;import com.itheima.health.entity.Result;import com.itheima.health.pojo.CheckItem;import com.itheima.health.service.CheckItemService;import org.springframework.web.bind.annotation.RequestBody;import org.springframework.web.bind.annotation.RequestMapping;import org.springframework.web.bind.annotation.RestController;/*** 体检检查项管理*/@RestController@RequestMapping("/checkitem")public class CheckItemController {@Referenceprivate CheckItemService checkItemService;//新增@RequestMapping("/add")public Result add(@RequestBody CheckItem checkItem){checkItemService.add(checkItem);return new Result(true,MessageConstant.ADD_CHECKITEM_SUCCESS);}}
1.2.2. 服务接口
在health_interface工程中创建CheckItemService接口
package com.itheima.health.service;import com.itheima.health.pojo.CheckItem;/*** 检查项服务接口*/public interface CheckItemService {void add(CheckItem checkItem);}
1.2.3. 服务实现类
在health_service工程中创建CheckItemServiceImpl实现类
package com.itheima.health.service;import com.alibaba.dubbo.config.annotation.Service;import com.itheima.health.dao.CheckItemDao;import com.itheima.health.pojo.CheckItem;import org.springframework.beans.factory.annotation.Autowired;import org.springframework.transaction.annotation.Transactional;/*** 检查项服务*/@Service(interfaceClass = CheckItemService.class)public class CheckItemServiceImpl implements CheckItemService {@Autowiredprivate CheckItemDao checkItemDao;//新增public void add(CheckItem checkItem) {checkItemDao.add(checkItem);}}
1.2.4. Dao接口
在health_dao工程中创建CheckItemDao接口,本项目是基于Mybatis的Mapper代理技术实现持久层操作,故只需要提供接口和Mapper映射文件,无须提供实现类
package com.itheima.health.dao;import com.itheima.health.pojo.CheckItem;/*** 持久层Dao接口*/public interface CheckItemDao {void add(CheckItem checkItem);}
1.2.5. Mapper映射文件
在health_dao工程中创建CheckItemDao.xml映射文件,需要和CheckItemDao接口在同一目录下
<?xml version="1.0" encoding="UTF-8" ?><!DOCTYPE mapper PUBLIC "-//mybatis.org//DTD Mapper 3.0//EN""http://mybatis.org/dtd/mybatis-3-mapper.dtd" ><mapper namespace="com.itheima.health.dao.CheckItemDao"><!--新增--><insert id="add" parameterType="com.itheima.health.pojo.CheckItem">insert into t_checkitem(code,name,sex,age,price,type,remark,attention)values(#{code},#{name},#{sex},#{age},#{price},#{type},#{remark},#{attention})</insert></mapper>
【小结】
先分析,业务对象是谁,对应表结构在哪里,表中的字段是什么意思
新增,表中数据从哪里来,从前端, 提供输入formData双向绑定,提交数据formData
写出操作的步骤,按着步骤完成代码
套路:
前端提请求 数据类型->Controller接收数据型->调用service->调用dao->映射文件
dao->service->controller->页面,提示结果,如果成功怎么样,失败怎么样
2. 检查项分页
【目标】
1:熟悉分页功能中的请求参数
2:熟悉分页功能中的响应数据
3:检查项分页功能实现
【路径】
1:前台代码 checkitem.html
需要提交的{page: 页码size: 大小条件:}响应的结果{flag:message:data:{ pageResulttotal: 100,rows:[]}}
查询绑定事件,提交查询的条件pagination(页码,大小,查询的条件),对结果进行提示,成功,绑定列表数据dataList=res.data.data.rows,绑定总记录数pagination.total=res.data.data.total。
CheckItemController 用QueryPageBean接收pagination对象, 调用服务查询返回pageResult, 返回Result(flag,message,data: pageResult)
CheckItemService, 实现分页查询 有条件则要模糊查询,调用Dao查询。且返回pageResult
使用PageHelper, PageHelper.startPage(页码,大小), 紧接着的查询语句会被分页CheckitemDao 条件查询Page
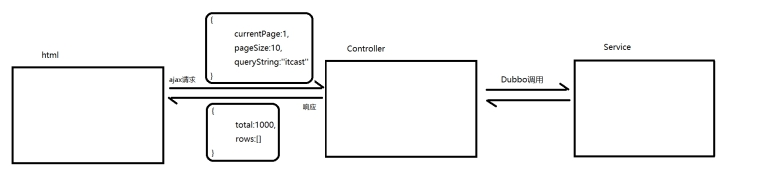
本项目所有分页功能都是基于ajax的异步请求来完成的,请求参数和后台响应数据格式都使用json数据格式。
1:请求参数包括页码、每页显示记录数、查询条件。
请求参数的json格式为:{currentPage:1,pageSize:10,queryString:’’itcast’’}
2:后台响应数据包括总记录数、当前页需要展示的数据集合。
响应数据的json格式为:{total:1000,rows:[]}
如下图:
2.1. 前台代码
2.1.1. 定义分页相关模型数据
pagination: {//分页相关模型数据currentPage: 1,//当前页码pageSize:10,//每页显示的记录数total:0,//总记录数queryString:null//查询条件},dataList: [],//当前页要展示的分页列表数据
2.1.2. 定义分页方法
在页面中提供了findPage方法用于分页查询,为了能够在checkitem.html页面加载后直接可以展示分页数据,可以在VUE提供的钩子函数created中调用findPage方法
//钩子函数,VUE对象初始化完成后自动执行created() {this.findPage();},
// 发送查询的请求,提交pagination(currentPage,pageSize)axios.post('/checkitem/findPage.do',this.pagination).then(res=>{if(res.data.flag){// 绑定数据//res.data => result {flag, message,data}// result.data = pageResult {total, rows}this.dataList = res.data.data.rows;// 总计录数this.pagination.total=res.data.data.total;}else{this.$message.error(res.data.message);}})
2.1.3. 完善分页方法执行时机
除了在created钩子函数中调用findPage方法查询分页数据之外,当用户点击查询按钮或者点击分页条中的页码时也需要调用findPage方法重新发起查询请求。
为查询按钮绑定单击事件,调用findPage方法
<el-button @click="handleCurrentChange(1)" class="dalfBut">查询</el-button>
为分页条组件绑定current-change事件,此事件是分页条组件自己定义的事件,当页码改变时触发,对应的处理函数为handleCurrentChange
<div class="pagination-container"><el-paginationclass="pagiantion"@current-change="handleCurrentChange":current-page="pagination.currentPage":page-size="pagination.pageSize"layout="total, prev, pager, next, jumper":total="pagination.total"></el-pagination></div>
定义handleCurrentChange方法
//切换页码handleCurrentChange(currentPage) {// currentPage为切换后的页码this.pagination.currentPage = currentPage;this.findPage();},
2.2. 后台代码
2.2.1. Controller
在CheckItemController中增加分页查询方法
/*** 分页查询*/@PostMapping("/findPage")public Result findPage(@RequestBody QueryPageBean queryPageBean){// 调用业务来分页PageResult<CheckItem> pageResult = checkItemService.findPage(queryPageBean);//return pageResult;// 返回给页面, 包装到Result, 统一风格return new Result(true, MessageConstant.QUERY_CHECKITEM_SUCCESS,pageResult);}
2.2.2. 服务接口
在CheckItemService服务接口中扩展分页查询方法
/**** @param queryPageBean* @return*/PageResult<CheckItem> findPage(QueryPageBean queryPageBean);
2.2.3. 服务实现类
在CheckItemServiceImpl服务实现类中实现分页查询方法,基于Mybatis分页助手插件实现分页
/*** 分页查询* @param queryPageBean* @return*/@Overridepublic PageResult<CheckItem> findPage(QueryPageBean queryPageBean) {//第二种,Mapper接口方式的调用,推荐这种使用方式。PageHelper.startPage(queryPageBean.getCurrentPage(), queryPageBean.getPageSize());// 模糊查询 拼接 %// 判断是否有查询条件if(!StringUtils.isEmpty(queryPageBean.getQueryString())){// 有查询条件,拼接%queryPageBean.setQueryString("%" + queryPageBean.getQueryString() + "%");}// 紧接着的查询语句会被分页Page<CheckItem> page = checkItemDao.findByCondition(queryPageBean.getQueryString());PageResult<CheckItem> pageResult = new PageResult<CheckItem>(page.getTotal(), page.getResult());return pageResult;}
正常分页逻辑(即:不使用PageHelper):
- 写2条sql
- 第一条sql:select count(0) from tcheckitem where name = ‘传智身高’ —>封装到PageResult中total 第二条sql:select _ from t_checkitem where name = ‘传智身高’ limit ?,? —>封装到PageResult中rows*
- limit ?,? :第一个问号:表示从第几条开始检索 计算:(currentPage-1)*pageSize 第二个问号:表示当前页最多显示的记录数, 计算:pageSize
- 问题:1:麻烦;2:不能通用,当前切换数据库的时候改动的代码多。
2.2.4. Dao接口
在CheckItemDao接口中扩展分页查询方法
/*** 分页条件查询* @return*/Page<CheckItem> findByCondition(String queryString);
2.2.5. Mapper映射文件
在CheckItemDao.xml文件中增加SQL定义
<!--条件查询--><select id="findByCondition" resultType="Checkitem" parameterType="String">select * From t_checkitem<if test="value !=null and value.length > 0">where code like #{value} or name like #{value}</if></select><!-- Mybatis 动态参数赋值 DynamicContext<if>标签里的变量,如果参数类型是基本数据类型,只能用 value 或 _parameter,这个是由它的底层ognl表达式决定的。如果参数类型是对象类型,则可以填它的属性。另外,使用#的参数可以是形参名也可以是value-->
如果使用if进行判断,这里需要是value读取值,不能改成其他参数。
【小结】
提交currentPage, pageSize
使用PageHelper ```xml 配置它 mybatis的拦截器 PageHelper.startPage(页码,大小) dao的查询语句会被分页
拦截sql语句,拼接查询总计录数的语句 拼接分页的语句 ThreadLocal 线程绑定数据
3.前端接收返回的结果,格式Result(PageResult)```jsonresult={flag:true,message:'查询成功',data:{ // pageResulttotal: 100,rows: [{checkitem}]}}res.data => result查询的结果集 res.data.data.rows总计录数 res.data.data.total
分页查询的时机:
- 进入页面
- 页码变更时要查询
- 点击查询按钮时要查,回到第一页
- 添加成功后要查
- 修改成功后要查
- 删除成功后要查
3. 删除检查项
【目标】
删除检查项
【路径】
- 绑定删除按钮,获取要删除的检查项id, 弹出询问窗口,确认后就提交请求,把id传给后台,提示返回的结果,成功则刷新列表。
- CheckItemCotnroller接收id, 调用服务删除,返回操作结果给页面
CheckItemService
- 判断检查项是否被检查组使用了 调用dao通过检查项id查询检查组与检查项的关系表,统计个数
- 个数>0不能删除,报错, 抛出自定义异常
- =0就可以删除
CheckItemDao
- 通过检查项id查询检查组与检查项的关系表,统计个数
- 通过id删除检查项
- 做一个全局异常处理 @ControllerAdvice
【讲解】
3.1. 前台代码
为了防止用户误操作,点击删除按钮时需要弹出确认删除的提示,用户点击取消则不做任何操作,用户点击确定按钮再提交删除请求。
3.1.1. 绑定单击事件
需要为删除按钮绑定单击事件,并且将当前行数据作为参数传递给处理函数
<el-button size="mini" type="danger" @click="handleDelete(scope.row)">删除</el-button>
调用的方法
// 删除handleDelete(row) {alert(row.id);}
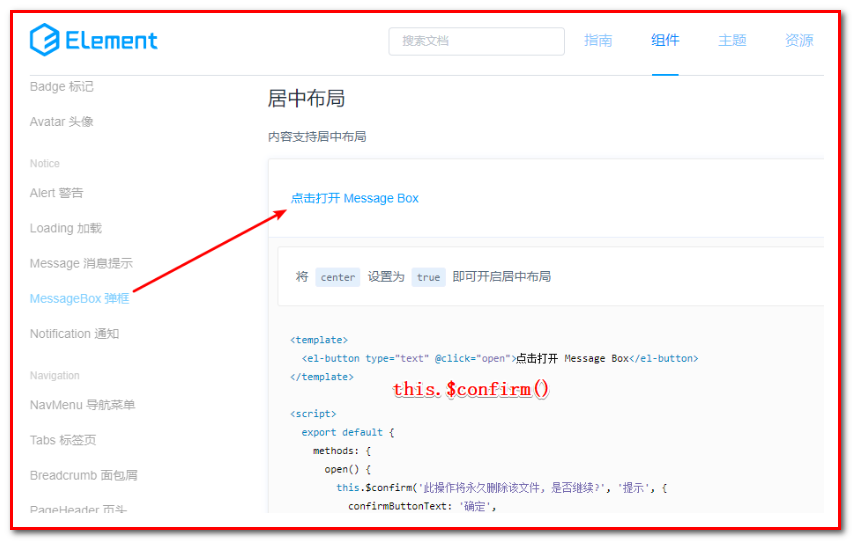
3.1.2. 弹出确认操作提示
用户点击删除按钮会执行handleDelete方法,此处需要完善handleDelete方法,弹出确认提示信息。ElementUI提供了$confirm方法来实现确认提示信息弹框效果
// 删除handleDelete(row) {// alert(row.id);this.$confirm("确认删除当前选中记录吗?","提示",{type:'warning'}).then(()=>{//点击确定按钮时只需此处代码alert('用户点击的是确定按钮');});}
3.1.3. 发送请求
如果用户点击确定按钮就需要发送ajax请求,并且将当前检查项的id作为参数提交到后台进行删除操作
// 删除handleDelete(row) {// row行数据,数据库中的一条记录,checkitem实体对象// 获取删除的idvar id = row.id;//alert(JSON.stringify(row));this.$confirm('此操作将【永久删除】该检查项, 是否继续?', '提示', {confirmButtonText: '确定',cancelButtonText: '取消',type: 'warning'}).then(() => {// 点击确定后调用axios.post('/checkitem/deleteById.do?id=' + id).then(res=>{this.$message({message: res.data.message,type: res.data.flag?"success":"error"})if(res.data.flag){// 成功// 刷新列表数据this.findPage();}})}).catch(() => {// 点击取消后调用// 空着,防止报错});}
3.2. 后台代码
3.2.0 自定义异常与处理
在health_common工程中创建
package com.itheima.health.exception;/*** Description: 自定义异常* 友好提示* 终止已经不符合业务逻辑的代码* User: Eric*/public class HealthException extends RuntimeException{public HealthException(String message){super(message);}}
3.2.1. Controller
在CheckItemController中增加删除方法
/*** 删除*/@PostMapping("/deleteById")public Result deleteById(int id){// 调用业务服务//try {checkItemService.deleteById(id);//} catch (Exception e) {// e.printStackTrace();//}// 响应结果return new Result(true, MessageConstant.DELETE_CHECKITEM_SUCCESS);}
添加异常处理类
package com.itheima.health.controller;import com.itheima.health.entity.Result;import com.itheima.health.exception.HealthException;import org.springframework.web.bind.annotation.ExceptionHandler;import org.springframework.web.bind.annotation.RestControllerAdvice;/*** Description: No Description* User: Eric*/// 与前端约定好的,返回的都是json数据@RestControllerAdvicepublic class HealExceptionAdvice {/*** 自定义招出的异常处理* @param he* @return*/@ExceptionHandler(HealthException.class)public Result handleHealthException(HealthException he){return new Result(false, he.getMessage());}/*** 所有未知的异常* @param he* @return*/@ExceptionHandler(Exception.class)public Result handleException(Exception he){return new Result(false, "发生未知错误,操作失败,请联系管理员");}}
3.2.2. 服务接口
在CheckItemService服务接口中扩展删除方法
void delete(Integer id) throws HealthException;
3.2.3. 服务实现类
注意:不能直接删除,需要判断当前检查项是否和检查组关联,如果已经和检查组进行了关联则不允许删除
/*** 删除* @param id*/@Overridepublic void deleteById(int id) throws HealthException {//先判断这个检查项是否被检查组使用了//调用dao查询检查项的id是否在t_checkgroup_checkitem表中存在记录int cnt = checkItemDao.findCountByCheckItemId(id);//被使用了则不能删除if(cnt > 0){//??? health_web能捕获到这个异常吗?throw new HealthException(MessageConstant.CHECKITEM_IN_USE);}//没使用就可以调用dao删除checkItemDao.deleteById(id);}
3.2.4. Dao接口
在CheckItemDao接口中扩展方法findCountByCheckItemId和deleteById
/*** 检查 检查项是否被检查组使用了* @param id* @return*/int findCountByCheckItemId(int id);/*** 通过id删除检查项* @param id*/void deleteById(int id);
3.2.5. Mapper映射文件
在CheckItemDao.xml中扩展SQL语句
<!--查询优化select count(1) from t_checkitem; 1使用人混淆select count(100) from t_checkitem; 1select count('abc1') from t_checkitem; 1上面三条语句相对而言,查询速度最快相对而言慢一丢丢,原因,要解析列名是否在表中存在select count(id) from t_checkitem; 2最慢,原因,要解析*含义,列表表中所有的列select count(*) from t_checkitem; 3--><select id="findCountByCheckItemId" parameterType="int" resultType="int">select count(1) from t_checkgroup_checkitem where checkitem_id=#{id}</select><delete id="deleteById" parameterType="int">delete from t_checkitem where id=#{id}</delete>
【小结】
- 企业开发分为2种:物理删除(删除表中的数据),逻辑删除(多)(更新表的字段status,state,active 为失效, 代表着这条记录不再使用
- 自定义异常 作用
- 全局异常处理@RestControllerAdvice, @ExceptionHandler
- 删除时要询问提示一下,防止用户操作失误
- 在dubbo的架构中,服务端抛出自定义异常要在接口的方法中声明抛出,否则会被dubbo转成RuntimeException
4. 编辑检查项
【目标】
1:编辑检查项(ID查询,回显)
2:编辑检查项(更新保存,执行update)
【路径】
回显数据
- 绑定编辑按钮,清空表单,弹出编辑窗口,获取id, 发送请求,获取响应的数据绑定到formData,如果失败要提示
- CheckItemController, CheckItemService, checkItemDao, 通过id查询检查项
修改的提交
- 绑定确定按钮,校验后发送请求提交formData。提示返回的结果,成功则关闭编辑窗口,刷新列表数据
- CheckItemController, checkItemService, checkItemDao 更新的方法
【讲解】
4.1. 前台代码
用户点击编辑按钮时,需要弹出编辑窗口并且将当前记录的数据进行回显,用户修改完成后点击确定按钮将修改后的数据提交到后台进行数据库操作。
4.1.1. 绑定单击事件
需要为编辑按钮绑定单击事件,并且将当前行数据作为参数传递给处理函数
<el-button type="primary" size="mini" @click="handleUpdate(scope.row)">编辑</el-button>
处理事件:handleUpdate();
// 弹出编辑窗口handleUpdate(row) {alert(row.id);},
4.1.2. 弹出编辑窗口回显数据
当前页面中的编辑窗口已经提供好了,默认处于隐藏状态。在handleUpdate方法中需要将编辑窗口展示出来,并且需要发送ajax请求查询当前检查项数据用于回显
// 弹出编辑窗口handleUpdate(row) {this.resetForm();var id = row.id;// 弹出编辑窗口this.dialogFormVisible4Edit = true;// 回显 发送请求axios.get('/checkitem/findById.do?id=' + id).then(res => {if(res.data.flag){// 绑定数据回显, 编辑的form表单也绑定了这个formDatathis.formData = res.data.data;}else{this.$message.error(res.data.message);}})},
4.1.3. 发送请求更改数据
在编辑窗口中修改完成后,点击确定按钮需要提交请求,所以需要为确定按钮绑定事件并提供处理函数handleEdit
<div slot="footer" class="dialog-footer"><el-button @click="dialogFormVisible4Edit = false">取消</el-button><el-button type="primary" @click="handleEdit()">确定</el-button></div>
handleEdit()方法
//编辑提交handleEdit() {// 提交修改this.$refs['dataEditForm'].validate((valid) => {if (valid) {// 所有检验通过, 提交数据给后台this.formDataaxios.post('/checkitem/update.do', this.formData).then(res=>{this.$message({message: res.data.message,type: res.data.flag?"success":"error"})if(res.data.flag){// 成功的处理// 关闭窗口this.dialogFormVisible4Edit = false;// 刷新列表数据this.findPage();}})} else {console.log('error submit!!');return false;}});},
4.2. 后台代码
4.2.1. Controller
在CheckItemController中增加编辑方法
/*** 通过id查询*/@GetMapping("/findById")public Result findById(int id){CheckItem checkItem = checkItemService.findById(id);return new Result(true, MessageConstant.QUERY_CHECKITEM_SUCCESS,checkItem);}/*** 修改检查项* @param checkitem* @return*/@PostMapping("/update")public Result update(@RequestBody CheckItem checkitem){// 调用业务服务checkItemService.update(checkitem);// 响应结果给前端return new Result(true, MessageConstant.EDIT_CHECKITEM_SUCCESS);}
4.2.2. 服务接口
在CheckItemService服务接口中扩展编辑方法
/*** 通过id查询* @param id* @return*/CheckItem findById(int id);/*** 更新检查项* @param checkitem*/void update(CheckItem checkitem);
4.2.3. 服务实现类
在CheckItemServiceImpl实现类中实现编辑方法
/*** 通过id查询* @param id* @return*/@Overridepublic CheckItem findById(int id) {return checkItemDao.findById(id);}/*** 更新* @param checkitem*/@Overridepublic void update(CheckItem checkitem) {checkItemDao.update(checkitem);}
4.2.4. Dao接口
在CheckItemDao接口中扩展edit方法
/*** 通过id查询* @param id* @return*/CheckItem findById(int id);/*** 更新检查项* @param checkitem*/void update(CheckItem checkitem);
4.2.5. Mapper映射文件
在CheckItemDao.xml中扩展SQL语句
<select id="findById" parameterType="int" resultType="checkitem">select * From t_checkitem where id=#{id}</select><update id="update" parameterType="checkitem">update t_checkitemsetcode=#{code},name=#{name},sex=#{sex},age=#{age},price=#{price},type=#{type},remark=#{remark},attention=#{attention}where id=#{id}</update>
【小结】
数据回显
通过id查询,绑定到formData修改后提交
跟添加类似, 表单校验,提交formData
注意:数据类型要与实体匹配, 价格的输入框的值必须是数字
5. 新增检查组
【需求】
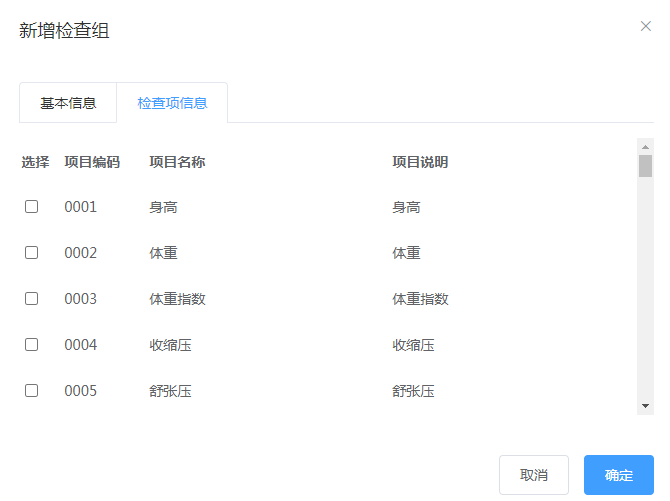
检查组其实就是多个检查项的集合,例如有一个检查组为“一般检查”,这个检查组可以包括多个检查项:身高、体重、收缩压、舒张压等。所以在添加检查组时需要选择这个检查组包括的检查项。
检查组对应的实体类为CheckGroup,对应的数据表为t_checkgroup。检查组和检查项为多对多关系,所以需要中间表t_checkgroup_checkitem进行关联。
【目标】
新增检查组
【路径】
1:前台代码
- 绑定新建按钮事件,弹出新增窗口,重置表单,请求检查项列表数据,绑定到tableData.
- 绑定确定按钮,提交formData检查组信息, 选中的检查项checkitemIds集合, 提示操作的信息,成功则关闭新增窗口,刷新列表数据
2:后台代码
- CheckGroupController 接收formData 用CheckGroup, checkitemIds=>用Integer[] 数组。调用业务添加,返回结果给页面
CheckGroupService
- 调用Dao添加到检查组
- 获取新添加的检查组id
- 遍历checkitemIds, 调用dao添加检查组与检查项的关系
- 添加事务控制
CheckGroupDao
- 添加检查组 selectKey
- 添加检查组与检查项的关系
【讲解】
5.1. 前台代码
检查组管理页面对应的是checkgroup.html页面,根据产品设计的原型已经完成了页面基本结构的编写,现在需要完善页面动态效果。
5.1.1. 弹出新增窗口
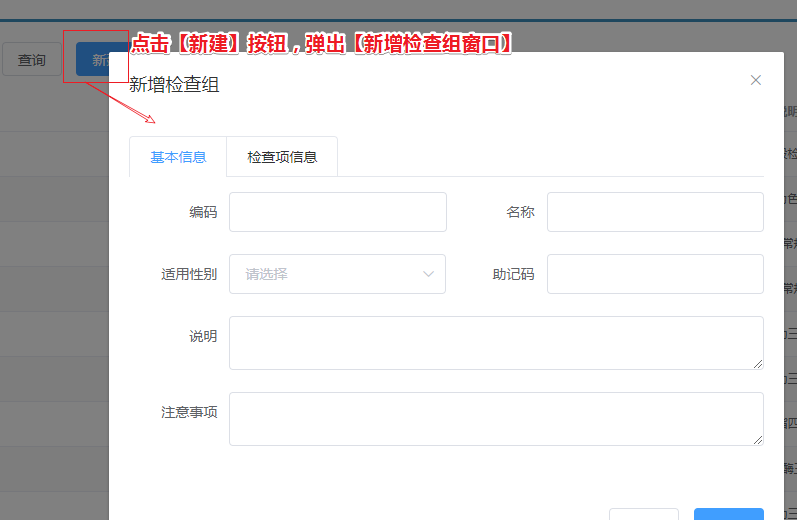
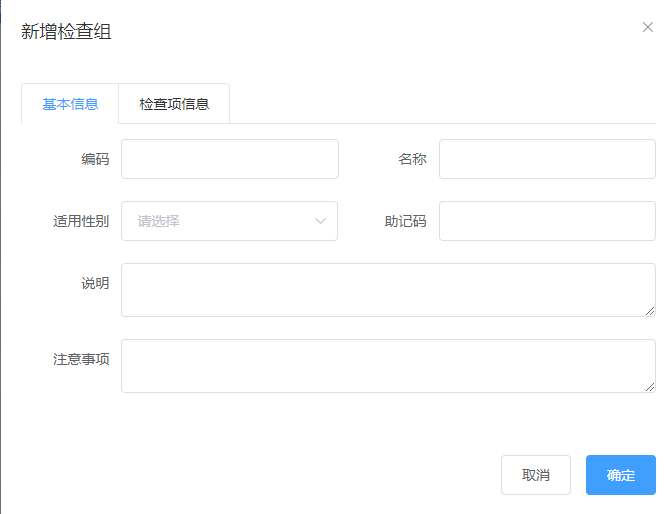
页面中已经提供了新增窗口,只是出于隐藏状态。只需要将控制展示状态的属性dialogFormVisible改为true即可显示出新增窗口。点击新建按钮时绑定的方法为handleCreate,所以在handleCreate方法中修改dialogFormVisible属性的值为true即可。同时为了增加用户体验度,需要每次点击新建按钮时清空表单输入项。
由于新增检查组时还需要选择此检查组包含的检查项,所以新增检查组窗口分为两部分信息:基本信息和检查项信息,如下图:
(1)新建按钮绑定单击事件,对应的处理函数为handleCreate
<el-button type="primary" class="butT" @click="handleCreate()">新建</el-button>
(2)handleCreate()方法
// 重置表单resetForm() {// 清空表单this.formData = {};this.activeName='first'; //选中基本信息标签项// 清除钩选this.checkitemIds=[];},// 弹出添加窗口handleCreate() {//重置表单,弹出窗口this.resetForm();this.dialogFormVisible = true;},
5.1.2. 新增窗口中,动态展示检查项列表
现在虽然已经完成了新增窗口的弹出,但是在检查项信息标签页中需要动态展示所有的检查项信息列表数据,并且可以进行勾选。具体操作步骤如下:
(1)定义模型数据
tableData:[],//新增和编辑表单中对应的检查项列表数据checkitemIds:[],//新增和编辑表单中检查项对应的复选框,基于双向绑定可以进行回显和数据提交,传递检查项id的数组
(2)动态展示检查项列表数据,数据来源于上面定义的tableData模型数据
<el-tab-pane label="检查项信息" name="second"><div class="checkScrol"><table class="datatable"><thead><tr><th>选择</th><th>项目编码</th><th>项目名称</th><th>项目说明</th></tr></thead><tbody><tr v-for="c in tableData"><td><input :id="c.id" v-model="checkitemIds" type="checkbox" :value="c.id"></td><td><label :for="c.id">{{c.code}}</label></td><td><label :for="c.id">{{c.name}}</label></td><td><label :for="c.id">{{c.remark}}</label></td></tr></tbody></table></div></el-tab-pane>
(3)完善handleCreate方法,发送ajax请求查询所有检查项数据并将结果赋值给tableData模型数据用于页面表格展示
// 弹出添加窗口handleCreate() {//重置表单,弹出窗口this.resetForm();this.dialogFormVisible = true;//发送请求后台获取所有检查项数据,得到后绑定tableData(检查项列表)axios.get('/checkitem/findAll.do').then(res => {if(res.data.flag){this.tableData = res.data.data;}else{this.$message.error(res.data.message);}})},
(4)分别在CheckItemController、CheckItemService、CheckItemServiceImpl、CheckItemDao、CheckItemDao.xml中扩展方法查询所有检查项数据
【1】:CheckItemController:
@GetMapping("/findAll")public Result findAll(){// 调用服务查询所有的检查项List<CheckItem> list = checkItemService.findAll();// 封装返回的结果return new Result(true, MessageConstant.QUERY_CHECKITEM_SUCCESS,list);}
【2】:CheckItemService:
List<CheckItem> findAll();
【3】:CheckItemServiceImpl:
public List<CheckItem> findAll() {return checkItemDao.findAll();}
【4】:CheckItemDao:
List<CheckItem> findAll();
【5】:CheckItemDao.xml:
<select id="findAll" resultType="CheckItem">select * from t_checkitem</select>
5.1.3. 提交请求,执行保存
当用户点击新增窗口中的确定按钮时发送ajax请求将数据提交到后台进行数据库操作。提交到后台的数据分为两部分:检查组基本信息(对应的模型数据为formData)和检查项id数组(对应的模型数据为checkitemIds)。
(1)为确定按钮绑定单击事件,对应的处理函数为handleAdd
<el-button type="primary" @click="handleAdd()">确定</el-button>
(2)完善handleAdd方法
//添加handleAdd () {//提交检查组信息this.formData, 选中的检查项id this.checkitemIdsaxios.post('/checkgroup/add.do?checkitemIds=' + this.checkitemIds, this.formData).then(res => {this.$message({message: res.data.message,type: res.data.flag?"success":"error"})if(res.data.flag){// 关闭窗口this.dialogFormVisible = false;// 刷新列表数据this.findPage();}})},
5.2. 后台代码
2.2.1. Controller
在health_web工程中创建CheckGroupController
package com.itheima.health.controller;import com.alibaba.dubbo.config.annotation.Reference;import com.itheima.health.constant.MessageConstant;import com.itheima.health.entity.PageResult;import com.itheima.health.entity.QueryPageBean;import com.itheima.health.entity.Result;import com.itheima.health.pojo.CheckGroup;import com.itheima.health.service.CheckGroupService;import org.springframework.web.bind.annotation.PostMapping;import org.springframework.web.bind.annotation.RequestBody;import org.springframework.web.bind.annotation.RequestMapping;import org.springframework.web.bind.annotation.RestController;/*** Description: No Description* User: Eric*/@RestController@RequestMapping("/checkgroup")public class CheckGroupController {@Referenceprivate CheckGroupService checkGroupService;/*** 添加检查组* @param checkGroup* @param checkitemIds* @return*/@PostMapping("/add")public Result add(@RequestBody CheckGroup checkGroup, Integer[] checkitemIds){// 调用业务服务checkGroupService.add(checkGroup, checkitemIds);// 响应结果return new Result(true, MessageConstant.ADD_CHECKGROUP_SUCCESS);}}
5.2.2. 服务接口
在health_interface工程中创建CheckGroupService接口
package com.itheima.health.service;import com.itheima.health.entity.PageResult;import com.itheima.health.entity.QueryPageBean;import com.itheima.health.pojo.CheckGroup;/*** Description: No Description* User: Eric*/public interface CheckGroupService {/*** 添加检查组* @param checkGroup* @param checkitemIds*/void add(CheckGroup checkGroup, Integer[] checkitemIds);}
5.2.3. 服务实现类
在health_service工程中创建CheckGroupServiceImpl实现类
package com.itheima.health.service.impl;import com.alibaba.dubbo.config.annotation.Service;import com.github.pagehelper.Page;import com.github.pagehelper.PageHelper;import com.itheima.health.dao.CheckGroupDao;import com.itheima.health.entity.PageResult;import com.itheima.health.entity.QueryPageBean;import com.itheima.health.pojo.CheckGroup;import com.itheima.health.service.CheckGroupService;import org.springframework.beans.factory.annotation.Autowired;import org.springframework.transaction.annotation.Transactional;import org.springframework.util.StringUtils;/*** Description: No Description* User: Eric*/@Service(interfaceClass = CheckGroupService.class)public class CheckGroupServiceImpl implements CheckGroupService {@Autowiredprivate CheckGroupDao checkGroupDao;/*** 添加* @param checkGroup* @param checkitemIds*/@Override@Transactionalpublic void add(CheckGroup checkGroup, Integer[] checkitemIds) {// 添加检查组checkGroupDao.add(checkGroup);// 获取检查组的idInteger checkGroupId = checkGroup.getId();// 遍历检查项id, 添加检查组与检查项的关系if(null != checkitemIds){// 有钩选for (Integer checkitemId : checkitemIds) {//添加检查组与检查项的关系checkGroupDao.addCheckGroupCheckItem(checkGroupId, checkitemId);}}}}
2.4. Dao接口
在health_dao工程中创建CheckGroupDao接口
package com.itheima.health.dao;import com.github.pagehelper.Page;import com.itheima.health.pojo.CheckGroup;import org.apache.ibatis.annotations.Param;/*** Description: No Description* User: Eric*/public interface CheckGroupDao {/*** 添加检查组* @param checkGroup*/void add(CheckGroup checkGroup);/*** 添加检查组与检查项的关系* @param checkGroupId 注意要取别名,类型相同* @param checkitemId*/void addCheckGroupCheckItem(@Param("checkGroupId") Integer checkGroupId, @Param("checkitemId") Integer checkitemId);}
上面我们使用@Param区别两个参数类型相同的参数
5.2.5. Mapper映射文件
在health_dao工程中创建CheckGroupDao.xml映射文件,需要和CheckGroupDao接口在同一目录下
<?xml version="1.0" encoding="UTF-8" ?><!DOCTYPE mapperPUBLIC "-//mybatis.org//DTD Mapper 3.0//EN""http://mybatis.org/dtd/mybatis-3-mapper.dtd"><mapper namespace="com.itheima.health.dao.CheckGroupDao"><insert id="add" parameterType="checkgroup"><selectKey resultType="int" order="AFTER" keyProperty="id">select last_insert_id()</selectKey>insert into t_checkgroup (code,name,helpCode,sex,remark,attention)values (#{code},#{name},#{helpCode},#{sex},#{remark},#{attention})</insert><insert id="addCheckGroupCheckItem" parameterType="int">insert into t_checkgroup_checkitem (checkgroup_id, checkitem_id)values (#{checkGroupId}, #{checkitemId})</insert></mapper>
【小结】
1:前台代码
(1)弹出新增窗口 this.dialogFormVisable=ture
- 使用选项卡
- 选项卡一:检查组信息 放到form保存及展示 检查组信息
- 选项卡二:检查项列表,并提供复选框 供给用户来选择
(2)新增窗口中,动态展示检查项列表
- 查询所有检查项,弹出 窗口时,加载检查项列表数据 绑定到this.tableData
(3)提交请求(检查组信息this.formData, 选中的检查项id this.checkitemIds),执行保存, 关闭窗口且刷新列表
2:后台代码
- Controller用@Requestbody(只能有一个)前端传过来form表单数据=>CheckGroup
- Integer[] 数组来接收选中的检查项id数组 (提交是字符串,后台拿到的是数组,springMVC)
- 业务服务中,对多数据操作,开启事务(注意)
- 插入数据后获取id使用 selectKey select last_insert_id()
优化: 添加检查组与检查项关系使用的for循环,效率比较,使用批量的方式提交
知识点:关系维护
基本信息,列表来钩选(关系), 只提交选中的id。
6. 检查组查询、分页
【目标】
检查组查询、分页
【路径】
1:前台代码
(1)定义分页相关模型数据
(2)定义分页方法
(3)完善分页方法执行时机(点击“查询”,点击“分页”)
2:后台代码
执行
- 检查组分页查询
(1)CheckGroupController.java(Controller)
(2)CheckGroupService.java(服务接口)
(3)CheckGroupServiceImpl.java(服务实现类)
(4)CheckGroupDao.java(Dao接口)
(5)CheckGroupDao.xml(Mapper映射文件)
【讲解】
6.1. 前台代码
6.1.1. 定义分页相关模型数据
pagination: {//分页相关模型数据currentPage: 1,//当前页码pageSize:10,//每页显示的记录数total:0,//总记录数queryString:null//查询条件},dataList: [],//当前页要展示的分页列表数据
6.1.2. 定义分页方法
在页面中提供了findPage方法用于分页查询,为了能够在checkgroup.html页面加载后直接可以展示分页数据,可以在VUE提供的钩子函数created中调用findPage方法
//钩子函数,VUE对象初始化完成后自动执行created() {this.findPage();},
findPage()方法。
//分页查询findPage() {axios.post('/checkgroup/findPage.do',this.pagination).then(res => {if(res.data.flag){this.dataList = res.data.data.rows;this.pagination.total = res.data.data.total;} else{this.$message.error(res.data.message);}});},
6.1.3. 完善分页方法执行时机
除了在created钩子函数中调用findPage方法查询分页数据之外,当用户点击查询按钮或者点击分页条中的页码时也需要调用findPage方法重新发起查询请求。
(1)为查询按钮绑定单击事件,调用findPage方法
<el-button @click="handleCurrentChange(1)" class="dalfBut">查询</el-button>
(2)为分页条组件绑定current-change事件,此事件是分页条组件自己定义的事件,当页码改变时触发,对应的处理函数为handleCurrentChange
<div class="pagination-container"><el-paginationclass="pagiantion"@current-change="handleCurrentChange":current-page="pagination.currentPage":page-size="pagination.pageSize"layout="total, prev, pager, next, jumper":total="pagination.total"></el-pagination></div>
(3)定义handleCurrentChange方法
//切换页码handleCurrentChange(currentPage) {//currentPage为切换后的页码this.pagination.currentPage = currentPage;this.findPage();},
6.2. 后台代码
6.2.1. Controller
在CheckGroupController中增加分页查询方法
/*** 分页条件查询*/@PostMapping("/findPage")public Result findPage(@RequestBody QueryPageBean queryPageBean){// 调用业务查询PageResult<CheckGroup> pageResult = checkGroupService.findPage(queryPageBean);return new Result(true, MessageConstant.QUERY_CHECKGROUP_SUCCESS, pageResult);}
6.2.2. 服务接口
在CheckGroupService服务接口中扩展分页查询方法
/*** 分页条件查询* @param queryPageBean* @return*/PageResult<CheckGroup> findPage(QueryPageBean queryPageBean);
6.2.3. 服务实现类
在CheckGroupServiceImpl服务实现类中实现分页查询方法,基于Mybatis分页助手插件实现分页
/*** 分页条件查询* @param queryPageBean* @return*/@Overridepublic PageResult<CheckGroup> findPage(QueryPageBean queryPageBean) {// 使用PageHelper.startPagePageHelper.startPage(queryPageBean.getCurrentPage(), queryPageBean.getPageSize());// 有查询条件的处理, 模糊查询if(!StringUtils.isEmpty(queryPageBean.getQueryString())){// 拼接%queryPageBean.setQueryString("%" + queryPageBean.getQueryString()+ "%");}// 紧接着的查询会被分页Page<CheckGroup> page = checkGroupDao.findByCondition(queryPageBean.getQueryString());return new PageResult<CheckGroup>(page.getTotal(), page.getResult());}
6.2.4. Dao接口
在CheckGroupDao接口中扩展分页查询方法
Page<CheckGroup> findByCondition(String queryString);
6.2.5. Mapper映射文件
在CheckGroupDao.xml文件中增加SQL定义
<select id="findByCondition" resultType="checkgroup" parameterType="String">select * From t_checkgroup<if test="value !=null and value.length > 0">where code like #{value} or name like #{value} or helpCode like #{value}</if></select>
【小结】
1:前台代码
(1)定义分页相关模型数据
(2)定义分页方法
findPage()方法。
//分页查询findPage() {axios.post('/checkgroup/findPage.do',this.pagination).then(res => {if(res.data.flag){this.dataList = res.data.data.rows;this.pagination.total = res.data.data.total;} else{this.$message.error(res.data.message);}});},
(3)完善分页方法执行时机(点击“查询”,点击“分页”)
2:后台代码
执行
- 检查组分页查询
(1)CheckGroupController.java(Controller)
(2)CheckGroupService.java(服务接口)
(3)CheckGroupServiceImpl.java(服务实现类)
(4)CheckGroupDao.java(Dao接口)
(5)CheckGroupDao.xml(Mapper映射文件)
7. 编辑检查组
【目标】
编辑检查组
【路径】
回显
- 【编辑】按钮,弹出编辑窗口,表单初始化,获取编辑的id,发送请求获取检查组信息,返回的检查组绑formData
- 获取检查项列表,绑定到tableData, 发送请求获取选中的检查项ids 绑定到checkitemIds,钩选中
CheckGroupController
- 提交findById
- 通过检查组id查询选中的检查项id集合 List
CheckGroupService
- findById
- 通过检查组id查询选中的检查项id集合 List
CheckGroupDao
- findById
- 通过检查组id查询选中的检查项id集合 List
提交修改
- 【确定】发送请求提交formData, checkitemIds。提示操作结果,成功则要关闭编辑窗口,刷新列表数据
- CheckGroupController CheckGroup接收formData, Integer[] 接收checkItemIds,调用服务修改,返回结果给页面
CheckGroupService
- 更新检查组
- 先删除旧关系
- 再添加新关系
- 事务控制
CheckGroupDao与映射
- update
- deleteCheckGroupCheckItem t_checkgroup_checkitem
【讲解】
7.1. 前台页面
用户点击编辑按钮时,需要弹出编辑窗口并且将当前记录的数据进行回显,用户修改完成后点击确定按钮将修改后的数据提交到后台进行数据库操作。此处进行数据回显的时候,除了需要检查组基本信息的回显之外,还需要回显当前检查组包含的检查项(以复选框勾选的形式回显)。
7.1.1. 绑定单击事件
(1)需要为编辑按钮绑定单击事件,并且将当前行数据作为参数传递给处理函数
<el-table-column label="操作" align="center"><template slot-scope="scope"><el-button type="primary" size="mini" @click="handleUpdate(scope.row)">编辑</el-button><el-button size="mini" type="danger" @click="handleDelete(scope.row)">删除</el-button></template></el-table-column>
(2)handleUpdate事件
// 弹出编辑窗口handleUpdate(row) {alert(row.id);},
7.1.2. 弹出编辑窗口回显数据
当前页面的编辑窗口已经提供好了,默认处于隐藏状态。在handleUpdate方法中需要将编辑窗口展示出来,并且需要发送多个ajax请求分别查询当前检查组数据、所有检查项数据、当前检查组包含的检查项id用于基本数据回显
// 重置表单resetForm() {// 清空表单this.formData = {};this.activeName='first'; //选中基本信息标签项// 清除钩选this.checkitemIds=[];},
// 弹出编辑窗口handleUpdate(row) {this.resetForm();// 弹出编辑窗口this.dialogFormVisible4Edit = true;// 获取检查组的idvar checkGroupId = row.id;axios.get("/checkgroup/findById.do?checkGroupId=" + checkGroupId).then(res =>{if(res.data.flag){// 成功绑定数据this.formData = res.data.data;//发送请求后台获取所有检查项数据,得到后绑定tableData(检查项列表)axios.get('/checkitem/findAll.do').then(resp => {if(resp.data.flag){this.tableData = resp.data.data;// 获取选中的检查项id, 回显数据时,检查项列表要钩选中axios.get("/checkgroup/findCheckItemIdsByCheckGroupId.do?checkGroupId=" + checkGroupId).then(response=>{// 后台要返回data必须为Listif(response.data.flag){this.checkitemIds = response.data.data;}else{this.$message.error(response.data.message);}})}else{this.$message.error(resp.data.message);}})}else{this.$message.error(res.data.message);}})},
7.1.3. 发送请求,编辑保存检查组
(1)在编辑窗口中修改完成后,点击确定按钮需要提交请求,所以需要为确定按钮绑定事件并提供处理函数handleEdit
<el-button type="primary" @click="handleEdit()">确定</el-button>
(2)handleEdit()方法
//编辑 修改后提交handleEdit() {//提交检查组信息this.formData, 选中的检查项id this.checkitemIdsaxios.post('/checkgroup/update.do?checkitemIds=' + this.checkitemIds, this.formData).then(res => {this.$message({message: res.data.message,type: res.data.flag?"success":"error"})if(res.data.flag){// 关闭编辑窗口this.dialogFormVisible4Edit = false;// 刷新列表数据this.findPage();}})},
7.2. 后台代码
7.2.1. Controller
在CheckGroupController中增加方法
/*** 通过id获取检查组*/@GetMapping("/findById")public Result findById(int checkGroupId){// 调用业务服务CheckGroup checkGroup = checkGroupService.findById(checkGroupId);return new Result(true, MessageConstant.QUERY_CHECKGROUP_SUCCESS,checkGroup);}/*** 通过检查组id查询选中的检查项id*/@GetMapping("/findCheckItemIdsByCheckGroupId")public Result findCheckItemIdsByCheckGroupId(int checkGroupId){// 调用服务查询List<Integer> checkItemIds = checkGroupService.findCheckItemIdsByCheckGroupId(checkGroupId);return new Result(true, MessageConstant.QUERY_CHECKITEM_SUCCESS,checkItemIds);}/*** 修改提交*/@PostMapping("/update")public Result update(@RequestBody CheckGroup checkGroup, Integer[] checkitemIds){// 调用业务服务checkGroupService.update(checkGroup, checkitemIds);// 响应结果return new Result(true, MessageConstant.EDIT_CHECKGROUP_SUCCESS);}
7.2.2. 服务接口
在CheckGroupService服务接口中扩展方法
/*** 通过检查组id查询选中的检查项id* @param checkGroupId* @return*/List<Integer> findCheckItemIdsByCheckGroupId(int checkGroupId);/*** 通过id获取检查组* @param checkGroupId* @return*/CheckGroup findById(int checkGroupId);/*** 修改检查组* @param checkGroup* @param checkitemIds*/void update(CheckGroup checkGroup, Integer[] checkitemIds);
7.2.3. 服务实现类
在CheckGroupServiceImpl实现类中实现编辑方法
/*** 通过检查组id查询选中的检查项id* @param checkGroupId* @return*/@Overridepublic List<Integer> findCheckItemIdsByCheckGroupId(int checkGroupId) {return checkGroupDao.findCheckItemIdsByCheckGroupId(checkGroupId);}/*** 通过id获取检查组* @param checkGroupId* @return*/@Overridepublic CheckGroup findById(int checkGroupId) {return checkGroupDao.findById(checkGroupId);}/*** 修改检查组* @param checkGroup* @param checkitemIds*/@Override@Transactionalpublic void update(CheckGroup checkGroup, Integer[] checkitemIds) {// 先更新检查组checkGroupDao.update(checkGroup);// 删除旧关系checkGroupDao.deleteCheckGroupCheckItem(checkGroup.getId());// 建立新关系if(null != checkitemIds){for (Integer checkitemId : checkitemIds) {checkGroupDao.addCheckGroupCheckItem(checkGroup.getId(), checkitemId);}}}
7.2.4. Dao接口
在CheckGroupDao接口中扩展方法
/*** 通过检查组id查询选中的检查项id* @param checkGroupId* @return*/List<Integer> findCheckItemIdsByCheckGroupId(int checkGroupId);/*** 通过id获取检查组* @param checkGroupId* @return*/CheckGroup findById(int checkGroupId);/*** 更新检查组* @param checkGroup*/void update(CheckGroup checkGroup);/*** 删除检查组与检查项的关系* @param id*/void deleteCheckGroupCheckItem(Integer id);
7.2.5. Mapper映射文件
在CheckGroupDao.xml中扩展SQL语句
<select id="findCheckItemIdsByCheckGroupId" parameterType="int" resultType="int">select checkitem_id from t_checkgroup_checkitem where checkgroup_id=#{checkGroupId}</select><select id="findById" parameterType="int" resultType="checkgroup">select * From t_checkgroup where id=#{checkGroupId}</select><update id="update" parameterType="checkgroup">update t_checkgroupsetcode=#{code},name=#{name},helpCode=#{helpCode},sex=#{sex},remark=#{remark},attention=#{attention}where id=#{id}</update><delete id="deleteCheckGroupCheckItem" parameterType="int">delete from t_checkgroup_checkitem where checkgroup_id=#{id}</delete>
【小结】
回显数据,除了要回显检查组信息外,还要去查检查项列表,查询选中的检查项id集合
默认钩选, 把id的集合绑定this.checkitemIds关系维护前端
<table class="datatable"><thead><tr><th>选择</th><th>项目编码</th><th>项目名称</th><th>项目说明</th></tr></thead><tbody><tr v-for="c in tableData"><td><input :id="c.id" v-model="checkitemIds" type="checkbox" :value="c.id"></td><td><label :for="c.id">{{c.code}}</label></td><td><label :for="c.id">{{c.name}}</label></td><td><label :for="c.id">{{c.remark}}</label></td></tr></tbody></table>
提交,对已经关系维护(多对多),先删除再添加新关系
业务层如果多种修改数据库的操作,记得要加事务管理@Transactional打在方法上
8. 删除检查组
【目标】
删除检查组
【路径】
1:前台代码
- 【删除】编辑单击事件,弹出询问窗口,确定后提交检查组id,提示操作结果,如果成功则刷新列表数据
2:后台代码
CheckGroupController接收id,调用服务删除,返回结果给页面
CheckGroupService 事务
- 判断检查组是否被套餐使用了
- 被使用, 报错
没被使用
- 先解散,删除检查组与检查项的关系
- 再来删除检查组
CheckGroupDao
- 通过检查组id查询套餐与检查组的关系的个数
- 通过检查组id删除检查组与检查项的关系
- 删除检查组
【讲解】
3.1. 前台代码
为了防止用户误操作,点击删除按钮时需要弹出确认删除的提示,用户点击取消则不做任何操作,用户点击确定按钮再提交删除请求。
3.1.1. 绑定单击事件
需要为删除按钮绑定单击事件,并且将当前行数据作为参数传递给处理函数
<el-button size="mini" type="danger" @click="handleDelete(scope.row)">删除</el-button>
调用的方法
// 删除handleDelete(row) {alert(row.id);}
3.1.2. 弹出确认操作 发送删除请求
用户点击删除按钮会执行handleDelete方法,此处需要完善handleDelete方法,弹出确认提示信息。ElementUI提供了$confirm方法来实现确认提示信息弹框效果,如果用户点击确定按钮就需要发送ajax请求,并且将当前检查组的id作为参数提交到后台进行删除操作
// 删除handleDelete(row) {// 获取删除的idvar id = row.id;//alert(JSON.stringify(row));this.$confirm('此操作将【永久删除】该检查组, 是否继续?', '提示', {confirmButtonText: '确定',cancelButtonText: '取消',type: 'warning'}).then(() => {// 点击确定后调用axios.post('/checkgroup/deleteById.do?id=' + id).then(res=>{this.$message({message: res.data.message,type: res.data.flag?"success":"error"})if(res.data.flag){// 成功// 刷新列表数据this.findPage();}})}).catch(() => {// 点击取消后调用// 空着,防止报错});}
3.2. 后台代码
3.2.1. Controller
在CheckGroupController中增加删除方法
/*** 删除检查组* @param id* @return*/@PostMapping("/deleteById")public Result deleteById(int id){//调用业务服务删除checkGroupService.deleteById(id);return new Result(true, MessageConstant.DELETE_CHECKGROUP_SUCCESS);}
3.2.2. 服务接口
在CheckGroupService服务接口中扩展删除方法
/*** 删除检查组* @param id*/void deleteById(int id) throws HealthException;
3.2.3. 服务实现类
注意:不能直接删除,需要判断当前检查组是否和检查项、套餐关联,如果已经和检查项、套餐进行了关联则不允许删除
/*** 删除检查组* @param id*/@Override@Transactionalpublic void deleteById(int id) {// 检查 这个检查组是否被套餐使用了int count = checkGroupDao.findSetmealCountByCheckGroupId(id);if(count > 0){// 被使用了throw new HealthException(MessageConstant.CHECKGROUP_IN_USE);}// 没有被套餐使用,就可以删除数据// 先删除检查组与检查项的关系checkGroupDao.deleteCheckGroupCheckItem(id);// 删除检查组checkGroupDao.deleteById(id);}
3.2.4. Dao接口
在CheckGroupDao接口中扩展方法findSetmealAndCheckGroupCountByCheckGroupId和deleteById
/*** 通过检查组id查询是否被套餐使用了* @param id* @return*/int findSetmealCountByCheckGroupId(int id);/*** 删除检查组* @param id*/void deleteById(int id);
3.2.5. Mapper映射文件
在CheckGroupDao.xml中扩展SQL语句
<select id="findSetmealCountByCheckGroupId" parameterType="int" resultType="int">select count(1) from t_setmeal_checkgroup where checkgroup_id=#{id}</select><delete id="deleteById" parameterType="int">delete from t_checkgroup where id=#{id}</delete>
【小结】
- 删除前要判断是否被套餐使用了,业务关系使然,业务: 1个套餐下多个检查组,1个检查组下多个检查项
- 删除主表数据(t_checkgroup),就先删除从表(t_checkgroup_checkitem)数据
- 注意事务,抛出的异常一定要在接口中声明,异常类名称不要写成HandlerException
事务问题
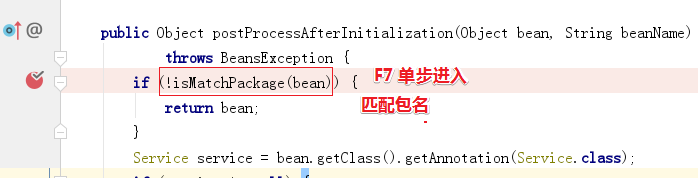
AnnotationBean.postProcessAfterInitialization 在dubbo包下的
开启事务控制的注解支持注意:此处必须加入proxy-target-class="true",需要进行事务控制,会由Spring框架产生代理对象,Dubbo需要将Service发布为服务,要求必须使用cglib创建代理对象。如果没 proxy-target-class="true", 业务实现类/方法加上@Transaction,类创建的方式为jdk动态代理,发布服务时,类名与接口包名不一致,所以不发布服务加上proxy-target-class="true", 业务实现类/方法加上@Transaction, 类的创建方式为SpringProxy(CGLIB), 找@Service,看有接口申明(interfaceClass=)如果有接口声明,则发布的服务接口为声明的接口,如果没有的情况下则发布的服务接口为org.springframework.aop.SpringProxy那么服务的消费者(controller 找的是业务服务接口)没有提供者解决事务导致找不到服务的问题proxy-target-class="true" 同时service实现类上加上@Service(interfaceClass=接口类字节码)


若有收获,就点个赞吧
0 人点赞
