typora-copy-images-to: img
Spring _01
学习目标
- 能够描述spring框架
- 能够编写spring的IOC的入门案例
- 能够说出spring的bean标签的配置
- 能够理解Bean的属性注入方法
- 能够理解复杂类型的属性注入
- 能够实现spring框架整合JUnit
第一章-Spring概述
知识点-Spring介绍
1.目标
- 能够描述spring框架
2.路径
- 什么是Spring
- Spring 的发展历程
- Spring的优点
- Spring的体系结构
3.讲解
3.1什么是Spring
Spring 是一个开源框架,是为了解决企业应用程序开发复杂性而创建的(解耦)。框架的主要优势之一就是其分层架构,分层架构允许您选择使用哪一个组件,同时为 J2EE 应用程序开发提供集成的框架。简单来说,Spring是一个分层的JavaSE/EE full-stack(一站式) 轻量级开源框架。一站式:Spring提供了三层解决方案.
3.2Spring 的发展历程
1997 年 IBM 提出了 EJB 的思想
1998 年, SUN 制定开发标准规范 EJB1.0
1999 年, EJB1.1 发布
2001 年, EJB2.0 发布
2003 年, EJB2.1 发布
2006 年, EJB3.0 发布
Rod Johnson(spring 之父)
Expert One-to-One J2EE Design and Development(2002),阐述了 J2EE 使用 EJB 开发设计的优点及解决方案
Expert One-to-One J2EE Development without EJB(2004),阐述了 J2EE 开发不使用 EJB 的解决方式(Spring 雏形)
2017 年 9 月份发布了 spring 的最新版本 spring 5.0 通用版(GA)
3.3 Spring的优点
1.方便解耦,简化开发(基础重要功能)
通过Spring提供的IOC容器,我们可以将对象之间的依赖关系交由Spring进行控制,避免硬编码所造成的过度程序耦合。有了Spring,用户不必再为单实例模式类、属性文件解析等这些很底层的需求编写代码,可以更专注于上层的应用。
AOP编程的支持(亮点)
通过Spring提供的AOP功能,方便进行面向切面的编程,许多不容易用传统OOP实现的功能可以通过AOP轻松应付。
声明式事务的支持 (简化事务)
在Spring中, 我们可以从单调烦闷的事务管理代码中解脱出来,通过声明式方式灵活地进行事务的管理,提高开发效率和质量
方便程序的测试 (集成Junit测试框架)
可以用非容器依赖的编程方式进行几乎所有的测试工作,在Spring里,测试不再是昂贵的操作,而是随手可做的事情。例如:Spring对Junit4支持,可以通过注解方便的测试Spring程序。
5.方便集成各种优秀框架 (亮点、优势)
Spring不排斥各种优秀的开源框架,相反,Spring可以降低各种框架的使用难度,Spring提供了对各种优秀框架(如Struts,Hibernate、Hessian、Quartz)等的直接支持。
6.降低Java EE API的使用难度(了解)
Spring对很多难用的Java EE API(如JDBC,JavaMail,远程调用等)提供了一个薄薄的封装层,通过Spring的简易封装,这些Java EE API的使用难度大为降低
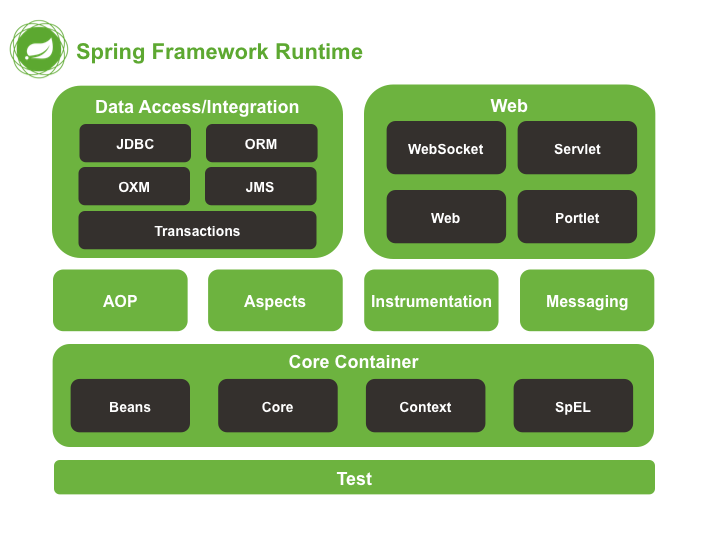
3.4Spring的体系结构

4.小结
Spring是JavaSE/JavaEE 一系列的框架. 提供了三层开发里面的技术解决方案, 是一站式框架
我们这三天学的是Spring的核心部分
- IOC
- AOP
- 声明式事务
第二章-IOC
知识点-工厂模式解耦
1.目标
- 能够使用工厂模式进行解耦
2.路径
程序耦合的概述
使用工厂模式解耦
3.讲解
3.1程序的耦合
3.1.1 程序耦合的概述
耦合性(Coupling),也叫耦合度,是对模块间关联程度的度量。耦合的强弱取决于模块间接口的复杂性、调用模块的方式以及通过界面传送数据的多少。模块间的耦合度是指模块之间的依赖关系,包括控制关系、调用关系、数据传递关系。模块间联系越多,其耦合性越强,同时表明其独立性越差( 降低耦合性,可以提高其独立性)。 耦合性存在于各个领域,而非软件设计中独有的,但是我们只讨论软件工程中的耦合。<br />在软件工程中, 耦合指的就是就是对象之间的依赖性。对象之间的耦合越高,维护成本越高。因此对象的设计<br />
应使类和构件之间的耦合最小。 软件设计中通常用耦合度和内聚度作为衡量模块独立程度的标准。 划分模块的一个
准则就是高内聚低耦合。
总结:
耦合是影响软件复杂程度和设计质量的一个重要因素,在设计上我们应采用以下原则:如果模块间必须存在耦合,就尽量使用数据耦合,少用控制耦合,限制公共耦合的范围,尽量避免使用内容耦合。内聚与耦合内聚标志一个模块内各个元素彼此结合的紧密程度,它是信息隐蔽和局部化概念的自然扩展。内聚是从功能角度来度量模块内的联系,一个好的内聚模块应当恰好做一件事。它描述的是模块内的功能联系。耦合是软件
结构中各模块之间相互连接的一种度量,耦合强弱取决于模块间接口的复杂程度、进入或访问一个模块的点以及通过接口的数据。 程序讲究的是低耦合,高内聚。就是同一个模块内的各个元素之间要高度紧密,但是各个模块之
间的相互依存度却要不那么紧密。
内聚和耦合是密切相关的,同其他模块存在高耦合的模块意味着低内聚,而高内聚的模块意味着该模块同其他<br />
模块之间是低耦合。在进行软件设计时,应力争做到高内聚,低耦合。
3.1.2在代码中体现
早期我们的 JDBC 操作(面向接口的编程),注册驱动时,我们为什么不使用 DriverManager 的 register 方法,而是采<br />
用 Class.forName 的方式?
原因就是: 我们的类依赖了数据库的具体驱动类(MySQL) ,如果这时候更换了数据库(比如 Oracle) ,<br />
需要修改源码来重新数据库驱动。这显然不是我们想要的。
/*** 程序的耦合* 耦合:程序间的依赖关系* 包括:* 类之间的依赖* 方法间的依赖* 解耦:* 降低程序间的依赖关系* 实际开发中:* 应该做到:编译期不依赖,运行时才依赖。* 解耦的思路:* 第一步:使用反射来创建对象,而避免使用 new 关键字。* 第二步:通过读取配置文件来获取要创建的对象全限定类名*/public class JdbcDemo1 {public static void main(String[] args) throws Exception{//1.注册驱动//DriverManager.registerDriver(new Driver());//第一种注册驱动的方式//第一种注册驱动的方式,缺点是耦合性强Class.forName("com.mysql.jdbc.Driver");//这是第二种注册驱动的方式//第二种注册驱动的方式,缺点是"字符串硬编码",可以使用配置文件解决//2.获取连接//3.获取操作数据库的预处理对象//4.执行 SQL,得到结果集//5.遍历结果集//6.释放资源}}
第一种耦合:一个类直接依赖另外一个类
第二种耦合:将字符串直接写死在Java代码中(字符串的硬编码)
3.1.3解决程序耦合的思路
**产生类与类之间的耦合的根本原因是:在一个类中new了另外一个类的对象****解决耦合的思路:不在类中创建另外一个类的对象,但是我们还需要另一个类的对象;由别人(Spring)把那个类的对象创建好之后给我用就可以了**当是我们讲解 jdbc 时,是通过反射来注册驱动的,代码如下:`Class.forName("com.mysql.jdbc.Driver");//此处只是一个字符串`此时的好处是,我们的类中不再依赖具体的驱动类,此时就算删除 mysql 的驱动 jar 包,依然可以编译(运行就不要想了没有驱动不可能运行成功的) 。同时,也产生了一个新的问题, mysql 驱动的全限定类名字符串是在 java 类中写死的,一旦要改还是要修改源码。解决这个问题也很简单,使用配置文件配置
3.2.自定义IOC(工厂模式解耦)
原始方式
- 方式: 创建类, 直接根据类new对象
- 优点: 好写, 简单
- 缺点: 耦合度太高, 不好维护
接口方式
- 方式: 定义接口, 创建实现类. 接口=子类的对象
- 优点: 耦合度相对原始方式 减低了一点
- 缺点: 多写了接口, 还是需要改源码 不好维护
自定义IOC
- 方式: 使用对象的话, 不直接new()了,直接从工厂里面取; 不需要改变源码
3.2.1原始方式
代码略
3.2.2接口方式
- UserService.java
package com.itheima.service;/*** 包名:com.itheima.service** @author Leevi* 日期2020-08-09 10:22*/public interface UserService {String getName();}
- UserServiceImpl.java
package com.itheima.service.impl;import com.itheima.service.UserService;/*** 包名:com.itheima.service.impl** @author Leevi* 日期2020-08-09 10:22*/public class UserServiceImpl implements UserService{public void init(){System.out.println("UserServiceImpl对象创建了...");}public void destroy(){System.out.println("UserServiceImpl对象销毁了...");}@Overridepublic String getName() {return "周杰棍";}}
- TestSpring.java
public class TestSpring {public void test01() {AccountService accountService = new AccountServiceImpl();accountService.getName();}}
3.2.3自定义IOC(使用工厂模式解耦)
3.2.2.1工厂模式解耦思路
在实际开发中我们可以把三层的对象都使用配置文件配置起来,当启动服务器应用加载的时候, 让一个类中的方法通过读取配置文件,把这些对象创建出来并存起来。在接下来的使用的时候,直接拿过来用就好了。那么,这个读取配置文件, 创建和获取三层对象的类就是工厂
3.2.2.2实现
- 添加坐标依赖
<dependencies><dependency><groupId>junit</groupId><artifactId>junit</artifactId><version>4.12</version><scope>test</scope></dependency><!-- 解析 xml 的 dom4j --><dependency><groupId>dom4j</groupId><artifactId>dom4j</artifactId><version>1.6.1</version></dependency><!-- dom4j 的依赖包 jaxen --><dependency><groupId>jaxen</groupId><artifactId>jaxen</artifactId><version>1.1-beta-8</version></dependency></dependencies>
- UserService.java
package com.itheima.service;/*** 包名:com.itheima.service** @author Leevi* 日期2020-08-09 10:22*/public interface UserService {String getName();}
- UserServiceImpl.java
package com.itheima.service.impl;import com.itheima.service.UserService;/*** 包名:com.itheima.service.impl** @author Leevi* 日期2020-08-09 10:22*/public class UserServiceImpl implements UserService{public void init(){System.out.println("UserServiceImpl对象创建了...");}public void destroy(){System.out.println("UserServiceImpl对象销毁了...");}@Overridepublic String getName() {return "周杰棍";}}
- Client.java
package com.itheima.service.impl;import com.itheima.service.UserService;/*** 包名:com.itheima.service.impl** @author Leevi* 日期2020-08-09 09:14*/public class UserServiceImpl implements UserService{@Overridepublic String getName() {return "张三";}}
- BeanFactory.java
下面的通过 BeanFactory 中 getBean 方法获取对象就解决了我们代码中对具体实现类的依赖。
package com.itheima.factory;import org.dom4j.Document;import org.dom4j.Element;import org.dom4j.io.SAXReader;import java.io.InputStream;import java.util.HashMap;import java.util.List;import java.util.Map;/*** 包名:com.itheima.factory* @author Leevi* 日期2020-08-09 09:18*/public class BeanFactory {private static Map<String,Object> map = new HashMap();static {try {//将读取配置文件的代码,放到静态代码块中//解析配置文件beans.xml,根据id的值,获取class的值SAXReader saxReader = new SAXReader();InputStream is = BeanFactory.class.getClassLoader().getResourceAsStream("beans.xml");Document document = saxReader.read(is);//获取所有的bean标签List<Element> elementList = document.selectNodes("//bean");if (elementList != null) {for (Element element : elementList) {//获取标签的id属性String idAttr = element.attributeValue("id");String className = element.attributeValue("class");//根据类的全限定名,创建出该类的对象Object obj = Class.forName(className).newInstance();//以id作为key,以对象作为value存入map中map.put(idAttr,obj);}}} catch (Exception e) {e.printStackTrace();}}public static Object getBean(String id){try {//根据传入的id,获取到对应的classNameObject obj = map.get(id);if (obj != null) {return obj;}throw new RuntimeException("找不到对应的类!!!");} catch (Exception e) {e.printStackTrace();throw new RuntimeException(e.getMessage());}}}
- spring.xml
<?xml version="1.0" encoding="UTF-8"?><beans><bean class="com.itheima.service.impl.UserServiceImpl" id="userService"></bean></beans>
4.小结
- 程序初始化的时候, 解析xml, 全部解析好 存到容器【Map】里面
- 把bean标签的id作为map的key, bean标签的class属性值反射创建对象之后作为map的value
- 要使用对象, 不再直接new了, 而是从容器里面直接取
知识点-IOC概念
1.目标
- 能够理解IOC概念
2.路径
- 分析和IOC的引入
- IOC概述
3.讲解
3.1分析和IOC的引入
上一小节我们通过使用工厂模式,实现了解耦。
它的核心思想就是:
1、通过Bean工厂读取配置文件使用反射创建对象。
2、把创建出来的对象都存起来,当使用者需要对象的时候,不再自己创建对象,而是调用Bean工厂的方法从容器中获取对象
这里面要解释两个问题:
第一个:存哪去?
分析:由于我们是很多对象,肯定要找个集合来存。这时候有 Map 和 List 供选择。
到底选 Map 还是 List 就看我们有没有查找需求。有查找需求,选 Map。
所以我们的答案就是:在应用加载时,创建一个 Map,用于存放三层对象。我们把这个 map 称之为容器。
第二个: 什么是工厂?
工厂就是负责给我们从容器中获取指定对象的类。这时候我们获取对象的方式发生了改变。
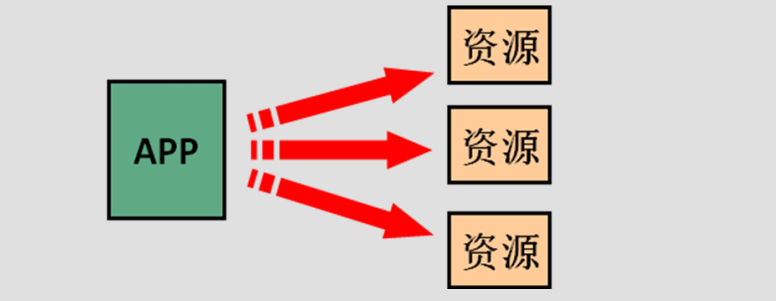
原来:我们在获取对象时,都是采用 new 的方式。 是主动的。
- 老方式

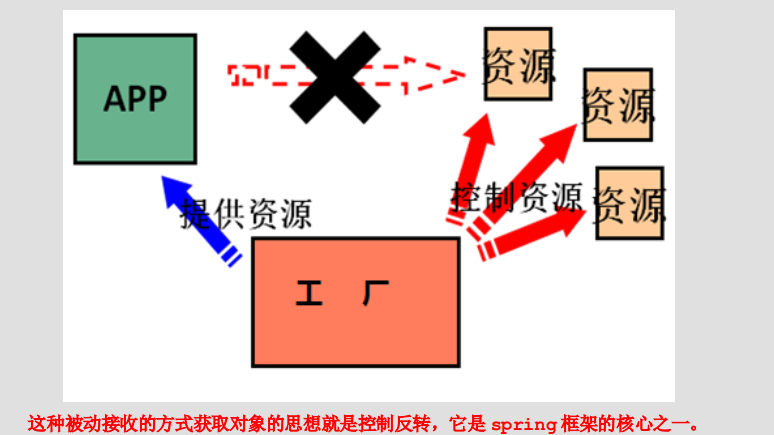
- 现在 我们获取对象时,同时跟工厂要,有工厂为我们查找或者创建对象。 是被动的。

3.2IOC概述
IOC(inversion of control)的中文解释是“控制反转”,对象的使用者不是创建者. 作用是将对象的创建 反转给spring框架来创建和管理。控制反转怎么去理解呢。 其实它反转的是什么呢,是对象的创建工作。 举个例子:平常我们在servlet或者service里面创建对象,都是使用new 的方式来直接创建对象,现在有了spring之后,我们就再也不new对象了,而是把对象创建的工作交给spring容器去维护。我们只需要问spring容器要对象即可ioc 的作用:削减计算机程序的耦合(解除我们代码中的依赖关系)。
4.小结
- IOC: 控制反转. 对象的使用者不是创建者. 把对象的创建和管理, 交给Spring框架. 要使用的时候, 直接从Spring工厂(容器)里面取
- 作用: 解耦.
案例-Spring的IOC快速入门
1.需求
- 能够编写spring的IOC的入门案例
2.分析
本章我们使用的案例是, 账户的业务层和持久层的依赖关系解决。在开始 spring 的配置之前,我们要先准备一下环境。由于我们是使用 spring 解决依赖关系,并不是真正的要做增删改查操作,所以此时我们没必要写实体类。并且我们在此处使用的是 java 工程,不是 java web 工程。
3.实现
3.0 步骤
创建Maven工程, 添加坐标
准备好接口和实现类
创建spring的配置文件 (applicationContext.xml), 配置bean标签
创建工厂对象 获得bean 调用
3.1准备工作
3.1.1 引入spring的依赖(使用5.0.2版本)
3.1.2接口和实现类
- UserService.java
package com.itheima.service;/*** 包名:com.itheima.service** @author Leevi* 日期2020-08-09 10:22*/public interface UserService {String getName();}
- UserServiceImpl.java
package com.itheima.service.impl;import com.itheima.service.UserService;/*** 包名:com.itheima.service.impl** @author Leevi* 日期2020-08-09 10:22*/public class UserServiceImpl implements UserService{public void init(){System.out.println("UserServiceImpl对象创建了...");}public void destroy(){System.out.println("UserServiceImpl对象销毁了...");}@Overridepublic String getName() {return "周杰棍";}}
3.2代码实现
创建 maven 工程并导入坐标
坐标
<dependencies><!--引入相关依赖--><dependency><groupId>org.springframework</groupId><artifactId>spring-context</artifactId><version>5.0.2.RELEASE</version></dependency><dependency><groupId>junit</groupId><artifactId>junit</artifactId><version>4.12</version><scope>test</scope></dependency></dependencies>
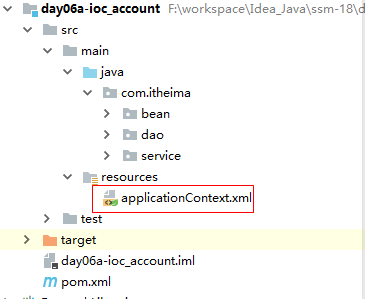
在类的根路径下创建spring的配置文件
配置文件为任意名称的 xml 文件(不能是中文)
<?xml version="1.0" encoding="UTF-8"?><beans xmlns="http://www.springframework.org/schema/beans"xmlns:xsi="http://www.w3.org/2001/XMLSchema-instance"xsi:schemaLocation="http://www.springframework.org/schema/beanshttp://www.springframework.org/schema/beans/spring-beans.xsd"><!--每一个实现类就对应一个bean标签id属性: 对象的唯一标识,根据这个唯一标识,就可以从核心容器中获取对象class属性: 对象所属的实现类的全限定名--><bean class="com.itheima.service.impl.UserServiceImpl"id="userService"></bean></beans>
- 编写Java代码测试
public class TestSpring {@Testpublic void test01(){//调用UserServiceImpl类的方法//1. 创建spring的核心容器(加载类路径下的xml配置文件的核心容器)//在创建核心容器的时候,就已经读取了整个spring.xml配置文件,就已经创建好了它里面的bean标签对应的对象//并且对象都放到核心容器中了ApplicationContext act = new ClassPathXmlApplicationContext("classpath:spring.xml");//ApplicationContext act = new FileSystemXmlApplicationContext("d:/a/spring.xml");//2. 调用核心容器的方法,根据id获取对象UserService userService = (UserService) act.getBean("userService");System.out.println(userService.getName());}}
4.小结
4.1步骤
- 创建Maven工程, 添加坐标
- 准备接口和实现类
- 创建applicationContext.xml 配置bean
- 创建工厂, 从工厂获得对象
4.2注意事项
我们当前使用的Spring版本是5.0.2 jdk要求>=8的
知识点-Spring 基于 XML 的 IOC 细节
1.目标
- 能够说出spring的bean标签的配置
2.路径
- 配置文件详解(Bean标签)
- bean的作用范围和生命周期
3.讲解
3.1配置文件详解(Bean标签)
<?xml version="1.0" encoding="UTF-8"?><beans xmlns="http://www.springframework.org/schema/beans"xmlns:xsi="http://www.w3.org/2001/XMLSchema-instance"xsi:schemaLocation="http://www.springframework.org/schema/beanshttp://www.springframework.org/schema/beans/spring-beans.xsd"><!--每一个实现类就对应一个bean标签id属性: 对象的唯一标识,根据这个唯一标识,就可以从核心容器中获取对象class属性: 对象所属的实现类的全限定名scope属性: 对象的范围1. singleton 单例(默认)2. prototype 多例lazy-init: 配置懒加载,核心容器创建的时候是否创建出该类对象init-method: 配置类的对象初始化的时候,要调用哪个方法destroy-method: 配置这个类的对象销毁的时候,要调用哪个方法单例模式下(默认没有开启懒加载),由核心容器进行管理的对象什么时候创建什么时候销毁?1. 核心容器创建的时候,会创建出它所配置的所有类的对象2. 核心容器销毁的时候,它里面的对象才会被销毁多例模式下,由spring管理的对象什么时候创建什么时候销毁1. 当核心容器调用getBean(id)的时候,创建对象2. 垃圾回收机制才能销毁这个对象--><bean class="com.itheima.service.impl.UserServiceImpl"id="userService"scope="prototype" lazy-init="false"init-method="init"destroy-method="destroy"></bean></beans>
id或者name属性
用于标识bean , 其实id 和 name都必须具备唯一标识 ,两种用哪一种都可以。但是一定要唯一、 一般开发中使用id来声明.class属性: 用来配置要实现化类的全限定名
scope属性: 用来描述bean的作用范围
singleton: 默认值,单例模式。spring创建bean对象时会以单例方式创建。(默认)
prototype: 多例模式。spring创建bean对象时会以多例模式创建。
request: 针对Web应用。spring创建对象时,会将此对象存储到request作用域。(不用管)
session: 针对Web应用。spring创建对象时,会将此对象存储到session作用域。(不用管)init-method属性:spring为bean初始化提供的回调方法
destroy-method属性:spring为bean销毁时提供的回调方法. 销毁方法针对的都是单例bean , 如果想销毁bean , 可以关闭工厂
3.2bean的作用范围和生命周期
单例对象: scope=”singleton”,一个应用只有一个对象的实例。它的作用范围就是整个引用。
- 核心容器创建的时候,会创建出它所配置的所有类的对象
- 核心容器销毁的时候,它里面的对象才会被销毁
多例对象: scope=”prototype”,每次访问对象时,都会重新创建对象实例。
- 当核心容器调用getBean(id)的时候,创建对象
- 垃圾回收机制才能销毁这个对象
4.小结
知识点-Spring工厂详解(了解)
1.目标
- 掌握Spring常见的工厂类
2.路径
- spring 中工厂的类结构图
- BeanFactory 和 ApplicationContext 的区别
3.讲解
3.1 ApplicationContext接口的三种实现类
- ClassPathXmlApplicationContext:它是从类的根路径下加载配置文件
- FileSystemXmlApplicationContext:它是从磁盘路径上加载配置文件,配置文件可以在磁盘的任意位置。
- AnnotationConfigApplicationContext:当我们使用注解配置容器对象时,需要使用此类来创建 spring 容器。它用来读取注解。
3.2 BeanFactory 和 ApplicationContext 的区别(了解)
- ApplicationContext 是现在使用的工厂
ApplicationContext context = new ClassPathXmlApplicationContext("applicationContext.xml");
- XmlBeanFactory是老版本使用的工厂,目前已经被废弃【了解】
BeanFactory beanFactory = new XmlBeanFactory(new ClassPathResource("applicationContext.xml"));
两者的区别:
ApplicationContext加载方式是框架启动时就开始创建所有单例的bean,存到了容器里面
非懒加载: 在核心容器创建的时候,创建出所有的bean对象,存到核心容器中
懒加载: 第一次调用getBean()的时候,创建出bean对象,存到核心容器中
BeanFactory加载方式是用到bean时再加载(目前已经被废弃)
- 懒加载: 第一次调用getBean()的时候,创建出bean对象,存到核心容器中
- ApplicationContext是BeanFactory的子接口,子接口的功能肯定比父接口更强大
4.小结
工厂类继承关系
BeanFactory
ApplicationContext
- FileSystemXmlApplicationContext xml方式 它是从磁盘路径上加载配置文件
- ClassPathXmlApplicationContext xml方式 它是从类的根路径下加载配置文件
- AnnotationConfigApplicationContext 注解方式的
新旧工厂
- 新工厂: 在工厂初始化的话的时候, 就会创建配置的所有的单例bean,存到Spring容器里面
- 旧工厂(已经废弃了): 等用到对象的时候, 再创建
知识点-实例化Bean的三种方式【了解】
1.目标
- 了解实例化 Bean 的三种方式
2.路径
- 无参构造方法方式
- 静态工厂方式
- 实例工厂实例化的方法
3.讲解
3.1方式一: 无参构造方法方式 (只需要掌握这种)
需要实例化的类,提供无参构造方法配置代码
<bean class="com.itheima.service.impl.UserServiceImpl"id="userService"></bean>
3.2方式二: 静态工厂方式
需要额外提供工厂类 , 工厂方法是静态方法
package com.itheima.service.utils;import com.alibaba.druid.pool.DruidDataSourceFactory;import javax.sql.DataSource;import java.io.InputStream;import java.util.Properties;/*** 包名:com.itheima.utils** @author Leevi* 日期2020-07-06 11:45*/public class DruidUtil {private static DataSource dataSource;static {try {//1. 创建Properties对象Properties properties = new Properties();//2. 将配置文件转换成字节输入流InputStream is = DruidUtil.class.getClassLoader().getResourceAsStream("druid.properties");//3. 使用properties对象加载isproperties.load(is);//druid底层是使用的工厂设计模式,去加载配置文件,创建DruidDataSource对象dataSource = DruidDataSourceFactory.createDataSource(properties);} catch (Exception e) {e.printStackTrace();}}public static DataSource getDataSource(){System.out.println("调用静态工厂的getDataSource方法...");return dataSource;}}
配置代码
<!--配置使用静态工厂实例化Beanid就是创建的这个对象的唯一标识class就是要调用的那个静态工厂的全限定名factory-method就是要调用的那个静态工厂中的方法名--><bean id="dataSource" class="com.itheima.service.utils.DruidUtil"factory-method="getDataSource"></bean>
3.3方式三:实例工厂实例化Bean的方法
创建实例化工厂类
package com.itheima.service.utils;import com.alibaba.druid.pool.DruidDataSourceFactory;import javax.sql.DataSource;import java.io.InputStream;import java.util.Properties;/*** 包名:com.itheima.utils** @author Leevi* 日期2020-07-06 11:45*/public class DruidUtil {private static DataSource dataSource;static {try {//1. 创建Properties对象Properties properties = new Properties();//2. 将配置文件转换成字节输入流InputStream is = DruidUtil.class.getClassLoader().getResourceAsStream("druid.properties");//3. 使用properties对象加载isproperties.load(is);//druid底层是使用的工厂设计模式,去加载配置文件,创建DruidDataSource对象dataSource = DruidDataSourceFactory.createDataSource(properties);} catch (Exception e) {e.printStackTrace();}}//非静态方法public DataSource getDataSource(){System.out.println("调用实例工厂的getDataSource方法...");return dataSource;}}
配置
<!--配置实例工厂实例化Bean第一步: 配置实例工厂对象第二步: 配置bean对象factory-bean 表示要调用哪个实例工厂对象的方法factory-method 表示要调用实例工厂对象的哪个方法--><bean id="druidUtil" class="com.itheima.service.utils.DruidUtil"></bean><bean id="dataSource" factory-bean="druidUtil" factory-method="getDataSource"></bean>
4.小结
- 一般情况下不会使用第二和三种, 主要使用第一种
第三章 - 依赖注入
知识点-依赖注入概念
1.目标
- 掌握什么是依赖注入
2.讲解
依赖注入全称是 dependency Injection 翻译过来是依赖注入.其实就是如果我们托管的某一个类中存在属性,需要spring在创建该类实例的时候,顺便给这个对象里面的属性进行赋值。 这就是依赖注入。现在, Bean的创建交给Spring了, 需要在xml里面进行注册我们交给Spring创建的Bean里面可能有一些属性(字段), Spring帮我创建的同时也把Bean的一些属性(字段)给赋值, 这个赋值就是注入.
3.小结
- 注册: 把bean的创建交给Spring
- 依赖注入: bean创建的同时, bean里面可能有一些字段需要赋值, 这个赋值交给Spring, 这个过程就是依赖注入
知识点-依赖注入实现
1.目标
- 能够理解Bean的属性注入方法
- 能够理解复杂类型的属性注入
2.路径
- 构造方法方式注入
- set方法方式的注入
- P名称空间注入
3.讲解
3.1构造方法方式注入【掌握】
- UserController ```java package com.itheima.controller;
import com.itheima.service.UserService;
/**
- 包名:com.itheima.controller *
- @author Leevi
- 日期2020-08-09 12:05
- 给对象的属性赋值的方式
- 有参构造
set方法 */ public class UserController{ private UserService userService;
public UserController() { }
public UserController(UserService userService) { this.userService = userService; }
public String getName(){ return userService.getName(); } } ```
- UserServiceImpl ```java package com.itheima.service.impl;
import com.itheima.dao.UserDao; import com.itheima.service.UserService;
/**
- 包名:com.itheima.service.impl *
- @author Leevi
日期2020-08-09 12:05 */ public class UserServiceImpl implements UserService{ private UserDao userDao;
public UserServiceImpl() { } public UserServiceImpl(UserDao userDao) {
this.userDao = userDao;
}
@Override public String getName() {
return userDao.getName();
} } ```
配置文件
<?xml version="1.0" encoding="UTF-8"?><beans xmlns="http://www.springframework.org/schema/beans"xmlns:xsi="http://www.w3.org/2001/XMLSchema-instance"xsi:schemaLocation="http://www.springframework.org/schema/beanshttp://www.springframework.org/schema/beans/spring-beans.xsd"><!--它里面的UserService属性要进行赋值使用有参构造进行属性的注入,使用<constructor-arg>标签注入--><bean id="userController" class="com.itheima.controller.UserController"><constructor-arg name="userService" ref="userService"></constructor-arg></bean><!--它里面的userDao属性要进行赋值--><bean id="userService" class="com.itheima.service.impl.UserServiceImpl"><constructor-arg name="userDao" ref="userDao"></constructor-arg></bean><bean id="userDao" class="com.itheima.dao.impl.UserDaoImpl"></bean></beans>
3.2 set方法方式的注入【重点】
3.2.1注入对象类型(重点)
- UserController ```java package com.itheima.controller;
import com.itheima.service.UserService;
/**
- 包名:com.itheima.controller *
- @author Leevi
- 日期2020-08-09 12:05
- 给对象的属性赋值的方式
- 有参构造
- set方法 *
- 注入的属性类型:
对象(spring核心容器中的)类型:使用ref=”对象的id” / public class UserController{ private UserService userService;
public void setUserService(UserService userService) { this.userService = userService; }
public String getName(){ return userService.getName(); } } ```
- UserServiceImpl ```java package com.itheima.service.impl;
import com.itheima.dao.UserDao; import com.itheima.service.UserService;
/**
- 包名:com.itheima.service.impl *
- @author Leevi
日期2020-08-09 12:05 */ public class UserServiceImpl implements UserService{ private UserDao userDao;
public void setUserDao(UserDao userDao) {
this.userDao = userDao;
}
@Override public String getName() {
return userDao.getName();
} } ```
配置文件 ```xml <?xml version=”1.0” encoding=”UTF-8”?> <beans xmlns=”http://www.springframework.org/schema/beans“
xmlns:xsi="http://www.w3.org/2001/XMLSchema-instance"xmlns:p="http://www.springframework.org/schema/p"xsi:schemaLocation="http://www.springframework.org/schema/beanshttp://www.springframework.org/schema/beans/spring-beans.xsd">
<bean id="userDao" class="com.itheima.dao.impl.UserDaoImpl"></bean>
<a name="5996752e"></a>##### 3.2.2 注入数组类型(了解一下)-java代码```javapackage com.itheima.dao.impl;import com.itheima.dao.UserDao;import java.util.Arrays;import java.util.Map;/*** 包名:com.itheima.dao.impl** @author Leevi* 日期2020-08-09 12:05*/public class UserDaoImpl implements UserDao{private String[] stringArray;public void setStringArray(String[] stringArray) {this.stringArray = stringArray;}@Overridepublic String getName() {System.out.println("数组stringArray:" + Arrays.toString(stringArray));//模拟调用数据库方法获取namereturn "奥巴马";}}
- 配置文件
<bean id="userDao" class="com.itheima.dao.impl.UserDaoImpl"><!--注入数组--><property name="stringArray"><array><value>hello1</value><value>hello2</value><value>hello3</value><value>hello4</value></array></property></bean>
3.2.3 注入Map类型(了解)
- Java代码 ```java package com.itheima.dao.impl;
import com.itheima.dao.UserDao;
import java.util.Arrays; import java.util.Map;
/**
- 包名:com.itheima.dao.impl *
- @author Leevi
- 日期2020-08-09 12:05
*/
public class UserDaoImpl implements UserDao{
private Map map;
public void setMap(Map map) {
} @Override public String getName() {this.map = map;
} } ```System.out.println("map的值为:" + map);//模拟调用数据库方法获取namereturn "奥巴马";
- 配置文件
<bean id="userDao" class="com.itheima.dao.impl.UserDaoImpl""><!--注入map--><property name="map"><map><entry key="username" value="aobama"></entry><entry key="pwd" value="123456"></entry><entry key="address" value="召唤师峡谷"></entry></map></property></bean>
##### 3.2.4 注入简单类型数据(掌握)+ Java代码```javapackage com.itheima.dao.impl;import com.itheima.dao.UserDao;import java.util.Arrays;import java.util.Map;/*** 包名:com.itheima.dao.impl** @author Leevi* 日期2020-08-09 12:05*/public class UserDaoImpl implements UserDao{private String username;private Integer age;public void setAge(Integer age) {this.age = age;}public void setUsername(String username) {this.username = username;}@Overridepublic String getName() {System.out.println("年龄是:" + age);//模拟调用数据库方法获取namereturn username;}}
- 配置文件
```xml
<a name="dc44b2e9"></a>
#### 3.3 P名称空间注入[了解] 其实底层也是调用set方法,只是写法有点不同

<a name="856a3967"></a>
##### 3.3.1 p名称空间的方式

-
提供属性的set方法

-
在applicationContext.xml引入p命名空间`xmlns:p="http://www.springframework.org/schema/p"`
xml
<?xml version=”1.0” encoding=”UTF-8”?>
- 使用xml
<a name="dd631cbe-7"></a>### 4.小结1.构造方法方式- 定义变量 ,提供构造方法- 在bean标签里面配置子标签constructor-arg```xml<bean id="" class=""><constructor-arg name="" value=""></constructor-arg><constructor-arg name="" ref=""></constructor-arg></bean>
Set方法方式
2.1 步骤
- 定义变量 ,提供Set方法
- bean标签里面配置子标签property
- 2.2 简单类型(基本类型, String)
<bean id="" class=""><property name="" value=""></property></bean>
2.3 数组类型
<bean id="" class=""><property name=""><array><value></value></array></property></bean>
2.3 Map类型
<bean id="" class=""><property name=""><map><entry key="" value=""></entry></map></property></bean>
2.4 对象类型
<bean id="" class=""><property name="" ref=""></property></bean>
第四章-IOC和依赖注入练习
使用Spring的IOC的实现账户的CRUD
1.目标
- 够实现spring基于XML的IoC案例
2.分析
- 环境搭建
创建applicationContext.xml
- new的地方, 就注册
- 需要用到的字段(对象), 就注入
- 启动Spring工厂
3.实现
3.1环境搭建
- 创建Maven工程,导入坐标
<dependencies><!--引入相关依赖--><dependency><groupId>org.springframework</groupId><artifactId>spring-context</artifactId><version>5.0.2.RELEASE</version></dependency><dependency><groupId>junit</groupId><artifactId>junit</artifactId><version>4.12</version><scope>test</scope></dependency><dependency><groupId>org.projectlombok</groupId><artifactId>lombok</artifactId><version>1.18.8</version></dependency><!--druid的依赖--><dependency><groupId>com.alibaba</groupId><artifactId>druid</artifactId><version>1.1.18</version></dependency><!--mysql的依赖--><dependency><groupId>mysql</groupId><artifactId>mysql-connector-java</artifactId><version>5.1.25</version></dependency><!--dbutils的依赖--><dependency><groupId>commons-dbutils</groupId><artifactId>commons-dbutils</artifactId><version>1.7</version></dependency></dependencies>
实体
package com.itheima.pojo;import lombok.Data;/*** 包名:com.itheima.pojo** @author Leevi* 日期2020-08-09 14:55*/@Datapublic class Account {private String name;private Integer id;private Double money;}
- 编写持久层代码
AccountDao.java
package com.itheima.dao;import com.itheima.pojo.Account;import java.sql.SQLException;import java.util.List;/*** 包名:com.itheima.dao** @author Leevi* 日期2020-08-09 14:56*/public interface AccountDao {/*** 查询所有账号信息* @return*/public List<Account> findAll() throws SQLException;/*** 根据id查询账号信息* @param id* @return*/public Account findById(int id) throws SQLException;/*** 根据id删除账号信息* @param id*/public void deleteById(int id) throws SQLException;/*** 添加账号信息* @param account*/public void add(Account account) throws SQLException;/*** 修改账号信息* @param account*/public void update(Account account) throws SQLException;}
AccountDaoImpl.java
package com.itheima.dao.impl;import com.itheima.dao.AccountDao;import com.itheima.pojo.Account;import org.apache.commons.dbutils.QueryRunner;import org.apache.commons.dbutils.handlers.BeanHandler;import org.apache.commons.dbutils.handlers.BeanListHandler;import java.sql.SQLException;import java.util.List;/*** 包名:com.itheima.dao.impl* @author Leevi* 日期2020-08-09 14:58* 使用DBUtils* 1. 创建QueryRunner对象*/public class AccountDaoImpl implements AccountDao {private QueryRunner queryRunner;public void setQueryRunner(QueryRunner queryRunner) {this.queryRunner = queryRunner;}@Overridepublic List<Account> findAll() throws SQLException {String sql = "select * from account";List<Account> accountList = queryRunner.query(sql, new BeanListHandler<>(Account.class));return accountList;}@Overridepublic Account findById(int id) throws SQLException {String sql = "select * from account where id=?";Account account = queryRunner.query(sql, new BeanHandler<>(Account.class), id);return account;}@Overridepublic void deleteById(int id) throws SQLException {String sql = "delete from account where id=?";queryRunner.update(sql,id);}@Overridepublic void add(Account account) throws SQLException {String sql = "insert into account values (null,?,?)";queryRunner.update(sql,account.getName(),account.getMoney());}@Overridepublic void update(Account account) throws SQLException {String sql = "update account set name=?,money=? where id=?";queryRunner.update(sql,account.getName(),account.getMoney(),account.getId());}}
- 编写业务层代码
AccountService.java
package com.itheima.service;import com.itheima.pojo.Account;import java.sql.SQLException;import java.util.List;/*** 包名:com.itheima.service** @author Leevi* 日期2020-08-09 15:05*/public interface AccountService {/*** 查询所有账号信息* @return*/public List<Account> findAll() throws SQLException;/*** 根据id查询账号信息* @param id* @return*/public Account findById(int id) throws SQLException;/*** 根据id删除账号信息* @param id*/public void deleteById(int id) throws SQLException;/*** 添加账号信息* @param account*/public void add(Account account) throws SQLException;/*** 修改账号信息* @param account*/public void update(Account account) throws SQLException;}
AccountServiceImpl.java
package com.itheima.service.impl;import com.itheima.dao.AccountDao;import com.itheima.pojo.Account;import com.itheima.service.AccountService;import java.sql.SQLException;import java.util.List;/*** 包名:com.itheima.service.impl** @author Leevi* 日期2020-08-09 15:05*/public class AccountServiceImpl implements AccountService {private AccountDao accountDao;public void setAccountDao(AccountDao accountDao) {this.accountDao = accountDao;}@Overridepublic List<Account> findAll() throws SQLException {return accountDao.findAll();}@Overridepublic Account findById(int id) throws SQLException {return accountDao.findById(id);}@Overridepublic void deleteById(int id) throws SQLException {accountDao.deleteById(id);}@Overridepublic void add(Account account) throws SQLException {accountDao.add(account);}@Overridepublic void update(Account account) throws SQLException {accountDao.update(account);}}
- 编写控制层AccountController的代码
package com.itheima.controller;import com.itheima.pojo.Account;import com.itheima.service.AccountService;import java.sql.SQLException;import java.util.List;/*** 包名:com.itheima.controller** @author Leevi* 日期2020-08-09 15:06*/public class AccountController {private AccountService accountService;public void setAccountService(AccountService accountService) {this.accountService = accountService;}public List<Account> findAll() throws SQLException {return accountService.findAll();}public Account findById(int id) throws SQLException {return accountService.findById(id);}public void deleteById(int id) throws SQLException {accountService.deleteById(id);}public void add(Account account) throws SQLException {accountService.add(account);}public void update(Account account) throws SQLException {accountService.update(account);}}
3.2 拷贝Druid的工具类以及Druid的配置文件
- DruidUtil
package com.itheima.utils;import com.alibaba.druid.pool.DruidDataSourceFactory;import javax.sql.DataSource;import java.io.InputStream;import java.util.Properties;/*** 包名:com.itheima.utils** @author Leevi* 日期2020-07-06 11:45*/public class DruidUtil {private static DataSource dataSource;static {try {//1. 创建Properties对象Properties properties = new Properties();//2. 将配置文件转换成字节输入流InputStream is = DruidUtil.class.getClassLoader().getResourceAsStream("druid.properties");//3. 使用properties对象加载isproperties.load(is);//druid底层是使用的工厂设计模式,去加载配置文件,创建DruidDataSource对象dataSource = DruidDataSourceFactory.createDataSource(properties);} catch (Exception e) {e.printStackTrace();}}public static DataSource getDataSource(){return dataSource;}}
- jdbc.properties
# 数据库连接参数url=jdbc:mysql://localhost:3306/day20username=rootpassword=123driverClassName=com.mysql.jdbc.Driver# 连接池的参数initialSize=10maxActive=10maxWait=2000
3.3 配置步骤
- 创建applicationContext.xml

<?xml version="1.0" encoding="UTF-8"?><beans xmlns="http://www.springframework.org/schema/beans"xmlns:xsi="http://www.w3.org/2001/XMLSchema-instance"xsi:schemaLocation="http://www.springframework.org/schema/beanshttp://www.springframework.org/schema/beans/spring-beans.xsd"><!--进行IOC:AccountControllerAccountServiceImplAccountDaoImplQueryRunnerDataSource: 调用静态工厂的方法进行依赖注入将AccountServiceImpl的对象注入进AccountController中将AccountDaoImpl的对象注入进AccountServiceImpl中将QueryRunner的对象注入到AccountDaoImpl中将DataSource注入到QueryRunner中--><bean id="accountController" class="com.itheima.controller.AccountController"><property name="accountService" ref="accountService"></property></bean><bean id="accountService" class="com.itheima.service.impl.AccountServiceImpl"><property name="accountDao" ref="accountDao"></property></bean><bean id="accountDao" class="com.itheima.dao.impl.AccountDaoImpl"><property name="queryRunner" ref="queryRunner"></property></bean><bean id="queryRunner" class="org.apache.commons.dbutils.QueryRunner"><!--采用构造函数方式注入--><constructor-arg name="ds" ref="dataSource"></constructor-arg></bean><!--静态工厂方式实例化bean--><bean id="dataSource" class="com.itheima.utils.DruidUtil" factory-method="getDataSource"></bean></beans>
3.3测试案例
package com.itheima.test;import com.itheima.controller.AccountController;import com.itheima.pojo.Account;import org.junit.Before;import org.junit.Test;import org.springframework.context.ApplicationContext;import org.springframework.context.support.ClassPathXmlApplicationContext;import java.sql.SQLException;import java.util.List;/*** 包名:com.itheima.test** @author Leevi* 日期2020-08-09 15:16*/public class TestSpring {private AccountController accountController;@Beforepublic void init(){//1. 创建spring的核心容器对象ApplicationContext act = new ClassPathXmlApplicationContext("classpath:applicationContext.xml");//2. 从核心容器中获取AccountController的对象accountController = (AccountController) act.getBean("accountController");}@Testpublic void testFindAll() throws SQLException {List<Account> accountList = accountController.findAll();System.out.println(accountList);}@Testpublic void testFindById() throws SQLException {Account account = accountController.findById(1);System.out.println(account);}@Testpublic void testDeleteById() throws SQLException {accountController.deleteById(3);}@Testpublic void testAdd() throws SQLException {Account account = new Account();account.setName("ww");account.setMoney(1000.0);accountController.add(account);}@Testpublic void testUpdate() throws SQLException {Account account = accountController.findById(5);account.setName("aobama");account.setMoney(1500.0);accountController.update(account);}}
4.小结
第五章-Spring5 的新特性【了解】
知识点-Spring5 的新特性
1.目标
- 了解Spring5 的新特性
2.路径
- 与 JDK 相关的升级
- 核心容器的更新
- JetBrains Kotlin 语言支持
- 响应式编程风格
- Junit5 支持
- 依赖类库的更新
3.讲解
3.1与 JDK 相关的升级
3.1.1jdk 版本要求
spring5.0 在 2017 年 9 月发布了它的 GA(通用)版本。该版本是基于 jdk8 编写的, 所以 jdk8 以下版本将无法使用。 同时,可以兼容 jdk9 版本。<br />
注:
我们使用 jdk8 构建工程,可以降版编译。但是不能使用 jdk8 以下版本构建工程。
Spring 大量使用了反射
3.1.2 利用 jdk8 版本更新的内容
- 基于 JDK8 的反射增强
public class Test {//循环次数定义: 10 亿次private static final int loopCnt = 1000 * 1000 * 1000;public static void main(String[] args) throws Exception {//输出 jdk 的版本System.out.println("java.version=" + System.getProperty("java.version"));t1();t2();t3();}// 每次重新生成对象public static void t1() {long s = System.currentTimeMillis();for (int i = 0; i < loopCnt; i++) {Person p = new Person();p.setAge(31);}long e = System.currentTimeMillis();System.out.println("循环 10 亿次创建对象的时间: " + (e - s));}// 同一个对象public static void t2() {long s = System.currentTimeMillis();Person p = new Person();for (int i = 0; i < loopCnt; i++) {p.setAge(32);}long e = System.currentTimeMillis();System.out.println("循环 10 亿次给同一对象赋值的时间: " + (e - s));}//使用反射创建对象public static void t3() throws Exception {long s = System.currentTimeMillis();Class<Person> c = Person.class;Person p = c.newInstance();Method m = c.getMethod("setAge", Integer.class);for (int i = 0; i < loopCnt; i++) {m.invoke(p, 33);}long e = System.currentTimeMillis();System.out.println("循环 10 亿次反射创建对象的时间: " + (e - s));}static class Person {private int age = 20;public int getAge() {return age;}public void setAge(Integer age) {this.age = age;}}}

@NonNull 注解和@Nullable 注解的使用
用 @Nullable 和 @NotNull 注解来显示表明可为空的参数和以及返回值。这样就够在编译的时候处理空值而不是在运行时抛出 NullPointerExceptions。日志记录方面
Spring Framework 5.0 带来了 Commons Logging 桥接模块的封装, 它被叫做 spring-jcl 而不是标准的 Commons Logging。当然,无需任何额外的桥接,新版本也会对 Log4j 2.x, SLF4J, JUL( java.util.logging) 进行自动检测。
3.2.核心容器的更新
Spring Framework 5.0 现在支持候选组件索引作为类路径扫描的替代方案。该功能已经在类路径扫描器中添加,以简化添加候选组件标识的步骤。应用程序构建任务可以定义当前项目自己的 META-INF/spring.components 文件。在编译时,源模型是自包含的, JPA 实体和 Spring 组件是已被标记的。从索引读取实体而不是扫描类路径对于小于 200 个类的小型项目是没有明显差异。但对大型项目影响较大。加载组件索引开销更低。因此,随着类数的增加,索引读取的启动时间将保持不变。 加载组件索引的耗费是廉价的。因此当类的数量不断增长,加上构建索引的启动时间仍然可以维持一个常数,不过对于组件扫描而言,启动时间则会有明显的增长。 这个对于我们处于大型 Spring 项目的开发者所意味着的,是应用程序的启动时间将被大大缩减。虽然 20 或者 30 秒钟看似没什么,但如果每天要这样登上好几百次,加起来就够你受的了。使用了组件索引的话,就能帮助你每天过的更加高效。你可以在 Spring 的 Jira 上了解更多关于组件索引的相关信息。
3.3. JetBrains Kotlin 语言支持
Kolin概述:谷歌公司研发的,是一种支持函数式编程编程风格的面向对象语言。 Kotlin 运行在 JVM 之上,但运行环境并不<br />
限于 JVM。
- Kolin 的示例代码:
{("/movie" and accept(TEXT_HTML)).nest {GET("/", movieHandler::findAllView)GET("/{card}", movieHandler::findOneView)}("/api/movie" and accept(APPLICATION_JSON)).nest {GET("/", movieApiHandler::findAll)GET("/{id}", movieApiHandler::findOne)}}
- Kolin 注册 bean 对象到 spring 容器:
val context = GenericApplicationContext {registerBean()registerBean { Cinema(it.getBean()) }}
3.4. 响应式编程风格
此次 Spring 发行版本的一个激动人心的特性就是新的响应式堆栈 WEB 框架。这个堆栈完全的响应式且非阻塞,适合于事件循环风格的处理,可以进行少量线程的扩展。<br />Reactive Streams 是来自于 Netflix, Pivotal, Typesafe, Red Hat, Oracle, Twitter 以及Spray.io 的工程师特地开发的一个 API。它为响应式编程实现 的实现提供一个公共 的 API,好实现Hibernate 的 JPA。这里 JPA 就是这个 API, 而 Hibernate 就是实现。Reactive Streams API 是 Java 9 的官方版本的一部分。在 Java 8 中, 你会需要专门引入依赖来使用 Reactive Streams API。Spring Framework 5.0 对于流式处理的支持依赖于 Project Reactor 来构建, 其专门实现了Reactive Streams API。<br />Spring Framework 5.0 拥有一个新的 spring-webflux 模块,支持响应式 HTTP 和 WebSocket 客<br />
户端 Spring Framework 5.0 还提供了对于运行于服务器之上,包含了 REST, HTML, 以及 WebSocket 风格交互的响应式网页应用程序的支持。在 spring-webflux 中包含了两种独立的服务端编程模型:基于注解:使用到了@Controller 以及 Spring MVC 的其它一些注解;使用 Java 8 lambda 表达式的函数式风格的路由和处理。有 了 Spring Webflux, 你 现 在 可 以 创 建 出 WebClient, 它 是 响 应 式 且 非 阻 塞 的 , 可 以 作 为RestTemplate 的一个替代方案。
- 这里有一个使用 Spring 5.0 的 REST 端点的 WebClient 实现:
WebClient webClient = WebClient.create();Movie movie = webClient.get().uri("http://localhost:8080/movie/42").accept(MediaType.APPLICATION_JSON).exchange().then(response -> response.bodyToMono(Movie.class));
3.5. Junit5 支持
完全支持 JUnit 5 Jupiter,所以可以使用 JUnit 5 来编写测试以及扩展。此外还提供了一个编程以及扩展模型, Jupiter 子项目提供了一个测试引擎来在 Spring 上运行基于 Jupiter 的测试。<br />另外, Spring Framework 5 还提供了在 Spring TestContext Framework 中进行并行测试的扩展。针对响应式编程模型, spring-test 现在还引入了支持 Spring WebFlux 的 WebTestClient 集成测试的支持,类似于 MockMvc,并不需要一个运行着的服务端。使用一个模拟的请求或者响应, WebTestClient就可以直接绑定到 WebFlux 服务端设施。<br />你可以在这里找到这个激动人心的 TestContext 框架所带来的增强功能的完整列表。当然, Spring Framework 5.0 仍然支持我们的老朋友 JUnit! 在我写这篇文章的时候, JUnit 5 还只是发展到了 GA 版本。对于 JUnit4, Spring Framework 在未来还是要支持一段时间的。
3.6.依赖类库的更新
终止支持的类库
Portlet.
Velocity.
JasperReports.
XMLBeans.
JDO.
Guava.支持的类库
Jackson 2.6+
EhCache 2.10+ / 3.0 GA
Hibernate 5.0+
JDBC 4.0+
XmlUnit 2.x+
OkHttp 3.x+
Netty 4.1+

