环境
DBC相关配置
FileZilla
主机:sftp://111.44.254.168
用户名:root
密码:zheshimima
端口:12876
ssh
windows:C:/Users/ShiNian/.ssh/id_rsa.pub
linux:/root/.ssh/authorized_keys/
windows的移动到linux下
Nextcloud
位置:/data/nextcloud/dbc2017/files/
(本地下载好git的库然后上传到目录下)
mmdet
conda create -n mmdet python=3.7 -yconda activate mmdetconda install pytorch torchvision cudatoolkit=10.1 -y## mmcv#option-1git clone https://github.com.cnpmjs.org/open-mmlab/mmcv.gitcd mmcvpip install .#option-2pip install mmcv-full==latest+torch1.5.0+cu101 -f https://openmmlab.oss-accelerate.aliyuncs.com/mmcv/dist/index.htmlcd ../git clone https://github.com.cnpmjs.org/open-mmlab/mmdetection.gitcd mmdetectionpip install -r requirements.txt # 需要提前将对应txt中的“github.com”换成“github.com.cnpmjs.org”# pip install -r requirements/build.txtpip install "git+https://github.com.cnpmjs.org/open-mmlab/cocoapi.git#subdirectory=pycocotools"#pip install -v -e .python setup.py develop #pip install -v -e . #替代上面的那一行(https://blog.csdn.net/qq_41375609/article/details/106512843)
创建自己的数据集
https://zhuanlan.zhihu.com/p/119456263 https://zhuanlan.zhihu.com/p/101983661
# cd mmdetectionmkdir data# 创建软链接export COCO_ROOT=/data/nextcloud/dbc2017/files/cocoln -s $COCO_ROOT data
配置好自己的配置文件后,使用下列命令来检验配置文件是否规范
python /path/to/config
pycocotools
训练
配置文件
- 8个batch 对应lr=0.01

colab
!python -W ignore::UserWarning tools/train.py /content/mmdetection/configs/faster_rcnn_r101_fpn_1x.py
分析
tools 下:train->test->test_robustness->robustness_eval
基础知识
数据集格式
https://www.geek-share.com/detail/2776336514.html https://github.com/spytensor/prepare_detection_dataset
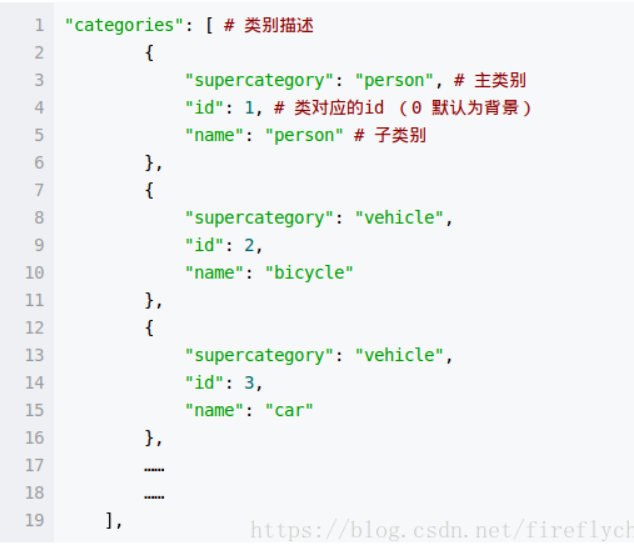
coco
目录格式
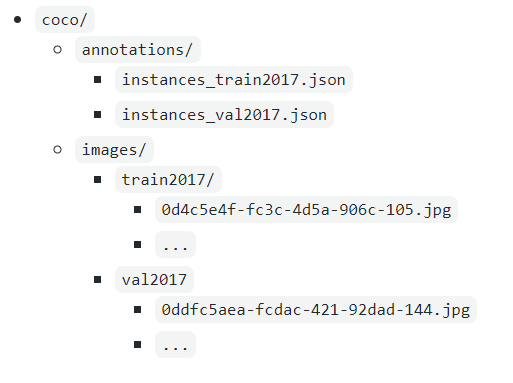
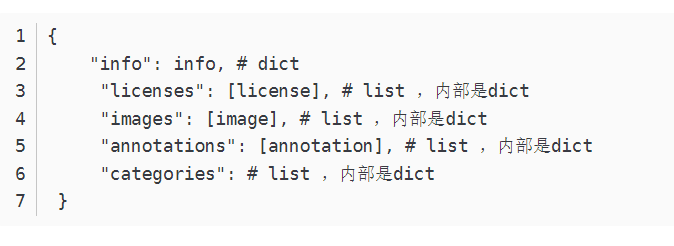
json 格式
根目录
子目录
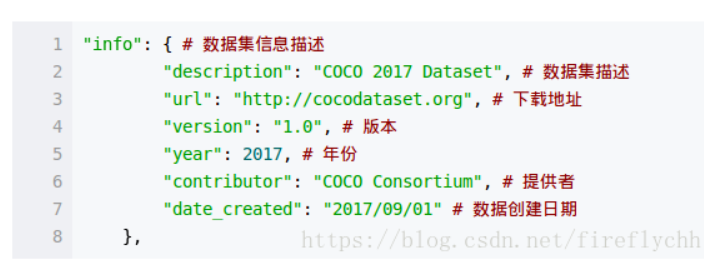
- info(可空,dict)
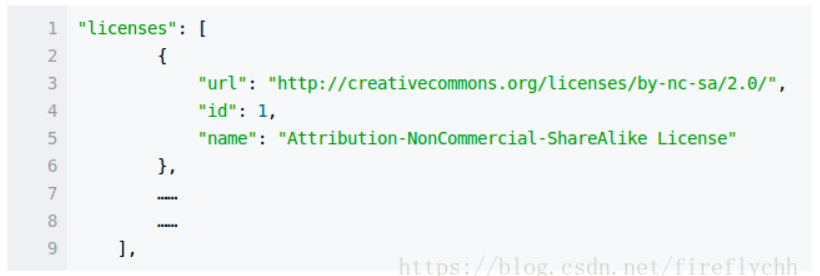
- licenses(可空,list)
- images(list)

- annotations(list[dict])
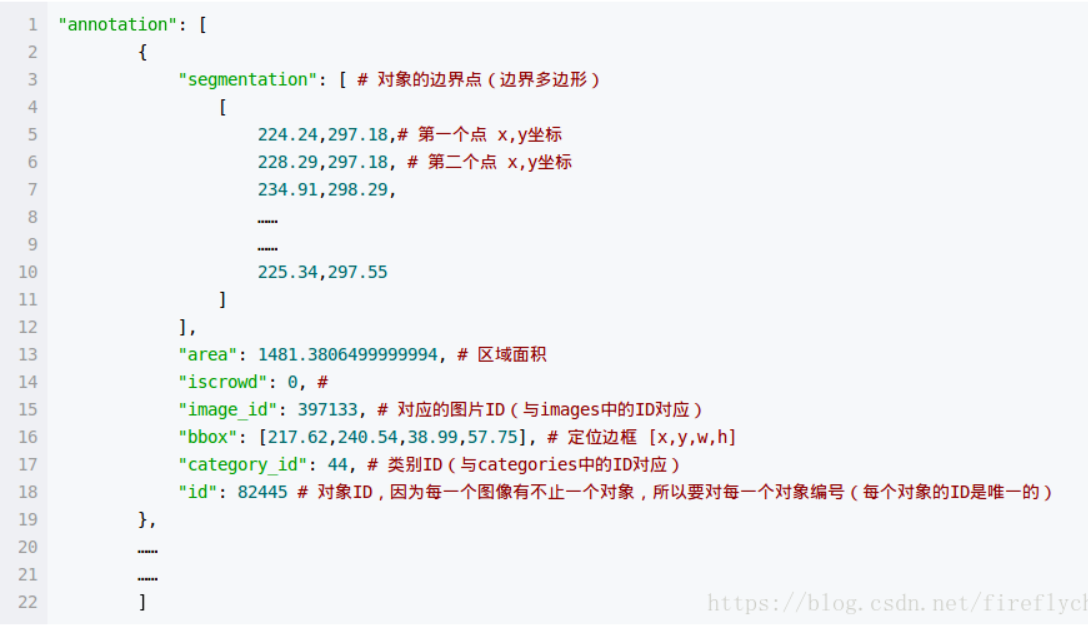
- categories(list)
voc
- 目录格式
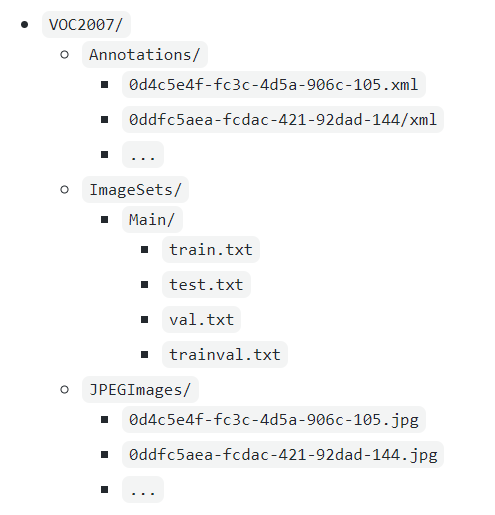
- xml格式
一个图片对应一个 xml 文件,xml 中的 object 表示标注了一个对象。
<annotation><filename>2012_004331.jpg</filename><folder>VOC2012</folder><object><name>person</name><bndbox><xmax>208</xmax><xmin>102</xmin><ymax>230</ymax><ymin>25</ymin></bndbox></object><segmented>0</segmented><size><depth>3</depth><height>375</height><width>500</width></size><source><annotation>PASCAL VOC2012</annotation><database>The VOC2012 Database</database><image>flickr</image></source></annotation>
labme
yolo
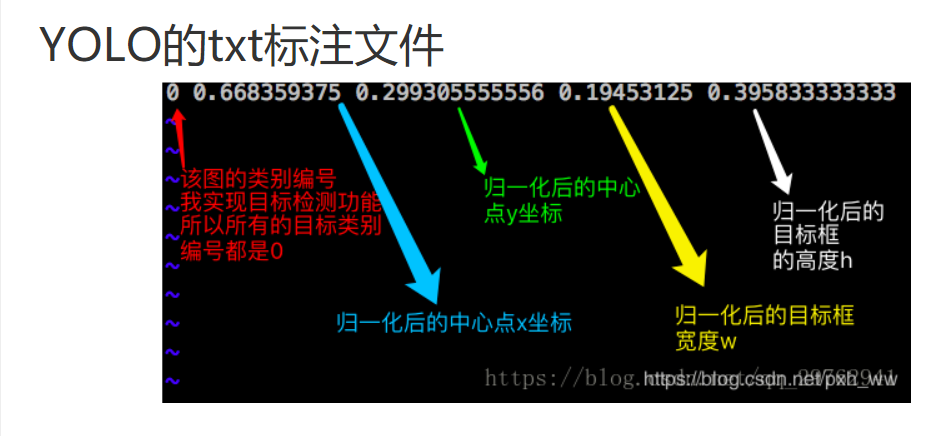
Pr Re AP
其他
查询cuda、cudnn
cat /usr/local/cuda/version.txtcat /usr/local/cuda/include/cudnn.h | grep CUDNN_MAJOR -A 2
pip 更新失败导致 pip 丢失
https://blog.csdn.net/wwangfabei1989/article/details/80107147
python -m ensurepippython -m pip install --upgrade pip
colab 连接到本地时
本地运行
pip install jupyter_http_over_wsjupyter serverextension enable --py jupyter_http_over_wsjupyter notebook \--NotebookApp.allow_origin='https://colab.research.google.com' \--port=8888 \--NotebookApp.port_retries=0
tensorboard 显示错误
e.g.
tensorflow_core._api.v2.errors' has no attribute 'raise_exception_on_not_ok_status'
此时,卸载所有tensorboard版本,运行
# pip uninstall tensorboardpip install tb-nightly
OSError: [Errno 40] Too many levels of symbolic links
OOM during the training process
可能是因为尺寸改变导致内存上升
可能是因为图片中gt number数量上升导致
tensorboard command not found
python -m tensorboard.main --logdir=logs
jupyter notebook指定目录打开
jupyter notebook ${MY_DIR}
cv2.rectangle : function takes exactly 4 arguments (2 given)
显示字符错误
一般是因为编码问题,要么是结尾的换行符,要么是空格等符号。
编辑器->微信 微信->编辑器
然后就报错了,我** *
参考
总体
mmdetection中文文档
目标检测框架mmdetection入门
【干货】mmdetection使用coco格式的CrowdHuman数据集进行训练及测试(附调参过程)
mmdetection - 基于PyTorch的开源目标检测系统
目标检测比赛中的tricks
mmdetection2.0 (v2.0.0版本)环境搭建、训练自己的数据集、测试以及常见错误集合

若有收获,就点个赞吧
0 人点赞
