1. 官网
2. 基于Nacos的服务提供者
2.1 payment9001
(1)module
cloudalibaba-provider-payment9001
(2)pom
a. 父pom
<dependencyManagement><dependencies><!--spring cloud alibaba 2.1.0.RELEASE--><dependency><groupId>com.alibaba.cloud</groupId><artifactId>spring-cloud-alibaba-dependencies</artifactId><version>2.1.0.RELEASE</version><type>pom</type><scope>import</scope></dependency></dependencies></dependencyManagement>
b. 本模块pom
<?xml version="1.0" encoding="UTF-8"?>
<project xmlns="http://maven.apache.org/POM/4.0.0"
         xmlns:xsi="http://www.w3.org/2001/XMLSchema-instance"
         xsi:schemaLocation="http://maven.apache.org/POM/4.0.0 http://maven.apache.org/xsd/maven-4.0.0.xsd">
    <parent>
        <artifactId>cloud2021</artifactId>
        <groupId>com.atguigu.springcloud</groupId>
        <version>1.0-SNAPSHOT</version>
    </parent>
    <modelVersion>4.0.0</modelVersion>

    <artifactId>cloudalibaba-provider-payment9001</artifactId>
    <dependencies>
        <!--SpringCloud ailibaba nacos -->
        <dependency>
            <groupId>com.alibaba.cloud</groupId>
            <artifactId>spring-cloud-starter-alibaba-nacos-discovery</artifactId>
        </dependency>
        <!-- SpringBoot整合Web组件 -->
        <dependency>
            <groupId>org.springframework.boot</groupId>
            <artifactId>spring-boot-starter-web</artifactId>
        </dependency>
        <dependency>
            <groupId>org.springframework.boot</groupId>
            <artifactId>spring-boot-starter-actuator</artifactId>
        </dependency>
        <!--日常通用jar包配置-->
        <dependency>
            <groupId>org.springframework.boot</groupId>
            <artifactId>spring-boot-devtools</artifactId>
            <scope>runtime</scope>
            <optional>true</optional>
        </dependency>
        <dependency>
            <groupId>org.projectlombok</groupId>
            <artifactId>lombok</artifactId>
            <optional>true</optional>
        </dependency>
        <dependency>
            <groupId>org.springframework.boot</groupId>
            <artifactId>spring-boot-starter-test</artifactId>
            <scope>test</scope>
        </dependency>
    </dependencies>
</project>v
(3)yml
server:
  port: 9001

spring:
  application:
    name: nacos-payment-provider
  cloud:
    nacos:
      discovery:
        server-addr: 127.0.0.1:8848

management:
  endpoints:
    web:
      exposure:
        exclude: "*"
(4)主启动类
package com.atguigu.springcloud;

import org.springframework.boot.SpringApplication;
import org.springframework.boot.autoconfigure.SpringBootApplication;
import org.springframework.cloud.client.discovery.EnableDiscoveryClient;

@SpringBootApplication
@EnableDiscoveryClient
public class PaymentMain9001 {

    public static void main(String[] args) {
        SpringApplication.run(PaymentMain9001 .class,args);
    }
}
(5)业务类
package com.atguigu.springcloud.controller;

import org.springframework.beans.factory.annotation.Value;
import org.springframework.web.bind.annotation.GetMapping;
import org.springframework.web.bind.annotation.PathVariable;
import org.springframework.web.bind.annotation.RestController;

@RestController
public class PaymentController {

    @Value("${server.port}")
    private String serverPort;

    @GetMapping(value = "/payment/nacos/{id}")
    public String getPayment(@PathVariable("id") Integer id) {
        return "nacos registry, serverPort: "+ serverPort+"\t id"+id;
    }
}
(6)启动

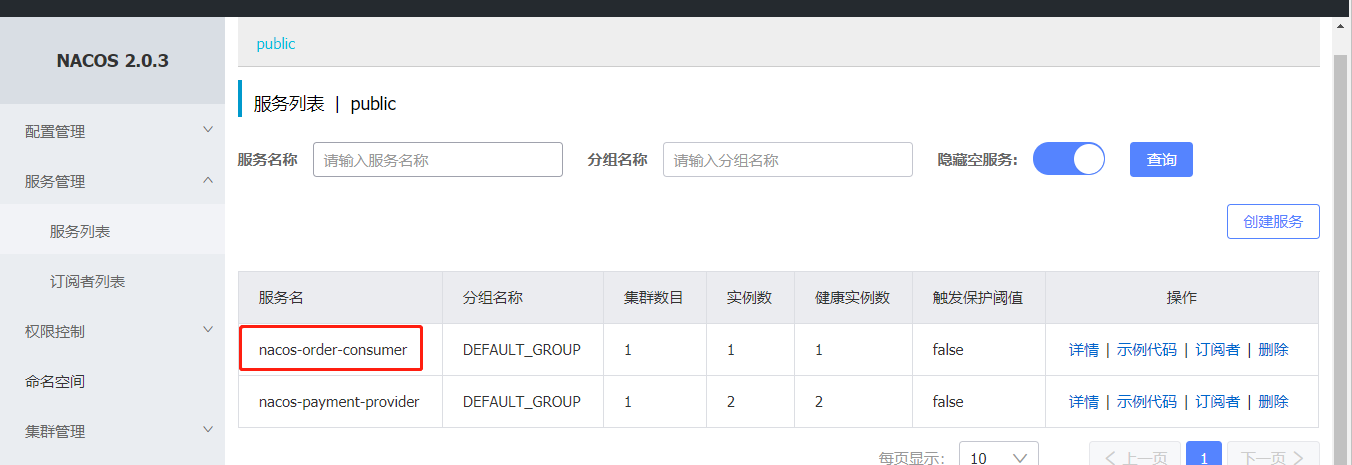
2.2 payment9002
按照9001创建9002
或者取巧不想新建重复体力劳动,可以利用IDEA功能,直接拷贝虚拟端口映射v
3. 基于Nacos的服务消费者
3.1 消费者module
(1)module
cloudalibaba-consumer-nacos-order83
(2)pom
        <!--SpringCloud ailibaba nacos -->
        <dependency>
            <groupId>com.alibaba.cloud</groupId>
            <artifactId>spring-cloud-starter-alibaba-nacos-discovery</artifactId>
        </dependency>
<?xml version="1.0" encoding="UTF-8"?>
<project xmlns="http://maven.apache.org/POM/4.0.0"
         xmlns:xsi="http://www.w3.org/2001/XMLSchema-instance"
         xsi:schemaLocation="http://maven.apache.org/POM/4.0.0 http://maven.apache.org/xsd/maven-4.0.0.xsd">
    <parent>
        <artifactId>cloud2021</artifactId>
        <groupId>com.atguigu.springcloud</groupId>
        <version>1.0-SNAPSHOT</version>
    </parent>
    <modelVersion>4.0.0</modelVersion>

    <artifactId>cloudalibaba-consumer-nacos-order83</artifactId>

    <dependencies>
        <!--SpringCloud ailibaba nacos -->
        <dependency>
            <groupId>com.alibaba.cloud</groupId>
            <artifactId>spring-cloud-starter-alibaba-nacos-discovery</artifactId>
        </dependency>
        <!-- 引入自己定义的api通用包,可以使用Payment支付Entity -->
        <dependency>
            <groupId>com.atguigu.springcloud</groupId>
            <artifactId>cloud-api-commons</artifactId>
            <version>1.0-SNAPSHOT</version>
        </dependency>
        <!-- SpringBoot整合Web组件 -->
        <dependency>
            <groupId>org.springframework.boot</groupId>
            <artifactId>spring-boot-starter-web</artifactId>
        </dependency>
        <dependency>
            <groupId>org.springframework.boot</groupId>
            <artifactId>spring-boot-starter-actuator</artifactId>
        </dependency>
        <!--日常通用jar包配置-->
        <dependency>
            <groupId>org.springframework.boot</groupId>
            <artifactId>spring-boot-devtools</artifactId>
            <scope>runtime</scope>
            <optional>true</optional>
        </dependency>
        <dependency>
            <groupId>org.projectlombok</groupId>
            <artifactId>lombok</artifactId>
            <optional>true</optional>
        </dependency>
        <dependency>
            <groupId>org.springframework.boot</groupId>
            <artifactId>spring-boot-starter-test</artifactId>
            <scope>test</scope>
        </dependency>
    </dependencies>

</project>
(3)yml
server:
  port: 83

spring:
  application:
    name: nacos-order-consumer
  cloud:
    nacos:
      discovery:
        server-addr: localhost:8848

#消费者将要去访问的微服务名称(注册成功进nacos的微服务提供者)
service-url:
  nacos-user-service: http://nacos-payment-provider
(4)主启动类
package com.atguigu.springcloud;

import org.springframework.boot.SpringApplication;
import org.springframework.boot.autoconfigure.SpringBootApplication;
import org.springframework.cloud.client.discovery.EnableDiscoveryClient;

@EnableDiscoveryClient
@SpringBootApplication
public class OrderNacosMain83
{
    public static void main(String[] args)
    {
        SpringApplication.run(OrderNacosMain83.class,args);
    }
}
(5)配置类
package com.atguigu.springcloud.config;

import org.springframework.cloud.client.loadbalancer.LoadBalanced;
import org.springframework.context.annotation.Bean;
import org.springframework.context.annotation.Configuration;
import org.springframework.web.client.RestTemplate;

@Configuration
public class ApplicationContextConfig {

    @Bean
    @LoadBalanced
    public RestTemplate getRestTemplate(){
        return new RestTemplate();
    }
}
(6)业务类
package com.atguigu.springcloud.controller;

import org.springframework.beans.factory.annotation.Autowired;
import org.springframework.beans.factory.annotation.Value;
import org.springframework.web.bind.annotation.GetMapping;
import org.springframework.web.bind.annotation.PathVariable;
import org.springframework.web.bind.annotation.RestController;
import org.springframework.web.client.RestTemplate;

@RestController
public class OrderNacosController {

    @Autowired
    private RestTemplate restTemplate;

    @Value("${service-url.nacos-user-service}")
    private String serverURL;

    @GetMapping(value = "/consumer/payment/nacos/{id}")
    public String paymentInfo(@PathVariable("id") Long id)
    {
        return restTemplate.getForObject(serverURL+"/payment/nacos/"+id,String.class);
    }
}
3.2 测试
(1)启动
(2)请求
http://localhost:83/consumer/payment/nacos/13
83访问9001/9002,轮询负载OK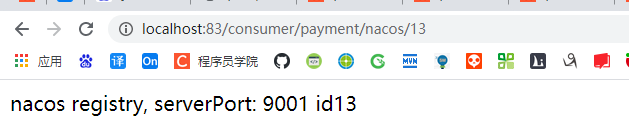
4.服务注册中心的对比
4.1 Nacos全景图所示

4.2 Nacos和CAP

(1)Nacos与其他注册中心特性对比

(2)Nacos服务发现实例模型

(3)Nacos支持AP和CP模式的切换
C是所有节点在同一时间看到的数据是一致的;而A的定义是所有的请求都会收到响应。
何时选择使用何种模式?
—般来说,如果不需要存储服务级别的信息且服务实例是通过nacos-client注册,并能够保持心跳上报,那么就可以选择AP模式。当前主流的服务如Spring cloud和Dubbo服务,都适用于AP模式,AP模式为了服务的可能性而减弱了一致性,因此AP模式下只支持注册临时实例。
如果需要在服务级别编辑或者存储配置信息,那么CP是必须,K8S服务和DNS服务则适用于CP模式。CP模式下则支持注册持久化实例,此时则是以Raft协议为集群运行模式,该模式下注册实例之前必须先注册服务,如果服务不存在,则会返回错误。
切换命令:
curl -X PUT ‘$NACOS_SERVER:8848/nacos/v1/ns/operator/switches?entry=serverMode&value=CP

若有收获,就点个赞吧
0 人点赞
