预备知识
dnsrecon
dnsrecon是一款DNS记录的工具,其中一个特色是通过Google查出站点的子域名与IP信息。与dnsmap暴力破解子域名是不一样的,因此速度比dnsmap快,缺点是返回结果不如dnsmap全面。
不仅如此,它还是一款针对DNS的安全探测工具,包含多项枚举探测功能,包括DNS域传送、DNS递归等。
下面是常用的几个参数和用法:
Usage: dnsrecon.py <options>-d, --domain <domain> Domain to Target for enumeration.这个参数用的最多,指定目标域名-r, --range <range> IP Range for reverse look-up brute force in formats (first-last) or in (range/bitmask).这个参数是用来进行反向解析的。下面会有具体实例演示-D, --dictionary <file> Dictionary file of sub-domain and hostnames to use for brute force.指定字典文件,对目标进行枚举。-t, --type <types> Specify the type of enumeration to perform:std To Enumerate general record types, enumerates.SOA, NS, A, AAAA, MX and SRV if AXRF on the NS Servers fail.rvl To Reverse Look Up a given CIDR IP range.brt To Brute force Domains and Hosts using a given dictionary.srv To Enumerate common SRV Records for a given domain.axfr Test all NS Servers in a domain for misconfigured zone transfers.goo Perform Google search for sub-domains and hosts.snoop To Perform a Cache Snooping against all NS servers for a given domain, testing all with file containing the domains, file given with -D option.tld Will remove the TLD of given domain and test against all TLD's registered in IANA zonewalk Will perform a DNSSEC Zone Walk using NSEC Records.T参数后面有好几种类型,具体使用那个选项取决与使用者。--threads <number> Number of threads to use in Range Reverse Look-up, Forward Look-up Brute force and SRV Record Enumeration指定线程--xml <file> XML File to save found records.保存结果文件
fierce
fierce是使用多种技术来扫描目标主机IP地址和主机名的一个DNS服务器枚举工具。运用递归的方式来工作。
它的工作原理是先通过查询本地DNS服务器来查找目标DNS服务器,然后使用目标DNS服务器来查找子域名。
fierce的主要特点就是可以用来定位独立IP空间对应域名和主机名。
语法:perl fierce.pl [-dns example.com] [OPTIONS]
dnsmap
Dnsmap也是一款搜集信息的工具,它和Dnsenum一样是用于获得子域名的强有力的工具。
usage: dnsmap <target-domain> [options]dnsmap target-domain.com -w yourwordlist.txt -r /tmp/domainbf_results.txt
具体操作
Dnsrecon
语法:dnsrecon.pl [Options] <domain>
-d参数。后面直接加目标域名
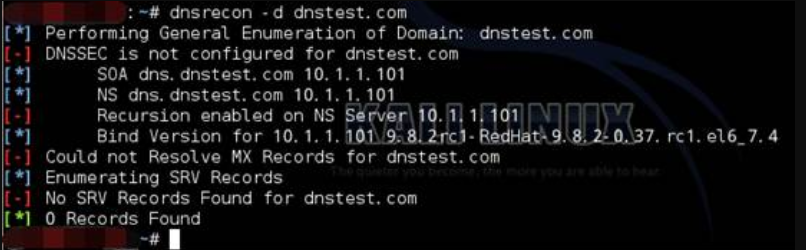
可以看到DNS服务器和IP,自己可以在真实环境中测试,查询到的信息会更多:

- -r参数。指定一个ip范围进行反向解析。
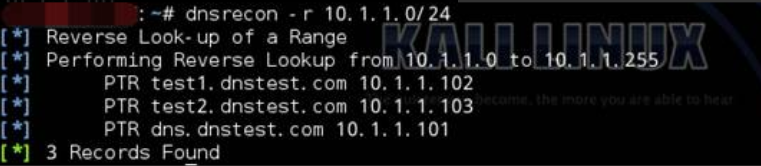
参数后面直接跟一个ip范围可以是掩码也可以是范围形式。
- —threads参数。指定线程

具体线程根据你的实际配置更改。
- –xml参数把查询结果保存到本地文件

现在查看结果
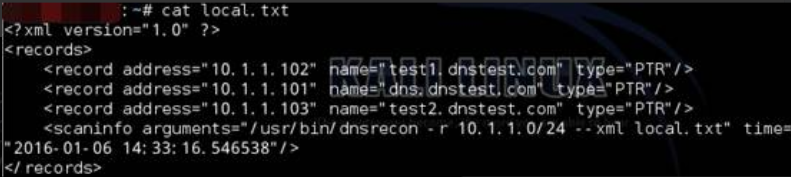
是以xml格式输出的。
- -a参数。就是以标准枚举执行axfr请求
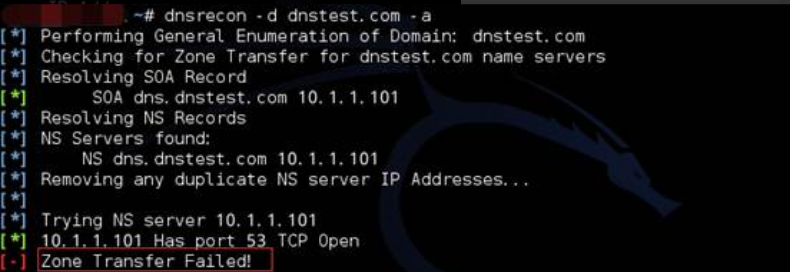
这里传输失败,说明不存在漏洞。现在来看看服务器的安全配置。路径/etc/named.conf
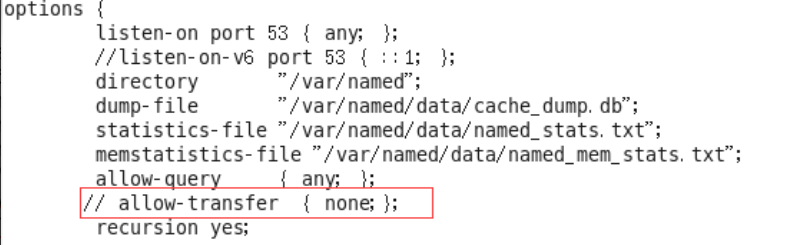
注释掉这一行,重启服务
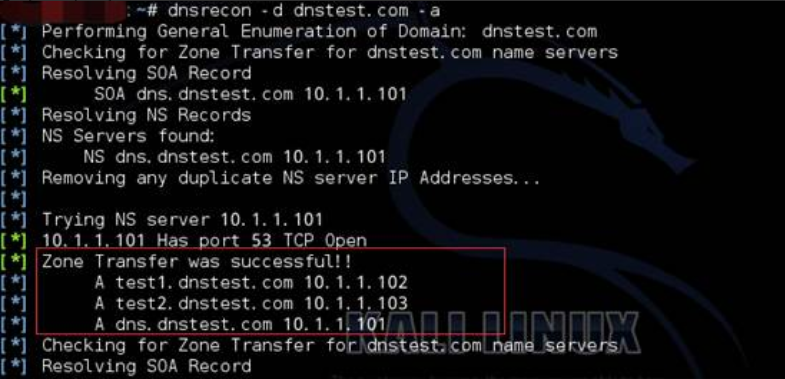
成功查询到服务器所有子域名。
-a参数并非唯一一个可用来检测漏洞的参数,下面还会介绍一个另一个非常有用的参数-t。
- -t参数,后面跟执行枚举的类型,类型如下:STD,RVL,BRT,SRV,AXFR,GOO,SNOOP,TLD,ZONEWALK。
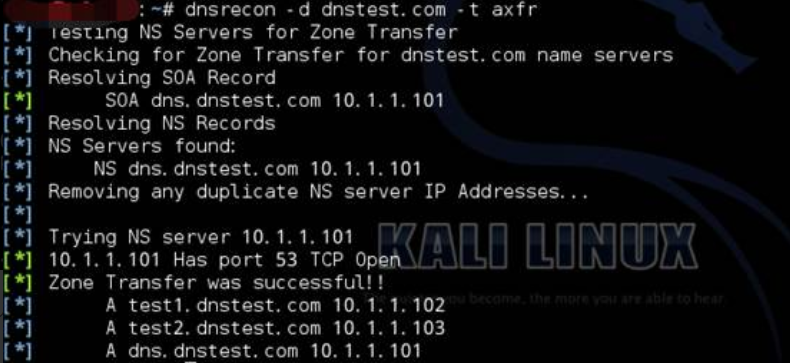
-t axfr也可以检测域传送漏洞,也可以仔细和-a比较一下
- -D参数,带字典爆破子域名
新建文件do.txt
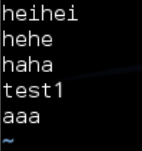

-D+字典 –t brt进行子域名枚举。命中了字典的一个记录
Dnsmap
Dnsmap options:-w <wordlist-file>-r <regular-results-file>-c <csv-results-file>-d <delay-millisecs>-i <ips-to-ignore> (useful if you're obtaining false positives)常用参数:-w指定字典文件-r指定保存结果文件
dnsmap dnstest.com -w do.txt -r map.txt
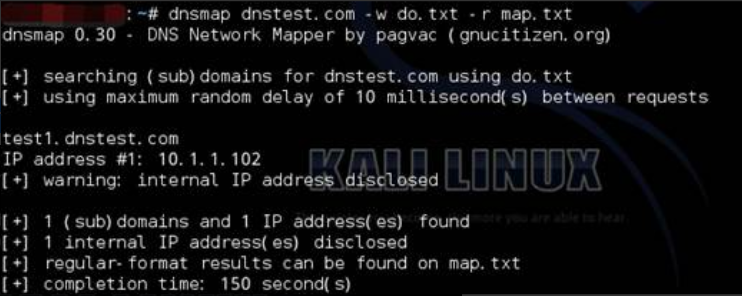
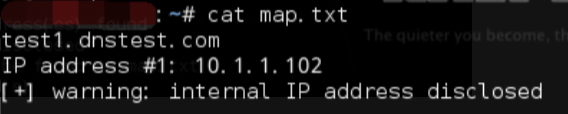
查看结果
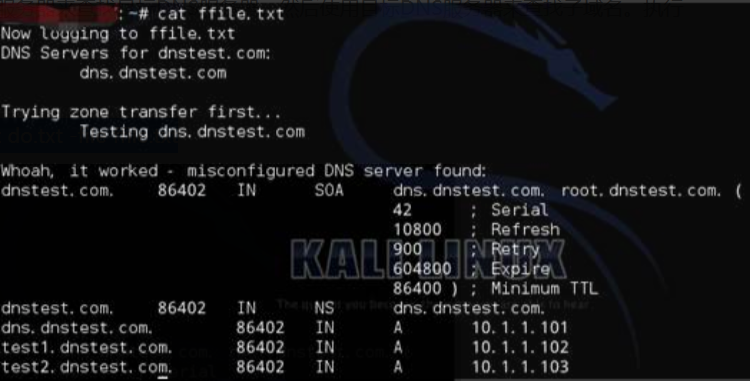
Fierce
最简单的用法是后面直接跟上-dns
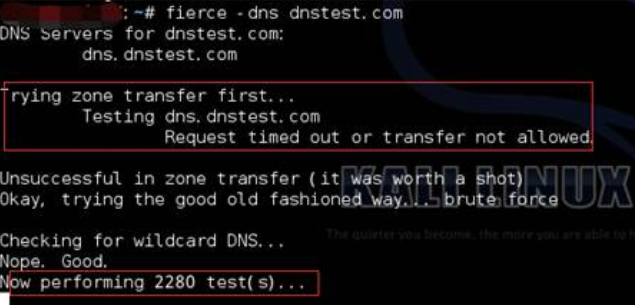
它会自动去检测是否存在域传送漏洞。如果不存在然后使用自带字典枚举域名。工具自带的字典路径/usr/share/fierce/,有个hosts.txt文件(预置好的可能效果不是很好)
登录到服务器上,查看安全配置。路径是/etc/named.conf

注释掉这一行就会产生传送漏洞。重启服务再来测试

可获取所有子域名。
新建一个字典文件

执行命令
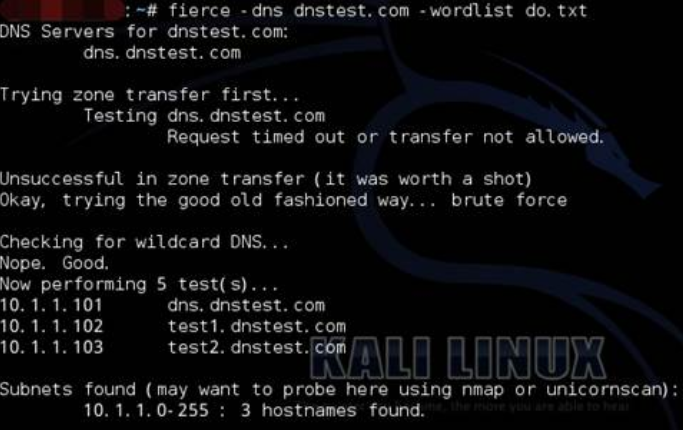
首先自动去检测是否存在域传送漏洞。如果没有,然后根据字典进行域名枚举。
这个工具是运用递归的方式来工作。它的工作原理是先通过查询本地DNS服务器来查找目标DNS服务器,然后使用目标DNS服务器来查找子域名。执行命令时可能需要等待几分钟…..
把获取结果保存到本地文件中
# fierce -dns dnstest.com -wordlist do.txt -file ffile.txt

若有收获,就点个赞吧
0 人点赞
