说明
自定义适配器可从两个方面入手。
- 第一,则是直接从DataHandlingAdapter继承,此时可以接触到最原始的TCP数据,可以自定实现数据的继续投递方式。但一般实现算法比较困难,因为所考虑的情况比较多。
- 第二,则是从CustomDataHandlingAdapter(用户快捷自定义适配器)继承,此时数据的投递必须通过IRequestInfo,ByteBlock将为null。所需考虑的情况比较单一,对于数据的处理也比较简单。
原始DataHandlingAdapter
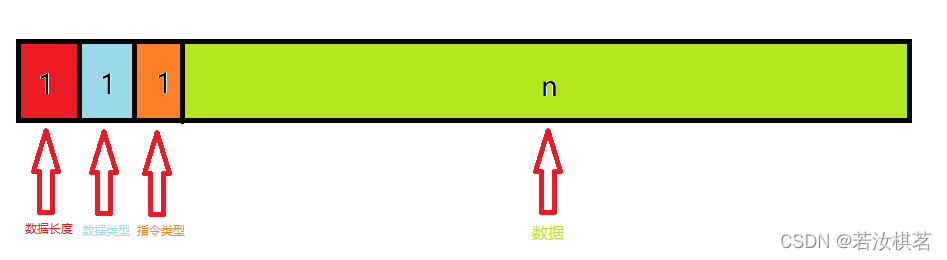
自己实现适配器,然后使其工作。例如:假设如下数据格式,第一个字节表示整个数据长度(包括数据类型和指令类型),第二字节表示数据类型,第三字节表示指令类型,后续字节表示其他数据。其次,希望在发送时,只传入数据类型,指令类型和其他数据,而数据长度则由适配器自行封装。最后,希望在接收端每次能接收到一个完整的数据。
实现
首先,创建类,继承自DataHandlingAdapter,然后实现对应属性,及方法。
CanSplicingSend 属性和实现:能有效减少由封装数据而带来的复制操作,下面会讲解。
class MyDataHandleAdapter : DataHandlingAdapter{/// <summary>/// 是否支持拼接发送,为false的话可以不实现<see cref="PreviewSend(IList{TransferByte}, bool)"/>/// </summary>public override bool CanSplicingSend => false;protected override void PreviewReceived(ByteBlock byteBlock){}protected override void PreviewSend(byte[] buffer, int offset, int length, bool isAsync){}protected override void PreviewSend(IList<TransferByte> transferBytes, bool isAsync){//暂时不实现。}}
【封装发送数据长度】
封装发送数据时,比较简单,示例如下:
protected override void PreviewSend(byte[] buffer, int offset, int length, bool isAsync){int dataLen = length - offset;//先获取需要发送的实际数据长度if (dataLen > byte.MaxValue)//超长判断{throw new RRQMOverlengthException("发送数据太长。");}ByteBlock byteBlock = BytePool.GetByteBlock(64 * 1024);//从内存池申请内存块,因为此处数据绝不超过255,所以避免内存池碎片化,每次申请64K//ByteBlock byteBlock = BytePool.GetByteBlock(dataLen+1);//实际写法。try{byteBlock.Write((byte)dataLen);//先写长度byteBlock.Write(buffer, offset, length);//再写数据if (isAsync)//判断异步{byte[] data = byteBlock.ToArray();//使用异步时不能将byteBlock.Buffer进行发送,应当ToArray成新的Byte[]。this.GoSend(data, 0, data.Length, isAsync);//调用GoSend,实际发送}else{this.GoSend(byteBlock.Buffer, 0, byteBlock.Len, isAsync);}}finally{byteBlock.Dispose();//释放内存块}}
【 解封接收数据】
从原生适配器解封数据,需要考虑的情况比较多。在本示例中,需要考虑以下情况:
- 一次刚好接收一个数据。
- 一次刚好接收了多个数据。
- 一次接收了多个数据,但最后一个数据不完整。
- 一次未接收完一个数据。
综上,情况比较复杂,所以就必须自己做接收数据的缓存容器。
/// <summary>/// 临时包,此包仅当前实例储存/// </summary>private ByteBlock tempByteBlock;/// <summary>/// 包剩余长度/// </summary>private byte surPlusLength;protected override void PreviewReceived(ByteBlock byteBlock){byte[] buffer = byteBlock.Buffer;int r = byteBlock.Len;if (this.tempByteBlock == null)//如果没有临时包,则直接分包。{SplitPackage(buffer, 0, r);}else{if (surPlusLength == r)//接收长度正好等于剩余长度,组合完数据以后直接处理数据。{this.tempByteBlock.Write(buffer, 0, surPlusLength);PreviewHandle(this.tempByteBlock);this.tempByteBlock = null;surPlusLength = 0;}else if (surPlusLength < r)//接收长度大于剩余长度,先组合包,然后处理包,然后将剩下的分包。{this.tempByteBlock.Write(buffer, 0, surPlusLength);PreviewHandle(this.tempByteBlock);this.tempByteBlock = null;SplitPackage(buffer, surPlusLength, r);}else//接收长度小于剩余长度,无法处理包,所以必须先组合包,然后等下次接收。{this.tempByteBlock.Write(buffer, 0, r);surPlusLength -= (byte)r;}}}/// <summary>/// 分解包/// </summary>/// <param name="dataBuffer"></param>/// <param name="index"></param>/// <param name="r"></param>private void SplitPackage(byte[] dataBuffer, int index, int r){while (index < r){byte length = dataBuffer[index];int recedSurPlusLength = r - index - 1;if (recedSurPlusLength >= length){ByteBlock byteBlock = BytePool.GetByteBlock(length);byteBlock.Write(dataBuffer, index + 1, length);PreviewHandle(byteBlock);surPlusLength = 0;}else//半包{this.tempByteBlock = BytePool.GetByteBlock(length);surPlusLength = (byte)(length - recedSurPlusLength);this.tempByteBlock.Write(dataBuffer, index + 1, recedSurPlusLength);}index += length + 1;}}/// <summary>/// 处理数据/// </summary>/// <param name="byteBlock"></param>private void PreviewHandle(ByteBlock byteBlock){try{this.GoReceived(byteBlock, null);}finally{byteBlock.Dispose();//在框架里面将内存块释放}}
使用自定义适配器
自定义适配器的使用和预设的适配器一样。不过在该案例中,发送数据时,应当传入三个有效值,分别为数据类型,指令类型,其他数据。
对自定义适配器进行单元测试
适配器写完以后,需要经过缜密测试,方才能使用。在RRQM中内置了DataAdapterTester进行模拟、接收的适配器测试类,该测试类能模拟粘包、分包等情况。如果通过,则基本说明能适应99%的情况。具体使用如下:
包长度的工作机制相当于发送固定长度的数据,例如发送方多次发送数据{1,2,3,4,5}。如果设置包长度为10,则在接收时会收到{1,2,3,4,5,1,2,3,4,5},如果包长度设置为7,则会收到{1,2,3,4,5,1,2}{3,4,5,1,2,3,4},以此类推。所以在测试时应当多次设置该值,且最好不要整除发送的数据长度,以模拟更恶劣的环境
【适配器测试】
适配器在发送时会自动封装数据长度,所以不用写。
[Theory][InlineData(10000, 3)][InlineData(10000, 5)][InlineData(10000, 200)][InlineData(10000, 500)][InlineData(10000, 1000)]public void MyCustomDataHandlingAdapterShouldBeOk(int inputCount, int bufferLength){DataAdapterTester tester = DataAdapterTester.CreateTester(new MyDataHandlingAdapter(), bufferLength);//用BufferLength模拟粘包,分包ByteBlock block = new ByteBlock();block.Write((byte)1);//写入数据类型block.Write((byte)1);//写入数据指令byte[] buffer = new byte[100];new Random().NextBytes(buffer);block.Write(buffer);//写入数据byte[] data = block.ToArray();//输出测试时间,用于衡量适配性能output.WriteLine(tester.Run(data, inputCount, inputCount, 1000 * 2).ToString());}
封装函数及分片发送意义
在上述案例中,发送数据时应当传入数据类型,指令类型,其他数据三个有效值,而在RRQM中,发送函数仅有Send(和重载),这无疑需要我们自己封装其他方法。
假设以下情况需要实现:
数据类型有两种,分别为Up(1),Down(0)。指令类型有两种,分别为Go(1)、Hold(0)。数据类型和指令类型可以任意组合,且均可携带其他数据。
面对上述情况,我们可以封装以下函数使用:
public class MySocketClient : SimpleSocketClient{public void Up_Go_Send(byte[] data){ByteBlock byteBlock = BytePool.GetByteBlock(this.BufferLength);//内存池实现,可以直接new byte[].byteBlock.Write((byte)1);byteBlock.Write((byte)1);byteBlock.Write(data);try{this.Send(byteBlock);}finally{byteBlock.Dispose();}}public void Down_Go_Send(byte[] data){ByteBlock byteBlock = BytePool.GetByteBlock(this.BufferLength);//内存池实现,可以直接new byte[].byteBlock.Write((byte)0);byteBlock.Write((byte)1);byteBlock.Write(data);try{this.Send(byteBlock);}finally{byteBlock.Dispose();}}public void Up_Hold_Send(byte[] data){ByteBlock byteBlock = BytePool.GetByteBlock(this.BufferLength);//内存池实现,可以直接new byte[].byteBlock.Write((byte)1);byteBlock.Write((byte)0);byteBlock.Write(data);try{this.Send(byteBlock);}finally{byteBlock.Dispose();}}public void Down_Hold_Send(byte[] data){ByteBlock byteBlock = BytePool.GetByteBlock(this.BufferLength);//内存池实现,可以直接new byte[].byteBlock.Write((byte)0);byteBlock.Write((byte)0);byteBlock.Write(data);try{this.Send(byteBlock);}finally{byteBlock.Dispose();}}}
为什么要分片发送??
在示例代码中不难看出,封装的函数将发送数据进行了Write操作(相当于Copy),这无疑是消耗性能的。只是在该案例中,复制的数据最大为255,感觉优化效果甚微,倘若我们需要发送的数据是1Mb,那就相当于在封装数据时,因为前两个字节的存在而复制1Mb的数据(冤死了),然后在适配器中还需要因为数据包头,再复制一次。
优化。。。
所以我们在封装时,可以使用分片发送,但是同时也需要适配器支持。不然内部会出错。
protected override void PreviewSend(IList<TransferByte> transferBytes, bool isAsync){int dataLen = 0;foreach (var item in transferBytes){dataLen += item.Length;}if (dataLen > byte.MaxValue)//超长判断{throw new RRQMOverlengthException("发送数据太长。");}ByteBlock byteBlock = BytePool.GetByteBlock(64 * 1024);//从内存池申请内存块,因为此处数据绝不超过255,所以避免内存池碎片化,每次申请64K//ByteBlock byteBlock = BytePool.GetByteBlock(dataLen+1);//实际写法。try{byteBlock.Write((byte)dataLen);//先写长度foreach (var item in transferBytes){byteBlock.Write(item.Buffer, item.Offset, item.Length);//依次写入}if (isAsync)//判断异步{byte[] data = byteBlock.ToArray();//使用异步时不能将byteBlock.Buffer进行发送,应当ToArray成新的Byte[]。this.GoSend(data, 0, data.Length, isAsync);//调用GoSend,实际发送}else{this.GoSend(byteBlock.Buffer, 0, byteBlock.Len, isAsync);}}finally{byteBlock.Dispose();}}
重新封装函数。。。
public void Up_Go_SplicingSend(byte[] data){List<TransferByte> transferBytes = new List<TransferByte>();transferBytes.Add(new TransferByte(new byte[] { 1}));transferBytes.Add(new TransferByte(new byte[] { 1}));transferBytes.Add(new TransferByte(data));this.Send(transferBytes);}public void Down_Go_SplicingSend(byte[] data){List<TransferByte> transferBytes = new List<TransferByte>();transferBytes.Add(new TransferByte(new byte[] { 0 }));transferBytes.Add(new TransferByte(new byte[] { 1 }));transferBytes.Add(new TransferByte(data));this.Send(transferBytes);}public void Up_Hold_SplicingSend(byte[] data){List<TransferByte> transferBytes = new List<TransferByte>();transferBytes.Add(new TransferByte(new byte[] { 1 }));transferBytes.Add(new TransferByte(new byte[] { 0 }));transferBytes.Add(new TransferByte(data));this.Send(transferBytes);}public void Down_Hold_SplicingSend(byte[] data){List<TransferByte> transferBytes = new List<TransferByte>();transferBytes.Add(new TransferByte(new byte[] { 0 }));transferBytes.Add(new TransferByte(new byte[] { 0 }));transferBytes.Add(new TransferByte(data));this.Send(transferBytes);}

若有收获,就点个赞吧
0 人点赞
