指定运行级别
基本介绍
运行级别说明:
0:关机
1:单用户【找回丢失密码】
2:多用户状态没有网络服务
3:多用户状态有网络服务
4:系统未使用保留给用户
5:图形界面
6:系统重启
常用运行级别是 3 和 5 ,也可以指定默认运行级别, 后面演示
应用实例
命令init [0123456]
通过 init 来切换不同的运行级别,比如动 5-3 , 然后关机
[root@localhost home]# init 5[root@localhost home]# init 3[root@localhost home]# init 0
CentOS7 后运行级别说明
运行级别说明文件在 /etc/inittab 中 ,查看如下
[root@localhost etc]# cat inittab# inittab is no longer used when using systemd.## ADDING CONFIGURATION HERE WILL HAVE NO EFFECT ON YOUR SYSTEM.## Ctrl-Alt-Delete is handled by /usr/lib/systemd/system/ctrl-alt-del.target## systemd uses 'targets' instead of runlevels. By default, there are two main targets:## multi-user.target: analogous to runlevel 3 # multi-user.target 等价于 运行级别3# graphical.target: analogous to runlevel 5 # graphical.target 等价于 运行级别5## To view current default target, run: # 查看当前默认运行级别# systemctl get-default## To set a default target, run: # 设置当前默认运行级别# systemctl set-default TARGET.target#[root@localhost etc]#
查看当前默认运行级别并进行变更
[root@localhost etc]# systemctl get-defaultmulti-user.target[root@localhost etc]# systemctl set-default graphical.targetRemoved symlink /etc/systemd/system/default.target.Created symlink from /etc/systemd/system/default.target to /usr/lib/systemd/system/graphical.target.[root@localhost etc]# systemctl get-defaultgraphical.target
找回root密码
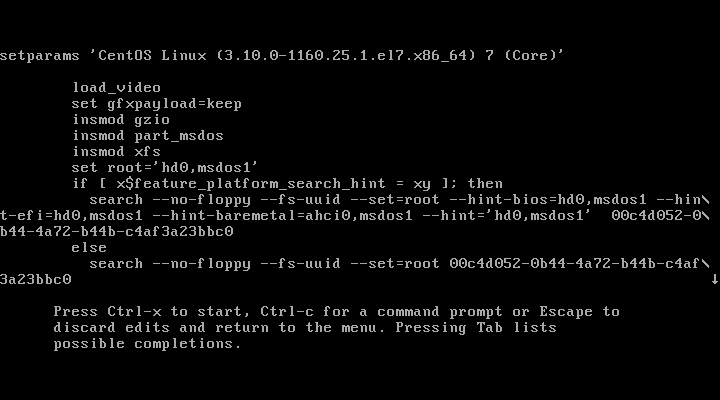
- 首先,启动系统,进入开机界面,在界面中按“e”进入编辑界面。如图
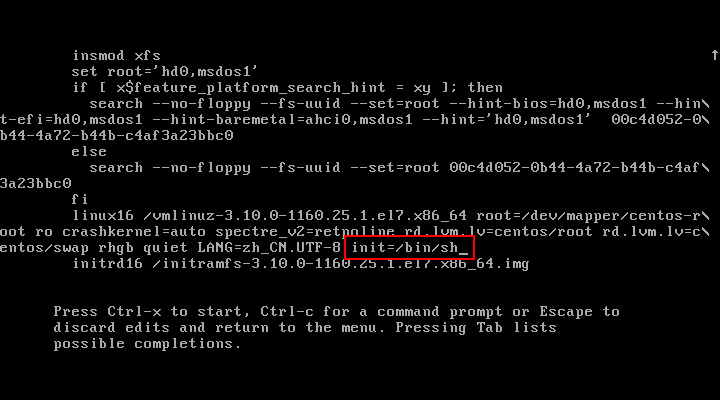
- 进入编辑界面,使用键盘上的上下键把光标往下移动,找到以““Linux16”开头内容所在的行数”,在行的最后面输入:
init=/bin/sh。如图
- 接着,输入完成后,直接按快捷键:Ctrl+x 进入单用户模式。
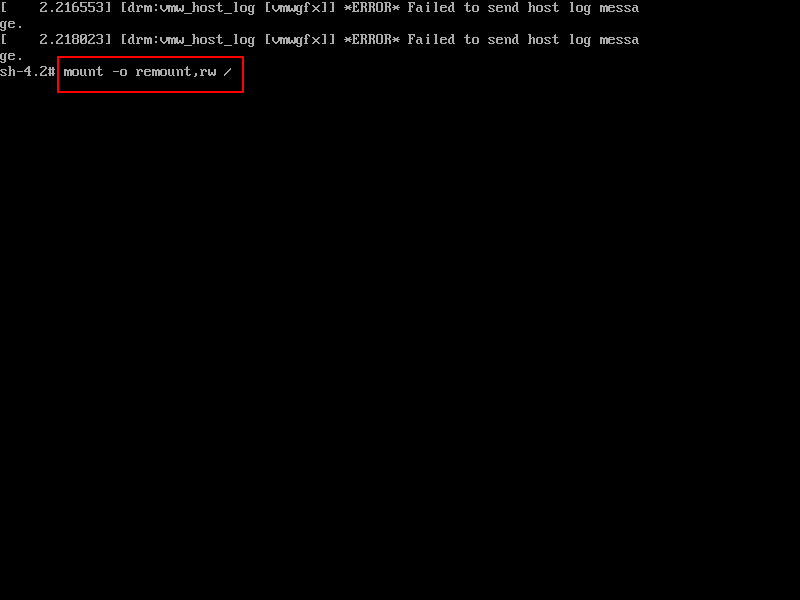
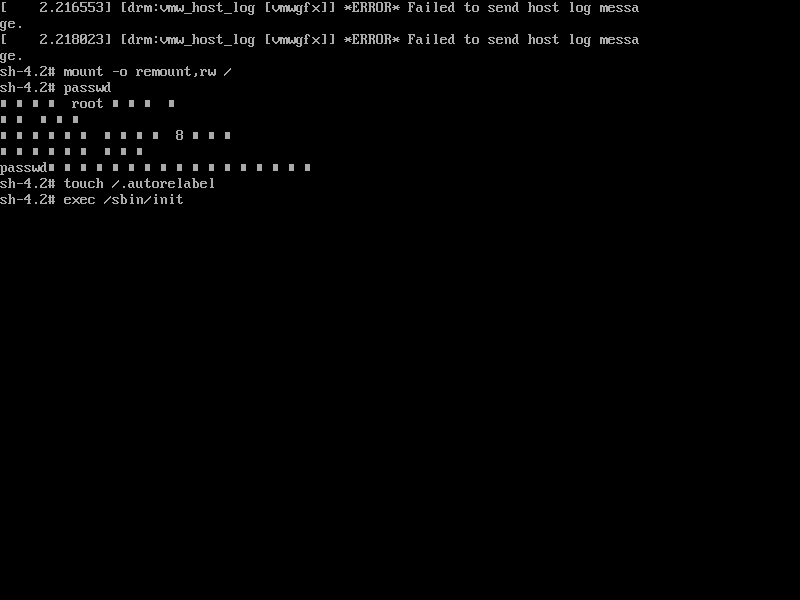
- 接着,在光标闪烁的位置中输入:
mount -o remount,rw /(注意:各个单词间有空格),完成后按键盘的回车键(Enter)。如图
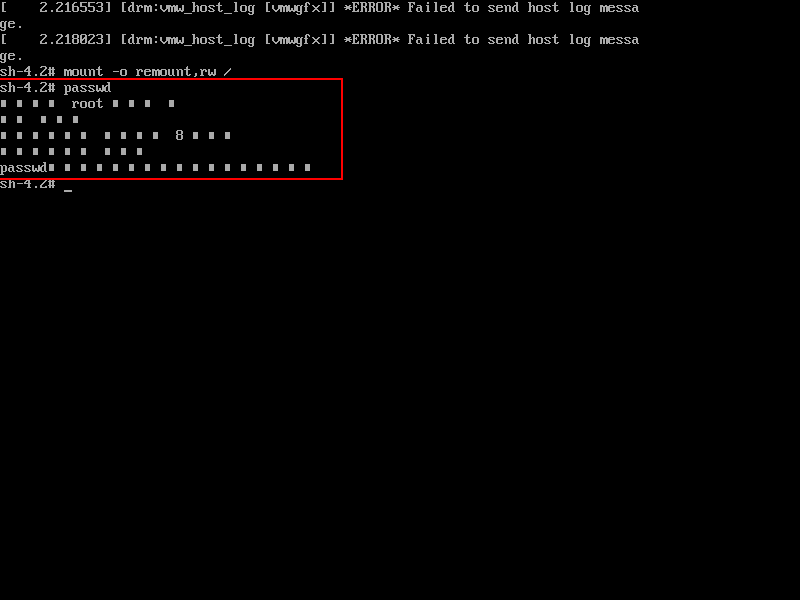
- 在新的一行最后面输入:
passwd, 完成后按键盘的回车键(Enter)。输入密码,然后再次确认密码即可(韩顺平提示: 密码长度最好8位以上,但不是必须的), 密码修改成功后,会显示passwd…..的样式,说明密码修改成功
- 接着,在鼠标闪烁的位置中(最后一行中)输入:
touch /.autorelabel(注意:touch与 /后面有一个空格),完成后按键盘的回车键(Enter)

- 继续在光标闪烁的位置中,输入:
exec /sbin/init(注意:exec与 /后面有一个空格),完成后按键盘的回车键(Enter),等待系统自动修改密码(韩顺平提示:这个过程时间可能有点长,耐心等待),完成后,系统会自动重启, 新的密码生效了
帮助指令
man 获得帮助信息
基本语法
man [命令或配置文件] (功能描述:获得帮助信息)
查看 ls 命令的帮助信息
[root@localhost ~]# man ls
细节说明
- 隐藏文件是以 .开头 , 选项可以组合使用 比如
ls -al比如ls -al /roothelp 指令
基本语法
help 命令 # 功能描述:获得 shell 内置命令的帮助信息
查看 cd 命令的帮助信息
[root@localhost ~]# help cdcd: cd [-L|[-P [-e]]] [dir]Change the shell working directory.Change the current directory to DIR. The default DIR is the value of theHOME shell variable.The variable CDPATH defines the search path for the directory containingDIR. Alternative directory names in CDPATH are separated by a colon (:).A null directory name is the same as the current directory. If DIR beginswith a slash (/), then CDPATH is not used.If the directory is not found, and the shell option `cdable_vars' is set,the word is assumed to be a variable name. If that variable has a value,its value is used for DIR.Options:-L force symbolic links to be followed-P use the physical directory structure without following symboliclinks-e if the -P option is supplied, and the current working directorycannot be determined successfully, exit with a non-zero statusThe default is to follow symbolic links, as if `-L' were specified.Exit Status:Returns 0 if the directory is changed, and if $PWD is set successfully when-P is used; non-zero otherwise.
文件目录类
pwd 指令
基本语法
pwd # 功能描述:显示当前工作目录的绝对路径
显示当前工作目录的绝对路径
[root@localhost ~]# pwd/root
ls 指令
基本语法
ls [选项] [目录或是文件]常用选项-a :显示当前目录所有的文件和目录,包括隐藏的。-l :以列表的方式显示
查看当前目录的所有内容信息
[root@localhost ~]# ls -al总用量 181324dr-xr-x---. 17 root root 4096 7月 3 15:36 .dr-xr-xr-x. 21 root root 4096 7月 3 11:21 ..-rw-------. 1 root root 1242 10月 23 2020 anaconda-ks.cfg-rw-------. 1 root root 18686 7月 3 11:25 .bash_history-rw-r--r--. 1 root root 18 12月 29 2013 .bash_logout-rw-r--r--. 1 root root 176 12月 29 2013 .bash_profile-rw-r--r--. 1 root root 176 12月 29 2013 .bashrcdrwx------. 14 root root 4096 5月 19 10:39 .cachedrwxr-xr-x. 16 root root 4096 5月 19 10:40 .config-rw-r--r--. 1 root root 100 12月 29 2013 .cshrcdrwx------. 3 root root 25 5月 19 10:22 .dbus-rw-------. 1 root root 16 5月 19 10:22 .esd_auth-rw-------. 1 root root 620 5月 19 11:18 .ICEauthority-rw-------. 1 root root 35 7月 3 15:36 .lesshstdrwx------. 3 root root 19 5月 19 10:22 .localdrwxr-xr-x. 5 root root 66 5月 19 10:32 .mozilladrwxr-xr-x. 2 root root 40 10月 28 2020 .oracle_jre_usagedrwxr-----. 3 root root 19 5月 19 10:34 .pki-rwxr-xr-x. 1 root root 7042 6月 17 17:44 showdoc-rw-r--r--. 1 root root 129 12月 29 2013 .tcshrc-rw-------. 1 root root 12027 6月 18 12:08 .viminfodrwxr-xr-x. 2 root root 6 5月 19 10:22 公共drwxr-xr-x. 2 root root 6 5月 19 10:22 模板drwxr-xr-x. 2 root root 6 5月 19 10:22 视频drwxr-xr-x. 2 root root 6 5月 19 10:22 图片drwxr-xr-x. 2 root root 6 5月 19 10:22 文档drwxr-xr-x. 2 root root 6 5月 19 15:03 下载drwxr-xr-x. 2 root root 6 5月 19 10:22 音乐
cd 指令
基本语法
cd [参数] # 功能描述:切换到指定目录理解绝对路径和相对路径:cd ~ 或者 cd :回到自己的家目录当你是root 用户时[root@localhost ~]# cd ~[root@localhost ~]# pwd/root # 回到了root目录当你是tom 用户时[tom@localhost ~]$ cd[tom@localhost ~]$ pwd/home/tom # 回到了tom用户的家目录cd .. 回到当前目录的上一级目录 也是一种相对路径的用法
使用绝对路径切换到 root 目录
[root@localhost tom]# cd /root[root@localhost ~]#
使用相对路径到/root 目录, 比如在 /home/tom
[root@localhost tom]# cd[root@localhost ~]#
表示回到当前目录的上一级目录
[root@localhost ~]# cd ..[root@localhost /]#
回到家目录
[root@localhost /]# cd ~[root@localhost ~]#
mkdir 指令
基本语法
mkdir [选项] 要创建的目录常用选项-p :创建多级目录
创建一个目录 /home/dog
[root@localhost home]# lsadmin tom[root@localhost home]# mkdir /home/dog[root@localhost home]# lsadmin dog tom
创建多级目录 /home/animal/tiger
[root@localhost home]# mkdir -p /home/animal/tiger[root@localhost home]# lsadmin animal dog tom[root@localhost home]# cd animal/[root@localhost animal]# lstiger
rmdir 指令
基本语法
rmdir [选项] 要删除的空目录使用细节rmdir 删除的是空目录,如果目录下有内容时无法删除的
删除一个空目录 /home/dog
[root@localhost home]# lsadmin animal dog tom[root@localhost home]# rmdir /home/dog/[root@localhost home]# lsadmin animal tom
删除一个非空目录 /home/animal
[root@localhost home]# rmdir /home/animal/rmdir: 删除 "/home/animal/" 失败: 目录非空[root@localhost home]# rm -rf /home/animal/[root@localhost home]# lsadmin tom
touch 指令
基本语法
touch 文件名称 # 创建空文件
在/home 目录下 , 创建一个空文件 hello.txt
[root@localhost home]# touch hello.txt[root@localhost home]# lsadmin hello.txt tom
cp 指令
基本语法
cp [选项] source dest # 拷贝文件到指定目录常用选项-r :递归复制整个文件夹
将 /home/hello.txt 文件拷贝到 /home/tom/ 目录下
[root@localhost tom]# cp /home/hello.txt /home/tom/[root@localhost tom]# ll总用量 0-rw-r--r--. 1 root root 0 7月 3 17:22 hello.txt
递归复制整个文件夹,举例, 比如将 /home/tom整个目录, 拷贝到 /opt
[root@localhost tom]# cd /opt/[root@localhost opt]# ls[root@localhost opt]# cp -r /home/tom/ /opt/[root@localhost opt]# lstom# 使用细节强制覆盖不提示的方法:\cp[root@localhost opt]# cp -r /home/tom/ /opt/cp:是否覆盖"/opt/tom/.bash_logout"?cp:是否覆盖"/opt/tom/.bash_profile"?cp:是否覆盖"/opt/tom/.bashrc"?cp:是否覆盖"/opt/tom/.cache/abrt/lastnotification"?cp:是否覆盖"/opt/tom/.bash_history"?cp:是否覆盖"/opt/tom/hello.txt"?[root@localhost tom]# \cp -r /home/tom/ /opt/
rm 指令
基本语法
rm [选项] 要删除的文件或目录常用选项-r :递归删除整个文件夹-f :强制删除不提示
将 /home/hello.txt 删除
[root@localhost home]# lshello.txt jack tom zwj[root@localhost home]# rm hello.txtrm:是否删除普通空文件 "hello.txt"?y[root@localhost home]# lsjack tom zwj
递归删除整个文件夹 /home/bbb
[root@localhost home]# lsddd jack tom zwj[root@localhost home]# rm /home/ddd/rm: 无法删除"/home/ddd/": 是一个目录[root@localhost home]# rm -rf /home/ddd/[root@localhost home]# lsjack tom zwj# 使用细节强制删除不提示的方法:带上 -f 参数即可
mv 指令
基本语法
mv oldNameFile newNameFile # 功能描述:重命名mv /temp/movefile /targetFolder #功能描述:移动文件
将 /home/cat.txt 文件 重新命名为 pig.txt
[root@localhost home]# lscat.txt jack tom zwj[root@localhost home]# mv cat.txt pig.txt[root@localhost home]# lsjack pig.txt tom zwj
将 /home/pig.txt 文件 移动到 /root 目录下
[root@localhost home]# lsjack pig.txt tom zwj[root@localhost home]# mv pig.txt /root/[root@localhost home]# cd[root@localhost ~]# lsanaconda-ks.cfg initial-setup-ks.cfg 公共 视频 文档 音乐Hello.java pig.txt 模板 图片 下载 桌面
移动整个目录 , 比如将 /opt/bbb 移动到 /home
[root@localhost opt]# mv /opt/ddd/ /home/[root@localhost opt]# cd /home/[root@localhost home]# lsddd jack tom zwj
cat 指令
基本语法
cat [选项] 要查看的文件常用选项-n :显示行号细节:cat 只能浏览文件,而不能修改文件,为了浏览方便,一般会带上 管道命令 |
查看 /etc/profile 文件内容,并显示行号
[root@localhost home]# cat -n /etc/profile1 # /etc/profile23 # System wide environment and startup programs, for login setup...76 unset -f pathmunge
more 指令
more 指令more 指令是一个基于 VI 编辑器的文本过滤器,它以全屏幕的方式按页显示文本文件的内容。more 指令中内置了若干快捷键(交互的指令),详见操作说明
| 操作 | 功能说明 |
|---|---|
| 空格键(Space) | 向下翻一页 |
| Enter | 向下翻一行 |
| q | 立即离开more , 不再显示该文件内容 |
| Ctrl + F | 向下滚动一屏 |
| Ctrl + B | 向上滚动一屏 |
| = | 输出当前行的行号 |
| :f | 输出文件名和当前行的行号 |
基本语法
more 要查看的文件
采用 more 查看文件 /etc/profileless
[root@localhost home]# more /etc/profile# /etc/profile...if [ -x /usr/bin/id ]; then--More--(35%)
less 指令
less 指令用来分屏查看文件内容,它的功能与 more 指令类似,但是比 more 指令更加强大,支持各种显示终端。less 指令在显示文件内容时,并不是一次将整个文件加载之后才显示,而是根据显示需要加载内容,对于显示大型文件具有较高的效率。
| 操作 | 功能说明 |
|---|---|
| 空格键(Space) | 向下翻一页 |
| [pagedown] | 向下翻一页 |
| [pageup] | 向上翻一页 |
| /字串 | 向下搜寻【字串】的功能;n:向下查找 N:向上查找 |
| ?字串 | 向上搜寻【字串】的功能;n:向下查找 N:向上查找 |
| q | 离开less这个程序 |
基本语法
less 要查看的文件
采用 less 查看一个大文件文件 /opt/杂文.txt
[root@localhost home]# less /opt/杂文.txt
echo 指令
输出内容到控制台
echo [选项] [输出内容]
使用 echo 指令输出环境变量, 比如输出 $PATH $HOSTNAME
[root@localhost home]# echo $PATH/usr/local/sbin:/usr/local/bin:/usr/sbin:/usr/bin:/root/bin
使用 echo 指令输出 hello,world!
[root@localhost home]# echo hello,world!hello,world!
head 指令
head 用于显示文件的开头部分内容,默认情况下 head 指令显示文件的前 10 行内容
head 文件 # 功能描述:查看文件头 10 行内容head -n 5 文件 # 功能描述:查看文件头 5 行内容,5 可以是任意行数
查看/etc/profile 的前面 5 行代码
[root@localhost home]# head -n 5 /etc/profile# /etc/profile# System wide environment and startup programs, for login setup# Functions and aliases go in /etc/bashrc[root@localhost home]#
tail 指令
tail 用于输出文件中尾部的内容,默认情况下 tail 指令显示文件的前 10 行内容。
tail 文件 # 功能描述:查看文件尾 10 行内容tail -n 5 文件 # 功能描述:查看文件尾 5 行内容,5 可以是任意行数tail -f 文件 # 功能描述:实时追踪该文档的所有更新
查看/etc/profile 最后 5 行的代码
[root@localhost home]# tail -n 5 /etc/profilefidoneunset iunset -f pathmunge[root@localhost home]#
实时监控 mydate.txt , 看看到文件有变化时,是否看到, 实时的追加 hello,world

> 指令 和 >> 指令
输出重定向和 >> 追加
ls -l >文件 # 功能描述:列表的内容写入文件 a.txt 中(覆盖写)ls -al >>文件 # 功能描述:列表的内容追加到文件 aa.txt 的末尾cat 文件 1 > 文件 2 # 功能描述:将文件 1 的内容覆盖到文件 2echo "内容">> 文件 # 追加将 /home 目录下的文件列表 写入到 /home/info.txt 中, 覆盖写入 [如果 info.txt 没有,则会创建]
[root@localhost home]# ls -l /home/总用量 20drwxr-xr-x. 2 root root 4096 7月 3 22:37 ddddrwx------. 5 jack jack 4096 7月 2 22:58 jack-rw-r--r--. 1 root root 12 7月 3 23:37 mydate.txtdrwx------. 5 tom tom 4096 7月 2 22:44 tomdrwx------. 3 zwj mojiao 4096 7月 2 23:22 zwj[root@localhost home]# ls -l /home/ > /home/info.txt[root@localhost home]# lsddd info.txt jack mydate.txt tom zwj[root@localhost home]# cat info.txt总用量 20drwxr-xr-x. 2 root root 4096 7月 3 22:37 ddd-rw-r--r--. 1 root root 0 7月 3 23:44 info.txtdrwx------. 5 jack jack 4096 7月 2 22:58 jack-rw-r--r--. 1 root root 12 7月 3 23:37 mydate.txtdrwx------. 5 tom tom 4096 7月 2 22:44 tomdrwx------. 3 zwj mojiao 4096 7月 2 23:22 zwj
将当前日历信息 追加到 /home/mycal 文件中
[root@localhost home]# cal七月 2021日 一 二 三 四 五 六1 2 34 5 6 7 8 9 1011 12 13 14 15 16 1718 19 20 21 22 23 2425 26 27 28 29 30 31[root@localhost home]# cal >> /home/mycal[root@localhost home]# lsddd info.txt jack mycal mydate.txt tom zwj[root@localhost home]# cat mycal七月 2021日 一 二 三 四 五 六1 2 34 5 6 7 8 9 1011 12 13 14 15 16 1718 19 20 21 22 23 2425 26 27 28 29 30 31
ln 指令
ln 指令软链接也称为符号链接,类似于 windows 里的快捷方式,主要存放了链接其他文件的路径
ln -s [原文件或目录] [软链接名] # 功能描述:给原文件创建一个软链接细节说明当我们使用 pwd 指令查看目录时,仍然看到的是软链接所在目录。
在/home 目录下创建一个软连接 myroot,连接到 /root 目录
[root@localhost home]# ln -s /root/ /home/myroot[root@localhost home]# ll总用量 28drwxr-xr-x. 2 root root 4096 7月 3 22:37 ddd-rw-r--r--. 1 root root 326 7月 3 23:44 info.txtdrwx------. 5 jack jack 4096 7月 2 22:58 jack-rw-r--r--. 1 root root 157 7月 3 23:46 mycal-rw-r--r--. 1 root root 12 7月 3 23:37 mydate.txtlrwxrwxrwx. 1 root root 6 7月 3 23:51 myroot -> /root/drwx------. 5 tom tom 4096 7月 2 22:44 tomdrwx------. 3 zwj mojiao 4096 7月 2 23:22 zwj[root@localhost home]# cd myroot/[root@localhost myroot]# lsanaconda-ks.cfg initial-setup-ks.cfg 公共 视频 文档 音乐Hello.java pig.txt 模板 图片 下载 桌面[root@localhost myroot]# pwd/home/myroot
删除软连接 myroot
[root@localhost home]# rm /home/myrootrm:是否删除符号链接 "myroot"?y
history 指令
查看已经执行过历史命令,也可以执行历史指令
history # 功能描述:查看已经执行过历史命令
显示所有的历史命令
[root@localhost home]# history1 curl www.baidu.com2 exit...
显示最近使用过的 10 个指令
[root@localhost home]# history 10135 ll136 cd /137 ll138 cd /home/139 ll140 rm myroot141 ll142 histroy143 history144 history 10
执行历史编号为 1 的指令
[root@localhost home]# !1curl www.baidu.com<!DOCTYPE html>...
时间日期类
date 指令-显示当前日期
date # 功能描述:显示当前时间date +%Y # 功能描述:显示当前年份date +%m # 功能描述:显示当前月份date +%d # 功能描述:显示当前是哪一天date "+%Y-%m-%d %H:%M:%S" #功能描述:显示年月日时分秒
显示当前时间信息
[root@localhost ~]# date2021年 07月 04日 星期日 21:41:03 CST
显示当前时间年月日
[root@localhost ~]# date "+%Y-%m-%d"2021-07-04
显示当前时间年月日时分秒
[root@localhost ~]# date "+%Y-%m-%d %H:%M:%S"2021-07-04 21:43:05
date 指令-设置日期
date -s 字符串时间
设置系统当前时间 , 比如设置成 2020-11-03 20:02:10
[root@localhost ~]# date -s "2020-11-03 20:02:10"2020年 11月 03日 星期二 20:02:10 CST[root@localhost ~]# date "+%Y-%m-%d %H:%M:%S"2020-11-03 20:02:12
cal 指令-查看日历
cal [选项] # 功能描述:不加选项,显示本月日历
显示当前日历 cal
[root@localhost ~]# cal十一月 2020日 一 二 三 四 五 六1 2 3 4 5 6 78 9 10 11 12 13 1415 16 17 18 19 20 2122 23 24 25 26 27 2829 30
显示 2020 年日历 : cal 2020
[root@localhost ~]# cal 20202020一月 二月 三月日 一 二 三 四 五 六 日 一 二 三 四 五 六 日 一 二 三 四 五 六1 2 3 4 1 1 2 3 4 5 6 75 6 7 8 9 10 11 2 3 4 5 6 7 8 8 9 10 11 12 13 1412 13 14 15 16 17 18 9 10 11 12 13 14 15 15 16 17 18 19 20 2119 20 21 22 23 24 25 16 17 18 19 20 21 22 22 23 24 25 26 27 2826 27 28 29 30 31 23 24 25 26 27 28 29 29 30 31四月 五月 六月日 一 二 三 四 五 六 日 一 二 三 四 五 六 日 一 二 三 四 五 六1 2 3 4 1 2 1 2 3 4 5 65 6 7 8 9 10 11 3 4 5 6 7 8 9 7 8 9 10 11 12 1312 13 14 15 16 17 18 10 11 12 13 14 15 16 14 15 16 17 18 19 2019 20 21 22 23 24 25 17 18 19 20 21 22 23 21 22 23 24 25 26 2726 27 28 29 30 24 25 26 27 28 29 30 28 29 3031七月 八月 九月日 一 二 三 四 五 六 日 一 二 三 四 五 六 日 一 二 三 四 五 六1 2 3 4 1 1 2 3 4 55 6 7 8 9 10 11 2 3 4 5 6 7 8 6 7 8 9 10 11 1212 13 14 15 16 17 18 9 10 11 12 13 14 15 13 14 15 16 17 18 1919 20 21 22 23 24 25 16 17 18 19 20 21 22 20 21 22 23 24 25 2626 27 28 29 30 31 23 24 25 26 27 28 29 27 28 29 3030 31十月 十一月 十二月日 一 二 三 四 五 六 日 一 二 三 四 五 六 日 一 二 三 四 五 六1 2 3 1 2 3 4 5 6 7 1 2 3 4 54 5 6 7 8 9 10 8 9 10 11 12 13 14 6 7 8 9 10 11 1211 12 13 14 15 16 17 15 16 17 18 19 20 21 13 14 15 16 17 18 1918 19 20 21 22 23 24 22 23 24 25 26 27 28 20 21 22 23 24 25 2625 26 27 28 29 30 31 29 30 27 28 29 30 31
搜索查找类
find 指令
find 指令将从指定目录向下递归地遍历其各个子目录,将满足条件的文件或者目录显示在终端。
find [搜索范围] [选项]常用选项-name<文件名> # 按指定的文件名查找文件 可以用*代替未知 如 *.txt-user<用户名> # 查找属于指定用户的所有文件-size<文件大小> # 按照指定的文件大小查找文件
按文件名:根据名称查找/home 目录下的 hello.txt 文件
[root@localhost home]# find /home -name hello.txt/home/hello.txt
按拥有者:查找/opt 目录下,用户名称为 nobody 的文件
[root@localhost home]# find /opt -user nobody[root@localhost home]#
查找整个 linux 系统下大于 200M 的文件(+n 大于 -n 小于 n 等于, 单位有 k,M,G)
[root@localhost home]# find / -size +200M/proc/kcorefind: ‘/proc/9948/task/9948/fd/5’: 没有那个文件或目录find: ‘/proc/9948/task/9948/fdinfo/5’: 没有那个文件或目录find: ‘/proc/9948/fd/6’: 没有那个文件或目录find: ‘/proc/9948/fdinfo/6’: 没有那个文件或目录
locate 指令
locate 指令可以快速定位文件路径。locate 指令利用事先建立的系统中所有文件名称及路径的 locate 数据库实现快速定位给定的文件。Locate 指令无需遍历整个文件系统,查询速度较快。为了保证查询结果的准确度,管理员必须定期更新 locate 时刻
locate 搜索文件特别说明由于 locate 指令基于数据库进行查询,所以第一次运行前,必须使用 updatedb 指令创建 locate 数据库。
使用 locate 指令快速定位 hello.txt 文件所在目录
[root@localhost home]# updatedb[root@localhost home]# locate hello.txt/home/hello.txt
which 指令
可以查看某个指令在哪个目录下
which [指令名称]
查看ls 指令在那个目录
[root@localhost home]# which lsalias ls='ls --color=auto'/usr/bin/ls
grep 指令和管道符号 |
grep 过滤查找 , 管道符 |,表示将前一个命令的处理结果输出传递给后面的命令处理。
grep [选项] 查找内容 源文件常用选项-n # 显示匹配行及行号-i # 忽略字母大小写
在 hello.txt 文件中,查找 “yes” 所在行,并且显示行号
[root@localhost home]# cat /home/hello.txt |grep "yes"yes[root@localhost home]# grep -n "yes" /home/hello.txt1:yes
压缩和解压类
gzip/gunzip 指令
gzip 用于压缩文件, gunzip 用于解压
gzip 文件 # 功能描述:压缩文件,只能将文件压缩为*.gz 文件gunzip 文件.gz # 功能描述:解压缩文件命令
gzip 压缩, 将 /home 下的 hello.txt 文件进行压缩
[root@localhost home]# gzip /home/hello.txt[root@localhost home]# ll总用量 8-rw-r--r--. 1 root root 34 7月 4 22:42 hello.txt.gzdrwx------. 3 tom tom 4096 4月 11 2018 tom
gunzip 压缩, 将 /home 下的 hello.txt.gz 文件进行解压缩
[root@localhost home]# gunzip /home/hello.txt.gz[root@localhost home]# ll总用量 8-rw-r--r--. 1 root root 4 7月 4 22:42 hello.txtdrwx------. 3 tom tom 4096 4月 11 2018 tom
zip/unzip 指令
zip 用于压缩文件, unzip 用于解压的,这个在项目打包发布中很有用的
zip [选项] XXX.zip 将要压缩的内容 # 功能描述:压缩文件和目录的命令unzip [选项] XXX.zip # 功能描述:解压缩文件zip 常用选项-r:递归压缩,即压缩目录unzip 的常用选项-d<目录> :指定解压后文件的存放目录
将 /home 下的所有文件/文件夹进行压缩成 myhome.zip
[root@localhost home]# zip -r myhome.zip /home/adding: home/ (stored 0%)adding: home/hello.txt (stored 0%)adding: home/tom/ (stored 0%)adding: home/tom/.mozilla/ (stored 0%)adding: home/tom/.mozilla/extensions/ (stored 0%)adding: home/tom/.mozilla/plugins/ (stored 0%)adding: home/tom/.bash_logout (stored 0%)adding: home/tom/.bash_profile (deflated 21%)adding: home/tom/.bashrc (deflated 23%)[root@localhost home]# ll总用量 12-rw-r--r--. 1 root root 4 7月 4 22:42 hello.txt-rw-r--r--. 1 root root 1847 7月 4 22:51 myhome.zipdrwx------. 3 tom tom 4096 4月 11 2018 tom
将 myhome.zip 解压到 /opt/tmp 目录下
[root@localhost home]# mkdir /opt/tmp[root@localhost home]# unzip -d /opt/tmp/ /home/myhome.zipArchive: /home/myhome.zipcreating: /opt/tmp/home/extracting: /opt/tmp/home/hello.txtcreating: /opt/tmp/home/tom/creating: /opt/tmp/home/tom/.mozilla/creating: /opt/tmp/home/tom/.mozilla/extensions/creating: /opt/tmp/home/tom/.mozilla/plugins/extracting: /opt/tmp/home/tom/.bash_logoutinflating: /opt/tmp/home/tom/.bash_profileinflating: /opt/tmp/home/tom/.bashrc[root@localhost home]# cd /opt/tmp/[root@localhost tmp]# ll总用量 4drwxr-xr-x. 3 root root 4096 7月 4 22:51 home
tar 指令
tar 指令 是打包指令,最后打包后的文件是 .tar.gz 的文件。
tar [选项] XXX.tar.gz 打包的内容 # 功能描述:打包目录,压缩后的文件格式.tar.gz常用选项-c # 产生.tar打包文件-v # 显示详细信息-f # 指定压缩后的文件名-z # 打包同时压缩-x # 解包.tar文件
压缩多个文件,将 /home/pig.txt 和 /home/cat.txt 压缩成 pc.tar.gz
[root@localhost home]# tar -zcvf pc.tar.gz /home/pig.txt /home/cat.txttar: 从成员名中删除开头的“/”/home/pig.txt/home/cat.txt[root@localhost home]# lscat.txt hello.txt myhome.zip pc.tar.gz pig.txt tom
将/home 的文件夹 压缩成 myhome.tar.gz
[root@localhost home]# tar -zcvf myhome.ter.gz /home/tar: 从成员名中删除开头的“/”/home//home/myhome.zip/home/hello.txt/home/tom//home/tom/.mozilla//home/tom/.mozilla/extensions//home/tom/.mozilla/plugins//home/tom/.bash_logout/home/tom/.bash_profile/home/tom/.bashrc/home/cat.txt/home/pc.tar.gz/home/pig.txt/home/myhome.tar.gz[root@localhost home]# lscat.txt hello.txt myhome.tar.gz myhome.ter.gz myhome.zip pc.tar.gz pig.txt tom
将 pc.tar.gz 解压到当前目录
[root@localhost home]# tar -zxvf pc.tar.gzhome/pig.txthome/cat.txt[root@localhost home]# lscat.txt hello.txt home myhome.tar.gz myhome.zip pc.tar.gz pig.txt tom
将myhome.tar.gz 解压到 /opt/tmp2 目录下
[root@localhost home]# tar -zxvf /home/myhome.tar.gz -C /opt/tmp2home/home/myhome.ziphome/hello.txthome/tom/home/tom/.mozilla/home/tom/.mozilla/extensions/home/tom/.mozilla/plugins/home/tom/.bash_logouthome/tom/.bash_profilehome/tom/.bashrchome/cat.txthome/pc.tar.gzhome/pig.txt[root@localhost home]# cd /opt/tmp2[root@localhost tmp2]# ll总用量 4drwxr-xr-x. 3 root root 4096 7月 4 23:02 home[root@localhost tmp2]# cd home/[root@localhost home]# lscat.txt hello.txt myhome.zip pc.tar.gz pig.txt tom

若有收获,就点个赞吧
0 人点赞
