- 安装JDK
- /etc/profile
- System wide environment and startup programs, for login setup
- Functions and aliases go in /etc/bashrc
- It’s NOT a good idea to change this file unless you know what you
- are doing. It’s much better to create a custom.sh shell script in
- /etc/profile.d/ to make custom changes to your environment, as this
- will prevent the need for merging in future updates.
- Path manipulation
- By default, we want umask to get set. This sets it for login shell
- Current threshold for system reserved uid/gids is 200
- You could check uidgid reservation validity in
- /usr/share/doc/setup-*/uidgid file
- 查看是否已安装jdk
- 卸载openjdk
- 检查是否卸载成功
安装JDK
安装步骤
- mkdir /opt/jdk
- 通过 xftp6 上传到 /opt/jdk 下
- cd /opt/jdk
- 解压 tar -zxvf jdk-8u261-linux-x64.tar.gz
- mkdir /usr/local/java
- mv /opt/jdk/jdk1.8.0_261 /usr/local/java
- 配置环境变量的配置文件
- vim /etc/profile
- export JAVA_HOME=/usr/local/java/jdk1.8.0_261
- export PATH=$JAVA_HOME/bin:$PATH
- source /etc/profile [让新的环境变量生效]
```
[root@localhost etc]# cat profile
export JAVA_HOME=/usr/local/java/jdk1.8.0_261
export PATH=$JAVA_HOME/bin:$PATH
/etc/profile
System wide environment and startup programs, for login setup
Functions and aliases go in /etc/bashrc
It’s NOT a good idea to change this file unless you know what you
are doing. It’s much better to create a custom.sh shell script in
/etc/profile.d/ to make custom changes to your environment, as this
will prevent the need for merging in future updates.
pathmunge () { case “:${PATH}:” in :”$1”:) ;; *) if [ “$2” = “after” ] ; then PATH=$PATH:$1 else PATH=$1:$PATH fi esac }
if [ -x /usr/bin/id ]; then if [ -z “$EUID” ]; then
# ksh workaroundEUID=`/usr/bin/id -u`UID=`/usr/bin/id -ru`fiUSER="`/usr/bin/id -un`"LOGNAME=$USERMAIL="/var/spool/mail/$USER"
fi
Path manipulation
if [ “$EUID” = “0” ]; then pathmunge /usr/sbin pathmunge /usr/local/sbin else pathmunge /usr/local/sbin after pathmunge /usr/sbin after fi
HOSTNAME=/usr/bin/hostname 2>/dev/null
HISTSIZE=1000
if [ “$HISTCONTROL” = “ignorespace” ] ; then
export HISTCONTROL=ignoreboth
else
export HISTCONTROL=ignoredups
fi
export PATH USER LOGNAME MAIL HOSTNAME HISTSIZE HISTCONTROL
By default, we want umask to get set. This sets it for login shell
Current threshold for system reserved uid/gids is 200
You could check uidgid reservation validity in
/usr/share/doc/setup-*/uidgid file
if [ $UID -gt 199 ] && [ “/usr/bin/id -gn“ = “/usr/bin/id -un“ ]; then
umask 002
else
umask 022
fi
for i in /etc/profile.d/.sh /etc/profile.d/sh.local ; do if [ -r “$i” ]; then if [ “${-#i}” != “$-“ ]; then . “$i” else . “$i” >/dev/null fi fi done
unset i unset -f pathmunge [root@localhost etc]# source /etc/profile [root@localhost etc]# java -version java version “1.8.0_261” Java(TM) SE Runtime Environment (build 1.8.0_261-b12) Java HotSpot(TM) 64-Bit Server VM (build 25.261-b12, mixed mode)
<a name="b4OZB"></a>## 检查java -version<a name="lA4Ke"></a>## 注意事项检查系统是否已安装了系统默认的openJDK,若有需要先卸载再安装jdk
查看是否已安装jdk
[root@localhost etc]# rpm -qa |grep java java-1.8.0-openjdk-headless-1.8.0.181-7.b13.el7.x86_64 python-javapackages-3.4.1-11.el7.noarch javapackages-tools-3.4.1-11.el7.noarch java-1.8.0-openjdk-1.8.0.181-7.b13.el7.x86_64 java-1.7.0-openjdk-headless-1.7.0.191-2.6.15.5.el7.x86_64 java-1.7.0-openjdk-1.7.0.191-2.6.15.5.el7.x86_64 tzdata-java-2018e-3.el7.noarch [root@localhost etc]# java -version openjdk version “1.8.0_181” OpenJDK Runtime Environment (build 1.8.0_181-b13) OpenJDK 64-Bit Server VM (build 25.181-b13, mixed mode)
卸载openjdk
[root@localhost etc]# yum remove openjdk 已加载插件:fastestmirror, langpacks 正在解决依赖关系 —> 正在检查事务 —-> 软件包 java-1.7.0-openjdk.x86_64.1.1.7.0.191-2.6.15.5.el7 将被 删除 … 作为依赖被删除: icedtea-web.x86_64 0:1.7.1-1.el7 jline.noarch 0:1.0-8.el7 rhino.noarch 0:1.7R5-1.el7
完毕!
检查是否卸载成功
[root@localhost etc]# java -version -bash: /usr/bin/java: 没有那个文件或目录
<a name="ju5st"></a># 安装tomcat<a name="DnkG6"></a>## 步骤- 上传安装文件,并解压缩到/opt/tomcat- 进入解压目录/bin , 启动 tomcat ./startup.sh- 开放端口 8080 , 回顾 firewall-cmd
[root@localhost opt]# mkdir /opt/tomcat
[root@localhost opt]# cd tomcat/
[root@localhost tomcat]# tar -zxvf apache-tomcat-8.5.59.tar.gz
[root@localhost tomcat]# ll
总用量 10192
drwxr-xr-x. 9 root root 4096 1月 19 14:24 apache-tomcat-8.5.59
-rw-r—r—. 1 root root 10432020 1月 19 09:52 apache-tomcat-8.5.59.tar.gz
[root@localhost tomcat]# cd apache-tomcat-8.5.59/bin/
[root@localhost bin]# ./startup.sh
Using CATALINA_BASE: /opt/tomcat/apache-tomcat-8.5.59
Using CATALINA_HOME: /opt/tomcat/apache-tomcat-8.5.59
Using CATALINA_TMPDIR: /opt/tomcat/apache-tomcat-8.5.59/temp
Using JRE_HOME: /usr/local/java/jdk1.8.0_261
Using CLASSPATH: /opt/tomcat/apache-tomcat-8.5.59/bin/bootstrap.jar:/opt/tomcat/apache-tomcat-8.5.59/bin/tomcat-juli.jar
Using CATALINA_OPTS:
Tomcat started.
[root@localhost bin]# netstat -anp |grep 8080
tcp6 0 0 :::8080 :::* LISTEN 54597/java
[root@localhost bin]# firewall-cmd —permanent —add-port=8080/tcp
success
[root@localhost bin]# firewall-cmd —reload
success
<a name="TQVeL"></a>## 测试是否安装成功windos、Linux下访问 [http://192.168.200.130:8080/](http://192.168.200.130:8080/)<br />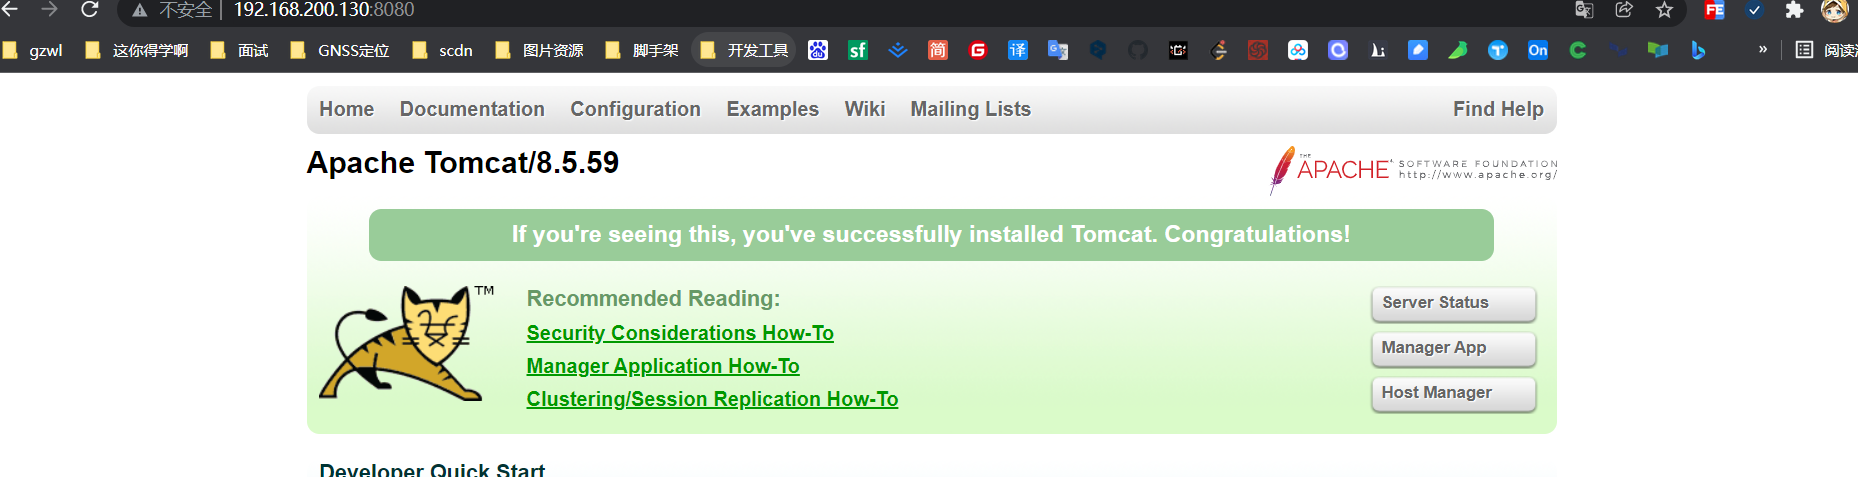<a name="d3Wgu"></a># 安装idea- 下载地址: [https://www.jetbrains.com/idea/download/#section=windows](https://www.jetbrains.com/idea/download/#section=windows)- 解压缩到/opt/idea- 启动 idea bin 目录下 ./idea.sh,配置 jdk<a name="dTtdA"></a># 安装mysql新建文件夹/opt/mysql,并cd进去<br />运行wget [http://dev.mysql.com/get/mysql-5.7.26-1.el7.x86_64.rpm-bundle.tar](http://dev.mysql.com/get/mysql-5.7.26-1.el7.x86_64.rpm-bundle.tar),下载mysql安装包<br />PS:centos7.6自带的类mysql数据库是mariadb,会跟mysql冲突,要先删除。 <br />运行tar -xvf mysql-5.7.26-1.el7.x86_64.rpm-bundle.tar<br />运行rpm -qa|grep mari,查询mariadb相关安装包<br />运行rpm -e --nodeps mariadb-libs,卸载然后开始真正安装mysql,依次运行以下几条<br />rpm -ivh mysql-community-common-5.7.26-1.el7.x86_64.rpm<br />rpm -ivh mysql-community-libs-5.7.26-1.el7.x86_64.rpm<br />rpm -ivh mysql-community-client-5.7.26-1.el7.x86_64.rpm<br />rpm -ivh mysql-community-server-5.7.26-1.el7.x86_64.rpm<br />运行systemctl start mysqld.service,启动mysql<br />然后开始设置root用户密码<br />Mysql自动给root用户设置随机密码,运行grep "password" /var/log/mysqld.log可看到当前密码<br />运行mysql -u root -p,用root用户登录,提示输入密码可用上述的,可以成功登陆进入mysql命令行<br />设置root密码,对于个人开发环境,如果要设比较简单的密码(生产环境服务器要设复杂密码),可以运行set global validate_password_policy=0; 提示密码设置策略(validate_password_policy默认值1,)<br />set password for 'root'@'localhost' =password('hspedu100');<br />运行flush privileges;使密码设置生效```shell[root@localhost ~]# mkdir /opt/mysql[root@localhost ~]# mv 下载/mysql-5.7.26-1.el7.x86_64.rpm-bundle.tar /opt/mysql/[root@localhost ~]# cd /opt/mysql/[root@localhost mysql]# ll总用量 518444-rw-r--r--. 1 root root 530882560 1月 19 09:53 mysql-5.7.26-1.el7.x86_64.rpm-bundle.tar[root@localhost mysql]# tar -xvf mysql-5.7.26-1.el7.x86_64.rpm-bundle.tarmysql-community-embedded-devel-5.7.26-1.el7.x86_64.rpmmysql-community-libs-5.7.26-1.el7.x86_64.rpmmysql-community-embedded-5.7.26-1.el7.x86_64.rpmmysql-community-test-5.7.26-1.el7.x86_64.rpmmysql-community-embedded-compat-5.7.26-1.el7.x86_64.rpmmysql-community-common-5.7.26-1.el7.x86_64.rpmmysql-community-devel-5.7.26-1.el7.x86_64.rpmmysql-community-client-5.7.26-1.el7.x86_64.rpmmysql-community-server-5.7.26-1.el7.x86_64.rpmmysql-community-libs-compat-5.7.26-1.el7.x86_64.rpm[root@localhost mysql]# ll总用量 1036900-rw-r--r--. 1 root root 530882560 1月 19 09:53 mysql-5.7.26-1.el7.x86_64.rpm-bundle.tar-rw-r--r--. 1 7155 31415 25381952 4月 15 2019 mysql-community-client-5.7.26-1.el7.x86_64.rpm-rw-r--r--. 1 7155 31415 280904 4月 15 2019 mysql-community-common-5.7.26-1.el7.x86_64.rpm-rw-r--r--. 1 7155 31415 3838100 4月 15 2019 mysql-community-devel-5.7.26-1.el7.x86_64.rpm-rw-r--r--. 1 7155 31415 47076368 4月 15 2019 mysql-community-embedded-5.7.26-1.el7.x86_64.rpm-rw-r--r--. 1 7155 31415 24086952 4月 15 2019 mysql-community-embedded-compat-5.7.26-1.el7.x86_64.rpm-rw-r--r--. 1 7155 31415 130023844 4月 15 2019 mysql-community-embedded-devel-5.7.26-1.el7.x86_64.rpm-rw-r--r--. 1 7155 31415 2274268 4月 15 2019 mysql-community-libs-5.7.26-1.el7.x86_64.rpm-rw-r--r--. 1 7155 31415 2118444 4月 15 2019 mysql-community-libs-compat-5.7.26-1.el7.x86_64.rpm-rw-r--r--. 1 7155 31415 173541272 4月 15 2019 mysql-community-server-5.7.26-1.el7.x86_64.rpm-rw-r--r--. 1 7155 31415 122249684 4月 15 2019 mysql-community-test-5.7.26-1.el7.x86_64.rpm[root@localhost mysql]# rpm -qa |grep marimariadb-libs-5.5.60-1.el7_5.x86_64marisa-0.2.4-4.el7.x86_64[root@localhost mysql]# rpm -e --nodeps mariadb-libs[root@localhost mysql]# rpm -qa |grep marimarisa-0.2.4-4.el7.x86_64[root@localhost mysql]# rpm -ivh mysql-community-common-5.7.26-1.el7.x86_64.rpm警告:mysql-community-common-5.7.26-1.el7.x86_64.rpm: 头V3 DSA/SHA1 Signature, 密钥 ID 5072e1f5: NOKEY准备中... ################################# [100%]正在升级/安装...1:mysql-community-common-5.7.26-1.e################################# [100%][root@localhost mysql]# rpm -ivh mysql-community-libs-5.7.26-1.el7.x86_64.rpm警告:mysql-community-libs-5.7.26-1.el7.x86_64.rpm: 头V3 DSA/SHA1 Signature, 密钥 ID 5072e1f5: NOKEY准备中... ################################# [100%]正在升级/安装...1:mysql-community-libs-5.7.26-1.el7################################# [100%][root@localhost mysql]# rpm -ivh mysql-community-client-5.7.26-1.el7.x86_64.rpm警告:mysql-community-client-5.7.26-1.el7.x86_64.rpm: 头V3 DSA/SHA1 Signature, 密钥 ID 5072e1f5: NOKEY准备中... ################################# [100%]正在升级/安装...1:mysql-community-client-5.7.26-1.e################################# [100%][root@localhost mysql]# rpm -ivh mysql-community-server-5.7.26-1.el7.x86_64.rpm警告:mysql-community-server-5.7.26-1.el7.x86_64.rpm: 头V3 DSA/SHA1 Signature, 密钥 ID 5072e1f5: NOKEY准备中... ################################# [100%]正在升级/安装...1:mysql-community-server-5.7.26-1.e################################# [100%][root@localhost mysql]# systemctl start mysqld.service[root@localhost mysql]# grep "password" /var/log/mysqld.log2022-01-20T06:33:30.813358Z 1 [Note] A temporary password is generated for root@localhost: F#lyhwG8ninl[root@localhost mysql]# mysql -u root -pEnter password:Welcome to the MySQL monitor. Commands end with ; or \g.Your MySQL connection id is 2Server version: 5.7.26Copyright (c) 2000, 2019, Oracle and/or its affiliates. All rights reserved.Oracle is a registered trademark of Oracle Corporation and/or itsaffiliates. Other names may be trademarks of their respectiveowners.Type 'help;' or '\h' for help. Type '\c' to clear the current input statement.mysql> set global validate_password_policy=0;Query OK, 0 rows affected (0.00 sec)mysql> set password for 'root'@'localhost'=password('root');ERROR 1819 (HY000): Your password does not satisfy the current policy requirementsmysql> set password for 'root'@'localhost'=password('123456');ERROR 1819 (HY000): Your password does not satisfy the current policy requirementsmysql> SHOW VARIABLES LIKE 'validate_password%';ERROR 1820 (HY000): You must reset your password using ALTER USER statement before executing this statement.mysql> set global validate_password_length=1;Query OK, 0 rows affected (0.01 sec)mysql> SHOW VARIABLES LIKE 'validate_password%';ERROR 1820 (HY000): You must reset your password using ALTER USER statement before executing this statement.mysql> set global validate_password_policy=0;Query OK, 0 rows affected (0.00 sec)mysql> set password for 'root'@'localhost'=password('123456');Query OK, 0 rows affected, 1 warning (0.02 sec)mysql> flush privileges;Query OK, 0 rows affected (0.00 sec)mysql> exitBye[root@localhost mysql]# mysql -u root -pEnter password:Welcome to the MySQL monitor. Commands end with ; or \g.Your MySQL connection id is 3Server version: 5.7.26 MySQL Community Server (GPL)Copyright (c) 2000, 2019, Oracle and/or its affiliates. All rights reserved.Oracle is a registered trademark of Oracle Corporation and/or itsaffiliates. Other names may be trademarks of their respectiveowners.Type 'help;' or '\h' for help. Type '\c' to clear the current input statement.mysql> exitBye

若有收获,就点个赞吧
0 人点赞
