- 分析日志t.log(访问量),将各个ip 地址截取,并统计出现次数,并按从大到小排序(腾讯)
- 统计连接到服务器的各个 ip 情况,并按连接数从大到小排序 (腾讯)
- 如忘记了mysql5.7 数据库的 ROOT 用户的密码,如何找回? (滴滴)
- For advice on how to change settings please see
- http://dev.mysql.com/doc/refman/5.7/en/server-configuration-defaults.html">http://dev.mysql.com/doc/refman/5.7/en/server-configuration-defaults.html
- Remove leading # and set to the amount of RAM for the most important data
- cache in MySQL. Start at 70% of total RAM for dedicated server, else 10%.
- innodb_buffer_pool_size = 128M
- Remove leading # to turn on a very important data integrity option: logging
- changes to the binary log between backups.
- log_bin
- Remove leading # to set options mainly useful for reporting servers.
- The server defaults are faster for transactions and fast SELECTs.
- Adjust sizes as needed, experiment to find the optimal values.
- join_buffer_size = 128M
- sort_buffer_size = 2M
- read_rnd_buffer_size = 2M
- Disabling symbolic-links is recommended to prevent assorted security risks
- 重启使配置生效
- 无密码登录数据库
- 设置初始密码
- 刷新权限配置
- For advice on how to change settings please see
- http://dev.mysql.com/doc/refman/5.7/en/server-configuration-defaults.html">http://dev.mysql.com/doc/refman/5.7/en/server-configuration-defaults.html
- Remove leading # and set to the amount of RAM for the most important data
- cache in MySQL. Start at 70% of total RAM for dedicated server, else 10%.
- innodb_buffer_pool_size = 128M
- Remove leading # to turn on a very important data integrity option: logging
- changes to the binary log between backups.
- log_bin
- Remove leading # to set options mainly useful for reporting servers.
- The server defaults are faster for transactions and fast SELECTs.
- Adjust sizes as needed, experiment to find the optimal values.
- join_buffer_size = 128M
- sort_buffer_size = 2M
- read_rnd_buffer_size = 2M
- Disabling symbolic-links is recommended to prevent assorted security risks
- skip-grant-tables
- 重启使配置生效
- !/bin/bash
- 设置定时任务
分析日志t.log(访问量),将各个ip 地址截取,并统计出现次数,并按从大到小排序(腾讯)
http://192.168.200.10/index1.htmlhttp://192.168.200.10/index2.htmlhttp://192.168.200.20/index1.htmlhttp://192.168.200.30/index1.htmlhttp://192.168.200.40/index1.htmlhttp://192.168.200.30/order.htmlhttp://192.168.200.10/order.html答案: cat t.txt | cut -d '/' -f 3 | sort | uniq -c | sort -nr解析:cat t.txt 读取文件cut -d '/' -f 3 切分http://192.168.200.10/order.html,按照'/'来切,取第三段sort 排序uniq -c 统计重复个数sort -nr 统计结果从大到小排序
统计连接到服务器的各个 ip 情况,并按连接数从大到小排序 (腾讯)
答案:netstat -an | grep ESTABLISHED | awk -F " " '{print $5}' | cut -d ":" -f 1 | sort | uniq -c| sort -nr解析:netstat -an 查看Linux中网络系统状态信息 -a或--all:显示所有连线中的Socket;-n或--numeric:直接使用ip地址,而不通过域名服务器;grep ESTABLISHED 过滤关键字为'ESTABLISHED'连接状态的ipawk -F " " '{print $5}' 按空格分割,取第5个内容即连接IP ,-F fs fs指定输入分隔符,fs可以是字符串或正则表达式cut -d ":" -f 1 切分192.168.200.1:56720 去除端口号sort 排序uniq -c 统计重复个数sort -nr 统计结果从大到小排序
如忘记了mysql5.7 数据库的 ROOT 用户的密码,如何找回? (滴滴)
- 修改mysql配置文件 设置跳过权限认证登录 skip-grant-tables
```
[root@localhost ~]# vim /etc/my.cnf
[root@localhost ~]# cat /etc/my.cnf
For advice on how to change settings please see
http://dev.mysql.com/doc/refman/5.7/en/server-configuration-defaults.html
[mysqld] #
Remove leading # and set to the amount of RAM for the most important data
cache in MySQL. Start at 70% of total RAM for dedicated server, else 10%.
innodb_buffer_pool_size = 128M
#
Remove leading # to turn on a very important data integrity option: logging
changes to the binary log between backups.
log_bin
#
Remove leading # to set options mainly useful for reporting servers.
The server defaults are faster for transactions and fast SELECTs.
Adjust sizes as needed, experiment to find the optimal values.
join_buffer_size = 128M
sort_buffer_size = 2M
read_rnd_buffer_size = 2M
datadir=/var/lib/mysql socket=/var/lib/mysql/mysql.sock
Disabling symbolic-links is recommended to prevent assorted security risks
symbolic-links=0
log-error=/var/log/mysqld.log pid-file=/var/run/mysqld/mysqld.pid skip-grant-tables
重启使配置生效
[root@localhost ~]# service mysqld restart Redirecting to /bin/systemctl restart mysqld.service
2. 进入数据库,重置密码
无密码登录数据库
[root@localhost ~]# mysql -u root -p Enter password: Welcome to the MySQL monitor. Commands end with ; or \g. Your MySQL connection id is 2 Server version: 5.7.26 MySQL Community Server (GPL)
Copyright (c) 2000, 2019, Oracle and/or its affiliates. All rights reserved.
Oracle is a registered trademark of Oracle Corporation and/or its affiliates. Other names may be trademarks of their respective owners.
Type ‘help;’ or ‘\h’ for help. Type ‘\c’ to clear the current input statement.
mysql> show databases; +——————————+ | Database | +——————————+ | information_schema | | hspedu | | mysql | | performance_schema | | sys | +——————————+ 5 rows in set (0.02 sec)
mysql> use mysql; Reading table information for completion of table and column names You can turn off this feature to get a quicker startup with -A
Database changed mysql> show tables; +—————————————-+ | Tables_in_mysql | +—————————————-+ | columns_priv | | db | | engine_cost | | event | | func | | general_log | | gtid_executed | | help_category | | help_keyword | | help_relation | | help_topic | | innodb_index_stats | | innodb_table_stats | | ndb_binlog_index | | plugin | | proc | | procs_priv | | proxies_priv | | server_cost | | servers | | slave_master_info | | slave_relay_log_info | | slave_worker_info | | slow_log | | tables_priv | | time_zone | | time_zone_leap_second | | time_zone_name | | time_zone_transition | | time_zone_transition_type | | user | +—————————————-+ 31 rows in set (0.00 sec)
mysql> desc user; +————————————+—————————————————-+———+——-+———————————-+———-+ | Field | Type | Null | Key | Default | Extra | +————————————+—————————————————-+———+——-+———————————-+———-+ | Host | char(60) | NO | PRI | | | | User | char(32) | NO | PRI | | | | Select_priv | enum(‘N’,’Y’) | NO | | N | | | Insert_priv | enum(‘N’,’Y’) | NO | | N | | | Update_priv | enum(‘N’,’Y’) | NO | | N | | | Delete_priv | enum(‘N’,’Y’) | NO | | N | | | Create_priv | enum(‘N’,’Y’) | NO | | N | | | Drop_priv | enum(‘N’,’Y’) | NO | | N | | | Reload_priv | enum(‘N’,’Y’) | NO | | N | | | Shutdown_priv | enum(‘N’,’Y’) | NO | | N | | | Process_priv | enum(‘N’,’Y’) | NO | | N | | | File_priv | enum(‘N’,’Y’) | NO | | N | | | Grant_priv | enum(‘N’,’Y’) | NO | | N | | | References_priv | enum(‘N’,’Y’) | NO | | N | | | Index_priv | enum(‘N’,’Y’) | NO | | N | | | Alter_priv | enum(‘N’,’Y’) | NO | | N | | | Show_db_priv | enum(‘N’,’Y’) | NO | | N | | | Super_priv | enum(‘N’,’Y’) | NO | | N | | | Create_tmp_table_priv | enum(‘N’,’Y’) | NO | | N | | | Lock_tables_priv | enum(‘N’,’Y’) | NO | | N | | | Execute_priv | enum(‘N’,’Y’) | NO | | N | | | Repl_slave_priv | enum(‘N’,’Y’) | NO | | N | | | Repl_client_priv | enum(‘N’,’Y’) | NO | | N | | | Create_view_priv | enum(‘N’,’Y’) | NO | | N | | | Show_view_priv | enum(‘N’,’Y’) | NO | | N | | | Create_routine_priv | enum(‘N’,’Y’) | NO | | N | | | Alter_routine_priv | enum(‘N’,’Y’) | NO | | N | | | Create_user_priv | enum(‘N’,’Y’) | NO | | N | | | Event_priv | enum(‘N’,’Y’) | NO | | N | | | Trigger_priv | enum(‘N’,’Y’) | NO | | N | | | Create_tablespace_priv | enum(‘N’,’Y’) | NO | | N | | | ssl_type | enum(‘’,’ANY’,’X509’,’SPECIFIED’) | NO | | | | | ssl_cipher | blob | NO | | NULL | | | x509_issuer | blob | NO | | NULL | | | x509_subject | blob | NO | | NULL | | | max_questions | int(11) unsigned | NO | | 0 | | | max_updates | int(11) unsigned | NO | | 0 | | | max_connections | int(11) unsigned | NO | | 0 | | | max_user_connections | int(11) unsigned | NO | | 0 | | | plugin | char(64) | NO | | mysql_native_password | | | authentication_string | text | YES | | NULL | | | password_expired | enum(‘N’,’Y’) | NO | | N | | | password_last_changed | timestamp | YES | | NULL | | | password_lifetime | smallint(5) unsigned | YES | | NULL | | | account_locked | enum(‘N’,’Y’) | NO | | N | | +————————————+—————————————————-+———+——-+———————————-+———-+ 45 rows in set (0.01 sec)
设置初始密码
mysql> update user set authentication_string=password(“123456”) where user=’root’; Query OK, 0 rows affected, 1 warning (0.00 sec) Rows matched: 1 Changed: 0 Warnings: 1
刷新权限配置
mysql> flush privileges; Query OK, 0 rows affected (0.01 sec)
mysql> exit Bye
3. 修改MySQL配置文件,将跳过权限验证去掉
[root@localhost ~]# vim /etc/my.cnf [root@localhost ~]# cat /etc/my.cnf
For advice on how to change settings please see
http://dev.mysql.com/doc/refman/5.7/en/server-configuration-defaults.html
[mysqld] #
Remove leading # and set to the amount of RAM for the most important data
cache in MySQL. Start at 70% of total RAM for dedicated server, else 10%.
innodb_buffer_pool_size = 128M
#
Remove leading # to turn on a very important data integrity option: logging
changes to the binary log between backups.
log_bin
#
Remove leading # to set options mainly useful for reporting servers.
The server defaults are faster for transactions and fast SELECTs.
Adjust sizes as needed, experiment to find the optimal values.
join_buffer_size = 128M
sort_buffer_size = 2M
read_rnd_buffer_size = 2M
datadir=/var/lib/mysql socket=/var/lib/mysql/mysql.sock
Disabling symbolic-links is recommended to prevent assorted security risks
symbolic-links=0
log-error=/var/log/mysqld.log pid-file=/var/run/mysqld/mysqld.pid
skip-grant-tables
重启使配置生效
[root@localhost ~]# service mysqld restart Redirecting to /bin/systemctl restart mysqld.service
<a name="myw3j"></a># 写出指令:统计 ip 访问情况,要求分析nginx 访问日志(access.log),找出访问页面数量在前 2 位的 ip(美团)
192.168.130.21 aaa.html 192.168.130.20 aaa.html 192.168.130.20 aaa.html 192.168.130.20 aaa.html 192.168.130.23 aaa.html 192.168.130.20 aaa.html 192.168.130.25 aaa.html 192.168.130.20 aaa.html 192.168.130.20 aaa.html 192.168.130.25 aaa.html 192.168.130.20 aaa.html
答案: cat access.log | awk -F “ “ ‘{print $1}’ | sort | uniq -c | sort -nr | head -2 解析: head -2 取前两个
<a name="wFKmA"></a># 使用 tcpdump 监听本机, 将来自ip 192.168.200.1,tcp 端口为 22 的数据,保存输出到tcpdump.log , 用做将来数据分析(美团)
答案: tcpdump -i ens33 host 192.168.200.1 and port 22 >> /home/tcpdump.log 解析: tcpdump tcpdump命令 是一款抓包,嗅探器工具,它可以打印所有经过网络接口的数据包的头信息 -i ens33 监听ens33 这个网络接口 host 192.168.200.1 and port 22 监听IP为192.168.200.1端口为22的数据
/home/tcpdump.log 将追加到/home/tcpdump.log文件中
<a name="M5c5j"></a># 常用的Nginx 模块,用来做什么(头条)
rewrite 模块,实现重写功能 access 模块:来源控制 ssl 模块:安全加密 ngx_http_gzip_module:网络传输压缩模块 ngx_http_proxy_module 模块实现代理 ngx_http_upstream_module 模块实现定义后端服务器列表 ngx_cache_purge 实现缓存清除功能
<a name="p1tcJ"></a># 如果你是系统管理员,在进行Linux 系统权限划分时,应考虑哪些因素?(腾讯)1. 首先阐述 Linux 权限的主要对象<br />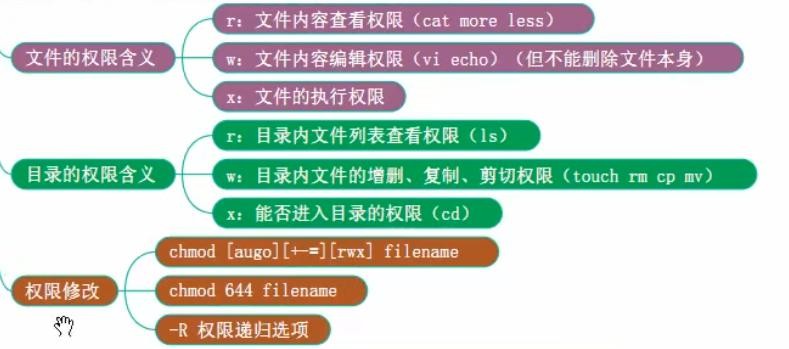2. 根据自己实际经验谈考虑因素- 注意权限分离,比如: 工作中,Linux 系统权限和数据库权限不要在同一个部门- 权限最小原则(即:在满足使用的情况下最少优先)- 减少使用 root 用户,尽量用普通用户+sudo 提权进行日常操作。- 重要的系统文件,比如/etc/passwd, /etc/shadow etc/fstab,/etc/sudoers 等,日常建议使用 chattr(change attribute)锁定,需要操作时再打开。【演示 比如: 锁定 /etc/passwd 让任何用户都不能随意 useradd,除非解除锁定】- 使用 SUID, SGID, Sticky 设置特殊权限。- 可以利用工具,比如 chkrootkit/rootkit hunter 检测 rootkit 脚本(rootkit 是入侵者使用工具,在不察觉的建立了入侵系统途径) [演示使用 wget ftp://ftp.pangeia.com.br/pub/seg/pac/chkrootkit.tar.gz ]- 利用工具 Tripwire 检测文件系统完整性<a name="DT3ff"></a># 权限操作思考题1. 用户 tom 对目录 /home/test 有执行 x 和读 r 写 w 权限,/home/test/hello.java 是只读文件,问 tom 对 hello.java 文件能读吗(ok)? 能修改吗(no)?能删除吗?(ok)1. 用户tom 对目录 /home/test 只有读写权限,/home/test/hello.java 是只读文件,问tom 对 hello.java 文件能读吗(no)? 能修改吗(no)?能删除吗(no)?1. 用户 tom 对目录 /home/test 只有执行权限 x,/home/test/hello.java 是只读文件,问 tom 对 hello.java 文件能读吗(ok)? 能修改吗(no)?能删除吗(no)?1. 用户 tom 对目录 /home/test 只有执行和写权限,/home/test/hello.java 是只读文件,问 tom 对 hello.java 文件能读吗(ok)? 能修改吗(no)?能删除吗(ok)?<a name="bNK3X"></a># 说明 Centos7 启动流程,并说明和CentOS6 相同和不同的地方(腾讯)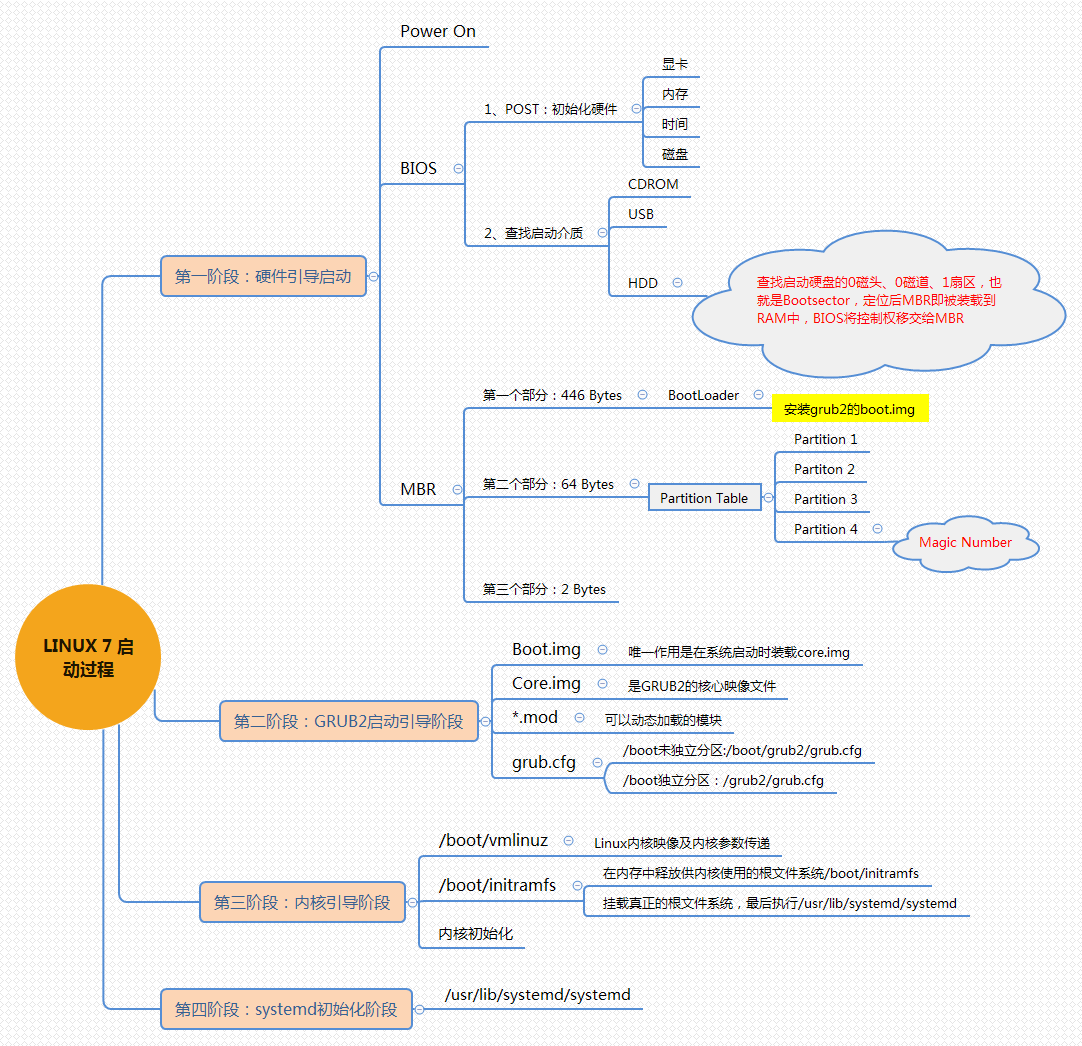<br />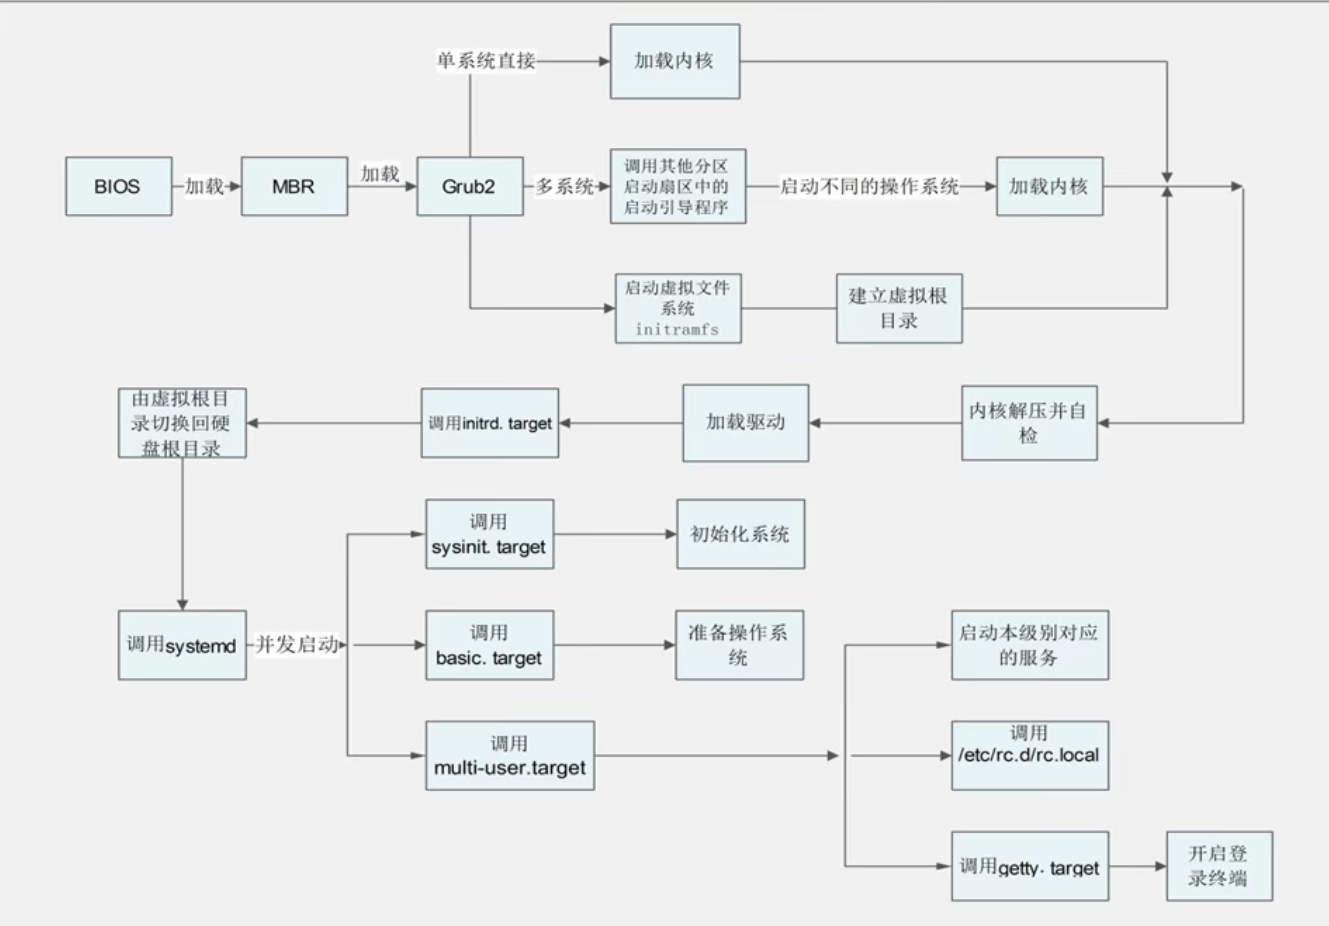<a name="tt6hI"></a># 列举 Linux 高级命令,至少 6 个(百度)
netstat //网络状态监控 top //系统运行状态 lsblk //查看硬盘分区 find 在指定目录下查找文件 ps -aux //查看运行进程 chkconfig //查看服务启动状态 systemctl //管理系统服务器
<a name="q19sr"></a># Linux 查看内存、io 读写、磁盘存储、端口占用、进程查看命令是什么?(瓜子)
top, iotop, df -lh , netstat -tunlp , ps -aux | grep 关心的进程
<a name="rMi12"></a># 使用 Linux 命令计算 t2.txt 第二列的和并输出 (美团)
张 三 40 李 四 50 王 五 60 cat t2.txt | awk -F “ “ ‘{sum+=$2} END {print sum}’
<a name="jlJwb"></a># Shell 脚本里如何检查一个文件是否存在?并给出提示(百度)
if [ -f 文件名 ] then echo “存在” else echo “不存在” fi
<a name="ZJlKr"></a># 用shell 写一个脚本,对文本 t3.txt 中无序的一列数字排序, 并将总和输出(百度)
9 8 7 6 5 4 3 2 10
sort -nr t3.txt | awk ‘{sum+=$0; print $0} END {print “和=”sum}
<a name="YQsbc"></a># 请用指令写出查找当前文件夹(/home)下所有的文本文件内容中包含有字符 “cat” 的文件名称(金山)
grep -r “cat” /home |cut -d “:” -f 1
<a name="OsFod"></a># 请写出统计/home 目录下所有文件个数和所有文件总行数的指令(在金山面试题扩展)
find /home/test -name “.“ | wc -l find /home/test -name “.“ | xargs wc -l
wc 统计文件的字节数、字数、行数 -c # 统计字节数,或—bytes或——chars:只显示Bytes数;-l # 统计行数,或——lines:只显示列数; xargs 命令 是给其他命令传递参数的一个过滤器,也是组合多个命令的一个工具。它擅长将标准输入数据转换成命令行参数
<a name="Nuule"></a># 列出你了解的web 服务器负载架构(滴滴)
Nginx Haproxy Keepalived LVS
<a name="llDHI"></a># 每天晚上 10 点 30 分,打包站点目录/var/spool/mail 备份到/home 目录下(每次备份按时间生成不同的备份包 比如按照 年月日时分秒)(滴滴)
[root@localhost interview]# cd /root [root@localhost ~]# vim mail.sh [root@localhost ~]# cat mail.sh
!/bin/bash
cd /var/spool/ && /bin/tar zcf /home/mail-date +%Y-%m-%d_%H%M%S.tar.gz mail/
设置定时任务
[root@localhost ~]# crontab -l 30 2 /usr/sbin/mysql_db.backup.sh [root@localhost ~]# crontab -e crontab: installing new crontab [root@localhost ~]# crontab -l 30 2 /usr/sbin/mysql_db.backup.sh 30 20 * /root/mail.sh
<a name="q5bLN"></a># 如何优化Linux 系统, 说出你的方法 (瓜子)1. 对 Linux 的架构的优化,和原则分析(示意图)1. 对 linux 系统本身的优化-规则
不用 root ,使用 sudo 提示权限 定时的自动更新服务时间,使用 nptdate npt1.aliyun.com , 让 croud 定时更新 配置 yum 源,指向国内镜像(清华,163) 配置合理的防火墙策略,打开必要的端口,关闭不必要的端口 打开最大文件数(调整文件的描述的数量) vim /etc/profile ulimit -SHn 65535 配置合理的监控策略 配置合理的系统重要文件的备份策略 对安装的软件进行优化,比如 nginx ,apache 内核参数进行优化 /etc/sysctl.conf 锁定一些重要的系统文件 chattr /etc/passwd /ect/shadow /etc/inittab 禁用不必要的服务 setup , ntsysv ```

若有收获,就点个赞吧
0 人点赞
