1 相关知识点
1.1 EasyUI介绍
easyui是一种基于jQuery的用户界面插件集合。
easyui为创建现代化,互动,JavaScript应用程序,提供必要的功能。
使用easyui你不需要写很多代码,你只需要通过编写一些简单HTML标记,就可以定义用户界面。
easyui是个完美支持HTML5网页的完整框架。
easyui节省您网页开发的时间和规模。
easyui很简单但功能强大的。
是一个老技术,一般用于对页面花哨程度要求不高的管理系统。
1.2 EasyUI的环境搭建
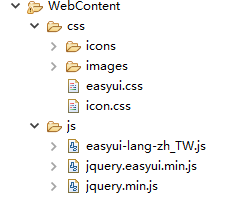
需要导入的js文件:
必导的文件:
jquery.min.js 因为是EasyUI是jquery的插件所以必导。
jquery.easyui.min.js EasyUI的核心js所以必导。
建议导入的文件:
easyui-lang-zh_CN.js 导入后为自带文字为中文简体,不导入为英文提示。(locale文件夹下)
easyui-lang-zh_TW.js 导入后为自带文字为繁体简体,不导入为英文提示。(locale文件夹下)
需要导入的css文件:
icon.css 用于图标的显示。(themes文件夹下)
icons文件夹(themes文件夹下)(需要和icon.css在同一级目录下)
easyui.css(default文件夹下,easyui.css是这个文件夹下其他文件组合在一起的内容,是其他文件的集合)
image文件夹
基本的环境搭建完成后目录结构如图:
文件的引入
<script type="text/javascript" src="js/jquery.min.js"></script><script type="text/javascript" src="js/jquery.easyui.min.js"></script><script type="text/javascript" src="js/easyui-lang-zh_TW.js"></script><link rel="stylesheet" type="text/css" href="css/easyui.css"><link rel="stylesheet" type="text/css" href="css/icon.css">
注意:文件的导入顺序: jquery文件要位于jquery.easyui.min.js文件的上方。
1.3 EasyUI运行原理以及组件使用的通用规律
1.3.1 EasyUI运行原理:
当浏览器是识别到案例中的案例代码后,easyui要通过识别a链接标签上不同的属性,例如
class的值,data-options属性中的不同的值,将标签a渲染为一个linkbutton组件.类似的
EasyUI通过识别HTML标签上不同的属性值来将各个不同的标签渲染为不同的组件.
1.3.2 EasyUI组件调用通用规律
通过我们研究帮助文档中linkbutton组件的使用方式,得出使用EasyUI组件的通用规律
HTML创建组件的通用格式:
<标签名 id="btn"
        class="easyui-组件名称"
        data-options="属性1:值1,属性2:值2">easyui</标签名>
JQ方式创建组件
<标签名 id="btn" href="#">easyui</标签名>
$('#btn').组件名称({
组件属性1:值1,
组件属性2:值2
});
PS:组件具有2种属性:HTML标签自身具有的属性和组件自身具有的属性,
用2种方式创建组件时属性的设置格式
组件上方法的调用:
$('#btn').组件名称('方法名称');
组件上事件的绑定
JQ本身支持的事件,可以用JQ的语法
$(“#btn”).JQ事件名(function(){
                alert(“easyUI_linkbutton”);
       });
组件自身支持的事件,可以用以下形式语法<br />
$(“#btn”).组件名称({
           title:”标题”,
           事件名称1:function(){.....},
           事件名称2:function(){.....}
       });
举例:
<!DOCTYPE html>
<html>
<head>
<meta charset="UTF-8">
<script type="text/javascript" src="js/jquery.min.js"></script>
<script type="text/javascript" src="js/jquery.easyui.min.js"></script>
<script type="text/javascript" src="js/easyui-lang-zh_TW.js"></script>
<link rel="stylesheet" type="text/css" href="css/easyui.css">
<link rel="stylesheet" type="text/css" href="css/icon.css">
<script type="text/javascript">
    $(function(){
        //选中a标签,并调用linkedbutton组件名称的方法即可
        $("#a1").linkbutton({
            iconCls:'icon-add',
            size:'large'
        });
    })

    //定义一个提示方法,当点击按钮的时候,会执行这个方法
    function tishi(){
        var t=$("#a1").html();
        //alert(t)////easyUI会自动给a标签添加一些元素体,让a标签形成了我们看到的效果;
        //让a2按钮,禁用
        $("#a2").linkbutton('disable');
        $("#a3").linkbutton('resize',{width: '80px',height: '50px'});
    }
</script>

<title>入门练习</title>
</head>
<body>
    <h1>使用html标签的方式写一些按钮</h1>
    <a href="#" id="a2" class="easyui-linkbutton" data-options="iconCls:'icon-add'">添加</a>
    <a href="#" id="a3" class="easyui-linkbutton" data-options="iconCls:'icon-remove'">移除</a>
    <a href="#" class="easyui-linkbutton" data-options="iconCls:'icon-save'">保存</a>
    <a href="#" class="easyui-linkbutton" data-options="iconCls:'icon-cut',disabled:true">剪切</a>
    <a href="#" class="easyui-linkbutton">Text Button</a>
    <h1>使用jquery代码的方式创建一些按钮</h1>
    <a href="javascript:void(0)" onclick="tishi()" id="a1">动态创建的按钮1</a>    <!--javascript:void(0) 固定写法,此处表示让herf失效-->
</body>
</html>
2 dialog组件(对话框组件)
该对话框是一种特殊类型的窗口,它在顶部有一个工具栏,在底部有一个按钮栏。对话框窗口右上角只有一个关闭按钮用户可以配置对话框的行为显示其他工具,如collapsible,minimizable,maximizable工具等。
2.1 Html方式创建dialog组件((了解))
<div class=”easyui-dialog”
       style=”width:400;height:200” title=”标题”
       data-options="iconCls:'icon-man',resizable:false,modal:true"><div>
2.2 JQ形式创建dialog组件
<div id="dd">Dialog Content.</div>
$('#dd').dialog({
    title: 'My Dialog',
    width: 400,
    height: 200,
    closed: false,
    href: '/day32/ServletDemo' ,
    modal: true
});
2.3 组件dialog自身的属性
iconCls 窗口的图标
resizable 窗口是否可以调整大小
modal 窗口是否为模态窗口(模态就是窗口在的时候不能点窗口外的底部页面上的东西,不是模态就能点)
title 窗口的标题
width 窗口的宽
height 窗口的高
closed 窗口是否是关闭的,
href 从URL读取远程数据并且显示到窗口
toolbar 设置对话框窗口顶部工具栏
[{iconCls:”icon-add”, text:”增加车辆”, handler:function(){alert(“add Car”);}},{},{}],
buttons 对话框窗口底部按钮
[{text:’确定’, iconCls:’icon-ok’, handler:function(){alert(“确定”);}},{},{}]
2.4 组件自身方法
$(“#dd”).window(“open”);//打开窗口
$(“#dd”).window(“close”);//关闭窗口
$(“#dd”).dialog(“refresh”,”test02.html”);
//重新刷新窗口,加载服务端的资源test02.html
2.5 举例:
<!DOCTYPE html>
<html>
<head>
<meta charset="UTF-8">
<script type="text/javascript" src="js/jquery.min.js"></script>
<script type="text/javascript" src="js/jquery.easyui.min.js"></script>
<script type="text/javascript" src="js/easyui-lang-zh_TW.js"></script>
<link rel="stylesheet" type="text/css" href="css/easyui.css">
<link rel="stylesheet" type="text/css" href="css/icon.css">
<script type="text/javascript">
function dopen(){
    $("#dd").dialog('open');
}

$(function(){
    //给对话框添加顶部的按钮和底部的按钮
    $("#dd").dialog({
        toolbar:[{
            text:'编辑11',
            iconCls:'icon-edit',
            handler:function(){alert('edit')}
        },{
            text:'帮助22',
            iconCls:'icon-help',
            handler:function(){alert('help')}
        }],
        buttons:[{
            text:'保存',
            iconCls:'icon-save',
            handler:function(){alert("存存存")}
        },{
            text:'关闭',
            iconCls:'icon-no',
            handler:function(){
                $("#dd").dialog('close')
            }
        }]
    });
})
</script>
<title>easyUI对话框练习</title>
</head>
<body>
    <div id="dd" class="easyui-dialog" title="我的对话框嘿嘿" style="width:400px;height:200px;"
            data-options="iconCls:'icon-save',resizable:false,modal:false,closed:true">
            这里是对话框的内容

    </div>
       <a href="javascript:dopen()">打开隐藏的对话框</a>


</body>
</html>
3 form组件(表单组件)
easyui中是ajax方式提交,所以easyui中的表单没有submit也没有action。所以一般都与dialog组件配合提交数据。
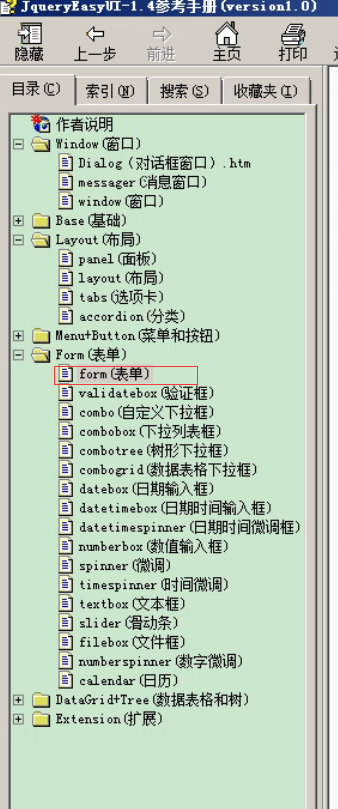
直接去api的这里查就行
3.1 构建一个包含id、action和method值的表单元素。
构建一个包含id、action和method值的表单元素。
<form id="ff" method="post">
<div>
     <label for="name">Name:</label>
     <input class="easyui-validatebox" type="text" name="name" data-options="required:true" />
</div>
<div>
     <label for="email">Email:</label>
     <input class="easyui-validatebox" type="text" name="email" data-options="validType:'email'" />
 </div>
</form>
使普通表单成为ajax提交方式的表单。
方式一:
$('#ff').form({
    url:...,
    onSubmit: function(){
        // do some check
        // return false to prevent submit;
    },
    success:function(data){
        alert(data)
    }
});
// submit the form
$('#ff').submit();
方式二:
$('#ff').form('submit', {
    url:...,
    onSubmit: function(){
        // do some check
        // return false to prevent submit;
    },
    success:function(data){
        alert(data)
    }
});
url:提交路径
success:回调函数
data:服务器响应回来的数据
3.2 举例:
写一个jsp举例
<%@ page language="java" contentType="text/html; charset=UTF-8"
    pageEncoding="UTF-8"%>
<!DOCTYPE html PUBLIC "-//W3C//DTD HTML 4.01 Transitional//EN" "http://www.w3.org/TR/html4/loose.dtd">
<html>
<head>
<script type="text/javascript" src="${pageContext.request.contextPath}/js/jquery.min.js"></script>
<script type="text/javascript" src="${pageContext.request.contextPath}/js/jquery.easyui.min.js"></script>
<script type="text/javascript" src="${pageContext.request.contextPath}/js/easyui-lang-zh_TW.js"></script>
<link rel="stylesheet" type="text/css" href="${pageContext.request.contextPath}/css/easyui.css">
<link rel="stylesheet" type="text/css" href="${pageContext.request.contextPath}/css/icon.css">
<meta http-equiv="Content-Type" content="text/html; charset=UTF-8">
<script type="text/javascript">
    $(function(){
        $(function(){
            //给对话框添加顶部的按钮和底部的按钮
            $("#dd").dialog({
                buttons:[{
                    text:'保存',
                    iconCls:'icon-save',
                    handler:function(){
                        //alert("存存存");
                        $('#ff').form('submit', {
                            url:"${pageContext.request.contextPath}/HelloServlet",
                            //当服务器正常响应之后,会执行下面的这个方法
                            success:function(data){
                                alert("服务器响应回来的数据:"+data)
                            }
                        });
                    }
                },{
                    text:'关闭',
                    iconCls:'icon-no',
                    handler:function(){
                        $("#dd").dialog('close')
                    }
                }]
            });
        })
    })
</script>
<title>练习表达与对话框的整合</title>
</head>
<body>
    <div id="dd" class="easyui-dialog" title="My Dialog" style="width:400px;height:200px;"
            data-options="iconCls:'icon-save',resizable:true,modal:true">

         <form id="ff" method="post">
             <input type="hidden" name="m" value="form">
            <div>
                <label for="name">姓名:</label>
                <input class="easyui-validatebox" type="text" name="name" data-options="required:true" />
            </div>
            <div>
                <label for="email">邮箱:</label>
                <input class="easyui-validatebox" type="text" name="email" data-options="validType:'email'" />
            </div>
        </form>

    </div>


</body>
</html>
HelloServlet.java
import java.io.IOException;
import java.sql.SQLException;
import java.util.List;

import javax.servlet.ServletException;
import javax.servlet.http.HttpServlet;
import javax.servlet.http.HttpServletRequest;
import javax.servlet.http.HttpServletResponse;

import org.apache.commons.dbutils.QueryRunner;
import org.apache.commons.dbutils.handlers.BeanListHandler;

import com.itheima.anli_04_utils.MyC3P0Utils;
import com.itheima.anli_05_domain.Stu;

import net.sf.json.JSONArray;

/**
 * 所有基本练习通用的servlet
 */
public class HelloServlet extends MyBaseServlet {
    //与form配合的方法
    public void form(HttpServletRequest request, HttpServletResponse response) throws ServletException, IOException {
        //1:获取参数并打印
        String n = request.getParameter("name");
        String e = request.getParameter("email");
        System.out.println(n+"===>"+e);
        //2:响应数据
        response.getWriter().println("ok");
    }
    //查询所有数据的方法,与datagrid配合的方法     不带分页
    public void dgAll(HttpServletRequest request, HttpServletResponse response) throws ServletException, IOException, Exception {
        /*
         * 1:获取数据库中所有数据(list)
         * 2:将list转成json
         * 3:响应json
         */
        QueryRunner q = new QueryRunner(MyC3P0Utils.getDataSource());
        String sql = "select * from stu";
        List<Stu> li = q.query(sql, new BeanListHandler(Stu.class));
        String s = JSONArray.fromObject(li).toString();
        response.getWriter().println(s);
    }
}
MyBaseServlet.java
package com.itheima.demo01_知识点练习;

import java.io.IOException;
import java.lang.reflect.Method;

import javax.servlet.ServletException;
import javax.servlet.http.HttpServlet;
import javax.servlet.http.HttpServletRequest;
import javax.servlet.http.HttpServletResponse;
/*
 * 这个类就是我们要抽取的工具类,专门用于反射子类中的方法,并执行子类中的方法;
 */
public class MyBaseServlet extends HttpServlet{
    //tocmat会调用子类的service方法,如果子类中没有service,自动会找到这个类中的service方法,并执行
    protected void service(HttpServletRequest req, HttpServletResponse resp) throws ServletException, IOException {
        //1:获取浏览器传递过来的方法名
        String methodName = req.getParameter("m");
        //2:获取子类的字节码文件对象
        //System.out.println(this);
        Class c = this.getClass();
        //3:从c中获取methodName方法
        try {
            Method m=c.getMethod(methodName, HttpServletRequest.class,HttpServletResponse.class);
            //4:让m执行起来
            String s=(String) m.invoke(this,req,resp);
            //5:判断子类是否返回了一个要转发的路径,如果有路径,帮子类转发,否则什么也不做
            if(s!=null){
                req.getRequestDispatcher(s).forward(req, resp);
            }
        } catch (Exception e) {
            e.printStackTrace();
            throw new RuntimeException("工具类运行错误,请检查是否传递了方法名!!!或其他异常!");
        }
    }

}
4 DataGrid组件(数据表格组件)
DataGrid以表格形式展示数据,并提供了丰富的选择、排序、分组和编辑数据的功能支持。DataGrid的设计用于缩短开发时间,并且使开发人员不需要具备特定的知识。它是轻量级的且功能丰富。单元格合并、多列标题、冻结列和页脚只是其中的一小部分功能。
相当于自动生成一个table,里面有各种属性,需要做的就是把服务器查出来的数据转成json格式格式给他响应回来,因为他只认识json。
4.1 HTML方式创建DataGrid
<table class="easyui-datagrid">
    <thead>
        <tr>
            <th data-options="field:'code'">编码</th>
            <th data-options="field:'name'">名称</th>
            <th data-options="field:'price'">价格</th>
        </tr>
    </thead>
    <tbody>
        <tr>
            <td>001</td><td>name1</td><td>2323</td>
        </tr>
        <tr>
            <td>002</td><td>name2</td><td>4612</td>
        </tr>
    </tbody>
</table>
<table class="easyui-datagrid" style="width:400px;height:250px"
       data-options="url:'datagrid_data.json',fitColumns:true,singleSelect:true">
    <thead>
        <tr>
            <th data-options="field:'code',width:100">编码</th>
            <th data-options="field:'name',width:100">名称</th>
            <th data-options="field:'price',width:100,align:'right'">价格</th>
        </tr>
    </thead>
</table>
4.2 JQ方式创建DataGrid组件
方式一:常用,一般用于查询的
<table id="dg"></table>
$('#dg').datagrid({
    url:'datagrid_data.json',
    columns:[[
        {field:'code',title:'Code',width:100},
        {field:'name',title:'Name',width:100},
        {field:'price',title:'Price',width:100,align:'right'}
    ]]
});
url:数据来源
方式二:一般用于写死的
 <table class="easyui-datagrid" style="width:700px;height:250px"
       data-options="url:'datagrid_data2.json',fitColumns:true,
                        singleSelect:true,pagination:true">
    <thead>
        <tr>
            <th data-options="field:'code',width:100">编码</th>
            <th data-options="field:'name',width:100">名称</th>
            <th data-options="field:'price',width:100,align:'right'">价格</th>
        </tr>
    </thead>
</table>
4.3 举例
<%@ page language="java" contentType="text/html; charset=UTF-8"
    pageEncoding="UTF-8"%>
<!DOCTYPE html PUBLIC "-//W3C//DTD HTML 4.01 Transitional//EN" "http://www.w3.org/TR/html4/loose.dtd">
<html>
<head>
<script type="text/javascript" src="${pageContext.request.contextPath}/js/jquery.min.js"></script>
<script type="text/javascript" src="${pageContext.request.contextPath}/js/jquery.easyui.min.js"></script>
<script type="text/javascript" src="${pageContext.request.contextPath}/js/easyui-lang-zh_TW.js"></script>
<link rel="stylesheet" type="text/css" href="${pageContext.request.contextPath}/css/easyui.css">
<link rel="stylesheet" type="text/css" href="${pageContext.request.contextPath}/css/icon.css">
<meta http-equiv="Content-Type" content="text/html; charset=UTF-8">
<script type="text/javascript">
    //页面加载的时候,将table变成一个数据表格
    $(function(){
        $('#dg').datagrid({
            //数据的来源路径
            url:'${pageContext.request.contextPath}/HelloServlet',
            //数据如何展示,field就是服务器响应回来的json数据中的属性名
            //title在列表第一行显示的标题名称,
            columns:[[
                {field:'num',title:'编号',width:100},
                {field:'name',title:'姓名',width:100},
                {field:'age',title:'年龄',width:100},
                {field:'sex',title:'性别',width:100,align:'right'}
            ]],
            //queryParams代表向servlet发请求的时候要传参数
            queryParams: {
                //m是参数名,dgAll是参数值
                m:'dgAll'
            },
            striped:true,
            singleSelect:true
        });
    })
</script>

<title>数据表格练习-不带分页</title>
</head>
<body>
    <table id="dg"></table>
</body>
</html>

