Welcome to use CyberPi for Python learning!
CyberPi provides abundant input and output functions, allowing you to interact with your code and view the output of your code.
CyberPi is equipped with built-in Bluetooth and Wi-Fi, which can be used to set up a local area network (LAN) or connect to the Internet. You can create your own projects with CyberPi. It can help you understand and master the knowledge and skills related to various fields, such as Internet of things (IoT), artificial intelligence (AI), computing, and network.
In addition, CyberPi supports more than 30 electronic modules and multiple extension shields, allowing you to create various projects such as smart farm, smart home, self-driving car, intelligent robot, and competition robot.
You can use the cyberpi library to implement the functions described in the preceding.
Import the cyberpi library
The cyberpi library described in this document refers to two separate libraries with the same name:
- MicroPython library that can run on CyberPi
- Python library that can run on computers
These two libraries include the same APIs and almost the same output.
The CyberPi team develop these two libraries in this way on purpose, so that the MicroPython code you compile in Upload mode (to run on CyberPi) can be executed as Python code in Live mode (to run on a computer). We think this would be a good way to help learners make the transition from MicroPython learning to Python learning.
To help you use the APIs more efficiently, the application scenarios of the APIs are labelled as follows: : indicates that an API supports Python 3 programming and can be used in Live mode on the mBlock Python editor.
 : indicates that an API supports MicroPython programming and can be used in Upload mode on the mBlock Python editor.
 : indicates that an API supports both Python 3 and MicroPython programming and can be used in both Live and Upload modes on the mBlock Python editor.
You can use the cyberpi library on mBlock-Python Editor or mBlock 5.
Import the library as follows:
## Python coding-no omittingimport cyberpicyberpi.console.print("hello")## MicroPython coding-omitting "cyberpi"from cyberpi import *console.print("hello")
The non-omitting coding way is preferable for Python coding (Live mode), which prevents errors of the code compiled for CyberPi when other Python libraries are imported.
The omitting coding way is preferable for MicroPython coding (Upload mode), which allows you to write fewer words.
mBlock 5 uses the non-omitting way for transcoding in most of the cases to prevent errors.
APIs in the cyberpi library
The cyberpi library provides multiple APIs for controlling hardware. This page describes the APIs for CyberPi. For the APIs provided for function extension and extension boards, see:
APIs for Function Extension
APIs for Extension boards
APIs for mBuild Modules
APIs for CyberPi
These APIs can be used to control CyberPi, allowing CyberPi to perform its functions.
APIs for CyberPi include the following:
Audio
CyberPi is equipped with a speaker and microphone. You can use the following APIs to record and play audio files and set the volume and playing speed.
Preset audio files

**audio.play_until(music_name)**
Plays a preset audio file
This API blocks the thread until the playing ends.
Parameter:
- music
str: name of the audio file to be played. The table “Setting range and sound effects“ describes the setting range and sound effects of this parameter.

**cyberpi.audio.play(music_name)**
Plays a preset audio file
Parameter:
- music
str: name of the audio file to be played. The table “Setting range and sound effects“ describes the setting range and sound effects of this parameter.
Setting range and sound effects
| Category | File name | Variable name | Sound effect |
|---|---|---|---|
| 01-Emotion | hello | SPEAKER.hello | hello |
| hi | SPEAKER.hi | hi | |
| bye | SPEAKER.bye | bye | |
| yeah | SPEAKER.yeah | yeah | |
| wow | SPEAKER.wow | wow | |
| laugh | SPEAKER.laugh | laugh | |
| hum | SPEAKER.hum | hum | |
| sad | SPEAKER.sad | sad | |
| sigh | SPEAKER.sigh | sigh | |
| annoyed | SPEAKER.annoyed | annoyed | |
| angry | SPEAKER.angry | angry | |
| surprised | SPEAKER.surprised | surprised | |
| yummy | SPEAKER.yummy | yummy | |
| curious | SPEAKER.curious | curious | |
| embarrassed | SPEAKER.embarrassed | embarrassed | |
| ready | SPEAKER.ready | ready | |
| sprint | SPEAKER.sprint | sprint | |
| sleepy | SPEAKER.sleepy | sleepy | |
| meow | SPEAKER.meow | meow | |
| 02-Electronic sounds | start | SPEAKER.start | start |
| switch | SPEAKER.switch | switch | |
| beeps | SPEAKER.beeps | beeps | |
| buzzing | SPEAKER.buzzing | buzzing | |
| explosion | SPEAKER.explosion | explosion | |
| jump | SPEAKER.jump | jump | |
| laser | SPEAKER.laser | laser | |
| level-up | SPEAKER.level-up | level-up | |
| low-energy | SPEAKER.low-energy | low-energy | |
| prompt-tone | SPEAKER.prompt-tone | prompt-tone | |
| right | SPEAKER.right | right | |
| wrong | SPEAKER.wrong | wrong | |
| ring | SPEAKER.ring | ring | |
| score | SPEAKER.score | score | |
| wake | SPEAKER.wake | wake | |
| warning | SPEAKER.warning | warning | |
| 03-Physical sounds | metal-clash | SPEAKER.metal-clash | metal-clash |
| shot | SPEAKER.shot-1 | shot | |
| glass-clink | SPEAKER.glass-clink | glass-clink | |
| inflator | SPEAKER.inflator | inflator | |
| running water | SPEAKER.running-water | running water | |
| clockwork | SPEAKER.clockwork | clockwork | |
| click | SPEAKER.click | click | |
| current | SPEAKER.current | current | |
| switch | SPEAKER.switch | switch | |
| wood-hit | SPEAKER.wood-hit-3 | wood-hit | |
| iron | SPEAKER.iron-1 | iron | |
| drop | SPEAKER.drop | drop | |
| bubble | SPEAKER.bubble-1 | bubble | |
| wave | SPEAKER.wave | wave | |
| magic | SPEAKER.magic | magic | |
| spitfire | SPEAKER.spitfire | spitfire | |
| heartbeat | SPEAKER.heartbeat | heartbeat | |
| load | SPEAKER.load | load |
Instrument simulating

**cyberpi.audio.play_music(note, beat, type = "piano")**
Plays the specified note of the specified instrument for the specified beats
This API blocks the thread until the playing ends. You can use it to compile and play music.
Parameters:
- type
str: type of the instrument to be simulated. The value is set topiano. - note
int: frequency of the sound to be played. Setting range:0~132. The table “Values and corresponding notes“ describes the values and their corresponding notes. - beat
float: duration a note is to be played. Setting range: beat > 0. At general playing speed, one beat equals one second.Values and corresponding notes
| Value | Note | | Value | Note | | Value | Note | | —- | —- | —- | —- | —- | —- | —- | —- | | 0 | C-1 | | 43 | G2 | | 86 | D6 | | 1 | C#-1 | | 44 | G#2 | | 87 | D#6 | | 2 | D-1 | | 45 | A2 | | 88 | E6 | | 3 | D#-1 | | 46 | A#2 | | 89 | F6 | | 4 | E-1 | | 47 | B2 | | 90 | F#6 | | 5 | F-1 | | 48 | C3 | | 91 | G6 | | 6 | F#-1 | | 49 | C#3 | | 92 | G#6 | | 7 | G-1 | | 50 | D3 | | 93 | A6 | | 8 | G#-1 | | 51 | D#3 | | 94 | A#6 | | 9 | A-1 | | 52 | E3 | | 95 | B6 | | 10 | A#-1 | | 53 | F3 | | 96 | C7 | | 11 | B-1 | | 54 | F#3 | | 97 | C#7 | | 12 | C0 | | 55 | G3 | | 98 | D7 | | 13 | C#0 | | 56 | G#3 | | 99 | D#7 | | 14 | D0 | | 57 | A3 | | 100 | E7 | | 15 | D#0 | | 58 | A#3 | | 101 | F7 | | 16 | E0 | | 59 | B3 | | 102 | F#7 | | 17 | F0 | | 60 | C4 | | 103 | G7 | | 18 | F#0 | | 61 | C#4 | | 104 | G#7 | | 19 | G0 | | 62 | D4 | | 105 | A7 | | 20 | G#0 | | 63 | D#4 | | 106 | A#7 | | 21 | A0 | | 64 | E4 | | 107 | B7 | | 22 | A#0 | | 65 | F4 | | 108 | C8 | | 23 | B0 | | 66 | F#4 | | 109 | C#8 | | 24 | C1 | | 67 | G4 | | 110 | D8 | | 25 | C#1 | | 68 | G#4 | | 111 | D#8 | | 26 | D1 | | 69 | A4 | | 112 | E8 | | 27 | D#1 | | 70 | A#4 | | 113 | F8 | | 28 | E1 | | 71 | B4 | | 114 | F#8 | | 29 | F1 | | 72 | C5 | | 115 | G8 | | 30 | F#1 | | 73 | C#5 | | 116 | G#8 | | 31 | G1 | | 74 | D5 | | 117 | A8 | | 32 | G#1 | | 75 | D#5 | | 118 | A#8 | | 33 | A1 | | 76 | E5 | | 119 | B8 | | 34 | A#1 | | 77 | F5 | | 120 | C9 | | 35 | B1 | | 78 | F#5 | | 121 | C#9 | | 36 | C2 | | 79 | G5 | | 122 | D9 | | 37 | C#2 | | 80 | G#5 | | 123 | D#9 | | 38 | D2 | | 81 | A5 | | 124 | E9 | | 39 | D#2 | | 82 | A#5 | | 125 | F9 | | 40 | E2 | | 83 | B5 | | 126 | F#9 | | 41 | F2 | | 84 | C6 | | 127 | G9 | | 42 | F#2 | | 85 | C#6 | | | |
Example program
import time, cyberpicyberpi.console.println('Press B to play music')cyberpi.console.println('Press B to play music.')while True:while not cyberpi.controller.is_press('b'):pass# You can right-click a block to view help information.# The block uses MIDI codes to indicate notes. The following MIDI codes are used in this example:## Numbered musical notation/Note/MIDI code# 1 C4 60# 2 D4 62# 3 E4 64# 4 F4 65# 5 G4 67# 6 A4 69# 7 B4 71cyberpi.audio.play_music(60, 0.25)cyberpi.audio.play_music(60, 0.25)cyberpi.audio.play_music(67, 0.25)cyberpi.audio.play_music(67, 0.25)cyberpi.audio.play_music(69, 0.25)cyberpi.audio.play_music(69, 0.25)cyberpi.audio.play_music(67, 0.25)time.sleep(1)cyberpi.audio.play_music(65, 0.25)cyberpi.audio.play_music(65, 0.25)cyberpi.audio.play_music(64, 0.25)cyberpi.audio.play_music(64, 0.25)cyberpi.audio.play_music(62, 0.25)cyberpi.audio.play_music(62, 0.25)cyberpi.audio.play_music(60, 0.25)

**cyberpi.audio.play_drum(type, beat)**
Plays the specified sound for the specified beats
- type
str: type of the instrument to be simulated.
Setting range:snare: snare drumbass-drum: bass drumside-stick: beating the edge of a drumcrash-cymbal: crash cymbalopen-hi-hat: open hi-hatclosed-hi-hat: closed hi-hattambourine: tambourinehand-clap: handclapclaves: claves
- beat
float: duration a note to be played. The value must be greater than 0. At general playing speed, one beat equals one second.
Example program
# generated by mBlock5 for CyberPi# codes make you happyimport event, time, cyberpi@event.startdef on_start():global frequencywhile True:if cyberpi.is_tiltforward():cyberpi.audio.play_drum('snare', 0.25)if cyberpi.is_tiltforward():cyberpi.audio.play_drum('bass-drum', 0.25)if cyberpi.is_tiltforward():cyberpi.audio.play_drum('open-hi-hat', 0.25)if cyberpi.is_tiltforward():cyberpi.audio.play_drum('closed-hi-hat', 0.25)
Sounds recording and playing

**cyberpi.audio.record()**
Starts to record sounds
When this API is executed, CyberPi starts to record sounds until audio.stop_record() is executed or the recording exceeds 10 seconds. The recorded file is stored in RAM, and so the recorded file is lost if CyberPi is turned off or restarted.

**cyberpi.audio.stop_record()**
Stops recording sounds
This API needs to be used in combination with audio.record().

**cyberpi.audio.play_record_until()**
Plays the recorded sounds
This API blocks the thread until the playing ends.

**cyberpi.audio.play_record()**
Plays the recorded sounds
Example program
# generated by mBlock5 for CyberPi# codes make you happyimport time, event, cyberpi@event.startdef on_start():"""Press the middle of the joystick to start recordingPress button A to stop recordingPress button B to play the recorded soundsMove the joystick up or down to change the playing speedMove the joystick to the left or right to change the playing volume"""cyberpi.display.set_brush(255, 255, 255)cyberpi.led.set_bri(30)cyberpi.audio.set_vol(50)cyberpi.audio.set_tempo(100)cyberpi.console.println('1.Magical Recorder')cyberpi.console.println('Press the middle of the joystick to start recording')cyberpi.console.println('')cyberpi.led.show('orange orange orange orange orange')@event.is_press('middle')def is_press():cyberpi.console.clear()cyberpi.console.println('Press button A to stop recording')cyberpi.console.println('')cyberpi.led.show('green green green green green')cyberpi.audio.record()@event.is_press('a')def on_received():cyberpi.console.clear()cyberpi.console.println('Press button B to play the recorded sounds')cyberpi.console.println('Move the joystick up or down to change the playing speed and move it to the left or right to change the playing volume')cyberpi.console.println('')cyberpi.led.show('red red red red red')cyberpi.audio.stop_record()@event.is_press('b')def on_received1():cyberpi.console.clear()cyberpi.console.println('Playing...')cyberpi.console.println('Move the joystick up or down to change the playing speed and move it to the left or right to change the playing volume')cyberpi.console.println('')cyberpi.led.show('blue blue blue blue blue')cyberpi.audio.play_record_until()@event.is_press('up')def is_press1():"""Move the joystick up or down to change the playing speed.The speed setting function is a feature of CyberPi's audio system, allowing you to have fun by slowing down or speeding up the playing.The speed setting function can also be used to slow down or speed up the playing of the preset audio files and simulated instrument sounds."""cyberpi.led.off(0)cyberpi.audio.add_tempo(10)cyberpi.console.println(str('Playing speed:') + str(cyberpi.audio.get_tempo()))cyberpi.console.println('')@event.is_press('down')def is_press2():cyberpi.led.off(0)cyberpi.audio.add_tempo(-10)if cyberpi.audio.get_tempo() < 40:cyberpi.audio.set_tempo(40)cyberpi.console.println(str('Playing speed:') + str(cyberpi.audio.get_tempo()))cyberpi.console.println('')@event.is_press('left')def is_press3():"""Move the joystick to the left or right to change the playing volume"""cyberpi.led.off(0)cyberpi.audio.add_vol(-10)cyberpi.console.println(str('Playing volume:') + str(cyberpi.audio.get_vol()))cyberpi.console.println('')@event.is_press('right')def is_press4():cyberpi.led.off(0)cyberpi.audio.add_vol(10)cyberpi.console.println(str('Playing volume:') + str(cyberpi.audio.get_vol()))cyberpi.console.println('')
Buzzer simulating

**cyberpi.audio.play_tone(freq, t)**
Simulates the sound of a buzzer
Parameters:
freq
int: frequency of the sound to be played. Setting range:20-5000Hz. To protect your ears, no sound is made if the frequency is out of the range. Your ears may get hurt if you listen to high-frequency sounds for a long period.
In addition, if you want to change music by setting the frequency, refer to the following notes and their corresponding frequencies:['C2','65'], ['D2','73'], ['E2','82'], ['F2','87'],['G2','98'], ['A2','110'], ['B2','123'], ['C3','131'],['D3','147'], ['E3','165'], ['F3','175'], ['G3','196'],['A3','220'], ['B3','247'], ['C4','262'], ['D4','294'],['E4','330'], ['F4','349'], ['G4','392'], ['A4','440'],['B4','494'], ['C5','523'], ['D5','587'], ['E5','659'],['F5','698'], ['G5','784'], ['A5','880'], ['B5','988'],['C6','1047'], ['D6','1175'], ['E6','1319'], ['F6','1397'],['G6','1568'], ['A6','1760'], ['B6','1976'], ['C7','2093'],['D7','2349'], ['E7','2637'], ['F7','2794'], ['G7','3136'],['A7','3520'], ['B7','3951'], ['C8','4186'], ['D8','4699'],
_t_: duration the sound is to be played. Setting range: t ≥ 0
Example program
import event, time, cyberpi@event.is_press('a')def on_received():global frequencyfor count in range(2):cyberpi.audio.play_tone(800, 1)cyberpi.audio.play_tone(200, 1)
Speed and volume of CyberPi’s speaker
You can use the following APIs to set the playing speed and volume of CyberPi’s speaker.

**cyberpi.audio.add_tempo(pct)**
Changes the playing speed of CyberPi’s speaker
Parameter:
- pct:
int, percentage (of the normal playing speed) by which the playing speed is to be changed; a negative value indicates decreasing the speed, and a positive one indicates increasing the speed

**cyberpi.audio.set_tempo(pct)**
Sets the playing speed of CyberPi’s speaker
Parameter:
- pct:
int, percentage of the normal playing speed; setting range:25–400%

**cyberpi.audio.get_tempo()**
Obtains the playing speed of CyberPi’s speaker
The value returned is an integer, ranging from 25 to 400 (%).

**cyberpi.audio.add_vol(val)**
Changes the playing volume of CyberPi’s speaker
Parameter:
- pct:
int, percentage by which the playing volume is changed; setting range:-100–+100%; a negative value indicates decreasing the volume, and a positive one indicates increasing the volume

**cyberpi.audio.set_vol(val)**
Sets the playing volume of CyberPi’s speaker
Parameter:
- pct:
int, percentage of the playing volume; setting range:0–100%

**cyberpi.audio.get_vol()**
Obtains the playing volume of CyberPi’s speaker
The value returned is an integer, ranging from 0 to 100 (%).

**cyberpi.audio.stop()**
Stops the playing of all sounds
LED
CyberPi is equipped with five programmable LEDs. You can use the following APIs to compile programs for controlling the LEDs.

**cyberpi.led.on(r, g, b, id = "all")**
Sets the color(s) of the LEDs
Parameters:
- r:
intorstr
r: int , intensity of the red color; setting range: 0 - 255
r: str, full name or abbreviation of a color; the following describes colors and their abbreviations:
red rorange oyellow ygreen gcyan cblue bpurple pwhite wblack k
- g:
int, intensity of the green color; setting range:0–255 - b:
int, intensity of the blue color; setting range:0–255 - id:
intorstr; the default value isall
id: str, only the value all is valid.
id: int, setting range: 1-5, indicating the position of an LED. The following figure shows the
positions of the LEDs.
Example program
import cyberpicyberpi.led.on(255,0,0) #Lights up all the LEDs
import cyberpicyberpi.led.on('red', id = 1) #Lights up LED 1 in red
import cyberpi
cyberpi.led.on('r',  id = 1) #Lights up LED 1 in red

**cyberpi.led.play(name = "rainbow")**
Displays the specified LED animation
This API blocks the thread until the display ends.
Parameter:
- name:
str, name of an LED animation; the default value israinbow, and the options include the following:
rainbowspoondriftmeteor_bluemeteor_greenflash_redflash_orangefirefly

**cyberpi.led.show(color)**
Sets the color(s) of the five LEDs
Parameter:
- color:
str, color(s) of the five LEDs, set in thecolor1 color2 color3 color4 color5mode, with one space between any two colors. If you set more than five colors, only the first five colors are used. You can set this parameter to the full name or abbreviation of the colors. The options include the following:
red, rgreen, gblue, byellow, ycyan, cpurple, pwhite, worange, oblack, k

**led.move(step = 1)**
Makes the colors of the LEDs roll from left to right by the specified number of positions
Parameter:
- step:
int, number of positions by which the colors of the LEDs roll; setting range:-4–+4; default value:1
For example, you set the colors of the five LEDs to r,o,y,g,c and then use this API. When you set step to 0, the colors of the LEDs are shown in Figure A; and when you set step to 1, the colors roll from left to right by one position, and the color of the first LED is that of the original last LED, as shown in Figure B


**cyberpi.led.off(id = "all")**
Turns off the specified LED(s)
Parameter:
- id:
intorstr, position of the LED to be turned off; the default value isall, indicating all the LEDs; when you set it to an integer, the setting range is 1 to 5.

**cyberpi.led.add_bri(brightness)**
Changes the brightness of CyberPi’s LEDs
Parameter:
- brightness:
int, percentage by which the brightness is to be changed; setting range:-100–+100%; a negative value indicates decreasing, and a positive one indicates increasing.

**cyberpi.led.set_bri(brightness)**
Sets the brightness of CyberPi’s LEDs
Parameter:
- brightness:
int, brightness of the LEDs, in percentage; setting range:0–100(%)

**cyberpi.led.get_bri()**
Obtains the brightness of CyberPi’s LEDs
The returned value is an integer ranging from 0 to 100.
Example program
# generated by mBlock5 for CyberPi
# codes make you happy

import cyberpi
while True:
    for count in range(10):
        cyberpi.led.add_bri(10)
        cyberpi.led.move(1)

    for count2 in range(10):
        cyberpi.led.add_bri(-10)
        cyberpi.led.move(1)
Display
CyberPi is equipped with a 1.89-inch full-color display. With the following APIs, you can use CyberPi to display texts and images, draw charts, design games, and create apps.
Texts and images

**cyberpi.console.print(message)**
Displays texts on CyberPi’s screen with automatic line breaks
When this block is executed, texts are displayed on the same line, and when a line is full, the texts are continued on new lines.
Parameter:
- message:
str, text to be displayed, such ashello
Example program
import cyberpi
cyberpi.console.print('hello')
cyberpi.console.print('world')

**cyberpi.console.println(message)**
Displays texts on CyberPi’s screen with forced line breaks
- message:
str, text to be displayed, such ashello
Example program
import cyberpi
cyberpi.console.println('hello world')
cyberpi.console.print('hello'+' '+'world')
Positions of texts

**cyberpi.display.show_label(message, size, x, y)**
Displays a text in the specified position of CyberPi’s screen
Parameter:
- message:
str, text to be displayed, such ashello - size:
int, font size of the text to be displayed; setting range:16,24, and32 - x:
strorint, position where the text is to be displayed
When x is str, the options are as follows:top_mid: in the upper centertop_left: in the upper lefttop_right: in the upper rightcenter: in the centermid_left: in the middle leftmid_right: in the middle rightbottom_mid: in the lower centerbottom_left: in the lower leftbottom_right: in the lower right
When x is int, the value ranges from 0 to 128, indicating the x-coordinate of the upper left corner of the text.
- y:
int, y-coordinate of the upper left corner of the text; setting range:0–128
The following figure shows the x- and y-coordinates defined for CyberPi’s screen.
Example program
import cyberpi
cyberpi.display.show_label('cyberpi', 16, 'center')
import cyberpi
cyberpi.display.show_label('cyberpi', 16, x = 64, y = 64)
Charts

**cyberpi.linechart.add(data)**
Adds a piece of data and displays a line chart
You can use the API cyberpi.display.set_brush(color) to set the color of a line, and thus can draw line charts in different colors to present different data sets.
Parameter:
- data:
float, ranging from0to100
If a value to be input exceeds the setting range, rescale all the original data to be within the setting range.
For example, you can rescale the values 200, 300, and 400 to 20, 30, and 40, respectively.

**cyberpi.linechart.set_step(step)**
Sets the spacing between data points in a line chart
- step:
int, spacing between data points; setting range:0–128(pixels)
For example, the following figures show the line charts with the same data but different data point spacings.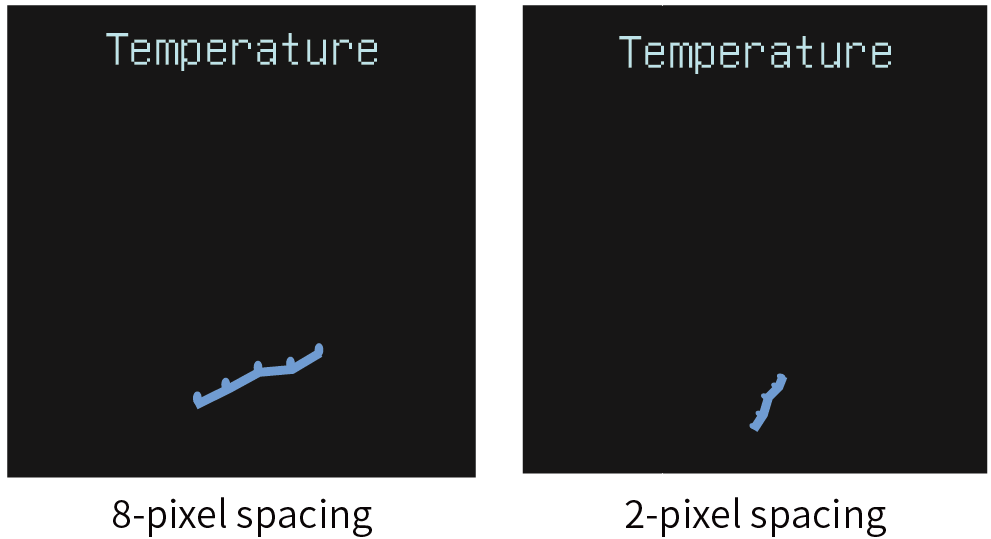

**cyberpi.barchart.add(data)**
Adds a piece of data and displays a bar chart
You can use the API display.set_brush(r, g, b) to set the color of a bar, and thus can draw a bar chart with different colors of bars to present different data sets. The width of a bar changes with the number of bars.
Parameter:
- data:
float, ranging from0to100
If a value to be input exceeds the setting range, rescale all the original data to be within the setting range.
For example, you can rescale the values 200, 300, and 400 to 20, 30, and 40, respectively.
**~~cyberpi.piechart.add(data)~~**Adds a piece of data and displays a pie chartYou can use the API display.set_brush(r, g, b) to set the color of a section, and thus can draw a pie chart with different colors of sections to present different pieces of data. The degree of a section changes with the number of pieces of data.Parameter:
data:~~`float`, ranging from`0`to`﹢∞~~`

**cyberpi.table.add(row, column, data)**
Adds a piece of data and displays a table
The number of rows and columns depends on the content you input. A maximum table of 4 (rows) × 3 (columns) is supported. When a piece of content is too long, it scrolls in the cell.
You can use the API display.set_brush(r, g, b) to set the color of the content. The content can be texts and predefined icons.
Parameter:
- row:
int, number of rows to be created - column:
int, number of columns to be created - data:
str, content to be input into a cell of the table
Example program
# generated by mBlock5 for CyberPi
# codes make you happy

import random, cyberpi, event, time

@event.start
def on_start():
    cyberpi.console.println('2.Volumn-reactive Lights and Columns')
    cyberpi.console.println('2.光影音量柱')
    cyberpi.console.println('Press B to start')
    cyberpi.console.println('按 B 以开始...')
    while not cyberpi.controller.is_press('b'):
        cyberpi.display.set_brush(random.randint(1, 255), random.randint(1, 255), random.randint(1, 255))

        # The color of the texts changes randomly before you press button B.
        cyberpi.console.print('')
        time.sleep(0.1)

    cyberpi.broadcast('Message 1')

@event.receive('Message 1')
def on_receive():
    """The bar chart changes with the volume of the sounds in the ambient environment. Try playing a song!
    The brightness of the LEDs also changes with the volume."""
    cyberpi.led.on(114, 0, 255, 1)
    cyberpi.led.on(191, 0, 255, 2)
    cyberpi.led.on(255, 0, 195, 3)
    cyberpi.led.on(255, 0, 72, 4)
    cyberpi.led.on(255, 0, 0, 5)
    while True:
        cyberpi.led.set_bri(cyberpi.get_loudness("maximum"))
        cyberpi.display.set_brush(114, 0, 255)
        cyberpi.barchart.add(cyberpi.get_loudness("maximum"))
        time.sleep(0.02)
        cyberpi.display.set_brush(191, 0, 255)
        cyberpi.barchart.add(cyberpi.get_loudness("maximum"))
        time.sleep(0.02)
        cyberpi.display.set_brush(255, 0, 195)
        cyberpi.barchart.add(cyberpi.get_loudness("maximum"))
        time.sleep(0.02)
        cyberpi.display.set_brush(255, 0, 72)
        cyberpi.barchart.add(cyberpi.get_loudness("maximum"))
        time.sleep(0.02)
        cyberpi.display.set_brush(255, 24, 24)
        cyberpi.barchart.add(cyberpi.get_loudness("maximum"))
        time.sleep(0.05)

**cyberpi.display.set_brush(r, g, b)**
- r:
intorstr
r: int , intensity of the red color; setting range: 0 - 255
r: str, full name or abbreviation of a color; the following describes colors and their abbreviations:
red r
orange o
yellow y
green g
cyan c
blue b
purple p
white w
black k
- g:
int, intensity of the green color, ranging from0to255 - b:
int, intensity of the blue color, ranging from0to255
Display directions

**cyberpi.display.rotate_to(angle)**
Sets CyberPi’s screen to the specified displaying direction (angles)
Parameter
- angle:
int, displaying direction; setting range:-90°,0°,90°,180°,and -180°
The corresponding displaying directions are shown in the following figure.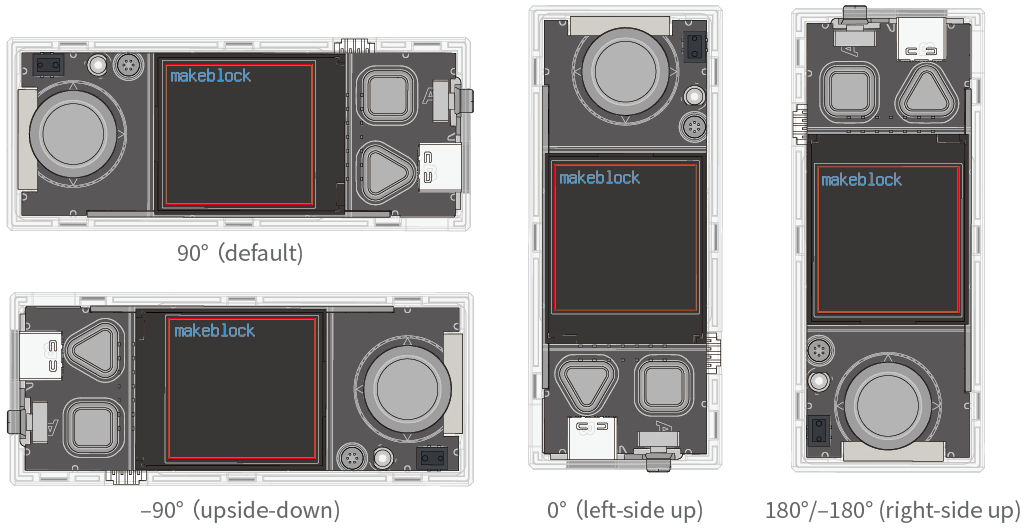

**cyberpi.display.clear()**
Clears CyberPi’s screen

**cyberpi.display.off()**
Turns off the background light of CyberPi’s screen
Sensing
With the following APIs, you can obtain output values of the sensors on your CyberPi or information about your CyberPi.
Button or joystick status
CyberPi is equipped a joystick (that can be moved in five directions to implement control) and two buttons (buttons A and B), as shown in the following figure.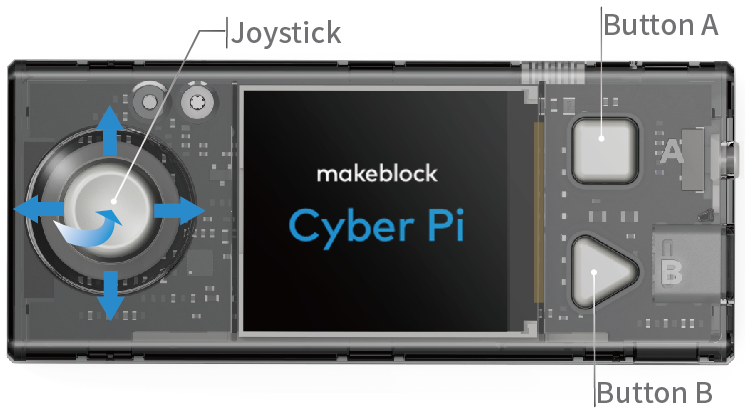
The following APIs are available for programming CyberPi:

**cyberpi.controller.is_press(name)**
Determines whether the specified button is pressed or the joystick is moved to the specified direction
Parameter:
- name:
str, name of the button or joystick direction
Setting range:a: button A (in the square shape)b: button B (in the rectangle shape)up: joystick moved updown: joystick moved downleft: joystick moved to the leftright: joystick moved to the rightmiddle: joystick pressed in the centerany_direction: joystick moved in any one directionany_button: button A or Bany: any button or joystick moving direction
A bool value is returned.

**cyberpi.controller.get_count(name)**
Obtains the number of times the specified button is pressed or the joystick is moved to the specified direction
Parameter:
- name:
str, name of the button or joystick direction
Setting range:a: button A (in the square shape)b: button B (in the rectangle shape)up: joystick moved updown: joystick moved downleft: joystick moved to the leftright: joystick moved to the rightmiddle: joystick pressed in the center
An int value is returned.

**cyberpi.controller.reset_count(name)**
Resets the number of times the specified button is pressed or the joystick is moved to the specified direction
Parameter:
- name:
str, name of the button or joystick direction
Setting range:a: button A (in the square shape)b: button B (in the rectangle shape)up: joystick moved updown: joystick moved downleft: joystick moved to the leftright: joystick moved to the rightmiddle: joystick pressed in the centerany_direction: joystick moved in any one directionany_button: button A or Bany: any button or joystick moving direction
Sensor outputs

**cyberpi.get_bri()**
Obtains the ambient light brightness detected by the light sensor on CyberPi
An int value ranging from 0 to 100 is returned. When the value returned is 100, the upper measuring limit is reached.

**cyberpi.get_loudness(mode = "maximum")**
Obtains the ambient sound loudness detected by the microphone on CyberPi
Parameter:
- mode:
str, type of loudness you want to obtain
Setting rangeaverage: average loudness in a periodmaximum: maximum loudness in a period; obviously, this mode is preferable for sound-sensitive projects.
An int value ranging from 0 to 100 is returned. When the value returned is 100, the upper measuring limit of the microphone is reached.
Timer

**cyberpi.timer.get()**
Obtains the count value of the timer
The timer starts to count when CyberPi starts up.
A float value is returned, in seconds.

**cyberpi.timer.reset()**
Resets the count value of CyberPi’s timer to 0
Other outputs

**cyberpi.get_mac_address()**
Obtains the media access control address (MAC address) of the Wi-Fi
Note that the address obtained may be wrong if Wi-Fi is not connected.
The value returned is a 12-byte str value, for example, FFEE33445566.

**cyberpi.get_battery()**
Obtains the battery level (in %) of the pocket shield connected to CyberPi
An int value ranging from 0 to 100 is returned. When the value 100 is returned, the battery is at its highest level; and when 0 is returned, no pocket shield is connected to CyberPi or the battery of the connected pocket shield runs out of battery.

**cyberpi.get_firmware_version()**
Obtains the version number of the firmware
The value returned is a str value, for example, 44.01.001.

**cyberpi.get_ble()**
Obtains the Bluetooth device name used by CyberPi
The value returned is a str value, for example, Makeblock_LE_XXXXX.

**cyberpi.get_name()**
Obtains the name of your CyberPi
The default name is cyberpi, and you can set the name of your CyberPi by using the API set_name(name).

**cyberpi.set_name(name)**
Sets the name of your CyberPi
The name you set is displayed on the UI of the CyberOS system that runs on your CyberPi. By setting device names, users can find their CyberPis or identify one another on a LAN or IoT.
Parameter:
- name:
str, name you set for your CyberPi, for example,Alex,Tom

**cyberpi.get_language()**
Obtains the system language currently used on CyberPi
The value returned is a str value and may be one of the following:"chinese": Chinese"cantonese": Cantonese"japanese": Japanese"english": English"french": French"german": German"spanish": Spanish"portuguese": Portuguese"russian": Russian"korean": Korean"italian": Italian"dutch": Dutch
Motion Sensing
With the gyroscope, accelerometer, and built-in motion detection algorithm on CyberPi, you can implement motion-based control. You can use the following APIs to obtain the postures of CyberPi.
CyberPi’s postures

**cyberpi.is_tiltforward()**
Determines whether CyberPi is tilted forward
The following figure shows the posture of tilting forward.
A bool value is returned.

**cyberpi.is_tiltback()**
Determines whether CyberPi is tilted backward
The following figure shows the posture of tilting backward.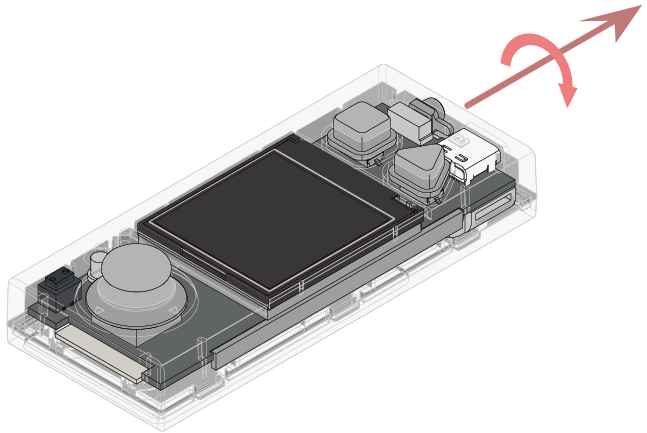
A bool value is returned.

**cyberpi.is_tiltleft()**
Determines whether CyberPi is tilted to the left
The following figure shows the posture of tilting to the left.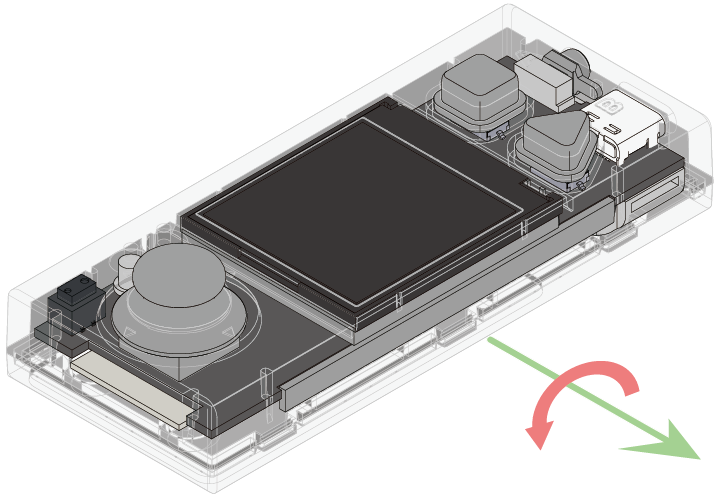
A bool value is returned.

**cyberpi.is_tiltright()**
Determines whether CyberPi is tilted to the right
The following figure shows the posture of tilting to the right.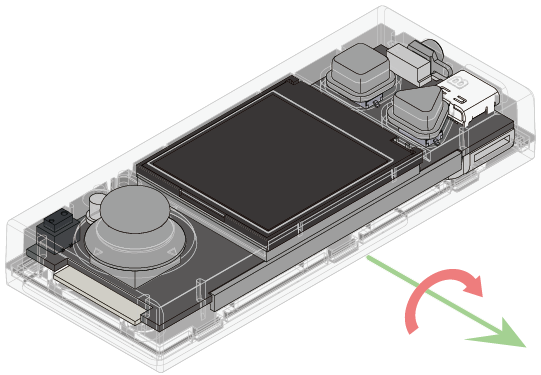
A bool value is returned.

**cyberpi.is_faceup()**
Determines whether CyberPi faces up
The following figure shows the posture of facing up.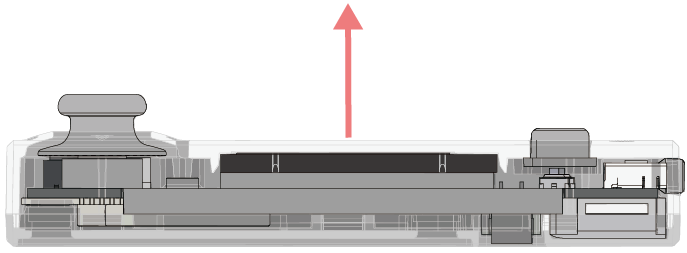
A bool value is returned.

**cyberpi.is_facedown()**
Determines whether CyberPi faces down
The following figure shows the posture of facing down.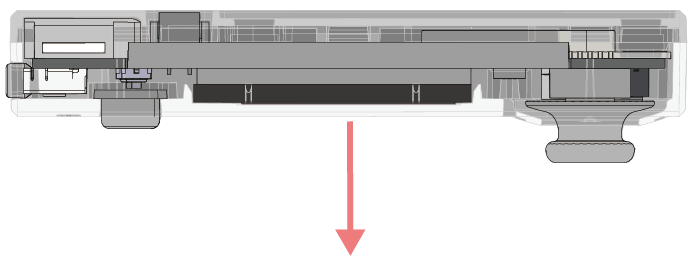
A bool value is returned.

**cyberpi.is_stand()**
Determines whether CyberPi is placed perpendicular to the ground, with the LED strip on the bottom, as shown in the following figure: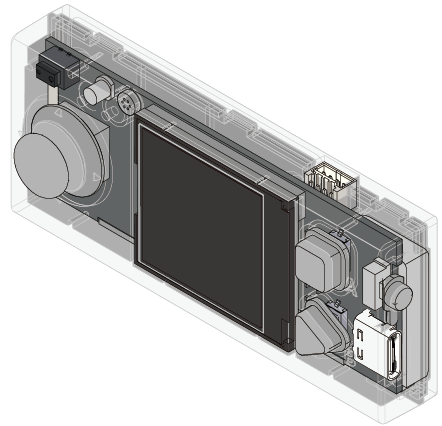
A bool value is returned.

**cyberpi.is_handstand()**
Determines whether CyberPi is placed perpendicular to the ground, with the LED strip on the top, as shown in the following figure: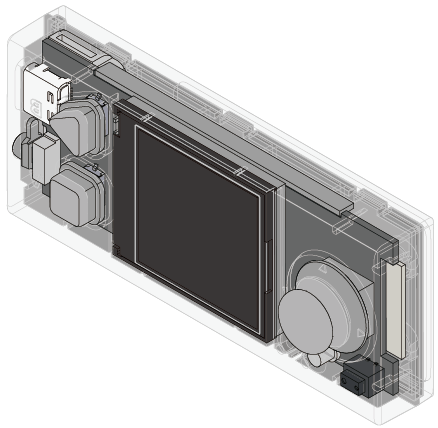
返回 bool。
Continuous motions

**cyberpi.is_shake()**
Determines whether CyberPi is shaken
It is determined that CyberPi is shaken when the shaking strength is higher than 20.
A bool value is returned.

**cyberpi.is_waveup()**
Determine whether CyberPi is waved up
A bool value is returned.

**cyberpi.is_wavedown()**
Determine whether CyberPi is waved down
A bool value is returned.

**cyberpi.is_waveleft()**
Determine whether CyberPi is waved to the left
A bool value is returned.

**cyberpi.is_waveright()**
Determine whether CyberPi is waved to the right
A bool value is returned.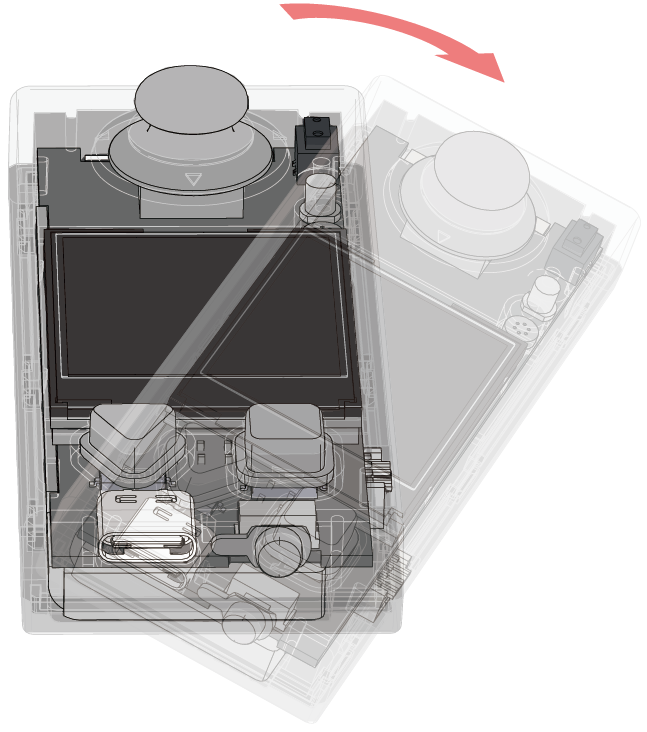

**cyberpi.is_freefall()**
Determines whether CyberPi is falling down
A bool value is returned.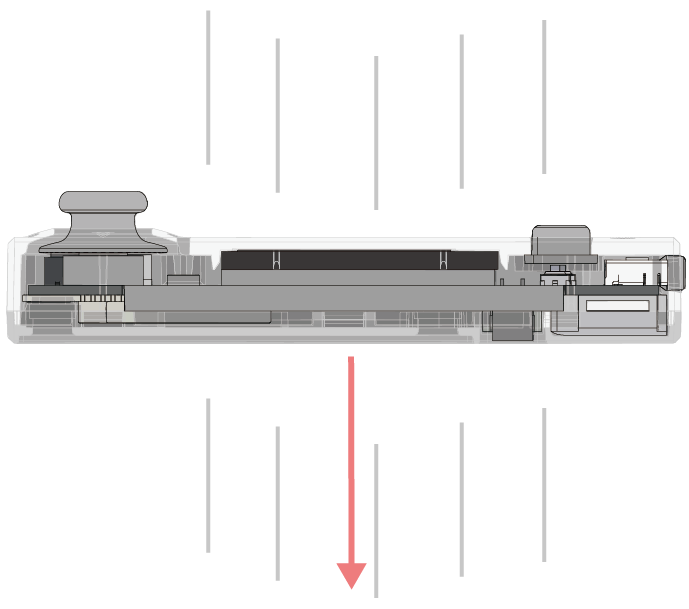

**cyberpi.is_clockwise()**
Determines whether CyberPi rotates clockwise around the z-axis
A bool value is returned.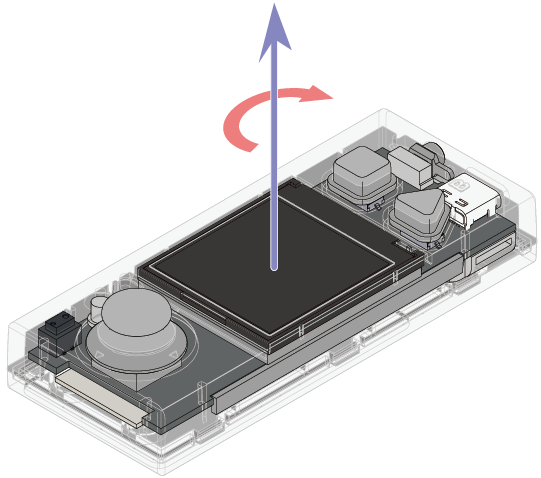

**cyberpi.is_anticlockwise()**
Determines whether CyberPi rotates counterclockwise around the z-axis
A bool value is returned.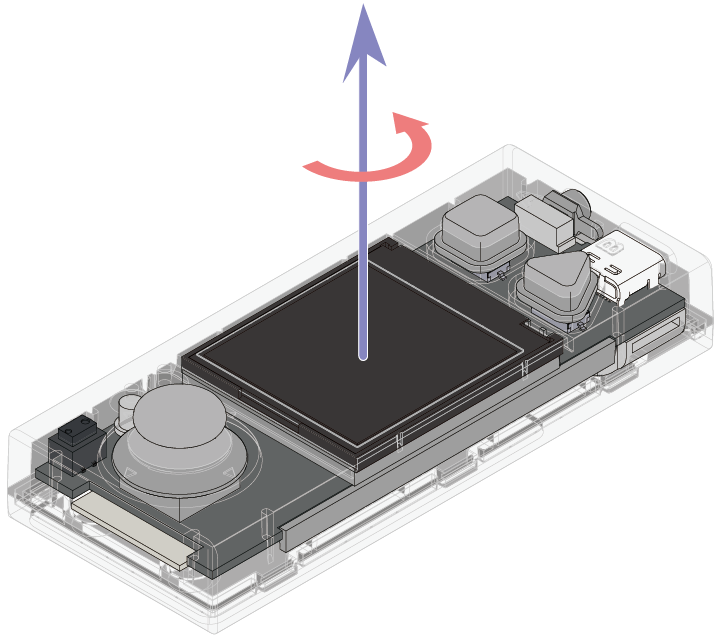
Posture and acceleration data

**cyberpi.get_shakeval()**
Obtains the shaking strength
The shaking strength is positively related to the shaking frequency and amplitude.
An int value ranging from 0 to 100 is returned. When the value returned is 100, the upper shaking strength limit is reached.

**cyberpi.get_wave_angle()**
Obtains the direction in which CyberPi is shaken
An int value ranging from –179 to 180 is returned, in degrees.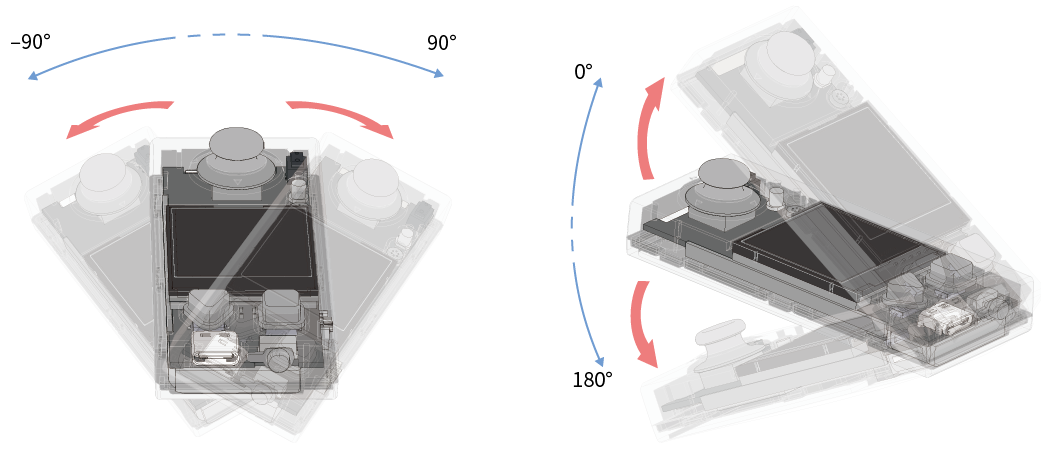

**cyberpi.get_wave_speed()**
Obtains the speed at which CyberPi is waved
The speed is positively related to but not equal to the actual moving speed of CyberPi. A large error may be caused in the value obtained due to the integral error.
An int value ranging from 0 to 100 is returned.

**cyberpi.get_pitch()**
Obtains the pitch angle of CyberPi
The pitch angle refers to the angle between the y-axis and horizontal plane.
An int value ranging from –90 to 90 is returned, in degrees.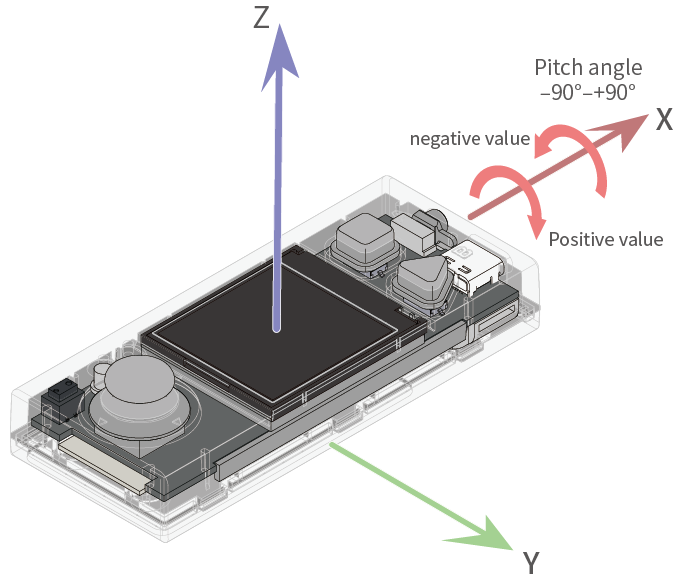

**cyberpi.get_roll()**
Obtains the roll angle of CyberPi
The roll angle refers to the angle between the x-axis and horizontal plane.
An int value ranging from –179 to 180 is returned, in degrees.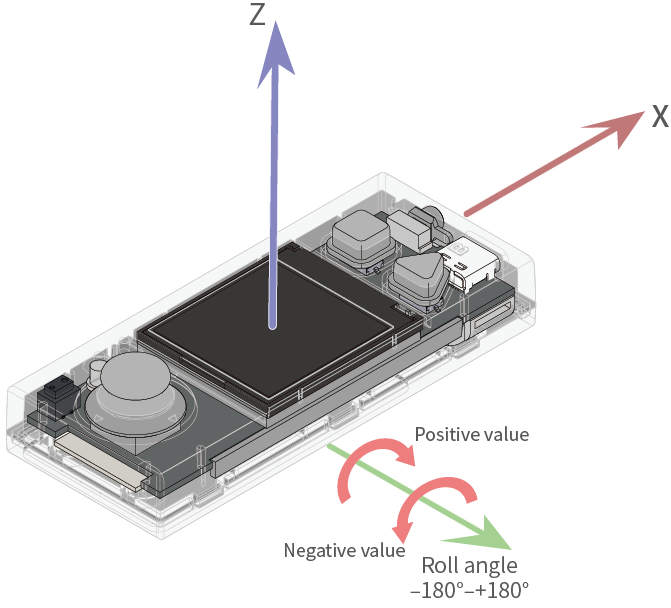

**cyberpi.get_yaw()**
Obtains the yaw angle of CyberPi
The yaw angle refers to the angle CyberPi rotates around the z-axis.
An int value ranging from –180 to 180 is returned, in degrees.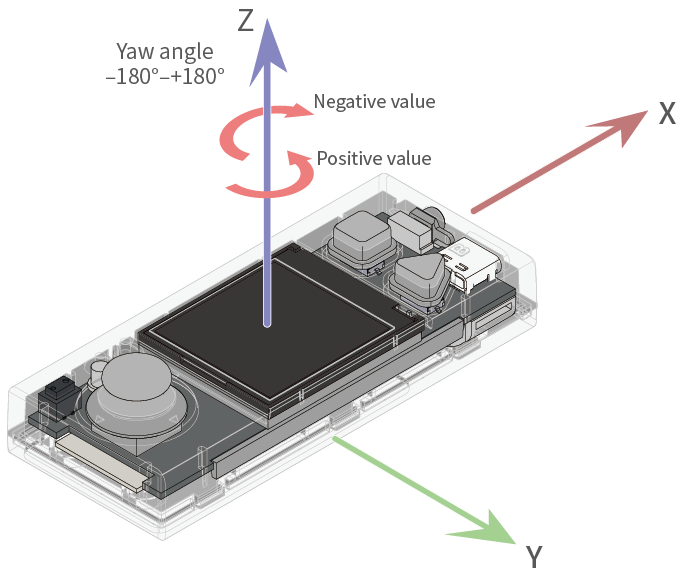 :::info
Note: Accumulated errors may be caused in the obtained yaw angle due to the lack of compass. You can use the API
:::info
Note: Accumulated errors may be caused in the obtained yaw angle due to the lack of compass. You can use the API reset_yaw() to calibrate the yaw angle. No compass is configured in CyberPi, and therefore, reset_yaw() is used to reset the yaw angle to 0.
:::

**cyberpi.reset_yaw()**
Resets the yaw angle
No compass is configured in CyberPi, and therefore, reset_yaw() is used to reset the yaw angle to 0.

**cyberpi.get_acc(axis)**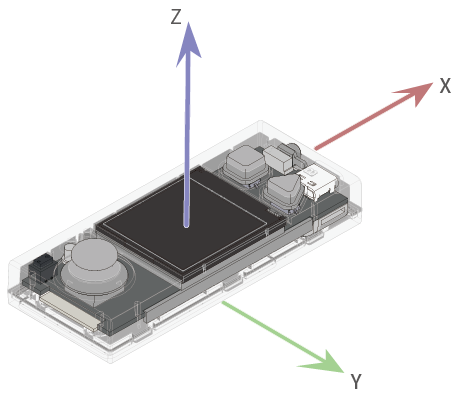
Obtains the output (in m/s²) of the accelerometer on the specified axis
Parameter:
- axis:
str, axis defined for CyberPi; setting range:x,y, andz
Afloatvalue is returned. Note that the accelerometer measures Earth’s gravity. When CyberPi is placed on a desk, the output of the accelerometer on the z-axis is –9.8m/s² (1g = 9.8m/s²).

**cyberpi.get_gyro(axis)**
Obtains the angular speed around the specified axis
Parameter:
- axis:
str, axis defined for CyberPi; setting range:x,y, andz
An int value ranging from –500 to 500 is returned, in degree/seconds (°/s).

**cyberpi.get_rotation(axis)**
Obtains the angle CyberPi rotates around the specified axis, with the counterclockwise direction as the positive direction
Parameter:
- axis:
str, axis defined for CyberPi; setting range:x,y, andz
A value is returned, in degrees.

**cyberpi.reset_rotation(axis= "all")**
Resets the angle (s) CyberPi rotates around the specified axis(axes) to zero
After this API is executed, the value obtained by get_rotation(axis) is counted from zero.
Parameter:
- axis:
str, axis or all the axes defined for CyberPi; setting range:x,y,z, andall
Wi-Fi
CyberPi is equipped with a Wi-Fi module. You can use the following APIs to connect CyberPi to the Internet or perform LAN broadcast.
**cyberpi.wifi.connect(ssid, password)**
Starts Wi-Fi connection
This API doesn’t block the thread, and therefore CyberPi is not necessarily connected to the Internet when this API stops. You need to use wifi.is_connect() to determine whether the Wi-Fi connection is complete.
Parameter:
- ssid:
str, Wi-Fi account; set it to an account that can be used - password:
str, Wi-Fi password; set it to the password of the account you use

**cyberpi.wifi.is_connect()**
Detects the Wi-Fi connection status
A bool value is returned.

**cyberpi.wifi_broadcast.set(message, val)**
Sends a LAN broadcast
For more information, see LAN broadcast.
**cyberpi.wifi_broadcast.get(message)**
Receives a LAN broadcast
For more information, see LAN broadcast.
Cloud Services
After connecting CyberPi to the Internet, you can use various cloud services provided by Makeblock to implement the AI and IoT functions of CyberPi.
**cyberpi.cloud.setkey(key)**
Use the API **cyberpi.cloud.setkey(key)** to verify your mBlock account, so that you can use the cloud services provided by Makeblock. Note that you can use this API only after you have connected CyberPi to the Internet.
Parameter:
- key:
str, authorization code for cloud services
Sign in to mBlock 5 on the web or your PC client, and then obtain your cloud service authorization code as follows.
IoT

**cyberpi.cloud.weather(option, woe_id)**
Obtains the real-time weather data of the specified location
Parameters:
- option:
str, weather data option
Setting range:max_temp: highest temperaturemin_temp: lowest temperatureweather: temperaturehumidity: humidity
- woe_id:
str, code of the city for which weather data is to be obtained
You can visit Yahoo Weather to obtain the codes of cities.
Change the location to the one of which the weather information is to be searched for, and then view the code on the address bar.
Alternatively, you can view the code of a city in the corresponding block on mBlock 5, as shown in the following figure.
A str value is returned, providing the weather information.
The returned value may be one of the following:
0    tornado
1    tropical storm
2    hurricane
3    severe thunderstorms
4    thunderstorms
5    mixed rain and snow
6    mixed rain and sleet
7    mixed snow and sleet
8    freezing drizzle
9    drizzle
10    freezing rain
11    showers
12    rain
13    snow flurries
14    light snow showers
15    blowing snow
16    snow
17    hail
18    sleet
19    dust
20    foggy
21    haze
22    smoky
23    blustery
24    windy
25    cold
26    cloudy
27    mostly cloudy (night)
28    mostly cloudy (day)
29    partly cloudy (night)
30    partly cloudy (day)
31    clear (night)
32    sunny
33    fair (night)
34    fair (day)
35    mixed rain and hail
36    hot
37    isolated thunderstorms
38    scattered thunderstorms
39    scattered showers (day)
40    heavy rain
41    scattered snow showers (day)
42    heavy snow
43    blizzard
44    not available
45    scattered showers (night)
46    scattered snow showers (night)
47    scattered thundershowers

**cyberpi.cloud.air(option, woe_id)**
- option:
str, air quality option
Setting rangeaqi: air quality indexpm2.5: density of PM2.5pm10: density of PM10co: density of COso2: density of SO2no2: density of NO2
- woe_id:
str, code of the city for which weather data is to be obtained
A str value is returned, providing the corresponding air quality information.

**cyberpi.cloud.time(option, location)**
- option:
str, time option
Setting range:sunrise_time: sunrise timesunrise_hour: hour of the sunrise timesunrise_minute: minute of the sunrise timesunrise_set: sunset timesunset_hour: hour of the sunset timesunset_minute: minute of the sunset time
[To be implemented]hour: hour of the specified time zoneminute: minute of the specified time zonesecond: second of the specified time zoneyear: year of the specified time zonemonth: month of the specified time zoneday: week day of the specified time zonedate: date of the specified time zone
- location:
strorint
str: code of the city for which weather data is to be obtained
You can visit Yahoo Weather to obtain the codes of cities.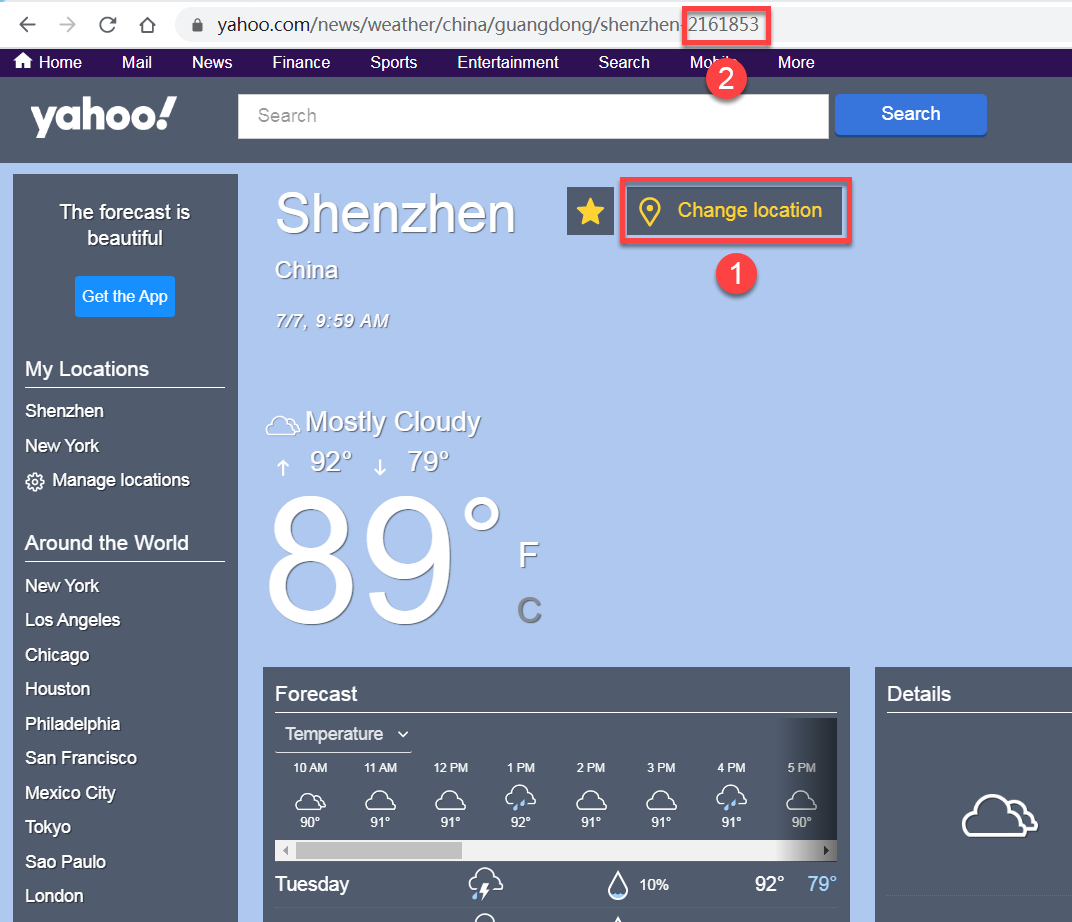
Change the location to the one of which the weather information is to be searched for, and then view the code on the address bar.
Alternatively, you can view the code of a city in the corresponding block on mBlock 5, as shown in the following figure.
[To be implemented]int: time zone of which the time information is to be obtained.
Setting range: –12 to +12
A str or intvalue is returned, providing the corresponding time information.
AI
CyberPi provides some AI capabilities. After being connected to the Internet, CyberPi can recognize speeches, read texts out loud, and translate some texts through the corresponding AI interfaces.
**cyberpi.cloud.listen(language, t=3)**
Starts to recognize a speech in the specified language
This API blocks the thread until the speech is recognized.
Parameters:
- language:
str, language of the speech to be recognized
Setting range:"chinese": Chinese"chinese_taiwan": Taiwan Mandarin"cantonese": Cantonese"japanese": Japanese"english": English"french": French"german": German"spanish": Spanish"portuguese": Portuguese"russian": Russian"korean": Korean"italian": Italian"dutch": Dutch
- t:
floatorstr; the default value is 3
When you set t to int, it indicates the period for recognizing a speech, in seconds; when you set it to str, you can set it only to record, indicating that the last recorded audio file is used for speech recognization.

**cyberpi.cloud.listen_result()**
Obtains the last recognized speech
A str value is returned.

**cyberpi.cloud.tts(language, message)**
Reads the specified text out loud
Parameters:
- language:
str, language in which the text is to read out loud
Currently, the language parameter can’t be set due to the limitation of cloud services. This API automatically recognizes the content of message and reads it out loud in Chinese or English. The following languages will be gradually supported:
"chinese": Chinese"chinese_taiwan": Taiwan Mandarin"cantonese": Cantonese"japanese": Japanese"english": English"french": French"german": German"spanish": Spanish"portuguese": Portuguese"russian": Russian"korean": Korean"italian": Italian"dutch": Dutch
- message:
str, text to be read out loud

**cyberpi.cloud.translate(language, message)**
Translates a text to the specified language
Parameters:
- language:
str, target language of the translation
Setting range:"chinese": Chinese"chinese_taiwan": Taiwan Mandarin"cantonese": Cantonese"japanese": Japanese"english": English"french": French"german": German"spanish": Spanish"portuguese": Portuguese"russian": Russian"korean": Korean"italian": Italian"dutch": Dutch
- message:
str, text to be translated
Broadcast
CyberPi supports multiple types of broadcasts. With these broadcasts, CyberPi can implement communication between threads and on LANs and the Internet.
Basic broadcast

**cyberpi.broadcast(message)**
Sends a broadcast message
The message can be received by all threads on CyberPi or by mBlock sprites in Live mode.
Parameter:
- message:
str, name of the broadcast message
LAN broadcast
:::info Note:
- All CyberPis on the same LAN must use the same channel for communication.
- Without router connection, CyberPis use the same default channel and thus can communicate with each other on the LAN; when CyberPi is connected to a router, its channel depends on the setting of the router, which may be different from the default channel, and thus it may fail to communicate with another CyberPi that is not connected to the router.
- Therefore, to ensure proper communication, if you use a router, connect all CyberPis on the same LAN to the router. :::

**cyberpi.wifi_broadcast.set(message, val)**
Sends a LAN broadcast message
Parameters:
- message:
str, name of the LAN broadcast message - val:
str, value transmitted by the LAN broadcast message

**cyberpi.wifi_broadcast.get(message)**
Obtains the value transmitted by a LAN broadcast message
Parameter:
- message:
str, name of the LAN broadcast message.
A str value is returned.
:::info
Tips: CyberPi may fail to receive a broadcast when you use this API in a program. Some APIs may block the thread when being executed, causing CyberPi to miss a broadcast.
The following program is an example: a CyberPi sends a broadcast when the time.sleep(1) code is executed, and the CyberPi supposed to receive the broadcast misses it.
:::
import cyberpi
import time

while True:
    cyberpi.led.on(0,0,255,1)
    time.sleep(1)
    cyberpi.wifi_broadcast.get(message)
Upload mode broadcast

**cyberpi.upload_broadcast.set(message, val)**
Sends an upload mode broadcast message
When CyberPi is connected to mBlock 5 through Bluetooth or a USB cable, upload mode broadcast messages are received by mBlock 5 sprites. This API is preferable for projects in which real-time interaction between mBlock 5 sprites and hardware devices is required.
Parameters:
- message:
str, name of the upload mode broadcast message - val:
str, value transmitted by the upload mode broadcast message

**cyberpi.upload_broadcast.get(message)**
Obtains the value transmitted by the specified upload mode broadcast message
Parameter
- message:
str, name of the upload mode broadcast message
A str value is returned.
:::info
Tips: CyberPi may fail to receive a broadcast when you use this API in a program. Some APIs may block the thread when being executed, causing CyberPi to miss a broadcast.
The following program is an example: a CyberPi sends a broadcast when the time.sleep(1) code is executed, and the CyberPi supposed to receive the broadcast misses it.
:::
import cyberpi
import time

while True:
    cyberpi.led.on(0,0,255,1)
    time.sleep(1)
    cyberpi.upload_broadcast.get(message)
User cloud broadcast

**cyberpi.cloud_broadcast.set(message, val)**
Sends a user cloud broadcast message
To use this API, you need to use wifi.is_connect() and cloud.setkey(key) to obtain the permission to use the cloud services provided by Makeblock for your CyberPi.
User cloud messages can be used to share data across devices and projects. For example, after signing in to mBlock 5 on multiple PCs, you can send a user cloud broadcast message on one PC to all the other online hardware devices and mBlock 5 sprites on the other PCs.
With this API, you can easily access and control your hardware devices through the Internet. In addition, you can use mBlock 5 or mBlock-Python Editor to design visual interaction UIs.
Parameters:
- message:
str, name of the user cloud broadcast message - val:
str, value transmitted by the user cloud broadcast message

**cyberpi.cloud_broadcast.get(message)**
Obtains the value transmitted by the specified user cloud broadcast message
Parameter:
- message:
str, name of the user cloud broadcast message
A str value is returned.
:::info
Tips: CyberPi may fail to receive a broadcast when you use this API in a program. Some APIs may block the thread when being executed, causing CyberPi to miss a broadcast.
The following program is an example: a CyberPi sends a broadcast when the time.sleep(1) code is executed, and the CyberPi supposed to receive the broadcast misses it.
:::
import cyberpi
import time

while True:
    cyberpi.led.on(0,0,255,1)
    time.sleep(1)
    cyberpi.cloud_broadcast.get(message)
Script control

**cyberpi.stop_all()**
Stops all the scripts

**cyberpi.stop_this()**
Stops the current script

**cyberpi.stop_other()**
Stops all the scripts except the current one

**cyberpi.restart()**
Restarts CyberPi
Events
CyberPi supports the execution of multiple threads. You can add a thread for CyberPi by adding the corresponding event header, and the thread listens to the specified event. When the event happens, the subsequent code in the thread is executed.
:::info Note: The Events APIs can’t be used in Python3 programming. You need to use the threading mechanism provided by Python3 to compile multi-thread code. :::
Event compiling
Event headers are compiled by using decorators, as shown in the following example:
import cyberpi

@cyberpi.event.start # Event to be listened to
def callback():
    cyberpi.led.on("green") # Code to be executed after the event happens

@cyberpi.event.received('hello') # Event (with a parameter) to be listened to
def callback():
    cyberpi.led.on("blue") # Code to be executed after the event happens
In this coding way, when the event defined in the event header happens, the subsequent code is executed. In the preceding example, the function name callback() is used. As a matter of fact, however, any function name that meets the naming convention can be used. In addition, it’s OK to use function names repeatedly because functions are defined after events.
As you can see in the preceding example, the function callback() is executed when you start CyberPi and the other function callback() is executed when CyberPi receives the broadcast message “hello.” No conflict occurs because they are defined after different events.
Event determination mechanism
An event header is triggered only when the event listened to happens. For example, if the event “button x _pressed” is listened to, the event header is triggered and the subsequent code is executed only when the state of button _x is changing from “unpressed” to “pressed”. If button x keeps in the pressed state, the subsequent code is not executed.
Event header APIs for CyberPi

**cyberpi.event.start**
Listens to the start of CyberPi and executes the subsequent code when CyberPi starts

**cyberpi.event.is_press(name)**
Listens to the state of the specified button or joystick moving direction and executes the subsequent code when the specified button is pressed or the joystick is moved to the specified direction
Parameter:
- name:
str, name of the button or joystick direction<br />Setting range:
a: button A (in the square shape)b: button B (in the rectangle shape)up: joystick moved updown: joystick moved downleft: joystick moved to the leftright: joystick moved to the rightmiddle: joystick pressed in the centerany_direction: joystick moved in any one directionany_button: button A or Bany: any button or joystick moving direction

**cyberpi.event.is_tiltforward**
Listens to the posture of CyberPi and executes the subsequent code when CyberPi tilts forward

**cyberpi.event.is_tiltback**
Listens to the posture of CyberPi and executes the subsequent code when CyberPi tilts backward

**cyberpi.event.is_tiltleft**
Listens to the posture of CyberPi and executes the subsequent code when CyberPi tilts to the left

**cyberpi.event.is_tiltright**
Listens to the posture of CyberPi and executes the subsequent code when CyberPi tilts to the right

**cyberpi.event.is_faceup**
Listens to the posture of CyberPi and executes the subsequent code when CyberPi’s screen faces up

**cyberpi.event.is_facedown**
Listens to the posture of CyberPi and executes the subsequent code when CyberPi’s screen faces down

**cyberpi.event.is_shake**
Listens to the motion of CyberPi and executes the subsequent code when CyberPi is shaken

**cyberpi.event.is_waveup**
Listens to the motion of CyberPi and executes the subsequent code when CyberPi is waved up

**cyberpi.event.is_wavedown**
Listens to the motion of CyberPi and executes the subsequent code when CyberPi is waved down

**cyberpi.event.is_waveleft**
Listens to the motion of CyberPi and executes the subsequent code when CyberPi is waved to the left

**cyberpi.event.is_waveright**
Listens to the motion of CyberPi and executes the subsequent code when CyberPi is waved to the right

**cyberpi.event.is_freefall**
Listens to the motion of CyberPi and executes the subsequent code when CyberPi falls down

**cyberpi.event.is_clockwise**
Listens to the motion of CyberPi and executes the subsequent code when CyberPi rotates clockwise around the z-axis

**cyberpi.event.is_anticlockwise**
Listens to the motion of CyberPi and executes the subsequent code when CyberPi rotates counterclockwise around the z-axis

**cyberpi.event.greater_than(threshold, type)**
Listens to the comparison result and executes the subsequent code when the value is greater than the threshold
Parameters:
- threshold:
int, threshold; setting range:0-100 - type:
str, type of the data source
Setting range: microphone: microphonelight_sensor: light sensorshake_val: shaking strengthtimer: timer

**cyberpi.event.smaller_than(threshold, type)**
Listens to the comparison result and executes the subsequent code when the value is smaller than the threshold
Parameters:
- threshold:
int, threshold; setting range:0-100 - type:
str, type of the data source
Setting range: microphone: microphonelight_sensor: light sensorshake_val: shaking strengthtimer: timer

**cyberpi.event.receive(message)**
Listens to the specified broadcast message and executes the subsequent code when the broadcast message is received
Parameter
- message:
str, name of the broadcast message listened to

**cyberpi.event.upload_broadcast(message)**
Listens to the specified upload mode broadcast message and executes the subsequent code when the upload mode broadcast message is received
Parameter:
- message:
str, name of the upload mode broadcast message listened to

**cyberpi.event.cloud_broadcast(message)**
Listens to the specified user cloud broadcast message and executes the subsequent code when the user cloud broadcast message is received
Parameter:
- message:
str, name of the user cloud broadcast message listened to

**cyberpi.event.wifi_broadcast(message)**
Listens to the specified LAN broadcast message and executes the subsequent code when the LANbroadcast message is received
Parameter:
| Date | Description |
|---|---|
| 2020/07/08 | Initial draft |
| 2020/08/25 | Added the description of the Sprites and Doodle APIs |
| 2020/09/29 | Added the API cyberpi.piechart.add(data), cyberpi.get_language(), cyberpi.is_stand(), cyberpi.is_handstand(), cyberpi.event.is_stand, and cyberpi.event.is_handstandModified the APIs cyberpi.cloud.listen(language,t=3), cyberpi.cloud.tts(language, message), and cyberpi.cloud.translate(language, message)Added the “APIs for mBot2 Shield” and “APIs for mBuild modules” sections |
| 2020/11/12 | Separated the APIs for function extension, extension boards, and mBuild modules from this page and created new pages for them. Currently, this page describes only the APIs for CyberPi. |
| 2021/02/25 | Added a note for “LAN broadcast.” |
| 2021/6/25 | Added the labels for indicating whether the APIs support Python 3 programming, MicroPython programming, or both |

若有收获,就点个赞吧
0 人点赞
