三种存在形式
行内 CSS
<h1 style="color:blue;">A Blue Heading</h1><p style="color:red;">A red paragraph.</p>
内部 CSS
一般在头部里面style的标签对里面
<!DOCTYPE html><html><head><style>body {background-color: powderblue;}h1 {color: blue;}p {color: red;}</style></head><body><h1>This is a heading</h1><p>This is a paragraph.</p></body></html>
外部css
首先写一个单独的css文件,然后link到html文件里面就可以了
<!DOCTYPE html><html><head><link rel="stylesheet" href="styles.css"></head><body><h1>This is a heading</h1><p>This is a paragraph.</p></body></html>
选择器
class,id选择器
单个的不说了,看下这个
p.center {text-align: center;color: red;}p#center {text-align: center;color: red;}
代表的意思是p标签下的对应的class,id
<p class="center large">This paragraph refers to two classes.</p>
*选择器
这个代表选择所有标签
*{color: red;}
分组选择器
h1, h2, p {text-align: center;color: red;}
意思就是你一次把几个相同的选择器可以写在一起,之间用逗号表示就可以了
后代选择器
div p {background-color: yellow; //div 里面的p全选了}
子选择器
div > p {background-color: yellow; //div的下一层的p,下2层的P不会选择,对只选自己的儿子}
相邻选择器
div + p {background-color: yellow; //div后面的第一个P兄弟元素必须有相同的父元素,“相邻”的意思是“紧随其后”。}
兄弟姐妹选择器
div ~ p {background-color: yellow; //div后面的所有的P}
背景
background-color
h1 {background-color: green;}div {background-color: lightblue;}p {background-color: yellow;}
opacity
这是一个透明度属性,0-0.1 0就是完全透明了。
注意它可以将整个元素标签的所有内容全部隐藏
p.one{background-color: rgb(218, 240, 198);border: solid 2px red;opacity: 0.8;}
image
背景图片
p {background-image: url("paper.gif");}
这是一个基本格式,默认的,图片不会有任何的拉伸,压缩,尺寸的变化,只会按照原来的尺寸填满你的元素
border
正规的写法顺序如下
p.one{display: inline;border-style: dotted solid double;border-width: 5px;border-color: blue;}
当然如果4边的样式都是一样的化,我们可以直接一起写
p {border: 5px solid red;}
在写好整体之后,哪边要改的可以单独修改
p.one{border: solid 5px blue;border-left: dotted 2px red;}
border-radius
p.one {width: 20px;height: 20px;border: solid 5px blue;border-radius: 20px;}
盒子模型
所有 HTML 元素都可以被视为盒子。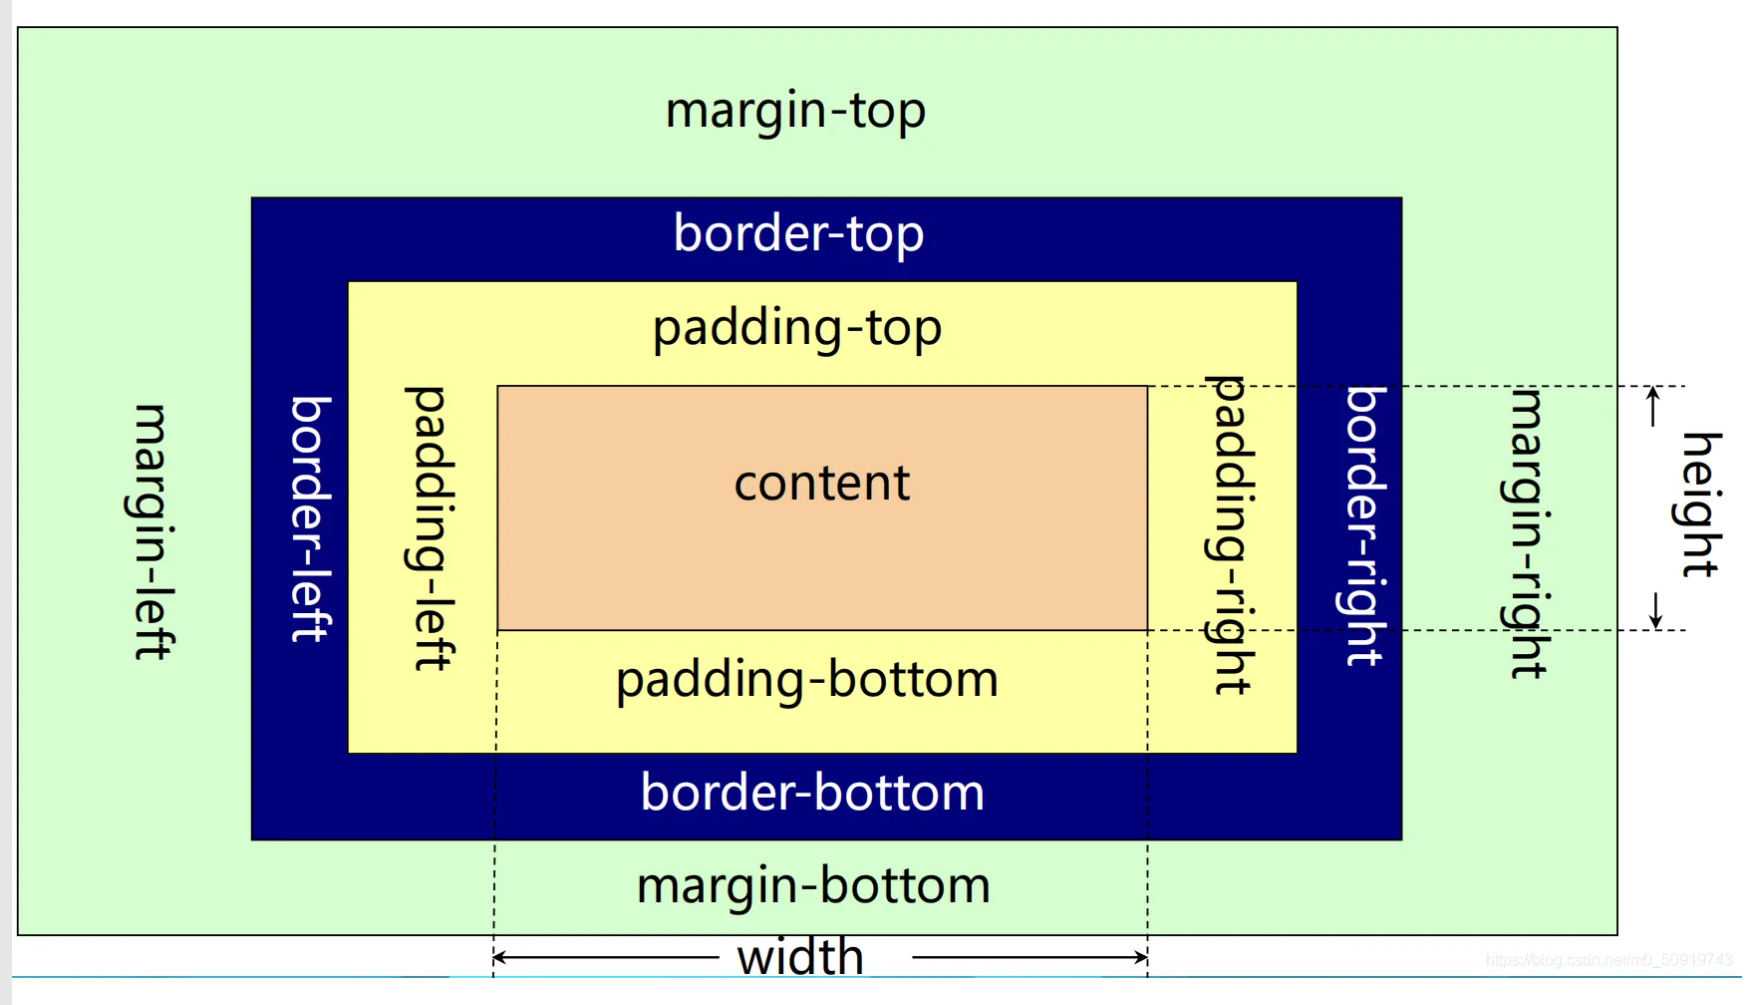
一图就能看懂、当然你在浏览器的开发者工具中,也是能够看到的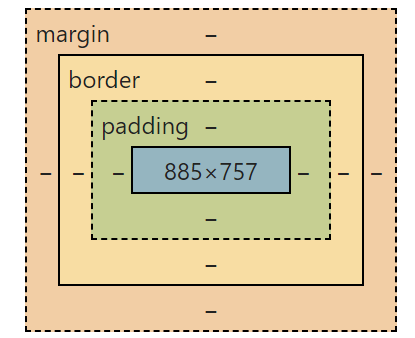
width,height
默认的width=content 对的是不包括padding和border的
看个例子就知道了
p.one {width: 100px;height: 100px;padding: 10px;border: solid 5px blue;border-radius: 20px;}
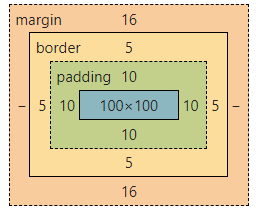
我们可以看到w和h就是content的内容
但是当我们加上
box-sizing: border-box;
我们再看下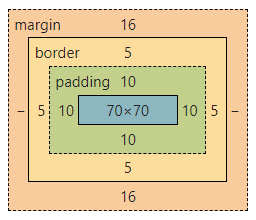
没错,现在的w和h就是包含border和padding了
margin,padding
p {margin-top: 100px;margin-bottom: 100px;margin-right: 150px;margin-left: 80px;}div {padding-top: 50px;padding-right: 30px;padding-bottom: 50px;padding-left: 80px;}
div {padding: 25px 50px 75px 100px;}div {padding: 25px 50px 75px;}div {padding: 25px 50px;}div {padding: 25px;}
- 4个—上 右 下 左
- 3个—上 左右 下
- 2个—上下 左右
- 1个—4边一样
布局
Flex Box
这个是非常好用的布局,弹性布局,会根据屏幕的大小自动改变布局,特别适合现在多端的应用。父盒子
```html111122223333
```css.box{height: 50px;width: 500px;background-color: green;margin: 2px;}.flx{/* 首先是外部盒子要flex */display: flex;/* 这个是盒子方向,一般就是默认的row就行了 */flex-direction: row;/* 这个属性是最关键的,默认不换行如果缩小页面就会压缩子盒子的宽度,当然我们不想这样所以改成换行,那么当宽度不够的时候就会自动换行了,这样我们的元素宽度就永远不会变了再小的屏幕也不会觉得元素小了。 */flex-wrap: wrap;/* 这是一个复合属性,是前2个的简写 */flex-flow: row wrap;/* 元素的对齐方式,一般默认就可以了 */}
justify-content
这个属性单独拉出来讲下
就是元素的对齐方式,首先3个基本的
justify-content: center;justify-content: end;justify-content: start;
justify-content: space-around;
这个是平均分配剩余空间
justify-content: space-between;
这个是两边对齐,中间空出来,其实这个用的比较多,不然一边空出来太多会非常的丑
align-items
/* 如果父容器有高度的话,子项目在纵轴上的排列 */align-items:flex-center;
子盒子
order
是设定每个子元素拍在第几个,默认都是0,谁小谁排前面,可以负数
flex
三个属性的缩写
flex-grow flex-shrink flex-basis,要固定顺序
首先用这个属性的时候,那我们一边就不会设定子元素的width了,而且父元素nowarp。让他们自动的去分配空间。grow,是每个子元素自己占空间的几份。
flex-shrink指的是,当空间压缩的时候大家要缩小,它压缩的程度,默认值是1,越大就压缩的越厉害。
flex-basis是
align-self
当父容器有固定高度,子元素在纵轴上默认是拉伸的。它的值分别是start center end,分别在三个位置上。
outline
很简单就是border外面的一道线,写法和border一样,而且不会影响margin
text
color and background-color
Text Alignment
- text-align
- text-align-last
这两个属性是规定文本的对齐方式
h1 {text-align: center;}h2 {text-align: left;}h3 {text-align: right;}div {text-align: justify; **没看懂是干嘛的,}
text-align-last就是最后一行的对齐方式没啥说的
Text Direction
文字方向,感觉有点傻逼
p {direction: rtl;unicode-bidi: bidi-override;}
direction 和 unicode-bidi 属性可用于更改元素的文本方向:
Text Decoration
就是文字装饰
只要是边线text-decoration-line
- text-decoration-color
- text-decoration-style
- text-decoration-thickness
- text-decoration
最后一个是一个简写,一般我们写简写
text-decoration: red dotted underline 5px;
简写的时候没有顺序要求,有几个属性就写几个
text-decoration:none;
Text Transformation
p.uppercase {text-transform: uppercase;}p.lowercase {text-transform: lowercase;}p.capitalize {text-transform: capitalize; //首字母大写}
font
我们一般直接用缩写就可以了,
The font property is a shorthand property for:
- font-style
- font-variant
- font-weight
- font-size/line-height
- font-family
font-size and font-family 是必须写的
p.b {font: italic small-caps bold 12px/30px Georgia, serif;}
link
The four links states are:
- a:link - a normal, unvisited link
- a:visited - a link the user has visited
- a:hover - a link when the user mouses over it
- a:active - a link the moment it is clicked ```css
/ unvisited link / a:link { color: red; }
/ visited link / a:visited { color: green; }
/ mouse over link / a:hover { color: hotpink; }
/ selected link / a:active { color: blue; }
其实就是链接经过时的4个状态<br />在为多个链接状态设置样式时,有一些顺序规则: a:hover 必须在 a:link 和 a:visited 之后 a:active 必须在 a:hover 之后<a name="y5oAw"></a># list<a name="fGaXB"></a># table<a name="DinjX"></a>## table border表格默认是没有border的,需要自己写样式<br />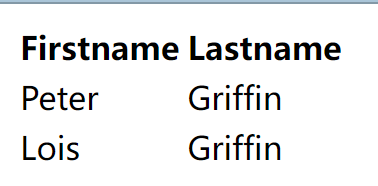<br />border可以给table,th,tr加```csstable, th, td {border: 1px solid;}
display
none就是不显示
默认是’’
可以换成block和inline
或者block-inline
positon
There are five different position values:
- static
- relative
- fixed
- absolute
- sticky
然后使用 top、bottom、left 和 right 属性定位元素。但是,除非首先设置 position 属性,否则这些属性将不起作用。它们的工作方式也不同,具体取决于位置值。
static
positon的默认值,叫做静态定位
静态定位元素不受 top、bottom、left 和 right 属性的影响。
但是如果不加是没有这个属性的,所以想它拥有还是要写的
没啥讲的
relative
相对定位
这个相对是相对自己本身原来的位置
然后自己原来的位置还是在的。
fixed
具有位置的元素:固定;相对于视口定位,这意味着即使页面滚动,它也始终保持在同一位置。 top、right、bottom 和 left 属性用于定位元素。
所以一旦fixed了,就失去了原来的位置占位了。
用这个做广告绝佳。
absolute
具有位置的元素:绝对;相对于最近的定位祖先定位(而不是相对于视口定位,如固定)。
会失去原来的位置
也就是说父元素要有relative或者fixed
sticky
相对于当前父元素,当可以完全显示的时候,那么它就正常显示。
一旦滚动的时候要看不到它的时候,那么就执行fixed了。
点击查看【codepen】
Z-index
这是一个元素重叠的时候,看谁在上面图层的属性
首先如何能重叠,那肯定元素要失去当前的位置,所以几个重叠的元素肯定position:absoult,而且父元素position:relative
<style>.box{position: relative;width: 60%;height: 100px;left: 20%;border: 1px solid green;}.lit{position:absolute;}.lit1{width: 100px;height: 100px;background-color: red;}.lit2{width: 60px;height: 60px;background-color: yellow;}.lit3{width: 30px;height: 30px;background-color: blue;}</style><body><div class="box"><div class="lit1 lit"></div><div class="lit2 lit"></div><div class="lit3 lit"></div></div></body>
现在没有加index-x,我们可以看到都被第一个元素给覆盖了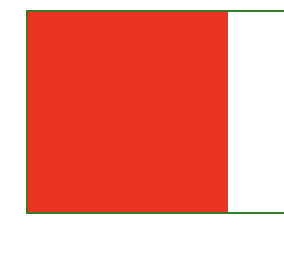
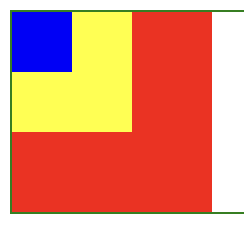
现在我们让小的在上面,这样就都可以看到了,Z-index的值越大,就越在上面
.lit1{z-index: 1;width: 100px;height: 100px;background-color: red;}.lit2{z-index: 2;width: 60px;height: 60px;background-color: yellow;}.lit3{z-index: 3;width: 30px;height: 30px;background-color: blue;}
overflow
是一个对超出盒子的内容的显示方式
The overflow property has the following values:
