https://github.com/openshift/source-to-image
https://v2-1.docs.kubesphere.io/docs/zh-CN/developer/s2i-introduction
https://cloud.redhat.com/blog/create-s2i-builder-image
Source-to-image (S2I) 是一个直接将源代码构建成镜像的自动化构建工具,它是通过将源代码放入一个负责编译源代码的 构建器镜像(Builder image) 中,自动将编译后的代码打包成 Docker 镜像。在 KubeSphere 中的使用示例可以参考示例七-Source to Image。更加详细的信息可以参考代码仓库 S2IOperator 和 S2IRun。
- 根据构建器镜像 (Builder Image) 运行容器,程序源代码注入到容器中指定的目录。
- 执行构建器镜像 (Builder Image) 中的 assemble脚本,会将源代码构建成可直接运行的程序。比如拉取各种依赖,配置程序到工作目录下等工作
- 设置运行构建器镜像 (Builder Image) 中提供的 run脚本作为容器的启动命令,然后提交新的镜像,此镜像就是用户所需要的应用程序镜像。

wget https://github.com/openshift/source-to-image/releases/download/v1.3.1/source-to-image-v1.3.1-a5a77147-linux-amd64.tar.gztar xf source-to-image-v1.3.1-a5a77147-linux-amd64.tar.gzcp s2i /usr/local/bins2i -hs2i create nginx-centos7 s2i-builder-docs
[root@UR-20210425NAMA ~]# s2i -hSource-to-image (S2I) is a tool for building repeatable docker images.A command line interface that injects and assembles source code into a docker image.Complete documentation is available at http://github.com/openshift/source-to-imageUsage:s2i [flags]s2i [command]Available Commands:build Build a new imagecompletion Generate completion for the s2i command (bash or zsh)create Bootstrap a new S2I image repositorygenerate Generate a Dockerfile using an existing S2I builder image that can be used to produce an image by any application supporting the format.rebuild Rebuild an existing imageusage Print usage of the assemble script associated with the imageversion Display versionFlags:--ca string Set the path of the docker TLS ca file (default "/root/.docker/ca.pem")--cert string Set the path of the docker TLS certificate file (default "/root/.docker/cert.pem")--key string Set the path of the docker TLS key file (default "/root/.docker/key.pem")--loglevel int32 Set the level of log output (0-5)--tls Use TLS to connect to docker; implied by --tlsverify--tlsverify Use TLS to connect to docker and verify the remote-U, --url string Set the url of the docker socket to use (default "unix:///var/run/docker.sock")Use "s2i [command] --help" for more information about a command.[root@UR-20210425NAMA ~]#
开发自定义 S2I 模版
对 Source-to-image (S2I) 工作原理有了一定了解之后,您也可以为自己的项目定义自己的构建器镜像模版 (即 S2I/B2I 模板) 来扩展 S2I,在我们的项目当中提供了部分常用的构建器镜像模版,例如 Python、Java 等。在 Kubesphere 2.1.1 版本中已经支持自定义 B2I 模版。
在详细介绍构建器镜像之前,先介绍下完成构建器镜像模版所需要提供的元素。
在自定 S2I 模版时,主要分为两个部分:
第一部分为 S2I 的构建器镜像。
第二部分为 S2Itemplate 的定义。
其中构建器镜像与 Openshift 的构建器镜像兼容,在 KubeSphere 中可以复用此部分。
1.1.assemble - 负责构建应用程序的脚本
1.2.run - 负责运行应用程序的脚本
1.3.save-artifacts - 在增量构建时负责依赖管理的脚本 (可选)
1.4.usage - 使用说明脚本 (可选)
1.5.test - 一些测试脚本 (可选)
2.1.S2Itemplate - 描述构建程序所使用的基础环境
S2I 构建器镜像的更多的信息可参考 S2IRun
在以下的步骤中,我们将向您展示如何创建一个 Nginx 服务的构建器镜像。若项目中希望使用运行时镜像(Runtime Image),可以参考文档如何构建运行时镜像
第一步:S2i CLI 构建项目目录
S2I 命令行工具 带有一个方便的命令,可以引导构建器所需的目录结构。如下安装 S2I CLI:
$ wget https://github.com/openshift/source-to-image/releases/download/v1.1.14/source-to-image-v1.1.14-874754de-linux-386.tar.gz$ tar -xvf source-to-image-v1.1.14-874754de-linux-386.tar.gz
$ lss2i source-to-image-v1.1.14-874754de-linux-386.tar.gz sti$ cp s2i /usr/local/bin
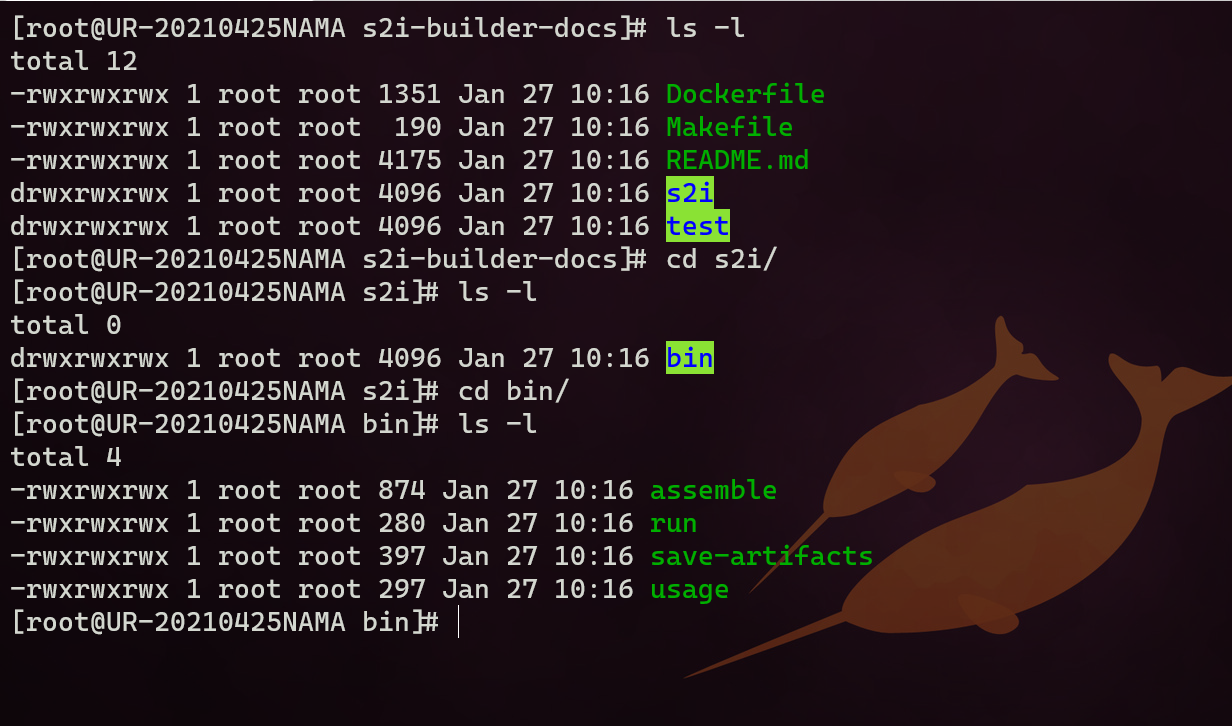
$ s2i create nginx-centos7 s2i-builder-docs
本文使用 nginx-centos7 作为构建器镜像的名字创建了初始目录,目录结构如下所示。
s2i-builder-docs/Dockerfile - 一个标准的Dockerfile,定义了构建器镜像。Makefile - 用于测试和构建构建器镜像的帮助脚本。test/run - 测试脚本,测试构建器镜像是否正常工作。test-app/ - 用于测试的应用程序的目录s2i/binassemble - 负责构建应用程序的脚本run - 负责运行应用程序的脚本usage - 负责打印构建器镜像用法的脚本
第二步:修改 Dockerfile
如下修改 Dockerfile 来定义构建器镜像。
Dockerfile
# nginx-centos7FROM kubespheredev/s2i-base-centos7:1LABEL maintainer="Runze Xia <runzexia@yunify.com>"# 声明当前应用的版本ENV NGINX_VERSION=1.6.3LABEL io.k8s.description="Nginx Webserver" \io.k8s.display-name="Nginx 1.6.3" \io.kubesphere.expose-services="8080:http" \io.kubesphere.tags="builder,nginx,html"# 安装nginx并且清理yum cacheRUN yum install -y epel-release && \yum install -y --setopt=tsflags=nodocs nginx && \yum clean all# 修改nginx的默认开放端口RUN sed -i 's/80/8080/' /etc/nginx/nginx.confRUN sed -i 's/user nginx;//' /etc/nginx/nginx.conf# 将S2I的脚本复制到构建器镜像当中COPY ./s2i/bin/ /usr/libexec/s2iRUN chown -R 1001:1001 /usr/share/nginxRUN chown -R 1001:1001 /var/log/nginxRUN chown -R 1001:1001 /var/lib/nginxRUN touch /run/nginx.pidRUN chown -R 1001:1001 /run/nginx.pidRUN chown -R 1001:1001 /etc/nginxUSER 1001# 声明默认使用的端口EXPOSE 8080# 修改构建器的默认启动命令,以展示构建器镜像的用法CMD ["/usr/libexec/s2i/usage"]
S2I 脚本中会根据 Dockerfile 中定义的 Label 信息作为使用参数,如果使用非 KubeSphere 提供的基础镜像,请参考 S2I Script
第三步 处理S2I构建器脚本
当我们完成了 Dockerfile 的定义,我们现在可以完成构建器镜像的其他部分。我们现在添加S2I脚本,我们将从 assemble(负责构建应用程序)开始。如下编辑 assemble 文件,在我们的例子中,它只是把 nginx 的配置文件以及静态内容复制到目标容器中:
assemble
#!/bin/bash -eif [[ "$1" == "-h" ]]; thenexec /usr/libexec/s2i/usagefiecho "---> Building and installing application from source..."if [ -f /tmp/src/nginx.conf ]; thenmv /tmp/src/nginx.conf /etc/nginx/nginx.conffiif [ "$(ls -A /tmp/src)" ]; thenmv /tmp/src/* /usr/share/nginx/html/fi
默认情况下,s2i build 将应用程序源代码放在 /tmp/src 目录中,在上面的命令当中,我们将应用源代码复制到了了 kubespheredev/s2i-base-centos7:1 定义的工作目录 /opt/app-root/src 当中。
现在我们可以来处理第二个脚本 run (用于启动应用程序),在我们的例子当中,它只是启动 nginx 服务器:
run
#!/bin/bash -eexec /usr/sbin/nginx -g "daemon off;"
我们使用 exec 命令将执行 run 脚本替换为执行 nginx 服务器的主进程。我们这样做是为了让所有 docker 发出的信号都可以被 nginx 收到,并且可以让 nginx 使用容器的标准输入和标准输出流。
我们在例子当中被没有实现增量构建,因此我们可以直接删除 save-artifacts 脚本。
最后我们在 usage 脚本当中添加一些使用信息:
usage
#!/bin/bash -ecat <<EOFThis is the nginx-centos7 S2I image:To use it, install S2I: https://github.com/kubesphere/s2i-operatorSample invocation:s2i build test/test-app kubespheredev/nginx-centos7 nginx-centos7-appYou can then run the resulting image via:docker run -d -p 8080:8080 nginx-centos7-appand see the test via http://localhost:8080EOF
第四步 构建与运行
当我们完成了 Dockerfile 和 S2I 的脚本,我们现在修改一下 Makefile 当中的镜像名称:
Makefile
IMAGE_NAME = kubespheredev/nginx-centos7-s2ibuilder-sample.PHONY: buildbuild:docker build -t $(IMAGE_NAME) ..PHONY: testtest:docker build -t $(IMAGE_NAME)-candidate .IMAGE_NAME=$(IMAGE_NAME)-candidate test/run
可以执行 make build 命令来构建我们的构建器镜像了。
$ make builddocker build -t kubespheredev/nginx-centos7-s2ibuilder-sample .Sending build context to Docker daemon 164.9kBStep 1/17 : FROM kubespheredev/s2i-base-centos7:1---> 48f8574c05dfStep 2/17 : LABEL maintainer="Runze Xia <runzexia@yunify.com>"---> Using cache---> d60ebf231518Step 3/17 : ENV NGINX_VERSION=1.6.3---> Using cache---> 5bd34674d1ebStep 4/17 : LABEL io.k8s.description="Nginx Webserver" io.k8s.display-name="Nginx 1.6.3" io.kubesphere.expose-services="8080:http" io.kubesphere.tags="builder,nginx,html"---> Using cache---> c837ad649086Step 5/17 : RUN yum install -y epel-release && yum install -y --setopt=tsflags=nodocs nginx && yum clean all---> Running in d2c8fe644415………………………………Step 17/17 : CMD ["/usr/libexec/s2i/usage"]---> Running in c24819f6be27Removing intermediate container c24819f6be27---> c147c86f2cb8Successfully built c147c86f2cb8Successfully tagged kubespheredev/nginx-centos7-s2ibuilder-sample:latest
可以看到我们的镜像已经构建成功了,现在我们执行 s2i build ./test/test-app kubespheredev/nginx-centos7-s2ibuilder-sample:latest sample app 命令来构建我们的应用镜像。
$ s2i build ./test/test-app kubespheredev/nginx-centos7-s2ibuilder-sample:latest sample-app---> Building and installing application from source...Build completed successfully
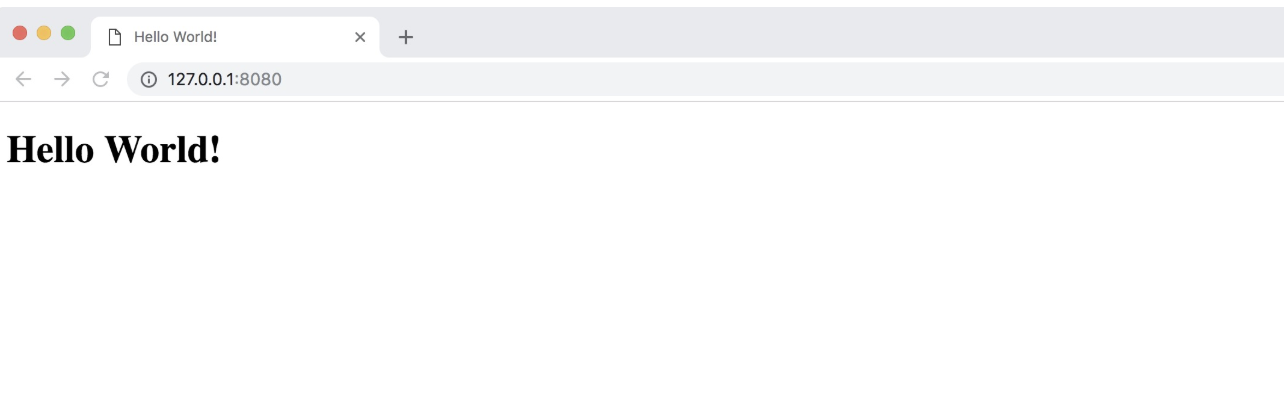
当我们完成了应用镜像的构建,我们可以在本地运行这个应用镜像看构建出的应用是否符合我们的要求:
$ docker run -p 8080:8080 sample-app
在浏览器中访问,可以看到我们的网页已经可以正常访问了:
第五步 推送镜像并在 KubeSphere 添加 S2I 模版
S2I 模版定义了应用程序构建的基础环境,包括构建器镜像 (Builder Image) 和 运行时镜像 (Runtime Image),以及环境参数、描述信息等。
当我们在本地完成 S2I 构建器镜像的测试之后,就可以推送镜像到自定义的镜像仓库当中,并创建构建器模版 yaml 文件:
s2ibuildertemplate.yaml
apiVersion: devops.kubesphere.io/v1alpha1kind: S2iBuilderTemplatemetadata:labels:controller-tools.k8s.io: "1.0"builder-type.kubesphere.io/s2i: "s2i"name: nginx-demospec:containerInfo:- builderImage: kubespheredev/nginx-centos7-s2ibuilder-samplecodeFramework: nginx # 代码框架类型defaultBaseImage: kubespheredev/nginx-centos7-s2ibuilder-sample # 默认使用的构建器镜像 (可替换为自定义的镜像)version: 0.0.1 # 构建器模版的版本description: "This is a S2I builder template for Nginx builds whose result can be run directly without any further application server.." # 构建器模版的描述信息
提示:S2I 模版中 label 作为前端分类的参数信息,详见本文底部的 S2I 参数释义表。
在创建好构建器模版后我们可以使用 kubectl 将构建器模版提交到 KubeSphere 环境当中:
$ kubectl apply -f s2ibuildertemplate.yamls2ibuildertemplate.devops.kubesphere.io/nginx created
现在我们来到 KubeSphere 的控制台界面,我们已经可以选择添加的构建器模版了:

至此我们就完成了 S2I 构建器镜像与构建器模版的创建。类似地,可以参考上述步骤,您可以基于 S2I CLI 自定义任何所需的 S2I 模板,然后在 KubeSphere 构建所需的镜像并一键部署至 Kubernetes 环境中,方便快速与多次构建环境。
S2I 模板参数释义表
S2I 模版中 label 作为前端分类的参数信息,其详细描述如下表所示。
| label名称 | 选项 | 含义 |
|---|---|---|
| builder-type.kubesphere.io/s2i: “s2i” | “s2i” | 描述该模版类型属于 S2I,即基于应用源代码进行构建 |
| builder-type.kubesphere.io/b2i | “b2i” | 描述该模版类型属于 B2I, 即基于二进制或其他制品进行构建 |
| binary-type.kubesphere.io | “jar”,”war”,”binary” | 描述该模版类型属于 B2I 下的细分类型,当选择 “B2I” 类型是需要加上此 label。比如提供的 jar 包则可以选择 “jar” 类型,其他类似。在 v2.1.1 版本中支持自定义 B2I 模版,例如 “nginx” 等 |
S2I 模版详细参数信息如下表所示,其中带有 * 的参数表示必填项:
| 修改项 | 类型 | 含义 |
|---|---|---|
| *containerInfo | []struct | 构建镜像的相关信息列表 |
| *containerInfo.builderImage | string | S2I 构建器镜像,比如:kubesphere/java-8-centos7:v2.1.0 |
| containerInfo.runtimeImage | string | S2I 运行时镜像镜像,比如:kubesphere/java-8-runtime:v2.1.0 |
| containerInfo.buildVolumes | []string | 挂载卷信息列表,格式”volume_name:mount_path”,比如:[“s2i_java_cache:/tmp/artifacts”,”test_cache:test_path”] |
| containerInfo.runtimeArtifacts | []struct | 输出制品的原路径和目标路径列表,仅用于分阶段构建时使用 |
| containerInfo.runtimeArtifacts.source | string | 制品在构建器镜像中的原路径 |
| containerInfo.runtimeArtifacts.destination | string | 移动到运行时镜像中的目标路径 |
| containerInfo.runtimeArtifacts.keep | bool | 是否将数据保留在最终镜像中 |
| *defaultBaseImage | string | 默认使用的构建器镜像 |
| *codeFramework | string | 代码框架类型,比如 Java、Ruby 等 |
| environment | []struct | 列表,用于设置一系列构建过程中的环境变量 |
| environment.key | string | 环境变量名称 |
| environment.type | string | 环境变量值类型 |
| environment.description | string | 环境变量描述信息 |
| environment.optValues | []string | 环境变量参数列表 |
| environment.required | bool | 是否必须设置该环境变量 |
| environment.defaultValue | string | 环境变量默认值 |
| environment.value | string | 环境变量值 |
| iconPath | string | 应用名称 |
| version | string | S2I 模版版本 |
| description | string | 用于描述此模版的功能、用途等 |

若有收获,就点个赞吧
0 人点赞
