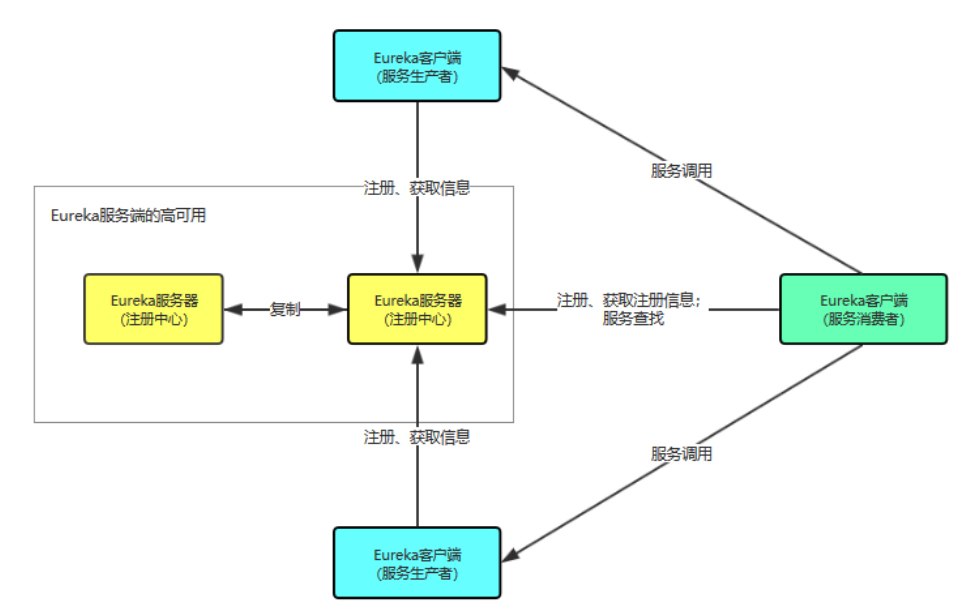
Eureka是SpringCloud中的一个负责服务注册与发现的组件。Eureka中分为Server和Client:
- Server是服务的注册与发现中心,Server端无需向注册中心注册,因为Server本身就是注册中心
- Client既可以作为服务的生产者,又可以作为服务的消费者。生产者Client和消费者Client都必须向注册中心注册
Eureka结构如下图: :::info
服务中心Server:8761
:::
添加
:::info
服务中心Server:8761
:::
添加spring-cloud-starter-netflix-eureka-server依赖
<parent><groupId>org.springframework.boot</groupId><artifactId>spring-boot-starter-parent</artifactId><version>2.0.6.RELEASE</version><relativePath/> <!-- lookup parent from repository --></parent><properties><java.version>1.8</java.version><spring-cloud.version>Finchley.SR2</spring-cloud.version></properties><dependencies><dependency><groupId>org.springframework.cloud</groupId><artifactId>spring-cloud-starter-netflix-eureka-server</artifactId></dependency><dependency><groupId>org.springframework.boot</groupId><artifactId>spring-boot-starter-security</artifactId></dependency><dependency><groupId>org.projectlombok</groupId><artifactId>lombok</artifactId><optional>true</optional></dependency><dependency><groupId>org.springframework.boot</groupId><artifactId>spring-boot-starter-test</artifactId><scope>test</scope><exclusions><exclusion><groupId>org.junit.vintage</groupId><artifactId>junit-vintage-engine</artifactId></exclusion></exclusions></dependency></dependencies><dependencyManagement><dependencies><dependency><groupId>org.springframework.cloud</groupId><artifactId>spring-cloud-dependencies</artifactId><version>${spring-cloud.version}</version><type>pom</type><scope>import</scope></dependency></dependencies></dependencyManagement>
在SpringBoot启动类上添加注解@EnableEurekaServer
@SpringBootApplication//开启服务治理功能@EnableEurekaServerpublic class EurekaServerApplication {public static void main(String[] args) {SpringApplication.run(EurekaServerApplication.class, args);}}
集成Security框架,实现Eureka密码登录
@EnableWebSecurity@Configurationpublic class WebSecurityConfig extends WebSecurityConfigurerAdapter {@Overrideprotected void configure(HttpSecurity http) throws Exception {http.csrf().disable();http.authorizeRequests().anyRequest().authenticated().and().httpBasic();}}
配置文件:
spring:application:# 服务名name: eureka-server# security安全认证配置security:user:name: yanglepassword: 123server:port: 8761eureka:client:# 该应用为注册中心,不需要向注册中心注册自己register-with-eureka: false# 关闭检索服务的功能,只需要维护服务fetch-registry: false
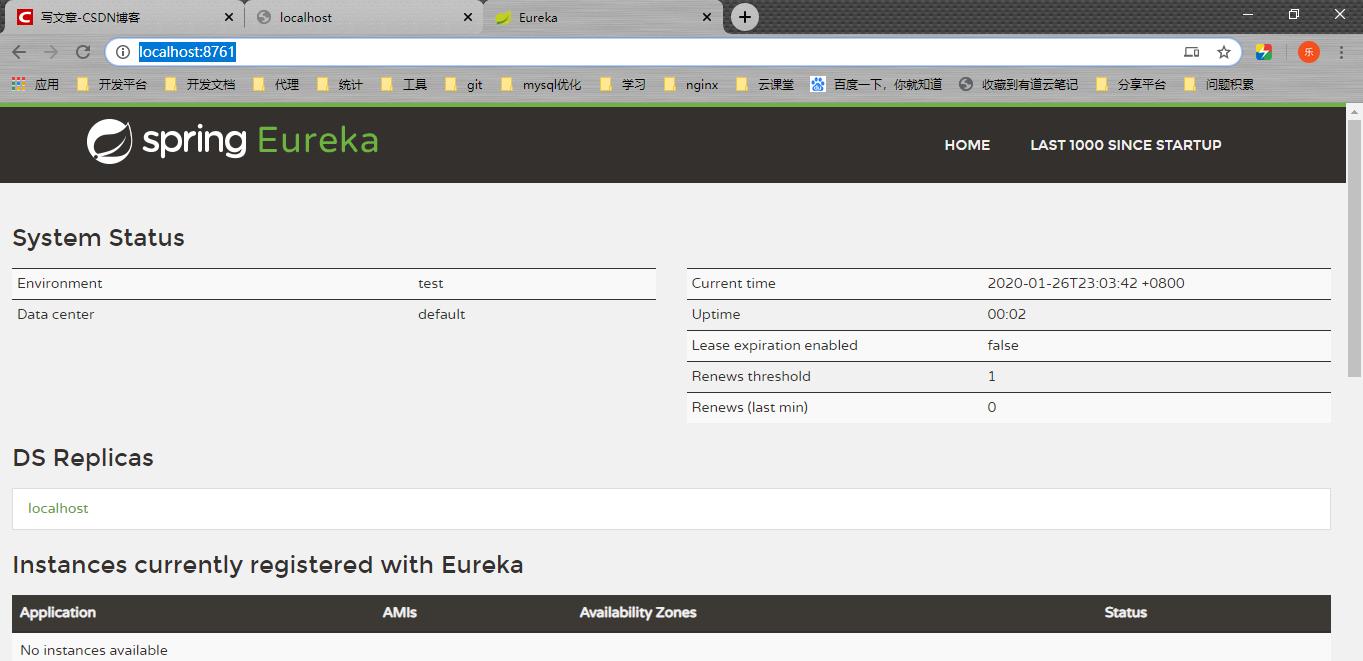
项目启动后,访问http://localhost:8761/,输入用户名和密码 yangle 123
目前我们还没有创建服务,因此下图Application栏目没有服务实例 :::info
生产者客户端:8081
:::
生产者会向服务中心注册自己的服务并周期性的发送心跳
- 心跳间隔默认30s:
eureka.instance.lease-renewal-interval-in-seconds=5 - 心跳超时时间默认90s:
eureka.instance.lease-expiration-duration-in-seconds=10
同时生产者也会周期性的从服务中心获取服务清单信息缓存到本地
- 是否从eureka获取服务清单:
fetch-registry: true - 向eureka服务端更新自己实例信息的间隔时间s:
instance-info-replication-interval-seconds: 15 - 从eureka客户端获得服务清单的间隔时间s:
registry-fetch-interval-seconds: 15
添加spring-cloud-starter-netflix-eureka-client依赖:
<parent><groupId>org.springframework.boot</groupId><artifactId>spring-boot-starter-parent</artifactId><version>2.0.6.RELEASE</version><relativePath/> <!-- lookup parent from repository --></parent><properties><java.version>1.8</java.version><spring-cloud.version>Finchley.SR2</spring-cloud.version></properties><dependencies><dependency><groupId>org.springframework.cloud</groupId><artifactId>spring-cloud-starter-netflix-eureka-client</artifactId></dependency><dependency><groupId>org.springframework.boot</groupId><artifactId>spring-boot-starter-web</artifactId></dependency><dependency><groupId>org.springframework.boot</groupId><artifactId>spring-boot-starter-test</artifactId><scope>test</scope><exclusions><exclusion><groupId>org.junit.vintage</groupId><artifactId>junit-vintage-engine</artifactId></exclusion></exclusions></dependency></dependencies><dependencyManagement><dependencies><dependency><groupId>org.springframework.cloud</groupId><artifactId>spring-cloud-dependencies</artifactId><version>${spring-cloud.version}</version><type>pom</type><scope>import</scope></dependency></dependencies></dependencyManagement>
然后在启动类中添加注解@EnableEurekaClient
@SpringBootApplication//开启服务发现功能@EnableDiscoveryClientpublic class EurekaClientProducterApplication {public static void main(String[] args) {SpringApplication.run(EurekaClientProducterApplication.class, args);}}
添加一个订单服务
@RestControllerpublic class OrderService {@RequestMapping("getOrder")public String getOrder(){return "{code:0,data:{}}";}}
在配置文件中添加配置信息:
spring:application:name: eureka-client-order-serviceserver:port: 8081eureka:client:serviceUrl:# 指定注册中心defaultZone: http://yangle:123@localhost:8761/eurekainstance:#可选preferIpAddress: true#实例ID支持自定义,可选instance-id: ${spring.application.name}:${spring.cloud.client.ip-address}:${server.port}
我们重新打开http://localhost:8761/,会看到生产者已经注册到注册中心里面了 :::info
消费者客户端:8082
:::
将restTemplate注入到容器中,SpringRestTemplate是Spring提供的用于访问Rest服务的客端,RestTemplate提供了多种便捷访问远程Http服务的方法,能够大大提高客户端的编写效率,所以很多客户端比如Android或者第三方服务商都是使用RestTemplate请求restful服务
@SpringBootApplicationpublic class EurekaClientConsumerApplication {public static void main(String[] args) {SpringApplication.run(EurekaClientConsumerApplication.class, args);}@Bean(name = "restTemplate")public RestTemplate getRestTemplate() {return new RestTemplate();}@Bean(name = "restTemplate2")@LoadBalanced//开启负载均衡,需要使用IDEA复制多份消费者public RestTemplate getRestTemplate2() {return new RestTemplate();}}
添加一个接口去调用生产者提供的服务
@RestControllerpublic class OrderConsumerService {@Autowired@Qualifier("restTemplate")private RestTemplate restTemplate;@Autowired@Qualifier("restTemplate2")private RestTemplate restTemplate2;@RequestMapping("getOrder")public String getOrder(){return restTemplate.getForObject("http://localhost:8081/getOrder",String.class);}//实现负载均衡的服务,不需要指定服务端口,只需要指定使用的服务名称@RequestMapping("getOrderForLoadBalence")public String getOrderForLoadBalence(){return restTemplate2.getForObject("http://eureka-client-order-service/getOrder",String.class);}}
配置文件中添加配置信息:
spring:application:name: eureka-client-order-consumer-serviceserver:port: 8082eureka:client:serviceUrl:defaultZone: http://yangle:123@localhost:8761/eurekainstance:preferIpAddress: trueinstance-id: ${spring.application.name}:${spring.cloud.client.ip-address}:${server.port}
查看eureka界面http://localhost:8761/,看到消费者也注册进来了 :::info
高可用注册中心
:::
服务注册中心集群方式部署,当其中某个注册中心分片故障后,Eureka就会转入自我保护模式,允许在故障期间继续进行服务注册与发现;
等到故障分片恢复时,集群其他分片会把它们的状态同步给故障分片;
集群中的分片会以异步的方式互相复制各自的状态;
复制eureka-server项目,更名为eureka-server-slave,eureka-server-slave的配置文件如下:
spring:application:name: eureka-serversecurity:user:name: yanglepassword: 123server:port: 8762eureka:client:serviceUrl:defaultZone: http://yangle:123@localhost:8761/eureka
修改eureka-server的配置文件
spring:application:name: eureka-serversecurity:user:name: yanglepassword: 123server:port: 8761eureka:client:serviceUrl:defaultZone: http://yangle:123@localhost:8762/eureka
修改producter的配置文件
spring:application:name: eureka-client-order-serviceserver:port: 8081eureka:client:serviceUrl:defaultZone: http://yangle:123@localhost:8761/eureka,http://yangle:123@localhost:8762/eurekainstance:preferIpAddress: trueinstance-id: ${spring.application.name}:${spring.cloud.client.ip-address}:${server.port}
修改consumer的配置文件
spring:application:name: eureka-client-order-consumer-serviceserver:port: 8082eureka:client:serviceUrl:defaultZone: http://yangle:123@localhost:8761/eureka,http://yangle:123@localhost:8762/eurekainstance:preferIpAddress: trueinstance-id: ${spring.application.name}:${spring.cloud.client.ip-address}:${server.port}

