- Angular中常常需要父组件和一个或多个子组件之间共享数据。可以使用
@Input和@Output来实现这个模式@Input()允许父组件更新子组件中的数据,父组件中存放属性值,传递给子组件@Output()允许子组件向父组件发送数据,子组件中有自己的属性值,发生改变后传递给父组件,父组件再传递给其他子组件

父组件通过子组件的自定义属性向下传递数据给子组件;子组件通过修改父组件的属性向上发送数据个父组件
1、组件间数值传递
1.1、创建父组件
在父组件的视图文件中引用子组件,从而道道父子组件的关系
- 在子组件中使用
[属性名]='属性值'的方式将父组件中的数据绑定到子组件的属性上
```typescript =============ng-parent.component.ts================= @Component({ selector: ‘app-ng-parent’, templateUrl: ‘./ng-parent.component.html’, styleUrls: [‘./ng-parent.component.css’] }) export class NgParentComponent implements OnInit {==============ng-parent.component.html==============<div style="background: beige"><h1>{{loginName}}的地盘</h1><hr><!--子组件2--><app-ng-child02 [c2LoginName]="loginName"></app-ng-child02></div>
public loginName: string = ‘曾经会飞的鱼’;
constructor() { }
1.2、创建子组件
- 在子组件中使用
子组件
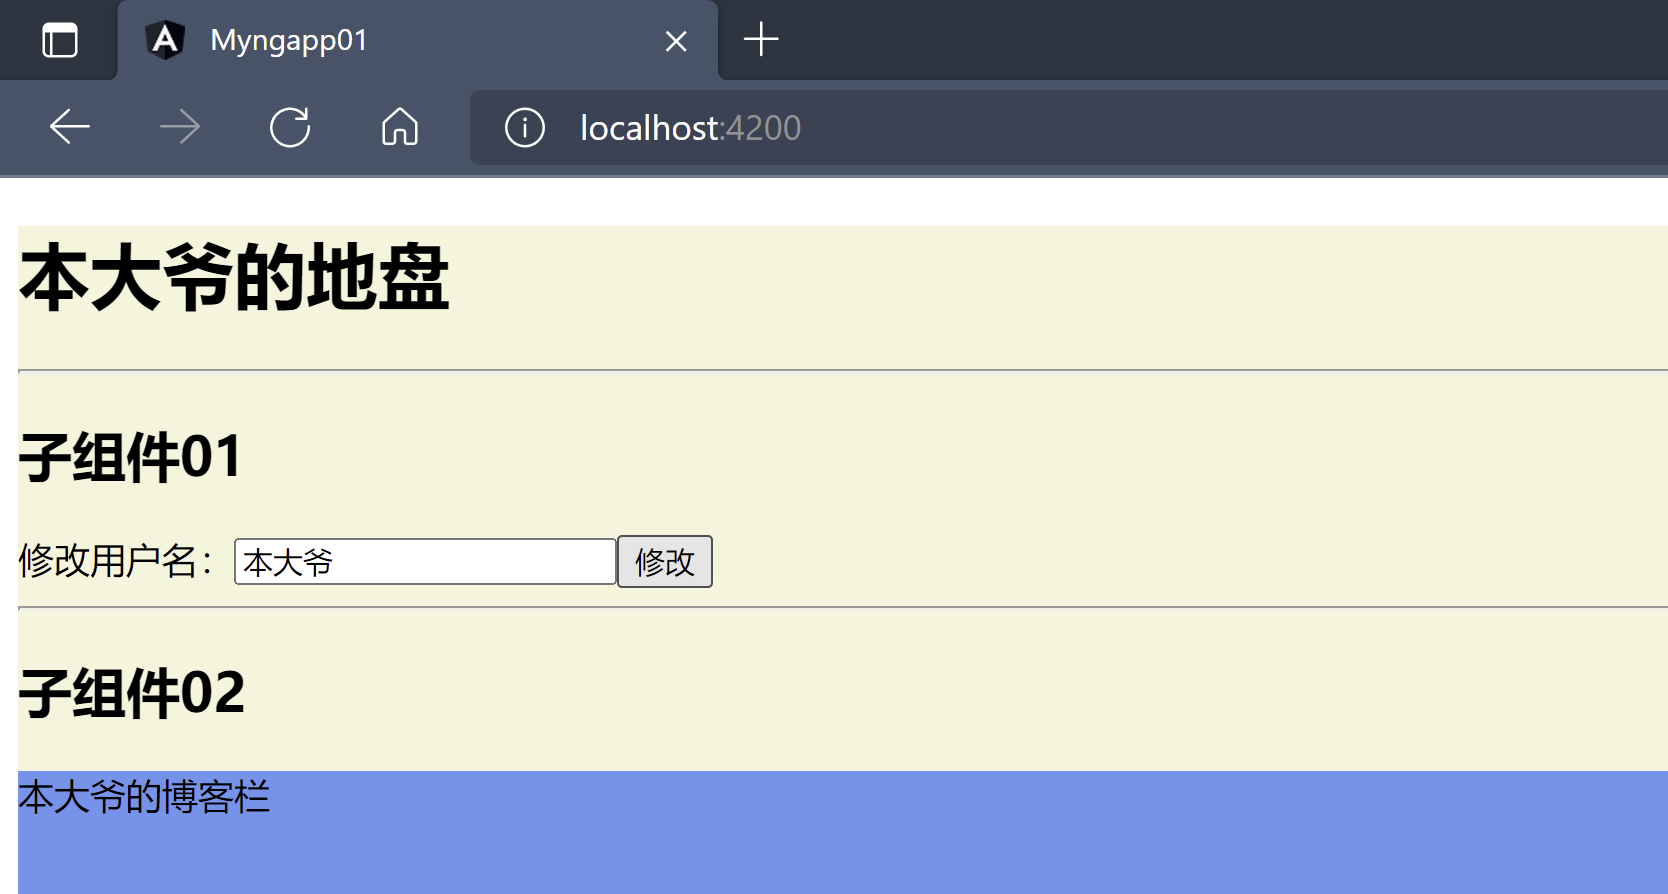
ChildComponent02,这个子组件仅获取父组件共享的数据,不对数据进行修改==============ng-chilid02.component.html===============<h2>子组件02</h2><div style="background: cornflowerblue; height: 200px">{{c2LoginName}}的博客栏</div>
- 子组件中用于接收共享数据的属性需要使用
@Input()装饰器装饰,表明是一个输入性的属性值 ```typescript ==============ng-child02.component.ts============== @Component({ selector: ‘app-ng-child02’, templateUrl: ‘./ng-child02.component.html’, styleUrls: [‘./ng-child02.component.css’] }) export class NgChild02Component implements OnInit {
//输入性属性用于接收父组件传值 @Input() public c2LoginName: string = ‘’;
constructor() { }
ngOnInit(): void { } } ```
父组件=>子组件传递效果:

子组件
ChildComponent01,这个子组件除了从获取父组件共享的数据外,还要支持修改共享的数据==============ng-child01.component.html================<h2>子组件01</h2>修改用户名:<input [(ngModel)]="c1LoginName"/><button (click)="editLoginName()"> 修改</button>
- 子组件通过触发特定的事件,将数据传递给父组件,由父组件提供事件处理方法
- 子组件中创建
EventEmitter实例对象,创建的实例对象需要使用@Output装饰器装饰 @Output装饰器的属性为输出属性,可以向父组件输出- 通过
EventEmitter实例对象的emit(val)方法,发送事件 ```typescript ==================ng-child01.component.ts=============== @Component({ selector: ‘app-ng-child01’, templateUrl: ‘./ng-child01.component.html’, styleUrls: [‘./ng-child01.component.css’] }) export class NgChild01Component implements OnInit {
@Input() public c1LoginName: string = ‘’;
//定义事件,定义为输出型属性,向父组件输出属性 @Output() private editEvent = new EventEmitter();
constructor() { }
ngOnInit(): void { }
editLoginName(): void { //调用EventEmitter对象的emit方法将事件发送出去 this.editEvent.emit(this.c1LoginName); }
}
- 父组件的视图中,子标签通过`(事件名)='父组件中的处理函数'`的方式接收子组件的事件,并进行对应的逻辑处理```html=============ng-parent.component.html================<div style="background: beige"><h1>{{loginName}}的地盘</h1><hr><!--子组件1--><app-ng-child01 [c1LoginName]="loginName" (editEvent)="editLoginName($event)"></app-ng-child01><br><hr><!--子组件2--><app-ng-child02 [c2LoginName]="loginName"></app-ng-child02></div>
@Component({selector: 'app-ng-parent',templateUrl: './ng-parent.component.html',styleUrls: ['./ng-parent.component.css']})export class NgParentComponent implements OnInit {public loginName: string = '曾经会飞的鱼';constructor() { }ngOnInit(): void {}//事件处理函数,参数为事件,类型为anyeditLoginName(val: any) {this.loginName = val;}}
- 在组件一中输入新的
loginName点击修改,查看效果
获取子组件对象的所有属性
通过下列方式获取子组对象的所有参数,这种方式很少使用,谨慎使用,传参最好还是通过事件的方式,防止数据混乱错误
<div style="background: beige"><h1>{{loginName}}的地盘</h1><hr><!--子组件1--><app-ng-child01 #c1 [c1LoginName]="loginName" (editEvent)="editLoginName($event)"></app-ng-child01><br><hr><!--子组件2--><app-ng-child02 #c2 [c2LoginName]="loginName"></app-ng-child02><button (click)="getSubComponent()">输出子组件</button></div
@Component({selector: 'app-ng-parent',templateUrl: './ng-parent.component.html',styleUrls: ['./ng-parent.component.css']})export class NgParentComponent implements OnInit {public loginName: string = '曾经会飞的鱼';constructor() { }ngOnInit(): void {}editLoginName(val: any) {this.loginName = val;}//通过下面手段获取子组件对象所有信息@ViewChild('c1', {static: false})private child1 = null;@ViewChild('c2', {static: false})private child2 = null;getSubComponent(){//通过获取的子对象调用对应的方法this.child1.editLoginName();//通过子对象访问对应的属性console.log(this.child2.c2LoginName);}}

若有收获,就点个赞吧
0 人点赞
