A
这周还是不能说没时间,我如果把看电影的时间省下来,还是应该有的,而且看的是个老片子,别说火星救援还真好,现在回头看,后来好多电影里熟悉的面孔啊
反正其实就是没做新题,继续优化最长公共前缀这个题
主要还是不太明白原来的内存消耗方面,究竟差在哪儿了
又完整看了遍题解,水平扫描法分析起来还是最优的,综合起来有最好的时间和空间复杂度,但是得承认复杂度这个事情,只是反映着随着数据量增长,资源消耗的增长趋势,我大概比较了下题解视频里面三种方法,水平扫描法肯定不会是在空间消耗上有什么问题,有问题也只能是我的问题
我回过头来看前一周的优化结果,发现确实多了两个String变量中间值,比较了待比较的两个字符串的长度之后,并不需要真的单独存下来,因为只要确保不会下标越界就可以了,但是那也不过是个引用变量,不占具体空间啊,果然跑了一下,不是它,结果如下,结果还多了点内存消耗?一下就落后下来了,只是为什么会多?估计是统计误差之类的?
难道是方法调用所致?也是按引用的值传递啊(这个说的好拧巴而且应该不准确,不过我清楚我想表达的意思),不知道,再试一下吧,我有预感这周也就这样了,不会有什么明显突破的结论了
果然,结果上,应该认为没什么差别
下周分析分析这个,实际时间分布就都差不多,然后应该还可以点击看到每一个具体的提交的代码,详细做下比较吧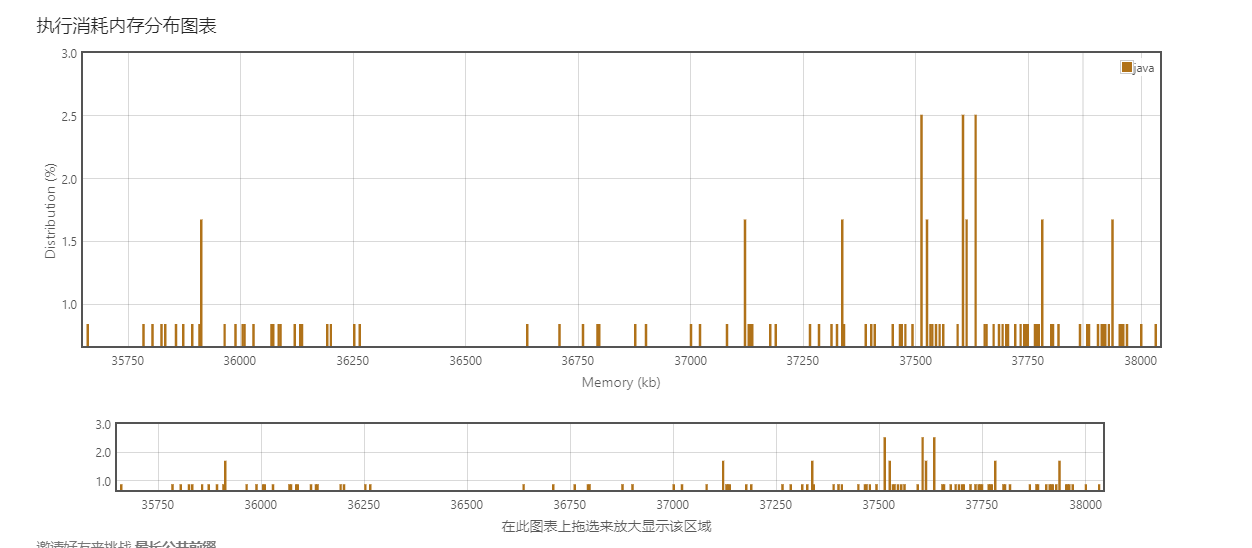
R
这篇官方文档没有汉化
Creating a single control-plane cluster with kubeadm
通过kubeadm 创建一个单控制平面(节点?译注)的集群
应该指的是单节点的控制平面吧,至少目前(20200714)我是这么理解
The
kubeadmtool helps you bootstrap a minimum viable Kubernetes cluster that conforms to best practices. In fact, you can usekubeadmto set up a cluster that will pass the Kubernetes Conformance tests.kubeadmalso supports other cluster lifecycle functions, such as bootstrap tokens and cluster upgrades.
kubeadm这个工具帮助你初始化一个符合最佳时间得最小可用得k8s集群
- viable,就是MVP得那个viable,单一个乍一看还不认识了?要是没前面的niminum还真有可能没认出来
- conform,注意不是confirm,跟上面那个一样是托福GRE词汇,
The
kubeadmtool is good if you need:
- A simple way for you to try out Kubernetes, possibly for the first time.
- A way for existing users to automate setting up a cluster and test their application.
- A building block in other ecosystem and/or installer tools with a larger scope.
You can install and use
kubeadmon various machines: your laptop, a set of cloud servers, a Raspberry Pi, and more. Whether you’re deploying into the cloud or on-premises, you can integratekubeadminto provisioning systems such as Ansible or Terraform当你要干下面这些事情的时候,kubeadm 这个工具是个不错得选择:
一个简单得第一次尝试k8s得方式>
>
> 你可以安装并且在各类机器上使用kubeadm,比如你的膝上型电脑,一组云服务器,树莓派,或其他。无论你是部署在云端还是私有化部署的,都可以集成kubeadm到你得流程化系统中,如Ansible 或者 Terraform
- premises
- provision
Before you begin
To follow this guide, you need:
- One or more machines running a deb/rpm-compatible Linux OS; for example: Ubuntu or CentOS.
- 2 GiB or more of RAM per machine—any less leaves little room for your apps.
- At least 2 CPUs on the machine that you use as a control-plane node.
- Full network connectivity among all machines in the cluster. You can use either a public or a private network.
You also need to use a version of
kubeadmthat can deploy the version of Kubernetes that you want to use in your new cluster. Kubernetes’ version and version skew support policy applies tokubeadmas well as to Kubernetes overall. Check that policy to learn about what versions of Kubernetes andkubeadmare supported. This page is written for Kubernetes v1.18. Thekubeadmtool’s overall feature state is General Availability (GA). Some sub-features are still under active development. The implementation of creating the cluster may change slightly as the tool evolves, but the overall implementation should be pretty stable.Note: Any commands under
kubeadm alphaare, by definition, supported on an alpha level.
要按着下文进行,需要:
- 一个或多个运行着 deb/rpm 兼容能力得Linux OS得主机;例如Ubuntu或者CentOS
- 每台主机有2GiB或更多的内存,
- 每台主机至少有2个CPU用来运行控制平面节点
- 集群中所有的主机网络完全互通,你还可以访问他们无论是通过公网还是私网
你也需要确保使用一个可以部署你想希望部署的k8s版本得kubeadm版本
k8s有一个版本和版本倾斜得支持策略,也是适用于kubeadm和k8s得关系得。检查这个策略以了解k8s和kubeadm版本支持的对应关系(译注:其实给的那个链接,并没有)。那一页(译注:应该还是指的policy页)是为k8s v1.18撰写的
kubeadm这个工具整体得特性状态都已经GA了。有一些小功能仍在开发。
随着工具的演进,创建集群的细节实现可能会发生些小变化,但是整体的实现应当是挺稳定得了
注意:任何在kubeadm alpha下的命令,都在一个alpha级别上定义和收到支持
Objectives
- Install a single control-plane Kubernetes cluster or high-availability cluster
- Install a Pod network on the cluster so that your Pods can talk to each other
目标
- 安装一个单节点的控制平面得k8s集群,或者高可用集群
- 在集群上安装一个Pod网络以便能让你得Pod彼此之间可以通信
所以说这一篇其实带者干两件事情
Instructions
使用手册
Installing kubeadm on your hosts
See “Installing kubeadm”.
Note: If you have already installed kubeadm, run
apt-get update && apt-get upgradeoryum updateto get the latest version of kubeadm. When you upgrade, the kubelet restarts every few seconds as it waits in a crashloop for kubeadm to tell it what to do. This crashloop is expected and normal. After you initialize your control-plane, the kubelet runs normally在你的主机上安装kubeadm
注意:如果你已经安装了kubeadm,运行apt-get update && apt-get upgrade 或者 yum update 升级到kubeadm得最新版本
当你升级时候,kubelet 会进入一个每隔几秒的重启得crashloop,等待kubeadm 告知它要做什么?这个crashloop 是符合预期得得标准行为,在你初始化你的控制平面之后,kubelet运行就正常了
看log,这个crashloop大概的周期是10s,不过这段说的也是自相矛盾?前面说升级kubeadm时候 会在crashloop之中,后面又说是初始化控制平面之后,文档也是瞎写
其实看到这前面也想吐槽,这行文水平不知道是不是阿三写的,别扭又罗嗦的感觉
Initializing your control-plane node
The control-plane node is the machine where the control plane components run, including etcd (the cluster database) and the API Server (which the kubectl command line tool communicates with).
- (Recommended) If you have plans to upgrade this single control-plane
kubeadmcluster to high availability you should specify the--control-plane-endpointto set the shared endpoint for all control-plane nodes. Such an endpoint can be either a DNS name or an IP address of a load-balancer.- Choose a Pod network add-on, and verify whether it requires any arguments to be passed to
kubeadm init. Depending on which third-party provider you choose, you might need to set the--pod-network-cidrto a provider-specific value. See Installing a Pod network add-on.- (Optional) Since version 1.14,
kubeadmtries to detect the container runtime on Linux by using a list of well known domain socket paths. To use different container runtime or if there are more than one installed on the provisioned node, specify the--cri-socketargument tokubeadm init. See Installing runtime.- (Optional) Unless otherwise specified,
kubeadmuses the network interface associated with the default gateway to set the advertise address for this particular control-plane node’s API server. To use a different network interface, specify the--apiserver-advertise-address=<ip-address>argument tokubeadm init. To deploy an IPv6 Kubernetes cluster using IPv6 addressing, you must specify an IPv6 address, for example--apiserver-advertise-address=fd00::101- (Optional) Run
kubeadm config images pullprior tokubeadm initto verify connectivity to the gcr.io container image registry.To initialize the control-plane node run:
kubeadm init <args>初始化你的控制平面节点
控制平面节点是控制平面组件运行得机器,包括etcd(集群数据库)和API Server(kubectl 命令行工具会与之通信)
- (推荐)如果你有计划升级一个单节点的控制平面集群到一个高可以用得集群,你应该指定 —control-plane-endpoint 这个option来设置所有的控制平面节点共享endpoint
- 选择一个Pod网络插件,并且校验是否传入kubeadm init任何参数,这依赖于你选择得第三方供应商,你可能需要设定—pod-network-cidr option来提供一个特定得值。具体要参考 Installing a Pod network add-on.
- (可选)自从version 1.14以来,kubeadm 尝试通过众所周知的domain socket 路径检查linux得容器运行时。要使用不同得运行时或者在一个准备好的节点上安装了超过一个运行时,那么需要指定—cri-socket参数到kubeadm init。细节可以参考 Installing runtime
- (可选)除非另有指定,kubeadm 使用关联缺省得网关网络接口来作为这个特定控制平面节点得API server。为了使用不同的网络接口,给kubeadm init 指定 —apiserver-advertise-address=
参数。为了部署一个使用IPv6地址的得IPv6 k8s集群,你必须指定一个IPv6 地址,例如 —apiserver-advertise-address=fd00::101 - (可选)在执行kubeadm init 之前运行 kubeadm config image pull ,可以用来检查到gcr.io 容器 image registry 得连接是否有问题(译注:这条估计是给天朝人看的?好像也不是,可能是为了检查是否内网吧)
初始化控制平面节点就运行下面的命令 kubeadm init
这段,同样扯得非常的罗嗦,这里需要赘述一下
- 首先是推荐得一个option,—control-plane-endpoint,我没试过,大概应该是在创建kubeconfig之类得环节起作用,下面这个图是kubeadm init得help,声明了自身执行得阶段

- 第二个没写可选,那应该是必选,也确实是,kubeadm init 完了之后,用kubectl get nodes,节点的状态也是NotReady得,如果用kubectl describe nodes xxx,会显示CNI没有配置完成,导致not ready
- 后面三个可选…只想评论下这文档写的也真是让我这个外籍人士看着都这么的绕
不copy原文了,这个排版好难看
Considerations about apiserver-advertise-address and ControlPlaneEndpoint
这段主要说的就是—apiserver-advertise-address 和 —control-plane-endpoint这两个配置项,更主要的是说后面这个选项,建议用DNS名称来配置,后面好改,最后一句注意下,如果一开始没带着—control-plane-endpoint,用kubeadm安装的集群就没法从单节点改成高可用了,那还是加这个参数吧
然后是
- 提供了kubeadm 的更多的文档参考地址,有中文汉化的
- 提到还可以用配置文件来做kubeadm的配置的,而不是命令行参数,也有ref,也有中文… 为啥就这篇没有呢,但说实话有中文也没看明白咋用
- 然后提到可以定制化控制品概念的一些参数,看着也是像用config文件来传入的,没看懂
- 然后说要是再次运行kubeadm init得先把集群关了
- 再然后说什么如果要添加一个不同架构的节点到这个集群,确保安装有支持整个集群架构的容器镜像的DaemonSets已经部署了,完全不知所云…
要不结一段原文吧
kubeadm initfirst runs a series of prechecks to ensure that the machine is ready to run Kubernetes. These prechecks expose warnings and exit on errors.kubeadm initthen downloads and installs the cluster control plane components. This may take several minutes. The output should look like:kubeadm init 首先运行一系列预检查的动作缺包机器已经准备好运行k8s了,这些预检输出一些警告并在遇到错误时退出。kubeadm init 接着下载和安装集群的控制平面组件。这要花上他几分钟,输出应该看起来像下面这个样子
我装过几次kubeadm,看起来就是下面那个输出
最后那些提示确实很重要,三个提示都挺重要的我觉得
- 第一个是非root用户怎么配置kubectl的
- 提示应该装pod network了,具体怎么装,参考的文档在哪儿什么的
- 其他机器怎么加进来这个集群,都有,感觉每次装完了应该把这瓶至少最后copy下来
再翻译最后一段吧,安装pod网络的下周吧,人得知道折中,算法题还没写呢,都周六了
Make a record of the
kubeadm joincommand thatkubeadm initoutputs. You need this command to join nodes to your cluster.The token is used for mutual authentication between the control-plane node and the joining nodes. The token included here is secret. Keep it safe, because anyone with this token can add authenticated nodes to your cluster. These tokens can be listed, created, and deleted with the
kubeadm tokencommand. See the kubeadm reference guide记录一下 kubeadm init 输出的 kubeadm join 命令。你需要这个命令添加节点到你的集群
这个token用来在控制平面和加入的节点之间相互校验。这个token包括其位置都是秘密的。保证他的安全,因为任何人有这个token就可以添加一个授信的节点到你的集群里。这个token可以被列表,创建和删除通过kubeadm token 命令,具体参考kubeadm的参考指南
- mutual,互相,彼此;共有
- used to describe fellings that two or more people have for each other equally, or actions that affect two or more people equally
- i dont like her, and i think the feeling is mutual
- shared by two or more people
- we met at the home of a mutual friend
- used to describe fellings that two or more people have for each other equally, or actions that affect two or more people equally
T
纯为完成作业?
- 两行
- 第一行我一直都知道
- 第二行,估计是遇到bug了吧,press啥?稍微推测了一下,应该有提示,所以我亲自去悬停了一下

- window这个其实应该是press alt,and click Close button
20200718补:
这周也真是巧了,今天又打开intellij的时候,又碰见了,这个就没问题

唉,太水了,再来一个吧,正好又要打开intellij

就是可以用驼峰前缀来使用code completion
其实有点明白,也有点不明白,这难道不是显而易见的?这周得tip太水了,凑合就这样吧…
S
简单写写吧,主要是测试组这边预研的进度和方法问题
- 方法可能不对,环境安装我感觉大家为啥整了那么久,刚好老郭有个课程,我照着来了一遍,没多复杂啊
- 老郭那个当然也有点反面教材,乱改什么缺省配置,PATH应该不用自己加啊,我回去看看再
- selenium 环境(win10,python,pycharm),不考虑grid的话,这里简单写下吧
- python 安装,官网下载3.7.x,选自定义,记得勾选PATH,然后一路next
- 不用3.8.x,我听另外一个geektime上讲师说的,是因为第三方库兼容性,这不是语义化版本么?都不能做到这个兼容的,无论是第三方库还是python,值得用么?反正持保留意见吧先
- 别特么的乱改缺省的路径,老郭教程我觉得可以当反面教材批评
- 测一下pip和python命令行能用不,也执行一下pip install selenium
- 这里装了,后面venv那里应该也有加速
- pip源目前看起来,反正我的机器环境装这么个玩意儿还不用改
- 从selenium.dev 的Document里面link到chrome的webdriver下载,注意看自己机器上的chrome的版本号,83还是84的目前是,下载同一个大版本的包,解压,这个得自己配到PATH里
- windows 10的搜索,win+s,如果会用会更快,直接搜环境变量
- 记得命令行敲chromedriver测一下
- 安装pycharm社区版,没啥可说的,按屏幕提示操作
- pycharm create a project,这里按说virtualenv里面就是刚才装的python解释器的地址了
- 创建完工程后,可以点terminal,然后敲pip install selenium,否则这个venv里没有selenium
- 新建一个xxx.py,从selenium.dev官网文档首页copy过来起步的python程序
- 下面得修改
- 把Firefox的换成Chrome
- 把By.XXX,和后面那个值,用括号括起来,就是个元组么,难道selenium官网是故意的?
- 依赖于你的环境有没有梯子,毕竟它get的是google,如果有梯子,应该很正常就过去了,起步环境安装完成
- python 安装,官网下载3.7.x,选自定义,记得勾选PATH,然后一路next
- 还有一个就是选择学习材料的问题,可能走过来了会觉得还是很简单的,但是一开始起步还没完成,看什么都懵圈的,真是个问题
- 首先靠积累,积累多了,更容易分辨哪些学习材料更靠谱
- 目前看,geektime的整体还是靠谱的,虽然很多也确实挺水的,而且也糙,但是个来源
- 官网、官网、官网
- 进度方面除了方法,还有一个就是必要的储备还是不够,这个慢慢来吧,我估计测试组再给他们半年时间,之后估计会好一些

若有收获,就点个赞吧
0 人点赞
