GetX功能介绍
- 依赖注入
- GetX是通过依赖注入的方式,存储相应的XxxGetxController;已经脱离了InheritedWidget那一套玩法,自己手动去管理这些实例,使用场景被大大拓展
- 简单的思路,却能产生深远的影响:优雅的跨页面功能便是基于这种设计而实现的、获取实例无需BuildContext、GetBuilder自动化的处理及其减少了入参等等
- 跨页面交互
- 这绝对是GetX的一个优点!对于复杂的生产环境,跨页面交互的场景,实在太常见了,GetX的跨页面交互,几乎和fish_redux一样简单。
- 路由管理
- 是的,getx内部实现了路由管理,而且用起来,那叫一个简单!bloc没实现路由管理,这让我不得不去找一个star量高的路由管理框架,就选择了fluro,但是让我不得不说,这个fluro用起来真的叫一个折磨人,每次新建一个页面,最让我抗拒的就是去写fluro路由代码,横跨几个文件来回写,真是肝疼
- GetX实现了动态路由传参,也就是说直接在命名路由上拼参数,然后能拿到这些拼在路由上的参数,也就是说用flutter写H5,直接能通过Url传值(fluro也能做到)
- 实现了全局BuildContext
- 国际化,主题实现。
使用
引用
# getx 状态管理框架 https://pub.flutter-io.cn/packages/get# 非空安全最后一个版本(flutter 2.0之前版本)get: ^3.26.0# 空安全版本 最新版本请查看 https://pub.flutter-io.cn/packages/getget: ^4.3.8
- Github:jonataslaw/getx
Pub:get
程序入口
只需要将MaterialApp改成GetMaterialApp即可 ```dart void main() { runApp(MyApp()); }
class MyApp extends StatelessWidget { @override Widget build(BuildContext context) { return GetMaterialApp( home: CounterGetPage(), ); } }
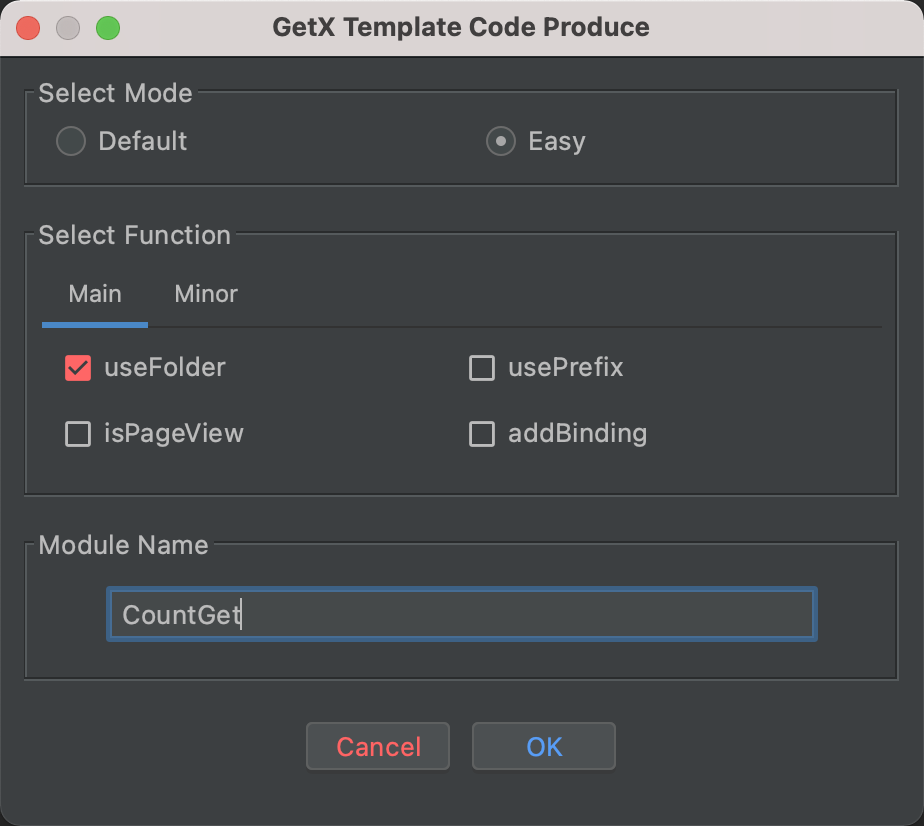
<a name="gWQW7"></a>### 插件**此外,为了进一步提高您的生产效率,我们还为您准备了一些插件**- **getx_template**:一键生成每个页面必需的文件夹、文件、模板代码等等- [Android Studio/Intellij插件](https://plugins.jetbrains.com/plugin/15919-getx)- **GetX Snippets**:输入少量字母,自动提示选择后,可生成常用的模板代码- [Android Studio/Intellij扩展](https://plugins.jetbrains.com/plugin/14975-getx-snippets)- [VSCode扩展](https://marketplace.visualstudio.com/items?itemName=get-snippets.get-snippets)<a name="Caanv"></a>### 计数器程序> 实现一个计数器程序来看下GetX如何将逻辑层和界面层解耦。1. 创建一个 get_x_demo 的 flutter 项目。1. 安装 getx。```shellflutter pub add get
- 利用插件生成文件。
- 修改主入口 ```dart import ‘package:flutter/material.dart’; import ‘package:get/get.dart’;
import ‘counter_get/view.dart’;
void main() { runApp(const MyApp()); }
class MyApp extends StatelessWidget { const MyApp({Key? key}) : super(key: key);
@override Widget build(BuildContext context) { return GetMaterialApp( title: ‘Flutter Demo’, theme: ThemeData(primarySwatch: Colors.blue), home: const CounterGetPage(), ); } }
5. 编写逻辑层代码```dartimport 'package:get/get.dart';class CounterGetLogic extends GetxController {var count = 0.obs;/// 自增void increase() => ++count;/// 自减void remove() => --count;}
- 编写视图层代码 ```dart import ‘package:flutter/material.dart’; import ‘package:get/get.dart’;
import ‘logic.dart’;
class CounterGetPage extends StatelessWidget { const CounterGetPage({Key? key}) : super(key: key);
@override Widget build(BuildContext context) { final logic = Get.put(CounterGetLogic()); return Scaffold( appBar: AppBar( title: const Text(“GetX Count”), ), body: Center( child: Obx(() { return Text( logic.count.value.toString(), style: const TextStyle(fontSize: 24), ); }), ), floatingActionButton: Column( mainAxisSize: MainAxisSize.min, children: [ FloatingActionButton( heroTag: “add”, onPressed: logic.increase, child: const Icon(Icons.add), ), const SizedBox(height: 10), FloatingActionButton( heroTag: “sub”, onPressed: logic.remove, backgroundColor: Colors.red, child: const Icon(Icons.remove), ) ], ), ); } }
7. 运行程序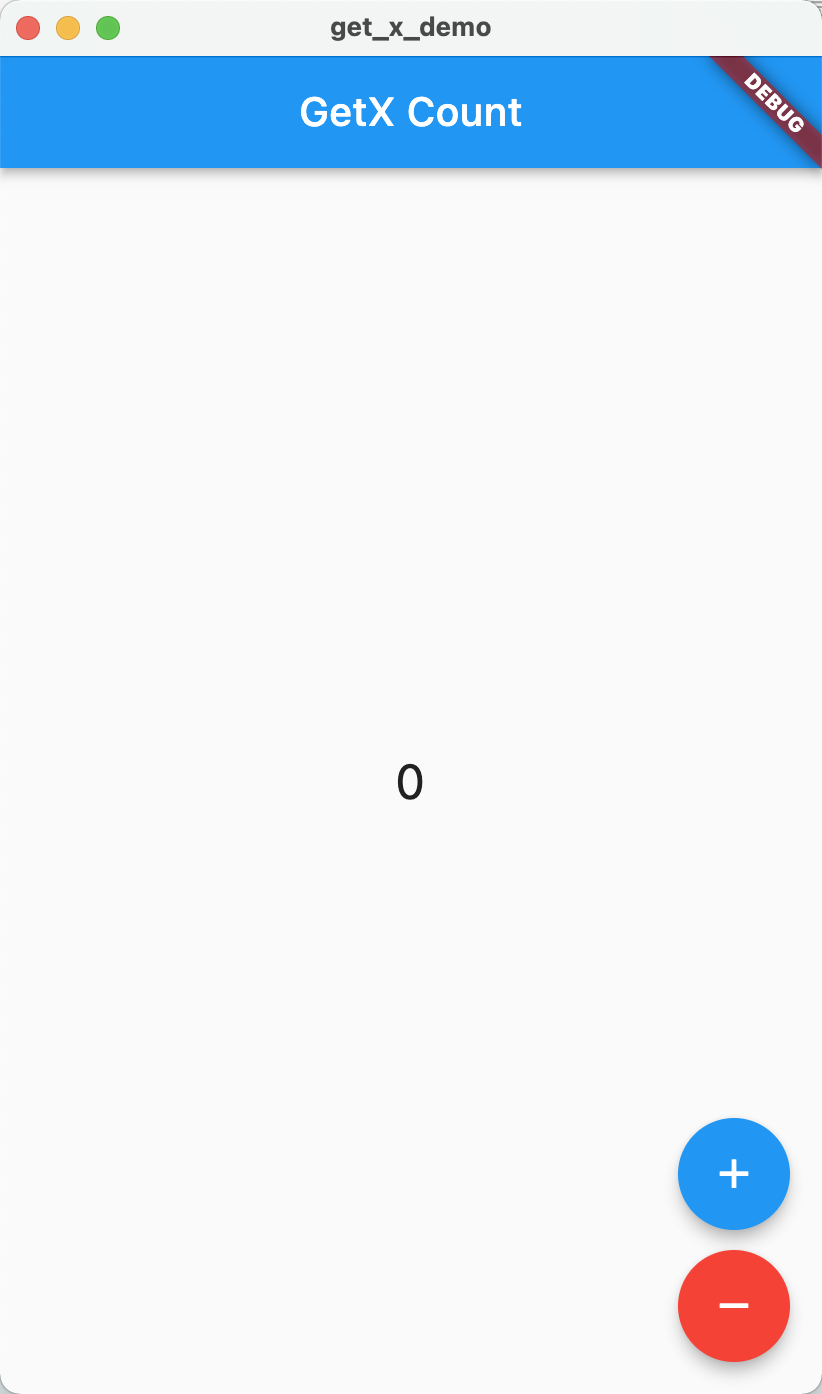<a name="uBWp1"></a>## 状态管理<a name="L6Nsl"></a>### 响应式状态管理> 上面的实例中,我们看到两个关键字「obs」和「obx」,配合使用即可。<a name="XC8wi"></a>#### 基本数据类型> 定义一个需要状态管理的变量。obs是响应式状态管理,自动完成数据更新。Obx()方法刷新的条件- 只有当响应式变量的值发生变化时,才会会执行刷新操作,当某个变量初始值为:“test”,再赋值为:“test”,并不会执行刷新操作- 当你定义了一个响应式变量,该响应式变量改变时,包裹该响应式变量的Obx()方法才会执行刷新操作,其它的未包裹该响应式变量的Obx()方法并不会执行刷新操作。<a name="qSEuS"></a>#### 基于类的使用```dartimport 'package:get/get.dart';import 'package:get_x_demo/user_obs/user.dart';import 'dart:math';class UserObsLogic extends GetxController {final _names = ["JsonYe", "LiuLi", "Luna", "Tomer"];final user = User().obs;@overridevoid onInit() {super.onInit();updateUser();}void updateUser() {User _user = User(name: _names[Random().nextInt(3)],age: 30 + Random().nextInt(50),sex: Random().nextBool());user.update((val) {val?.name = _user.name;val?.age = _user.age;val?.sex = _user.sex;});}}class User {String? name;int? age;bool? sex;User({this.name, this.age, this.sex});}
import 'package:flutter/material.dart';import 'package:get/get.dart';import 'logic.dart';class UserObsPage extends StatelessWidget {const UserObsPage({Key? key}) : super(key: key);@overrideWidget build(BuildContext context) {final logic = Get.put(UserObsLogic());return Scaffold(appBar: AppBar(title: const Text("Object obs"),),body: Center(child: Obx(() {return DefaultTextStyle(style: const TextStyle(color: Colors.black, fontSize: 30),child: Column(mainAxisSize: MainAxisSize.min,children: [Text("${logic.user.value.name}"),Text("${logic.user.value.age}"),Text("${logic.user().sex}"),],),);}),),floatingActionButton: FloatingActionButton(onPressed: logic.updateUser,child: const Icon(Icons.sync),),);}}
简单状态管理
通过GetBuilder组件构建,update()方法手动更新。
import 'dart:math';import 'package:get/get.dart';class BasicGetLogic extends GetxController {final _names = ["JsonYe", "LiuLi", "Luna", "Tomer"];String? name;int? age;bool? sex;@overridevoid onInit() {super.onInit();updateUser();}void updateUser() {name = _names[Random().nextInt(3)];age = 30 + Random().nextInt(50);sex = Random().nextBool();update();}}
import 'package:flutter/material.dart';import 'package:get/get.dart';import 'logic.dart';class BasicGetPage extends StatelessWidget {const BasicGetPage({Key? key}) : super(key: key);@overrideWidget build(BuildContext context) {final logic = Get.put(BasicGetLogic());return Scaffold(appBar: AppBar(title: const Text("Basic GetX"),),body: Center(child: GetBuilder<BasicGetLogic>(builder: (_logic) {return DefaultTextStyle(style: const TextStyle(color: Colors.black, fontSize: 30),child: Column(mainAxisSize: MainAxisSize.min,children: [Text("${_logic.name}"),Text("${_logic.age}"),Text("${_logic.sex}"),],),);},),),floatingActionButton: FloatingActionButton(onPressed: logic.updateUser,child: const Icon(Icons.sync),),);}}
Obx和GetBuilder比较
分析
- Obx是配合Rx响应式变量使用、GetBuilder是配合update使用:请注意,这完全是俩套定点刷新控件的方案
- 区别:前者响应式变量变化,Obx自动刷新;后者需要使用update手动调用刷新
- 每一个响应式变量,都需要生成对应的GetStream,占用资源大于基本数据类型,会对内存造成一定压力
GetBuilder内部实际上是对StatefulWidget的封装,所以占用资源极小
使用场景
一般来说,对于大多数场景都是可以使用响应式变量的
- 但是,在一个包含了大量对象的List,都使用响应式变量,将生成大量的GetStream,必将对内存造成较大的压力,该情况下,就要考虑使用简单状态管理了
- 总的来说:推荐GetBuilder和update配合的写法
- GetBuilder内置回收GetxController的功能,能避免一些无法自动回收GetxController的坑爹问题
- 使用GetBuilder的自动回收:GetBuilder需要设置assignId: true;或使用插件一键Wrap Widget:GetBuilder(Auto Dispose)
- 使用Obx,相关变量定义初始化以及实体更新和常规写法不同,会对初次接触该框架的人,造成很大的困扰
- getx插件现已支持一键Wrap Widget生成GetBuilder,可以一定程度上提升你的开发效率
- GetBuilder内置回收GetxController的功能,能避免一些无法自动回收GetxController的坑爹问题
跨页面交互
页面1
import 'package:get/get.dart';import 'package:get_x_demo/more_page_get/page_two_get/view.dart';class PageOneGetLogic extends GetxController {var count = 0;void toTwoPage() {Get.to(const PageTwoGetPage());}void increase() {count = ++count;update();}}
import 'package:flutter/material.dart';import 'package:get/get.dart';import 'logic.dart';class PageOneGetPage extends StatelessWidget {const PageOneGetPage({Key? key}) : super(key: key);@overrideWidget build(BuildContext context) {final logic = Get.put(PageOneGetLogic());return Scaffold(backgroundColor: Colors.white,appBar: AppBar(title: const Text('One Page')),floatingActionButton: FloatingActionButton(onPressed: logic.toTwoPage,child: const Icon(Icons.arrow_forward_outlined),),body: Center(child: GetBuilder<PageOneGetLogic>(builder: (logic) {return Text('Two点击了 ${logic.count} 次',style: const TextStyle(fontSize: 30.0),);},),),);}}
页面2
import 'package:get/get.dart';import 'package:get_x_demo/more_page_get/page_one_get/logic.dart';class PageTwoGetLogic extends GetxController {final oneLogic = Get.put(PageOneGetLogic());var count = 0;@overridevoid onReady() {count = oneLogic.count;update();super.onReady();}void increase() {oneLogic.increase();count = oneLogic.count;update();}}
import 'package:flutter/material.dart';import 'package:get/get.dart';import 'package:get_x_demo/more_page_get/page_one_get/logic.dart';import 'logic.dart';class PageTwoGetPage extends StatelessWidget {const PageTwoGetPage({Key? key}) : super(key: key);@overrideWidget build(BuildContext context) {final twoLogic = Get.put(PageTwoGetLogic());return Scaffold(backgroundColor: Colors.white,appBar: AppBar(title: const Text('Two Page')),floatingActionButton: FloatingActionButton(onPressed: twoLogic.increase,child: const Icon(Icons.add),),body: Center(child: GetBuilder<PageTwoGetLogic>(builder: (logic) {return Text('点击了 ${logic.count} 次',style: const TextStyle(fontSize: 30.0),);},),),);}}
状态分离
划分三个结构:state(状态层),logic(逻辑层),view(界面层)
State
class CountStateGetState {late int count;CountStateGetState() {count = 0;}}
logic
import 'package:get/get.dart';import 'state.dart';class CountStateGetLogic extends GetxController {final CountStateGetState state = CountStateGetState();void increase() {state.count = ++state.count;update();}void remove() {state.count = --state.count;update();}}
view
import 'package:flutter/material.dart';import 'package:get/get.dart';import 'logic.dart';class CountStateGetPage extends StatelessWidget {const CountStateGetPage({Key? key}) : super(key: key);@overrideWidget build(BuildContext context) {final logic = Get.put(CountStateGetLogic());final state = Get.find<CountStateGetLogic>().state;return Scaffold(appBar: AppBar(title: const Text("Count State Demo"),),body: Center(child: GetBuilder<CountStateGetLogic>(builder: (_) {return Text(state.count.toString(),style: const TextStyle(fontSize: 30),);}),),floatingActionButton: Column(mainAxisSize: MainAxisSize.min,children: [FloatingActionButton(heroTag: "add",onPressed: logic.increase,child: const Icon(Icons.add),),const SizedBox(height: 10),FloatingActionButton(heroTag: "sub",onPressed: logic.remove,backgroundColor: Colors.red,child: const Icon(Icons.remove),)],),);}}
- logic只专注于触发事件交互,state只专注数据。
Binding使用
可以统一管理复杂模块的多个GetXController。需要结合getx路由进行使用。
路由
import 'package:get/get.dart';import 'package:get_x_demo/binding_demo/binding_one_page/binding.dart';import 'package:get_x_demo/binding_demo/binding_one_page/view.dart';import 'package:get_x_demo/binding_demo/binding_two_page/binding.dart';import 'package:get_x_demo/binding_demo/binding_two_page/view.dart';class RouteConfig {static const String testOne = "/testOne";static const String testTwo = "/testTwo";static final List<GetPage> getPages = [GetPage(name: testOne,page: () => const BindingOnePage(),binding: BindingOnePageBinding(),),GetPage(name: testTwo,page: () => const BindingTwoPage(),binding: BindingTwoPageBinding(),),];}
Page One
- Logic ```dart import ‘package:get/get.dart’; import ‘package:get_x_demo/binding_demo/route_config.dart’;
class BindingOnePageLogic extends GetxController { void toTwoPage() { Get.toNamed(RouteConfig.testTwo); } }
- Binding```dartimport 'package:get/get.dart';import 'logic.dart';class BindingOnePageBinding extends Bindings {@overridevoid dependencies() {Get.lazyPut(() => BindingOnePageLogic());}}
- View ```dart import ‘package:flutter/material.dart’; import ‘package:get/get.dart’;
import ‘logic.dart’;
class BindingOnePage extends StatelessWidget { const BindingOnePage({Key? key}) : super(key: key);
@override
Widget build(BuildContext context) {
final logic = Get.find
<a name="Wsz84"></a>### Page Two- Logic```dartimport 'package:get/get.dart';class BindingTwoPageLogic extends GetxController {int count = 0;void increase() {count++;update();}void remove() {count--;update();}}
- Binding ```dart import ‘package:get/get.dart’;
import ‘logic.dart’;
class BindingTwoPageBinding extends Bindings { @override void dependencies() { Get.lazyPut(() => BindingTwoPageLogic()); } }
- View```dartimport 'package:flutter/material.dart';import 'package:get/get.dart';import 'logic.dart';class BindingTwoPage extends StatelessWidget {const BindingTwoPage({Key? key}) : super(key: key);@overrideWidget build(BuildContext context) {final logic = Get.find<BindingTwoPageLogic>();return Scaffold(appBar: AppBar(title: const Text("Binding Two Page"),),body: Center(child: GetBuilder<BindingTwoPageLogic>(assignId: true,builder: (logic) {return Text(logic.count.toString(),);},),),floatingActionButton: Column(mainAxisSize: MainAxisSize.min,children: [FloatingActionButton(heroTag: "add",onPressed: logic.increase,child: const Icon(Icons.add),),const SizedBox(height: 10),FloatingActionButton(heroTag: "sub",onPressed: logic.remove,backgroundColor: Colors.red,child: const Icon(Icons.remove),)],),);}}

若有收获,就点个赞吧
0 人点赞
