一个由 apifox 的接口文档生成 typescript 声明的小工具,记录一下开发过程。
仓库代码:https://github.com/JexLau/apifox-to-ts
背景
项目想要接入 typescript 开发,但维护接口的 typings 是一个繁琐且重复的过程,在观察后端提供的接口文档(基于 apifox 平台),发现它的数据构成有一定的规律,且后端的接口规范良好,得益于在前司学到的经验,决定写一个脚本工具来对接口文档自动生成接口 typings。
当然,apifox也提供了生成typings工具,但我觉得可能存在两个缺陷:
- 对于枚举类型的处理,在实际开发中,有些枚举书写不规范转换会报错,个人觉得还是把它处理成联合类型更好。
- apifox 生成的代码, schema 和接口层混杂在一起,项目庞大时比较混乱,按模块生成对应的 schema 和 path 会更清晰,更容易维护。
结果
为了更清晰地感知这个工具的作用,把结果放在前面。第一个文件是service.ts文件,也就是项目中可以直接引入使用的接口文件。第二个文件是schema文件,包含了项目所有的schema。第三个文件是path文件,包含了项目所有的请求。将这三个文件复制到项目中,可直接使用。后续接口有更新,执行脚本也可一键生成,不必费力维护接口的typings。
眼尖的小伙伴当然发现了,目前项目还没有根据模块生成对应的文件,原因是因为在开发过程中,发现模块名称是中文,我不愿意根据中文生成模块,所以暂时不做。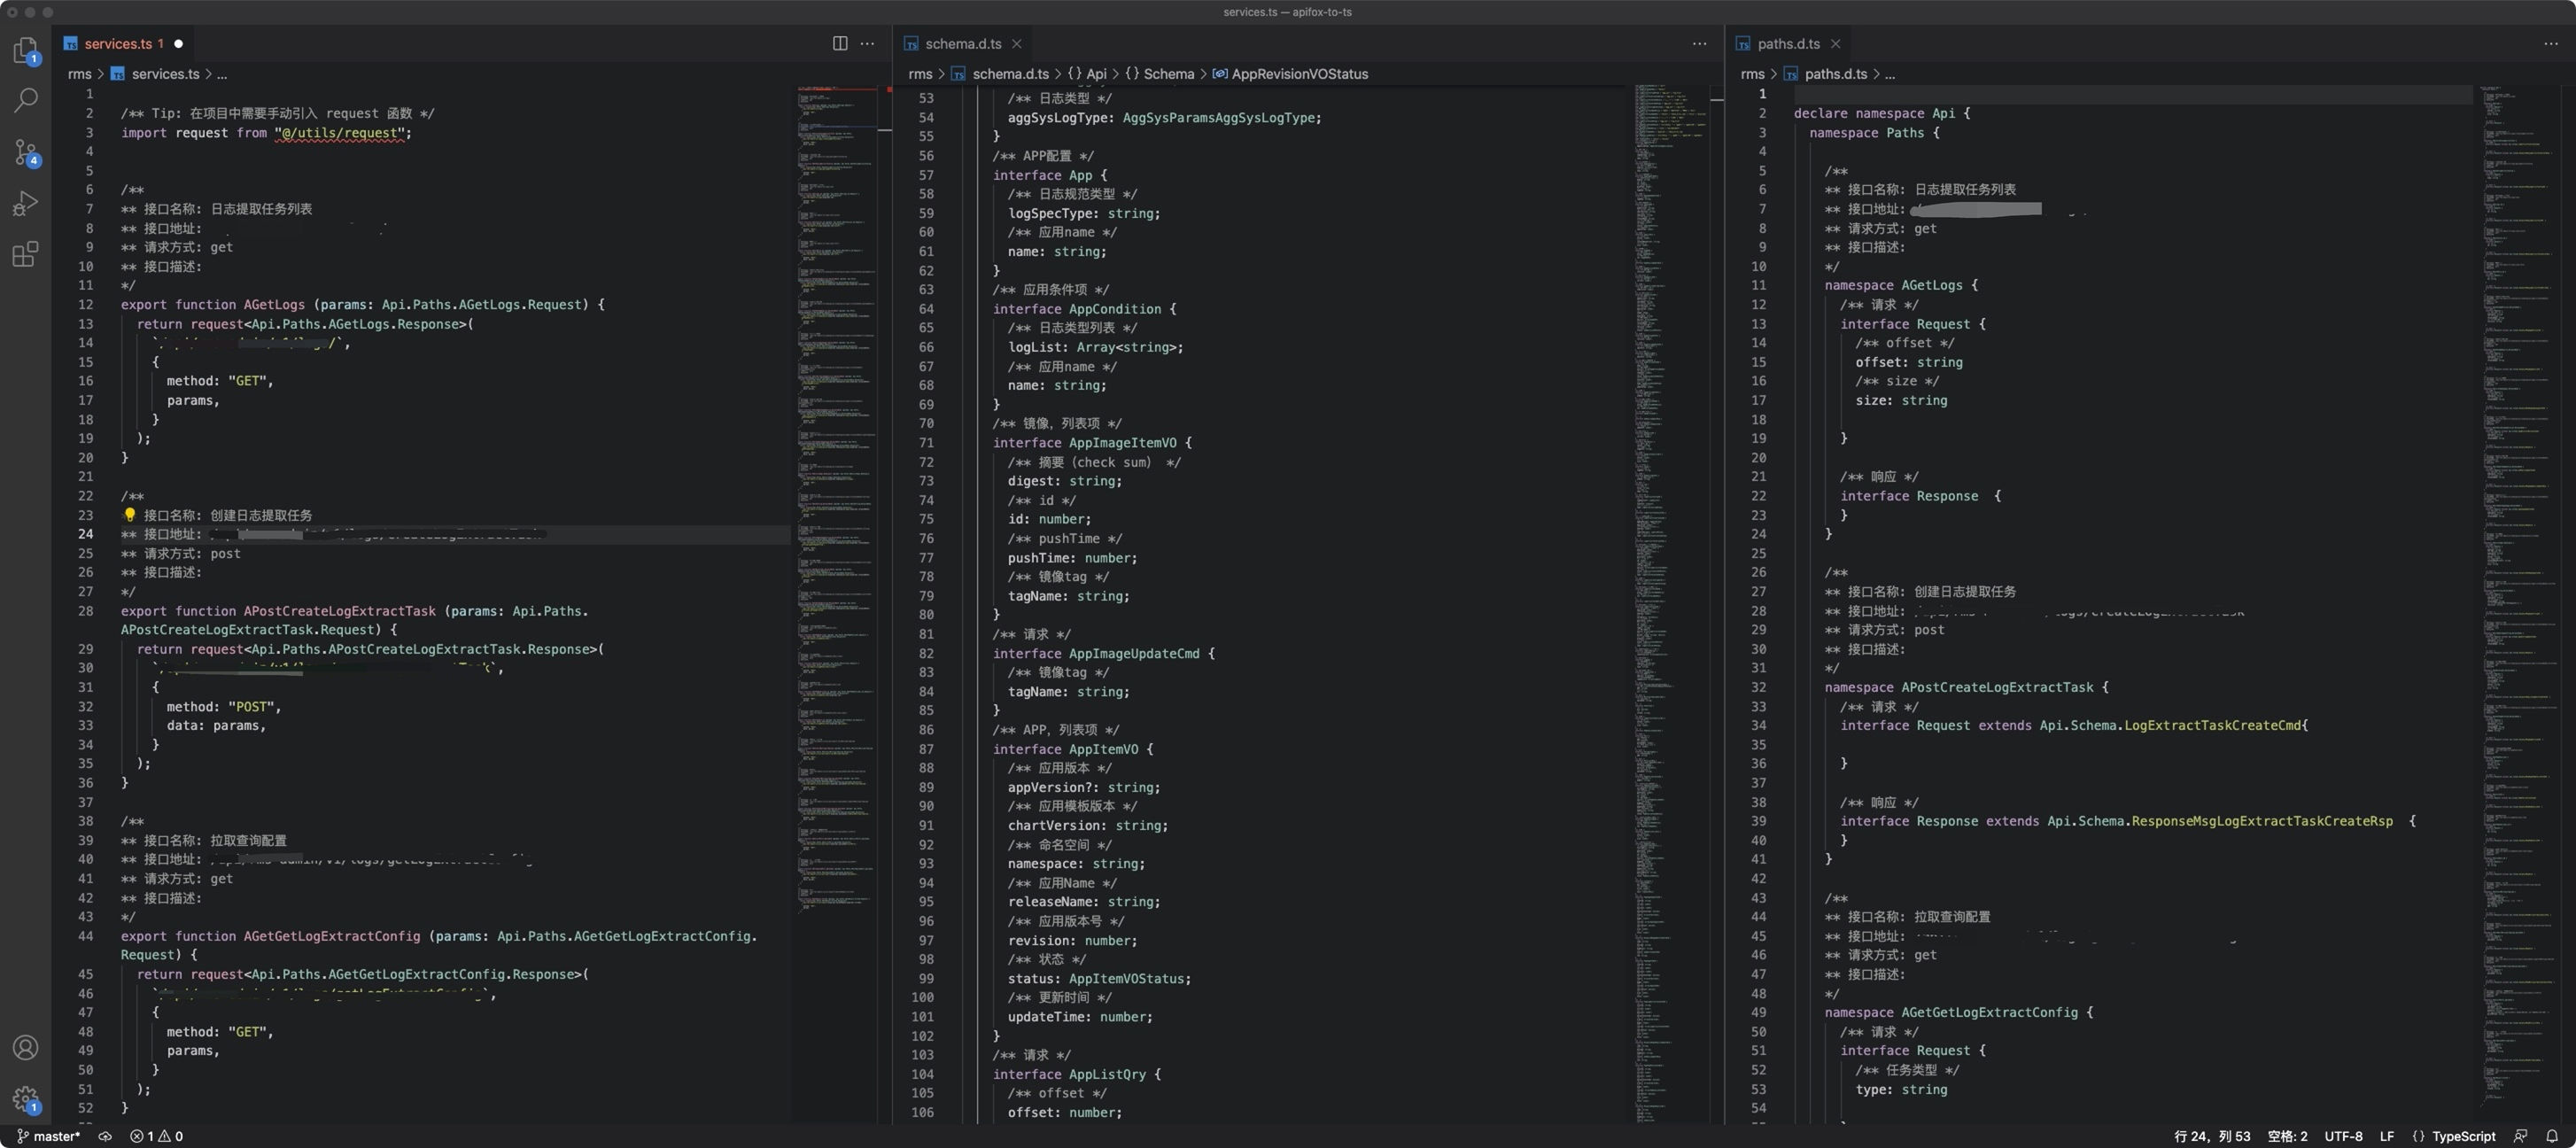
开发过程
打开一个 apifox 项目文档,通过观察控制台的请求,发现 apifox 网页端的数据主要来源于这三个接口:
- /api/v1/shared-docs/${share_id}/data-schemas 用来请求schemas(抽象集合)
- /api/v1/shared-docs/${share_id}/http-api-tree 用来请求接口所有模块
- /api/v1/shared-docs/${share_id}/http-apis/${api_id} 用来请求某一接口的具体构成(api_id是通过上一个接口http-api-tree拿到的)
share_id 为项目分享生成的 id
在日常开发中,我们知道一个请求主要有这两部分:请求参数Request+请求返回值Response,请求Path。第一部分可以抽象地看成是Schema(抽象集合),第二部分就是Path,工具函数需要做的就是解析这两部分。
1. 解析schema
上一步我们知道 data-schemas 这个接口可以拿到项目中所有 schemas,我放个具体的截图感受一下。左边是整体的截图,右边是某一项的截图。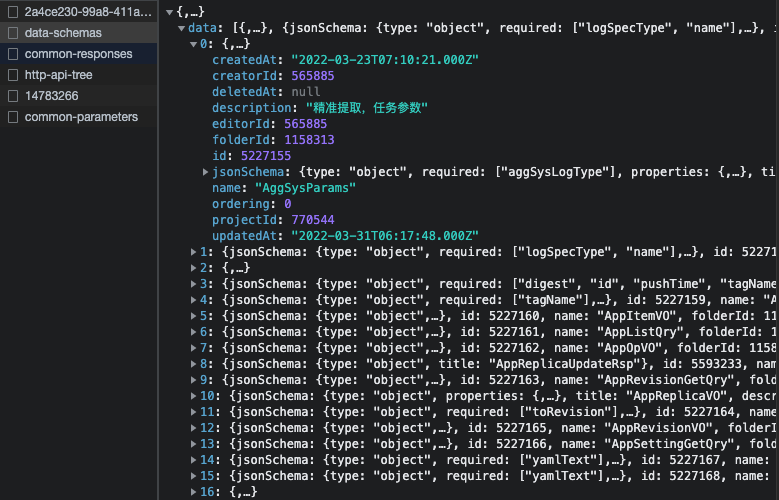
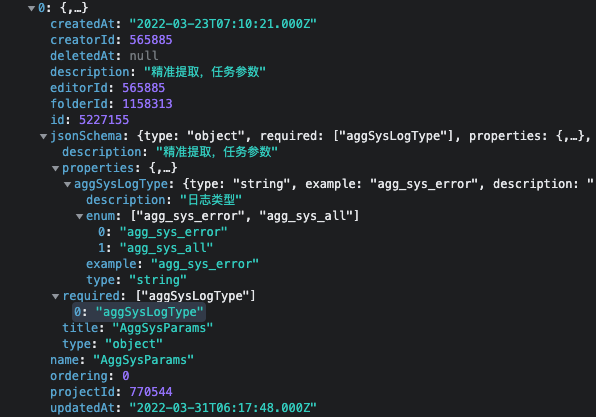
它是一个数组,每个数组项就是一个 schema,所谓的 schema 就是一个对象,解析 schema 就是解析这个对象里面的属性。解析属性,首先需要知道这个属性是什么类型,我们可以先把所有的 type 打印出来看一下。
// 抽离schemasconst schemasUrl = "https://www.apifox.cn/api/v1/shared-docs/xxxx/data-schemas"axios.get(schemasUrl).then(res => {const schemasData = res.data.data;console.log(`**************成功请求 schemas 数据**************`);// 处理schema// 先观察一下schema有多少种typeconst types = []schemasData.forEach(item => {const properties = item.jsonSchema.properties;if (properties) {for (let p in properties) {const type = properties[p].typeif(types.indexOf(type) === -1) {types.push(type)}}}})console.log(types.join(",")) // string,array,integer,,object,boolean})
打印出来的结果是 string,array,integer,,object,boolean。注意,里面有一个空值,待会我们可以打印一下空值的jsonSchema是什么情况。string, integer,boolean都是简单类型,可以直接转换为typescript里面对应的string, number,boolean类型,但对于object,array和空值,我们需要额外去处理它。那么我们先看一下这三种类型是什么情况: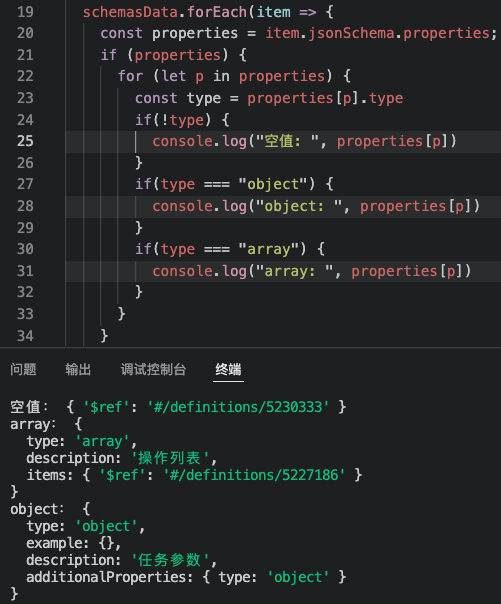
这是它们的结构,可以看到这三者的结构是不一样的,可以根据这些数据大概抽象出它们的interface。而 { ‘$ref’: ‘#/definitions/5227172’ } 这种结构,意思是它的类型对应的是 id 为 5227172 的 schema。
interface SchemaArray {type: string, // 目前发现有 'array' | 'object' 这两个类型的值example?: string[],description?: string,items: {type?: string, // 简单类型$ref?: string, // 链接另外一个scheme,和type互斥}}interface SchemaObject {type: string,example?: {},description?: string,additionalProperties: {type?: string, // 'object'}}interface SchemaNull {$ref?: string, // 链接另外一个scheme}
理清了这些类型关系,我们可以对这个schema对象数组简单做一个解析,解析的结果就是每一个 schema 数据对应的 interface/type。
解析类型
经过上面的过程,我们知道有 string,array,integer,,object,boolean 这几种类型。通过观察数据,发现type为string其中还有一种情况,就是枚举enum。所以我们首先要先把schema-data遍历一次,生成所有的枚举类型(方便后面引用)。
for (let key in properties) {const property = properties[key]if (property.enum) {// schemaTitle充当一个前缀的作用,防止枚举重命名const enumName = schemaTitle + firstToLocaleUpperCase(key)const description = property.description || ""result += `/** ${description} */type ${enumName} = ${handleEnumType(property.enum)}`}}
处理完枚举类型,然后再遍历一次,根据对应的type生成typescript的代码。
schemasData.forEach(item => {const properties = item.jsonSchema.properties;const required = item.jsonSchema.required;const description = item.jsonSchema.description || "";const schemaTitle = formatSchemaName(item.jsonSchema.title);result += `/** ${description} */interface ${schemaTitle} {${handleAllType(properties, required, schemaTitle)}}`})/** 转换类型 */const convertType = function (property, key, schemaTitle = "") {let type = "未知";switch (property.type) {case "string":if (property.enum) {const enumType = schemaTitle + firstToLocaleUpperCase(key)type = enumType} else {type = "string"};break;case "boolean":type = "boolean";break;case "integer":type = "number";break;case "number":type = "number";break;case "array":if (property.items.type) {let itemType = property.items.type;if (itemType === "integer") {type = `Array<number>`;} else {type = `Array<${itemType}>`;}} else if (property.items.$ref) {const refType = convertRefType(property.items.$ref);if (refType) {type = `Array<${refType}>`;}}break;case "object":if (property.additionalProperties && property.additionalProperties.type) {// 递归遍历type = convertType(property.additionalProperties);} else {// 任意objecttype = "{[key: string]: object}"}break;default:if (property.$ref) {const refType = convertRefType(property.$ref);if (refType) {type = refType;}}}// formatSchemaName 作用是对命名格式化,去除一些特殊符号return formatSchemaName(type);}
就可以生成所有的schema了。然后使用writeFileSync()写入到目标文件中。
2. 解析path
apifox数据结构是,先拿到api-tree,然后轮询id获取请求的request和response。所以第一步是拿到api-tree的数据,然后取出模块id轮询获取api接口的数据。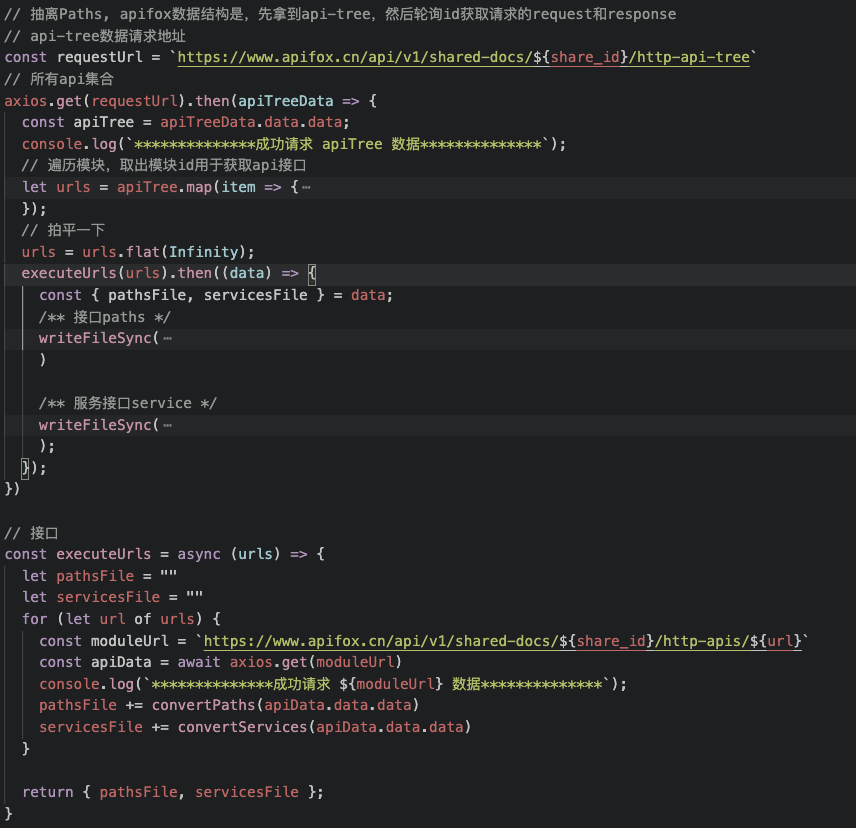
拿到数据之后,就是转换path文件。一个请求,最重要的就是请求参数和请求返回值。所以需要生成对应的Request和Response。正常情况下,传参有三种位置,path,query,body,path和query只能传递字符串,body一般是一个请求体(可以看作是一个schema),body的schema在前面生成的schema中可以找得到,所以直接引用就可以。(解析就是纯力气活,根据数据格式解析就完事了)
/** 转换Path */const convertPaths = (item) => {let cacheApiName = [];const getApiName = createApiName(item.path, item.method);let pathsFileCotent = `\/**** 接口名称: ${item.name}** 接口地址: ${item.path}** 请求方式: ${item.method}** 接口描述: ${item.description}*\/namespace ${getApiName(cacheApiName)} {/** 请求 */interface Request ${convertRequstBody(item.requestBody)}{${convertParameters(item.parameters)}}/** 响应 */interface Response ${convertResponse(item.responses)} {}}`return pathsFileCotent;}/** 转换body参数 */function convertRequstBody(requestBody) {if (!requestBody || requestBody.type === "none") {return "";}if (requestBody.type === "application/json") {const bodyRef = requestBody.jsonSchema.$ref;const bodySchemaName = convertRefType(bodyRef)if (bodySchemaName) {return `extends Api.Schema.${bodySchemaName}`;}}return ""}// convertParameters 略
解析response更简单了,一般返回值都是一个schema,直接把这个schema与前面的schema对应起来即可
function convertResponse(responses) {const successRes = responses.find(item => item.name === "OK");const resRef = successRes.jsonSchema.$ref || "";const resSchemaName = convertRefType(resRef)if (resSchemaName) {return `extends Api.Schema.${resSchemaName} `;}return ""}
此时可以生成所有接口的paths文件了。然后使用writeFileSync()写入到目标文件中。
3. 生成service文件
此时已经拥有了schema和paths文件,可以在项目里实际使用了。但经过实践发现,service文件也可以通过一定规律去生成,就不用那么麻烦去写接口代码了。
function convertServices(item) {let cacheApiName = [];const getApiName = createApiName(item.path, item.method);const apiName = getApiName(cacheApiName);const servicesFileCotent = `\/**** 接口名称: ${item.name}** 接口地址: ${item.path}** 请求方式: ${item.method}** 接口描述: ${item.description}*\/export function ${apiName} (params: Api.Paths.${apiName}.Request) {return request<Api.Paths.${apiName}.Response>(\`${item.path.replace(/[{]/g, "${params.")}\`,{method: "${item.method.toUpperCase()}",${["GET", "DELETE"].includes(item.method.toUpperCase()) ? "params," : "data: params,"}});}`;return servicesFileCotent;}
生成的代码如前面展示的结果图。
收获
开发体验更友好(更好地摸鱼)。

若有收获,就点个赞吧
0 人点赞
