如何使用根窗格
原文: https://docs.oracle.com/javase/tutorial/uiswing/components/rootpane.html
通常,您不直接创建 JRootPane 对象。相反,当您实例化 JInternalFrame 或其中一个顶级 Swing 容器(例如 JApplet )时,您会获得JRootPane(无论您是否想要!) , JDialog 和 JFrame 。
使用顶级容器告诉您使用根窗格的基础知识 - 获取内容窗格,设置其布局管理器以及向其添加 Swing 组件。本节将详细介绍根窗格,包括组成根窗格的组件以及如何使用它们。
如上图所示,根窗格有四个部分:
The glass pane
Hidden, by default. If you make the glass pane visible, then it’s like a sheet of glass over all the other parts of the root pane. It’s completely transparent unless you implement the glass pane’s paintComponent method so that it does something, and it can intercept input events for the root pane. In the next section, you’ll see an example of using a glass pane.
The layered pane
Serves to position its contents, which consist of the content pane and the optional menu bar. Can also hold other components in a specified Z order. For information, see The Layered Pane.
The content pane
The container of the root pane’s visible components, excluding the menu bar. For information on using the content pane, see Using Top-Level Containers.
The optional menu bar
The home for the root pane’s container’s menus. If the container has a menu bar, you generally use the container’s setJMenuBar method to put the menu bar in the appropriate place. For more information on using menus and menu bars, see How to Use Menus.
当您希望能够捕获事件或绘制已包含一个或多个组件的区域时,玻璃窗格非常有用。例如,您可以通过使玻璃窗格拦截事件来停用多组件区域的鼠标事件。或者,您可以使用玻璃窗格在多个组件上显示图像。
这是一个演示玻璃窗格功能的应用程序的图片。它包含一个复选框,可让您设置玻璃窗格是否“可见” - 是否可以获取事件并在屏幕上绘制自己。当玻璃窗格可见时,它会阻止所有输入事件到达内容窗格中的组件。它还会在上次检测到鼠标按下事件的位置绘制一个红点。
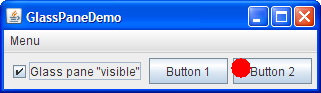
Try this:
单击“启动”按钮以使用 Java™Web Start (下载 JDK 7 或更高版本)运行 GlassPaneDemo。或者,要自己编译并运行示例,请参考示例索引。

单击按钮 1. 按钮的外观会更改以显示已单击按钮。
- 单击复选框以使玻璃窗格变为“可见”,然后再次单击“按钮 1”。 按钮不会单击,因为玻璃窗格会拦截所有鼠标事件。玻璃窗格绘制一个红色圆圈,释放鼠标。
- 再次单击该复选框,以隐藏玻璃窗格。 当玻璃窗格检测到复选框上的事件时,它会将其转发到复选框。否则,复选框不会响应点击。
来自 GlassPaneDemo.java 的以下代码显示并隐藏了玻璃窗格。该程序恰好创建了自己的玻璃窗格。但是,如果玻璃窗格没有进行任何绘制,程序可能只是将监听器附加到默认的玻璃窗格,如getGlassPane所返回。
myGlassPane = new MyGlassPane(...);changeButton.addItemListener(myGlassPane);frame.setGlassPane(myGlassPane);...class MyGlassPane extends JComponentimplements ItemListener {...//React to change button clicks.public void itemStateChanged(ItemEvent e) {setVisible(e.getStateChange() == ItemEvent.SELECTED);}...}
下一个代码段实现了玻璃窗格的鼠标事件处理。如果复选框上出现鼠标事件,则玻璃窗格会重新分配事件,以便复选框接收该事件。
...//In the implementation of the glass pane's mouse listener:public void mouseMoved(MouseEvent e) {redispatchMouseEvent(e, false);}.../* The mouseDragged, mouseClicked, mouseEntered,* mouseExited, and mousePressed methods have the same* implementation as mouseMoved. */...public void mouseReleased(MouseEvent e) {redispatchMouseEvent(e, true);}private void redispatchMouseEvent(MouseEvent e,boolean repaint) {Point glassPanePoint = e.getPoint();Container container = contentPane;Point containerPoint = SwingUtilities.convertPoint(glassPane,glassPanePoint,contentPane);if (containerPoint.y < 0) { //we're not in the content pane//Could have special code to handle mouse events over//the menu bar or non-system window decorations, such as//the ones provided by the Java look and feel.} else {//The mouse event is probably over the content pane.//Find out exactly which component it's over.Component component =SwingUtilities.getDeepestComponentAt(container,containerPoint.x,containerPoint.y);if ((component != null)&& (component.equals(liveButton))) {//Forward events over the check box.Point componentPoint = SwingUtilities.convertPoint(glassPane,glassPanePoint,component);component.dispatchEvent(new MouseEvent(component,e.getID(),e.getWhen(),e.getModifiers(),componentPoint.x,componentPoint.y,e.getClickCount(),e.isPopupTrigger()));}}//Update the glass pane if requested.if (repaint) {glassPane.setPoint(glassPanePoint);glassPane.repaint();}}
这是实现绘画的MyGlassPane中的代码。
protected void paintComponent(Graphics g) {if (point != null) {g.setColor(Color.red);g.fillOval(point.x - 10, point.y - 10, 20, 20);}}
分层窗格是具有深度的容器,使得重叠的组件可以一个在另一个上面。有关分层窗格的一般信息,请参见如何使用分层窗格。本节讨论根窗格如何使用分层窗格的详细信息。
每个根窗格都将其菜单栏和内容窗格放在JLayeredPane的实例中。分层窗格提供的 Z 排序启用了诸如在其他组件上方显示弹出菜单的行为。
您可以选择将组件放在根窗格的分层窗格中。如果这样做,那么您应该知道某些深度被定义为用于特定功能,您应该按预期使用深度。否则,您的组件可能无法与其他组件一起使用。这是一个显示功能层及其关系的图表:
下表描述了每个图层的预期用途,并列出了与每个图层对应的JLayeredPane常量:
| 图层名称 | 值 | 描述 |
|---|---|---|
FRAME_CONTENT_LAYER |
new Integer(-30000) |
根窗格将菜单栏和内容窗格添加到此深度的分层窗格。 |
DEFAULT_LAYER |
new Integer(0) |
如果在将组件添加到分层窗格时未指定组件的深度,则分层窗格会将其置于此深度。 |
PALETTE_LAYER |
new Integer(100) |
此图层对浮动工具栏和调色板很有用。 |
MODAL_LAYER |
new Integer(200) |
模态内部框架对话框将属于此图层。 |
POPUP_LAYER |
new Integer(300) |
Popups 会进入这一层,因为它们需要出现在几乎所有内容之上。 |
DRAG_LAYER |
new Integer(400) |
用于拖动组件时使用。删除时,组件应返回其常规层。 |
LayeredPaneDemo 的一个版本,它使用根窗格的分层窗格,而不是创建新的分层窗格。
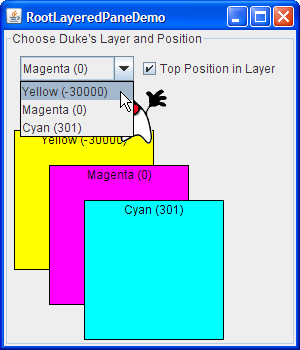
Try this:
单击“启动”按钮以使用 Java™Web Start (下载 JDK 7 或更高版本)运行 RootLayeredPaneDemo。或者,要自己编译并运行示例,请参考示例索引。
在窗口中移动光标,以便 Duke 在其他组件的顶部移动。 请注意,当光标位于非标签组件之上时 - 无论是在内容窗格中还是在 Java-look-and-feel 提供的标题栏中 - Duke 的移动都会暂时停止。这是因为鼠标移动事件会转到包含层次结构中最深的组件,并且对鼠标事件感兴趣。移动 Duke 的鼠标移动监听器在分层窗格中注册,该窗格中的大多数组件(标签除外)恰好具有鼠标移动监听器。当鼠标移动到分层窗格中感兴趣的组件上时,分层窗格不会获取事件,感兴趣的组件也会这样做。
- 确保选中图层中的顶部位置复选框,将 Duke 的图层更改为黄色(-30000)。 和以前一样,除了洋红色(0)和青色(301)矩形之外,他出现在其他组件之上。
- 将 Duke 保留在黄色图层中,单击复选框将 Duke 发送到图层-30000 的背面。 Duke 消失了,因为内容窗格及其中的所有组件现在都在他之上。
- 将 Duke 的图层更改为 Cyan(301),将 Duke 向下移动一点,使其站在黄色矩形的上边缘,然后按空格键以显示组合框的下拉列表。 如果外观将下拉列表实现为轻量级弹出窗口,则 Duke 会显示在下拉列表的顶部。
下面的表列出了使用根窗格,玻璃窗格和内容窗格的 API。有关使用内容窗格的更多信息,请转到使用顶级容器。以下是本节中的表格:
用于使用根窗格其他部分的 API 在别处描述:
| 方法 | 目的 |
|---|---|
| JRootPane getRootPane() |
(JApplet,JDialog,JFrame,JInternalFrame和JWindow) | 获取小程序,对话框,框架,内部框架或窗口的根窗格。 |
| 静态 JRootPane getRootPane(组件)
(在SwingUtilities中) | 如果组件包含根窗格,请返回该根窗格。否则,返回包含该组件的根窗格(如果有)。 |
| JRootPane getRootPane()
(在JComponent中) | 调用JComponent的SwingUtilities getRootPane方法。 |
| void setDefaultButton(JButton)
JButton getDefaultButton() | 设置或获取哪个按钮(如果有)是根窗格中的默认按钮。特定于外观的操作(例如按 Enter 键)会导致执行按钮的操作。 |
The following methods are defined in JApplet, JDialog, JFrame, JInternalFrame, JRootPane, and JWindow, unless noted otherwise.
| 方法 | 目的 |
| :— | :— |
| void setGlassPane(Component)
Component getGlassPane() | 设置或获取玻璃窗格。 |
| void setLayeredPane(JLayeredPane)
Container getLayeredPane() | 设置或获取分层窗格。 |
| void setContentPane(Container)
Container getContentPane() | 设置或获取内容窗格。 |
| void setJMenuBar(JMenuBar)
JMenuBar getJMenuBar()
(未在JWindow中定义) | 设置或获取菜单栏。 |
的示例
每个 Swing 程序都有一个根窗格,但很少有人直接引用它。以下列表中的示例说明了如何使用JRootPane或玻璃窗格的功能。另请参阅以下列表:
| 例 | 在哪里描述 | 笔记 |
|---|---|---|
GlassPaneDemo |
这个部分 | 使用绘制一点并重新分配事件的玻璃窗格。 |
RootLayeredPaneDemo |
这个部分 | 调整 LayeredPaneDemo 以使用根窗格的分层窗格。 |
ListDialog |
如何使用列表 | 设置JDialog的默认按钮。 |
FrameDemo2 |
如何制作框架 | 设置JFrame的默认按钮。 |

若有收获,就点个赞吧
0 人点赞
