使用2台物理机节点构建 K8s (2台 内存8G、4核 物理机) K8s 官网信息
服务器信息如下(如果是阿里云可以对应阿里云内网地址)
| 服务器 | 角色 | hostname | os | k8s、docker 版本 |
|---|---|---|---|---|
| 192.168.1.231 | master 节点 | k8s-master | centos | k8s1.22.4、docker 20.0 |
| 192.168.1.233 | node-1节点 | k8s-mode1 | unbuntu | k8s1.23.0、docker 20.0 |
需要打开端口(k8s官方指南)【为了方便可以直接关闭服务器防火墙,阿里云服务器关闭后可以在安全组中进行端口配置】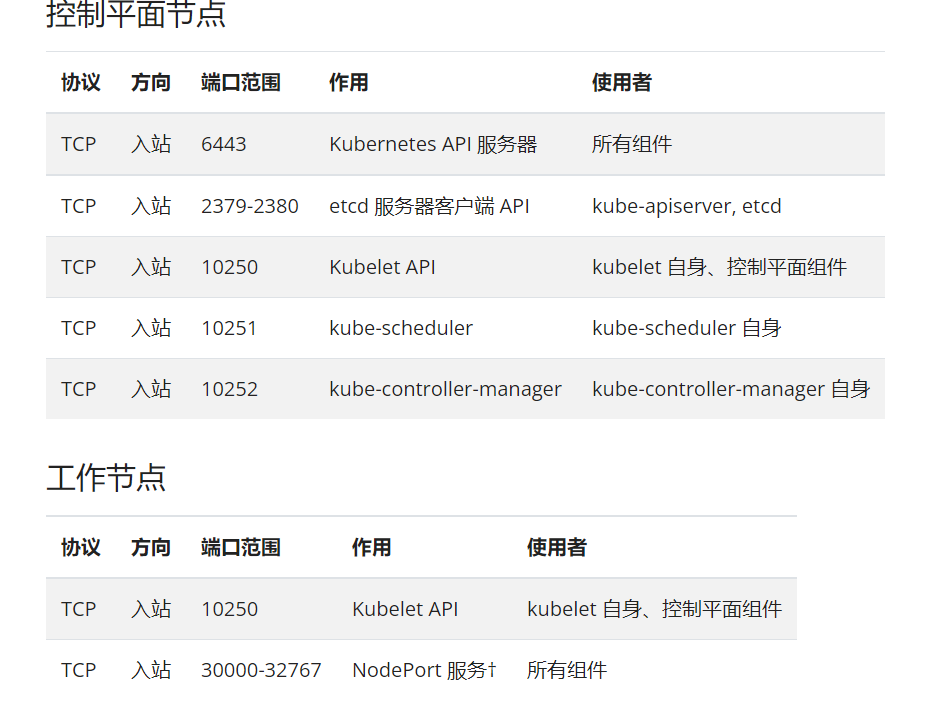
一、master/node 节点环境通用安装
官方安装指南 操作系统:Centos 7
1.1、关闭防火墙
## centos 如果是 firewalldsystemctl stop firewalldsystemctl disable firewalld## centos 如果是 iptablessystemctl stop iptablessystemctl disable iptables## ubuntu 使用的是 ufwsudo ufw disable
1.2、关闭 selinux
setenforce 0 # 临时关闭sed -i 's/SELINUX=enforcing/SELINUX=disabled/g' /etc/selinux/config # 永久关闭
1.3、关闭 swap(k8s 默认不支持 swap)
swapoff -a # 临时关闭;关闭swap主要是为了性能考虑vi /etc/fstab # 注释最后一行带有 swap 的
1.4、/etc/hosts 添加k8s 节点信息
$ vi /etc/hosts192.168.1.231 k8s-master192.168.1.233 k8s-node1
1.5、修改主机名
## master 节点
$ hostname k8s-master ## 临时生效
$ hostnamectl set-hostname k8s-master ##重启后永久生效

## node 节点
$ hostname k8s-node1 ## 临时生效
$ hostnamectl set-hostname k8s-node1 ##重启后永久生效
1.6、桥接设置
$ cat > /etc/sysctl.d/k8s.conf << EOF
net.bridge.bridge-nf-call-ip6tables = 1
net.bridge.bridge-nf-call-iptables = 1
EOF
$ sysctl --system
1.7、docker 安装
[
](https://www.yuque.com/zhi-xing/blog-java/etoz9d)
1.7.1、docker安装
1.7.2、docker 配置
docker 和 k8s 对应的 cgroupdriver 配置要一致,这里修改 docker 对应的 cgroupdriver 值。(官方修改k8s配置案例)
- step1、查看k8s cgroupdriver 配置,文件:
/var/lib/kubelet/config.yamlcgroupDriver: systemd - step2、修改 docker cgroupDriver 配置,文件:
/etc/docker/daemon.json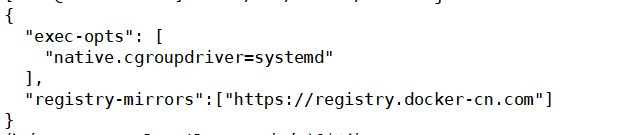
- step3、重新docker 服务
systemctl restart docker.service - step4、重新初始化 or 重启kubelete 服务
省略1.8、k8s 软件安装(kubeadm,kubelet和kubectl)
1.8.1、设置k8s 国内源(不设置代理翻墙也可以)
```shellcentos 系统操作如下
$ cat > /etc/yum.repos.d/kubernetes.repo << EOF [k8s] name=k8s enabled=1 gpgcheck=0 baseurl=https://mirrors.aliyun.com/kubernetes/yum/repos/kubernetes-el7-x86_64/ EOF
unbuntu 系统操作如下
$ curl -s https://mirrors.aliyun.com/kubernetes/apt/doc/apt-key.gpg | apt-key add -
$ cat <
<a name="zX8r5"></a>
#### 1.8.2、安装
```shell
# 安装
# 可以指定版本,也可以默认安装,指定版本在软件后增加版本号,如:kubelet-1.22.4
# k8s 版本和 docker 版本,以及k8s 版本间的不同可能导致安装集群部署问题,问题可参考 k8s github 变更
# 版本问题参考k8s 版本文档:https://github.com/kubernetes/kubernetes/tree/master/CHANGELOG

$ yum install -y kubelet kubectl kubeadm

# 开机重新 kubelet
$ systemctl enable kubelet
二、master 节点初始化安装
2.1、部署 k8s master 节点
部署失败,找到问题,使用
kubeadm reset重置,中心进行初始化安装部署
kubeadm init --image-repository=registry.aliyuncs.com/google_containers \
    --apiserver-advertise-address=192.168.1.231 \
    --pod-network-cidr=10.244.0.0/16
- —image-repository
指定镜像仓储,因为 k8s 镜像国内网络不可达 - —apiserver-advertise-address
指定自己本机IP、云服务指定分配的内网IP即可2.2、部署成功
如果部署成功,会有如下控制台打印信息 ```shell Your Kubernetes control-plane has initialized successfully!
To start using your cluster, you need to run the following as a regular user:
mkdir -p $HOME/.kube sudo cp -i /etc/kubernetes/admin.conf $HOME/.kube/config sudo chown $(id -u):$(id -g) $HOME/.kube/config
Alternatively, if you are the root user, you can run:
export KUBECONFIG=/etc/kubernetes/admin.conf
You should now deploy a pod network to the cluster. Run “kubectl apply -f [podnetwork].yaml” with one of the options listed at: https://kubernetes.io/docs/concepts/cluster-administration/addons/
Then you can join any number of worker nodes by running the following on each as root:
k8s node 节点加入的指令
kubeadm join 192.168.1.231:6443 —token nuen80.29sdki5058rh7fwf —discovery-token-ca-cert-hash sha256:53a59f2ed594a0e15233e2b90bacab53e4f057a9c541d0746d33ecb58771a725
记录这些信息,然后根据提示执行步骤
```shell
mkdir -p $HOME/.kube
sudo cp -i /etc/kubernetes/admin.conf $HOME/.kube/config
sudo chown $(id -u):$(id -g) $HOME/.kube/config
查看master 节点状态:kubectl get nodes
$ kubectl get nodes
NAME         STATUS   ROLES                  AGE    VERSION
k8s-master   Ready    control-plane,master   8h     v1.22.4
安装网络插件 flannel
## 设置 /etc/hosts 文件()
$ vi /etc/hosts
199.232.28.133 raw.githubusercontent.com

## 安装 flannel 组件
kubectl apply -f https://raw.githubusercontent.com/coreos/flannel/master/Documentation/kube-flannel.yml
三、node 节点加入 master 集群中
根据 master 节点安装成功中的提示 带有的 join 命令,将 node 节点加入到集群中
kubeadm join 192.168.1.231:6443 --token nuen80.29sdki5058rh7fwf --discovery-token-ca-cert-hash sha256:53a59f2ed594a0e15233e2b90bacab53e4f057a9c541d0746d33ecb58771a725
从 master 节点中 查看集群状态:kubectl get nodes·
$ kubectl get nodes
NAME         STATUS   ROLES                  AGE    VERSION
k8s-master   Ready    control-plane,master   8h     v1.22.4
k8s-node1    Ready    <none>                 116s   v1.23.0
四、安装中遇到的问题
4.1、服务器资源不足问题
4.1.1、报错信息描述
[root@localhost yum.repos.d]# kubeadm init --apiserver-advertise-address=192.168.1.103 --pod-network-cidr=10.244.0.0/16
[init] Using Kubernetes version: v1.22.4
[preflight] Running pre-flight checks
error execution phase preflight: [preflight] Some fatal errors occurred:
    [ERROR NumCPU]: the number of available CPUs 1 is less than the required 2
    [ERROR Mem]: the system RAM (972 MB) is less than the minimum 1700 MB
    [ERROR Swap]: running with swap on is not supported. Please disable swap
[preflight] If you know what you are doing, you can make a check non-fatal with `--ignore-preflight-errors=...`
To see the stack trace of this error execute with --v=5 or higher
4.1.2、解决思路
- K8s 安装对应服务至少2个核心
- K8s 安装要求服务器最少 1700 MB
- K8s 安装要求关闭 swap
- step1、
swapoff -a - step2、
vi /etc/fstab
注释掉最后一行# /dev/mapper/centos-swap swap swap defaults 0 0
- step1、
4.2、swap 未关闭报错
[root@localhost yum.repos.d]# kubeadm init --apiserver-advertise-address=192.168.1.103 --pod-network-cidr=10.244.0.0/16
[init] Using Kubernetes version: v1.22.4
[preflight] Running pre-flight checks
error execution phase preflight: [preflight] Some fatal errors occurred:
    ...... 省略
    [ERROR Swap]: running with swap on is not supported. Please disable swap
[preflight] If you know what you are doing, you can make a check non-fatal with `--ignore-preflight-errors=...`
To see the stack trace of this error execute with --v=5 or higher
4.3、cgroupdriver 问题
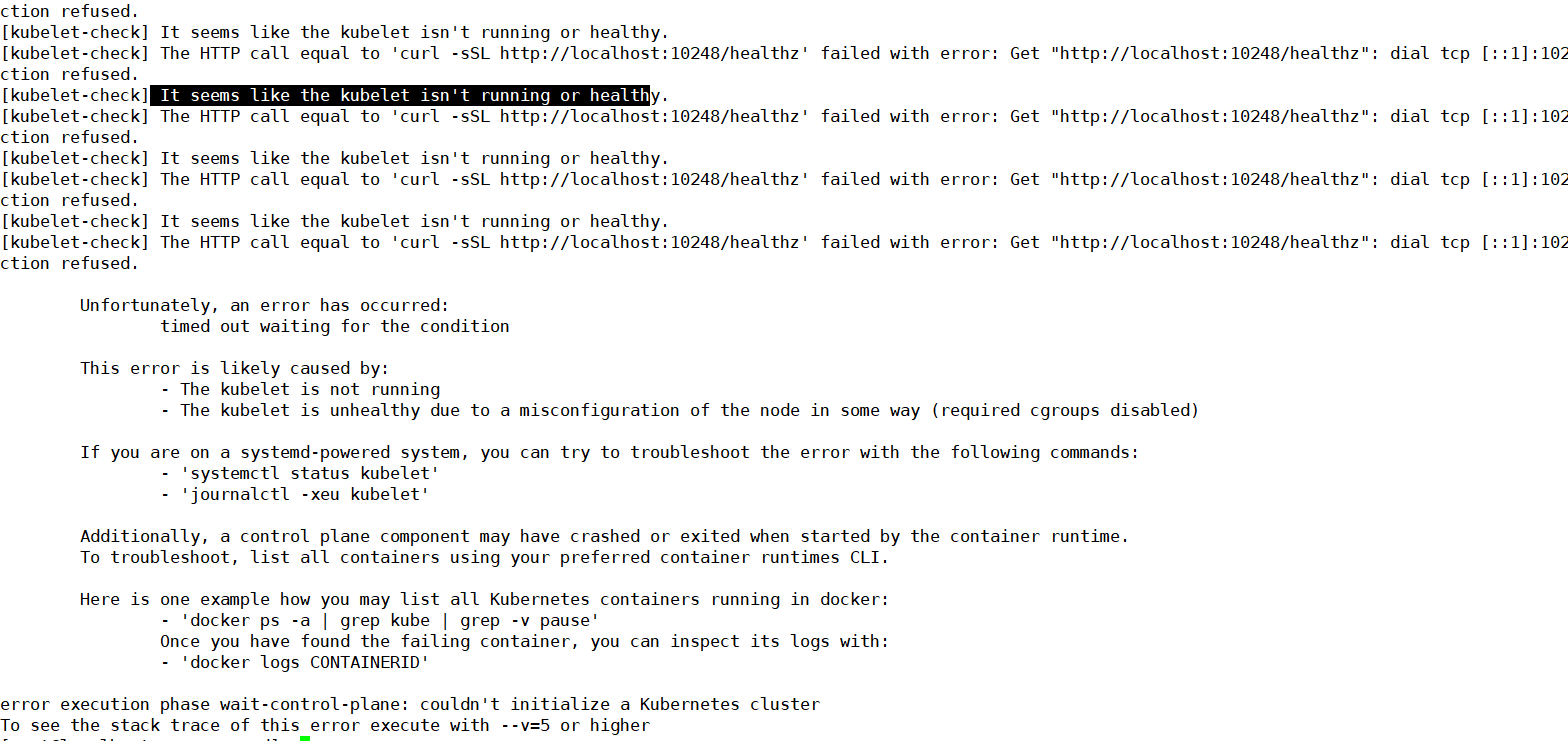
查看错误日志信息:tail /var/log/messages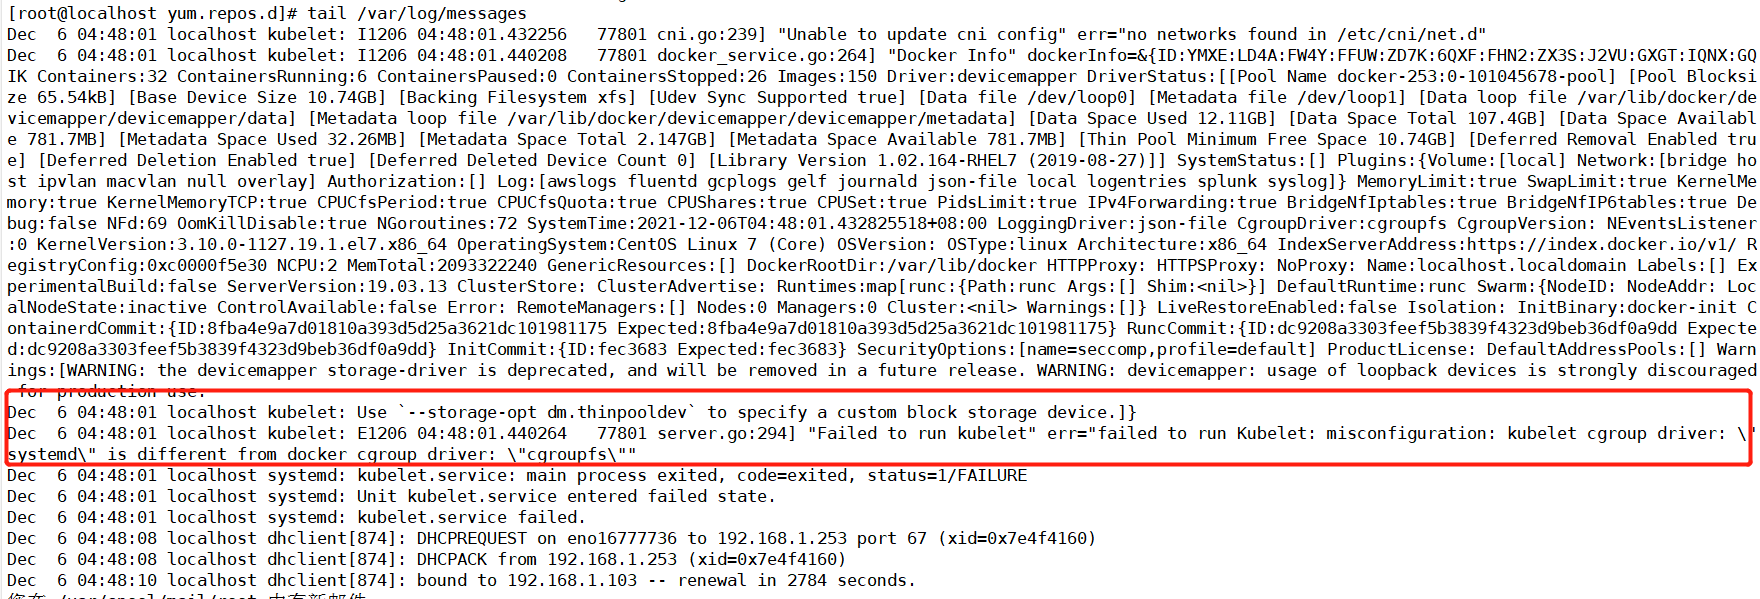
问题原因:k8s 和 dockercgroupdriver 配置不同。
TODO cgroup 解决
五、k8s 卸载
5.1、centos7 卸载
kubeadm reset -f
yum remove -y kubelet kubeadm kubectl
modprobe -r ipip
lsmod
rm -rf ~/.kube/
rm -rf /etc/kubernetes/
rm -rf /etc/systemd/system/kubelet.service.d
rm -rf /etc/systemd/system/kubelet.service
rm -rf /usr/bin/kube*
rm -rf /etc/cni
rm -rf /opt/cni
rm -rf /var/lib/etcd
rm -rf /var/etcd
5.2、ubuntu 卸载
sudo kubeadm reset -f
sudo modprobe -r ipip
sudo lsmod
sudo rm -rf ~/.kube/
sudo rm -rf /etc/kubernetes/
sudo rm -rf /etc/systemd/system/kubelet.service.d
sudo rm -rf /etc/systemd/system/kubelet.service
sudo rm -rf /usr/bin/kube*
sudo rm -rf /etc/cni
sudo rm -rf /opt/cni
sudo rm -rf /var/lib/etcd
sudo rm -rf /var/etcd

若有收获,就点个赞吧
0 人点赞
