Spark 计算框架为了能够进行高并发和高吞吐的数据处理,封装了三大数据结构,用于处理不同的应用场景。三大数据结构分别是:
- RDD : 弹性分布式数据集
- 累加器:分布式共享只写变量
- 广播变量:分布式共享只读变量
接下来我们一起看看这三大数据结构是如何在数据处理中使用的。
一、RDD
1、介绍
1、概念
RDD(Resilient Distributed Dataset)叫做弹性分布式数据集,是 Spark 中最基本的数据处理模型。代码中是一个抽象类,它代表一个弹性的、不可变、可分区、里面的元素可并行计算的集合。
弹性
- 存储的弹性:内存与磁盘的自动切换;
- 容错的弹性:数据丢失可以自动恢复;
- 计算的弹性:计算出错重试机制;
- 分片的弹性:可根据需要重新分片。
分布式:数据存储在大数据集群不同节点上
- 数据集:RDD 封装了计算逻辑,并不保存数据
- 数据抽象:RDD 是一个抽象类,需要子类具体实现
- 不可变:RDD 封装了计算逻辑,是不可以改变的,想要改变,只能产生新的 RDD,在新的 RDD 里面封装计算逻辑
- 可分区、并行计算
RDD的数据处理方式类似于IO流,也有装饰者设计模式
RDD的数据只有在调用collect方法时,才会真正执行业务逻辑操作。之前都不会
RDD是不保存数据的,但是IO可以临时保存一部分数据在缓冲区中。
2、核心属性
* Internally, each RDD is characterized by five main properties:** - A list of partitions* - A function for computing each split* - A list of dependencies on other RDDs* - Optionally, a Partitioner for key-value RDDs (e.g. to say that the RDD is hash-partitioned)* - Optionally, a list of preferred locations to compute each split on (e.g. block locations for* an HDFS file)
- 分区列表
RDD 数据结构中存在分区列表,用于执行任务时并行计算,是实现分布式计算的重要属性。
/*** Implemented by subclasses to return the set of partitions in this RDD. This method will only* be called once, so it is safe to implement a time-consuming computation in it.** The partitions in this array must satisfy the following property:* `rdd.partitions.zipWithIndex.forall { case (partition, index) => partition.index == index }`*/protected def getPartitions: Array[Partition]
- 分区计算函数
Spark 在计算时,是使用分区函数对每一个分区进行计算
/*** :: DeveloperApi ::* Implemented by subclasses to compute a given partition.*/@DeveloperApidef compute(split: Partition, context: TaskContext): Iterator[T]
- RDD 之间的依赖关系
RDD 是计算模型的封装,当需求中需要将多个计算模型进行组合时,就需要将多个 RDD 建立依赖关系
/*** Implemented by subclasses to return how this RDD depends on parent RDDs. This method will only* be called once, so it is safe to implement a time-consuming computation in it.*/protected def getDependencies: Seq[Dependency[_]] = deps
- 分区器(可选)
当数据为 KV 类型数据时,可以通过设定分区器自定义数据的分区
/** Optionally overridden by subclasses to specify how they are partitioned. */@transient val partitioner: Option[Partitioner] = None
- 首选位置(可选)
计算数据时,可以根据计算节点的状态选择不同的节点位置进行计算
/*** Optionally overridden by subclasses to specify placement preferences.*/protected def getPreferredLocations(split: Partition): Seq[String] = Nil
3、执行原理
从计算的角度来讲,数据处理过程中需要计算资源(内存 & CPU)和计算模型(逻辑)。执行时,需要将计算资源和计算模型进行协调和整合。
Spark 框架在执行时,先申请资源,然后将应用程序的数据处理逻辑分解成一个一个的计算任务。然后将任务发到已经分配资源的计算节点上, 按照指定的计算模型进行数据计算。最后得到计算结果。
RDD 是 Spark 框架中用于数据处理的核心模型,接下来我们看看,在 Yarn 环境中,RDD的工作原理:
1、启动Yarn集群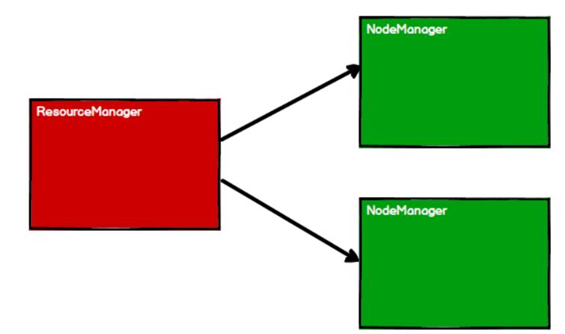
2、Spark通过申请资源创建调度节点和计算节点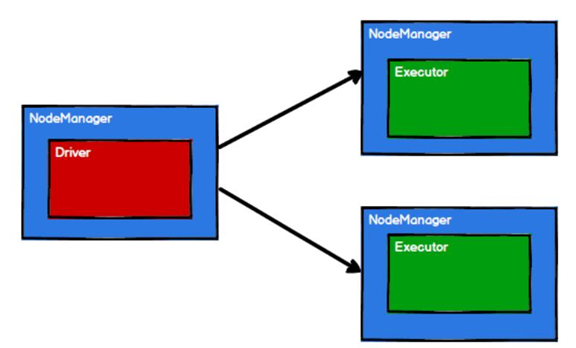
3、Spark框架根据需求计算逻辑根据分区划分成不同的任务
4、调度节点根据计算节点状态将任务发送到对应的计算节点进行计算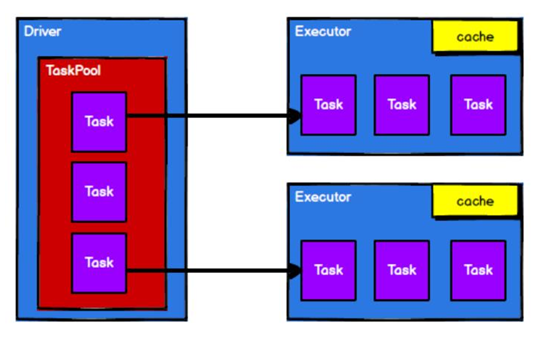
2、基础使用
1、创建RDD
在 Spark 中创建 RDD 的创建方式可以分为四种:
- 从集合(内存)中创建 RDD
从集合中创建 RDD,Spark 主要提供了两个方法:parallelize 和 makeRDD
object RDD_Memory {def main(args: Array[String]): Unit = {val conf = new SparkConf().setMaster("local[*]").setAppName("RDD_MEMORY")val context = new SparkContext(conf)// 创建rdd// seq: Seq[T],// numSlices: Int = defaultParallelismval seq: Seq[Int] = Seq(1, 2, 3)val rdd: RDD[Int] = context.parallelize(seq);// 其实makeRDD就是封装了parallelize方法val rdd2: RDD[Int] = context.makeRDD(seq)// rdd.collect.foreach(println)rdd2.collect.foreach(println)context.stop()}}
从底层代码实现来讲,makeRDD 方法其实就是 parallelize 方法
def makeRDD[T: ClassTag](seq: Seq[T],numSlices: Int = defaultParallelism): RDD[T] = withScope {// 调用parallelize()方法parallelize(seq, numSlices)}
从外部存储(文件)创建 RDD
- textFile:以行为单位读取数据,不考虑文件来自哪里 ```scala object RDD_File {
def main(args: Array[String]): Unit = {
val context = new SparkContext(new SparkConf().setMaster(“local[*]”).setAppName(“RDD_MEMORY”))
// 创建rdd // 1、path路径默认从当前环境的根路径为基准,可以绝对和相对路径 // val rdd1: RDD[String] = context.textFile(“datas/1.txt”) // 2、path路径可以是具体的文件,也可以是目录,读取该目录下所有文件 val rdd2: RDD[String] = context.textFile(“datas”) // 3、path路径可以使用通配符 val rdd3: RDD[String] = context.textFile(“datas/1.txt”) // 只读取1的文件 // 4、path路径也可以是分布式存储系统,如HDFS,Ceph、Nfs等 context.textFile(“hdfs://hadoop:9820/hello”)
rdd1.collect.foreach(println)
context.stop()
} }
- whoTextFiles:以文件为单位读取数据,读取的结果表示为元组,第一个元素表示文件路径,第二个元素表示文件内容```scala// 获取文件来源val rdd5: RDD[(String, String)] = context.wholeTextFiles("datas")rdd5.collect.foreach(x => println(x._2))
- 从其他 RDD 创建
- 主要是通过一个 RDD 运算完后,再产生新的 RDD。
- 直接创建 RDD(new)
- 使用 new 的方式直接构造 RDD,一般由 Spark 框架自身使用。
2、并行度和分区
1、集合数据的分配
默认情况下,Spark 可以将一个作业切分多个任务后,发送给 Executor 节点并行计算,而能够并行计算的任务数量我们称之为并行度。这个数量可以在构建 RDD 时指定。记住,这里的并行执行的任务数量,并不是指的切分任务的数量,不要混淆了。
我们在使用parallelize方法的时候,可以传入第二个参数:numSlices: Int = defaultParallelism,默认并行度。
来到TaskScheduler特质中
// Get the default level of parallelism to use in the cluster, as a hint for sizing jobs.def defaultParallelism(): Int
找其实现类
override def defaultParallelism(): Int = backend.defaultParallelism()
来到SchedulerBackend特质中
def defaultParallelism(): Int
继续找其实现类
分模式来找对应的实现
本地实现:找spark.default.parallelism配置项的值,如果没有设置就用默认totalCores,本地所有cpu核数
override def defaultParallelism(): Int =scheduler.conf.getInt("spark.default.parallelism", totalCores)
集群模式中,如果没有设置,就使用cpu总核数或者2中的最大值
override def defaultParallelism(): Int = {conf.getInt("spark.default.parallelism", math.max(totalCoreCount.get(), 2))}
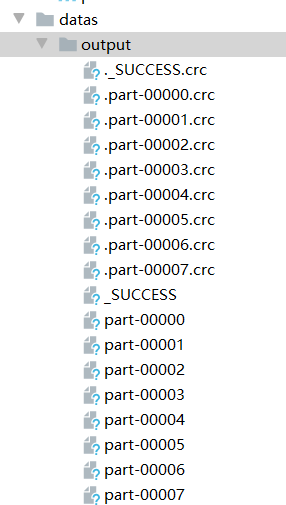
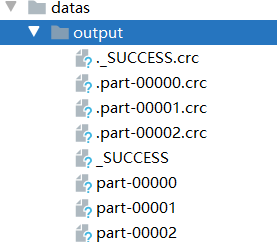
可以使用saveAsObjectFile将rdd产出文件保存到目录中
val rdd2: RDD[Int] = context.makeRDD(seq)rdd2.saveAsObjectFile("datas/output")
指定数量之后:
val rdd2: RDD[Int] = context.makeRDD(seq,3)rdd2.saveAsObjectFile("datas/output")
那么这个切分,是按照什么切分呢?切分后的数据到底存放在哪里呢?
比如一个5长度的数组,切分3个分区,数据怎么分呢?
来深入源码分析:
此时5个元素,三个分片
1、先来到SparkContext的parallelize()方法
def parallelize[T: ClassTag](seq: Seq[T],numSlices: Int = defaultParallelism): RDD[T] = withScope {assertNotStopped()// 创建一个ParallelCollectionRDD对象,new ParallelCollectionRDD[T](this, seq, numSlices, Map[Int, Seq[String]]())}
2、创建ParallelCollectionRDD对象
private[spark] class ParallelCollectionRDD[T: ClassTag](sc: SparkContext,@transient private val data: Seq[T],numSlices: Int,locationPrefs: Map[Int, Seq[String]])extends RDD[T](sc, Nil) {// 在这里获取分区数量override def getPartitions: Array[Partition] = {// 获取分片val slices = ParallelCollectionRDD.slice(data, numSlices).toArrayslices.indices.map(i => new ParallelCollectionPartition(id, i, slices(i))).toArray}
3、进入ParallelCollectionRDD.slice(data, numSlices)方法,求出数据如何分片
def slice[T: ClassTag](seq: Seq[T], numSlices: Int): Seq[Seq[T]] = {// 分片小于1抛出异常if (numSlices < 1) {throw new IllegalArgumentException("Positive number of partitions required")}// Sequences need to be sliced at the same set of index positions for operations// like RDD.zip() to behave as expected// 求出位置 5 3def positions(length: Long, numSlices: Int): Iterator[(Int, Int)] = {// 遍历所有分片,0, 1, 2(0 until numSlices).iterator.map { i =>// start = 0 * 5 / 3 = 0// 分片 * 数据长度 / 分片数量,决定轮询到哪个分片val start = ((i * length) / numSlices).toInt// 0 + 1 * 数据长度 / 分片数量val end = (((i + 1) * length) / numSlices).toInt// 就成了 (0,1) (1,3) (3,5)(start, end)}}// 模式匹配seq match {// 不是范围case r: Range =>positions(r.length, numSlices).zipWithIndex.map { case ((start, end), index) =>// If the range is inclusive, use inclusive range for the last sliceif (r.isInclusive && index == numSlices - 1) {new Range.Inclusive(r.start + start * r.step, r.end, r.step)}else {new Range(r.start + start * r.step, r.start + end * r.step, r.step)}}.toSeq.asInstanceOf[Seq[Seq[T]]]case nr: NumericRange[_] =>// For ranges of Long, Double, BigInteger, etcval slices = new ArrayBuffer[Seq[T]](numSlices)var r = nrfor ((start, end) <- positions(nr.length, numSlices)) {val sliceSize = end - startslices += r.take(sliceSize).asInstanceOf[Seq[T]]r = r.drop(sliceSize)}slices// 默认兜底处理case _ =>val array = seq.toArray // To prevent O(n^2) operations for List etc// 5,3positions(array.length, numSlices).map {// // 就成了 (0,1) (1,3) (3,5)case (start, end) =>array.slice(start, end).toSeq}.toSeq}}
4、slice最终分片
override def slice(from: Int, until: Int): Array[T] = {// 获取数组val reprVal = repr//val lo = math.max(from, 0)val hi = math.min(math.max(until, 0), reprVal.length)// 最大值减去最小值,决定每个分片存放数据的数量val size = math.max(hi - lo, 0)val result = java.lang.reflect.Array.newInstance(elementClass, size)if (size > 0) {// 通过copy方法,将原数组中的每个分片的位置拷贝size个元素Array.copy(reprVal, lo, result, 0, size)}result.asInstanceOf[Array[T]]}
5、copy数组元素
* @param src the source array.* @param srcPos starting position in the source array.* @param dest destination array.* @param destPos starting position in the destination array.* @param length the number of array elements to be copied.** @see `java.lang.System#arraycopy`*/def copy(src: AnyRef, srcPos: Int, dest: AnyRef, destPos: Int, length: Int) {val srcClass = src.getClassif (srcClass.isArray && dest.getClass.isAssignableFrom(srcClass))java.lang.System.arraycopy(src, srcPos, dest, destPos, length)elseslowcopy(src, srcPos, dest, destPos, length)}
2、文件数据的分配
读取文件数据时,数据是按照 Hadoop 文件读取的规则进行切片分区,而切片规则和数据读取的规则有些差异。
在读取文件的时候同样可以指定最小分区数量。
// minPartitions: Int = defaultMinPartitions 最小分区数量val rdd1: RDD[String] = context.textFile("datas/1.txt",2)// def defaultMinPartitions: Int = math.min(defaultParallelism, 2)
我们这个1.txt文件如下: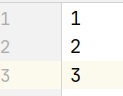
看着是三个字节,其实是包含了7个字节,回车和换行符。
1、textFile进行读取
def textFile(path: String,minPartitions: Int = defaultMinPartitions): RDD[String] = withScope {assertNotStopped()// 来到HadoopFile,其实是由Hadoop接管了hadoopFile(path, classOf[TextInputFormat], classOf[LongWritable], classOf[Text],minPartitions).map(pair => pair._2.toString).setName(path)}
2、HadoopFile创建一个新的HadoopRDD对象。
def hadoopFile[K, V](path: String,inputFormatClass: Class[_ <: InputFormat[K, V]],keyClass: Class[K],valueClass: Class[V],minPartitions: Int = defaultMinPartitions): RDD[(K, V)] = withScope {assertNotStopped()// This is a hack to enforce loading hdfs-site.xml.// See SPARK-11227 for details.FileSystem.getLocal(hadoopConfiguration)// A Hadoop configuration can be about 10 KiB, which is pretty big, so broadcast it.val confBroadcast = broadcast(new SerializableConfiguration(hadoopConfiguration))// 我们看到了熟悉的FileInputFormat,这就解释了为什么是一行一行读取。val setInputPathsFunc = (jobConf: JobConf) => FileInputFormat.setInputPaths(jobConf, path)new HadoopRDD(this,confBroadcast,Some(setInputPathsFunc),inputFormatClass,keyClass,valueClass,minPartitions).setName(path)}
3、等到collect收集的时候
来到HadoopRDD的getPartitions方法
override def getPartitions: Array[Partition] = {val jobConf = getJobConf()// add the credentials here as this can be called before SparkContext initializedSparkHadoopUtil.get.addCredentials(jobConf)try {// 从这里获取输入流,并且获取分片val allInputSplits = getInputFormat(jobConf).getSplits(jobConf, minPartitions)val inputSplits = if (ignoreEmptySplits) {allInputSplits.filter(_.getLength > 0)} else {allInputSplits}if (inputSplits.length == 1 && inputSplits(0).isInstanceOf[FileSplit]) {val fileSplit = inputSplits(0).asInstanceOf[FileSplit]val path = fileSplit.getPathif (fileSplit.getLength > conf.get(IO_WARNING_LARGEFILETHRESHOLD)) {val codecFactory = new CompressionCodecFactory(jobConf)if (Utils.isFileSplittable(path, codecFactory)) {logWarning(s"Loading one large file ${path.toString} with only one partition, " +s"we can increase partition numbers for improving performance.")} else {logWarning(s"Loading one large unsplittable file ${path.toString} with only one " +s"partition, because the file is compressed by unsplittable compression codec.")}}}val array = new Array[Partition](inputSplits.size)for (i <- 0 until inputSplits.size) {array(i) = new HadoopPartition(id, i, inputSplits(i))}array} catch {case e: InvalidInputException if ignoreMissingFiles =>logWarning(s"${jobConf.get(FileInputFormat.INPUT_DIR)} doesn't exist and no" +s" partitions returned from this path.", e)Array.empty[Partition]}}
4、来到Hadoop读取分片的getSplits方法,至此获取分片数量,完成任务
/** Splits files returned by {@link #listStatus(JobConf)} when* they're too big.*/public InputSplit[] getSplits(JobConf job, int numSplits)throws IOException {StopWatch sw = new StopWatch().start();FileStatus[] files = listStatus(job);// Save the number of input files for metrics/loadgenjob.setLong(NUM_INPUT_FILES, files.length);// 获取文件数据的总字节大小long totalSize = 0; // compute total sizefor (FileStatus file: files) { // check we have valid filesif (file.isDirectory()) {throw new IOException("Not a file: "+ file.getPath());}totalSize += file.getLen();}// goalSize就是总字节 / 有指定几个分区,就除几,获取每个分区应该存放多少字节long goalSize = totalSize / (numSplits == 0 ? 1 : numSplits);long minSize = Math.max(job.getLong(org.apache.hadoop.mapreduce.lib.input.FileInputFormat.SPLIT_MINSIZE, 1), minSplitSize);// generate splitsArrayList<FileSplit> splits = new ArrayList<FileSplit>(numSplits);NetworkTopology clusterMap = new NetworkTopology();for (FileStatus file: files) {Path path = file.getPath();long length = file.getLen();if (length != 0) {FileSystem fs = path.getFileSystem(job);BlockLocation[] blkLocations;if (file instanceof LocatedFileStatus) {blkLocations = ((LocatedFileStatus) file).getBlockLocations();} else {blkLocations = fs.getFileBlockLocations(file, 0, length);}// 如果可以分片,进行分片操作if (isSplitable(fs, path)) {long blockSize = file.getBlockSize(); // 获取块大小,集群模式128m,local模式32m// 获取切片大小,取块大小和目标分区大小的最小值long splitSize = computeSplitSize(goalSize, minSize, blockSize);long bytesRemaining = length;while (((double) bytesRemaining)/splitSize > SPLIT_SLOP) {String[][] splitHosts = getSplitHostsAndCachedHosts(blkLocations,length-bytesRemaining, splitSize, clusterMap);splits.add(makeSplit(path, length-bytesRemaining, splitSize,splitHosts[0], splitHosts[1]));bytesRemaining -= splitSize;}if (bytesRemaining != 0) {String[][] splitHosts = getSplitHostsAndCachedHosts(blkLocations, length- bytesRemaining, bytesRemaining, clusterMap);splits.add(makeSplit(path, length - bytesRemaining, bytesRemaining,splitHosts[0], splitHosts[1]));}} else {String[][] splitHosts = getSplitHostsAndCachedHosts(blkLocations,0,length,clusterMap);splits.add(makeSplit(path, 0, length, splitHosts[0], splitHosts[1]));}} else {//Create empty hosts array for zero length filessplits.add(makeSplit(path, 0, length, new String[0]));}}sw.stop();if (LOG.isDebugEnabled()) {LOG.debug("Total # of splits generated by getSplits: " + splits.size()+ ", TimeTaken: " + sw.now(TimeUnit.MILLISECONDS));}return splits.toArray(new FileSplit[splits.size()]);}
分区的数据是如何分配的呢?
1、spark读取文件,是以hadoop的FileInputFormat为默认实现的,所以是一行一行读取。和字节数没有关系
2、数据读取时以偏移量为单位,并且不会重复读取
我们的数据是 1@@ ==> 012 2@@ ==> 345 3 ==> 6
3、数据分区的偏移量范围的计算
0 ==> [0,3] => 12 1 ==> [3,6] => 3 2 ==> [6,7] =>
这个读取范围两边都可以取到
,我们读取0,1,2,3。由于是按照一行一行读取的,所以读取到了数据1和2。由于能够读取到2,所以说2所在的一行已经被读取了,不能被重复读取。所以继续往下走,读取第三行的3到第二个分区中,所以第三个分区什么也没有
3、RDD算子
RDD的方法总共分两种,大致分为:
- 转换:功能的补充和封装,将旧的RDD包装成新的RDD,比如flatMap、map操作
- 行动:触发任务的调度和执行
RDD的方法也称为算子。
认知心理学认为解决问题其实是将问题的状态进行改变:
问题(初始) => 操作(算子) => 问题(审核中) => 操作(算子) => 问题(完成)
这个 操作翻译过来就叫做Operator,所以RDD的方法就叫做算子。
1、RDD转换算子
RDD 根据数据处理方式的不同将算子整体上分为 Value 类型、双 Value 类型和 Key-Value类型
- Value类型
1、map
def map[U: ClassTag](f: T => U): RDD[U]
将处理的数据逐条进行映射转换,这里的转换可以是类型的转换,也可以是值的转换。
object Transform_map {def main(args: Array[String]): Unit = {val context = new SparkContext(new SparkConf().setMaster("local[*]").setAppName("map"))val rdd: RDD[Int] = context.makeRDD(List(1, 2, 3, 4))// 定义一个转换函数,将数值都乘以2返回def double(num: Int): Int = {num * 2}val value: RDD[Int] = rdd.map(double)// 函数至简原则,能省则省,// rdd.map((num: Int) => {num * 2})// 最简单形式:rdd.map(_*2)value.collect.foreach(println)}}
小案例:收集Apache的log日志,并获取uri
apache.log
思路:日志的话,如果格式可能一直,ip地址可能不一致,所以偏移量切割不太可行。尽量按照空格等切割。apache的日志访问uri都在最后一个,其实也可以倒着切
object Transform_map_test {def main(args: Array[String]): Unit = {val context = new SparkContext(new SparkConf().setMaster("local[*]").setAppName("map"))val rdd: RDD[String] = context.textFile("datas/apache.log")// 方便理解rdd.map(line => {val strings: Array[String] = line.split(" ")strings(6)})// 柯里化传值val value: RDD[String] = rdd.map(_.split(" ")(6))value.collect.foreach(println)}}
map的计算其实是并行的
演示:
object Transform_map_parallel_test {def main(args: Array[String]): Unit = {val context = new SparkContext(new SparkConf().setMaster("local[*]").setAppName("map"))val rdd: RDD[Int] = context.makeRDD(List(1, 2, 3, 4),1)val mappedRdd: RDD[Int] = rdd.map(num => {println(Thread.currentThread.getName + "=======>" + num)num})val mappedRdd1: RDD[Int] = mappedRdd.map(num => {println(Thread.currentThread.getName + "#######》" + num)num})mappedRdd1.collect.foreach(println)context.stop()}}
Rdd的计算,在一个分区内是一个一个执行逻辑,只有前一个数据的逻辑执行完毕之后才可以执行下一个数据,分区内数据是有序的。
当只有一个分区的结果:
Executor task launch worker for task 0=======>1 Executor task launch worker for task 0#######》1 Executor task launch worker for task 0=======>2 Executor task launch worker for task 0#######》2 Executor task launch worker for task 0=======>3 Executor task launch worker for task 0#######》3 Executor task launch worker for task 0=======>4 Executor task launch worker for task 0#######》4
分区数量改为2之后,同一个分区内是有序的,但是执行顺序就是并行的,谁先执行就不知道了
Executor task launch worker for task 1=======>3 Executor task launch worker for task 1#######》3 Executor task launch worker for task 1=======>4 Executor task launch worker for task 1#######》4 Executor task launch worker for task 0=======>1 Executor task launch worker for task 0#######》1 Executor task launch worker for task 0=======>2 Executor task launch worker for task 0#######》2
2、mapPartitions
按照分区进行计算
def mapPartitionsU: ClassTag: RDD[U]
object MapPartition_Test {def main(args: Array[String]): Unit = {val context: SparkContext = new SparkContext(new SparkConf().setMaster("local[*]").setAppName("mapPartition"))val rdd = context.makeRDD(List(1, 2, 3, 4), 1)// def mapPartitions[U: ClassTag](// f: Iterator[T] => Iterator[U],// preservesPartitioning: Boolean = false): RDD[U]//val value: RDD[Int] = rdd.mapPartitions(iter => {println("--------------")iter.map(_ * 2)})value.collect.foreach(println)}}
如果是两个分区的话就可以在每个分区执行一遍该操作。——-就会被输出两次。
小功能:获取每个分区的最大值
mapPartitions就可以轻松实现
def main(args: Array[String]): Unit = {val context: SparkContext = new SparkContext(new SparkConf().setMaster("local[*]").setAppName("mapPartition"))val rdd = context.makeRDD(List(1, 2, 3, 4), 2)// 但是这个mapPartitions方法,占用内存,会导致引用指向内存中的数据导致GC不会释放。所以慎用,或者考虑使用软引用// def mapPartitions[U: ClassTag](// f: Iterator[T] => Iterator[U],// preservesPartitioning: Boolean = false): RDD[U]//val value: RDD[Int] = rdd.mapPartitions(iter => {// 最外层是迭代器,所以要包装一下List(iter.max).iterator})value.collect.foreach(println)}}
思考一下:map和mapPartitions的区别?
- 数据处理角度
Map 算子是分区内一个数据一个数据的执行,类似于串行操作。而 mapPartitions 算子是以分区为单位进行批处理操作。
- 功能的角度
Map 算子主要目的将数据源中的数据进行转换和改变。但是不会减少或增多数据。MapPartitions 算子需要传递一个迭代器,返回一个迭代器,没有要求的元素的个数保持不变,所以可以增加或减少数据
- 性能的角度
Map 算子因为类似于串行操作,所以性能比较低,而是 mapPartitions 算子类似于批处理,所以性能较高。但是 mapPartitions 算子会长时间占用内存,那么这样会导致内存可能不够用,出现内存溢出的错误。所以在内存有限的情况下,不推荐使用。使用 map 操作。
3、mapPartitionsWithIndex
**
def mapPartitionsWithIndexU: ClassTag => Iterator[U],
preservesPartitioning: Boolean = false): RDD[U]
将待处理的数据以分区为单位发送到计算节点进行处理,这里的处理是指可以进行任意的处理,哪怕是过滤数据,在处理时同时可以获取当前分区索引。
获取第二个数据分区的数据
object Transform_mapPartitionsWithIndex {def main(args: Array[String]): Unit = {val context = new SparkContext(new SparkConf().setMaster("local[*]").setAppName("map"))val rdd: RDD[Int] = context.makeRDD(List(1,2,3,4),2)// mapPartitionsWithIndex可以根据索引选择// 比如现在只要第二个分区的数据。val mappedRdd: RDD[Int] = rdd.mapPartitionsWithIndex((index, iter) => {if (index == 1) {iter} else {// 其他分区返回nullNil.iterator}})mappedRdd.collect.foreach(println)}}
将数据根据索引放到不同分区
object Transform_mapPartitionsWithIndex_2 {def main(args: Array[String]): Unit = {val context = new SparkContext(new SparkConf().setMaster("local[*]").setAppName("map"))val rdd: RDD[Int] = context.makeRDD(List(1,2,3,4),2)// mapPartitionsWithIndex可以根据索引选择//val mappedRdd: RDD[(Int, Int)] = rdd.mapPartitionsWithIndex(// 将获取到的数据,根据分区索引,将数据放到不同的分区(index, iter) => {iter.map(num => (index, num))})mappedRdd.collect.foreach(println)}}
4、flatMap
def flatMapU: ClassTag: RDD[U]
将处理的数据进行扁平化后再进行映射处理,所以算子也称之为扁平映射
object Transform_flatMap {def main(args: Array[String]): Unit = {val context = new SparkContext(new SparkConf().setMaster("local[*]").setAppName("map"))val rdd: RDD[List[Int]] = context.makeRDD(List(List(1,2),List(3,4)))// 不能使用_val mappedRdd = rdd.flatMap(list => list)mappedRdd.collect.foreach(println)}}
我们进行wordCount的时候,拆分字符串就可以使用这个方法,因为String切割之后是一个个的Array[String],所以扁平映射将所有String拿出来。
小功能:将 List(List(1,2),3,List(4,5))进行扁平化操作
这个是两个List并且混杂着一个Int,所以外面不能确定元素的类型,可以考虑使用模式匹配。你不是,让你变成List类型!
object Transform_flatMap_2 {def main(args: Array[String]): Unit = {val context = new SparkContext(new SparkConf().setMaster("local[*]").setAppName("map"))val rdd = context.makeRDD(List(List(1, 2), 3, List(4, 5)))// 不能使用_val mappedRdd = rdd.flatMap{// 不是集合,变成集合case list: List[_] => listcase data => List(data)}mappedRdd.collect.foreach(println)}}
5、glom
def glom(): RDD[Array[T]]
将同一个分区的数据直接转换为相同类型的内存数组进行处理,分区不变
object Transform_glom {def main(args: Array[String]): Unit = {val context = new SparkContext(new SparkConf().setMaster("local[*]").setAppName("map"))val rdd = context.makeRDD(List(1, 2, 3, 4), 2)// glom:对同一个分区内的数据转换为相同类型数组处理,分区不变val value: RDD[Array[Int]] = rdd.glom()value.collect.foreach(array => println(array.mkString(", ")))}}
小功能:计算所有分区最大值求和(分区内取最大值,分区间最大值求和)
object Transform_glom {def main(args: Array[String]): Unit = {val context = new SparkContext(new SparkConf().setMaster("local[*]").setAppName("map"))val rdd = context.makeRDD(List(1, 2, 3, 4), 2)// glom:对同一个分区内的数据转换为相同类型数组处理,分区不变val value = rdd.glom() // 分区内转成Array.map( _.max) // 每个分区求出最大值println(value.collect.sum) // 求和}}
6、groupBy
def groupByK(implicit kt: ClassTag[K]): RDD[(K, Iterable[T])]
将数据根据指定的规则进行分组, 分区默认不变,但是数据会被打乱重新组合,我们将这样的操作称之为 shuffle。极限情况下,数据可能被分在同一个分区中
一个组的数据在一个分区中,但是并不是说一个分区中只有一个组
**
object Transform_groupBy {def main(args: Array[String]): Unit = {val context = new SparkContext(new SparkConf().setMaster("local[*]").setAppName("map"))val rdd: RDD[Int] = context.makeRDD(List(1, 2, 3, 4), 2)// groupBy分组,按照余数作为key分组val value: RDD[(Int, Iterable[Int])] = rdd.groupBy(_ % 2)value.collect.foreach(println)}}
小功能:按照首字母分组
object Transform_groupBy1 {def main(args: Array[String]): Unit = {val context = new SparkContext(new SparkConf().setMaster("local[*]").setAppName("map"))val rdd: RDD[String] = context.makeRDD(List("Hello", "Spark", "Hadoop", "Storm"), 2)// 根据首字母分组val value: RDD[(Char, Iterable[String])] = rdd.groupBy(_.charAt(0))value.collect.foreach(println)}}
小功能:分析apache.log日志中时间段的统计量
object Transform_groupBy2 {def main(args: Array[String]): Unit = {val context = new SparkContext(new SparkConf().setMaster("local[*]").setAppName("map"))val rdd: RDD[String] = context.textFile("datas/apache.log")// 获取访问数量val value: RDD[(String, Int)] = rdd.map(f = line => {// 方式一:如果日期格式固定,通过字符串截串// 方式二:通过SimpleDateFormat格式转换后获取// 17/05/2015:10:05:03var time = line.split(" ")(3)// 获取到之后再转换成只有小时的形式val date: Date = new SimpleDateFormat("dd/MM/yyyy:HH:mm:ss").parse(time)// 返回val hour: String = new SimpleDateFormat("HH").format(date)// 返回二元组形式(hour, 1)}).groupBy(_._1) // 根据时间分组.map { case (hour, iter) => (hour, iter.size)} // 分组之后将结果聚合,value.collect.foreach(println)}}
7、filter
def filter(f: T => Boolean): RDD[T]
将数据根据指定的规则进行筛选过滤,符合规则的数据保留,不符合规则的数据丢弃。当数据进行筛选过滤后,分区不变,但是分区内的数据可能不均衡,生产环境下,可能会出现数据倾斜
**
object Transform_filter {def main(args: Array[String]): Unit = {val context = new SparkContext(new SparkConf().setMaster("local[*]").setAppName("map"))val rdd: RDD[Int] = context.makeRDD(List(1, 2, 3, 4), 2)// 过滤数据val value: RDD[Int] = rdd.filter(_ % 2 == 0)value.collect.foreach(println)context.stop()}}
小功能:获取apache.log中访问时间在17/05/2015的
object Transform_filter_Test {def main(args: Array[String]): Unit = {val context = new SparkContext(new SparkConf().setMaster("local[*]").setAppName("map"))val rdd: RDD[String] = context.textFile("datas/apache.log")// 过滤数据,===当然也可以使用map,但是数据会被丢弃,不如直接过滤val value: RDD[String] = rdd.filter(// 可以直接匹配以这个日期开头的line => {val time: String = line.split(" ")(3)time.startsWith("17/05/2015")})value.collect.foreach(println)context.stop()}}
8、sample
/*** Return a sampled subset of this RDD.** @param withReplacement: 一个数是否能被抽取多次,即放回其中。* @param fraction : 期待rdd中数据的概率* 如果withReplacement设置为false,即不放回,表示每个元素被选中的可能性; fraction must be [0, 1]* 如果withReplacement设置为true,放回数据: 表示每个元素被选中的次数; fraction must be greater than or equal to 0* @param seed :随机生成的种子,同样种子每次产生的数据是相同的。默认是系统当前时间戳** @note This is NOT guaranteed to provide exactly the fraction of the count* of the given [[RDD]].*/def sample(withReplacement: Boolean,fraction: Double,seed: Long = Utils.random.nextLong): RDD[T] = {require(fraction >= 0,s"Fraction must be nonnegative, but got ${fraction}")withScope {require(fraction >= 0.0, "Negative fraction value: " + fraction)if (withReplacement) {// PoissonSampler算法保证放回new PartitionwiseSampledRDD[T, T](this, new PoissonSampler[T](fraction), true, seed)} else {// BernoulliSampler算法保证不放回new PartitionwiseSampledRDD[T, T](this, new BernoulliSampler[T](fraction), true, seed)}}}
根据指定的规则从数据集中抽取数据
object Transform_sample {def main(args: Array[String]): Unit = {val context = new SparkContext(new SparkConf().setMaster("local[*]").setAppName("map"))val rdd: RDD[Int] = context.makeRDD(List(1, 2, 3, 4, 5, 6, 7, 8, 9, 10))val value: RDD[Int] = rdd.sample(false // 是否放回, 0.3 // false,每个元素出现的概率,// , 1 // 种子,相同种子的时间戳生成数据一样的)println(value.collect.mkString(", "))context.stop()}}
**
思考一个问题:有啥用,抽奖吗?
其实不是这样的,主要是为了解决极端情况下的数据倾斜问题
9、distinct
def distinct(numPartitions: Int)(implicit ord: Ordering[T] = null): RDD[T]
将数据集中重复的数据去重.
object Transform_distinct {def main(args: Array[String]): Unit = {val context = new SparkContext(new SparkConf().setMaster("local[*]").setAppName("map"))val rdd = context.makeRDD(List(1, 2, 3, 4,1, 2, 3, 4))// distinct去重val value: RDD[Int] = rdd.distinct()value.collect.foreach(println)}}
distinct是如何将数据去重的呢?
我们知道,scala中也有distinct函数,但是是使用底层HashSet数据结构实现的去重操作:
def distinct: Repr = {val isImmutable = this.isInstanceOf[immutable.Seq[_]]if (isImmutable && lengthCompare(1) <= 0) reprelse {val b = newBuilder// hashsetval seen = new mutable.HashSet[A]()var it = this.iteratorvar different = falsewhile (it.hasNext) {val next = it.nextif (seen.add(next)) b += next else different = true}if (different || !isImmutable) b.result() else repr}}
但是spark中的distinct却是这样做的:
/*** Return a new RDD containing the distinct elements in this RDD.*/def distinct(numPartitions: Int)(implicit ord: Ordering[T] = null): RDD[T] = withScope {def removeDuplicatesInPartition(partition: Iterator[T]): Iterator[T] = {// Create an instance of external append only map which ignores values.val map = new ExternalAppendOnlyMap[T, Null, Null](createCombiner = _ => null,mergeValue = (a, b) => a,mergeCombiners = (a, b) => a)map.insertAll(partition.map(_ -> null))map.iterator.map(_._1)}// 在这里匹配可选的分区partitioner match {case Some(_) if numPartitions == partitions.length =>mapPartitions(removeDuplicatesInPartition, preservesPartitioning = true)// 来到这里兜底,将数据变成二元组形式,根据key聚合之后,只保留第一个,然后每个结果取元组第一个元素完成去重操作case _ => map(x => (x, null)).reduceByKey((x, _) => x, numPartitions).map(_._1)}}
10、coalesce
def coalesce(numPartitions: Int, shuffle: Boolean = false,
partitionCoalescer: Option[PartitionCoalescer] = Option.empty)
(implicit ord: Ordering[T] = null)
: RDD[T]
根据数据量缩减分区**,用于大数据集过滤后,提高小数据集的执行效率
当 spark 程序中,存在过多的小任务的时候,可以通过 coalesce 方法,收缩合并分区,减少分区的个数,减小任务调度成本
object Transform_coalesce {def main(args: Array[String]): Unit = {val context = new SparkContext(new SparkConf().setMaster("local[*]").setAppName("map"))val rdd = context.makeRDD(List(1, 2, 3, 4, 5, 6),4)// coalesce缩减分区val value: RDD[Int] = rdd.coalesce(2)value.saveAsTextFile("datas/output")context.stop()}}
分区后两个分区分别是123,456
如果是三个分区呢?
object Transform_coalesce {def main(args: Array[String]): Unit = {val context = new SparkContext(new SparkConf().setMaster("local[*]").setAppName("map"))val rdd = context.makeRDD(List(1, 2, 3, 4, 5, 6),3)// coalesce缩减分区val value: RDD[Int] = rdd.coalesce(2)value.saveAsTextFile("datas/output")context.stop()}}
数据变成了12,3456???
因为coalesce默认是不会将数据打乱重新组合的。这样子缩减分区可能出现数据倾斜。可以使用shuffle处理。
object Transform_coalesce {def main(args: Array[String]): Unit = {val context = new SparkContext(new SparkConf().setMaster("local[*]").setAppName("map"))val rdd = context.makeRDD(List(1, 2, 3, 4, 5, 6),3)// coalesce缩减分区// 进行shuffle洗牌val value: RDD[Int] = rdd.coalesce(2,true)value.saveAsTextFile("datas/output")context.stop()}}
数据变成了145,236,顺序完全乱了,但是数据不倾斜了。
思考:我想扩大分区怎么办?
扩大分区需要将coalesce调大并且一定要进行shuffle操作才可以打乱分区。虽然数据打乱,但是扩大了分区。
11、repartition
def repartition(numPartitions: Int)(implicit ord: Ordering[T] = null): RDD[T] = withScope {
coalesce(numPartitions, shuffle = true)
}
是一种简化的扩大分区,底层调用就是coalesce
object Transform_repartition {def main(args: Array[String]): Unit = {val context = new SparkContext(new SparkConf().setMaster("local[*]").setAppName("map"))val rdd = context.makeRDD(List(1, 2, 3, 4, 5, 6),2)// coalesce缩减分区// 进行shuffle洗牌val value: RDD[Int] = rdd.repartition(3)value.saveAsTextFile("datas/output")context.stop()}}
12、sortBy
def sortByK => K,
ascending: Boolean = true,
numPartitions: Int = this.partitions.length)
(implicit ord: Ordering[K], ctag: ClassTag[K]): RDD[T]
该操作用于排序数据。在排序之前,可以将数据通过 f 函数进行处理,之后按照 f 函数处理的结果进行排序,默认为升序排列。排序后新产生的 RDD 的分区数与原 RDD 的分区数一致。中间存在 shuffle 的过程
object Transform_sortBy {def main(args: Array[String]): Unit = {val context = new SparkContext(new SparkConf().setMaster("local[*]").setAppName("map"))val rdd = context.makeRDD(List(1, 3, 6, 4, 5, 2), 2)// 按照自身升序排列,分区数量不会改变,但是会进行shuffle打乱操作// rdd.sortBy(k => k).saveAsTextFile("datas/output")// 第二个参数控制降序排列rdd.sortBy(k => k,false).saveAsTextFile("datas/output")context.stop()}}
- 双Value类型
13、intersection
对源 RDD 和参数 RDD 求交集后返回一个新的 RDD
14、union
对源 RDD 和参数 RDD 求并集后返回一个新的 RDD
15、subtract
以一个 RDD 元素为主,去除两个 RDD 重复元素,将其他元素保留下来。求差集D
思考:如果两个RDD数据类型不一致怎么办
16、zip
将两个 RDD 中的元素,以键值对的形式进行合并。其中,键值对中的 Key 为第 1 个 RDD中的元素,Value 为第 2 个 RDD 中的相同位置的元素。
思考:如果两个RDD数据类型不一致怎么办 思考:如果两个RDD数据分区不一致怎么办 思考:如果两个RDD分区数据量不一致怎么办
object Transform_doubleValue {def main(args: Array[String]): Unit = {val context = new SparkContext(new SparkConf().setMaster("local[*]").setAppName("map"))val rdd1 = context.makeRDD(List(1, 2, 3, 4))val rdd2 = context.makeRDD(List(3, 4, 5, 6))// 交集val rdd3: RDD[Int] = rdd1.intersection(rdd2)println(rdd3.collect.mkString(","))// 并集val rdd4: RDD[Int] = rdd1.union(rdd2)println(rdd4.collect.mkString(","))// 差集val rdd5: RDD[Int] = rdd1.subtract(rdd2)println(rdd5.collect.mkString(","))// 拉链val rdd6: RDD[(Int, Int)] = rdd1.zip(rdd2)println(rdd6.collect.mkString(","))context.stop()}}
数据类型问题:
交集、并集、差集的数据源必须要求数据类型一致,方法签名规定了返回泛型T
def intersection(other: RDD[T]): RDD[T]
但是zip拉链可以返回不同数据类型。
def zip[U: ClassTag](other: RDD[U]): RDD[(T, U)]
分区数量问题:
val rdd1 = context.makeRDD(List(1, 2, 3, 4),2)val rdd2 = context.makeRDD(List(3, 4, 5, 6),3)// Can't zip RDDs with unequal numbers of partitions: List(2, 3)val rdd6: RDD[(Int, Int)] = rdd1.zip(rdd2)println(rdd6.collect.mkString(","))
运行时出错,不相等的数据分区,所以zip要求分区数量一致
分区数据量问题:
val rdd1 = context.makeRDD(List(1, 2, 3, 4, 5, 6), 3)val rdd2 = context.makeRDD(List(3, 4, 5, 6), 3)// Can only zip RDDs with same number of elements in each partitionval rdd6: RDD[(Int, Int)] = rdd1.zip(rdd2)println(rdd6.collect.mkString(","))
只能够对分区数据量相同的分区进行拉链
- key-value类型
17、partitionBy
/*** Extra functions available on RDDs of (key, value) pairs through an implicit conversion.*/class PairRDDFunctions[K, V](self: RDD[(K, V)])(implicit kt: ClassTag[K], vt: ClassTag[V], ord: Ordering[K] = null)extends Logging with Serializable {
这个方法时PairRDDFunctions中的,并不是RDD的方法,并且只对键值类型的RDD才可以使用。
我们没有看到它和RDD的继承关系,为什么它也是RDD呢?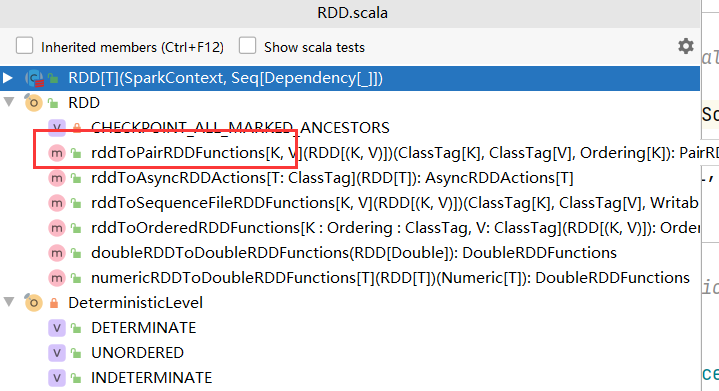
在RDD类中,有伴生对象RDD,定义了隐式转换函数,将键值类型的RDD转换成PairRDDFunctions
implicit def rddToPairRDDFunctions[K, V](rdd: RDD[(K, V)])(implicit kt: ClassTag[K], vt: ClassTag[V], ord: Ordering[K] = null): PairRDDFunctions[K, V] = {new PairRDDFunctions(rdd)}
这个partitionBy方法需要传入一个Partitioner分区器,我们以它的实现类HashPartitioner来传递
object Transform_partitionBy {def main(args: Array[String]): Unit = {val context = new SparkContext(new SparkConf().setMaster("local[*]").setAppName("map"))val rdd: RDD[Int] = context.makeRDD(List(1, 2, 3, 4, 5, 6))val mappedRdd: RDD[(Int, Int)] = rdd.map((_, 1))// RDD => PairRDDFunctions// 不是RDD的方法,但是PairRddFunctionsval value: RDD[(Int, Int)] = mappedRdd.partitionBy(new HashPartitioner(2)) // 需要传入分区器,这里以Hash分区value.collect.foreach(println)context.stop()}}
来看一下这个HashPartitioner,对数据进行分区的方法
class HashPartitioner(partitions: Int) extends Partitioner {require(partitions >= 0, s"Number of partitions ($partitions) cannot be negative.")def numPartitions: Int = partitionsdef getPartition(key: Any): Int = key match {case null => 0case _ => Utils.nonNegativeMod(key.hashCode, numPartitions)}// 其实就是取模运算def nonNegativeMod(x: Int, mod: Int): Int = {val rawMod = x % modrawMod + (if (rawMod < 0) mod else 0)}
思考:如果重分区的分区器和当前RDD的分区器一样怎么办?
首先第一次调用partitionBy的时候传入HashPartitioner(2),方法中会跟自身partitioner进行比较,如果相同返回self本身,不同则洗牌。
def partitionBy(partitioner: Partitioner): RDD[(K, V)] = self.withScope {if (keyClass.isArray && partitioner.isInstanceOf[HashPartitioner]) {throw new SparkException("HashPartitioner cannot partition array keys.")}// 这里的 == 比较在scala中就是调用equals方法进行比较if (self.partitioner == Some(partitioner)) {self} else {new ShuffledRDD[K, V, V](self, partitioner)}}
在Partitioner中的equals方法如下:
override def equals(other: Any): Boolean = other match {// 如果是HashPartitioner,比较两次分区数量是否一致case h: HashPartitioner =>h.numPartitions == numPartitions// 其他返回false,可以重分区case _ =>false}
所以两次如果传入相同的HashPartitioner和相同的分区数量,是不会重新分区的,而是将原先数据直接返回。
Spark还有其他分区器吗?
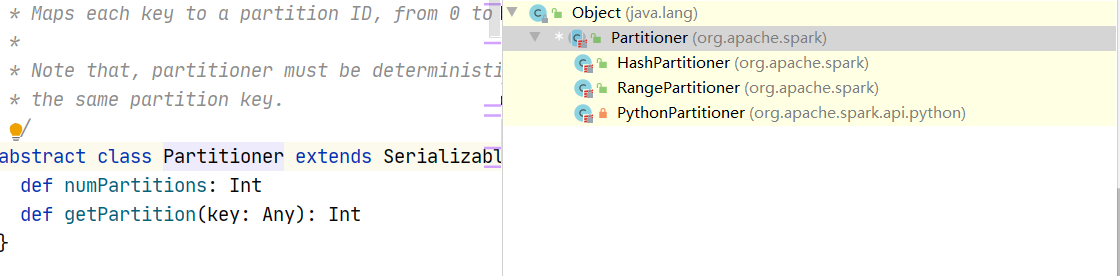
Partitioner是一个抽象类,有三个子类
RangePartitioner一般在排序的时候使用。我们在使用sortBy的时候就使用了
def sortBy[K](f: (T) => K,ascending: Boolean = true,numPartitions: Int = this.partitions.length)(implicit ord: Ordering[K], ctag: ClassTag[K]): RDD[T] = withScope {this.keyBy[K](f)// 这里.sortByKey(ascending, numPartitions).values}
def sortByKey(ascending: Boolean = true, numPartitions: Int = self.partitions.length): RDD[(K, V)] = self.withScope{// RangePartitionerval part = new RangePartitioner(numPartitions, self, ascending)new ShuffledRDD[K, V, V](self, part).setKeyOrdering(if (ascending) ordering else ordering.reverse)}
PythonPartitioner是锁着的,只有在特定包权限下才可以使用
private[spark] class PythonPartitioner(override val numPartitions: Int,val pyPartitionFunctionId: Long)extends Partitioner {
也可以自己继承Partitioner定制分区规则
18、reduceByKey
def reduceByKey(func: (V, V) => V): RDD[(K, V)]
可以将数据按照相同的 Key 对 Value 进行聚合
object Transform_reduceByKey {def main(args: Array[String]): Unit = {val context = new SparkContext(new SparkConf().setMaster("local[*]").setAppName("map"))val rdd = context.makeRDD(List(("a",1),("a",2) ,("a",3),("b",4)))// 根据相同key对数据进行两两聚合。// scala中是两两聚合,spark是基于scala,所以也是两两聚合// 如果相同的key只有一个,则不会参与聚合操作val reducedRdd: RDD[(String, Int)] = rdd.reduceByKey((x: Int, y: Int) => {println(s"x: $x , y: $y")x + y})reducedRdd.collect.foreach(println)context.stop()}}
19、groupByKey
def groupByKey(partitioner: Partitioner): RDD[(K, Iterable[V])]
将数据源的数据根据 key 对 value 进行分组
object Transform_groupByKey {def main(args: Array[String]): Unit = {val context = new SparkContext(new SparkConf().setMaster("local[*]").setAppName("map"))val rdd = context.makeRDD(List(("a", 1), ("a", 2), ("a", 3), ("b", 4)))// 根据相同key对数据分组,形成一个对偶元组,value是一个确定类型的集合val value: RDD[(String, Iterable[Int])] = rdd.groupByKey()value.collect.foreach(println)// 对比group,分组的规则不明确,可以是key或自定义规则,分组后的value,也是一个k,v形式的val value1: RDD[(String, Iterable[(String, Int)])] = rdd.groupBy(_._1)value1.collect.foreach(println)context.stop()}}
groupByKey和reduceByKey的区别?
- 从 shuffle 的角度:reduceByKey 和 groupByKey 都存在 shuffle 的操作,但是 reduceByKey可以在 shuffle 前对分区内相同 key 的数据进行预聚合(combine)功能,这样会减少落盘的数据量,而 groupByKey 只是进行分组,不存在数据量减少的问题,reduceByKey 性能比较高。
- 从功能的角度:reduceByKey 其实包含分组和聚合的功能。groupByKey 只能分组,不能聚合,所以在分组聚合的场合下,推荐使用 reduceByKey,如果仅仅是分组而不需要聚合。那么还是只能使用 groupByKey
reduceByKey分区内和分区间的计算规则是相同的。
20、aggregateByKey
/*** The former operation is used for merging values within a* partition, and the latter is used for merging values between partitions. To avoid memory* allocation, both of these functions are allowed to modify and return their first argument* instead of creating a new U.第一个参数表示分区内的聚合规则,第二个参数表示分区间的计算规则*/def aggregateByKey[U: ClassTag](zeroValue: U)(seqOp: (U, V) => U,combOp: (U, U) => U): RDD[(K, U)] = self.withScope {aggregateByKey(zeroValue, defaultPartitioner(self))(seqOp, combOp)}
将数据根据不同的规则进行分区内计算和分区间计算
object Transform_aggregationByKey {def main(args: Array[String]): Unit = {val context = new SparkContext(new SparkConf().setMaster("local[*]").setAppName("map"))val rdd = context.makeRDD(List(("a", 1), ("a", 2), ("a", 3), ("b", 4)))// 柯里化传值,第一个参数是分区内聚合规则// 参数表示第一个值的初始值,比如第一个数,没有第二个数,如何比较它是大是小// 第二个参数是分区间聚合规则// 参数第一个表示序列的比较规则// 参数第二个表示聚合的操作val value: RDD[(String, Int)] = rdd.aggregateByKey(0)(// 分区内计算规则(x, y) => math.max(x, y),// 分区间计算规则(x, y) => x + y)value.collect.foreach(println)context.stop()}}
小练习:求相同key的平均值
**
object Transform_aggregationByKey_Test {def main(args: Array[String]): Unit = {val context = new SparkContext(new SparkConf().setMaster("local[*]").setAppName("map"))val rdd = context.makeRDD(List(("a", 1), ("a", 2), ("a", 3), ("b", 4)))// 获取函数平均值val value: RDD[(String, Int)] = rdd.aggregateByKey((0, 0))(// 转换成元组(t, v) => {// 第一个表示为总和,第二个为该key出现的次数(t._1 + v, t._2 + 1)},(t1, t2) => {// 聚合(t1._1 + t2._1, t1._2 + t2._2)})// 聚合之后根据key将value进行映射.mapValues {// 获取平均值case (sum, count) => sum / count}value.collect.foreach(println)context.stop()}}
21、foldByKey**
def foldByKey(
zeroValue: V,
partitioner: Partitioner)(func: (V, V) => V): RDD[(K, V)]
当分区内计算规则和分区间计算规则相同时,aggregateByKey 就可以简化为 foldByKey。
object Transform_foldByKey {def main(args: Array[String]): Unit = {val context = new SparkContext(new SparkConf().setMaster("local[*]").setAppName("map"))val rdd = context.makeRDD(List(("a", 1), ("a", 2), ("a", 3), ("b", 4)),2)// 聚合计算时,分区内和分区间计算规则相同,可以简化val value: RDD[(String, Int)] = rdd.foldByKey(0)(_ + _)value.collect.foreach(println)context.stop()}}
22、combineByKey
def combineByKeyC => C,
mergeCombiners: (C, C) => C,
numPartitions: Int): RDD[(K, C)]
最通用的对 key-value 型 rdd 进行聚集操作的聚集函数(aggregation function)。类似于aggregate(),combineByKey()允许用户返回值的类型与输入不一致。
aggregationByKey的数据还需要一个初始值,我们可不可以把第一个出现的值作为初始值呢?是不是就省去了一些操作
object Transform_combineByKey {def main(args: Array[String]): Unit = {val context = new SparkContext(new SparkConf().setMaster("local[*]").setAppName("map"))val rdd = context.makeRDD(List(("a", 1), ("a", 2), ("a", 3), ("b", 4)))// 获取函数平均值// 第一个参数表示第一个值的转换,// 第二个参数表示分区内的计算规则// 第三个参数表示分区间的计算规则val value: RDD[(String, Int)] = rdd.combineByKey(v => (v,1),// 需要加上类型声明(t: (Int,Int), v) => {(t._1 + v,t._2 + 1)},(t1: (Int,Int),t2: (Int,Int)) => {(t1._1 + t2._1,t1._2 + t2._2)})// 聚合之后根据key将value进行映射.mapValues {// 获取平均值case (sum, count) => sum / count}value.collect.foreach(println)context.stop()}}
四个聚合算子的区别:
本质都是调用combineByKeyWithClassTag方法,区别在于计算规则和初始值的规则
object Transform_aggregations_distinction {def main(args: Array[String]): Unit = {val context = new SparkContext(new SparkConf().setMaster("local[*]").setAppName("map"))val rdd = context.makeRDD(List(("a", 1), ("a", 2), ("a", 3), ("b", 4)))// 四种聚合算子的区别/*aggregateByKey:combineByKeyWithClassTag[U]((v: V) => cleanedSeqOp(createZero(), v), // 初始值进行转换cleanedSeqOp // 分区内计算规则, combOp // 分区间计算规则, partitioner) // 分区器foldByKey:combineByKeyWithClassTag[V]((v: V) => cleanedFunc(createZero(), v), // 初始值进行转换cleanedFunc // 分区内计算规则, cleanedFunc // 分区间计算规则, partitioner) // 分区器reduceByKey:combineByKeyWithClassTag[V]((v: V) => v // 初始值进行转换, func // 分区内计算规则, func // 分区间计算规则, partitioner) // 分区器combineByKey:combineByKeyWithClassTag(createCombiner // 第一个值作为初始值, mergeValue // 分区内计算规则, mergeCombiners // 分区间计算规则, defaultPartitioner(self)) // 分区器*/rdd.aggregateByKey(0)(_+_,_+_)rdd.foldByKey(0)(_+_)rdd.reduceByKey(_+_)rdd.combineByKey(v=>v,(a: Int,b) => a+b,(a: Int,b: Int) => a+b)context.stop()}}
24、join
**
def joinW]): RDD[(K, (V, W))]
在类型为(K,V)和(K,W)的 RDD 上调用,返回一个相同 key 对应的所有元素连接在一起的(K,(V,W))的 RDD
object Transform_join {def main(args: Array[String]): Unit = {val context = new SparkContext(new SparkConf().setMaster("local[*]").setAppName("map"))val rdd = context.makeRDD(List(("a",1),("a",2),("c",3)))val rdd2 = context.makeRDD(List(("a",4),("a",5),("f",6)))// join : 两个不同数据源的数据,相同的key的value会连接在一起,形成元组// 如果两个数据源key没有匹配上,那么数据不会出现在结果中// 如果两个数据源key有多个相同的,会依次进行匹配,可能出现笛卡尔乘积,数据量增加。val value: RDD[(String, (Int, Int))] = rdd.join(rdd2)value.collect.foreach(println)context.stop()}}
25、leftOuterJoin
def leftOuterJoinW],
partitioner: Partitioner): RDD[(K, (V, Option[W]))]
类似于 SQL 语句的左外连接
26、rightOuterJoin
def rightOuterJoinW], partitioner: Partitioner)
: RDD[(K, (Option[V], W))]
类似于SQL语句的右外连接
object Transform_leftOuterJoin {def main(args: Array[String]): Unit = {val context = new SparkContext(new SparkConf().setMaster("local[*]").setAppName("map"))val rdd = context.makeRDD(List(("a",1),("b",2),("c",3)))val rdd2 = context.makeRDD(List(("a",4),("b",5),("c",6)))// leftOuterJoinval value: RDD[(String, (Int, Option[Int]))] = rdd.leftOuterJoin(rdd2)// rightOuterJoinval value1: RDD[(String, (Option[Int], Int))] = rdd.rightOuterJoin(rdd2)value.collect.foreach(println)value1.collect.foreach(println)context.stop()}}
27、cogroup
def cogroupW1, W2, W3], other2: RDD[(K, W2)], other3: RDD[(K, W3)])
: RDD[(K, (Iterable[V], Iterable[W1], Iterable[W2], Iterable[W3]))]
在类型为(K,V)和(K,W)的 RDD 上调用,返回一个(K,(Iterable
object Transform_cogroup {def main(args: Array[String]): Unit = {val context = new SparkContext(new SparkConf().setMaster("local[*]").setAppName("map"))val rdd = context.makeRDD(List(("a",1),("b",2),("c",3),("c",6)))val rdd2 = context.makeRDD(List(("a",4),("b",5)))val rdd3 = context.makeRDD(List(("a",4),("b",5),("d",5)))val rdd4 = context.makeRDD(List(("a",4),("b",5),("c",2)))// cogroup: connect + group//把相同key连接在一起,value是一个个组,如果没有就是()空的// 如果一个数据源中多个相同key,连接放在一起// 最多可以同时连接三个groupval value: RDD[(String, (Iterable[Int], Iterable[Int], Iterable[Int], Iterable[Int]))] = rdd.cogroup(rdd2,rdd3,rdd4)value.collect().foreach(println)context.stop()}}
2、案例实操
agent.log:时间戳,省份,城市,用户,广告,中间字段使用空格分隔。
需求描述:统计出每一个省份每个广告被点击数量排行的 Top3
object Transform_case {def main(args: Array[String]): Unit = {val context = new SparkContext(new SparkConf().setMaster("local[*]").setAppName("operator-case"))// 1、获取原始数据: 时间戳,省份,城市,用户,广告val rawRdd: RDD[String] = context.textFile("datas/agent.log")// 2、将原始数据进行结构的转换。方便统计// 时间戳,省份,城市,用户,广告 => (( 省份,广告), 1)val transformedRdd: RDD[((String, String), Int)] = rawRdd.map(line => {val datas: Array[String] = line.split(" ")((datas(1), datas(4)), 1)})// 3、将转换后的数据,分组聚合// (( 省份,广告), 1) => (( 省份,广告), sum)val reducedRdd: RDD[((String, String), Int)] = transformedRdd.reduceByKey(_ + _)// 4、将聚合后的数据进行结构的转换// (( 省份,广告), sum) => (省份,(广告, sum))val convertedRdd: RDD[(String, (String, Int))] = reducedRdd.map {case ((prv, ad), sum) => (prv, (ad, sum))}// 5、将数据根据省份分组// (省份,【(广告A,sumA)】,【(广告B,sumB)】val groupedRdd: RDD[(String, Iterable[(String, Int)])] = convertedRdd.groupByKey()// 6、将分组后的数据组内降序排序,取前三val value: RDD[(String, List[(String, Int)])] = groupedRdd.mapValues(iter => iter.toList.sortBy(_._2)(Ordering.Int.reverse).take(3))// 7、采集数据打印在控制台value.collect.foreach(println)context.stop()}}
3、行动算子
所谓的行动算子,其实就是触发作业(Job)执行的方法,底层代码调用的是环境对象的runJob方法,底层代码中会创建ActiveJob,并提交执行。
def collect(): Array[T] = withScope {val results = sc.runJob(this, (iter: Iterator[T]) => iter.toArray)Array.concat(results: _*)}......
// 一系列的封装之后,来到DAGScheduler中的runJob
def runJob[T, U](rdd: RDD[T],func: (TaskContext, Iterator[T]) => U,partitions: Seq[Int],callSite: CallSite,resultHandler: (Int, U) => Unit,properties: Properties): Unit = {val start = System.nanoTime// 在这里提交Jobval waiter = submitJob(rdd, func, partitions, callSite, resultHandler, properties)ThreadUtils.awaitReady(waiter.completionFuture, Duration.Inf)waiter.completionFuture.value.get match {case scala.util.Success(_) =>logInfo("Job %d finished: %s, took %f s".format(waiter.jobId, callSite.shortForm, (System.nanoTime - start) / 1e9))case scala.util.Failure(exception) =>logInfo("Job %d failed: %s, took %f s".format(waiter.jobId, callSite.shortForm, (System.nanoTime - start) / 1e9))// SPARK-8644: Include user stack trace in exceptions coming from DAGScheduler.val callerStackTrace = Thread.currentThread().getStackTrace.tailexception.setStackTrace(exception.getStackTrace ++ callerStackTrace)throw exception}}
def submitJob[T, U](rdd: RDD[T],func: (TaskContext, Iterator[T]) => U,partitions: Seq[Int],callSite: CallSite,resultHandler: (Int, U) => Unit,properties: Properties): JobWaiter[U] = {// Check to make sure we are not launching a task on a partition that does not exist.val maxPartitions = rdd.partitions.lengthpartitions.find(p => p >= maxPartitions || p < 0).foreach { p =>throw new IllegalArgumentException("Attempting to access a non-existent partition: " + p + ". " +"Total number of partitions: " + maxPartitions)}val jobId = nextJobId.getAndIncrement()if (partitions.isEmpty) {val clonedProperties = Utils.cloneProperties(properties)if (sc.getLocalProperty(SparkContext.SPARK_JOB_DESCRIPTION) == null) {clonedProperties.setProperty(SparkContext.SPARK_JOB_DESCRIPTION, callSite.shortForm)}val time = clock.getTimeMillis()listenerBus.post(SparkListenerJobStart(jobId, time, Seq.empty, clonedProperties))listenerBus.post(SparkListenerJobEnd(jobId, time, JobSucceeded))// Return immediately if the job is running 0 tasksreturn new JobWaiter[U](this, jobId, 0, resultHandler)}assert(partitions.nonEmpty)val func2 = func.asInstanceOf[(TaskContext, Iterator[_]) => _]val waiter = new JobWaiter[U](this, jobId, partitions.size, resultHandler)// 在这里会触发一个Job被提交的事件,具体怎么处理后面再说eventProcessLoop.post(JobSubmitted(jobId, rdd, func2, partitions.toArray, callSite, waiter,Utils.cloneProperties(properties)))waiter}
在这个eventProcessLoop中,也就是DAGScheduler中,有handleXxxx,处理各种事件的方法,这里处理Job被提交
private[scheduler] def handleJobSubmitted(jobId: Int,finalRDD: RDD[_],func: (TaskContext, Iterator[_]) => _,partitions: Array[Int],callSite: CallSite,listener: JobListener,properties: Properties): Unit = {var finalStage: ResultStage = nulltry {// New stage creation may throw an exception if, for example, jobs are run on a// HadoopRDD whose underlying HDFS files have been deleted.finalStage = createResultStage(finalRDD, func, partitions, jobId, callSite)} catch {case e: BarrierJobSlotsNumberCheckFailed =>// If jobId doesn't exist in the map, Scala coverts its value null to 0: Int automatically.val numCheckFailures = barrierJobIdToNumTasksCheckFailures.compute(jobId,(_: Int, value: Int) => value + 1)logWarning(s"Barrier stage in job $jobId requires ${e.requiredConcurrentTasks} slots, " +s"but only ${e.maxConcurrentTasks} are available. " +s"Will retry up to ${maxFailureNumTasksCheck - numCheckFailures + 1} more times")if (numCheckFailures <= maxFailureNumTasksCheck) {messageScheduler.schedule(new Runnable {override def run(): Unit = eventProcessLoop.post(JobSubmitted(jobId, finalRDD, func,partitions, callSite, listener, properties))},timeIntervalNumTasksCheck,TimeUnit.SECONDS)return} else {// Job failed, clear internal data.barrierJobIdToNumTasksCheckFailures.remove(jobId)listener.jobFailed(e)return}case e: Exception =>logWarning("Creating new stage failed due to exception - job: " + jobId, e)listener.jobFailed(e)return}// Job submitted, clear internal data.barrierJobIdToNumTasksCheckFailures.remove(jobId)// 这里创建一个ActiveJobval job = new ActiveJob(jobId, finalStage, callSite, listener, properties)clearCacheLocs()logInfo("Got job %s (%s) with %d output partitions".format(job.jobId, callSite.shortForm, partitions.length))logInfo("Final stage: " + finalStage + " (" + finalStage.name + ")")logInfo("Parents of final stage: " + finalStage.parents)logInfo("Missing parents: " + getMissingParentStages(finalStage))val jobSubmissionTime = clock.getTimeMillis()jobIdToActiveJob(jobId) = jobactiveJobs += jobfinalStage.setActiveJob(job)val stageIds = jobIdToStageIds(jobId).toArrayval stageInfos = stageIds.flatMap(id => stageIdToStage.get(id).map(_.latestInfo))listenerBus.post(SparkListenerJobStart(job.jobId, jobSubmissionTime, stageInfos, properties))submitStage(finalStage)}
1、reduce
def reduce(f: (T, T) => T): T
聚集 RDD 中的所有元素,先聚合分区内数据,再聚合分区间数据
2、collect
def collect(): Array[T]
在驱动程序中,以数组 Array 的形式返回数据集的所有元素
3、count
def count(): Long
返回 RDD 中元素的个数
4、first
def first(): T
返回 RDD 中的第一个元素
5、take
def take(num: Int): Array[T]
返回一个由 RDD 的前 n 个元素组成的数组
6、takeOrdered
def takeOrdered(num: Int)(implicit ord: Ordering[T]): Array[T]
返回一个由RDD的前n个元素组成的数组
object Action_Normal {def main(args: Array[String]): Unit = {val context = new SparkContext(new SparkConf().setMaster("local[*]").setAppName("operator-action"))val rdd: RDD[Int] = context.makeRDD(List(1, 2, 3, 4))// reduce : 对数据进行归约计算,直接出结果val i: Int = rdd.reduce(_ + _)println(i)// collect : 收集数据,并且在Driver中转换成数组val ints: Array[Int] = rdd.collect()println(ints.mkString(", "))// count : 统计数据的个数val l: Long = rdd.count()println(l)// first : 取数据源的第一个数据val i1: Int = rdd.first()println(i1)// take : 取数据源的前n个数据val ints1: Array[Int] = rdd.take(3)println(ints1.mkString(", "))val rdd1 = context.makeRDD(List(4,2,1,3))// takeOrdered : 先对数据源进行排序操作,再取前n个数据val ints2: Array[Int] = rdd1.takeOrdered(3)(Ordering.Int.reverse)println(ints2.mkString(", "))context.stop()}}
7、aggregate
def aggregateU: ClassTag(seqOp: (U, T) => U, combOp: (U, U) => U): U
分区的数据通过初始值和分区内的数据进行聚合,然后再和初始值进行分区间的数据聚合
object Action_aggregate {def main(args: Array[String]): Unit = {val context = new SparkContext(new SparkConf().setMaster("local[*]").setAppName("operator-action"))val rdd: RDD[Int] = context.makeRDD(List(1, 2, 3, 4),2)// aggregate : 聚合// 分区内:0 + 1 + 2 ,0 + 3 + 4, 分区间:3 + 7 = 10// val res: Int = rdd.aggregate(0)(_ + _, _ + _)// 如果没有指定分区,8个分区, 4个空,4个有数据。// 每个分区内计算都是加10=80 + (1 + 2 + 3 + 4) + 10(分区间计算)val res: Int = rdd.aggregate(10)(_ + _, _ + _)/*aggregateByKey : 聚合操作的初始值只参与分区内计算aggregate : 聚合操作的初始值不仅参与分区内计算,而且参与分区间计算*/println(res)context.stop()}}
8、fold
def fold(zeroValue: T)(op: (T, T) => T): T
折叠操作,aggregate 的简化版操作
如果分区内和分区间计算规则一致时,可以使用fold简化
9、countByKey
def countByKey(): Map[K, Long]
统计每种 key 的个数
10、countByValue
def countByValue()(implicit ord: Ordering[T]
统计每种value的个数
object Action_fold_countByKey_Value {def main(args: Array[String]): Unit = {val context = new SparkContext(new SparkConf().setMaster("local[*]").setAppName("operator-action"))val rdd: RDD[Int] = context.makeRDD(List(1, 2, 3, 4),2)// aggregate : 聚合// 分区内:0 + 1 + 2 ,0 + 3 + 4, 分区间:3 + 7 = 10// val res: Int = rdd.aggregate(0)(_ + _, _ + _)// 如果没有指定分区,8个分区, 4个空,4个有数据。// 每个分区内计算都是加10=80 + (1 + 2 + 3 + 4) + 10(分区间计算)val res: Int = rdd.fold(10)(_ + _)println(res)val rdd1: RDD[(String, Int)] = context.makeRDD(List(("a", 1), ("b", 1), ("b", 1)))// countByKey : 根据键值对类型,计算key的数量val stringToLong: collection.Map[String, Long] = rdd1.countByKey()println(stringToLong)rdd.countByValue()// countByValue : 任何类型,获取单值的数量val valRes: collection.Map[Int, Long] = rdd.countByValue()println(valRes)context.stop()}}
11、save的相关算法
def saveAsTextFile(path: String): Unit
def saveAsObjectFile(path: String): Unit
def saveAsSequenceFile(
path: String,
codec: Option[Class[_ <: CompressionCodec]] = None): Unit
object Action_save {def main(args: Array[String]): Unit = {val context = new SparkContext(new SparkConf().setMaster("local[*]").setAppName("operator-action"))val rdd: RDD[Int] = context.makeRDD(List(1, 2, 3, 4),2)rdd.saveAsTextFile("output")rdd.saveAsObjectFile("output1")rdd.map((_,1)).saveAsSequenceFile("output2")context.stop()}}
12、foreach
/*** Applies a function f to all elements of this RDD.*/def foreach(f: T => Unit): Unit = withScope {val cleanF = sc.clean(f)sc.runJob(this, (iter: Iterator[T]) => iter.foreach(cleanF))}
我们经常使用rdd.collect().foreach()遍历打印,谁又知道rdd.foreach()区别呢?
object Action_foreach {def main(args: Array[String]): Unit = {val context = new SparkContext(new SparkConf().setMaster("local[*]").setAppName("operator-action"))val rdd: RDD[Int] = context.makeRDD(List(1, 2, 3, 4),2)// 这个其实是在Driver端内存集合中的循环遍历方法rdd.collect().foreach(println)// foreach其实是Executor端内存集合数据打印rdd.foreach(println)// RDD的方法和Scala集合对象中的方法不一样// 集合对象的方法都是在同一个节点的内存中完成的// RDD的方法可以将计算逻辑发送到Executor(分布式节点)执行// RDD方法外部的操作都是在Driver端进行的,而方法内部的逻辑代码是在Executor端进行的。context.stop()}}
4、wordCount的11种死法
1、groupBy
通过对相同数据的分组,进行聚合操作,实现功能。
/*** 1、groupBy : 传统*/def wordCount1(sc: SparkContext) = {val rdd: RDD[String] = sc.makeRDD(List("Hello Spark", "Hello Scala"))// 分割val words: RDD[String] = rdd.flatMap(_.split(" "))// 分组val group: RDD[(String, Iterable[String])] = words.groupBy(word => word)// 聚合(求大小)val wordCount: RDD[(String, Int)] = group.mapValues(iter => iter.size)}
2、groupByKey
/*** 2、groupByKey : 简化一丢丢,但是效率上,由于是走shuffle的,会打乱*/def wordCount2(sc: SparkContext) = {val rdd: RDD[String] = sc.makeRDD(List("Hello Spark", "Hello Scala"))// 分割val words: RDD[String] = rdd.flatMap(_.split(" "))// 转换成元组形式val word: RDD[(String, Int)] = words.map((_, 1))// 分组val group: RDD[(String, Iterable[Int])] = word.groupByKey()// 聚合(求大小)val wordCount: RDD[(String, Int)] = group.mapValues(iter => iter.size)}
3、reduceByKey
/*** 3、reduceByKey : 效率比groupByKey好点,不会走shuffle,直接聚合*/def wordCount3(sc: SparkContext) = {val rdd: RDD[String] = sc.makeRDD(List("Hello Spark", "Hello Scala"))// 分割val words: RDD[String] = rdd.flatMap(_.split(" "))// 转换成元组形式val word: RDD[(String, Int)] = words.map((_, 1))// 聚合(求大小)val wordCount: RDD[(String, Int)] = word.reduceByKey(_ + _)}
4、aggregateByKey
/*** 4、aggregateByKey :*/def wordCount4(sc: SparkContext) = {val rdd: RDD[String] = sc.makeRDD(List("Hello Spark", "Hello Scala"))// 分割val words: RDD[String] = rdd.flatMap(_.split(" "))// 转换成元组形式val word: RDD[(String, Int)] = words.map((_, 1))// 聚合(求大小)val wordCount: RDD[(String, Int)] = word.aggregateByKey(0)(_ + _, _ + _)wordCount.collect().foreach(println)}
5、foldByKey
/*** 5、foldByKey :分区内和分区间规则相同时可简化*/def wordCount5(sc: SparkContext) = {val rdd: RDD[String] = sc.makeRDD(List("Hello Spark", "Hello Scala"))// 分割val words: RDD[String] = rdd.flatMap(_.split(" "))// 转换成元组形式val word: RDD[(String, Int)] = words.map((_, 1))// 聚合(求大小)val wordCount: RDD[(String, Int)] = word.foldByKey(0)(_ + _)wordCount.collect().foreach(println)}
6、combineByKey
/*** 6、combineByKey :三个参数,初始值进行操作*/def wordCount6(sc: SparkContext) = {val rdd: RDD[String] = sc.makeRDD(List("Hello Spark", "Hello Scala"))// 分割val words: RDD[String] = rdd.flatMap(_.split(" "))// 转换成元组形式val word: RDD[(String, Int)] = words.map((_, 1))// 聚合(求大小)val wordCount: RDD[(String, Int)] = word.combineByKey(v => v,(x: Int, y) => x + y,(x1: Int, x2: Int) => x1 + x2)wordCount.collect().foreach(println)}
7、countByKey
/*** 7、countByKey :直接对key的数量聚合*/def wordCount7(sc: SparkContext) = {val rdd: RDD[String] = sc.makeRDD(List("Hello Spark", "Hello Scala"))// 分割val words: RDD[String] = rdd.flatMap(_.split(" "))// 转换成元组形式val word: RDD[(String, Int)] = words.map((_, 1))val wordCount: collection.Map[String, Long] = word.countByKey()println(wordCount)}
8、countByValue
/*** 8、countByValue :直接对value的数量聚合*/def wordCount8(sc: SparkContext) = {val rdd: RDD[String] = sc.makeRDD(List("Hello Spark", "Hello Scala"))// 分割val words: RDD[String] = rdd.flatMap(_.split(" "))// 转换成元组形式val wordCount: collection.Map[String, Long] = words.countByValue()println(wordCount)}
9、reduce
/*** 9、reduce :直接聚合*/def wordCount9(sc: SparkContext) = {val rdd: RDD[String] = sc.makeRDD(List("Hello Spark", "Hello Scala"))// 分割val words: RDD[String] = rdd.flatMap(_.split(" "))// 为了能够直接reduce聚合,考虑将每个单词转换成Map形式,次数为1val maps: RDD[mutable.Map[String, Long]] = words.map(word => {// 1、创建一个单独的Map,将每个单词放入其中mutable.Map[String, Long]((word, 1))})// 2、将所有Map计算// reduce只能对相同类型进行聚合val wordCount: mutable.Map[String, Long] = maps.reduce(// 遍历所有map,不断往第一个map中更新数据(map1, map2) => {map2.foreach {case (word, count) => {// 取出所有word的countval cnt: Long = map1.getOrElse(word, 0L)// 给map1中更新值map1.update(word, cnt + count)}}// 将map1返回map1})println(wordCount)}
10、aggregate
/*** 10、aggregate :跟aggregateByKey差不多*/def wordCount10(sc: SparkContext) = {val rdd: RDD[String] = sc.makeRDD(List("Hello Spark", "Hello Scala"))// 拆分成单词val words: RDD[String] = rdd.flatMap(_.split(" "))// 根据key进行分组val wordCount: mutable.Map[String, Long] = words.aggregate(mutable.Map[String, Long]())((map: mutable.Map[String, Long], word) => {// 分区内集合,一个分区中没有改数据,获取0放入,否则数量+1val count = map.getOrElse(word, 0L)map.put(word, count + 1L)map},// 分区间聚合(map1: mutable.Map[String, Long], map2: mutable.Map[String, Long]) => {map2.foreach {case (word, count) => {// 取出所有word的countval cnt: Long = map1.getOrElse(word, 0L)// 给map1中更新值map1.update(word, cnt + count)}}// 将map1返回map1})println(wordCount)}
11、fold
待续
object wordCount8fold {def main(args: Array[String]): Unit = {//partitionByval sparkConf = new SparkConf().setMaster("local[*]").setAppName("File - RDD")val sc = new SparkContext(sparkConf)val rdd = sc.makeRDD(List(("a", 1), ("b", 2), ("a", 1), ("b", 2), ("a", 1), ("b", 2)), 2)val strRDD: RDD[String] = rdd.map {case (str, sum) => {(str + " ") * sum}}val flatMapRDD = strRDD.flatMap(_.split(" "))flatMapRDD.map(s => mutable.Map(s -> 1)).fold(mutable.Map[String, Int]())((map1: mutable.Map[String, Int], map2: mutable.Map[String, Int]) => {map1.foldLeft(map2)((innerMap, kv) => {innerMap(kv._1) = innerMap.getOrElse(kv._1, 0) + kv._2innerMap})}).foreach(println)// println (result.collect().mkString(","))}}原文链接:https://blog.csdn.net/qq_34158117/article/details/106611349

若有收获,就点个赞吧
0 人点赞
