一、RDD继续
1、RDD序列化
1、对象序列化case
我们现在进行这样一个操作,使用一个最普遍的foreach进行打印一个对象User,看是否出现问题。
object Test01 {def main(args: Array[String]): Unit = {val context = new SparkContext(new SparkConf().setMaster("local[*]").setAppName("serializable"))val rdd: RDD[Int] = context.makeRDD(List(1, 2, 3, 4))val user = new User// 遍历打印rdd.foreach(num => {println(user.age + num)})context.stop()}}
会出现以下错误:任务没有序列化。
任务怎么会没有序列化呢?真正的原因其实是这个User对象没有序列化。
Exception in thread "main" org.apache.spark.SparkException: Task not serializableat org.apache.spark.util.ClosureCleaner$.ensureSerializable(ClosureCleaner.scala:416)at org.apache.spark.util.ClosureCleaner$.clean(ClosureCleaner.scala:406)at org.apache.spark.util.ClosureCleaner$.clean(ClosureCleaner.scala:162)at org.apache.spark.SparkContext.clean(SparkContext.scala:2356)at org.apache.spark.rdd.RDD.$anonfun$foreach$1(RDD.scala:985)at org.apache.spark.rdd.RDDOperationScope$.withScope(RDDOperationScope.scala:151)at org.apache.spark.rdd.RDDOperationScope$.withScope(RDDOperationScope.scala:112)at org.apache.spark.rdd.RDD.withScope(RDD.scala:388)at org.apache.spark.rdd.RDD.foreach(RDD.scala:984)at org.yyds.spark.core.rdd.serialize.Test01$.main(Test01.scala:16)at org.yyds.spark.core.rdd.serialize.Test01.main(Test01.scala)Caused by: java.io.NotSerializableException: org.yyds.spark.core.rdd.serialize.UserSerialization stack:- object not serializable (class: org.yyds.spark.core.rdd.serialize.User, value: org.yyds.spark.core.rdd.serialize.User@7fc645e4)- element of array (index: 0)- array (class [Ljava.lang.Object;, size 1)- field (class: java.lang.invoke.SerializedLambda, name: capturedArgs, type: class [Ljava.lang.Object;)- object (class java.lang.invoke.SerializedLambda, SerializedLambda[capturingClass=class org.yyds.spark.core.rdd.serialize.Test01$, functionalInterfaceMethod=scala/runtime/java8/JFunction1$mcVI$sp.apply$mcVI$sp:(I)V, implementation=invokeStatic org/yyds/spark/core/rdd/serialize/Test01$.$anonfun$main$1:(Lorg/yyds/spark/core/rdd/serialize/User;I)V, instantiatedMethodType=(I)V, numCaptured=1])- writeReplace data (class: java.lang.invoke.SerializedLambda)- object (class org.yyds.spark.core.rdd.serialize.Test01$$$Lambda$631/439720255, org.yyds.spark.core.rdd.serialize.Test01$$$Lambda$631/439720255@37c2eacb)at org.apache.spark.serializer.SerializationDebugger$.improveException(SerializationDebugger.scala:41)at org.apache.spark.serializer.JavaSerializationStream.writeObject(JavaSerializer.scala:47)at org.apache.spark.serializer.JavaSerializerInstance.serialize(JavaSerializer.scala:101)at org.apache.spark.util.ClosureCleaner$.ensureSerializable(ClosureCleaner.scala:413)... 10 more
现在让这个User进行序列化看看
class User extends Serializable {var age: Int = _}
结果如下: 因为foreach内部是在Executor端进行的,所以是个并行任务,谁先执行谁后执行不知道。
4213
我们还可以使用样例类的方式来进行执行,因为样例类在执行的时候会混入序列化特质。
//class User extends Serializable {// 样例类会在编译时混入序列化特质,实现序列化接口case class User(){var age: Int = _}
当然,我们是做User的属性和List中的数据相加。而foreach是遍历每一个数据执行操作。如果List中没有数据,不会进行相加操作,那没有实现序列化特质的User还会出现序列化问题吗?
object Test01 {def main(args: Array[String]): Unit = {val context = new SparkContext(new SparkConf().setMaster("local[*]").setAppName("serializable"))val rdd: RDD[Int] = context.makeRDD(List[Int]())val user = new User// 遍历打印rdd.foreach(num => {println(user.age + num)})context.stop()}}//class User extends Serializable {// 样例类会在编译时混入序列化特质,实现序列化接口//case class User(){class User{var age: Int = _}
依然会出现序列化问题!
**
我们来看foreach的执行顺序:
def foreach(f: T => Unit): Unit = withScope {val cleanF = sc.clean(f)sc.runJob(this, (iter: Iterator[T]) => iter.foreach(cleanF))}
经过一系列的runHob之后,来到SparkContext的runJob中,这里执行清理工作,进行闭包检测。
def runJob[T, U: ClassTag](rdd: RDD[T],func: (TaskContext, Iterator[T]) => U,partitions: Seq[Int],resultHandler: (Int, U) => Unit): Unit = {if (stopped.get()) {throw new IllegalStateException("SparkContext has been shutdown")}val callSite = getCallSite// 在这里val cleanedFunc = clean(func)logInfo("Starting job: " + callSite.shortForm)if (conf.getBoolean("spark.logLineage", false)) {logInfo("RDD's recursive dependencies:\n" + rdd.toDebugString)}dagScheduler.runJob(rdd, cleanedFunc, partitions, callSite, resultHandler, localProperties.get)progressBar.foreach(_.finishAll())rdd.doCheckpoint()}
private[spark] def clean[F <: AnyRef](f: F, checkSerializable: Boolean = true): F = {ClosureCleaner.clean(f, checkSerializable)f}
来到ClosureCleaner的clean方法
private def clean(func: AnyRef,checkSerializable: Boolean,cleanTransitively: Boolean,accessedFields: Map[Class[_], Set[String]]): Unit = {// indylambda check. Most likely to be the case with 2.12, 2.13// so we check first// non LMF-closures should be less frequent from now onval maybeIndylambdaProxy = IndylambdaScalaClosures.getSerializationProxy(func)// 在这里进行闭包检测if (!isClosure(func.getClass) && maybeIndylambdaProxy.isEmpty) {logDebug(s"Expected a closure; got ${func.getClass.getName}")return}// TODO: clean all inner closures first. This requires us to find the inner objects.// TODO: cache outerClasses / innerClasses / accessedFieldsif (func == null) {return}if (maybeIndylambdaProxy.isEmpty) {logDebug(s"+++ Cleaning closure $func (${func.getClass.getName}) +++")// A list of classes that represents closures enclosed in the given one// 获取闭包中的内部类们val innerClasses = getInnerClosureClasses(func)// A list of enclosing objects and their respective classes, from innermost to outermost// An outer object at a given index is of type outer class at the same indexval (outerClasses, outerObjects) = getOuterClassesAndObjects(func)// For logging purposes onlyval declaredFields = func.getClass.getDeclaredFieldsval declaredMethods = func.getClass.getDeclaredMethodsif (log.isDebugEnabled) {logDebug(s" + declared fields: ${declaredFields.size}")declaredFields.foreach { f => logDebug(s" $f") }logDebug(s" + declared methods: ${declaredMethods.size}")declaredMethods.foreach { m => logDebug(s" $m") }logDebug(s" + inner classes: ${innerClasses.size}")innerClasses.foreach { c => logDebug(s" ${c.getName}") }logDebug(s" + outer classes: ${outerClasses.size}" )outerClasses.foreach { c => logDebug(s" ${c.getName}") }}// Fail fast if we detect return statements in closuresgetClassReader(func.getClass).accept(new ReturnStatementFinder(), 0)// If accessed fields is not populated yet, we assume that// the closure we are trying to clean is the starting oneif (accessedFields.isEmpty) {logDebug(" + populating accessed fields because this is the starting closure")// Initialize accessed fields with the outer classes first// This step is needed to associate the fields to the correct classes laterinitAccessedFields(accessedFields, outerClasses)// Populate accessed fields by visiting all fields and methods accessed by this and// all of its inner closures. If transitive cleaning is enabled, this may recursively// visits methods that belong to other classes in search of transitively referenced fields.for (cls <- func.getClass :: innerClasses) {getClassReader(cls).accept(new FieldAccessFinder(accessedFields, cleanTransitively), 0)}}logDebug(s" + fields accessed by starting closure: ${accessedFields.size} classes")accessedFields.foreach { f => logDebug(" " + f) }// List of outer (class, object) pairs, ordered from outermost to innermost// Note that all outer objects but the outermost one (first one in this list) must be closuresvar outerPairs: List[(Class[_], AnyRef)] = outerClasses.zip(outerObjects).reversevar parent: AnyRef = nullif (outerPairs.nonEmpty) {val outermostClass = outerPairs.head._1val outermostObject = outerPairs.head._2if (isClosure(outermostClass)) {logDebug(s" + outermost object is a closure, so we clone it: ${outermostClass}")} else if (outermostClass.getName.startsWith("$line")) {// SPARK-14558: if the outermost object is a REPL line object, we should clone// and clean it as it may carray a lot of unnecessary information,// e.g. hadoop conf, spark conf, etc.logDebug(s" + outermost object is a REPL line object, so we clone it:" +s" ${outermostClass}")} else {// The closure is ultimately nested inside a class; keep the object of that// class without cloning it since we don't want to clone the user's objects.// Note that we still need to keep around the outermost object itself because// we need it to clone its child closure later (see below).logDebug(s" + outermost object is not a closure or REPL line object," +s" so do not clone it: ${outermostClass}")parent = outermostObject // e.g. SparkContextouterPairs = outerPairs.tail}} else {logDebug(" + there are no enclosing objects!")}// Clone the closure objects themselves, nulling out any fields that are not// used in the closure we're working on or any of its inner closures.for ((cls, obj) <- outerPairs) {logDebug(s" + cloning instance of class ${cls.getName}")// We null out these unused references by cloning each object and then filling in all// required fields from the original object. We need the parent here because the Java// language specification requires the first constructor parameter of any closure to be// its enclosing object.val clone = cloneAndSetFields(parent, obj, cls, accessedFields)// If transitive cleaning is enabled, we recursively clean any enclosing closure using// the already populated accessed fields map of the starting closureif (cleanTransitively && isClosure(clone.getClass)) {logDebug(s" + cleaning cloned closure recursively (${cls.getName})")// No need to check serializable here for the outer closures because we're// only interested in the serializability of the starting closureclean(clone, checkSerializable = false, cleanTransitively, accessedFields)}parent = clone}// Update the parent pointer ($outer) of this closureif (parent != null) {val field = func.getClass.getDeclaredField("$outer")field.setAccessible(true)// If the starting closure doesn't actually need our enclosing object, then just null it outif (accessedFields.contains(func.getClass) &&!accessedFields(func.getClass).contains("$outer")) {logDebug(s" + the starting closure doesn't actually need $parent, so we null it out")field.set(func, null)} else {// Update this closure's parent pointer to point to our enclosing object,// which could either be a cloned closure or the original user objectfield.set(func, parent)}}logDebug(s" +++ closure $func (${func.getClass.getName}) is now cleaned +++")} else {val lambdaProxy = maybeIndylambdaProxy.getval implMethodName = lambdaProxy.getImplMethodNamelogDebug(s"Cleaning indylambda closure: $implMethodName")// capturing class is the class that declared this lambdaval capturingClassName = lambdaProxy.getCapturingClass.replace('/', '.')val classLoader = func.getClass.getClassLoader // this is the safest option// scalastyle:off classfornameval capturingClass = Class.forName(capturingClassName, false, classLoader)// scalastyle:on classforname// Fail fast if we detect return statements in closuresval capturingClassReader = getClassReader(capturingClass)capturingClassReader.accept(new ReturnStatementFinder(Option(implMethodName)), 0)val isClosureDeclaredInScalaRepl = capturingClassName.startsWith("$line") &&capturingClassName.endsWith("$iw")val outerThisOpt = if (lambdaProxy.getCapturedArgCount > 0) {Option(lambdaProxy.getCapturedArg(0))} else {None}// only need to clean when there is an enclosing "this" captured by the closure, and it// should be something cleanable, i.e. a Scala REPL line objectval needsCleaning = isClosureDeclaredInScalaRepl &&outerThisOpt.isDefined && outerThisOpt.get.getClass.getName == capturingClassNameif (needsCleaning) {// indylambda closures do not reference enclosing closures via an `$outer` chain, so no// transitive cleaning on the `$outer` chain is needed.// Thus clean() shouldn't be recursively called with a non-empty accessedFields.assert(accessedFields.isEmpty)initAccessedFields(accessedFields, Seq(capturingClass))IndylambdaScalaClosures.findAccessedFields(lambdaProxy, classLoader, accessedFields, cleanTransitively)logDebug(s" + fields accessed by starting closure: ${accessedFields.size} classes")accessedFields.foreach { f => logDebug(" " + f) }if (accessedFields(capturingClass).size < capturingClass.getDeclaredFields.length) {// clone and clean the enclosing `this` only when there are fields to null outval outerThis = outerThisOpt.getlogDebug(s" + cloning instance of REPL class $capturingClassName")val clonedOuterThis = cloneAndSetFields(parent = null, outerThis, capturingClass, accessedFields)val outerField = func.getClass.getDeclaredField("arg$1")outerField.setAccessible(true)outerField.set(func, clonedOuterThis)}}logDebug(s" +++ indylambda closure ($implMethodName) is now cleaned +++")}// ====== 在这里检查是否进行了序列化if (checkSerializable) {ensureSerializable(func)}}
private def ensureSerializable(func: AnyRef): Unit = {try {// 尝试对当前环境进行序列化,如果无法序列化而导致抛出异常,则抛出异常:Task not serializableif (SparkEnv.get != null) {SparkEnv.get.closureSerializer.newInstance().serialize(func)}} catch {case ex: Exception => throw new SparkException("Task not serializable", ex)}}
2、属性、方法序列化case
object Test_02 {def main(args: Array[String]): Unit = {//1.创建 SparkConf并设置 App名称val conf: SparkConf= new SparkConf().setAppName("SparkCoreTest").setMaster("local[*]")val sc: SparkContext = new SparkContext(conf)val rdd: RDD[String] = sc.makeRDD(Array("hello world", "hello spark","hive", "lalala"))val search = new Search("hello")//3.2 函数传递,打印:ERROR Task not serializablesearch.getMatch1(rdd).collect().foreach(println)//3.3 属性传递,打印:ERROR Task not serializablesearch.getMatch2(rdd).collect().foreach(println)//4.关闭连接sc.stop()}}class Search(query: String) {def isMatch(s: String): Boolean = {s.contains(query)}// 函数序列化案例def getMatch1(rdd: RDD[String]): RDD[String] = {//rdd.filter(this.isMatch)rdd.filter(isMatch)}// 属性序列化案例def getMatch2(rdd: RDD[String]): RDD[String] = {//rdd.filter(x => x.contains(this.query))rdd.filter(x => x.contains(query))//val q = query//rdd.filter(x => x.contains(q))}}
无法序列化错误。
原因:构造参数是作为类的属性使用的。方法在调用的时候都是进行的this.属性操作,所以属性的调用会导致类的序列化。
解决方案:
1、混入Serializable特质
2、使用case class
3、局部变量代替类的属性传参
3、总结
- 闭包检测
从计算的角度, 算子以外的代码都是在 Driver 端执行, 算子里面的代码都是在 Executor端执行。那么在 scala 的函数式编程中,就会导致算子内经常会用到算子外的数据,这样就形成了闭包的效果,如果使用的算子外的数据无法序列化,就意味着无法传值给 Executor端执行,就会发生错误,所以需要在执行任务计算前,检测闭包内的对象是否可以进行序列化,这个操作我们称之为闭包检测。Scala2.12 版本后闭包编译方式发生了改变
**
- 序列化属性和方法
从计算的角度, 算子以外的代码都是在 Driver 端执行, 算子里面的代码都是在 Executor端执行
**
4、Kryo序列化框架
参考地址:https://github.com/EsotericSoftware/kryo
Java 的序列化能够序列化任何的类。但是比较重(字节多),序列化后,对象的提交也比较大。Spark 出于性能的考虑,Spark2.0 开始支持另外一种 Kryo 序列化机制。Kryo 速度是 Serializable 的 10 倍。当 RDD 在 Shuffle 数据的时候,简单数据类型、数组和字符串类型已经在 Spark 内部使用 Kryo 来序列化。
注意:即使使用 Kryo 序列化,也要继承 Serializable 接口。
object Test_Serializable_Kryo {def main(args: Array[String]): Unit = {val conf: SparkConf = new SparkConf().setAppName("SerDemo").setMaster("local[*]")// 替换默认的序列化机制.set("spark.serializer","org.apache.spark.serializer.KryoSerializer")// 注册需要使用 kryo 序列化的自定义类.registerKryoClasses(Array(classOf[Searcher]))val sc = new SparkContext(conf)val rdd: RDD[String] = sc.makeRDD(Array("hello world", "hello atguigu","atguigu", "hahah"), 2)val searcher = new Searcher("hello")val result: RDD[String] = searcher.getMatchedRDD1(rdd)result.collect.foreach(println)}}case class Searcher(val query: String) {def isMatch(s: String) = {s.contains(query)}def getMatchedRDD1(rdd: RDD[String]) = {rdd.filter(isMatch)}def getMatchedRDD2(rdd: RDD[String]) = {val q = queryrdd.filter(_.contains(q))}}
2、RDD依赖关系
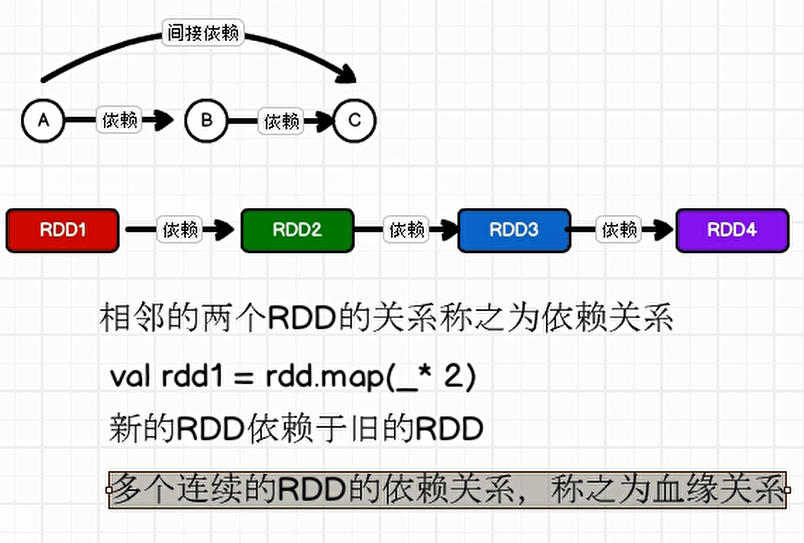

1、血缘关系
RDD 只支持粗粒度转换,即在大量记录上执行的单个操作。将创建 RDD 的一系列 Lineage(血统)记录下来,以便恢复丢失的分区。RDD 的 Lineage 会记录 RDD 的元数据信息和转换行为,当该 RDD 的部分分区数据丢失时,它可以根据这些信息来重新运算和恢复丢失的数据分区。
演示:
使用toDebugString打印血缘关系
object Test_Dep {def main(args: Array[String]): Unit = {// 1、连接Sparkval conf: SparkConf = new SparkConf().setMaster("local").setAppName("WordCount")val sparkContext = new SparkContext(conf)val lines: RDD[String] = sparkContext.textFile("datas/2.txt")// 使用toDebugString打印血缘信息println(lines.toDebugString)println("=========================================")val split: RDD[String] = lines.flatMap(_.split(" "))println(split.toDebugString)println("=========================================")val map: RDD[(String, Int)] = split.map(word => (word, 1))println(map.toDebugString)println("=========================================")val value: RDD[(String, Int)] = map.reduceByKey(_ + _)println(value.toDebugString)println("=========================================")value.collect().foreach(println)sparkContext.stop()}}
打印如下:
(1) datas/2.txt MapPartitionsRDD[1] at textFile at Test_Dep.scala:13 []| datas/2.txt HadoopRDD[0] at textFile at Test_Dep.scala:13 []=========================================(1) MapPartitionsRDD[2] at flatMap at Test_Dep.scala:18 []| datas/2.txt MapPartitionsRDD[1] at textFile at Test_Dep.scala:13 []| datas/2.txt HadoopRDD[0] at textFile at Test_Dep.scala:13 []=========================================(1) MapPartitionsRDD[3] at map at Test_Dep.scala:22 []| MapPartitionsRDD[2] at flatMap at Test_Dep.scala:18 []| datas/2.txt MapPartitionsRDD[1] at textFile at Test_Dep.scala:13 []| datas/2.txt HadoopRDD[0] at textFile at Test_Dep.scala:13 []=========================================(1) ShuffledRDD[4] at reduceByKey at Test_Dep.scala:26 []// 这里的+-表示在这里进行了shuffle操作,血缘关系断了,// 这个(1)表示第一个分区+-(1) MapPartitionsRDD[3] at map at Test_Dep.scala:22 []| MapPartitionsRDD[2] at flatMap at Test_Dep.scala:18 []| datas/2.txt MapPartitionsRDD[1] at textFile at Test_Dep.scala:13 []| datas/2.txt HadoopRDD[0] at textFile at Test_Dep.scala:13 []=========================================(Spark,1)(Hello,2)(Scala,1)
2、依赖关系
其实就是相邻两个RDD之间的关系。
使用dependencies打印依赖关系
object Test_Dep {def main(args: Array[String]): Unit = {// 1、连接Sparkval conf: SparkConf = new SparkConf().setMaster("local").setAppName("WordCount")val sparkContext = new SparkContext(conf)val lines: RDD[String] = sparkContext.textFile("datas/2.txt")// 使用toDebugString打印血缘信息println(lines.dependencies)println("=========================================")val split: RDD[String] = lines.flatMap(_.split(" "))println(split.dependencies)println("=========================================")val map: RDD[(String, Int)] = split.map(word => (word, 1))println(map.dependencies)println("=========================================")val value: RDD[(String, Int)] = map.reduceByKey(_ + _)println(value.dependencies)println("=========================================")value.collect().foreach(println)sparkContext.stop()}}
结果:
List(org.apache.spark.OneToOneDependency@68a4dcc6)=========================================List(org.apache.spark.OneToOneDependency@cb7fa71)=========================================List(org.apache.spark.OneToOneDependency@625d9132)=========================================List(org.apache.spark.ShuffleDependency@575e572f)=========================================(Spark,1)(Hello,2)(Scala,1)Process finished with exit code 0
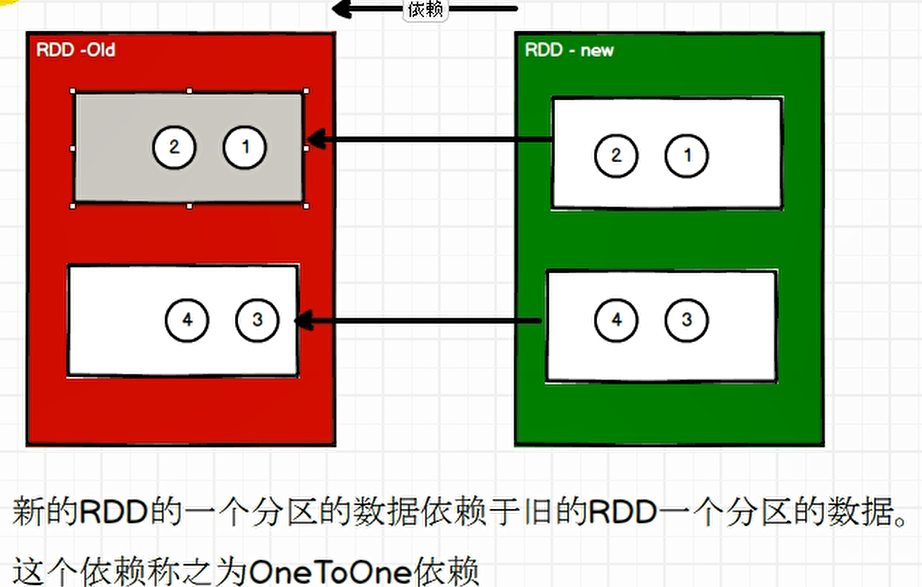
1、窄依赖
窄依赖表示每一个上游RDD 的 Partition 最多被下游RDD 的一个 分区使用,窄依赖我们形象的比喻为独生子女。
/*** :: DeveloperApi ::* Represents a one-to-one dependency between partitions of the parent and child RDDs.*/@DeveloperApiclass OneToOneDependency[T](rdd: RDD[T]) extends NarrowDependency[T](rdd) {override def getParents(partitionId: Int): List[Int] = List(partitionId)}
2、宽依赖
spark中并没有定义宽的概念,不过我们习惯与窄依赖对应,叫做宽依赖,表示上游RDD的数据被多个下游RDD的分区使用,会引起Shuffle
/*** :: DeveloperApi ::* Represents a dependency on the output of a shuffle stage. Note that in the case of shuffle,* the RDD is transient since we don't need it on the executor side.** @param _rdd the parent RDD* @param partitioner partitioner used to partition the shuffle output* @param serializer [[org.apache.spark.serializer.Serializer Serializer]] to use. If not set* explicitly then the default serializer, as specified by `spark.serializer`* config option, will be used.* @param keyOrdering key ordering for RDD's shuffles* @param aggregator map/reduce-side aggregator for RDD's shuffle* @param mapSideCombine whether to perform partial aggregation (also known as map-side combine)* @param shuffleWriterProcessor the processor to control the write behavior in ShuffleMapTask*/@DeveloperApiclass ShuffleDependency[K: ClassTag, V: ClassTag, C: ClassTag](@transient private val _rdd: RDD[_ <: Product2[K, V]],val partitioner: Partitioner,val serializer: Serializer = SparkEnv.get.serializer,val keyOrdering: Option[Ordering[K]] = None,val aggregator: Option[Aggregator[K, V, C]] = None,val mapSideCombine: Boolean = false,val shuffleWriterProcessor: ShuffleWriteProcessor = new ShuffleWriteProcessor)extends Dependency[Product2[K, V]] {
Shuffle
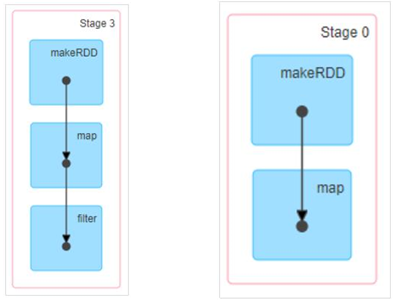
3、RDD阶段划分
1、简单解释
DAG(Directed Acyclic Graph)有向无环图是由点和线组成的拓扑图形,该图形具有方向,不会闭环。例如,DAG 记录了 RDD 的转换过程和任务的阶段。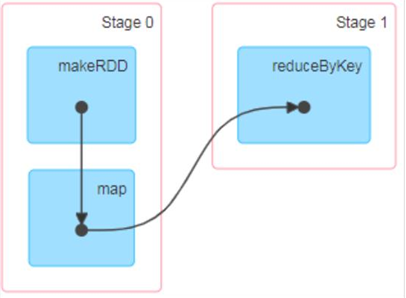
比如去搞团建,旅游分组去逛,不同分组之间可以看完一个景点直接去下一个景点,但是如果要是有集体性的,需要等待所有分组汇总之后一起进行。

2、源码解读
开始的开始还是从collect行动算子开始。
def collect(): Array[T] = withScope {val results = sc.runJob(this, (iter: Iterator[T]) => iter.toArray)Array.concat(results: _*)}
来到SparkContext的runJob方法,谁调用就将当前的rdd传入
def runJob[T, U: ClassTag](rdd: RDD[T],func: (TaskContext, Iterator[T]) => U,partitions: Seq[Int],resultHandler: (Int, U) => Unit): Unit = {if (stopped.get()) {throw new IllegalStateException("SparkContext has been shutdown")}val callSite = getCallSiteval cleanedFunc = clean(func)logInfo("Starting job: " + callSite.shortForm)if (conf.getBoolean("spark.logLineage", false)) {logInfo("RDD's recursive dependencies:\n" + rdd.toDebugString)}// 进入有向无环图的runJobdagScheduler.runJob(rdd, cleanedFunc, partitions, callSite, resultHandler, localProperties.get)progressBar.foreach(_.finishAll())rdd.doCheckpoint()}
DAGScheduler的runJob
def runJob[T, U](rdd: RDD[T],func: (TaskContext, Iterator[T]) => U,partitions: Seq[Int],callSite: CallSite,resultHandler: (Int, U) => Unit,properties: Properties): Unit = {val start = System.nanoTime// 提交任务val waiter = submitJob(rdd, func, partitions, callSite, resultHandler, properties)ThreadUtils.awaitReady(waiter.completionFuture, Duration.Inf)waiter.completionFuture.value.get match {case scala.util.Success(_) =>logInfo("Job %d finished: %s, took %f s".format(waiter.jobId, callSite.shortForm, (System.nanoTime - start) / 1e9))case scala.util.Failure(exception) =>logInfo("Job %d failed: %s, took %f s".format(waiter.jobId, callSite.shortForm, (System.nanoTime - start) / 1e9))// SPARK-8644: Include user stack trace in exceptions coming from DAGScheduler.val callerStackTrace = Thread.currentThread().getStackTrace.tailexception.setStackTrace(exception.getStackTrace ++ callerStackTrace)throw exception}}
提交任务的最后会发布一个Job被提交的事件
eventProcessLoop.post(JobSubmitted(jobId, rdd, func2, partitions.toArray, callSite, waiter,Utils.cloneProperties(properties)))
会有一个方法handleJobSubmitted处理该事件
1、其中第一步就是创建一个ResultStage,一个Job只有一个
// New stage creation may throw an exception if, for example, jobs are run on a// HadoopRDD whose underlying HDFS files have been deleted.finalStage = createResultStage(finalRDD, func, partitions, jobId, callSite)
如何创建ResultStage的呢?
private def createResultStage(rdd: RDD[_],func: (TaskContext, Iterator[_]) => _,partitions: Array[Int],jobId: Int,callSite: CallSite): ResultStage = {checkBarrierStageWithDynamicAllocation(rdd)checkBarrierStageWithNumSlots(rdd)checkBarrierStageWithRDDChainPattern(rdd, partitions.toSet.size)// 在这里还会获取之前创建的阶段作为上一步阶段val parents = getOrCreateParentStages(rdd, jobId)val id = nextStageId.getAndIncrement()// 在这里根据当前的rdd创建一个ResultStage,作为最终返回的阶段处理val stage = new ResultStage(id, rdd, func, partitions, parents, jobId, callSite)stageIdToStage(id) = stageupdateJobIdStageIdMaps(jobId, stage)stage}
2、在创建之前获取上一步阶段getOrCreateParentStages,先获取所有Shuffle依赖,并对每个依赖获取或者创建shuffle阶段
private def getOrCreateParentStages(rdd: RDD[_], firstJobId: Int): List[Stage] = {// 根据当前rdd获取getShuffleDependencies(rdd).map { shuffleDep =>getOrCreateShuffleMapStage(shuffleDep, firstJobId)}.toList}
3、如何获取Shuffle依赖的呢?将创建一个集合,获取当前rdd的所有依赖关系,
private[scheduler] def getShuffleDependencies(rdd: RDD[_]): HashSet[ShuffleDependency[_, _, _]] = {val parents = new HashSet[ShuffleDependency[_, _, _]]val visited = new HashSet[RDD[_]]// waitingForVisit就是准备去的下一个阶段val waitingForVisit = new ListBuffer[RDD[_]]// 将当前rdd添加进去waitingForVisit += rddwhile (waitingForVisit.nonEmpty) {// 从所有rdd中取出阶段val toVisit = waitingForVisit.remove(0)// 如果没有拜访过,if (!visited(toVisit)) {visited += toVisit// 遍历所有依赖关系,如果当前是shuffle依赖,创建一个shuffle,如果是普通依赖,准备去拜访toVisit.dependencies.foreach {case shuffleDep: ShuffleDependency[_, _, _] =>parents += shuffleDepcase dependency =>waitingForVisit.prepend(dependency.rdd)}}}parents}
获取或者创建shuffle阶段:
private def getOrCreateShuffleMapStage(shuffleDep: ShuffleDependency[_, _, _],firstJobId: Int): ShuffleMapStage = {// 获取该shuffle阶段shuffleIdToMapStage.get(shuffleDep.shuffleId) match {case Some(stage) =>stagecase None =>// 如果没有shuffle,创建一个shuffleMapStage// Create stages for all missing ancestor shuffle dependencies.getMissingAncestorShuffleDependencies(shuffleDep.rdd).foreach { dep =>// Even though getMissingAncestorShuffleDependencies only returns shuffle dependencies// that were not already in shuffleIdToMapStage, it's possible that by the time we// get to a particular dependency in the foreach loop, it's been added to// shuffleIdToMapStage by the stage creation process for an earlier dependency. See// SPARK-13902 for more information.if (!shuffleIdToMapStage.contains(dep.shuffleId)) {createShuffleMapStage(dep, firstJobId)}}// Finally, create a stage for the given shuffle dependency.createShuffleMapStage(shuffleDep, firstJobId)}}
createShuffleMapStage
def createShuffleMapStage[K, V, C](shuffleDep: ShuffleDependency[K, V, C], jobId: Int): ShuffleMapStage = {val rdd = shuffleDep.rddcheckBarrierStageWithDynamicAllocation(rdd)checkBarrierStageWithNumSlots(rdd)checkBarrierStageWithRDDChainPattern(rdd, rdd.getNumPartitions)val numTasks = rdd.partitions.lengthval parents = getOrCreateParentStages(rdd, jobId)val id = nextStageId.getAndIncrement()// new一个ShuffleMapStageval stage = new ShuffleMapStage(id, rdd, numTasks, parents, jobId, rdd.creationSite, shuffleDep, mapOutputTracker)stageIdToStage(id) = stageshuffleIdToMapStage(shuffleDep.shuffleId) = stageupdateJobIdStageIdMaps(jobId, stage)if (!mapOutputTracker.containsShuffle(shuffleDep.shuffleId)) {// Kind of ugly: need to register RDDs with the cache and map output tracker here// since we can't do it in the RDD constructor because # of partitions is unknownlogInfo(s"Registering RDD ${rdd.id} (${rdd.getCreationSite}) as input to " +s"shuffle ${shuffleDep.shuffleId}")mapOutputTracker.registerShuffle(shuffleDep.shuffleId, rdd.partitions.length)}stage}
4、RDD任务划分
RDD 任务切分中间分为:Application、Job、Stage 和 Task
- Application:初始化一个 SparkContext 即生成一个 Application;
- Job:一个 Action 算子就会生成一个 Job;
- Stage:Stage 等于宽依赖(ShuffleDependency)的个数加 1;
- Task:一个 Stage 阶段中,最后一个 RDD 的分区个数就是 Task 的个数。
注意:Application->Job->Stage->Task 每一层都是 1 对 n 的关系。

源码解读
阶段划分完成之后,在handleJobSubmitted中,最后会提交任务
submitStage(finalStage)
获取未提交的阶段,提交任务
private def submitStage(stage: Stage): Unit = {val jobId = activeJobForStage(stage)if (jobId.isDefined) {logDebug(s"submitStage($stage (name=${stage.name};" +s"jobs=${stage.jobIds.toSeq.sorted.mkString(",")}))")if (!waitingStages(stage) && !runningStages(stage) && !failedStages(stage)) {// 获取未提交的阶段,根据id排个序val missing = getMissingParentStages(stage).sortBy(_.id)logDebug("missing: " + missing)// 如果获取到了所有阶段则提交任务if (missing.isEmpty) {logInfo("Submitting " + stage + " (" + stage.rdd + "), which has no missing parents")// 提交任务submitMissingTasks(stage, jobId.get)} else {// 否则遍历所有未提交的阶段,先提交这些阶段for (parent <- missing) {submitStage(parent)}waitingStages += stage}}} else {abortStage(stage, "No active job for stage " + stage.id, None)}}
来到submitMissingTasks提交任务中,根据任务类型的不同划分不同的任务种类,最终汇总到partitionsToCompute中,它的数量就是执行的任务的数量;。
private def submitMissingTasks(stage: Stage, jobId: Int): Unit = {logDebug("submitMissingTasks(" + stage + ")")// Before find missing partition, do the intermediate state clean work first.// The operation here can make sure for the partially completed intermediate stage,// `findMissingPartitions()` returns all partitions every time.stage match {// 如果是shuffle阶段case sms: ShuffleMapStage if stage.isIndeterminate && !sms.isAvailable =>mapOutputTracker.unregisterAllMapOutput(sms.shuffleDep.shuffleId)case _ =>}// Figure out the indexes of partition ids to compute.val partitionsToCompute: Seq[Int] = stage.findMissingPartitions()// Use the scheduling pool, job group, description, etc. from an ActiveJob associated// with this Stageval properties = jobIdToActiveJob(jobId).propertiesrunningStages += stage// SparkListenerStageSubmitted should be posted before testing whether tasks are// serializable. If tasks are not serializable, a SparkListenerStageCompleted event// will be posted, which should always come after a corresponding SparkListenerStageSubmitted// event.// ===判断阶段是哪个阶段stage match {// 是shuffle,就提交shuffle阶段case s: ShuffleMapStage =>outputCommitCoordinator.stageStart(stage = s.id, maxPartitionId = s.numPartitions - 1)// 是ResultStage,就提交阶段case s: ResultStage =>outputCommitCoordinator.stageStart(stage = s.id, maxPartitionId = s.rdd.partitions.length - 1)}val taskIdToLocations: Map[Int, Seq[TaskLocation]] = try {stage match {case s: ShuffleMapStage =>partitionsToCompute.map { id => (id, getPreferredLocs(stage.rdd, id))}.toMapcase s: ResultStage =>partitionsToCompute.map { id =>val p = s.partitions(id)(id, getPreferredLocs(stage.rdd, p))}.toMap}} catch {case NonFatal(e) =>stage.makeNewStageAttempt(partitionsToCompute.size)listenerBus.post(SparkListenerStageSubmitted(stage.latestInfo, properties))abortStage(stage, s"Task creation failed: $e\n${Utils.exceptionString(e)}", Some(e))runningStages -= stagereturn}stage.makeNewStageAttempt(partitionsToCompute.size, taskIdToLocations.values.toSeq)// If there are tasks to execute, record the submission time of the stage. Otherwise,// post the even without the submission time, which indicates that this stage was// skipped.if (partitionsToCompute.nonEmpty) {stage.latestInfo.submissionTime = Some(clock.getTimeMillis())}listenerBus.post(SparkListenerStageSubmitted(stage.latestInfo, properties))// TODO: Maybe we can keep the taskBinary in Stage to avoid serializing it multiple times.// Broadcasted binary for the task, used to dispatch tasks to executors. Note that we broadcast// the serialized copy of the RDD and for each task we will deserialize it, which means each// task gets a different copy of the RDD. This provides stronger isolation between tasks that// might modify state of objects referenced in their closures. This is necessary in Hadoop// where the JobConf/Configuration object is not thread-safe.var taskBinary: Broadcast[Array[Byte]] = nullvar partitions: Array[Partition] = nulltry {// For ShuffleMapTask, serialize and broadcast (rdd, shuffleDep).// For ResultTask, serialize and broadcast (rdd, func).var taskBinaryBytes: Array[Byte] = null// taskBinaryBytes and partitions are both effected by the checkpoint status. We need// this synchronization in case another concurrent job is checkpointing this RDD, so we get a// consistent view of both variables.RDDCheckpointData.synchronized {taskBinaryBytes = stage match {case stage: ShuffleMapStage =>JavaUtils.bufferToArray(closureSerializer.serialize((stage.rdd, stage.shuffleDep): AnyRef))case stage: ResultStage =>JavaUtils.bufferToArray(closureSerializer.serialize((stage.rdd, stage.func): AnyRef))}partitions = stage.rdd.partitions}if (taskBinaryBytes.length > TaskSetManager.TASK_SIZE_TO_WARN_KIB * 1024) {logWarning(s"Broadcasting large task binary with size " +s"${Utils.bytesToString(taskBinaryBytes.length)}")}taskBinary = sc.broadcast(taskBinaryBytes)} catch {// In the case of a failure during serialization, abort the stage.case e: NotSerializableException =>abortStage(stage, "Task not serializable: " + e.toString, Some(e))runningStages -= stage// Abort executionreturncase e: Throwable =>abortStage(stage, s"Task serialization failed: $e\n${Utils.exceptionString(e)}", Some(e))runningStages -= stage// Abort executionreturn}// =====在这里其实有了任务的概念,根据任务类型的不同去执行不同任务val tasks: Seq[Task[_]] = try {val serializedTaskMetrics = closureSerializer.serialize(stage.latestInfo.taskMetrics).array()stage match {// 如果是shuffle任务,就去new一个ShuffleMapTaskcase stage: ShuffleMapStage =>stage.pendingPartitions.clear()// ============= 就看这个partitionsToComput中的数量了,有多少就起多少任务partitionsToCompute.map { id =>val locs = taskIdToLocations(id)val part = partitions(id)stage.pendingPartitions += idnew ShuffleMapTask(stage.id, stage.latestInfo.attemptNumber,taskBinary, part, locs, properties, serializedTaskMetrics, Option(jobId),Option(sc.applicationId), sc.applicationAttemptId, stage.rdd.isBarrier())}// 如果是ResultStage任务,就去new一个ResultTaskcase stage: ResultStage =>partitionsToCompute.map { id =>val p: Int = stage.partitions(id)val part = partitions(p)val locs = taskIdToLocations(id)new ResultTask(stage.id, stage.latestInfo.attemptNumber,taskBinary, part, locs, id, properties, serializedTaskMetrics,Option(jobId), Option(sc.applicationId), sc.applicationAttemptId,stage.rdd.isBarrier())}}} catch {case NonFatal(e) =>abortStage(stage, s"Task creation failed: $e\n${Utils.exceptionString(e)}", Some(e))runningStages -= stagereturn}if (tasks.nonEmpty) {logInfo(s"Submitting ${tasks.size} missing tasks from $stage (${stage.rdd}) (first 15 " +s"tasks are for partitions ${tasks.take(15).map(_.partitionId)})")taskScheduler.submitTasks(new TaskSet(tasks.toArray, stage.id, stage.latestInfo.attemptNumber, jobId, properties))} else {// Because we posted SparkListenerStageSubmitted earlier, we should mark// the stage as completed here in case there are no tasks to runmarkStageAsFinished(stage, None)stage match {case stage: ShuffleMapStage =>logDebug(s"Stage ${stage} is actually done; " +s"(available: ${stage.isAvailable}," +s"available outputs: ${stage.numAvailableOutputs}," +s"partitions: ${stage.numPartitions})")markMapStageJobsAsFinished(stage)case stage : ResultStage =>logDebug(s"Stage ${stage} is actually done; (partitions: ${stage.numPartitions})")}submitWaitingChildStages(stage)}}
计算任务数量
// Figure out the indexes of partition ids to compute.val partitionsToCompute: Seq[Int] = stage.findMissingPartitions()
来到抽象类Stage中
def findMissingPartitions(): Seq[Int]
抽象类就有具体的实现
ResultStage中
override def findMissingPartitions(): Seq[Int] = {val job = activeJob.get// 遍历所有分区的数量。(0 until job.numPartitions).filter(id => !job.finished(id))}
ShuffleMapStage中也是一样的流程,获取分区数量
override def findMissingPartitions(): Seq[Int] = {mapOutputTrackerMaster.findMissingPartitions(shuffleDep.shuffleId).getOrElse(0 until numPartitions)}
总结:有多少分区就有多少任务执行。
5、RDD持久化
如果我们想要对一个rdd进行重复使用,比如需要进行reduceByKey,还要进行groupByKey操作,这就涉及到了可重用的问题了。
1、cache&persist
object Persist01 {def main(args: Array[String]): Unit = {val sc = new SparkContext(new SparkConf().setMaster("local[*]").setAppName("persist"))// wcval rdd: RDD[String] = sc.makeRDD(List("Hello Spark", "Hello Scala"))val words: RDD[String] = rdd.flatMap(_.split(" "))val map: RDD[(String, Int)] = words.map(word => {println("************")(word, 1)})val wordCount: RDD[(String, Int)] = map.reduceByKey(_ + _)// 第一次收集数据,做reduceByKey操作wordCount.collect().foreach(println)println("=======================================================")// 如果想要进行第二个操作的时候,就需要再次重复创建一个rdd,执行相关操作。但是这样的效率非常低下。val rdd1: RDD[String] = sc.makeRDD(List("Hello Spark", "Hello Scala"))val words1: RDD[String] = rdd1.flatMap(_.split(" "))val map1: RDD[(String, Int)] = words1.map(word => {println("************")(word, 1)})val wc: RDD[(String, Iterable[Int])] = map1.groupByKey()wc.collect.foreach(println)sc.stop()}}
但是这样子的效率非常低不如我们可以复用rdd
// 重用同一个map的结果val wc: RDD[(String, Iterable[Int])] = map.groupByKey()wc.collect.foreach(println)sc.stop()
但是我们说过了,RDD本身是不保存数据的,但是rdd对象是可以重用的。
rdd既然不保存数据,那么在上一次操作完成就应该清空了数据,我们第二次可以用到,是因为如果rdd进行复用,会将之前获取数据的流程重新走一遍。
所以我们的结果中打印了两遍*号。
但是多次走了这些获取数据的流程,我们执行的效率就会降低,所以我们有没有办法将第一次rdd获取到数据的时候,将结果保存下来给第二次使用呢?
当然可以,可以通过cache()方法在内存中缓存,也可以持久化到磁盘中。
object Persist01 {def main(args: Array[String]): Unit = {val sc = new SparkContext(new SparkConf().setMaster("local[*]").setAppName("persist"))// wcval rdd: RDD[String] = sc.makeRDD(List("Hello Spark", "Hello Scala"))val words: RDD[String] = rdd.flatMap(_.split(" "))val map: RDD[(String, Int)] = words.map(word => {println("************")(word, 1)})val wordCount: RDD[(String, Int)] = map.reduceByKey(_ + _)// 第一次收集数据,做reduceByKey操作// 如果想要进行第二个操作的时候,就需要再次重复创建一个rdd,执行相关操作。但是这样的效率非常低下。// 调用cache或者persist方法在内存中缓存,或者持久化到磁盘// map.cache()map.persist()wordCount.collect().foreach(println)println("=======================================================")// 重用同一个map的结果val wc: RDD[(String, Iterable[Int])] = map.groupByKey()wc.collect.foreach(println)sc.stop()}}
那cache和persist其实就是一个方法。
但是这些方法并不会立即缓存,而是在后面触发行动算子的时候才会执行缓存。
/*** Persist this RDD with the default storage level (`MEMORY_ONLY`).*/def persist(): this.type = persist(StorageLevel.MEMORY_ONLY)/*** Persist this RDD with the default storage level (`MEMORY_ONLY`).*/def cache(): this.type = persist()
设置为持久化到磁盘中
map.persist(StorageLevel.DISK_ONLY)
2、checkpoint
检查点的设立让那些血缘关系比较长的对象,在过程中可能出现错误的情况有了余地。
这里请注意:检查点会被持久化到磁盘中,并且在Job执行完成之后不会被删除的!
**
// 设置检查点保存的路径,可以使分布式存储系统如HDFS:Ceph,NFS等sc.setCheckpointDir("cp/xxx")map.checkpoint()
3、区别
cache:
- 将数据临时存储在内存中进行数据重用
- 会在血缘关系中添加新的依赖。一旦出现问题,可以从头读取数据。
persist:
- 将数据临时存储在磁盘文件中进行数据重用
- 涉及到磁盘IO,性能较低,但是数据安全
- 如果作业执行完毕,临时保存数据文件就会被删除
checkpoint:
- 将数据长久地保存在磁盘文件中进行数据重用
- 涉及到磁盘IO,性能较低,但是数据安全
- 为了保证数据安全,所以一般情况下,会独立执行作业
- 执行过程中,会切断血缘关系,重新建立新的血缘关系
- checkpoint等于改变数据源
6、RDD分区器
Spark 目前支持 Hash 分区和 Range 分区,和用户自定义分区。Hash 分区为当前的默认
分区。分区器直接决定了 RDD 中分区的个数、RDD 中每条数据经过 Shuffle 后进入哪个分
区,进而决定了 Reduce 的个数。
- 只有 Key-Value 类型的 RDD 才有分区器,非 Key-Value 类型的 RDD 分区的值是 None
- 每个 RDD 的分区 ID 范围:0 ~ (numPartitions - 1),决定这个值是属于那个分区的。
我们前面已经见过了自带的HashPartitioner和RangePartitioner等,如果我们想要自己指定分区规则的话怎么办呢。可以自己继承Partitioner类,自定义getPartition方法实现分区逻辑。
abstract class Partitioner extends Serializable {def numPartitions: Intdef getPartition(key: Any): Int}
class CustomPartitioner extends Partitioner {// 分区数量override def numPartitions: Int = 3// 根据数据的key返回数据所在的分区索引(从0开始)override def getPartition(key: Any): Int = {key match {case "it666" => 0case "itdachang" => 1case "guigu" => 2case _ => 0}}}object CustomPartitioner {def main(args: Array[String]): Unit = {val sc = new SparkContext(new SparkConf().setMaster("local[*]").setAppName("customPartitioer"))val rdd: RDD[(String, String)] = sc.makeRDD(List(("it666", "6666"),("itdachang", "5555"),("guigu", "22222"),("25354", "22222"),),3)val value: RDD[(String, String)] = rdd.partitionBy(new CustomPartitioner)value.saveAsTextFile("datas/output")sc.stop()}}
7、RDD文件读取与保存
Spark 的数据读取及数据保存可以从两个维度来作区分:文件格式以及文件系统。
文件格式分为:text 文件、csv 文件、sequence 文件以及 Object 文件;
文件系统分为:本地文件系统、HDFS、HBASE 以及数据库。
text
// 读取输入文件val inputRDD: RDD[String] = sc.textFile("input/1.txt")// 保存数据inputRDD.saveAsTextFile("output")
sequence
SequenceFile 文件是 Hadoop 用来存储二进制形式的 key-value 对而设计的一种平面文件(Flat File)。在 SparkContext 中,可以调用 sequenceFilekeyClass, valueClass。
// 保存数据为 SequenceFiledataRDD.saveAsSequenceFile("output")// 读取 SequenceFile文件sc.sequenceFile[Int,Int]("output").collect().foreach(println)
- object 对象文件
// 保存数据dataRDD.saveAsObjectFile("output")// 读取数据sc.objectFile[Int]("output").collect().foreach(println)
二、累加器
分布式共享只写变量
累加器用来把 Executor 端变量信息聚合到 Driver 端。在 Driver 程序中定义的变量,在Executor 端的每个 Task 都会得到这个变量的一份新的副本,每个 task 更新这些副本的值后,传回 Driver 端进行 merge
我们有时候完成一个数据的累加操作的时候,可能用到reduce方法,但是这个方法是一个分布式计算的方法,会被Driver传递到Executor端进行计算,最终的数据在Executor端是进行了累加,但是Driver端的这个变量依旧是0.
如果我们想要实现该功能,可以使用累加器这种数据结构。
1、系统累加器
系统系统了三种累加器
- longAccumulator
- doubleAccumulator
collectionAccumulator
object AccTest01 {def main(args: Array[String]): Unit = {val sc = new SparkContext(new SparkConf().setMaster("local[*]").setAppName("acc"))val rdd = sc.makeRDD(List(1, 2, 3, 4))var sum = 0// 不可取!// rdd.foreach(sum += _)// 使用累加器// longAccumulator// sc.doubleAccumulator// sc.collectionAccumulator : java.util.Listval sumAccumulator: LongAccumulator = sc.longAccumulator("sum")rdd.foreach(sumAccumulator.add(_))println(sumAccumulator.value)sc.stop()}}
2、问题演示
object AccTest02 {def main(args: Array[String]): Unit = {val sc = new SparkContext(new SparkConf().setMaster("local[*]").setAppName("acc"))val rdd = sc.makeRDD(List(1, 2, 3, 4))val sumAccumulator: LongAccumulator = sc.longAccumulator("sum")val mappedRdd: RDD[Unit] = rdd.map(num => {sumAccumulator.add(num)})// 少加:抓换算子中调用累加器,如果没有行动算子的话不会执行// 多加:转换算子中调用累加器,如果行动算子出现多次的话会多次执行。mappedRdd.collectmappedRdd.collectprintln(sumAccumulator.value)sc.stop()}}
3、自定义累加器
1、继承AccumulatorV2,定义输入输出泛型
2、实现方法
3、在sparkContext中注册
object AccTest03 {def main(args: Array[String]): Unit = {val sc = new SparkContext(new SparkConf().setMaster("local[*]").setAppName("acc"))val rdd: RDD[String] = sc.makeRDD(List("hello", "spark", "hello"))// 自定义累加器val wcAcc = new WordCountAccumulator()// 向spark注册sc.register(wcAcc,"wordCountAccumulator")rdd.foreach(wcAcc.add)println(wcAcc.value)// 使用sc.stop()}/*** wordCount的累加器,传入一个单词,计算数量*/class WordCountAccumulator extends AccumulatorV2[String, mutable.Map[String, Long]] {private var map = mutable.Map[String, Long]()// 判断累加器是否为0override def isZero: Boolean = map.isEmpty// 如何复制override def copy(): AccumulatorV2[String, mutable.Map[String, Long]] = new WordCountAccumulator// 重置累加器override def reset(): Unit = map.clear// 添加数据override def add(word: String): Unit = {map.update(word, map.getOrElse(word, 0L) + 1)}// 合并数据,Driver端合并两个累加器的数据override def merge(other: AccumulatorV2[String, mutable.Map[String, Long]]): Unit = {val map1 = this.mapval map2 = other.valuemap2.foreach {case (word, count) => {val newCount: Long = map1.getOrElse(word, 0L) + countmap1.update(word, newCount)}}}// 获取累加器的值override def value: mutable.Map[String, Long] = this.map}}
三、广播变量
分布式共享只读变量。
如果我们想要将两个map获取并集,可以使用join完成。但是join存在一个非常大的缺点,会走shuffle,导致性能下降。
我们能不能够不走shuffle完成这个操作呢?那就需要用到map了。对每一个数据进行映射。
sc.broadcast(data: T)
broadcast.value获取广播变量
object BroadCastTest {def main(args: Array[String]): Unit = {val sc = new SparkContext(new SparkConf().setMaster("local[*]").setAppName("broadcast"))//val rdd: RDD[(String, Int)] = sc.makeRDD(List(("a", 1),("b", 2),("c", 3)))val map: mutable.Map[String, Long] = mutable.Map[String, Long](("a", 4), ("b", 5), ("c", 6))// 不走join,没有shuffle操作,但是// 闭包数据都是以Task为单位发送的,每个任务中包含闭包数据// Executor就是一个JVM,在Executor端进行多个Task,每个Task的变量都将这个map存了一份// 可以使用广播变量代替,将数据放在Executor的内存中,每个Task共享// val value: RDD[(String, (Int, Long))] = rdd.map {// case (w, c) => {// val l: Long = map.getOrElse(w, 0L)// (w, (c, l))// }// }// 创建广播变量val broadcast: Broadcast[mutable.Map[String, Long]] = sc.broadcast(map)val value: RDD[(String, (Int, Long))] = rdd.map {case (w, c) => {// 使用广播变量val l: Long = broadcast.value.getOrElse(w, 0L)(w, (c, l))}}value.collect.foreach(println)sc.stop()}}
四、案例实操
上面的数据图是从数据文件中截取的一部分内容,表示为电商网站的用户行为数据,主
要包含用户的 4种行为:搜索,点击,下单,支付。数据规则如下:
- 数据文件中每行数据采用下划线分隔数据
- 每一行数据表示用户的一次行为,这个行为只能是 4 种行为的一种
- 如果搜索关键字为 null,表示数据不是搜索数据
- 如果点击的品类 ID 和产品 ID 为-1,表示数据不是点击数据
- 针对于下单行为,一次可以下单多个商品,所以品类 ID 和产品 ID 可以是多个,id 之间采用逗号分隔,如果本次不是下单行为,则数据采用 null 表示
- 支付行为和下单行为类似
1、需求1:Top10热门品类
1、方式1:reduceByKey+cogroup+tuple’s sort rule
1、分割出商品种类、点击数量、下单数量、支付数量
2、将数据按照商品种类进行排列,并且使用元组的比较顺序组合三个数量
3、排序且top n
object HotCategoryTopAnalysis1 {def main(args: Array[String]): Unit = {val sc = new SparkContext(new SparkConf().setMaster("local[*]").setAppName("HotCategoryTopAnalysis"))// 1、读取文件获取原始数据val originRdd: RDD[String] = sc.textFile("datas/user_visit_action.txt")// 缓存下originRdd.cache()// 2、统计品类的点击数量,过滤没有点击的商品分类val clickedActionRdd: RDD[String] = originRdd.filter(data => {val datas: Array[String] = data.split("_")datas(6) != "-1"})// 将每个商品分类切割后,返回word count的形式val clickedCountRdd: RDD[(String, Int)] = clickedActionRdd.map(action => {(action.split("_")(6), 1)}).reduceByKey(_+_)clickedCountRdd.collect.foreach(println)println("-------------------------------")// 3、获取下单的数量val orderRdd: RDD[String] = originRdd.filter(data => {val datas: Array[String] = data.split("_")datas(8) != "null"})// 可能同时下单多个,支付也是,所以再此分割,切的是字符串,所以扁平化到最外层val orderCountRdd: RDD[(String, Int)] = orderRdd.flatMap(data => {val datas: Array[String] = data.split("_")val cids: Array[String] = datas(8).split(",")cids.map((_, 1))}).reduceByKey(_+_)orderCountRdd.collect.foreach(println)println("-------------------------------")// 4、获取支付的数量val payedRdd: RDD[String] = originRdd.filter(data => {val datas: Array[String] = data.split("_")datas(10) != "null"})// 可能同时下单多个,支付也是,所以再此分割,切的是字符串,所以扁平化到最外层val payCountRdd: RDD[(String, Int)] = payedRdd.flatMap(data => {val datas: Array[String] = data.split("_")val cids: Array[String] = datas(10).split(",")cids.map((_, 1))}).reduceByKey(_+_)payCountRdd.collect.foreach(println)println("-------------------------------")// 5、根据商品分类合并数量,// 使用cogroup : connect + groupval cogroupRdd: RDD[(String, (Iterable[Int], Iterable[Int], Iterable[Int]))]= clickedCountRdd.cogroup(orderCountRdd, payCountRdd)val resultRdd: RDD[(String, (Int, Int, Int))] = cogroupRdd.mapValues {// 排序成元组case (clickIter, orderIter, payIter) => {// 分别统计每个的数量var clickCount = 0var orderCount = 0var payCount = 0// 点击不一定下单,下单不一定支付,所以有个顺序判断val clkIter: Iterator[Int] = clickIter.iteratorif (clkIter.hasNext) {clickCount = clkIter.next()}val odIter: Iterator[Int] = orderIter.iteratorif (odIter.hasNext) {orderCount = odIter.next()}val pyIter: Iterator[Int] = payIter.iteratorif (pyIter.hasNext) {payCount = pyIter.next()}(clickCount,orderCount,payCount)}}resultRdd.collect.foreach(println)// 6、收集val res = resultRdd.sortBy(_._2, false).take(10)res.foreach(println)sc.stop()}}
2、方式2:方式1+cache+map+union
1、最初的数据多次使用,应该进行缓存
2、cogroup有可能出现shuffle,性能较低,考虑替换
将数据结构进行转换,(品类,(0,0,0))
两两聚合
// cogroupRDD的 getDependencies在数据源分区不一致的情况下,会进行shuffle操作override def getDependencies: Seq[Dependency[_]] = {rdds.map { rdd: RDD[_] =>if (rdd.partitioner == Some(part)) {logDebug("Adding one-to-one dependency with " + rdd)new OneToOneDependency(rdd)} else {logDebug("Adding shuffle dependency with " + rdd)new ShuffleDependency[K, Any, CoGroupCombiner](rdd.asInstanceOf[RDD[_ <: Product2[K, _]]], part, serializer)}}}
解决方案:
object HotCategoryTopAnalysis2 {def main(args: Array[String]): Unit = {val sc = new SparkContext(new SparkConf().setMaster("local[*]").setAppName("HotCategoryTopAnalysis"))// 1、读取文件获取原始数据val originRdd: RDD[String] = sc.textFile("datas/user_visit_action.txt")// 缓存下originRdd.cache()// 2、统计品类的点击数量,过滤没有点击的商品分类val clickedActionRdd: RDD[String] = originRdd.filter(data => {val datas: Array[String] = data.split("_")datas(6) != "-1"})// 将每个商品分类切割后,返回word count的形式val clickedCountRdd: RDD[(String, Int)] = clickedActionRdd.map(action => {(action.split("_")(6), 1)}).reduceByKey(_+_)clickedCountRdd.collect.foreach(println)println("-------------------------------")// 3、获取下单的数量val orderRdd: RDD[String] = originRdd.filter(data => {val datas: Array[String] = data.split("_")datas(8) != "null"})// 可能同时下单多个,支付也是,所以再此分割,切的是字符串,所以扁平化到最外层val orderCountRdd: RDD[(String, Int)] = orderRdd.flatMap(data => {val datas: Array[String] = data.split("_")val cids: Array[String] = datas(8).split(",")cids.map((_, 1))}).reduceByKey(_+_)orderCountRdd.collect.foreach(println)println("-------------------------------")// 4、获取支付的数量val payedRdd: RDD[String] = originRdd.filter(data => {val datas: Array[String] = data.split("_")datas(10) != "null"})// 可能同时下单多个,支付也是,所以再此分割,切的是字符串,所以扁平化到最外层val payCountRdd: RDD[(String, Int)] = payedRdd.flatMap(data => {val datas: Array[String] = data.split("_")val cids: Array[String] = datas(10).split(",")cids.map((_, 1))}).reduceByKey(_+_)payCountRdd.collect.foreach(println)println("-------------------------------")// 5、根据商品分类合并数量,// 使用转换数据结构的方式替换cogroup可能出现shuffle的问题val rdd1: RDD[(String, (Int, Int, Int))] = clickedCountRdd.map{case (w,c) => {(w,(c,0,0))}}val rdd2: RDD[(String, (Int, Int, Int))] = clickedCountRdd.map{case (w,c) => {(w,(0, c, 0))}}val rdd3: RDD[(String, (Int, Int, Int))] = clickedCountRdd.map{case (w,c) => {(w,(0, 0, c))}}// 使用union操作连接三个rddval resultRdd: RDD[(String, (Int, Int, Int))] = rdd1.union(rdd2).union(rdd3).reduceByKey((w1,w2) => {(w1._1 + w2._1,w1._2+w2._2,w1._3+w2._3)})// 6、收集val res = resultRdd.sortBy(_._2, false).take(10)res.foreach(println)sc.stop()}}
3、方式3:降低shuffle次数
1、既然能够让数据变成这个样子,为什么不在一开始的时候将数据转换成样子呢?
2、存在大量的shuffle操作(reduceByKey)
reduceByKey聚合算子,spark会提供优化,底层做了预聚合、缓存等
object HotCategoryTopAnalysis3 {def main(args: Array[String]): Unit = {val sc = new SparkContext(new SparkConf().setMaster("local[*]").setAppName("HotCategoryTopAnalysis"))// 1、读取文件获取原始数据val originRdd: RDD[String] = sc.textFile("datas/user_visit_action.txt")// 缓存下originRdd.cache()// 2、将数据转换结构val convertedRdd: RDD[(String, (Int, Int, Int))] = originRdd.flatMap(data => {val datas: Array[String] = data.split("_")// 统计点击数据if (datas(6) != "-1") {List((datas(6), (1, 0, 0)))}// 统计下单数据else if (datas(8) != "null") {// 切割idval ids: Array[String] = datas(8).split(",")ids.map(id => (id, (0, 1, 0)))}// 统计支付数据else if (datas(10) != "null") {// 切割idval ids: Array[String] = datas(10).split(",")ids.map(id => (id, (0, 0, 1)))}// 没有数据else {Nil}})// 3、将数据聚合val resultRdd: RDD[(String, (Int, Int, Int))] = convertedRdd.reduceByKey((w1, w2) => {(w1._1 + w2._1, w1._2 + w2._2, w1._3 + w2._3)})// 4、收集val res = resultRdd.sortBy(_._2, false).take(10)res.foreach(println)sc.stop()}}
4、方式4:自定义累加器+封装对象+自定义排序规则=去除shuffle操作
为了不让shuffle发生,使用累加器。
object HotCategoryTopAnalysis4 {def main(args: Array[String]): Unit = {val sc = new SparkContext(new SparkConf().setMaster("local[*]").setAppName("HotCategoryTopAnalysis"))// 1、读取文件获取原始数据val originRdd: RDD[String] = sc.textFile("datas/user_visit_action.txt")// 缓存下originRdd.cache()// 定义累加器并注册val categoryAccumulator: HotCategoryAccumulator = new HotCategoryAccumulatorsc.register(categoryAccumulator,"categoryAccumulator")// 2、将数据转换结构val convertedRdd = originRdd.foreach(data => {val datas: Array[String] = data.split("_")// 统计点击数据if (datas(6) != "-1") {categoryAccumulator.add((datas(6),"click"))}// 统计下单数据else if (datas(8) != "null") {// 切割idval ids: Array[String] = datas(8).split(",")ids.foreach(id => {categoryAccumulator.add(id,"order")})}// 统计支付数据else if (datas(10) != "null") {// 切割idval ids: Array[String] = datas(10).split(",")ids.foreach(categoryAccumulator.add(_,"pay"))}})// 3、获取到累加器结果val accVal: mutable.Map[String, HotCategory] = categoryAccumulator.value// 只获取分类val categories: mutable.Iterable[HotCategory] = accVal.map(_._2)// 自定义排序val res: List[Category] = categories.toList.sortWith((s1,s2) => {if(s1.clickCnt > s2.clickCnt){true}else if (s1.clickCnt == s2.clickCnt){if(s1.orderCnt > s2.orderCnt){true}else if (s1.orderCnt == s2.orderCnt){s1.payCnt > s2.payCnt}else {false}}else {false}})res.take(10).foreach(println)sc.stop()}// 自定义累加器// IN : 输出商品分类和行为(点击、下单、支付)// OUT: 输出结果class HotCategoryAccumulator extends AccumulatorV2[(String, String), mutable.Map[String, HotCategory]] {private val map = mutable.Map[String, HotCategory]()override def isZero: Boolean = map.isEmptyoverride def copy(): AccumulatorV2[(String, String), mutable.Map[String, HotCategory]] = new HotCategoryAccumulatoroverride def reset(): Unit = map.clearoverride def add(v: (String, String)): Unit = {// 从map中拿。val category: HotCategory = map.getOrElse(v._1, HotCategory(v._1, 0, 0, 0))val actionType: String = v._2// 根据类型判断哪种行为if(actionType == "click"){category.clickCnt += 1}else if (actionType == "order"){category.orderCnt += 1}else if (actionType == "pay"){category.payCnt += 1}// 放回去map.update(v._1,category)}// 合并两个mapoverride def merge(other: AccumulatorV2[(String, String), mutable.Map[String, HotCategory]]): Unit = {val map1 = this.mapval map2 = other.value// 遍历map2,往map1中放map2.foreach{case (cid,category) => {val ct: HotCategory = map1.getOrElse(cid, HotCategory(cid, 0, 0, 0))ct.payCnt += category.payCntct.orderCnt += category.orderCntct.clickCnt += category.clickCntmap1.update(cid,ct)}}}override def value: mutable.Map[String, HotCategory] = this.map}// 自定义对象类,封装三个数量case class HotCategory(cid: String, var clickCnt: Int, var orderCnt: Int, var payCnt: Int)}
2、需求2:Top10热门品类中每个品类的活跃Session Top10
在需求一的基础上,增加每个品类用户 session 的点击统计
object HotCategoryTopSessionAnalysis {def main(args: Array[String]): Unit = {val sc = new SparkContext(new SparkConf().setMaster("local[*]").setAppName("HotCategoryTopAnalysis"))val originRdd: RDD[String] = sc.textFile("datas/user_visit_action.txt")// 缓存下originRdd.cache()val top10Ids: Array[String] = top10(originRdd)// 1. 过滤原始数据,保留点击和前10品类IDval filterActionRdd = originRdd.filter(action => {val datas = action.split("_")if (datas(6) != "-1") {top10Ids.contains(datas(6))} else {false}})// 2. 根据品类ID和sessionid进行点击量的统计val reduceRdd: RDD[((String, String), Int)] = filterActionRdd.map(action => {val datas = action.split("_")((datas(6), datas(2)), 1)}).reduceByKey(_ + _)// 3、结构转换// (( 品类ID,sessionId ),sum) => ( 品类ID,(sessionId, sum) )val mappedRdd: RDD[(String, (String, Int))] = reduceRdd.map {case ((cid, sid), sum) => {(cid, (sid, sum))}}// 4、对相同分类的rdd进行分组val res = mappedRdd.groupByKey().mapValues(iter => {iter.toList.sortBy(_._2)(Ordering.Int.reverse).take(10)})res.collect.foreach(println)//sc.stop()}// 封装top10private def top10(originRdd: RDD[String]) = {val convertedRdd: RDD[(String, (Int, Int, Int))] = originRdd.flatMap(data => {val datas: Array[String] = data.split("_")// 统计点击数据if (datas(6) != "-1") {List((datas(6), (1, 0, 0)))}// 统计下单数据else if (datas(8) != "null") {// 切割idval ids: Array[String] = datas(8).split(",")ids.map(id => (id, (0, 1, 0)))}// 统计支付数据else if (datas(10) != "null") {// 切割idval ids: Array[String] = datas(10).split(",")ids.map(id => (id, (0, 0, 1)))}// 没有数据else {Nil}})val resultRdd: RDD[(String, (Int, Int, Int))] = convertedRdd.reduceByKey((w1, w2) => {(w1._1 + w2._1, w1._2 + w2._2, w1._3 + w2._3)})// 不需要数量,过滤StringresultRdd.sortBy(_._2, false).take(10).map(_._1)}}
3、需求3:页面单跳转换率统计
- 页面单跳转化率
计算页面单跳转化率,什么是页面单跳转换率,比如一个用户在一次 Session 过程中访问的页面路径 3,5,7,9,10,21,那么页面 3 跳到页面 5 叫一次单跳,7-9 也叫一次单跳,那么单跳转化率就是要统计页面点击的概率。
比如:计算 3-5 的单跳转化率,先获取符合条件的 Session 对于页面 3 的访问次数(PV)为 A,然后获取符合条件的 Session 中访问了页面 3 又紧接着访问了页面 5 的次数为 B,那么 B/A 就是 3-5 的页面单跳转化率。
- 统计页面单跳转换率的意义
产品经理和运营总监,可以根据这个指标,去尝试分析,整个网站,产品,各个页面的表现怎么样,是不是需要去优化产品的布局;吸引用户最终可以进入最后的支付页面。
数据分析师,可以此数据做更深一步的计算和分析。企业管理层,可以看到整个公司的网站,各个页面的之间的跳转的表现如何,可以适当调整公司的经营战略或策略。
1、计算分母
2、计算分子
3、计算单跳转换率
object PageForwardRate {def main(args: Array[String]): Unit = {val sc = new SparkContext(new SparkConf().setMaster("local[*]").setAppName("PageForwardRate"))// 1、读取文件获取原始数据val originRdd: RDD[String] = sc.textFile("datas/user_visit_action.txt")// 缓存下// 2、计算分母,直接计算每个页面即可val mappedRdd: RDD[UserVisitAction] = originRdd.map(action => {val datas: Array[String] = action.split("_")// 返回封装好的对象UserVisitAction(datas(0),datas(1).toLong,datas(2),datas(3).toLong,datas(4),datas(5),datas(6).toLong,datas(7).toLong,datas(8),datas(9),datas(10),datas(11),datas(12).toLong)})mappedRdd.cache()// 分母 转换为mapval denominator: Map[Long, Long] = mappedRdd.map(action => (action.page_id, 1L)).reduceByKey(_ + _).collect().toMap// 3、计算分子// 根据session分组val sessionRdd: RDD[(String, Iterable[UserVisitAction])] = mappedRdd.groupBy(_.session_id)// 根据访问时间升序val mvRdd: RDD[(String, List[((Long, Long), Int)])] = sessionRdd.mapValues(iter => {// 默认升序,排完序后舍弃时间,只要页面val flowIds: List[Long] = iter.toList.sortBy(_.action_time).map(_.page_id)// 获取每个页面拉起来,可以用Sliding划窗,也可以用zip拉链val pages: List[(Long, Long)] = flowIds.zip(flowIds.tail)pages.map(t => (t,1))})// 统计跳转的比率val molecule: RDD[((Long, Long), Int)] = mvRdd.map(_._2).flatMap(list => list).reduceByKey(_ + _)molecule.foreach {case ((page1, page2), sum) => {// 从分母中取val l: Long = denominator.getOrElse(page1, 0L)println(s"从${page1} 跳转到${page2} 的单挑转换率为:${sum.toDouble / l}")}}// 分子除以分母sc.stop()}//用户访问动作表case class UserVisitAction(date: String, //用户点击行为的日期user_id: Long, //用户的IDsession_id: String, //Session的IDpage_id: Long, //某个页面的IDaction_time: String, //动作的时间点search_keyword: String, //用户搜索的关键词click_category_id: Long, //某一个商品品类的IDclick_product_id: Long, //某一个商品的IDorder_category_ids: String, //一次订单中所有品类的ID集合order_product_ids: String, //一次订单中所有商品的ID集合pay_category_ids: String, //一次支付中所有品类的ID集合pay_product_ids: String, //一次支付中所有商品的ID集合city_id: Long) //城市 id}
优化:
1、filter过滤需要的页面
2、计算分母最后一个数不参与计算(init)
3、计算单跳转换率的时候,过滤合法的页面跳转
object Spark06_Req3_PageflowAnalysis {def main(args: Array[String]): Unit = {// TODO : Top10热门品类val sparConf = new SparkConf().setMaster("local[*]").setAppName("HotCategoryTop10Analysis")val sc = new SparkContext(sparConf)val actionRDD = sc.textFile("datas/user_visit_action.txt")val actionDataRDD = actionRDD.map(action => {val datas = action.split("_")UserVisitAction(datas(0),datas(1).toLong,datas(2),datas(3).toLong,datas(4),datas(5),datas(6).toLong,datas(7).toLong,datas(8),datas(9),datas(10),datas(11),datas(12).toLong)})actionDataRDD.cache()// TODO 对指定的页面连续跳转进行统计// 1-2,2-3,3-4,4-5,5-6,6-7val ids = List[Long](1,2,3,4,5,6,7)val okflowIds: List[(Long, Long)] = ids.zip(ids.tail)// TODO 计算分母val pageidToCountMap: Map[Long, Long] = actionDataRDD.filter(action => {ids.init.contains(action.page_id)}).map(action => {(action.page_id, 1L)}).reduceByKey(_ + _).collect().toMap// TODO 计算分子// 根据session进行分组val sessionRDD: RDD[(String, Iterable[UserVisitAction])] = actionDataRDD.groupBy(_.session_id)// 分组后,根据访问时间进行排序(升序)val mvRDD: RDD[(String, List[((Long, Long), Int)])] = sessionRDD.mapValues(iter => {val sortList: List[UserVisitAction] = iter.toList.sortBy(_.action_time)// 【1,2,3,4】// 【1,2】,【2,3】,【3,4】// 【1-2,2-3,3-4】// Sliding : 滑窗// 【1,2,3,4】// 【2,3,4】// zip : 拉链val flowIds: List[Long] = sortList.map(_.page_id)val pageflowIds: List[(Long, Long)] = flowIds.zip(flowIds.tail)// 将不合法的页面跳转进行过滤pageflowIds.filter(t => {okflowIds.contains(t)}).map(t => {(t, 1)})})// ((1,2),1)val flatRDD: RDD[((Long, Long), Int)] = mvRDD.map(_._2).flatMap(list=>list)// ((1,2),1) => ((1,2),sum)val dataRDD = flatRDD.reduceByKey(_+_)// TODO 计算单跳转换率// 分子除以分母dataRDD.foreach{case ( (pageid1, pageid2), sum ) => {val lon: Long = pageidToCountMap.getOrElse(pageid1, 0L)println(s"页面${pageid1}跳转到页面${pageid2}单跳转换率为:" + ( sum.toDouble/lon ))}}sc.stop()}//用户访问动作表case class UserVisitAction(date: String,//用户点击行为的日期user_id: Long,//用户的IDsession_id: String,//Session的IDpage_id: Long,//某个页面的IDaction_time: String,//动作的时间点search_keyword: String,//用户搜索的关键词click_category_id: Long,//某一个商品品类的IDclick_product_id: Long,//某一个商品的IDorder_category_ids: String,//一次订单中所有品类的ID集合order_product_ids: String,//一次订单中所有商品的ID集合pay_category_ids: String,//一次支付中所有品类的ID集合pay_product_ids: String,//一次支付中所有商品的ID集合city_id: Long)//城市 id}
五、工程化代码
之前的代码都是写在一个main方法中,就会感觉很乱。需要遵循一定的代码规范。
大数据技术没有view的概念,所以不考虑mvc。
就只能采用conroller-service-dao的三层架构了。
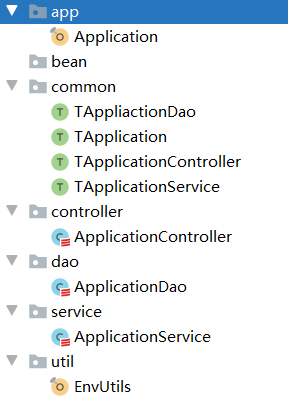
1、应用只负责运行,并且执行controller调度,所有应用都需要环境等,可以抽象出来
trait TApplication {// 控制抽象,替换执行逻辑def start(master: String = "local[*]",appName: String = "Application")(op: => Unit): Unit = {val sc = new SparkContext(new SparkConf().setMaster(master).setAppName(appName))EnvUtils.put(sc)try {op}catch {case e: Exception => println(e.printStackTrace())}sc.stop()EnvUtils.clear()}}
object Application extends App with TApplication{// 跑起来start(appName = "Test"){val controller = new ApplicationControllercontroller.dispatch()}}
2、三层逻辑更不用说了,也是可以抽象的
1、controller只负责调度service执行业务逻辑
2、service执行逻辑需要数据源,交给dao获取
3、dao获取数据源的形式多种多样,但是需要sparkContext环境信息,不应层层传递,使用ThreadLocal单独提取
抽象层:
trait TApplication {// 控制抽象,替换执行逻辑def start(master: String = "local[*]",appName: String = "Application")(op: => Unit): Unit = {val sc = new SparkContext(new SparkConf().setMaster(master).setAppName(appName))EnvUtils.put(sc)try {op}catch {case e: Exception => println(e.printStackTrace())}sc.stop()EnvUtils.clear()}}// 通用controllertrait TApplicationController {def dispatch(): Any}trait TApplicationService extends Serializable {def dataAnalysis(): Any}trait TAppliactionDao extends Serializable {def readFile(path: String): Any}
class ApplicationController extends TApplicationController {private val svc: ApplicationService = new ApplicationServiceoverride def dispatch(): Unit = {val res: RDD[Double] = svc.dataAnalysis()res.collect.foreach(println)}}
service
class ApplicationService extends TApplicationService {private val dao = new ApplicationDaooverride def dataAnalysis() = {// 1、读取文件获取原始数据val originRdd: RDD[String] = dao.readFile("datas/user_visit_action.txt")// 缓存下// 2、计算分母,直接计算每个页面即可val mappedRdd: RDD[UserVisitAction] = originRdd.map(action => {val datas: Array[String] = action.split("_")// 返回封装好的对象UserVisitAction(datas(0),datas(1).toLong,datas(2),datas(3).toLong,datas(4),datas(5),datas(6).toLong,datas(7).toLong,datas(8),datas(9),datas(10),datas(11),datas(12).toLong)})mappedRdd.cache()// 分母 转换为mapval denominator: Map[Long, Long] = mappedRdd.map(action => (action.page_id, 1L)).reduceByKey(_ + _).collect().toMap// 3、计算分子// 根据session分组val sessionRdd: RDD[(String, Iterable[UserVisitAction])] = mappedRdd.groupBy(_.session_id)// 根据访问时间升序val mvRdd: RDD[(String, List[((Long, Long), Int)])] = sessionRdd.mapValues(iter => {// 默认升序,排完序后舍弃时间,只要页面val flowIds: List[Long] = iter.toList.sortBy(_.action_time).map(_.page_id)// 获取每个页面拉起来,可以用Sliding划窗,也可以用zip拉链val pages: List[(Long, Long)] = flowIds.zip(flowIds.tail)pages.map(t => (t,1))})// 统计跳转的比率val molecule: RDD[((Long, Long), Int)] = mvRdd.map(_._2).flatMap(list => list).reduceByKey(_ + _)// 采集val res: RDD[Double] = molecule.collect {case ((page1, page2), sum) => {// 从分母中取val l: Long = denominator.getOrElse(page1, 0L)println(s"从${page1} 跳转到${page2} 的单挑转换率为:${sum.toDouble / l}")sum.toDouble / l}}// 返回res}//用户访问动作表case class UserVisitAction(date: String, //用户点击行为的日期user_id: Long, //用户的IDsession_id: String, //Session的IDpage_id: Long, //某个页面的IDaction_time: String, //动作的时间点search_keyword: String, //用户搜索的关键词click_category_id: Long, //某一个商品品类的IDclick_product_id: Long, //某一个商品的IDorder_category_ids: String, //一次订单中所有品类的ID集合order_product_ids: String, //一次订单中所有商品的ID集合pay_category_ids: String, //一次支付中所有品类的ID集合pay_product_ids: String, //一次支付中所有商品的ID集合city_id: Long) //城市 id}
dao
class ApplicationDao extends TAppliactionDao {override def readFile(path: String): RDD[String] = {val lines: RDD[String] = EnvUtils.take().textFile(path)lines}}
3、工具类ThreadLocal,要想被使用,就得使用object静态调用
// ThreadLocal线程本地化技术object EnvUtils {private val env: ThreadLocal[SparkContext] = new ThreadLocal[SparkContext]def take(): SparkContext = {env.get()}def put(sc: SparkContext): Unit = {env.set(sc)}def clear(): Unit = {env.remove()}}

若有收获,就点个赞吧
0 人点赞
