下载地址:https://matt.ucc.asn.au/dropbear/releases/dropbear-2017.75.tar.bz2
其他版本:https://matt.ucc.asn.au/dropbear/releases/
源码介绍
源码的使用
源码的安装一般由3个步骤组成:配置(configure)、编译(make)、安装(make install)
README
解压之后在目录下有readme说明
This is Dropbear, a smallish SSH server and client.https://matt.ucc.asn.au/dropbear/dropbear.htmlINSTALL has compilation instructions.(INSTALL中有编译说明)MULTI has instructions on making a multi-purpose binary (ie a single binarywhich performs multiple tasks, to save disk space)(MULTI中有关于制作多种类型的二进制程序(单个二进制程序执行多项任务从而节省磁盘空间))SMALL has some tips on creating small binaries.(SMALL中有编译小型二进制程序的一些技巧)See TODO for a few of the things I know need looking at, and please contactme if you have any questions/bugs found/features/ideas/comments etc :)(请去TODO中查看我认为你需要去看看的一些东西,并且如果你有问题或者bug请联系我)Matt Johnstonmatt@ucc.asn.auIn the absence of detailed documentation, some notes follow:(在没有非常详细文档的情况下,一些笔记在这里:)============================================================================Server public key auth:You can use ~/.ssh/authorized_keys in the same way as with OpenSSH, just putthe key entries in that file. They should be of the form:(你可以像OpenSSH一样使用~/.ssh/authorized_keys,只要把以下关键的条目放到authorized_keys这个文件:)ssh-rsa AAAAB3NzaC1yc2EAAAABIwAAAIEAwVa6M6cGVmUcLl2cFzkxEoJd06Ub4bVDsYrWvXhvUV+ZAM9uGuewZBDoAqNKJxoIn0Hyd0Nk/yU99UVv6NWV/5YSHtnf35LKds56j7cuzoQpFIdjNwdxAN0PCET/MG8qyskG/2IE2DPNIaJ3Wy+Ws4IZEgdJgPlTYUBWWtCWOGc= someone@hostnameYou must make sure that ~/.ssh, and the key file, are only writable by theuser. Beware of editors that split the key into multiple lines.(你必须保证~/.ssh这个目录和~/.ssh/authorized_keys这个密钥是被用户可写的。要防止密钥被编辑器拆分成多行)Dropbear supports some options for authorized_keys entries, see the manpage.(Dropbear 支持authorized_keys 条目的一些选项,请参见手册页。)============================================================================Client public key auth:(客户端公钥认证)Dropbear can do public key auth as a client, but you will have to convertOpenSSH style keys to Dropbear format, or use dropbearkey to create them.(Dropbear 可以作为客户端进行公钥认证,但您必须转换Dropbear 格式的 OpenSSH 样式密钥,或使用 dropbearkey 创建它们。)If you have an OpenSSH-style private key ~/.ssh/id_rsa, you need to do:(如果你已经有了OpenSSH类型的私钥~/.ssh/id_rsa,你需要将OpenSSH的私钥转换成dropbear类型的:)dropbearconvert openssh dropbear ~/.ssh/id_rsa ~/.ssh/id_rsa.dbdbclient -i ~/.ssh/id_rsa.db <hostname>Dropbear does not support encrypted hostkeys though can connect to ssh-agent.(Dropbear 不支持加密的主机密钥,但可以连接到 ssh-agent。)============================================================================If you want to get the public-key portion of a Dropbear private key, look atdropbearkey's '-y' option.(如果您想获取 Dropbear 私钥的公钥部分,请查看dropbearkey 的“-y”选项。)============================================================================To run the server, you need to server keys, this is one-off:(为了运行服务端,你需要有服务端的密钥,这里选择其中一个就行)./dropbearkey -t rsa -f dropbear_rsa_host_key./dropbearkey -t dss -f dropbear_dss_host_key./dropbearkey -t ecdsa -f dropbear_ecdsa_host_keyor alternatively convert OpenSSH keys to Dropbear:(或者将OpenSSH的密钥进行转换)./dropbearconvert openssh dropbear /etc/ssh/ssh_host_dsa_key dropbear_dss_host_keyYou can also get Dropbear to create keys when the first connection is made -this is preferable to generating keys when the system boots. Make sure/etc/dropbear/ exists and then pass '-R' to the dropbear server.(你也可以当你第一次连接时自动创建-一般在系统启动的时候会初始化密钥。确保/etc/dropbear/目录下存在并且其目录下的文件是通过"-R"传递的)============================================================================If the server is run as non-root, you most likely won't be able to allocate apty, and you cannot login as any user other than that running the daemon(obviously). Shadow passwords will also be unusable as non-root.(如果dropbear运行在没有root权限的情况,你很可能无法分配pty,并且你除了运行守护进程之外不能以任何身份进行登录)============================================================================The Dropbear distribution includes a standalone version of OpenSSH's scpprogram. You can compile it with "make scp", you may want to change the pathof the ssh binary, specified by _PATH_SSH_PROGRAM in options.h . By defaultthe progress meter isn't compiled in to save space, you can enable it byadding 'SCPPROGRESS=1' to the make commandline.(这个dropbear发行版包含一个独立版本的 OpenSSH 的 scp程序。 你可以用“make scp”编译它,你可能想改变ssh 二进制文件的路径,路径由 options.h 中的 _PATH_SSH_PROGRAM 指定。 默认进度表未编译以节省空间,您可以通过以下方式启用它将 'SCPPROGRESS=1' 添加到 make 命令行。)
INSTALL
Basic Dropbear build instructions:
(基础的dropbear编译说明:)

- Edit options.h to set which features you want.
- Edit debug.h if you want any debug options (not usually required).

(If using a non-tarball copy, "autoconf; autoheader")
(如果使用非压缩的拷贝)

./configure      (optionally with --disable-zlib or --disable-syslog,
                  or --help for other options)
(检测编译环境是否支持,同时生成makefile和config.status、config.h、config.log)

Now compile:
(现在开始编译:)

make PROGRAMS="dropbear dbclient dropbearkey dropbearconvert scp"

And install (/usr/local/bin is usual default):
(然后开始安装,默认安装目录是/usr/local/bin)

make PROGRAMS="dropbear dbclient dropbearkey dropbearconvert scp" install

(you can leave items out of the PROGRAMS list to avoid compiling them. If you
recompile after changing the PROGRAMS list, you *MUST* "make clean" before
recompiling - bad things will happen otherwise)
(你可以在PROGRAMS排除不编译的软件。如果你修改了PROGRAMS中要编译的程序并且重新编译,你一定要先运行"make clean"再继续-如果不这样做可能会出现问题)

See MULTI for instructions on making all-in-one binaries.
(需要编译all-in-one的二进制程序请查看MULTI)
If you want to compile statically, add "STATIC=1" to the make command-line.
(如果你想要静态编译,在make的时候添加"STATIC=1")
Binaries can be stripped with "make strip"
(二进制程序也可以通过"make strip"去掉符号表)

============================================================================

If you're compiling for a 386-class CPU, you will probably need to add
CFLAGS=-DLTC_NO_BSWAP so that libtomcrypt doesn't use 486+ instructions.
(如果你正在一个80386类型的cpu上编译,你可能需要添加CFLAGS=-DLTC_NO_BSWAP,从而libtomcryp)

============================================================================

Compiling with uClibc:

Firstly, make sure you have at least uclibc 0.9.17, as getusershell() in prior
versions is broken. Also note that you may get strange issues if your uClibc
headers don't match the library you are running with, ie the headers might
say that shadow password support exists, but the libraries don't have it.

Compiling for uClibc should be the same as normal, just set CC to the magic
uClibc toolchain compiler (ie export CC=i386-uclibc-gcc or whatever).
You can use "make STATIC=1" to make statically linked binaries, and it is
advisable to strip the binaries too. If you're looking to make a small binary,
you should remove unneeded ciphers and MD5, by editing options.h

It is possible to compile zlib in, by copying zlib.h and zconf.h into a
subdirectory (ie zlibincludes), and

export CFLAGS="-Izlibincludes -I../zlibincludes"
export LDFLAGS=/usr/lib/libz.a

before ./configure and make.

If you disable zlib, you must explicitly disable compression for the client -
OpenSSH is possibly buggy in this regard, it seems you need to disable it
globally in ~/.ssh/config, not just in the host entry in that file.

You may want to manually disable lastlog recording when using uClibc, configure
with --disable-lastlog.

One common problem is pty allocation. There are a number of types of pty
allocation which can be used -- if they work properly, the end result is the
same for each type. Running configure should detect the best type to use
automatically, however for some systems, this may be incorrect. Some
things to note:

    If your system expects /dev/pts to be mounted (this is a uClibc option),
    make sure that it is.

    Make sure that your libc headers match the library version you are using.

    If openpty() is being used (HAVE_OPENPTY defined in config.h) and it fails,
    you can try compiling with --disable-openpty. You will probably then need
    to create all the /dev/pty?? and /dev/tty?? devices, which can be
    problematic for devfs. In general, openpty() is the best way to allocate
    PTYs, so it's best to try and get it working.

./configure —help
参考:https://blog.csdn.net/xringm/article/details/79900154
root@ubuntu:~/Desktop/test# ./configure --help
`configure' configures this package to adapt to many kinds of systems.
(`configure' 配置这个软件包适应各种各样的操作系统)

Usage: ./configure [OPTION]... [VAR=VALUE]...

To assign environment variables (e.g., CC, CFLAGS...), specify them as
VAR=VALUE.  See below for descriptions of some of the useful variables.
(配置环境变量(例如CC、CFLAGS等),像这样VAR=VALUE。请看以下有用的描述:

Defaults for the options are specified in brackets.
(默认的选项在中括号中指定了)

Configuration:
  -h, --help              display this help and exit
      --help=short        display options specific to this package
      --help=recursive    display the short help of all the included packages
  -V, --version           display version information and exit
  -q, --quiet, --silent   do not print `checking ...' messages
      --cache-file=FILE   cache test results in FILE [disabled]
  -C, --config-cache      alias for `--cache-file=config.cache'
  -n, --no-create         do not create output files
      --srcdir=DIR        find the sources in DIR [configure dir or `..']

Installation directories:
(安装目录:)
  --prefix=PREFIX         install architecture-independent files in PREFIX
                          [/usr/local]
  --exec-prefix=EPREFIX   install architecture-dependent files in EPREFIX
                          [PREFIX]
其中--prefix选项是配置安装的路径,如果不配置该选项,安装后可执行文件默认放在/usr/local/bin,
库文件默认放在/usr/local/lib,配置文件默认放在/usr/local/etc,其它的资源文件放在/usr/
local/share,比较凌乱。
./configure --prefix=/usr/local/test
可以把所有资源文件放在/usr/local/test的路径中,不会杂乱。
用了—prefix选项的另一个好处是卸载软件或移植软件。当某个安装的软件不再需要时,只须简单的
删除该安装目录,就可以把软件卸载得干干净净;移植软件只需拷贝整个目录到另外一个机器即可
(相同的操作系统)。
当然要卸载程序,也可以在原来的make目录下用一次make uninstall,但前提是make文件指定过
uninstall。

--exec-prefix=EPREFIX
与'--prefix'选项类似,但是他是用来设置结构依赖的文件的安装位置.如果没有设置这个选项的话,
默认使用的选项值将被设为和'--prefix'选项值一样.


By default, `make install' will install all the files in
`/usr/local/bin', `/usr/local/lib' etc.  You can specify
an installation prefix other than `/usr/local' using `--prefix',
for instance `--prefix=$HOME'.

For better control, use the options below.

Fine tuning of the installation directories:
  --bindir=DIR            user executables [EPREFIX/bin]
  --sbindir=DIR           system admin executables [EPREFIX/sbin]
  --libexecdir=DIR        program executables [EPREFIX/libexec]
  --sysconfdir=DIR        read-only single-machine data [PREFIX/etc]
  --sharedstatedir=DIR    modifiable architecture-independent data [PREFIX/com]
  --localstatedir=DIR     modifiable single-machine data [PREFIX/var]
  --libdir=DIR            object code libraries [EPREFIX/lib]
  --includedir=DIR        C header files [PREFIX/include]
  --oldincludedir=DIR     C header files for non-gcc [/usr/include]
  --datarootdir=DIR       read-only arch.-independent data root [PREFIX/share]
  --datadir=DIR           read-only architecture-independent data [DATAROOTDIR]
  --infodir=DIR           info documentation [DATAROOTDIR/info]
  --localedir=DIR         locale-dependent data [DATAROOTDIR/locale]
  --mandir=DIR            man documentation [DATAROOTDIR/man]
  --docdir=DIR            documentation root [DATAROOTDIR/doc/PACKAGE]
  --htmldir=DIR           html documentation [DOCDIR]
  --dvidir=DIR            dvi documentation [DOCDIR]
  --pdfdir=DIR            pdf documentation [DOCDIR]
  --psdir=DIR             ps documentation [DOCDIR]

System types:
  --build=BUILD     configure for building on BUILD [guessed]
  --host=HOST       cross-compile to build programs to run on HOST [BUILD]
  这里可以通过--build=none,--host=none隐藏编译程序的buildid和所在程序编译时的操作系统

Optional Features:
  --disable-option-checking  ignore unrecognized --enable/--with options
  --disable-FEATURE       do not include FEATURE (same as --enable-FEATURE=no)
  --enable-FEATURE[=ARG]  include FEATURE [ARG=yes]
  --disable-largefile     omit support for large files
  --disable-zlib          Don't include zlib support
  --enable-pam          Try to include PAM support
  --disable-openpty       Don't use openpty, use alternative method
  --disable-syslog        Don't include syslog support
  --disable-shadow        Don't use shadow passwords (if available)
  --enable-bundled-libtom       Force using bundled libtomcrypt/libtommath even if a system version exists.
  --disable-bundled-libtom      Force using system libtomcrypt/libtommath, fail if it does not exist.
                                Default is to use system if available, otherwise bundled.
  --disable-lastlog       Disable use of lastlog even if detected no
  --disable-utmp          Disable use of utmp even if detected no
  --disable-utmpx         Disable use of utmpx even if detected no
  --disable-wtmp          Disable use of wtmp even if detected no
  --disable-wtmpx         Disable use of wtmpx even if detected no
  --disable-loginfunc     Disable use of login() etc. no
  --disable-pututline     Disable use of pututline() etc. (uwtmp) no
  --disable-pututxline    Disable use of pututxline() etc. (uwtmpx) no

Optional Packages:
  --with-PACKAGE[=ARG]    use PACKAGE [ARG=yes]
  --without-PACKAGE       do not use PACKAGE (same as --with-PACKAGE=no)
  --with-zlib=PATH        Use zlib in PATH
  --with-pam=PATH        Use pam in PATH
  --with-lastlog=FILE|DIR specify lastlog location common locations

Some influential environment variables:
  CC          C compiler command
  CFLAGS      C compiler flags
  LDFLAGS     linker flags, e.g. -L<lib dir> if you have libraries in a
              nonstandard directory <lib dir>
  LIBS        libraries to pass to the linker, e.g. -l<library>
  CPPFLAGS    (Objective) C/C++ preprocessor flags, e.g. -I<include dir> if
              you have headers in a nonstandard directory <include dir>
  CPP         C preprocessor

Use these variables to override the choices made by `configure' or to help
it to find libraries and programs with nonstandard names/locations.

Report bugs to the package provider.
编译器
参考:https://blog.csdn.net/weixin_42409052/article/details/121471436
gcc编译器
Linux下编译C代码使用的是gcc,GCC(GNU Compiler Collection)是由 GNU这个组织开发的编程语言
编译器,最开始叫GNU C Compiler,只支持编译C语言,后面渐渐开始支持编译C++,Java等语言,因此
改叫GNU Compiler Collection,缩写还是GCC。C语言的GCC由下面三部分组成:
1)gcc-core:gcc编译器,可以将源码编译成可执行程序
2)Binutils:除gcc-core之外的小工具的合集,里面包含了链接器ld,汇编器as等。
3)glibc:C语言的标准库,包含了printf等函数。
执行如下命令,可以查看当前gcc编译的目标程序是在x86上运行还是在arm上运行:
gcc -v

会输出gcc的版本信息,里面有target这一项,根据该项的值来判断:
1)target:x86_64-linux-gnu,表示编译生成的程序只能在x86架构上运行。
2)target:arm-linux-gnueabihf,表示编译生成的程序只能在arm架构上运行。
gcc编译过程
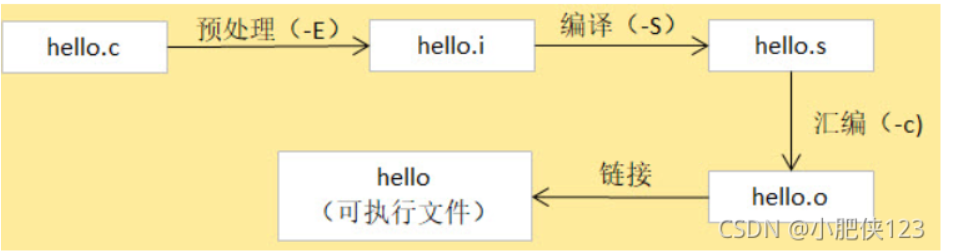
gcc hello.c -o hello这条命令包含了如下过程:

# 1.预处理,可理解为把头文件和宏的代码展开汇总成 C 代码,把 *.c 转换得到 *.i 文件
gcc –E hello.c –o hello.i
# 2.编译,可理解为把 C 代码转换为汇编代码,把 *.i 转换得到 *.s 文件
gcc –S hello.i –o hello.s
# 3.汇编,可理解为把汇编代码转换为机器码,把 *.s 转换得到 *.o,即目标文件
gcc –c hello.s –o hello.o
# 4.链接,把不同文件之间的调用关系链接起来,把一个或多个 *.o 转换成最终的可执行文件
gcc hello.o –o hello

上述四个过程是可以分别执行的,也可以按照顺序组合在一起,如:
gcc -S hello.c -o hello.s    #相当与1和2两条命令的结合,同理
gcc –c hello.c –o hello.o   #相当于1,2,3这三条命令的结合

链接分为两种:静态链接和动态链接。
动态链接: GCC 编译时的默认选项。动态是指在应用程序运行时才去加载外部的代码库,比如c语言的标准库,如果是动态链接生成的程序,那么都是在运行的时候才去加载。
静态链接: 链接时使用选项“–static”,它在编译阶段就会把所有用到的库打包到自己的可执行程序中。
静态链接的优点是兼容性好,程序基本不依赖于外部环境,但是生成的程序也比较大。
动态链接生成的程序兼容性差点,但是生成的程序比较小。
gcc hello.c -o hello   #动态链接生成
gcc hello.c -o hello_static --static   #静态链接生成
本地编译器和交叉编译器
编译器和目标程序运行在不同的架构上,这种编译器叫交叉编译器,x86平台上gcc交叉编译器主要有:
1)arm-linux-gnueabihf-gcc:这个编译器名称中的Linux表明该编译器生成的目标程序运行在Linux系统上,程序可以使用Linux下的c标准库和Linux内核API。
2)arm-none-eabi-gcc:名称中的none表示该编译器编译生成的目标程序运行环境不需要操作系统,可以用于编译逻辑代码,uboot,内核代码等。
3)arm-linux-gnueabihf-gcc也是可以编译uboot和内核代码的。但是推荐用arm-none-eabi-gcc。
(本地编译)在x86架构系统玩转x86架构程序
centos编译
https://blog.csdn.net/m0_38022615/article/details/80992048
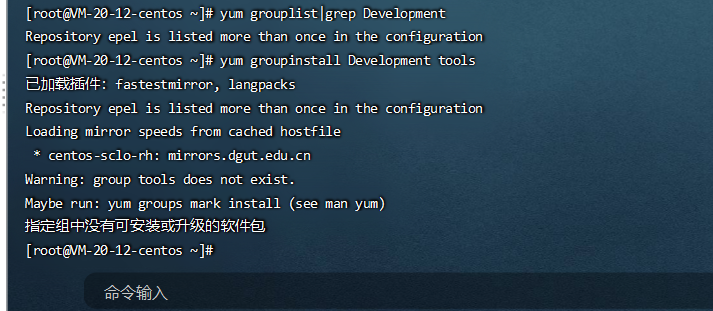
安装开发包组(可略过这一步)
yum install groupinstall Development tools
[root@VM-20-12-centos compare2txt]# yum groupinfo "Development Tools"
已加载插件:fastestmirror, langpacks
Repository epel is listed more than once in the configuration
Repodata is over 2 weeks old. Install yum-cron? Or run: yum makecache fast
Loading mirror speeds from cached hostfile
 * centos-sclo-rh: mirrors.aliyun.com

组:开发工具
 组编号:development
 描述:一个基本开发环境。
 必要的软件包:
    autoconf
    automake
    binutils
   =bison
   =flex
    gcc
    gcc-c++
    gettext
   =libtool
    make
   =patch
    pkgconfig
   =redhat-rpm-config
   =rpm-build
   =rpm-sign
 默认的软件包:
   =byacc
   =cscope
   =ctags
   =diffstat
   =doxygen
    elfutils
   =gcc-gfortran
    git
   =indent
   =intltool
   =patchutils
   =rcs
   =subversion
   =swig
   =systemtap
 可选的软件包:
   ElectricFence
   ant
   babel
   bzr
   ccache
   chrpath
   clips
   clips-devel
   clips-doc
   clips-emacs
   clips-xclips
   clipsmm-devel
   clipsmm-doc
   cmake
   cmucl
   colordiff
   compat-gcc-44
   compat-gcc-44-c++
   cvs
   cvsps
   darcs
   dejagnu
   email2trac
   expect
   ftnchek
   gcc-gnat
   gcc-objc
   gcc-objc++
   ghc
   git
   haskell-platform
   imake
   javapackages-tools
   ksc
   lua
   mercurial
   mock
   mod_dav_svn
   nasm
   nqc
   nqc-doc
   ocaml
   perltidy
   qgit
   rpmdevtools
   rpmlint
   sbcl
   scorep
   systemtap-sdt-devel
   systemtap-server
   trac
   trac-git-plugin
   trac-mercurial-plugin
   trac-webadmin
   translate-toolkit
[root@VM-20-12-centos compare2txt]#
解压dropbear源码
tar -jxvf dropbear-2017.75.tar.bz2
开始编译
[root@VM-20-12-centos dropbear]# cd dropbear-2016.74
#-–prefix=/usr/local/dropbear/指定安装后的总目录位置
#-–sysconfdir=/etc/dropbear/是指定其配置文件存放路径
[root@VM-20-12-centos dropbear]# ./configure --prefix=/usr/local/dropbear/ --sysconfdir=/etc/dropbear/
#make PROGRAMS=”dropbear dbclient dropbearkey dropbearconvert scp”(只写make也行)
[root@VM-20-12-centos dropbear]# make PROGRAMS="dropbear dbclient dropbearkey dropbearconvert scp"
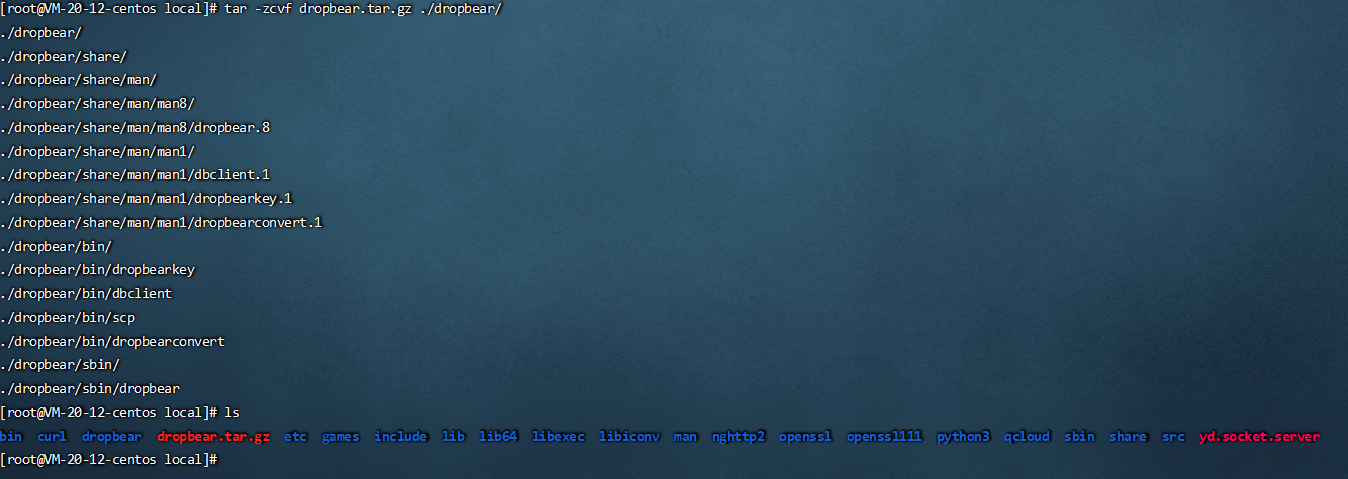
#make PROGRAMS=”dropbear dbclient dropbearkey dropbearconvert scp” install之后;可以看到下载的文件,在/usr/local/dropbear下
[root@VM-20-12-centos dropbear]# make PROGRAMS="dropbear dbclient dropbearkey dropbearconvert scp" install
#bin下的是客户端程序;
#sbin下的是服务端程序;
#/usr/local/dropbear/bin/dbclient就相当于ssh协议
[root@VM-20-12-centos dropbear]# tree -a
.
├── bin
│ ├── dbclient
│ ├── dropbearconvert
│ ├── dropbearkey
│ └── scp
├── sbin
│ └── dropbear
└── share
└── man
├── man1
│ ├── dbclient.1
│ ├── dropbearconvert.1
│ └── dropbearkey.1
└── man8
└── dropbear.8
6 directories, 9 files
[root@VM-20-12-centos dropbear]#
编译好的程序
root@ubuntu:~/Desktop/dropbear/自编译/dropbear/sbin# readelf -h dropbear
ELF Header:
  Magic:   7f 45 4c 46 02 01 01 00 00 00 00 00 00 00 00 00
  Class:                             ELF64
  Data:                              2's complement, little endian
  Version:                           1 (current)
  OS/ABI:                            UNIX - System V
  ABI Version:                       0
  Type:                              EXEC (Executable file)
  Machine:                           Advanced Micro Devices X86-64
  Version:                           0x1
  Entry point address:               0x4028f8
  Start of program headers:          64 (bytes into file)
  Start of section headers:          222944 (bytes into file)
  Flags:                             0x0
  Size of this header:               64 (bytes)
  Size of program headers:           56 (bytes)
  Number of program headers:         9
  Size of section headers:           64 (bytes)
  Number of section headers:         30
  Section header string table index: 29
root@ubuntu:~/Desktop/dropbear/自编译/dropbear/sbin# file dropbear
dropbear: ELF 64-bit LSB executable, x86-64, version 1 (SYSV), dynamically linked, interpreter /lib64/ld-linux-x86-64.so.2, for GNU/Linux 2.6.32, BuildID[sha1]=bdcb5f9e54de47607da03836ce51ec7678b4d091, not stripped
root@ubuntu:~/Desktop/dropbear/自编译/dropbear/sbin#
ubuntu编译
make PROGRAMS="dropbear dbclient dropbearkey dropbearconvert scp" STATIC=1 strip
这样编译出来的没有任何导入函数(加上strip参数)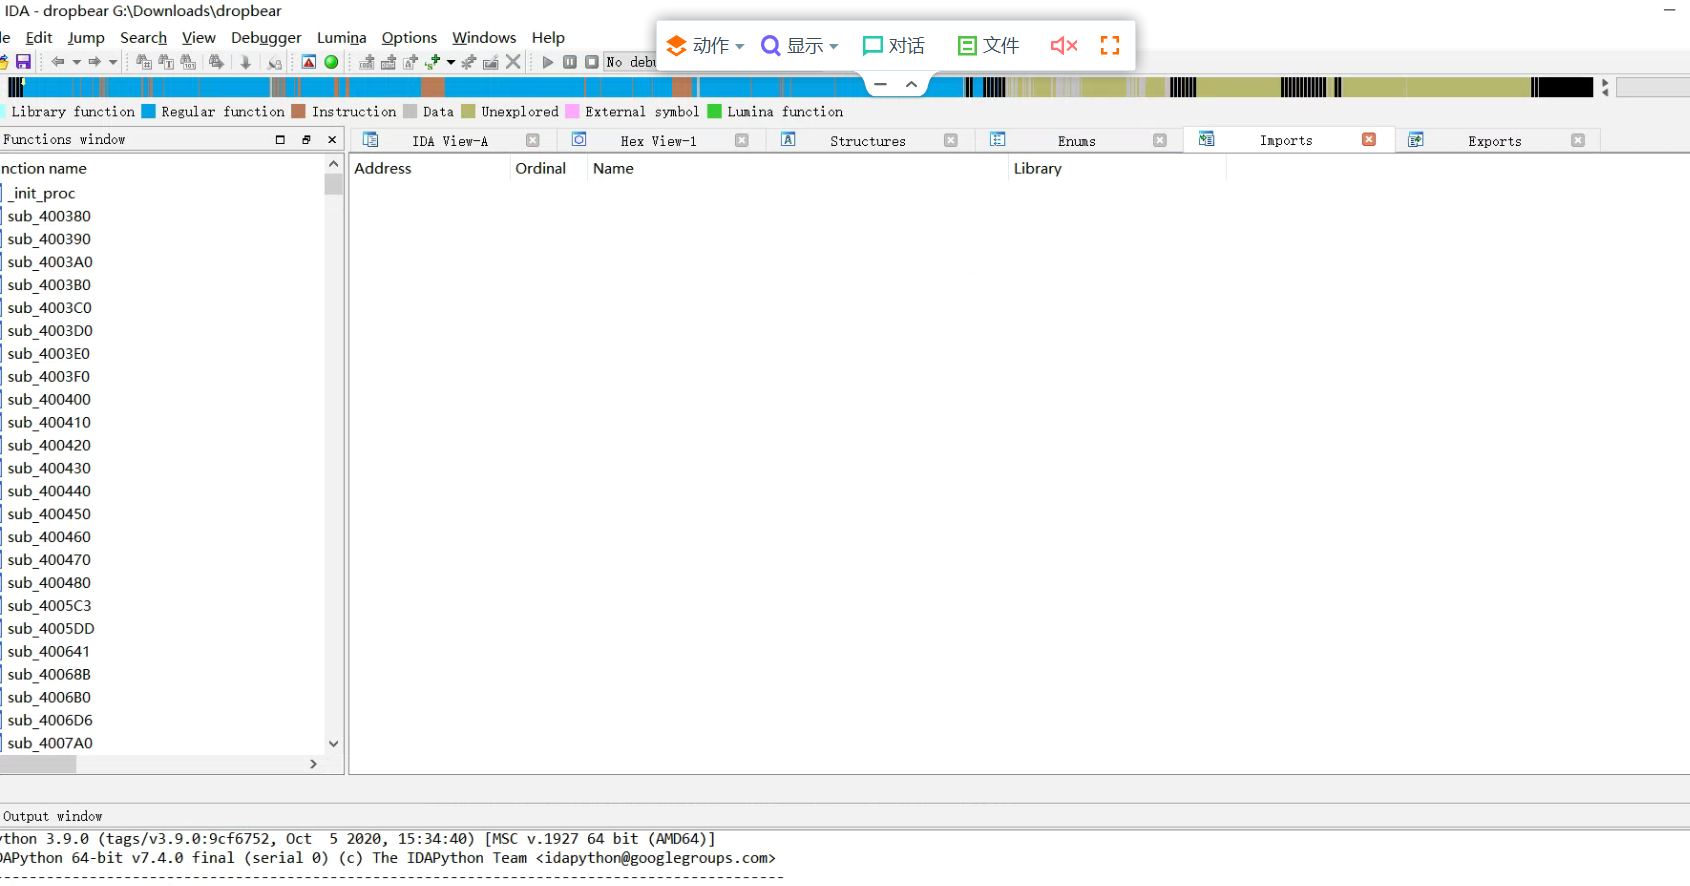
静态编译(加上STATIC=1)
我这里没有安装这个步骤(通过make PROGRAMS=”dropbear dbclient dropbearkey dropbearconvert scp” install),只是编译,编译的文件在当前目录之下
运行
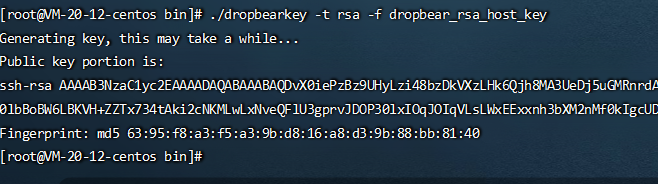
生成密钥
./dropbearkey -t rsa -f dropbear_rsa_host_key
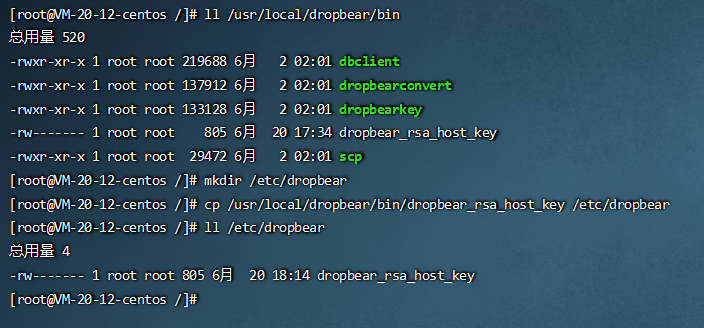
将生成的密钥复制到指定目录
[root@VM-20-12-centos /]# ll /usr/local/dropbear/bin
总用量 520
-rwxr-xr-x 1 root root 219688 6月   2 02:01 dbclient
-rwxr-xr-x 1 root root 137912 6月   2 02:01 dropbearconvert
-rwxr-xr-x 1 root root 133128 6月   2 02:01 dropbearkey
-rw------- 1 root root    805 6月  20 17:34 dropbear_rsa_host_key
-rwxr-xr-x 1 root root  29472 6月   2 02:01 scp
[root@VM-20-12-centos /]# mkdir /etc/dropbear
[root@VM-20-12-centos /]# cp /usr/local/dropbear/bin/dropbear_rsa_host_key /etc/dropbear
[root@VM-20-12-centos /]# ll /etc/dropbear
总用量 4
-rw------- 1 root root 805 6月  20 18:14 dropbear_rsa_host_key
[root@VM-20-12-centos /]#
运行
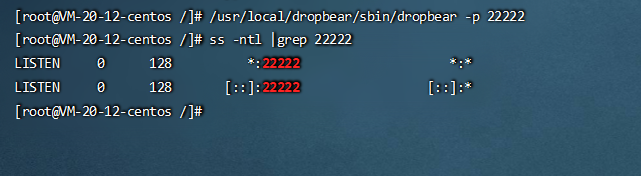
在本机笔记本上连接开启了dropbear 的服务器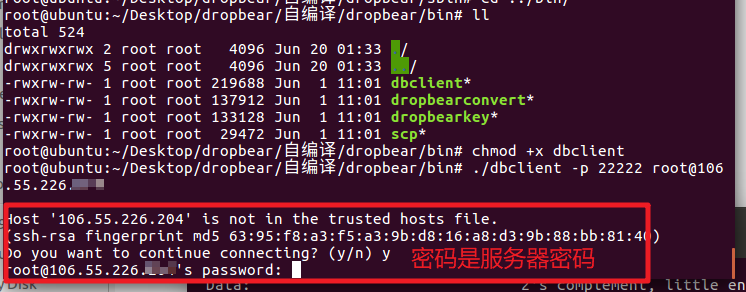
(交叉编译)在x86架构系统玩转arm架构程序
网上下载
下载地址:http://ipkg.nslu2-linux.org/feeds/optware/cs08q1armel/cross/unstable/dropbear_0.52-5_arm.ipk
dropbear_0.52-5_arm.ipk.zip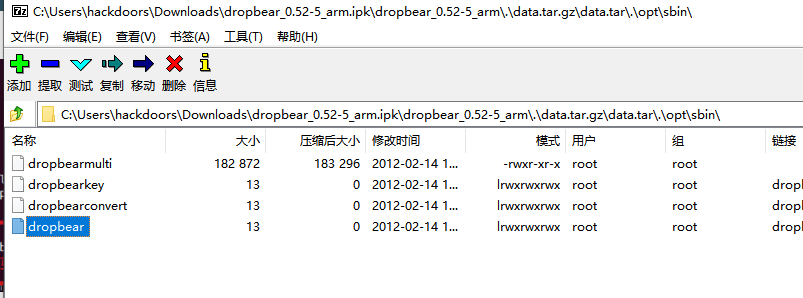
ubuntu编译
参考:http://blog.chinaunix.net/uid-22670933-id-5792705.html
https://www.freesion.com/article/188824076/
安装arm交叉编译器
apt search gcc|grep arm
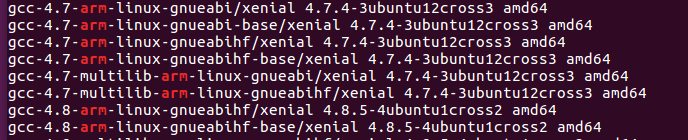
apt-get install gcc-4.7-arm-linux-gnueabi
./configure
修改makefile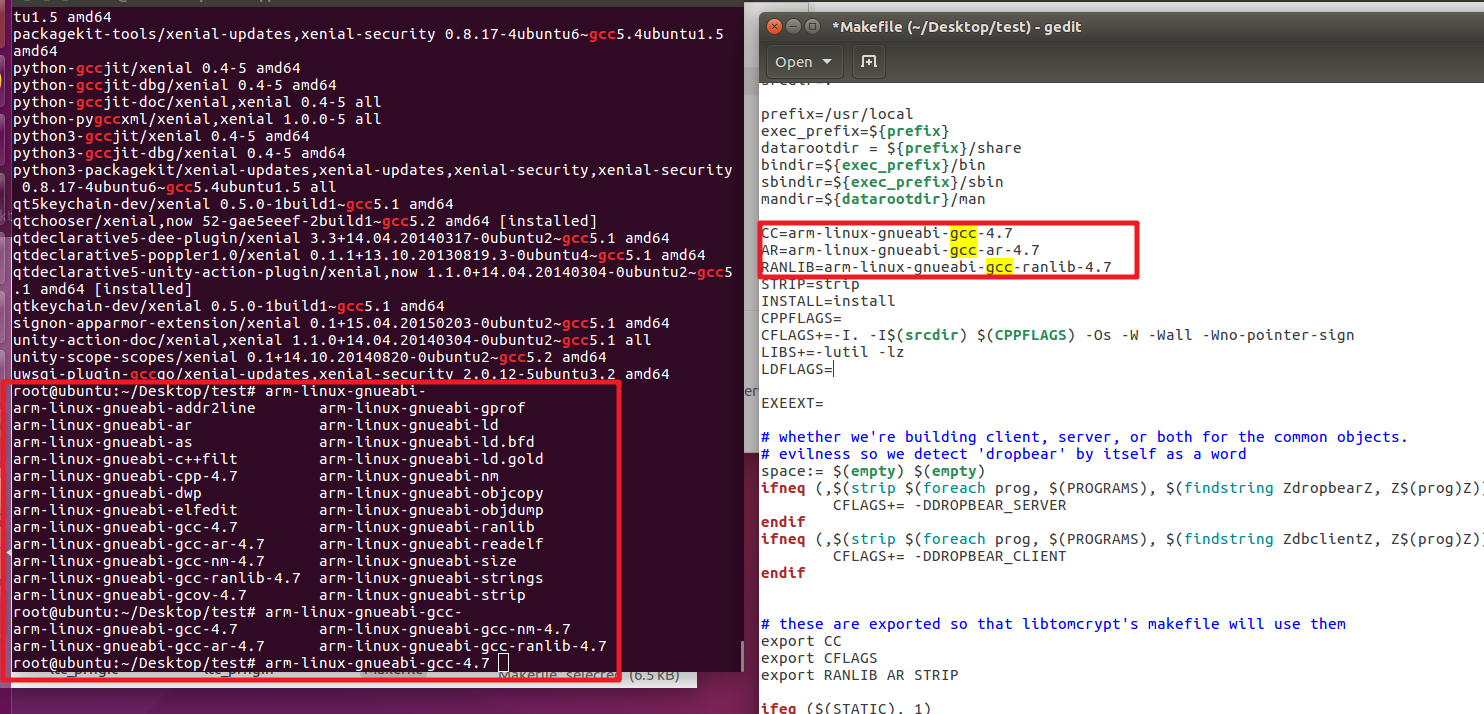
make PROGRAMS="dropbear dbclient dropbearkey dropbearconvert scp" STATIC=1 strip

如何反向查询程序使用的编译器
使用detect it easy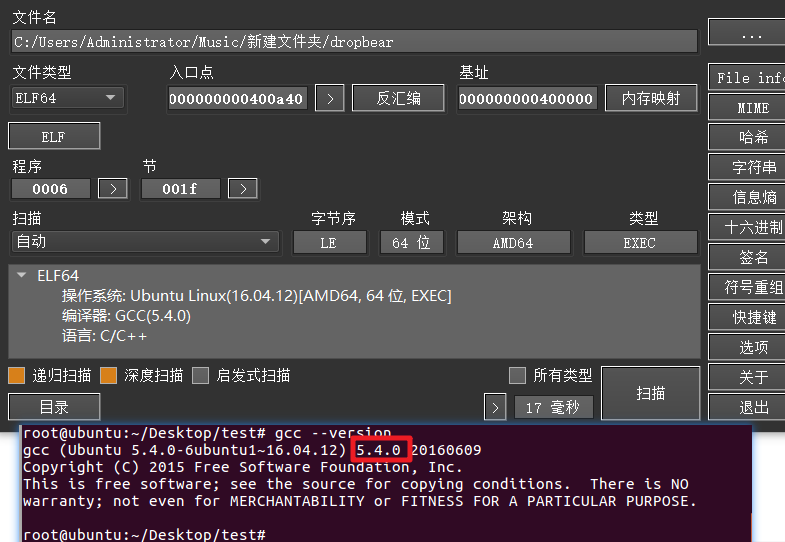
交叉编译的查询不出来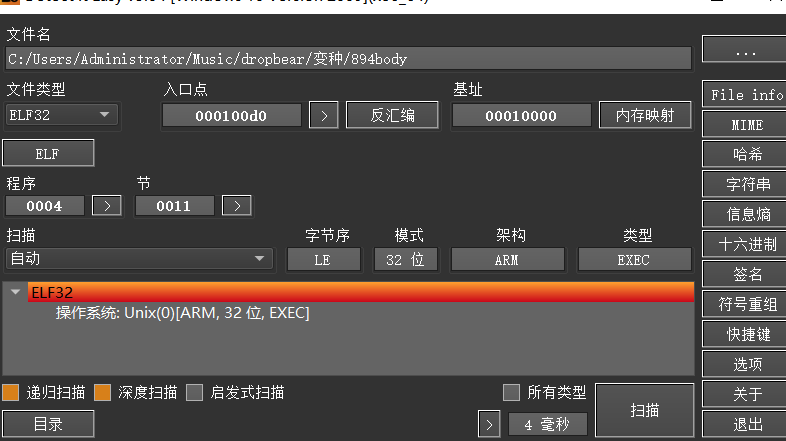

若有收获,就点个赞吧
0 人点赞
