BERT 是2018年Google提出的“11项全能模型”,在很多NLP场景里取得了非常好的结果。随着“Pretrain-Finetune”的模式逐渐发展,衍生出了很多类似的 BERT 类模型,我们统一把它们称之为预训练语言模型。除了对BERT预训练好的模型进行Finetune以外,BERT生成的向量本身也很有价值,我们也可以将BERT看做一个特征提取器,输入一个文本序列,输出一个向量的序列,同时我们可以将CLS输出的向量经过Dense后的向量作为整个句子的句向量。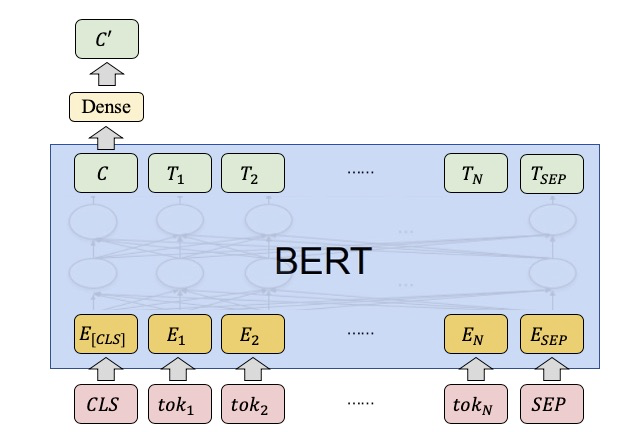
ez_bert_feat 这个组件以原始文本作为输入,端到端输出经过BERT后的向量。我们实现并且重新训练了中/英文场景下的以下预训练模型:
- BERT (Google, BERT: Pre-training of Deep Bidirectional Transformers for Language Understanding)
- Roberta (Facebook, Robustly Optimized BERT Pretraining Approach)
- ALBERT(Google, ALBERT: A Lite BERT for Self-supervised Learning of Language Representations)
- T5 (Google, Exploring the Limits of Transfer Learning with a Unified Text-to-Text Transformer)
用户可以直接提取相应预训练模型下对句子进行编码/对句子的每个词进行编码。
具体而言,当用户给定一个句子S,该组件会自动将其分词为subtoken形式S = [CLS, tok1, tok2, ..., tokN, SEP],并给出三种类型结果任用户选择:
pool_output: 即图中的 C’,也就是对句子进行编码后的向量first_token_output: 即图中的 Call_hidden_outputs: 即图中的 [C, T1, T2, …, TN, TSEP]该组件拥有以下特性:
- 命令简单,最短只需要4个PAI命令参数
- 支持以模型名称选择预训练模型,同时支持模型路径输入选择自定义预训练模型
- 支持多种多类开源的BERT类预训练模型
- ODPS表端到端输出,输入原始数据,输出向量,仅需指定输出表名
- 支持对输入表中字段添加到输出表中
- 支持
easy_transfer_appfinetune模型保存的checkpoint来提取向量
PAI 命令教程
1. 数据准备
首先在这个 链接 中下载本教程相关的数据,这是一个用\t 分隔的 .csv 文件,我们可以看到这个有五个字段,我们把它们命名为 example_id,query1,query2,category,score:
14606    借呗审核暂未通过怎么办    蚂蚁借呗的综合评估没通过怎么办    类别3    -0.05380478405955766
37202    花呗用不了    但是进入支付的时候花呗选不了    类别2    0.19953719332006672
31924    为什么我借呗还进去了 不能借出来了    借呗上借了款借呗进不去了    类别1    -0.9453511453023166
35904    花呗的钱能充值q币么    花呗可以卖q币么    类别3    0.7214070096167942
35871    蚂蚁借呗怎么才能显示在屏幕上    蚂蚁借呗怎么默认银行卡    类别1    -2.054884478044209
注意:本教程所用数据来自 AFQMC 蚂蚁金融语义相似度数据集,为了演示教程,我们随机生成了三个字段
example_id,category和score,用户在使用自己的table时一定要注意输入列不包含空值。
然后在自己的ODPS ${project_name} (如sre_mpi_algo_dev)中创建一张输入表并上传数据:
odpscmd -e "
CREATE TABLE ez_transfer_toy_test(
    example_id INT, query1 STRING, query2 STRING, category STRING, score DOUBLE);
"
odpscmd -e "tunnel upload test.csv ez_transfer_toy_test -fd \t;"
在这里,需要指定另外一张输出表接受输出
project_name="sre_mpi_algo_dev"
table_name=odps://${project_name}/tables/ez_transfer_toy_test
table_name_out=odps://${project_name}/tables/ez_transfer_toy_test_bert_feats
注意:本组件会自动建输出表,但不会覆盖已有表,因此需要该表不存在,否则会报错
ez_bert_feat 需要用户提供相应的 role_arn
role_arn="acs:ram::xxx:role/xx"
2. 提交 PAI 任务
2.1 最小的例子
对于一般而言,用户只需要指定需要提取向量特征的column名即可运行,最小例子如下所示
pai -name ez_bert_feat
  -DinputTable=${table_name}
  -DoutputTable=${table_name_out}
  -DfirstSequence=query1
  -DappendCols=example_id
  -Dbuckets=oss://${your_bucket}/?role_arn=${role_arn}&host=${your_host}
注意 [1]: 这里的buckets只需要改动${role_arn}即可。 注意 [2]:ez_bert_feat 生成的向量行是不保序的,因此appendCols里最好有一个id来进行对应。
2.2 更详细的例子
在这个任务中, 我们希望对输入表的 query1 字段进行BERT文本向量提取,并且将 example_id,query2,category,score 这四个字段一起输出到输出表。我们想要使用的预训练模型为 pai-bert-base-zh ,对 query1 的长度限制在32以内,每批处理 100 个样本。从资源上,我们使用多机多卡进行实验。具体命令如下所示:
DROP TABLE ez_transfer_toy_test_bert_feats;

pai -name ez_bert_feat
  -DinputTable=${table_name}
  -DoutputTable=${table_name_out}
  -DfirstSequence=query1
  -DappendCols=example_id,category,score,query2
  -DoutputSchema=pool_output
  -DmodelName=pai-bert-base-zh
  -DsequenceLength=32
  -DbatchSize=100
  -DworkerCount=3
  -Dbuckets=oss://${your_bucket}/?role_arn=${your_role_arn}&host=${your_host}
注意:分布式离线预测只需要设置workerCount即可,设置workerCount后,系统会自动分配相应的CPU/GPU卡在相应的机器上
3. 查看结果
我们对第二个例子进行观察,首先我们可以先查看一下输出表的Schema是否符合我们的预期:
DESC ez_transfer_toy_test_bert_feats;
预期结果如下:
+-------------------------------------------------------+
| Field           | Type       | Label | Comment        |
+-------------------------------------------------------+
| pool_output     | string     |       |                |
| example_id      | bigint     |       |                |
| category        | string     |       |                |
| score           | double     |       |                |
| query2          | string     |       |                |
+-------------------------------------------------------+
然后我们提取其中一行进行观察:
odpscmd -e 'SELECT * FROM ez_transfer_toy_test_bert_feats LIMIT 1;'
预期结果如下,其中 pool_output 为 768 维并用 , 分隔的字符串:
+-------------+------------+------------+------------+------------+
| pool_output | example_id | category   | score      | query2     |
+-------------+------------+------------+------------+------------+
| 0.999340713024,...,0.836870908737 | 14606      | 类别3        | -0.053804785 | 蚂蚁借呗的综合评估没通过怎么办 |
+-------------+------------+------------+------------+------------+
4. 加载自己的Pretrain或者Finetune模型
除却使用预训练模型对文本向量进行提取以外, ez_bert_feat 已经支持加载
- 任何开源的Google BERT、RoBerta、ALBERT下预训练的Tensorflow Checkpoint
easy_transfer_app中基于BERT、RoBerta、ALBERT的Finetune模型(如文本匹配、文本分类)训练好的模型。4.1 加载 Checkpoint(单机单卡)
如果只需要单机单卡做向量提取,只需要将 modelName 改成训练目录中的一个checkpoint的名字即可。pai -name ez_bert_feat -DinputTable=${table_name} -DoutputTable=${table_name_out} -DfirstSequence=query1 -DappendCols=col0 -DoutputSchema=pool_output -DmodelName=oss://path/to/model.ckpt-xx -DsequenceLength=32 -DbatchSize=128 -DworkerCount=1 -DworkerCPU=1 -DworkerGPU=1 -Dbuckets=oss://path/?role_arn=${role_arn}&host=${your_host}
4.2 加载 saved Model(多机多卡)
需要联动 easy_transfer_app 组件 export 相应的saved model
pai -name easy_transfer_app
    -Dmode=export
    -DcheckpointPath=oss://path/to/model.ckpt-xxx
    -DexportType=ez_bert_feat
    -DexportDirBase=oss://path/to/export_dir_base
    -Dbuckets=oss://${your_bucket}/?role_arn=${role_arn}&host=${your_host}
最终会在 /path/to/export_dir_base 会产生一个类似 一个 variables 文件夹和 saved_model.pb 文件夹,然后再次运行 ez_bert_feat
pai -name ez_bert_feat
  -DinputTable=${table_name}
  -DoutputTable=${table_name_out}
  -DfirstSequence=query1
  -DappendCols=col0
  -DoutputSchema=pool_output
  -DmodelName=oss://path/to/export_dir_base
  -DsequenceLength=32
  -DbatchSize=128
  -DworkerCount=4
  -Dbuckets=oss://${your_bucket}/?role_arn=${role_arn}&host=${your_host}
这里跟单机唯一的区别就是 modelName 替换成那个存有saved_model.pb 的文件目录
EasyTexMiner教程
1. 数据上传
在自己的ODPS ${project_name} (如pai_exp_dev)中创建一张输入表并将上一章下载的数据上传到ODPS:
odpscmd -e "
CREATE TABLE appzoo_example_feature_extraction_input(
        label STRING, sid1 STRING, sid2 STRING, sent1 STRING,sent2 STRING);
"
odpscmd -e "tunnel upload dev.tsv appzoo_example_feature_extraction_input -fd '\t';"
在这里,需要指定另外一张输出表接受输出
project_name="my_own_proj"
input_table=odps://${project_name}/tables/appzoo_example_feature_extraction_input
output_table=odps://${project_name}/tables/appzoo_example_feature_extraction_output
注意:本组件会自动建输出表,但不会覆盖已有表,因此需要该表不存在,否则会报错
easytexminer 需要用户提供相应的 role_arn
role_arn="acs:ram::xxx:role/xx"
2. 提交 PAI 任务
在这个任务中, 我们希望对输入表的 sent1 字段进行BERT文本向量提取,并且将 label 字段一起输出到输出表。我们想要使用的预训练模型为 bert-base-uncased ,模式为predict,对 sent1 的长度限制在128,每批处理 32个样本。具体命令如下所示:
pai -name easytexminer_dev
  -project algo_platform_dev
  -Dmode=predict
  -DworkerGPU=1
  -DinputTable=${input_table}
  -DoutputTable=${output_table}
  -DinputSchema=label:str:1,sid1:str:1,sid2:str:1,sent1:str:1,sent2:str:1
  -DoutputSchema=pooler_output,first_token_output,all_hidden_outputs
  -DfirstSequence=sent1
  -DcheckpointDir=bert-base-uncased
  -DappendCols=label
  -DbatchSize=32
  -DsequenceLength=128
  -DappName=vectorization
  -DworkerCount=1
  -Dbuckets='oss://${oss_bucket_name}/?role_arn=${role_arn_and_host}'
注意 [1]: 这里的buckets无需改动 注意 [2]:easytexminer_dev 生成的向量行是不保序的,因此appendCols里最好有一个id来进行对应。 注意 [3]:分布式离线预测只需要设置workerCount即可,设置workerCount后,系统会自动分配相应的CPU/GPU卡在相应的机器上
3. 查看结果
我们对第二个例子进行观察,首先我们可以先查看一下输出表的Schema是否符合我们的预期:
DESC appzoo_example_feature_extraction_output;
预期结果如下:
+----------------------------------------------------------+
| Field               | Type       | Label | Comment       |
+----------------------------------------------------------+
| pooler_output       | string     |       |               |
| first_token_output  | string     |       |               |
| all_hidden_outputs  | string     |       |               |
| label               | string     |       |               |
+----------------------------------------------------------+
然后我们提取其中一行进行观察:
SELECT * FROM appzoo_example_feature_extraction_output LIMIT 1;
预期结果如下,其中 pool_output 为 768 维并用 , 分隔的字符串;first_token_outputs 为 768 维并用 , 分隔的字符串;all_hidden_outputs 为 768*N 维并用 , 分隔的字符串;
+--------------------------+--------------------------+---------------------------+------------+
| pooler_output            | first_token_outputs      | all_hidden_outputs        | label      |
+--------------------------+--------------------------+---------------------------+------------+
| 0.6646083,...,-0.6311045 | 0.19408298,...0.10477261 | 0.19310124,...,0.25720125 |   0        |
+--------------------------+--------------------------+---------------------------+------------+
4. 加载自己的Pretrain或者Finetune模型
除却使用预训练模型对文本向量进行提取以外, easytexminer 已经支持加载
- 任何开源的Google BERT、RoBerta、ALBERT下预训练的Tensorflow Checkpoint
easytexminer中基于BERT、RoBerta、ALBERT的Finetune模型(如文本匹配、文本分类)训练好的模型。
在本例中,我们在文本分类任务上对预训练模型 bert-base-uncased 进行finetune,保存finetune后的模型到oss://path/to/export_dir_base ,具体过程参考文本向量化实践。
pai -name easytexminer_dev
    -project algo_platform_dev
    -Dmode=train
    -DinputTable=${train_table},${dev_table}
    -DinputSchema=label:str:1,sid1:str:1,sid2:str:1,sent1:str:1,sent2:str:1
    -DcheckpointDir=oss://path/to/export_dir_base
    -DfirstSequence=sent1
    -DsecondSequence=sent2
    -DlabelName=label
    -DlabelEnumerateValues=0,1
    -DsequenceLength=64
    -DappName=text_classify
    -DlearningRate=3e-5
    -DnumEpochs=3
    -DsaveCheckpointSteps=50
    -DbatchSize=32
    -DworkerCount=1
    -DworkerGPU=1
    -DpretrainedModelNameOrPath=bert-base-uncased
    -Dbuckets='oss://${oss_bucket_name}?access_key_id=${access_key_id}&access_key_secret=${access_key_secret}&host=${bucket_host}'
最终会在 /path/to/export_dir_base 会产生一个类似一个包含checkpoint 的文件夹,然后再次运行easytexminer_dev进行文本向量化。
pai -name easytexminer_dev
  -project algo_platform_dev
  -Dmode=predict
  -DworkerGPU=1
  -DinputTable=${input_table}
  -DoutputTable=${output_table}
  -DinputSchema=label:str:1,sid1:str:1,sid2:str:1,sent1:str:1,sent2:str:1
  -DoutputSchema=pooler_output,first_token_output,all_hidden_outputs
  -DfirstSequence=sent1
  -DcheckpointDir=oss://path/to/export_dir_base/
  -DappendCols=label
  -DbatchSize=32
  -DsequenceLength=128
  -DappName=vectorization
  -DworkerCount=1
  -Dbuckets='oss://${oss_bucket_name}/?role_arn=${role_arn_and_host}'
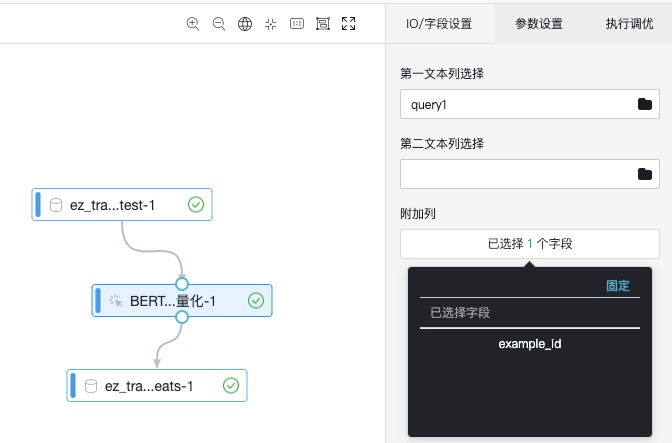
PAI Web教程
- 设置待向量化的列名,设置输出表保留列列名
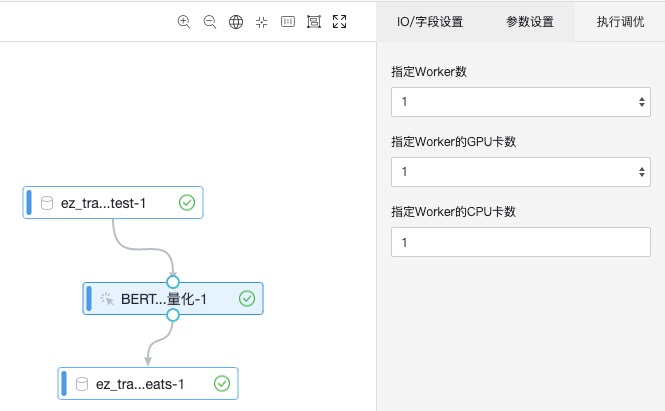
- 设置参数

- 设置执行调优所需资源
完整PAI命令参数
数据参数
| Pai命令选项 | Pai web参数名称 | 参数描述 | 取值类型 | 必选,默认值 |
|---|---|---|---|---|
| inputTable | 输入数据 | 输入待特征提取文本表格 | string类型,格式为project.table | 必选 |
| outputTable | 输出数据 | 输出特征表格 | string类型,格式为project.table | 必选 |
| firstSequence | 第一文本列选择 | 第一个文本序列在输入格式中对应的列名 | string类型 | 必选 |
| secondSequence | 第二文本列选择 | 第二个文本序列在输入格式中对应的列名 | string类型 | 可选,默认为空,’’ |
| appendCols | 附加列 | 用户输入表中添加到输出的列 | string类型 | 可选,默认为空,’’ |
| outputSchema | 输出特征选项 | 选择输出数据中需要哪几个特征 | string类型 | 可选,默认为’pool_output’ ,’pool_output,first_token_output,all_hidden_outputs’ (可多选) |
| sequenceLength | sequenceLength | 序列整体最大长度 | int | 可选,默认为128,范围为1~512 |
模型参数
| Pai命令选项 | Pai web参数名称 | 参数描述 | 取值类型 | 必选,默认值 |
|---|---|---|---|---|
| modelName | 模型选择 | 预训练模型名 | string | 可选,默认为’pai-bert-base-zh’,详见后一节“支持模型”;用户也可自定义输入自己预训练好的模型checkpoint path |
| batchSize | batchSize | 特征提取批大小 | int | 可选,默认为256 |
执行调优
| Pai命令选项 | Pai web参数名称 | 参数描述 | 取值类型 | 必选,默认值 |
|---|---|---|---|---|
| workerCount | 指定Worker数 | int | 可选,默认为1个Worker | |
| workerGPU | 指定Worker的GPU卡数 | int | 可选,标识是否使用GPU。默认是1张卡 | |
| workerCPU | 指定Worker的CPU卡数 | int | 可选,标识是否使用GPU。默认是1张卡。 |
支持模型
支持模型可见ModelZoo列表
FAQ
1. 运行PAI WEB的时候提示“参数转换错误”怎么办?
检查一下运行的Project是否给PAI授权,换一个授权了的project试试,OSS授权PAI教程 https://yuque.antfin-inc.com/pai-user/manual/tf_oss-role-arn-application
2. 出现 “FAILED: Failed Task generateCreateTableSql”的错误
请检查如下的参数:
- input和output table名是不是以 odps://${project_name}//tables/your_table_name
- firstSequence/secondSequence字段,appendCols中字段是否出现在输入表中
3. 生成的table表数目与输入表不一致
请检查logview 中 的 stderr中是否有报错,一般是因为空值原因造成

若有收获,就点个赞吧
0 人点赞
