1、自定义线程池
池化技术相比大家已经屡见不鲜了,线程池、数据库连接池、Http 连接池等等都是对这个思想的应用。池化技术的思想主要是为了减少每次获取资源的消耗,提高对资源的利用率。
- 降低资源消耗。通过重复利用已创建的线程降低线程创建和销毁造成的消耗。
- 提高响应速度。当任务到达时,任务可以不需要的等到线程创建就能立即执行。
- 提高线程的可管理性。线程是稀缺资源,如果无限制的创建,不仅会消耗系统资源,还会降低系统的稳定性,使用线程池可以进行统一的分配,调优和监控。

1、实现一个简单的线程池
public class ThreadPool {/*** 步骤1:自定义任务队列* 步骤2:自定义线程类* 步骤3:自定义线程池* 步骤4:测试*/private BlockingQueue<Runnable> queue;private int coreSize;private HashSet<Worker> workers = new HashSet<>();public ThreadPool(int coreSize, int capacity) {System.out.println("构造ThreadPool");this.coreSize = coreSize;this.queue = new BlockingQueue<>(capacity);}public void execute(Runnable task) {System.out.println("线程池接受到任务需要执行:" + task);// 当任务数没有超过 coreSize 时,直接交给 worker 对象执行// 如果任务数超过 coreSize 时,加入任务队列暂存synchronized (workers) {if (workers.size() < coreSize) {System.out.println("coreSize未满, 新增work执行任务:" + task);Worker worker = new Worker(task);workers.add(worker);System.out.println("worker新建好了,准备执行任务:" + task);worker.start();} else {System.out.println("coreSize已经满了!!!!!,尝试先将任务" + task + "放入队列");queue.put(task);System.out.println("队列长度" + queue.blockQueue.size());// 如果任务超过核心线程数+队列长度会死等}}}class Worker extends Thread {/*** 执行任务主体*/private Runnable task;public Worker(Runnable task) {this.task = task;}@Overridepublic void run() {System.out.println(Thread.currentThread().getName() + "正在执行任务。。");while (task != null || (task = queue.take()) != null) {try {task.run();} catch (Exception e) {e.printStackTrace();} finally {task = null;}}synchronized (workers) {workers.remove(this);}}}class BlockingQueue<T> {private Deque<T> blockQueue = new ArrayDeque<>();private int capacity;private ReentrantLock lock = new ReentrantLock();// 队列已满等待private Condition fullWaitSet = lock.newCondition();// 队列为空等待private Condition emptyWaitSet = lock.newCondition();public BlockingQueue(int capacity) {System.out.println("构造BlockingQueue");this.capacity = capacity;}// 获取public T take() {lock.lock();try {while (blockQueue.isEmpty()) {System.out.println(Thread.currentThread().getName() + ":" + "任务队列为空。。");try {emptyWaitSet.await();} catch (InterruptedException e) {e.printStackTrace();}}T t = blockQueue.removeFirst();System.out.println(Thread.currentThread().getName() + ":" + "取到任务" + t);fullWaitSet.signal();return t;} finally {lock.unlock();}}// 添加public void put(T task) {lock.lock();try {while (blockQueue.size() == capacity) {System.out.println(Thread.currentThread().getName() + ":" + "任务队列已满");fullWaitSet.await();}blockQueue.addLast(task);System.out.println(Thread.currentThread().getName() + ":" + "添加任务" + task);emptyWaitSet.signal();} catch (InterruptedException e) {e.printStackTrace();} finally {lock.unlock();}}}public static void main(String[] args) {ThreadPool threadPool = new ThreadPool(2, 5);for (int i = 0; i < 4; i++) {int j = i + 1;threadPool.execute(() -> {try {System.out.println("我是第 " + j + " 个任务我先睡1s");Thread.sleep(1000L);} catch (InterruptedException e) {e.printStackTrace();}System.out.println("我是第 " + j + " 个任务,我马上执行完了");});}}}
2、在上一部的基础上增加超时的方法和拒绝策略
/*** 步骤4:自定义线程池测试*/@Slf4j(topic = "Test18")public class Test18{public static void main(String[] args) {ThreadPool threadPool = new ThreadPool(1,1000, TimeUnit.MILLISECONDS, 1, (queue, task)->{// 1. 死等// queue.put(task);// 2) 带超时等待// queue.offer(task, 1500, TimeUnit.MILLISECONDS);// 3) 让调用者放弃任务执行// log.debug("放弃{}", task);// 4) 让调用者抛出异常// throw new RuntimeException("任务执行失败 " + task);// 5) 让调用者自己执行任务task.run();});for (int i = 0; i < 4; i++) {int j = i;threadPool.execute(() -> {try {Thread.sleep(1000L);} catch (InterruptedException e) {e.printStackTrace();}log.debug("{}", j);});}}}/*** 步骤2:自定义任务队列* @param <T>*/@Slf4j(topic = "BlockingQueue")class BlockingQueue<T> {// 1. 任务队列private Deque<T> queue = new ArrayDeque<>();// 2. 锁private ReentrantLock lock = new ReentrantLock();// 3. 生产者条件变量private Condition fullWaitSet = lock.newCondition();// 4. 消费者条件变量private Condition emptyWaitSet = lock.newCondition();// 5. 容量private int capcity;public BlockingQueue(int capcity) {this.capcity = capcity;}// 带超时时间的获取public T poll(long timeout, TimeUnit unit){lock.lock();try{// 将 timeout 统一转换为 纳秒long nanos = unit.toNanos(timeout);while (queue.isEmpty()){try {if (nanos<=0){return null;}// 返回的是剩余的等待时间,更改navos的值,使虚假唤醒的时候可以继续等待nanos = emptyWaitSet.awaitNanos(nanos);} catch (InterruptedException e) {e.printStackTrace();}}fullWaitSet.signal();return queue.getFirst();}finally {lock.unlock();}}// 阻塞获取public T Take(){lock.lock();try{while (queue.isEmpty()){try {emptyWaitSet.await();} catch (InterruptedException e) {e.printStackTrace();}}fullWaitSet.signal();return queue.getFirst();}finally {lock.unlock();}}// 阻塞增加public void put (T task){lock.lock();try{while (queue.size() == capcity){try {log.debug("等待加入任务队列 {} ...", task);fullWaitSet.await();} catch (InterruptedException e) {e.printStackTrace();}}log.debug("加入任务队列 {}", task);queue.addLast(task);emptyWaitSet.signal();}finally {lock.unlock();}}// 带超时时间的增加public boolean offer(T task , long timeout , TimeUnit unit){lock.lock();try{// 将 timeout 统一转换为 纳秒long nanos = unit.toNanos(timeout);while (queue.size() == capcity){try {if (nanos<=0){return false;}// 更新剩余需要等待的时间nanos = fullWaitSet.awaitNanos(nanos);} catch (InterruptedException e) {e.printStackTrace();}}log.debug("加入任务队列 {}", task);queue.addLast(task);emptyWaitSet.signal();return true;}finally {lock.unlock();}}public void tryPut(RejectPolicy<T> rejectPolicy, T task) {lock.lock();try{// 不空闲时怎么办?由rejectPolicy决定if (queue.size()> capcity){rejectPolicy.reject(this, task);}else {log.debug("加入任务队列 {}", task);queue.addLast(task);emptyWaitSet.signal();}}finally {lock.unlock();}}public int size(){lock.lock();try{return queue.size();}finally {lock.unlock();}}}/*** 步骤3:自定义线程池*/@Slf4j(topic = "ThreadPool")class ThreadPool{// 任务队列private BlockingQueue<Runnable> taskQueue;// 线程集合private HashSet<Worker> workers = new HashSet<>();// 核心线程数int coreSize;private long timeOut;private TimeUnit timeUnit;public ThreadPool(int coreSize, long timeOut, TimeUnit timeUnit,int capcity,RejectPolicy<Runnable> rejectPolicy) {this.coreSize = coreSize;this.timeOut = timeOut;this.timeUnit = timeUnit;this.taskQueue = new BlockingQueue<>(capcity);this.rejectPolicy = rejectPolicy;}// 执行任务public void execute(Runnable task){// 当任务数没有超过 coreSize 时,直接交给 worker 对象执行// 如果任务数超过 coreSize 时,加入任务队列暂存synchronized (workers){if (workers.size()<coreSize){Worker worker = new Worker(task);workers.add(worker);worker.start();}else {// 1) 死等// taskQueue.put(task);// 2) 带超时等待//taskQueue.tryPut(rejectPolicy, task);// 3) 让调用者放弃任务执行// 4) 让调用者抛出异常// 5) 让调用者自己执行任务//或者将以上的这些选项封装起来,由调用者调用时自己设计操作逻辑taskQueue.tryPut(rejectPolicy,task);}}}class Worker extends Thread{private Runnable task;public Worker(Runnable task) {this.task = task;}@Overridepublic void run() {// 执行任务// 1) 当 task 不为空,执行任务// 2) 当 task 执行完毕,再接着从任务队列获取任务并执行while(task!=null || (task = taskQueue.poll(timeOut,timeUnit)) != null) {try{log.debug("正在执行...{}", task);task.run();}catch (Exception e){e.printStackTrace();}finally {task = null;}}synchronized (workers){log.debug("worker 被移除{}", this);workers.remove(this);}}}}/*** 步骤1:自定义拒绝策略接口* @param <T>*/@FunctionalInterface // 拒绝策略 @FunctionalInterface的意思是这是一个函数式编程接口interface RejectPolicy<T> {void reject(BlockingQueue<T> queue, T task);}
2、ThreadPoolExecutor
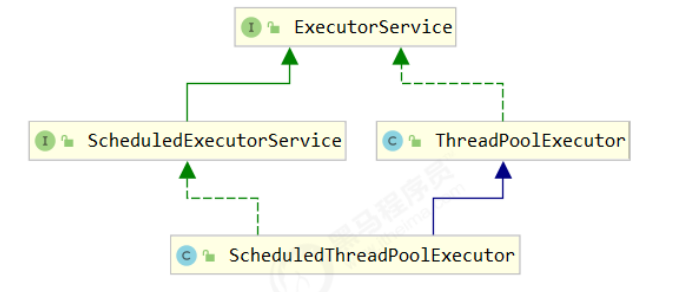
1、线程池状态
ThreadPoolExecutor 使用 int 的高 3 位来表示线程池状态,低 29 位表示线程数量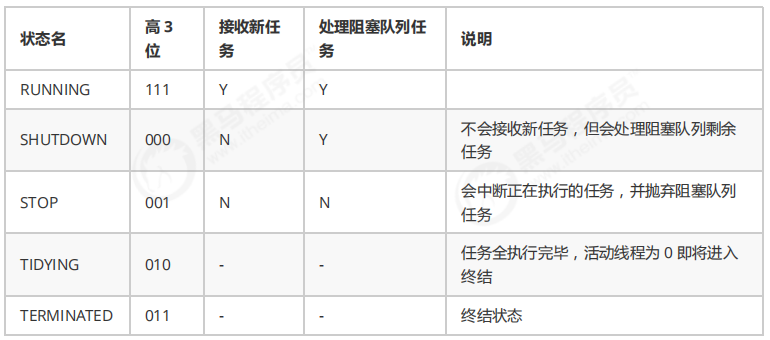
从数字上比较,TERMINATED > TIDYING > STOP > SHUTDOWN > RUNNING .
因为第一位是符号位,RUNNING 是负数,所以最小.
这些信息存储在一个原子变量 ctl 中,目的是将线程池状态与线程个数合二为一,这样就可以用一次 cas 原子操作进行赋值
// c 为旧值, ctlOf 返回结果为新值
ctl.compareAndSet(c, ctlOf(targetState, workerCountOf(c))));

// rs 为高 3 位代表线程池状态, wc 为低 29 位代表线程个数,ctl 是合并它们
private static int ctlOf(int rs, int wc) { return rs | wc; }
2、构造方法
public ThreadPoolExecutor(int corePoolSize,
                          int maximumPoolSize,
                          long keepAliveTime,
                          TimeUnit unit,
                          BlockingQueue<Runnable> workQueue,
                          ThreadFactory threadFactory,
                          RejectedExecutionHandler handler)

● corePoolSize 核心线程数目 (最多保留的线程数)
● maximumPoolSize 最大线程数目
● keepAliveTime 生存时间 - 针对救急线程
● unit 时间单位 - 针对救急线程
● workQueue 阻塞队列
● threadFactory 线程工厂 - 可以为线程创建时起个好名字
● handler 拒绝策略
工作方式: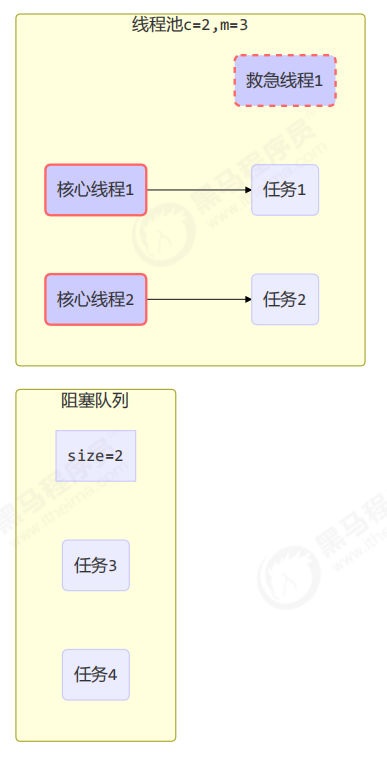
- 线程池中刚开始没有线程,当一个任务提交给线程池后,线程池会创建一个新线程来执行任务。
- 当线程数达到 corePoolSize 并没有线程空闲,这时再加入任务,新加的任务会被加入workQueue 队列排 队,直到有空闲的线程。
- 如果队列选择了有界队列,那么任务超过了队列大小时,会创建 maximumPoolSize – corePoolSize 数目的线程来救急。
- 如果线程到达 maximumPoolSize 仍然有新任务这时会执行拒绝策略。拒绝策略 jdk 提供了 下面的前4 种实现,其它著名框架也提供了实现
- ThreadPoolExecutor.AbortPolicy让调用者抛出 RejectedExecutionException 异常,这是默认策略
- ThreadPoolExecutor.CallerRunsPolicy 让调用者运行任务
- ThreadPoolExecutor.DiscardPolicy 放弃本次任务
- ThreadPoolExecutor.DiscardOldestPolicy 放弃队列中最早的任务,本任务取而代之
- Dubbo 的实现,在抛出 RejectedExecutionException 异常之前会记录日志,并 dump 线程栈信息,方 便定位问题
- Netty 的实现,是创建一个新线程来执行任务
- ActiveMQ 的实现,带超时等待(60s)尝试放入队列,类似我们之前自定义的拒绝策略
- PinPoint 的实现,它使用了一个拒绝策略链,会逐一尝试策略链中每种拒绝策略
- 当高峰过去后,超过corePoolSize 的救急线程如果一段时间没有任务做,需要结束节省资源,这个时间由 keepAliveTime 和 unit 来控制。

根据这个构造方法,JDK Executors类中提供了众多工厂方法来创建各种用途的线程池.
3、JDK Executors类中提供的工厂方法
1、newFixedThreadPool
public static ExecutorService newFixedThreadPool(int nThreads) {
    return new ThreadPoolExecutor(nThreads, nThreads,
                                  0L, TimeUnit.MILLISECONDS,
                                  new LinkedBlockingQueue<Runnable>());
}
- 核心线程数 == 最大线程数(没有救急线程被创建),因此也无需超时时间
- 阻塞队列是无界的,可以放任意数量的任务
- 适用于任务量已知,相对耗时的任务
2、newCachedThreadPool
定义: 一个可根据需要创建新线程的线程池,如果现有线程没有可用的,则创建一个新线程并添加到池中,如果有被使用完但是还没销毁的线程,就复用该线程。终止并从缓存中移除那些已有 60 秒钟未被使用的线程。因此,长时间保持空闲的线程池不会使用任何资源。
public static ExecutorService newCachedThreadPool() {
    return new ThreadPoolExecutor(0, Integer.MAX_VALUE,
                                  60L, TimeUnit.SECONDS,
                                  new SynchronousQueue<Runnable>());
}
- 核心线程数是 0, 最大线程数是 Integer.MAX_VALUE,救急线程的空闲生存时间是 60s,意味着
- 全部都是救急线程(60s 后可以回收)
- 救急线程可以无限创建
- 队列采用了 SynchronousQueue 实现特点是,它没有容量,没有线程来取是放不进去的(一手交钱、一手交 货)SynchronousQueue测试代码 Test20.java
整个线程池表现为线程数会根据任务量不断增长,没有上限,当任务执行完毕,空闲 1分钟后释放线 程。 适合任务数比较密集,但每个任务执行时间较短的情况
public static void main(String[] args) throws InterruptedException {
 ExecutorService service = Executors.newCachedThreadPool();

 for (int i = 0; i < 20; i++) {
     service.execute(() -> System.out.println(Thread.currentThread().getName()));
 }
 service.shutdown();
}
结果 ```java 通过输出可以看到有些线程执行完任务后,会空闲下来,有新的任务提交时,会利用空闲线程执行
pool-1-thread-1 pool-1-thread-3 pool-1-thread-2 pool-1-thread-4 pool-1-thread-5 pool-1-thread-6 pool-1-thread-1 pool-1-thread-3 pool-1-thread-4 pool-1-thread-3 pool-1-thread-1 pool-1-thread-7 pool-1-thread-5 pool-1-thread-2 pool-1-thread-6 pool-1-thread-8 pool-1-thread-4 pool-1-thread-3 pool-1-thread-1 pool-1-thread-9
<a name="a0PIB"></a>
### 3、newSingleThreadExecutor
```java
public static ExecutorService newSingleThreadExecutor() {
    return new FinalizableDelegatedExecutorService
        (new ThreadPoolExecutor(1, 1, 0L, TimeUnit.MILLISECONDS, new LinkedBlockingQueue<Runnable>()));
}
- 希望多个任务排队执行。线程数固定为 1,任务数多于 1 时,会放入无界队列排队。任务执行完毕,这唯一的线程也不会被释放。
- 区别:
- 自己创建一个单线程串行执行任务,如果任务执行失败而终止那么没有任何补救措施,而线程池还会新建一个线程,保证线程池中始终有一个可用的线程
- Executors.newSingleThreadExecutor() 线程个数始终为1,不能修改
- FinalizableDelegatedExecutorService 应用的是装饰器模式,只对外暴露了 ExecutorService 接口,因此不能调用 ThreadPoolExecutor 中特有的方法
- Executors.newFixedThreadPool(1) 初始时为1,以后还可以修改
- 对外暴露的是 ThreadPoolExecutor 对象,可以强转后调用 setCorePoolSize 等方法进行修改
弊端:
《阿里巴巴 Java 开发手册》中强制线程池不允许使用 Executors 去创建,而是通过 ThreadPoolExecutor 的方式,这样的处理方式让写的同学更加明确线程池的运行规则,规避资源耗尽的风险
Executors 返回线程池对象的弊端如下:
- FixedThreadPool 和 SingleThreadExecutor : 允许请求的队列长度为 Integer.MAX_VALUE,可能堆积大量的请求,从而导致 OOM。
- CachedThreadPool 和 ScheduledThreadPool : 允许创建的线程数量为 Integer.MAX_VALUE ,可能会创建大量线程,从而导致 OOM。
说白了就是:使用有界队列,控制线程创建数量。
除了避免 OOM 的原因之外,不推荐使用 Executors提供的两种快捷的线程池的原因还有:
- 实际使用中需要根据自己机器的性能、业务场景来手动配置线程池的参数比如核心线程数、使用的任务队列、饱和策略等等。
- 我们应该显示地给我们的线程池命名,这样有助于我们定位问题。
4、提交任务
// 执行任务
void execute(Runnable command);

// 提交任务 task,用返回值 Future 获得任务执行结果,Future的原理就是利用我们之前讲到的保护性暂停模式来接受返回结果的,主线程可以执行 FutureTask.get()方法来等待任务执行完成
<T> Future<T> submit(Callable<T> task);

// 提交 tasks 中所有任务
<T> List<Future<T>> invokeAll(Collection<? extends Callable<T>> tasks) throws InterruptedException;

// 提交 tasks 中所有任务,带超时时间
<T> List<Future<T>> invokeAll(Collection<? extends Callable<T>> tasks, long timeout, TimeUnit unit) throws InterruptedException;

// 提交 tasks 中所有任务,哪个任务先成功执行完毕,返回此任务执行结果,其它任务取消
<T> T invokeAny(Collection<? extends Callable<T>> tasks) throws InterruptedException, ExecutionException;

// 提交 tasks 中所有任务,哪个任务先成功执行完毕,返回此任务执行结果,其它任务取消,带超时时间
<T> T invokeAny(Collection<? extends Callable<T>> tasks, long timeout, TimeUnit unit) throws InterruptedException, ExecutionException, TimeoutException;
5、关闭线程池
/*
线程池状态变为 SHUTDOWN
- 不会接收新任务
- 但已提交任务会执行完,包括等待队列里面的
- 此方法不会阻塞调用线程的执行
*/
void shutdown();

public void shutdown() {
    final ReentrantLock mainLock = this.mainLock;
    mainLock.lock();
    try {
        checkShutdownAccess();
        // 修改线程池状态
        advanceRunState(SHUTDOWN);
        // 仅会打断空闲线程
        interruptIdleWorkers();
        onShutdown(); // 扩展点 ScheduledThreadPoolExecutor
    } finally {
        mainLock.unlock();
    }
    // 尝试终结(没有运行的线程可以立刻终结)
    tryTerminate();
}
/*
线程池状态变为 STOP
- 不会接收新任务
- 会将队列中的任务返回
- 并用 interrupt 的方式中断正在执行的任务
*/
List<Runnable> shutdownNow();


public List<Runnable> shutdownNow() {
    List<Runnable> tasks;
    final ReentrantLock mainLock = this.mainLock;
    mainLock.lock();
    try {
        checkShutdownAccess();
        // 修改线程池状态
        advanceRunState(STOP);
        // 打断所有线程
        interruptWorkers();
        // 获取队列中剩余任务
        tasks = drainQueue();
    } finally {
        mainLock.unlock();
    }
    // 尝试终结
    tryTerminate();
    return tasks;
}
// 不在 RUNNING 状态的线程池,此方法就返回 true
boolean isShutdown();

// 线程池状态是否是 TERMINATED
boolean isTerminated();

// 调用 shutdown 后,由于调用线程并不会等待所有任务运行结束,因此如果它想在线程池 TERMINATED 后做些事情,可以利用此方法等待
boolean awaitTermination(long timeout, TimeUnit unit) throws InterruptedException;
6、异步模式之工作线程
1. 定义
让有限的工作线程(Worker Thread)来轮流异步处理无限多的任务。也可以将其归类为分工模式,它的典型实现就是线程池,也体现了经典设计模式中的享元模式。
例如,海底捞的服务员(线程),轮流处理每位客人的点餐(任务),如果为每位客人都配一名专属的服务员,那么成本就太高了(对比另一种多线程设计模式:Thread-Per-Message)
注意,不同任务类型应该使用不同的线程池,这样能够避免饥饿,并能提升效率
例如,如果一个餐馆的工人既要招呼客人(任务类型A),又要到后厨做菜(任务类型B)显然效率不咋地,分成 服务员(线程池A)与厨师(线程池B)更为合理
2. 饥饿
固定大小的线程池会有饥饿现象
1. 两个工人是同一个线程池中的两个线程
2. 他们要做的事情是:为客人点餐和到后厨做菜,这是两个阶段的工作
    1. 客人点餐:必须先点完餐,等菜做好,上菜,在此期间处理点餐的工人必须等待
    2. 后厨做菜:没啥说的,做就是了
3. 比如工人A 处理了点餐任务,接下来它要等着 工人B 把菜做好,然后上菜,他俩也配合的蛮好 但现在同时来了两个客人,这个时候工人A 和工人B 都去处理点餐了,这时没人做饭了,饥饿

@Slf4j
public class TestStarvation {

    static final List<String> MENU = Arrays.asList("宫保鸡丁","地三鲜", "辣子鸡", "番茄炒蛋");
    static Random RANDOM = new Random();
    static String cooking() {
        return MENU.get(RANDOM.nextInt(MENU.size()));
    }

    public static void main(String[] args) {
        ExecutorService pool = Executors.newFixedThreadPool(2);
        pool.execute(() -> {
            log.info("点餐");
            Future<String> f1 = pool.submit(() -> {
                log.info("做菜");
                return cooking();
            });
            try {
                log.debug("上菜: {}", f1.get());
            } catch (InterruptedException | ExecutionException e){
                e.printStackTrace();
            }
        });

        pool.execute(() -> {
            log.info("点餐");
            Future<String> f1 = pool.submit(() -> {
                log.info("做菜");
                return cooking();
            });
            try {
                log.debug("上菜: {}", f1.get());
            } catch (InterruptedException | ExecutionException e){
                e.printStackTrace();
            }
        });
    }
}
解决方法:可以增加线程池的大小,不过不是根本解决方案,还是前面提到的,不同的任务类型,采用不同的线程池
@Slf4j
public class TestStarvation {

    static final List<String> MENU = Arrays.asList("宫保鸡丁","地三鲜", "辣子鸡", "番茄炒蛋");
    static Random RANDOM = new Random();
    static String cooking() {
        return MENU.get(RANDOM.nextInt(MENU.size()));
    }

    public static void main(String[] args) {
        ExecutorService waiterPool = Executors.newFixedThreadPool(1);
        ExecutorService cookPool = Executors.newFixedThreadPool(1);
        waiterPool.execute(() -> {
            log.info("点餐");
            Future<String> f1 = cookPool.submit(() -> {
                log.info("做菜");
                return cooking();
            });
            try {
                log.debug("上菜: {}", f1.get());
            } catch (InterruptedException | ExecutionException e){
                e.printStackTrace();
            }
        });

        waiterPool.execute(() -> {
            log.info("点餐");
            Future<String> f1 = cookPool.submit(() -> {
                log.info("做菜");
                return cooking();
            });
            try {
                log.debug("上菜: {}", f1.get());
            } catch (InterruptedException | ExecutionException e){
                e.printStackTrace();
            }
        });
    }
}
3. 创建多少线程池合适
- 过小会导致程序不能充分地利用系统资源、容易导致饥饿
- 过大会导致更多的线程上下文切换,占用更多内存
- CPU 密集型运算
通常采用 cpu 核数 + 1 能够实现最优的 CPU 利用率,+1 是保证当线程由于页缺失故障(操作系统)或其它原因
导致暂停时,额外的这个线程就能顶上去,保证 CPU 时钟周期不被浪费
- I/O 密集型运算
CPU 不总是处于繁忙状态,例如,当你执行业务计算时,这时候会使用 CPU 资源,但当你执行 I/O 操作时、远程
RPC 调用时,包括进行数据库操作时,这时候 CPU 就闲下来了,你可以利用多线程提高它的利用率。
经验公式如下
线程数 = 核数 * 期望 CPU 利用率 * 总时间(CPU计算时间+等待时间) / CPU 计算时间

例如 4 核 CPU 计算时间是 50% ,其它等待时间是 50%,期望 cpu 被 100% 利用,套用公式
4 * 100% * 100% / 50% = 8
例如 4 核 CPU 计算时间是 10% ,其它等待时间是 90%,期望 cpu 被 100% 利用,套用公式
4 * 100% * 100% / 10% = 40
7、任务调度线程池 ScheduledExecutorService
java.util.Timer
在『任务调度线程池』功能加入之前,可以使用 java.util.Timer 来实现定时功能,Timer 的优点在于简单易用,但由于所有任务都是由同一个线程来调度,因此所有任务都是串行执行的,同一时间只能有一个任务在执行,前一个任务的延迟或异常都将会影响到之后的任务。
@Slf4j
public class Test {

    public static void main(String[] args) {
        Timer timer = new Timer();

        TimerTask task1 = new TimerTask() {
            @Override
            public void run() {
                log.debug("task 1");
                try {
                    sleep(2000);
                } catch (InterruptedException e) {
                    e.printStackTrace();
                }
            }
        };

        TimerTask task2 = new TimerTask() {
            @Override
            public void run() {
                log.debug("task 2");
            }
        };

        log.debug("start...");
        // 使用 timer 添加两个任务,希望它们都在 1s 后执行
        // 但由于 timer 内只有一个线程来顺序执行队列中的任务,因此『任务1』的延时,影响了『任务2』的执行
        // 甚至如果task1出异常停止后,task2都不会执行
        timer.schedule(task1, 1000);
        timer.schedule(task2, 1000);
    }
}
输出
18:29:29.566 [main] DEBUG org.inter.java.Test - start...
18:29:30.570 [Timer-0] DEBUG org.inter.java.Test - task 1
18:29:32.574 [Timer-0] DEBUG org.inter.java.Test - task 2
ScheduledExecutorService
@Slf4j
public class Test {

    public static void main(String[] args) {
        ScheduledExecutorService executor = Executors.newScheduledThreadPool(2);

        executor.schedule(() -> {
            log.debug("任务1执行");
            try {
                Thread.sleep(2000);
            } catch (InterruptedException e) {
                e.printStackTrace();
            }
        }, 1000, TimeUnit.MILLISECONDS);

        executor.schedule(() -> log.debug("任务2执行"), 1000, TimeUnit.MILLISECONDS);
    }
}

----------------------------------------------------------------------------------------------------------------------------------------------------------------------------------------------
scheduleAtFixedRate

@Slf4j
public class Test {

    public static void main(String[] args) {
        ScheduledExecutorService executor = Executors.newScheduledThreadPool(2);

        executor.scheduleAtFixedRate(() -> {
            log.debug("任务1执行");
            try {
                Thread.sleep(2000);
            } catch (InterruptedException e) {
                e.printStackTrace();
            }
        }, 1000, 1000, TimeUnit.MILLISECONDS);

        executor.schedule(() -> log.debug("任务2执行"), 1000, TimeUnit.MILLISECONDS);
    }
}
输出
18:37:56.245 [pool-1-thread-2] DEBUG org.inter.java.Test - 任务2执行
18:37:56.245 [pool-1-thread-1] DEBUG org.inter.java.Test - 任务1执行

----------------------------------------------------------------------------------------------------------------------------------------------------------------------------------------------
scheduleAtFixedRate
18:41:21.134 [pool-1-thread-1] DEBUG org.inter.java.Test - 任务1执行
18:41:21.134 [pool-1-thread-2] DEBUG org.inter.java.Test - 任务2执行
18:41:23.140 [pool-1-thread-1] DEBUG org.inter.java.Test - 任务1执行
18:41:25.143 [pool-1-thread-1] DEBUG org.inter.java.Test - 任务1执行
18:41:27.148 [pool-1-thread-1] DEBUG org.inter.java.Test - 任务1执行
整个线程池表现为:线程数固定,任务数多于线程数时,会放入无界队列排队。任务执行完毕,这些线 程也不会被释放。用来执行延迟或反复执行的任务。
8、正确处理执行任务异常
1、主动捕获异常
ExecutorService pool = Executors.newFixedThreadPool(1);
pool.submit(() -> {
    try {
        log.debug("task1");
        int i = 1 / 0;
    } catch (Exception e) {
        log.error("error:", e);
    }
});
2、使用 Future
ExecutorService pool = Executors.newFixedThreadPool(1);

Future<Boolean> f = pool.submit(() -> {
    log.debug("task1");
    int i = 1 / 0;
    return true;
});
log.debug("result:{}", f.get());
9、应用之定时任务*
定期执行
@Slf4j
public class ScheduledTask {
    public static void main(String[] args) {
        // 获得当前时间
        LocalDateTime now = LocalDateTime.now();
        // 获取本周四 18:00:00.000
        LocalDateTime thursday = now.with(DayOfWeek.THURSDAY).withHour(18).withMinute(0).withSecond(0).withNano(0);
        // 如果当前时间已经超过 本周四 18:00:00.000, 那么找下周四 18:00:00.000
        if (now.compareTo(thursday) >= 0) {
            thursday = thursday.plusWeeks(1);
        }

        // 计算时间差,即延时执行时间
        long initialDelay = Duration.between(now, thursday).toMillis();
        // 计算间隔时间,即 1 周的毫秒值
        long oneWeek = 7 * 24 * 3600 * 1000;

        ScheduledExecutorService executor = Executors.newScheduledThreadPool(2);
        log.debug("开始时间");

        executor.scheduleAtFixedRate(() -> log.debug("执行时间"), initialDelay, oneWeek, TimeUnit.MILLISECONDS);
    }
}
11、Tomcat (的)线程池(策略)
Tomcat 在哪里用到了线程池呢
- LimitLatch 用来限流,可以控制最大连接个数,类似 J.U.C 中的 Semaphore
- Acceptor 只负责【接收新的 socket 连接】
- Poller 只负责监听 socket channel 是否有【可读的 I/O 事件】
- 一旦可读,封装一个任务对象(socketProcessor),提交给 Executor 线程池处理
- Executor 线程池中的工作线程最终负责【处理请求】
扩展了 ThreadPoolExecutor
Tomcat 线程池扩展了 ThreadPoolExecutor,行为稍有不同
- 如果总线程数达到 maximumPoolSize,这时不会立刻抛 RejectedExecutionException 异常,而是再次尝试将任务放入队列,如果还失败,才抛出 RejectedExecutionException 异常
public void execute(Runnable command, long timeout, TimeUnit unit) {
 submittedCount.incrementAndGet();
 try {
     super.execute(command);
 } catch (RejectedExecutionException rx) {
     if (super.getQueue() instanceof TaskQueue) {
         final TaskQueue queue = (TaskQueue)super.getQueue();
         try {
             // 使任务从新进入阻塞队列
             if (!queue.force(command, timeout, unit)) {
                 submittedCount.decrementAndGet();
                 throw new RejectedExecutionException("Queue capacity is full.");
             }
         } catch (InterruptedException x) {
             submittedCount.decrementAndGet();
             Thread.interrupted();
             throw new RejectedExecutionException(x);
         }
     } else {
         submittedCount.decrementAndGet();
         throw rx;
     }
 }
}
TaskQueue.java
public boolean force(Runnable o, long timeout, TimeUnit unit) throws InterruptedException {
    if ( parent.isShutdown() )
        throw new RejectedExecutionException(
                "Executor not running, can't force a command into the queue"
        );
    return super.offer(o,timeout,unit); //forces the item onto the queue, to be used if the task
    is rejected
}
Connector 配置

Executor 线程配置
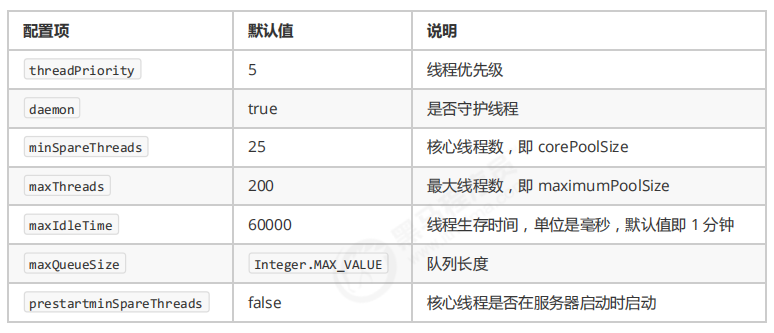

3、Fork/Join (分治思想)
1) 概念
Fork/Join 是 JDK 1.7 加入的新的线程池实现,它体现的是一种分治思想,适用于能够进行任务拆分的 cpu 密集型运算
所谓的任务拆分,是将一个大任务拆分为算法上相同的小任务,直至不能拆分可以直接求解。跟递归相关的一些计算,如归并排序、斐波那契数列、都可以用分治思想进行求解
Fork/Join 在分治的基础上加入了多线程,可以把每个任务的分解和合并交给不同的线程来完成,进一步提升了运算效率
Fork/Join 默认会创建与 cpu 核心数大小相同的线程池
2) 使用
提交给 Fork/Join 线程池的任务需要继承 RecursiveTask(有返回值)或 RecursiveAction(没有返回值),例如下面定义了一个对 1~n 之间的整数求和的任务
@Slf4j(topic = "c.AddTask")
class AddTask1 extends RecursiveTask<Integer> {
    int n;

    public AddTask1(int n) {
        this.n = n;
    }

    @Override
    public String toString() {
        return "{" + n + '}';
    }

    @Override
    protected Integer compute() {
        // 如果 n 已经为 1,可以求得结果了
        if (n == 1) {
            log.debug("join() {}", n);
            return n;
        }

        // 将任务进行拆分(fork)
        AddTask1 t1 = new AddTask1(n - 1);
        t1.fork();
        log.debug("fork() {} + {}", n, t1);

        // 合并(join)结果
        int result = n + t1.join();
        log.debug("join() {} + {} = {}", n, t1, result);
        return result;
    }
}
然后提交给 ForkJoinPool 来执行
public static void main(String[] args) {
    ForkJoinPool pool = new ForkJoinPool(4);
    System.out.println(pool.invoke(new AddTask1(5)));
}
结果
[ForkJoinPool-1-worker-0] - fork() 2 + {1}
[ForkJoinPool-1-worker-1] - fork() 5 + {4}
[ForkJoinPool-1-worker-0] - join() 1
[ForkJoinPool-1-worker-0] - join() 2 + {1} = 3
[ForkJoinPool-1-worker-2] - fork() 4 + {3}
[ForkJoinPool-1-worker-3] - fork() 3 + {2}
[ForkJoinPool-1-worker-3] - join() 3 + {2} = 6
[ForkJoinPool-1-worker-2] - join() 4 + {3} = 10
[ForkJoinPool-1-worker-1] - join() 5 + {4} = 15
15
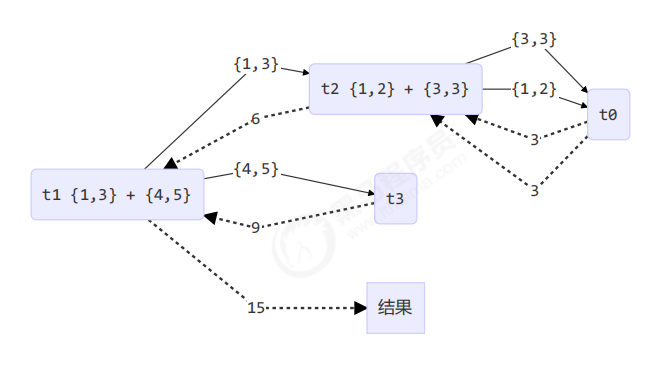
用图来表示
改进
class AddTask3 extends RecursiveTask<Integer> {

    int begin;
    int end;

    public AddTask3(int begin, int end) {
        this.begin = begin;
        this.end = end;
    }

    @Override
    public String toString() {
        return "{" + begin + "," + end + '}';
    }

    @Override
    protected Integer compute() {
        // 5, 5
        if (begin == end) {
            log.debug("join() {}", begin);
            return begin;
        }
        // 4, 5
        if (end - begin == 1) {
            log.debug("join() {} + {} = {}", begin, end, end + begin);
            return end + begin;
        }

        // 1 5
        int mid = (end + begin) / 2; // 3
        AddTask3 t1 = new AddTask3(begin, mid); // 1,3
        t1.fork();
        AddTask3 t2 = new AddTask3(mid + 1, end); // 4,5
        t2.fork();
        log.debug("fork() {} + {} = ?", t1, t2);
        int result = t1.join() + t2.join();
        log.debug("join() {} + {} = {}", t1, t2, result);
        return result;
    }
}
然后提交给 ForkJoinPool 来执行
public static void main(String[] args) {
    ForkJoinPool pool = new ForkJoinPool(4);
    System.out.println(pool.invoke(new AddTask3(1, 10)));
}
结果
[ForkJoinPool-1-worker-0] - join() 1 + 2 = 3
[ForkJoinPool-1-worker-3] - join() 4 + 5 = 9
[ForkJoinPool-1-worker-0] - join() 3
[ForkJoinPool-1-worker-1] - fork() {1,3} + {4,5} = ?
[ForkJoinPool-1-worker-2] - fork() {1,2} + {3,3} = ?
[ForkJoinPool-1-worker-2] - join() {1,2} + {3,3} = 6
[ForkJoinPool-1-worker-1] - join() {1,3} + {4,5} = 15
15
用图来表示