背景说明
随着业务的增长和开发团队的成员快速增加,其中很多新人来自于五湖四海各大门派,在编码的风格和习惯中也出现各异。通常在相互 code review 时发现很多代码上的问题,久而久之代码出现了代码难以维护的问题,甚至还会出现低级错误。
格式化代码规范
第三方库版本
环境准备前端代码开发规范工程化
- node >= v20.0.0
- vite >= 5.2.0
- vscode 插件
- ESLint
- Stylelint
- Prettier - Code formatter
初始化Remix 项目
- 创建一个新的 Hydrogen 店面,可以使用官方提供的脚手架
npm create @shopify/hydrogen@latest -- --quickstart
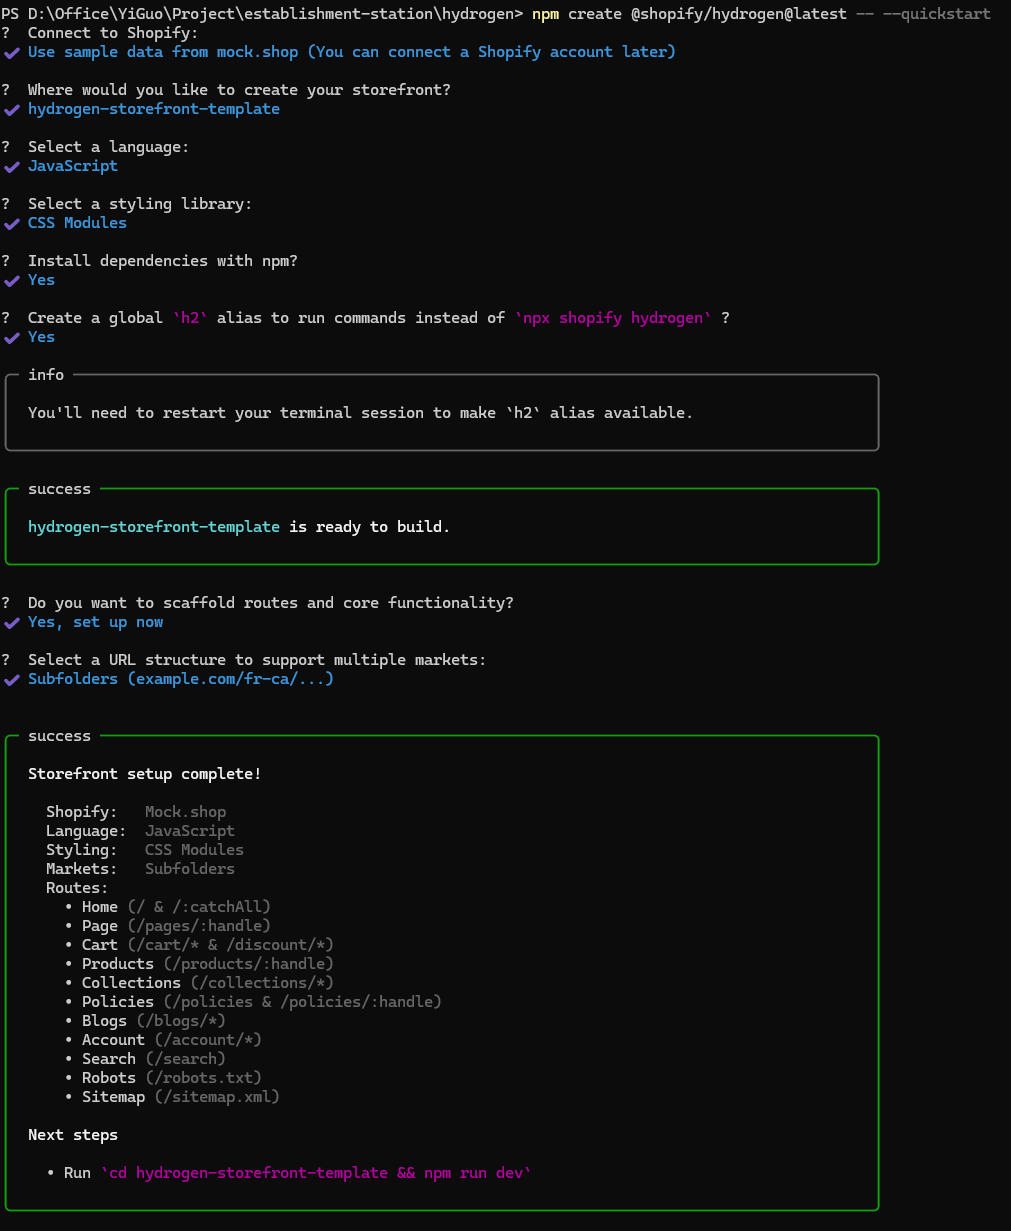
- 可以看到项目已经默认集成了Remix、Vite、Eslint等等
- 根目录下创建.vscode文件夹
- extensions.json - 用于存放推荐vscode扩展插件
- settings.json - 用于设置vscode的基本配置(项目配置会覆盖本地全局配置)
ESLint
ESLint 能够帮助开发者发现代码中的潜在错误和不良实践,确保代码符合团队或项目的编码规范,从而提高代码质量和可维护性。
这是使用的版本是eslint v8的版本,和v9的版本有一定的区别
- 配置写入(保存的时候会自动修复)
{"editor.codeActionsOnSave": {"source.fixAll": "explicit","source.fixAll.eslint": "explicit",},}
- 提供的脚手架已经有安装了相关的ESlint的插件,例如:eslint-plugin-hydrogen、@remix-run/eslint-config等等
- 安装额外ESlint相关的插件(排序插件)
eslint-import-resolver-alias: 允许你配置模块别名,帮助 ESLint 正确解析这些别名。这样在使用 import 语法时,ESLint 可以正确识别别名对应的模块路径,避免因无法解析别名而导致的错误提示。
eslint-plugin-import: 它通常与 eslint-plugin-import 一起使用,后者用于增强 ESLint 对模块导入的检查和规范化。通过 eslint-import-resolver-alias,你可以确保 ESLint 的 import 规则能够正确处理你的别名配置。
npm install eslint-import-resolver-alias eslint-plugin-import -D
- 在
.eslintrc.cjs文件中配置相关配置
module.export = {// ...extends: [// ..."plugin:import/recommended",],settings: {'import/resolver': {// eslint-import-resolver-typescript 可以解决别名报错的问题typescript: {alwaysTryTypes: true,},// eslint-import-resolver-alias 可以解决绝对路径的问题alias: {map: [['', './public'], // <-- this line],extensions: ['.js', '.jsx', '.ts', '.tsx', '.svg'],},},},rules: {//..."import/order": ["error",{// 对导入模块进行分组,分组排序规则如下groups: ["builtin", // 内置模块"external", // 外部模块"parent", //父节点依赖"sibling", //兄弟依赖"internal", //内部引用"index", // index文件"type", //类型文件"unknown",],//通过路径自定义分组pathGroups: [{pattern: "@/**", // 把@开头的应用放在external分组后面group: "external",position: "after",},],// 是否开启独特组,用于区分自定义规则分组和其他规则分组distinctGroup: true,// 每个分组之间换行"newlines-between": "always",// 相同分组排列规则 按字母升序排序alphabetize: { order: "asc" },},],},};
- 在package.json添加脚本
"lint:fix": "eslint . --ext .js,.ts,.jsx,.tsx --ignore-path .gitignore --fix" - 这时候可以使用脚本
npm run lint:fix进行初步格式化
Prettier
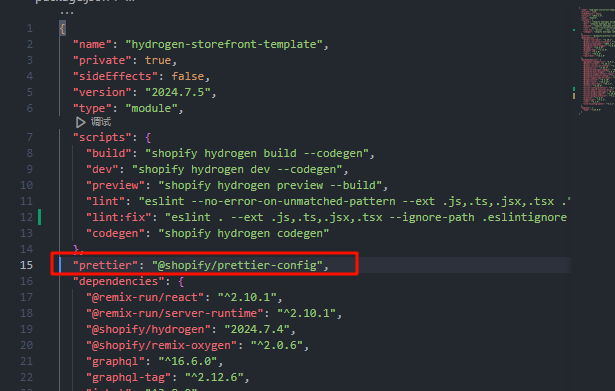
- 删除掉package.json中的
"prettier": "@shopify/prettier-config"
- 安装prettier相关依赖
Prettier 是一个代码格式化工具,旨在自动化地格式化代码,使其符合一致的风格标准。它支持多种语言,包括 JavaScript、TypeScript、HTML 和 CSS 等。
eslint-config-prettier 是一个 ESLint 配置,它用于禁用与 Prettier 冲突的 ESLint 规则,确保 ESLint 和 Prettier 可以和平共处。
eslint-plugin-prettier 是一个 ESLint 插件,它将 Prettier 的格式化规则作为 ESLint 规则运行,确保代码在保存时自动格式化。
npm install prettier eslint-config-prettier eslint-plugin-prettier -D
- 添加
.prettierrc.cjs文件
module.exports = {// 一行最多多少个字符printWidth: 90,// 指定每个缩进级别的空格数tabWidth: 2,// 使用制表符而不是空格缩进行useTabs: false,// 在语句末尾是否需要分号semi: true,// 是否使用单引号singleQuote: true,// 更改引用对象属性的时间 可选值"<as-needed|consistent|preserve>"quoteProps: 'as-needed',// 在JSX中使用单引号而不是双引号jsxSingleQuote: false,// 多行时尽可能打印尾随逗号。(例如,单行数组永远不会出现逗号结尾。) 可选值"<none|es5|all>",默认nonetrailingComma: 'es5',// 在对象文字中的括号之间打印空格bracketSpacing: true,// jsx 标签的反尖括号需要换行jsxBracketSameLine: false,// 在单独的箭头函数参数周围包括括号 always:(x) => x \ avoid:x => xarrowParens: 'always',// 这两个选项可用于格式化以给定字符偏移量(分别包括和不包括)开始和结束的代码rangeStart: 0,rangeEnd: Infinity,// 指定要使用的解析器,不需要写文件开头的 @prettierrequirePragma: false,// 不需要自动在文件开头插入 @prettierinsertPragma: false,// 使用默认的折行标准 always\never\preserveproseWrap: 'preserve',// 指定HTML文件的全局空格敏感度 css\strict\ignorehtmlWhitespaceSensitivity: 'css',// Vue文件脚本和样式标签缩进vueIndentScriptAndStyle: false,//在 windows 操作系统中换行符通常是回车 (CR) 加换行分隔符 (LF),也就是回车换行(CRLF),//然而在 Linux 和 Unix 中只使用简单的换行分隔符 (LF)。//对应的控制字符为 "\n" (LF) 和 "\r\n"(CRLF)。auto意为保持现有的行尾// 换行符使用 lf 结尾是 可选值"<auto|lf|crlf|cr>"endOfLine: 'crlf',};
- 修改
.eslintrc.cjs文件,注入prettier相关插件和配置 - 添加
.prettierignore文件
/dist//node_modules//public/
- 配置好可以看到
_index.tsx文件里的内容标红了- 使用配置好的脚本
npm run lint:fix进行修复
- 使用配置好的脚本
- .vscode/settings.json中配置自动保存格式化,然后使用保存快捷键
{"editor.codeActionsOnSave": {"source.fixAll": "explicit","source.fixAll.eslint": "explicit","source.fixAll.stylelint": "explicit"},"editor.formatOnSave": true,"editor.defaultFormatter": "esbenp.prettier-vscode",}
- Tip:
.prettierrc.cjs修改了相关格式化配置规则,ESLint代码不会立即去检查报红,Ctrl+Shift+P 打开命令面板,输入Restart Extension Host重启扩展宿主,等待加载一会儿,就能同步更新了。也可以暴力直接重启打开vscode软件。 - 疑问
- 为什么有了eslint还使用prettier?
Stylelint
- 安装css预处理器 sass
npm i sass
- 安装相关依赖(这是使用Scss样式预处理器为例)
npm install stylelint stylelint-scss stylelint-config-recommended-scss stylelint-config-standard stylelint-config-standard-scss stylelint-order -D
- 根目录分别新增
.stylelintignore、.stylelintrc.cjs两个文件
# .stylelintignore# 旧的不需打包的样式库*.min.css# 其他类型文件*.js*.jpg*.png*.eot*.ttf*.woff*.json# 测试和打包目录/test//dist//node_modules//lib/
module.exports = {extends: ['stylelint-config-standard','stylelint-config-standard-scss','stylelint-config-recommended-scss',],plugins: ['stylelint-scss', 'stylelint-order'],rules: {'no-irregular-whitespace': true,// 指定样式的排序'order/properties-order': [['content','position','top','right','bottom','left','z-index','display','vertical-align','flex','flex-grow','flex-shrink','flex-basis','flex-direction','flex-flow','flex-wrap','grid','grid-area','grid-template','grid-template-areas','grid-template-rows','grid-template-columns','grid-row','grid-row-start','grid-row-end','grid-column','grid-column-start','grid-column-end','grid-auto-rows','grid-auto-columns','grid-auto-flow','grid-gap','grid-row-gap','grid-column-gap','gap','row-gap','column-gap','align-content','align-items','align-self','justify-content','justify-items','justify-self','order','float','clear','object-fit','overflow','overflow-x','overflow-y','overflow-scrolling','clip',//'box-sizing','width','min-width','max-width','height','min-height','max-height','margin','margin-top','margin-right','margin-bottom','margin-left','padding','padding-top','padding-right','padding-bottom','padding-left','border','border-spacing','border-collapse','border-width','border-style','border-color','border-top','border-top-width','border-top-style','border-top-color','border-right','border-right-width','border-right-style','border-right-color','border-bottom','border-bottom-width','border-bottom-style','border-bottom-color','border-left','border-left-width','border-left-style','border-left-color','border-radius','border-top-left-radius','border-top-right-radius','border-bottom-right-radius','border-bottom-left-radius','border-image','border-image-source','border-image-slice','border-image-width','border-image-outset','border-image-repeat','border-top-image','border-right-image','border-bottom-image','border-left-image','border-corner-image','border-top-left-image','border-top-right-image','border-bottom-right-image','border-bottom-left-image',//'background','background-color','background-image','background-attachment','background-position','background-position-x','background-position-y','background-clip','background-origin','background-size','background-repeat','color','box-decoration-break','box-shadow','outline','outline-width','outline-style','outline-color','outline-offset','table-layout','caption-side','empty-cells','list-style','list-style-position','list-style-type','list-style-image',//'font','font-weight','font-style','font-variant','font-size-adjust','font-stretch','font-size','font-family','src','line-height','letter-spacing','quotes','counter-increment','counter-reset','-ms-writing-mode','text-align','text-align-last','text-decoration','text-emphasis','text-emphasis-position','text-emphasis-style','text-emphasis-color','text-indent','text-justify','text-outline','text-transform','text-wrap','text-overflow','text-overflow-ellipsis','text-overflow-mode','text-shadow','white-space','word-spacing','word-wrap','word-break','overflow-wrap','tab-size','hyphens','interpolation-mode',//'opacity','visibility','filter','resize','cursor','pointer-events','user-select',//'unicode-bidi','direction','columns','column-span','column-width','column-count','column-fill','column-gap','column-rule','column-rule-width','column-rule-style','column-rule-color','break-before','break-inside','break-after','page-break-before','page-break-inside','page-break-after','orphans','widows','zoom','max-zoom','min-zoom','user-zoom','orientation','fill','stroke',//'transition','transition-delay','transition-timing-function','transition-duration','transition-property','transform','transform-origin','animation','animation-name','animation-duration','animation-play-state','animation-timing-function','animation-delay','animation-iteration-count','animation-direction','animation-fill-mode',],{unspecified: 'bottom',severity: 'error',},],},}
- 打开命令面板重启一下扩展宿主,可以创建一个css文件,输入相关样式,可以看到文件报红
- 添加脚本命令行
// ..."scripts": {// ..."stylelint": "stylelint ./**/*.{css,scss}","stylelint:fix": "stylelint ./**/*.{css,scss} --fix",},// ...
- 使用
npm run stylelint:fix进行样式格式化修复 - .vscode/settings.json中配置自动保存格式化,然后使用保存快捷键
{"editor.codeActionsOnSave": {"source.fixAll": "explicit","source.fixAll.eslint": "explicit","source.fixAll.stylelint": "explicit"},"editor.formatOnSave": true,"editor.defaultFormatter": "esbenp.prettier-vscode","stylelint.validate": ["css", "scss", "sass"],"stylelint.enable": true,"css.validate": false,"scss.validate": false,"[scss]": {"editor.defaultFormatter": "esbenp.prettier-vscode"},"[css]": {"editor.defaultFormatter": "esbenp.prettier-vscode"}}
Husky
- 安装依赖
npm install husky@8.0.3 -D
- 添加脚本命令
// ..."scripts": {// ..."prepare": "husky install"},// ...
- 执行
npm run prepare命令,根目录会多一个.husky的目录 - 在终端输入命令
就可以当我们在使用 git commit 代码提交的时候会先触发以下命令进行代码格式化修复
npm husky add .husky/pre-commit "npm run lint:fix && npm run stylelint:fix"
- 输入完后在
.husky文件下会出现pre-commit文件
Commitlint
- 安装Commitlint相关依赖
npm install @commitlint/config-conventional @commitlint/cli commitizen@4.2.4 cz-customizable -D
- 为什么使用指定版本
- 在根目录分别新增
.commitlintrc.cjs、.cz-config.cjs两个文件
module.exports = {extends: ['@commitlint/config-conventional'],rules: {'type-enum': [// type枚举2,'always',[':sparkles:',':bug:',':construction:',':memo:',':lipstick:',':zap:',':hammer:',':white_check_mark:',':rewind:',':package:',':rocket:',':construction_worker:',],],// 'type-empty': [2, 'never'], // 提交类型不能为空// 'type-case': [0, 'always', 'lower-case'], // 提交类型的大小写(0表示不检查)// 'scope-empty': [0], // 提交范围(scope)是否为空(0表示不检查)// 'scope-case': [0], // 提交范围的大小写(0表示不检查)// 'subject-empty': [2, 'never'], // 提交说明(subject)不能为空// 'subject-case': [0], // 提交说明的大小写(0表示不检查)// 'subject-full-stop': [0, 'never', '.'], // 提交说明的结尾不能有句号// 'header-max-length': [2, 'always', 72], // 提交信息的头部最长72个字符// 'body-leading-blank': [0], // 提交信息的主体开头不强制为空行// 'footer-leading-blank': [0, 'always'], // 提交信息的脚注开头需要有空行},parserPreset: {parserOpts: {headerPattern: /^(:\w*:)(?:\((.*?)\))?\s((?:.*(?=\())|.*)(?:\(#(\d*)\))?/,headerCorrespondence: ['type', 'scope', 'subject', 'ticket'],},},}
module.exports = {types: [{value: ':sparkles: feat',name: '✨ feat: 新功能',},{value: ':bug: fix',name: '🐛 fix: 修复bug',},{value: ':construction: WIP',name: '🚧 WIP: 工作进行中',},{value: ':memo: docs',name: '📝 docs: 文档变更',},{value: ':lipstick: style',name: '💄 style: 代码风格变更',},{value: ':zap: perf',name: '⚡ perf: 性能优化',},{value: ':hammer: refactor',name: '🔨 refactor: 重构',},{value: ':white_check_mark: test',name: '✅ test: 测试',},{value: ':rewind: revert',name: '⏪️ revert: 代码回退',},{value: ':package: build',name: '📦 build: 打包构建',},{value: ':rocket: chore',name: '🚀 chore: 构建/工程依赖/工具',},{value: ':construction_worker: ci',name: '👷 CI 配置变更',},],scopes: [],scopeOverrides: {},// override the messages, defaults are as followsmessages: {type: '请选择提交类型(必填):',scope: '请输入文件修改范围(可选):',// used if allowCustomScopes is truecustomScope: '请输入文件修改范围(可选):',subject: '请简要描述提交(必填):\n',body: '请输入详细描述,使用 "|" 实现换行输入(可选):\n',breaking: '列出所有BREAKING CHANGES(可选):\n',footer: '请输入要关联的 YouTrack Issue ID,例如: #5, #30 (可选):\n',confirmCommit: '确定提交此说明吗?',},// 跳过空的 scopeskipEmptyScopes: false,skipQuestions: ['breaking', 'body'],// 设置为 true,在 scope 选择的时候,会有 empty 和 custom 可以选择// 顾名思义,选择 empty 表示 scope 缺省,如果选择 custom,则可以自己输入信息allowCustomScopes: true,// 只有我们 type 选择了 feat 或者是 fix,才会询问我们 breaking message.allowBreakingChanges: ['feat', 'fix'],}
package.json
"scripts": {// ..."commit": "git-cz"},"config": {"commitizen": {"path": "./node_modules/cz-customizable"},"cz-customizable": {"config": ".cz-config.cjs"}}
- 添加commit-msg钩子
会验证你输入的commit信息是否符合规范
npm husky add .husky/commit-msg 'npx --no -- commitlint --edit "$1"'
- 输入完后在
.husky文件下会出现commit-msg文件
lint-staged
- 安装lint-staged相关依赖
npm install lint-staged -D
- 在根目录新增文件
.lintstagedrc
{"*.{js,jsx,ts,tsx}": ["npm run lint:fix"],"*.{css,scss}": ["npm run stylelint:fix","git add"]}
- 或者
package.json下新增
"lint-staged": {"*.{js,jsx,ts,tsx}": ["npm run lint:fix"],"*.{css,scss}": ["npm run stylelint:fix","git add"]}
- 修改.husky/pre-commit文件
#!/usr/bin/env sh. "$(dirname -- "$0")/_/husky.sh"npx lint-staged
准备完毕
- 这时候可以使用
npm commit进行代码提交
Axios请求的二次封装
- 安装依赖
npm i axios
- 在
app文件夹中新建http文件夹,然后在http文件夹下新建request.js文件用于存放axios的二次封装
import axios from 'axios';// BASE_URLconst BASE_URL = 'https://strapi.wininfluencer.com/api';// 请求头 - Authorizationconst AUTHORIZATION ='Bearer 514be30c52acc904c0474108388b9f8b4c00c66f543d011ad3b9f8d2c0a98d2fe79faf517779c10876234c36f44ee374ffdefbe1c1e114278ba183f8a1d8b27f304bee80108d7934db81cd647419b1a8d14f400a706f6f233303745485bc5e403bf21a66d373c8db80db5f2bc48311f4f9c4d36b49dd37732916f75e84ae3c43';const service = axios.create({timeout: 60 * 1000,baseURL: BASE_URL,headers: {'Content-Type': 'application/json',Authorization: AUTHORIZATION,},});// axios实例拦截请求service.interceptors.request.use((config) => {// 这里可以对config请求体数据进行处理return config;},(error) => {// 排除错误return Promise.reject(error);},);// axios实例拦截响应service.interceptors.response.use((response) => {return response.data;},// 请求失败(error) => {return Promise.reject(error);},);// 此处相当于二次响应拦截// 为响应数据进行定制化处理const requestInstance = (config) => {return new Promise((resolve, reject) => {service.request(config).then(({data}) => {// 成功直接返回数据if (data.result === 'success') {resolve(data);} else {resolve(data);}}).catch((error) => {reject(error);});});};// GET请求export function get(url, parms, config = {}) {return requestInstance({url, method: 'GET', params: parms, ...config});}// POST请求export function post(url, data, config = {}) {return requestInstance({url, method: 'POST', data, ...config});}// PUT请求export function put(url, data, config = {}) {return requestInstance({url, method: 'PUT', data, ...config});}// DELETE请求export function del(url, data, config = {}) {return requestInstance({url, method: 'DELETE', data, ...config});}
- 在
http文件夹下新建homepage.js文件用于存放首页的一些请求
这里最好进行模块化 account collections blogs 分别创建不同的文件以更好的区分
import {get, post, put, del} from '~/http/request';/*** 定义接口示例* 遵循RESFUL API规范*/const services = {// GET请求getXxxXxx(params) {return get('/xxxx/xxxx', params, {});},// POST请求postXxxXxx(data) {return post('/xxxx/xxxx', data, {});},// PUT请求putXxxXxx(data) {return put('/xxxx/xxxx', data, { });},// DELETE请求delXxxXxx(data) {return del('/xxxx/xxxx', data, {});},};export default services;
- 使用:引用刚刚创建的
homepage.js文件
import {defer, redirect} from '@shopify/remix-oxygen';import httpHomepage from '~/http/homepage';export async function loader(args) {// 举例const dataResult = await httpHomepage.getXxxXxx({key: 'value'})return defer({dataResult})}export default function Homepage() {const data = useLoaderData();// 打印结果console.log('data====>', data.dataResult);return (<div className="home">{/* ...... */}</div>);}
Fetch 请求二次封装
- 在
app文件夹中新建http文件夹,然后在http文件夹下新建request.js文件用于存放axios的二次封装
// BASE_URLconst BASE_URL = 'https://strapi.wininfluencer.com/api';// 请求头 - Authorizationconst AUTHORIZATION ='Bearer 514be30c52acc904c0474108388b9f8b4c00c66f543d011ad3b9f8d2c0a98d2fe79faf517779c10876234c36f44ee374ffdefbe1c1e114278ba183f8a1d8b27f304bee80108d7934db81cd647419b1a8d14f400a706f6f233303745485bc5e403bf21a66d373c8db80db5f2bc48311f4f9c4d36b49dd37732916f75e84ae3c43';// 封装的Fetch请求函数export const customFetch = async ({ url, params, method, data, config }) => {const options = {method,body: data,headers: {'Content-Type': 'application/json',Authorization: AUTHORIZATION},...config};// 对GET请求的参数进行拼接处理if (method === 'GET' && params) {const urlSearchParams = new URLSearchParams(params);const queryString = urlSearchParams.toString(); // 输出 "a=xxx&b=yyy"// 兼容http开头的请求if (!(url.includes('http://') || url.includes('https://'))) {url = url + '?' + queryString;}}// 如果是POST请求,将数据转换成JSON字符串if (data) {options.body = JSON.stringify(data);}// 最终请求的urlconst fetchUrl = BASE_URL + url;return fetch(fetchUrl, options).then((response) => {if (!response.ok) {throw new Error(`${fetchUrl} HTTP error! Status: ${response.status}`);}return response.json();}).catch((error) => {console.error('Fetch error:', error);throw error;});};// GET请求export function get(url, params, config = {}) {return customFetch({ url, method: 'GET', params, config });}// POST请求export function post(url, data, config = {}) {return customFetch({ url, method: 'POST', data, config });}// PUT请求export function put(url, data, config = {}) {return customFetch({ url, method: 'PUT', data, config });}// DELETE请求export function del(url, data, config = {}) {return customFetch({ url, method: 'DELETE', data, config });}
- 在
http文件夹下新建homepage.js文件用于存放首页的一些请求
这里最好进行模块化 account collections blogs 分别创建不同的文件以更好的区分
import {get, post, put, del} from './request';/*** 定义接口示例* 遵循RESFUL API规范*/const services = {// GET请求getXxxXxx(params) {return get('/xxxx/xxxx', params, {});},// POST请求postXxxXxx(data) {return post('/xxxx/xxxx', data, {});},// PUT请求putXxxXxx(data) {return put('/xxxx/xxxx', data, { });},// DELETE请求delXxxXxx(data) {return del('/xxxx/xxxx', data, {});},};export default services;
- 使用:引用刚刚创建的
homepage.js文件
import {defer, redirect} from '@shopify/remix-oxygen';import httpHomepage from '~/http/homepage';export async function loader(args) {// 举例const dataResult = await httpHomepage.getXxxXxx({key: 'value'})return defer({dataResult})}export default function Homepage() {const data = useLoaderData();// 打印结果console.log('data====>', data.dataResult);return (<div className="home">{/* ...... */}</div>);}
README文档说明撰写规范

一、 项目说明
- 项目名:XXXX
- 简要说明:xxxxxxxxxxxxxxxx
二、关联文档
- PRD:
- 原型图:
- 设计图:
- 设计文档:
- 接口文档:
- 需求文档:
- gitee地址:
- shopify后台:
三、使用技术
3.1 主要技术栈
- Remix、React、TypeScript
3.2 使用到的第三方库
| 第三方库 | 版本 | 用途 |
|---|---|---|
| axios | 1.6.8 | 常用于发送 HTTP 请求和处理响应数据 |
| xxx | x.x.x | xxxxxxx |
四、开发步骤
4.1 环境准备
4.2 项目启动
五、 部署构建流程
5.1 分支说明
5.2 CI/CD说明
六、 其他说明
七、其他参考文档/链接
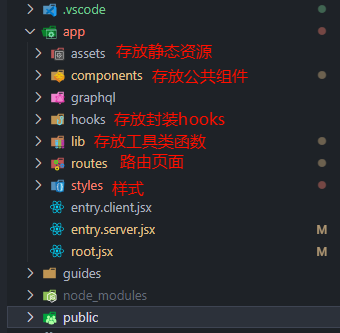
目录统一规范
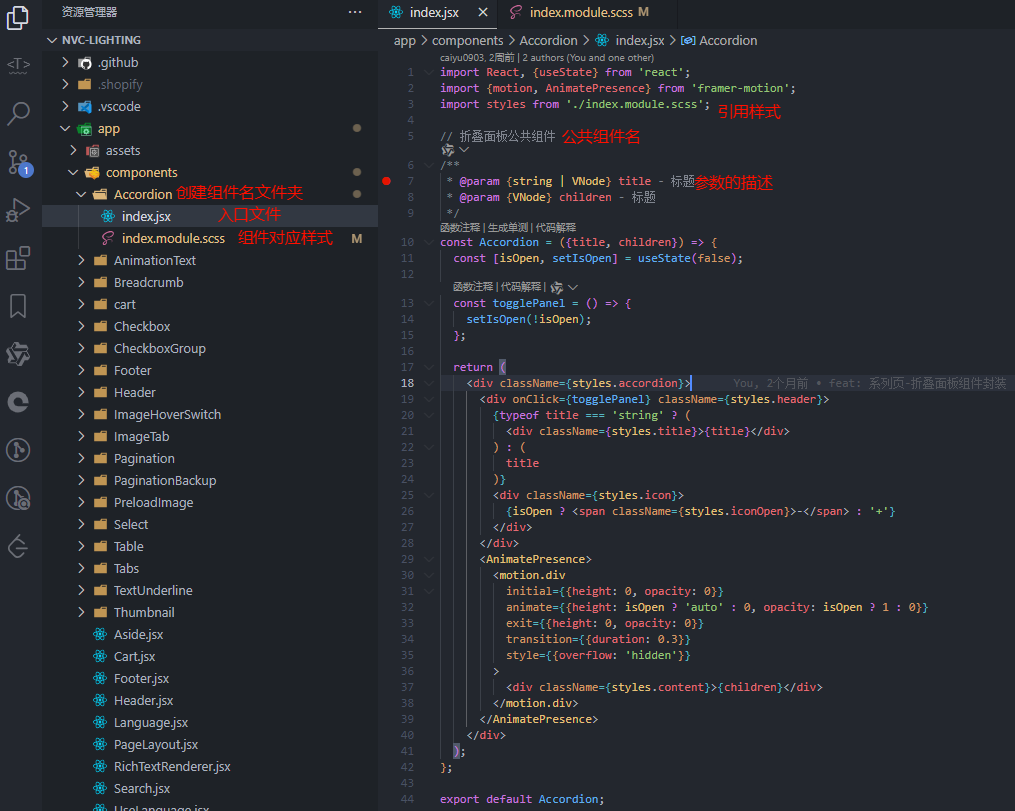
公共组件封装编写规范
参考资料

若有收获,就点个赞吧
0 人点赞
