Spring IoC容器管理的对象称为 Bean,其根据Spring配置文件中的信息创建。
Spring 配置文件支持两种格式:XML、Properties 文件格式。
- Properties 配置文件主要以 key-value 键值对的形式存在,只能赋值,不能进行其他操作,适用于简单的属性配置。
- XML 配置文件是树形结构,相对于 Properties 文件来说更加灵活。XML 配置文件结构清晰,但是内容比较繁琐,适用于大型复杂的项目。
一、简单例子
根元素是
如下:id属性定义了Bean,并使用class属性指定了Bean对应的类。
<?xml version="1.0" encoding="UTF-8"?><beans xmlns="http://www.springframework.org/schema/beans"xmlns:xsi="http://www.w3.org/2001/XMLSchema-instance"xsi:schemaLocation="http://www.springframework.org/schema/beanshttp://www.springframework.org/schema/beans/spring-beans-3.0.xsd"><bean id="helloWorld" class="com.cimon.HelloWorld"><property name="message" value="Hello World!" /></bean></beans>
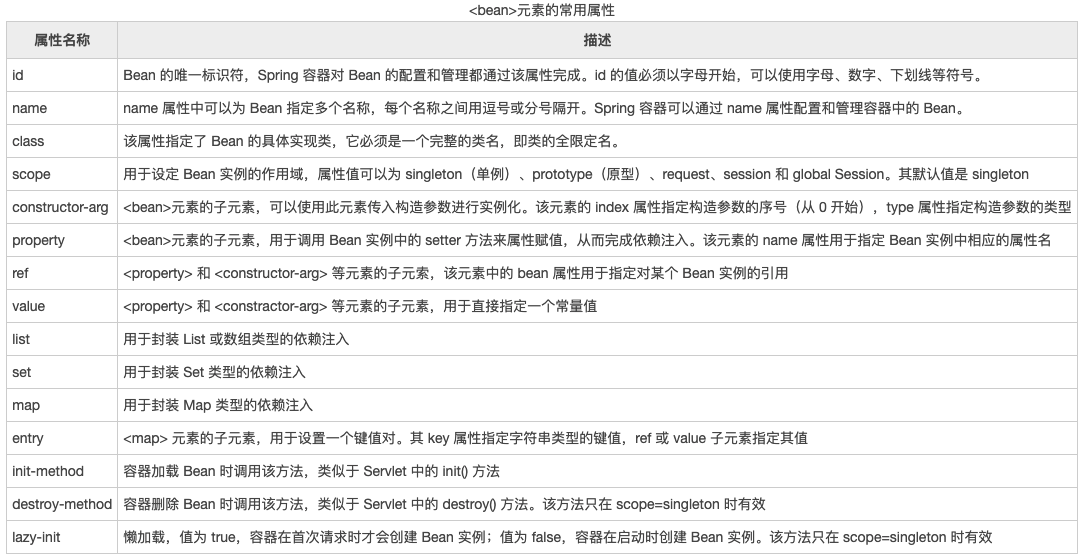
二、常见属性
三、Bean作用域
作用域种类
Spring 容器在初始化一个 Bean 实例时,同时会指定该实例的作用域。Spring 5 支持以下 6 种作用域。
1)singleton
单例模式,表示在 Spring 容器中只有一个 Bean 实例,Bean 以单例的方式存在。
是Spring容器默认的作用域。
<bean id="helloWorld" class="net.com.HelloWorld" scope="singleton"/>
2)prototype
原型模式,表示每次通过 Spring 容器获取 Bean 时,容器都会创建一个 Bean 实例。
3)request
每次 HTTP 请求,容器都会创建一个 Bean 实例。该作用域只在当前 HTTP Request 内有效。
4)session
同一个 HTTP Session 共享一个 Bean 实例,不同的 Session 使用不同的 Bean 实例。该作用域仅在当前 HTTP Session 内有效。
5)application
同一个 Web 应用共享一个 Bean 实例,该作用域在当前 ServletContext 内有效。
类似于 singleton,不同的是,singleton 表示每个 IoC 容器中仅有一个 Bean 实例,而同一个 Web 应用中可能会有多个 IoC 容器,但一个 Web 应用只会有一个 ServletContext,也可以说 application 才是 Web 应用中货真价实的单例模式。
6)websocket
websocket 的作用域是 WebSocket ,即在整个 WebSocket 中有效。
四、Bean生命周期
在传统的Java应用中,Bean的生命周期很简单,使用关键字new实例化Bean,当不需要该Bean时,由Java自动进行垃圾回收。
Spring中Bean的生命周期更复杂:Bean定义 -> Bean初始化 -> Bean 使用 -> Bean销毁。
Spring 根据 Bean 的作用域来选择管理方式。
singleton 作用域的 Bean,Spring 能够精确地知道该 Bean 何时被创建,何时初始化完成,以及何时被销毁;
prototype 作用域的 Bean,Spring 只负责创建,当容器创建了 Bean 的实例后,Bean 的实例就交给客户端代码管理,Spring 容器将不再跟踪其生命周期

Bean 生命周期的整个执行过程描述如下:
- Spring 启动,查找并加载需要被 Spring 管理的 Bean,并实例化 Bean。
- 利用依赖注入完成 Bean 中所有属性值的配置注入。
- 如果 Bean 实现了 BeanNameAware 接口,则 Spring 调用 Bean 的 setBeanName() 方法传入当前 Bean 的 id 值。
- 如果 Bean 实现了 BeanFactoryAware 接口,则 Spring 调用 setBeanFactory() 方法传入当前工厂实例的引用。
- 如果 Bean 实现了 ApplicationContextAware 接口,则 Spring 调用 setApplicationContext() 方法传入当前 ApplicationContext 实例的引用。
- 如果 Bean 实现了 BeanPostProcessor 接口,则 Spring 调用该接口的预初始化方法 postProcessBeforeInitialzation() 对 Bean 进行加工操作,此处非常重要,Spring 的 AOP 就是利用它实现的。
- 如果 Bean 实现了 InitializingBean 接口,则 Spring 将调用 afterPropertiesSet() 方法。
- 如果在配置文件中通过 init-method 属性指定了初始化方法,则调用该初始化方法。
- 如果 BeanPostProcessor和 Bean 关联,则 Spring 将调用该接口的初始化方法 postProcessAfterInitialization()。此时,Bean 已经可以被应用系统使用了。
- 如果在
中指定了该 Bean 的作用域为 singleton,则将该 Bean 放入 Spring IoC 的缓存池中,触发 Spring 对该 Bean 的生命周期管理;如果在 中指定了该 Bean 的作用域为 prototype,则将该 Bean 交给调用者,调用者管理该 Bean 的生命周期,Spring 不再管理该 Bean。 - 如果 Bean 实现了 DisposableBean 接口,则 Spring 会调用 destory() 方法销毁 Bean;如果在配置文件中通过 destory-method 属性指定了 Bean 的销毁方法,则 Spring 将调用该方法对 Bean 进行销毁。
Spring 为 Bean 提供了细致全面的生命周期过程,实现特定的接口或设置
了解 Spring 生命周期的意义就在于,可以利用 Bean 在其存活期间的指定时刻完成一些相关操作。一般情况下,会在 Bean 被初始化后和被销毁前执行一些相关操作。
Spring 官方提供了 3 种方法实现初始化回调和销毁回调:
- 实现 InitializingBean 和 DisposableBean 接口;
- 在 XML 中配置 init-method 和 destory-method;
- 使用 @PostConstruct 和 @PreDestory 注解。
初始化回调
1、使用接口
org.springframework.beans.factory.initializingBean 提供了一下方法:
void afterPropertiesSet() throws Exception
public class User implements InitializingBean {@Overridepublic void afterPropertiesSet() throws Exception {System.out.println("调用接口:InitializingBean,方法:afterPropertiesSet,无参数");}}
2、配置XML
通过init-method属性指定Bean初始化后执行的方法
<bean id="..." class="..." init-method="init"/>public class User {public void init() {System.out.println("调用init-method指定的初始化方法:init" );}}
3、使用注解
使用PostConstruct注解表明该方法为Bean初始化后的方法
public class ExampleBean {@PostConstructpublic void init() {System.out.println("@PostConstruct注解指定的初始化方法:init" );}}
销毁回调
1、使用接口,org.springframework.beans.factory.DisposableBean
2、配置XML,通过destroy-method 属性指定 Bean 销毁后执行的方法。
3、使用注解,使用 @PreDestory标明该方法为 Bean 销毁前执行的方法。
默认的初始化和销毁方法
如果多个 Bean 需要使用相同的初始化或者销毁方法,不用为每个 bean 声明初始化和销毁方法,可以使用 default-init-method 和 default-destroy-method 属性,如下所示。
<beans xmlns="http://www.springframework.org/schema/beans"xmlns:xsi="http://www.w3.org/2001/XMLSchema-instance"xsi:schemaLocation="http://www.springframework.org/schema/beanshttp://www.springframework.org/schema/beans/spring-beans-3.0.xsd"default-init-method="init"default-destroy-method="destroy"><bean id="..." class="...">...</bean></beans>
五、后置处理器
六、Bean继承
子 Bean 可以继承父 Bean 的配置数据,根据需要,子 Bean 可以重写值或添加其它值。
另外,Spring Bean 定义的继承与 Java 中的继承无关。可以将父 Bean 的定义作为一个模板,其它子 Bean 从父 Bean 中继承所需的配置。配置文件中通过 parent 属性来指定继承的父 Bean。
普通继承
<beans xmlns="http://www.springframework.org/schema/beans"xmlns:xsi="http://www.w3.org/2001/XMLSchema-instance"xsi:schemaLocation="http://www.springframework.org/schema/beans http://www.springframework.org/schema/beans/spring-beans.xsd"><bean id = "parentHelloWorld" class="springdemo.parentbean.ParentHelloWorld"><property name="message1" value = "hello"></property></bean><bean id = "subHelloWorld" class="springdemo.parentbean.SubHelloWorld" parent="parentHelloWorld"><property name="message2" value = "world"></property></bean></beans>
类之间通过配置,有属性继承
import lombok.Getter;import lombok.Setter;public class ParentHelloWorld {@Setter@Getterprivate String message1;}public class SubHelloWorld {@Getter@Setterprivate String message1;@Getter@Setterprivate String message2;}public class ParentBeanTestMain {public static void main(String args[]){ApplicationContext applicationContext = new ClassPathXmlApplicationContext("parentbean.xml");SubHelloWorld subHelloWorld = (SubHelloWorld)applicationContext.getBean("subHelloWorld");System.out.println(subHelloWorld.getMessage2());SubHelloWorld subHelloWorld2 = (SubHelloWorld)applicationContext.getBean("subHelloWorld");System.out.println(subHelloWorld2.getMessage2());}}
定义模板
创建一个 Bean 定义模板,该模板只能被继承,不能被实例化。创建 Bean 定义模板时,不用指定 class 属性,而是指定 abstarct=”true” 将该 Bean 定义为抽象 Bean。
<beans xmlns="http://www.springframework.org/schema/beans"xmlns:xsi="http://www.w3.org/2001/XMLSchema-instance"xsi:schemaLocation="http://www.springframework.org/schema/beans http://www.springframework.org/schema/beans/spring-beans.xsd"><bean id = "message" abstract="true"><property name="message1" value = "hello"></property></bean><bean id = "subHelloWorld2" class="springdemo.parentbean.SubHelloWorld" parent="message"><property name="message2" value = "world"></property></bean></beans>
参考

若有收获,就点个赞吧
0 人点赞
