概述
架构
(https://technologyconversations.files.wordpress.com/2015/09/etcd-registrator-confd2.png)
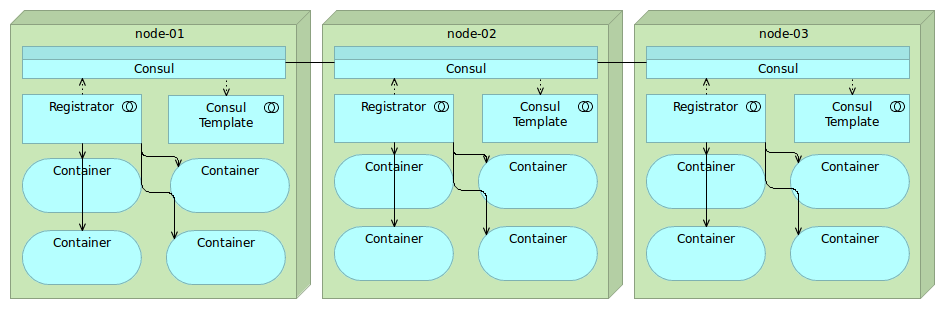
通过这张架构图,可以看出来使用Consul实现应用外服务注册和发现主要依靠三个重要的组件:
- Consul:注册中心的服务端,实现服务注册信息的存储,并提供注册和发现服务。
- Registrator:一个开源的第三方服务管理器项目,它通过监听服务部署的Docker实例是否存活,来负责服务提供者的注册和销毁。
Consul Template:定时从注册中心服务端获取最新的服务提供者节点列表并刷新LB配置(比如Nginx的upstream),这样服务消费者就通过访问Nginx就可以获取最新的服务提供者信息。
功能
服务发现 /service discovery:通过 DNS 或 HTTP 的方式获取服务信息。
- 健康检查/health checking:可以提供与给定服务相关联的任何数量的健康检查。防止服务转发到故障的服务上面
- 键值对存储 /key/value storage:存储动态配置。
多数据中心 multi-datacenter:无需复杂的配置,即可支持任意数量的区域。
优势:
使用 Raft 算法来保证一致性, 比复杂的 Paxos 算法更直接. 相比较而言, zookeeper 采用的是 Paxos, 而 etcd 使用的则是 Raft。
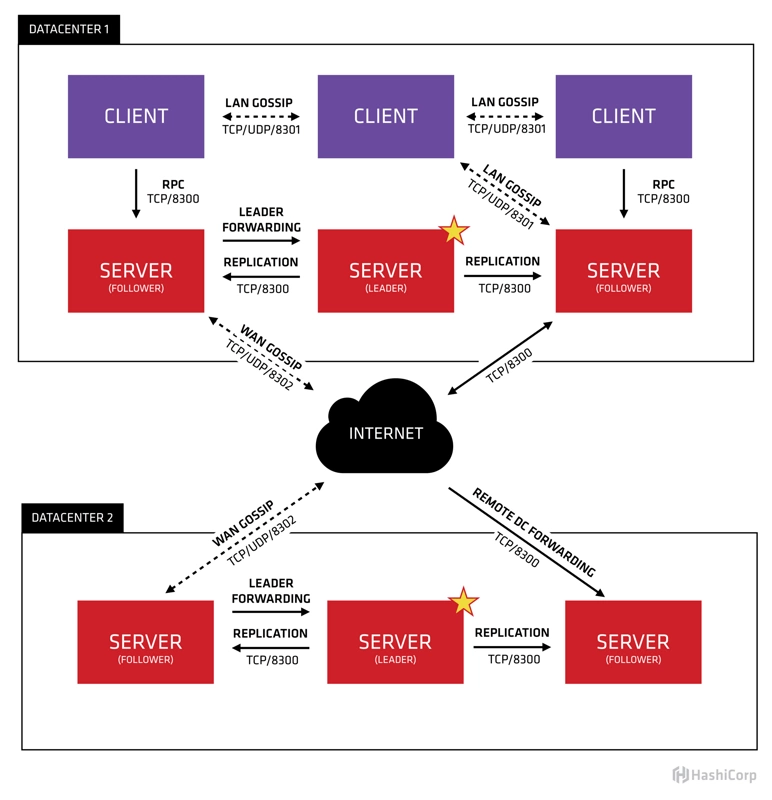
- 支持多数据中心,内外网的服务采用不同的端口进行监听。 多数据中心集群可以避免单数据中心的单点故障,而其部署则需要考虑网络延迟, 分片等情况等。 zookeeper 和 etcd 均不提供多数据中心功能的支持。
- 支持健康检查。 etcd 不提供此功能。
- 支持 http 和 dns 协议接口。 zookeeper 的集成较为复杂, etcd 只支持 http 协议。
-
角色
consu主要有server和client两种组件组成。每个数据中心官方建议需要3或5个server节点以保证数据安全,server只有一个实例是leader实例,就是主节点,主节点是自动选举产生的,主节点负责处理数据的写入处理,同时将数据同步至其他server节点。
client负责跟server通信,处理转发服务注册、服务发现请求到server节点,client还负责服务的健康检查,client节点也可以部署多个实例,甚至每个微服务节点都部署一个client实例。工作原理
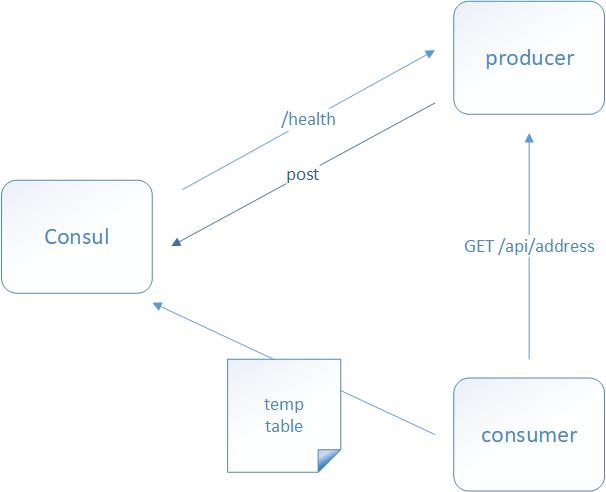
1、当 Producer 启动的时候,会向 Consul 发送一个 post 请求,告诉 Consul 自己的 IP 和 Port
- 2、Consul 接收到 Producer 的注册后,每隔10s(默认)会向 Producer 发送一个健康检查的请求,检验Producer是否健康
- 3、当 Consumer 发送 GET 方式请求 /api/address 到 Producer 时,会先从 Consul 中拿到一个存储服务 IP 和 Port 的临时表,从表中拿到 Producer 的 IP 和 Port 后再发送 GET 方式请求 /api/address
- 4、该临时表每隔10s会更新,只包含有通过了健康检查的 Producer
安装
二进制安装
下载地址https://www.consul.io/downloads.html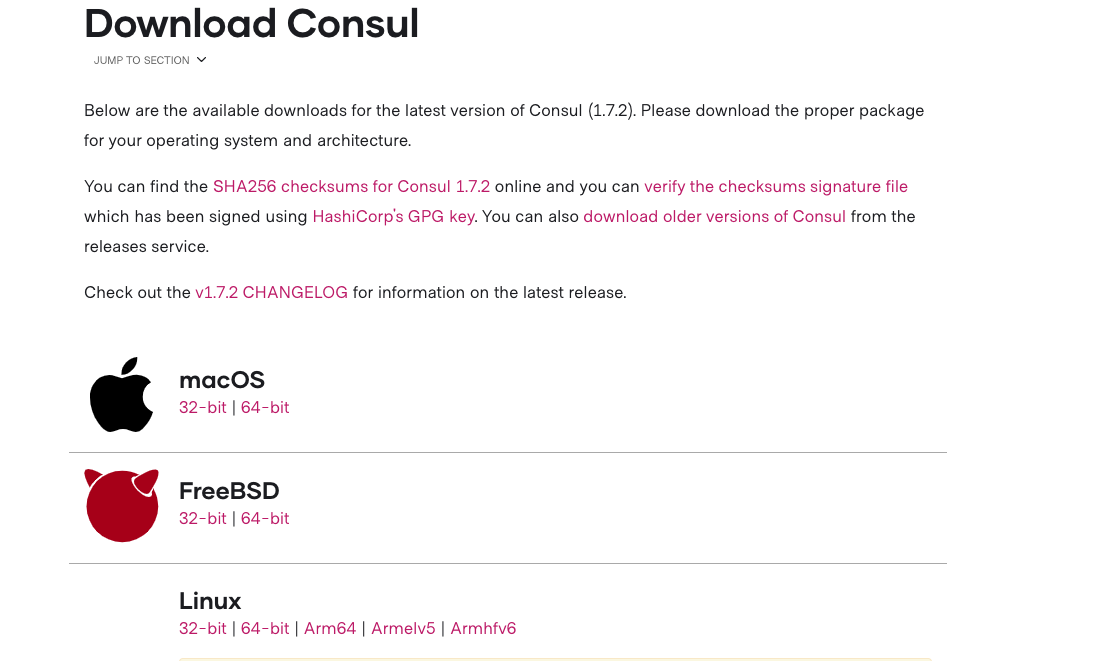
根据安装主机的系统版本和位数选择安装# wget https://releases.hashicorp.com/consul/1.6.1/consul_1.6.1_linux_amd64.zip# apt install unzip//没有unzip# unzip consul_1.6.1_linux_amd64.zip# cp ./consul /usr/local/bin/
查看安装版本
# consul versionConsul v1.6.1Protocol 2 spoken by default, understands 2 to 3 (agent will automatically use protocol >2 when speaking to compatible agents)
docker安装
$ sudo docker run --name consul1 -d -p 8500:8500 -p 8300:8300 -p 8301:8301 -p 8302:8302 -p 8600:8600 consul agent -server -bootstrap-expect 2 -ui -bind=0.0.0.0 -client=0.0.0.0
查看第一个server节点的ip地址(注意:这种方式下容器重启后ip可能会发生改变)
$ sudo docker inspect --format '{{ .NetworkSettings.IPAddress }}' consul1172.18.0.2
启动第二
$ sudo docker run --name consul2 -d -p 8501:8500 consul agent -server -bind=0.0.0.0 -client=0.0.0.0 -join 172.18.0.2db205eceabe9b5c6fc58c276d435ff2fa7d1cdcc2a59a5a27dd5ea6ccc35f92d
启动三
$ sudo docker run --name consul3 -d -p 8502:8500 consul agent -server -bind=0.0.0.0 -client=0.0.0.0 -join 172.18.0.2562f8530c242468cdfc4968057b0f11e85ae63f18e24ed8ba4e9e87d71499e71
指定 data 数据的创建方式
docker run -d --name consul-server1 --restart=always -v /home/docker/consul/consul-server1-data:/consul/data -v /home/docker/consul/consul-server1-conf:/consul/config consul agent -data-dir /consul/data -config-dir /consul/configdocker run -d --name consul-server2 --restart=always -v /home/docker/consul/consul-server2-data:/consul/data -v /home/docker/consul/consul-server2-conf:/consul/config consul agent -data-dir /consul/data -config-dir /consul/configdocker run -d --name consul-server3 --restart=always -v /home/docker/consul/consul-server3-data:/consul/data -v /home/docker/consul/consul-server3-conf:/consul/config consul agent -data-dir /consul/data -config-dir /consul/configdocker run -d --net=host --name consul-client --restart=always -p 8400:8400 -p 8500:8500 -p 8600:53/udp -v /home/docker/consul/consul-client-data:/consul/data -v /home/docker/consul/consul-client-conf:/consul/config consul agent -data-dir /consul/data -config-dir /consul/config
配置参数
官方参数说明地址:https://www.consul.io/docs/agent/options.html#command-line-options
-server:定义agent运行在server模式,每个数据中心的Server建议在3~5个避免失败情况下数据的丢失-client:定义agent运行在client模式bootstrap-expect:server模式下,集群要求的最低数量,当低于这个数量,集群失效-bootstrap-expect:在一个datacenter中期望提供的server节点数目,当该值提供的时候,consul一直等到达到指定sever数目的时候才会引导整个集群-bind:节点的ip地址一般是0.0.0.0或云服务内网地址,用于被集群中的其他节点所访问-node:指定节点在集群中的唯一名称,默认为机器的hostname-config-dir:配置文件目录,里面所有以.json结尾的文件都会被加载data-dir:data存放的目录,consul数据同步机制,(该目录必须已存在)- -serf-lan-bind绑定地址,用于内网集群通信,缺省使用 -bind 地址
- -serf-wan-bind绑定地址,用于跨机房通信,缺省使用 -bind 地址
- -advertise通告地址,通告给集群中其他节点,缺省使用 -bind 地址
- -advertise-wan通告地址,通告给其他机房的服务节点,缺省使用 -advertise 地址
- -join -retry-join加入集群的目标地址
- -join-wan -retry-join-wan跨机房邦联的目标地址
- -recursor上游DNS地址
开发模式
执行下面命令,启动开发模式,开发模式会快速启动一个单节点的Consul。但是需要注意的是开发模式不能数据持久化,因此,不能用于生产环境
# consul agent -dev==> Starting Consul agent...Version: 'v1.6.1'Node ID: '698f72ee-40fb-6676-18be-19ef509f4bdd'Node name: 'iZhp3f2wn461rak5gw97qmZ'Datacenter: 'dc1' (Segment: '<all>')Server: true (Bootstrap: false)Client Addr: [127.0.0.1] (HTTP: 8500, HTTPS: -1, gRPC: 8502, DNS: 8600)Cluster Addr: 127.0.0.1 (LAN: 8301, WAN: 8302)Encrypt: Gossip: false, TLS-Outgoing: false, TLS-Incoming: false, Auto-Encrypt-TLS: false
- Node name:代理的唯一名称,默认是机器的hostname,可以通过
-node标志自定义,例如:consul agent -dev -node myNode - Datacenter:数据中心,Consul支持多个数据中心,为了有效的工作,每个节点必须被配置且上报到数据中心,
-datacenter标志用来设置数据中心,对于单一的DC配置,这个代理默认为dc1 - Server:表示代理是以服务器还是客户端的模式来运行。
- Client Addr:用于代理的客户端接口地址。
- Cluster Addr:用于集群中的Consul代理之间通信的地址和端口集,改地址必须可供其它节点访问。
集群搭建
创建第一台设备
consul agent -server -bootstrap-expect 1 -data-dir /data/consul -node=n1 -bind=0.0.0.0 -ui -config-dir /etc/consul.d -client 0.0.0.0 ```goconsul agent -server -bootstrap-expect 1 -data-dir /data/consul -node=n1 -bind=0.0.0.0 -ui -config-dir /etc/consul.d -client 0.0.0.0
BootstrapExpect is set to 1; this is the same as Bootstrap mode. bootstrap = true: do not enable unless necessary ==> Starting Consul agent…Version: 'v1.6.1'Node ID: '6ca0b149-a98c-d316-e7a3-85350ab7ca96'Node name: 'n1'Datacenter: 'dc1' (Segment: '<all>')Server: true (Bootstrap: true)Client Addr: [0.0.0.0] (HTTP: 8500, HTTPS: -1, gRPC: -1, DNS: 8600)Cluster Addr: 172.21.16.7 (LAN: 8301, WAN: 8302)Encrypt: Gossip: false, TLS-Outgoing: false, TLS-Incoming: false, Auto-Encrypt-TLS: false
==> Log data will now stream in as it occurs:
2019/09/18 22:24:52 [INFO] raft: Initial configuration (index=56): [{Suffrage:Voter ID:6ca0b149-a98c-d316-e7a3-85350ab7ca96 Address:172.21.16.7:8300}]2019/09/18 22:24:52 [INFO] serf: EventMemberJoin: n1.dc1 172.21.16.72019/09/18 22:24:52 [INFO] serf: EventMemberJoin: n1 172.21.16.72019/09/18 22:24:52 [INFO] agent: Started DNS server 0.0.0.0:8600 (udp)2019/09/18 22:24:52 [INFO] raft: Node at 172.21.16.7:8300 [Follower] entering Follower state (Leader: "")2019/09/18 22:24:52 [WARN] serf: Failed to re-join any previously known node2019/09/18 22:24:52 [WARN] serf: Failed to re-join any previously known node2019/09/18 22:24:52 [INFO] consul: Adding LAN server n1 (Addr: tcp/172.21.16.7:8300) (DC: dc1)2019/09/18 22:24:52 [INFO] consul: Handled member-join event for server "n1.dc1" in area "wan"2019/09/18 22:24:52 [INFO] agent: Started DNS server 0.0.0.0:8600 (tcp)2019/09/18 22:24:52 [INFO] agent: Started HTTP server on [::]:8500 (tcp)2019/09/18 22:24:52 [INFO] agent: started state syncer
==> Consul agent running! 2019/09/18 22:24:59 [ERR] agent: failed to sync remote state: No cluster leader 2019/09/18 22:25:01 [WARN] raft: Heartbeat timeout from “” reached, starting election 2019/09/18 22:25:01 [INFO] raft: Node at 172.21.16.7:8300 [Candidate] entering Candidate state in term 7 2019/09/18 22:25:01 [INFO] raft: Election won. Tally: 1 2019/09/18 22:25:01 [INFO] raft: Node at 172.21.16.7:8300 [Leader] entering Leader state 2019/09/18 22:25:01 [INFO] consul: cluster leadership acquired 2019/09/18 22:25:01 [INFO] consul: New leader elected: n1 2019/09/18 22:25:03 [INFO] agent: Synced node info
加入机器创建数据和配置目录```shell$ sudo mkdir -p /data/consul$ sudo mkdir -p /etc/consul.d
前台启动
consul agent -server -bootstrap -ui -data-dir=/data/soft/consul_1.4/consul-data -bind=0.0.0.0 -client=0.0.0.0 -node=120.27.239.212consul agent -server -bind=192.168.xxx.134 -client=0.0.0.0 -bootstrap-expect=1 -data-dir=/usr/data/consul_data -node=server1
后台启动
nohup consul agent -server -bind=192.168.xxx.134 -client=0.0.0.0 -bootstrap-expect=1 -data-dir=/usr/data/consul_data -node=server1 > /dev/null 2>&1 &
多数据中心搭建
关键在于要在每个数据中心选择一个边界节点,并配好-advertise-wan=参数,
再执行consul join -wan $other_wlan_ip。
-node 为节点取名-bind 绑定的IP-advertise-wan 通告自己的IP(外网IP),consul agent -server -bootstrap-expect 1 -node=qcloud -bind=10.0.1.86 -advertise-wan=10.0.1.86 -data-dir /tmpconsul agent -server -bootstrap-expect 1 -node=aliyun -bind=10.0.1.87 -advertise-wan=10.0.1.87 -data-dir /tmpconsul agent -server -bootstrap-expect 1 -node=aws -bind=10.0.1.88 -advertise-wan=10.0.1.88 -data-dir /tmp
docker-compose
创建 vim docker-compose.yaml
version: '3'networks:consul_net:services:consul1:image: consul:latestcontainer_name: consul1restart: alwaysnetworks:- consul_netcommand: agent -server -client=0.0.0.0 -bootstrap-expect=3 -node=consul1consul2:image: consul:latestcontainer_name: consul2networks:- consul_netrestart: alwayscommand: agent -server -client=0.0.0.0 -retry-join=consul1 -node=consul2consul3:image: consul:latestcontainer_name: consul3networks:- consul_netrestart: alwayscommand: agent -server -client=0.0.0.0 -retry-join=consul1 -node=consul3consul4:image: consul:latestcontainer_name: consul4networks:- consul_netrestart: alwaysports:- 8500:8500command: agent -client=0.0.0.0 -retry-join=consul1 -ui -node=client1
执行命令 启动命令
docker-compose -f docker-compose.yaml up -d
查看结果
# docker psCONTAINER ID IMAGE COMMAND CREATED STATUS PORTS NAMESc8c8c9d6c1d2 consul:latest "docker-entrypoint.s…" 53 seconds ago Up 50 seconds 8300-8302/tcp, 8301-8302/udp, 8600/tcp, 8600/udp, 0.0.0.0:8500->8500/tcp consul469d2bfd8205f consul:latest "docker-entrypoint.s…" 53 seconds ago Up 49 seconds 8300-8302/tcp, 8500/tcp, 8301-8302/udp, 8600/tcp, 8600/udp consul1c554365d219f consul:latest "docker-entrypoint.s…" 53 seconds ago Up 51 seconds 8300-8302/tcp, 8500/tcp, 8301-8302/udp, 8600/tcp, 8600/udp consul2d01718f626f7 consul:latest "docker-entrypoint.s…" 53 seconds ago Up 51 seconds 8300-8302/tcp, 8500/tcp, 8301-8302/udp, 8600/tcp, 8600/udp consul3
操作命令
查看命令
consulUsage: consul [--version] [--help] <command> [<args>]Available commands are:acl Interact with Consul's ACLsagent Runs a Consul agentcatalog Interact with the catalogconfig Interact with Consul's Centralized Configurationsconnect Interact with Consul Connectdebug Records a debugging archive for operatorsevent Fire a new eventexec Executes a command on Consul nodesforce-leave Forces a member of the cluster to enter the "left" stateinfo Provides debugging information for operators.intention Interact with Connect service intentionsjoin Tell Consul agent to join clusterkeygen Generates a new encryption keykeyring Manages gossip layer encryption keyskv Interact with the key-value storeleave Gracefully leaves the Consul cluster and shuts downlock Execute a command holding a locklogin Login to Consul using an auth methodlogout Destroy a Consul token created with loginmaint Controls node or service maintenance modemembers Lists the members of a Consul clustermonitor Stream logs from a Consul agentoperator Provides cluster-level tools for Consul operatorsreload Triggers the agent to reload configuration filesrtt Estimates network round trip time between nodesservices Interact with servicessnapshot Saves, restores and inspects snapshots of Consul server statetls Builtin helpers for creating CAs and certificatesvalidate Validate config files/directoriesversion Prints the Consul versionwatch Watch for changes in Consul
在consul命令中,无论server还是client都叫做agent,通过命令参数区分,我们运行的是server还是client。
集群成员(Members)
# consul membersNode Address Status Type Build Protocol DC SegmentiZhp3f2wn461rak5gw97qmZ 127.0.0.1:8301 alive server 1.6.1 2 dc1 <all>
通过http方式查看
# curl localhost:8500/v1/catalog/nodes[{"ID": "a3343a5f-5290-4b53-1bdf-6b17c8ced3ac","Node": "JD","Address": "127.0.0.1","Datacenter": "dc1","TaggedAddresses": {"lan": "127.0.0.1","lan_ipv4": "127.0.0.1","wan": "127.0.0.1","wan_ipv4": "127.0.0.1"},"Meta": {"consul-network-segment": ""},"CreateIndex": 10,"ModifyIndex": 11}]
通过DNS 查看
# dig @127.0.0.1 -p 8600 JD.node.consul; <<>> DiG 9.11.3-1ubuntu1.8-Ubuntu <<>> @127.0.0.1 -p 8600 JD.node.consul; (1 server found);; global options: +cmd;; Got answer:;; ->>HEADER<<- opcode: QUERY, status: NOERROR, id: 35600;; flags: qr aa rd; QUERY: 1, ANSWER: 1, AUTHORITY: 0, ADDITIONAL: 2;; WARNING: recursion requested but not available;; OPT PSEUDOSECTION:; EDNS: version: 0, flags:; udp: 4096;; QUESTION SECTION:;JD.node.consul. IN A;; ANSWER SECTION:JD.node.consul. 0 IN A 127.0.0.1;; ADDITIONAL SECTION:JD.node.consul. 0 IN TXT "consul-network-segment=";; Query time: 0 msec;; SERVER: 127.0.0.1#8600(127.0.0.1);; WHEN: Fri Mar 20 14:22:00 CST 2020;; MSG SIZE rcvd: 95
停止服务
$ consul leaveGraceful leave complete
历史日志
consul monitor显示最近历史日志,默认显示的日志级别为info可以根据-log-level进行设置
-log-level: debug,还有"debug","info", "warn", "error"
服务注册
创建目录,默认推荐目录文件名称是consul.d
# mkdir /etc/consul.dcd /etc/consul.d
注册服务
/etc/consul.d# echo '{"service":> {"name": "web",> "tags": ["rails"],> "port": 80> }> }' > ./consul.d/web.json-bash: ./consul.d/web.json: No such file or directoryroot@JD:/etc/consul.d# echo '{"service":{"name": "web","tags": ["rails"],"port": 80}}' > web.json
在配置中启用脚本检查可能会引入远程执行漏洞,这是已知的恶意软件的目标。在生产环境中,我们强烈建议使用-enable-local-script-check。重新启动服务
# consul agent -dev -enable-script-checks -config-dir=/etc/consul.d
通过dns 查看服务
# dig @127.0.0.1 -p 8600 web.service.consul; <<>> DiG 9.11.3-1ubuntu1.8-Ubuntu <<>> @127.0.0.1 -p 8600 web.service.consul; (1 server found);; global options: +cmd;; Got answer:;; ->>HEADER<<- opcode: QUERY, status: NOERROR, id: 31116;; flags: qr aa rd; QUERY: 1, ANSWER: 1, AUTHORITY: 0, ADDITIONAL: 1;; WARNING: recursion requested but not available;; OPT PSEUDOSECTION:; EDNS: version: 0, flags:; udp: 4096;; QUESTION SECTION:;web.service.consul. IN A;; ANSWER SECTION:web.service.consul. 0 IN A 127.0.0.1;; Query time: 0 msec;; SERVER: 127.0.0.1#8600(127.0.0.1);; WHEN: Fri Mar 20 14:37:46 CST 2020;; MSG SIZE rcvd: 63
http 查看服务
$ curl http://localhost:8500/v1/catalog/service/web
查看所有可用的服务
curl 'http://localhost:8500/v1/health/service/web?passing'
重新刷新注册信息
$ consul reloadConfiguration reload triggered
查看新服务
# dig @127.0.0.1 -p 8600 web.service.consul; <<>> DiG 9.11.3-1ubuntu1.8-Ubuntu <<>> @127.0.0.1 -p 8600 web.service.consul; (1 server found);; global options: +cmd;; Got answer:;; ->>HEADER<<- opcode: QUERY, status: NOERROR, id: 20451;; flags: qr aa rd; QUERY: 1, ANSWER: 1, AUTHORITY: 0, ADDITIONAL: 1;; WARNING: recursion requested but not available;; OPT PSEUDOSECTION:; EDNS: version: 0, flags:; udp: 4096;; QUESTION SECTION:;web.service.consul. IN A;; ANSWER SECTION:web.service.consul. 0 IN A 127.0.0.1;; Query time: 0 msec;; SERVER: 127.0.0.1#8600(127.0.0.1);; WHEN: Fri Mar 20 14:47:50 CST 2020;; MSG SIZE rcvd: 63
数据存储
存储
$ consul kv put redis/config/minconns 1Success! Data written to: redis/config/minconns$ consul kv put redis/config/maxconns 25Success! Data written to: redis/config/maxconns$ consul kv put -flags=42 redis/config/users/admin abcd1234Success! Data written to: redis/config/users/admin
获取数据
# consul kv get -detailed redis/config/users/adminCreateIndex 164Flags 42Key redis/config/users/adminLockIndex 0ModifyIndex 164Session -Value abcd1234
获取所有的数据
# consul kv get -recurseredis/config/maxconns:25redis/config/minconns:1redis/config/users/admin:abcd1234
删除数据
# consul kv delete redis/config/minconnsSuccess! Deleted key: redis/config/minconns
删除所有已redis前缀的数据
# consul kv delete -recurse redisSuccess! Deleted keys with prefix: redis
修改数据
# consul kv put foo barSuccess! Data written to: foo# consul kv get foobar# consul kv put foo zipSuccess! Data written to: foo# consul kv get foozip
UI
参考
https://learn.hashicorp.com/consul/getting-started/install
https://www.jianshu.com/p/067154800683
consul 整合多个数据节点
https://book-consul-guide.vnzmi.com/
使用Consul做服务发现的若干姿势
http://lhyd.top/?p=139151

若有收获,就点个赞吧
0 人点赞
