- 环境
- 配置检查
- 使用过命令记录
- 踩坑记录
- kubeadm init 及 join等操作必须以root身份
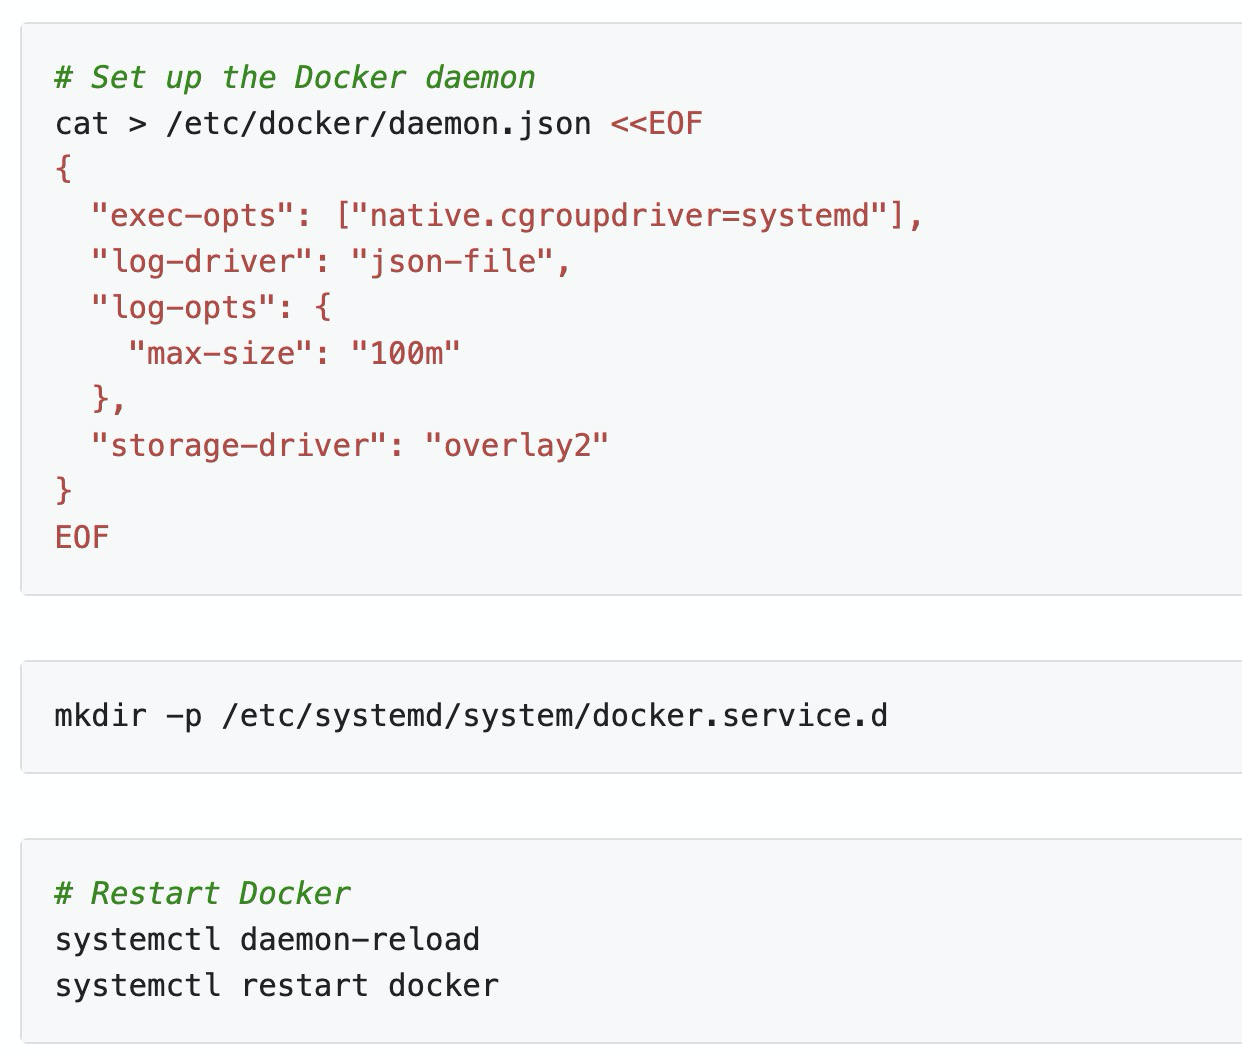
- docker服务的配置文件写错导致启动不了
- 交换分区关闭了又启动开了,导致集群起不来
- 非root用户操作docker权限问题
- coredns CrashLoopBackOff
- 镜像问题
- kube-system:default用户创建资源权限问题
- WARNING: kubeadm cannot validate component configs for API groups [kubelet.config.k8s.io kubeproxy.config.k8s.io]
- [WARNING IsDockerSystemdCheck]: detected “cgroupfs” as the Docker cgroup driver. The recommended driver is “systemd”.
- 利用 iptables 打开端口
- K8s - 重新生成token以及hash值(解决令牌过期的问题)
- /etc/resolv.conf 配置的域名服务是本地IP
- https://raw.githubusercontent.com/.../kube-flannel.yml 命令失败">DNS解析问题: kubectl apply -f https://raw.githubusercontent.com/.../kube-flannel.yml 命令失败
- 安装网络插件 Flannel 时,从 1.17 开始 rbac.authorization.k8s.io/v1beta1 的接口已经是 GA 阶段了,应该直接v1
- 安装 Flannel 失败,错误日志提示 Error registering network: failed to acquire lease: node “vb-n2” pod cidr not assigned
- 类似教程
环境
本机
虚拟机
数量
Master
内存:6G
处理器:2核

Node-1/2
内存
处理器
IP

安装前的负载

配置检查
禁用交换分区
执行 sudo swapoff -a
总结
三台机器
192.168.43.236
192.168.43.215
192.168.43.126
确认是否连通
ping
安装Docker
sudo apt-get update && sudo apt-get install -y \apt-transport-https ca-certificates curl software-properties-common gnupg2# 换成国内镜像源curl -fsSL https://mirrors.ustc.edu.cn/docker-ce/linux/raspbian/gpg | sudo apt-key add -
{"exec-opts": ["native.cgroupdriver=systemd"],"log-driver": "json-file","log-opts": {"max-size": "100m"},"storage-driver": "overlay2","registry-mirrors": ["https://hub-mirror.c.163.com","https://mirror.baidubce.com"]}
sudo systemctl daemon-reload \&& sudo systemctl restart docker
安装kubeadm kubelet
默认安装最新
apt-get update && apt-get install -y apt-transport-httpscurl -s https://mirrors.aliyun.com/kubernetes/apt/doc/apt-key.gpg | sudo apt-key add -cat <<EOF >/etc/apt/sources.list.d/kubernetes.listdeb https://mirrors.aliyun.com/kubernetes/apt/ kubernetes-xenial mainEOFapt-get update && apt-get install -y kubelet kubeadm kubectl
安装指定版本
sudo apt-get install kubeadm=1.18.8-00 kubelet=1.18.8-00 kubectl=1.18.8-00
内核配置
相关服务设置开机
操作前的 kubeadm配置
镜像
registry.cn-hangzhou.aliyuncs.com/google_containers
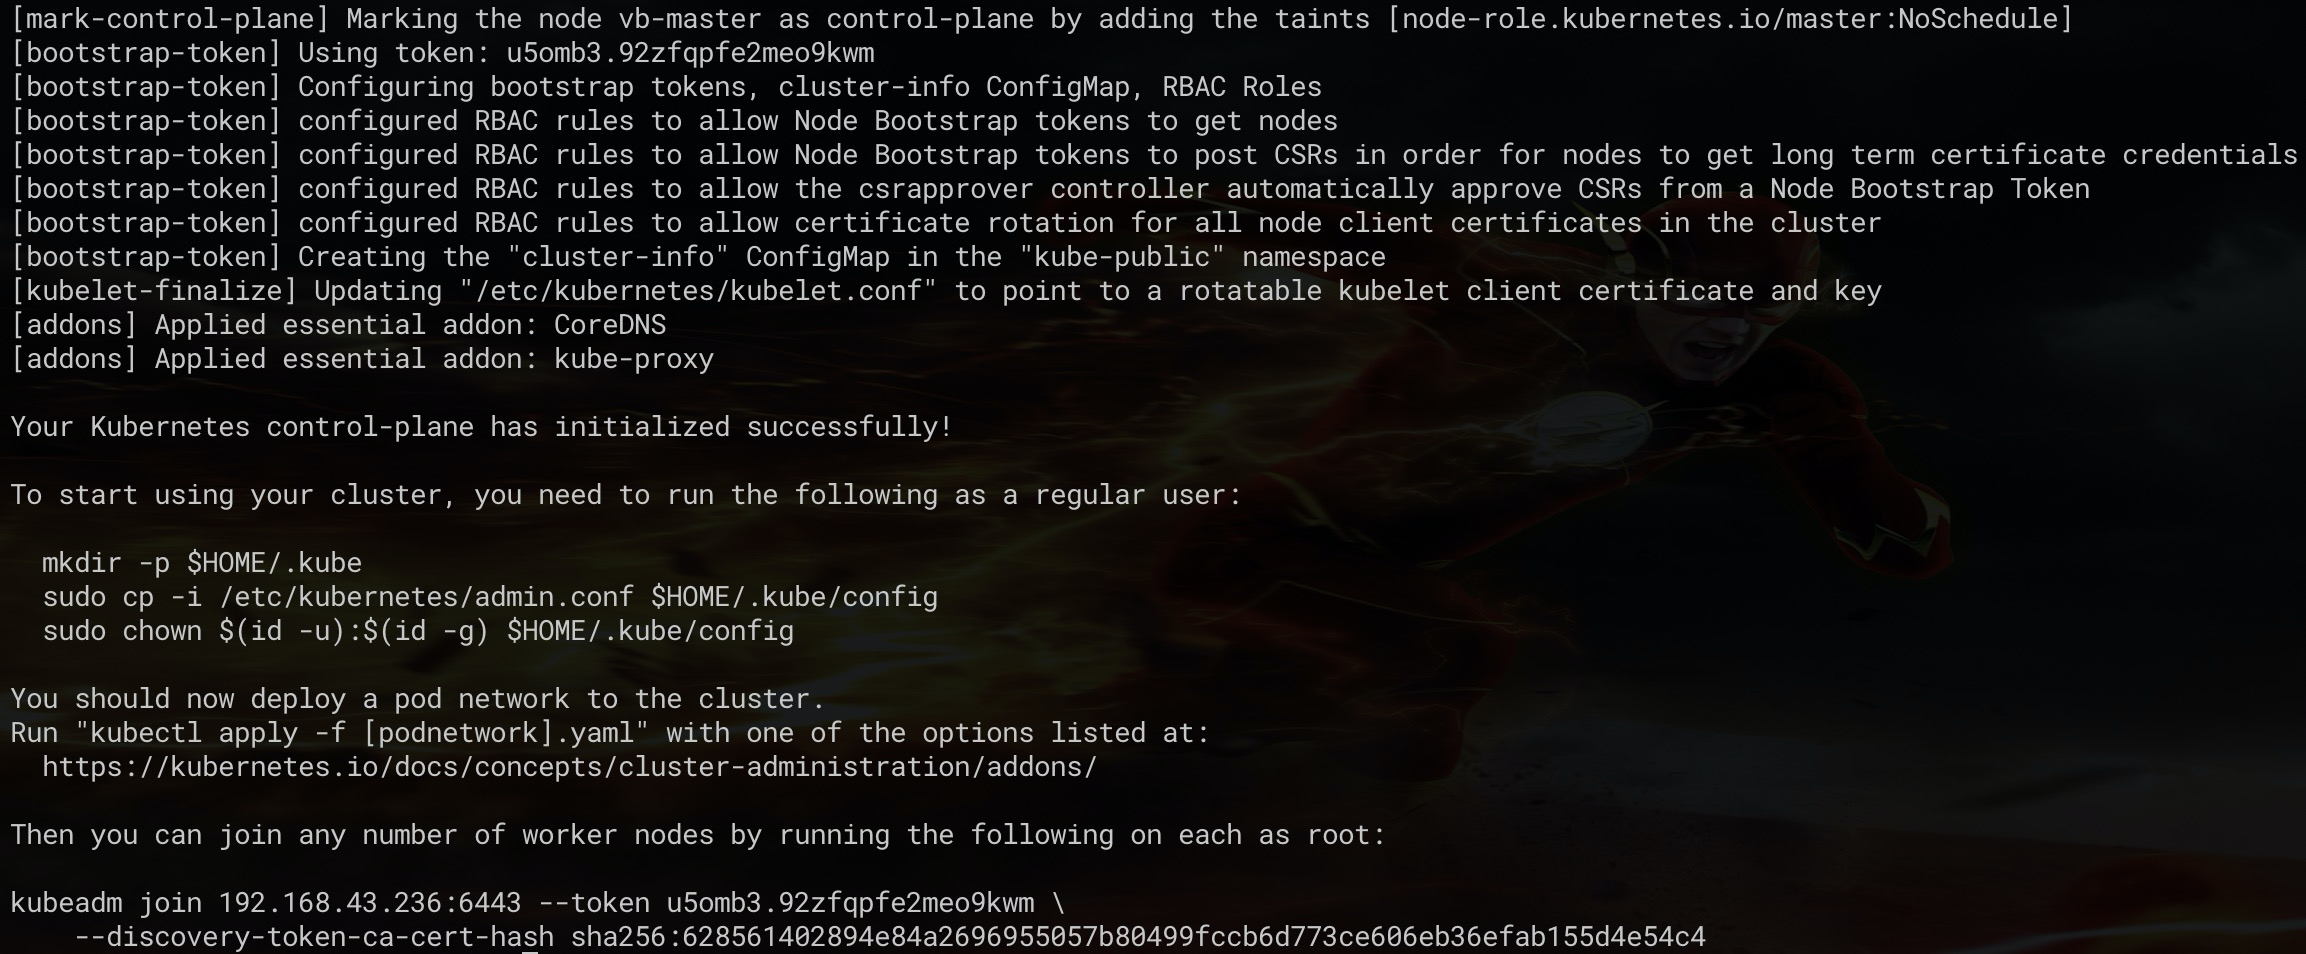
root@vb-master:/home/baiyutang# kubeadm init —config=init-config.yaml W0810 18:03:57.186948 8245 configset.go:202] WARNING: kubeadm cannot validate component configs for API groups [kubelet.config.k8s.io kubeproxy.config.k8s.io] [init] Using Kubernetes version: v1.18.0 [preflight] Running pre-flight checks [preflight] Pulling images required for setting up a Kubernetes cluster [preflight] This might take a minute or two, depending on the speed of your internet connection [preflight] You can also perform this action in beforehand using ‘kubeadm config images pull’ [kubelet-start] Writing kubelet environment file with flags to file “/var/lib/kubelet/kubeadm-flags.env” [kubelet-start] Writing kubelet configuration to file “/var/lib/kubelet/config.yaml” [kubelet-start] Starting the kubelet [certs] Using certificateDir folder “/etc/kubernetes/pki” [certs] Generating “ca” certificate and key [certs] Generating “apiserver” certificate and key [certs] apiserver serving cert is signed for DNS names [vb-master kubernetes kubernetes.default kubernetes.default.svc kubernetes.default.svc.cluster.local] and IPs [10.96.0.1 192.168.43.236] [certs] Generating “apiserver-kubelet-client” certificate and key [certs] Generating “front-proxy-ca” certificate and key [certs] Generating “front-proxy-client” certificate and key [certs] Generating “etcd/ca” certificate and key [certs] Generating “etcd/server” certificate and key [certs] etcd/server serving cert is signed for DNS names [vb-master localhost] and IPs [192.168.43.236 127.0.0.1 ::1] [certs] Generating “etcd/peer” certificate and key [certs] etcd/peer serving cert is signed for DNS names [vb-master localhost] and IPs [192.168.43.236 127.0.0.1 ::1] [certs] Generating “etcd/healthcheck-client” certificate and key [certs] Generating “apiserver-etcd-client” certificate and key [certs] Generating “sa” key and public key [kubeconfig] Using kubeconfig folder “/etc/kubernetes” [kubeconfig] Writing “admin.conf” kubeconfig file [kubeconfig] Writing “kubelet.conf” kubeconfig file [kubeconfig] Writing “controller-manager.conf” kubeconfig file [kubeconfig] Writing “scheduler.conf” kubeconfig file [control-plane] Using manifest folder “/etc/kubernetes/manifests” [control-plane] Creating static Pod manifest for “kube-apiserver” [control-plane] Creating static Pod manifest for “kube-controller-manager” W0810 18:04:01.684242 8245 manifests.go:225] the default kube-apiserver authorization-mode is “Node,RBAC”; using “Node,RBAC” [control-plane] Creating static Pod manifest for “kube-scheduler” W0810 18:04:01.685425 8245 manifests.go:225] the default kube-apiserver authorization-mode is “Node,RBAC”; using “Node,RBAC” [etcd] Creating static Pod manifest for local etcd in “/etc/kubernetes/manifests” [wait-control-plane] Waiting for the kubelet to boot up the control plane as static Pods from directory “/etc/kubernetes/manifests”. This can take up to 4m0s [apiclient] All control plane components are healthy after 21.005980 seconds [upload-config] Storing the configuration used in ConfigMap “kubeadm-config” in the “kube-system” Namespace [kubelet] Creating a ConfigMap “kubelet-config-1.18” in namespace kube-system with the configuration for the kubelets in the cluster [upload-certs] Skipping phase. Please see —upload-certs [mark-control-plane] Marking the node vb-master as control-plane by adding the label “node-role.kubernetes.io/master=’’” [mark-control-plane] Marking the node vb-master as control-plane by adding the taints [node-role.kubernetes.io/master:NoSchedule] [bootstrap-token] Using token: u5omb3.92zfqpfe2meo9kwm [bootstrap-token] Configuring bootstrap tokens, cluster-info ConfigMap, RBAC Roles [bootstrap-token] configured RBAC rules to allow Node Bootstrap tokens to get nodes [bootstrap-token] configured RBAC rules to allow Node Bootstrap tokens to post CSRs in order for nodes to get long term certificate credentials [bootstrap-token] configured RBAC rules to allow the csrapprover controller automatically approve CSRs from a Node Bootstrap Token [bootstrap-token] configured RBAC rules to allow certificate rotation for all node client certificates in the cluster [bootstrap-token] Creating the “cluster-info” ConfigMap in the “kube-public” namespace [kubelet-finalize] Updating “/etc/kubernetes/kubelet.conf” to point to a rotatable kubelet client certificate and key
[addons] Applied essential addon: CoreDNS
[addons] Applied essential addon: kube-proxy
Your Kubernetes control-plane has initialized successfully!
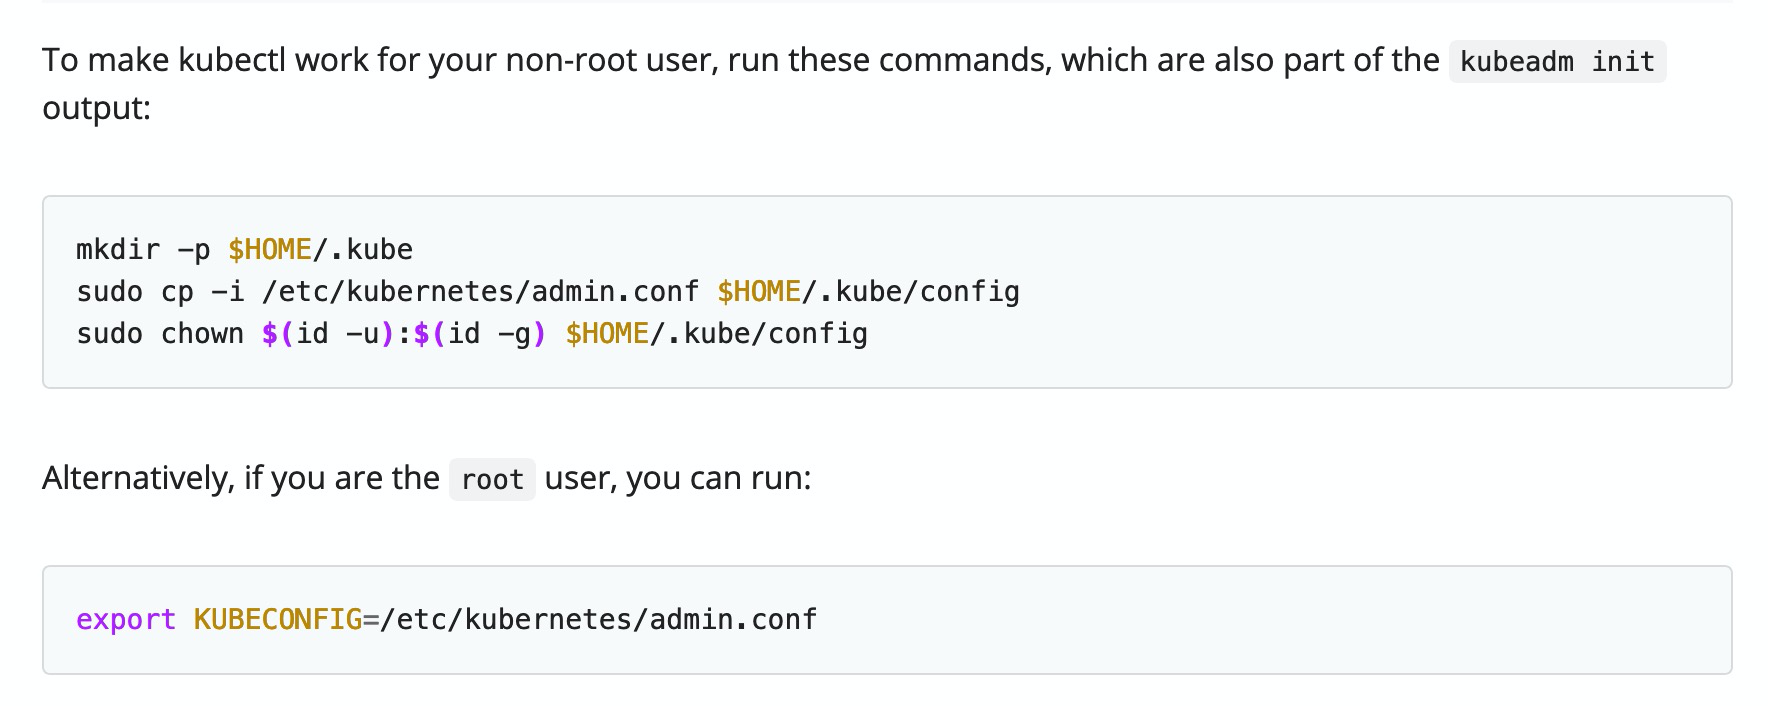
To start using your cluster, you need to run the following as a regular user:
mkdir -p $HOME/.kube
sudo cp -i /etc/kubernetes/admin.conf $HOME/.kube/config
sudo chown $(id -u):$(id -g) $HOME/.kube/config
You should now deploy a pod network to the cluster.
Run “kubectl apply -f [podnetwork].yaml” with one of the options listed at:
https://kubernetes.io/docs/concepts/cluster-administration/addons/
Then you can join any number of worker nodes by running the following on each as root:
kubeadm join 192.168.43.236:6443 —token u5omb3.92zfqpfe2meo9kwm \
—discovery-token-ca-cert-hash sha256:628561402894e84a2696955057b80499fccb6d773ce606eb36efab155d4e54c4
网络插件
kubectl apply -f "https://cloud.weave.works/k8s/net?k8s-version=$(kubectl version | base64 | tr -d '\n')"
使用过命令记录
查看初始化集群默认配置
kubeadm config print init-defaults [flags]
踩坑记录
kubeadm init 及 join等操作必须以root身份
error execution phase preflight: [preflight] Some fatal errors occurred:
[ERROR IsPrivilegedUser]: user is not running as root
[preflight] If you know what you are doing, you can make a check non-fatal with --ignore-preflight-errors=...
拷贝配置文件到 用户目录下
docker服务的配置文件写错导致启动不了
文件 /etc/docker/daemon.json
仓库中心镜像地址有一个没有加https写成了registry.aliyuncs.com
“registry-mirrors”: [
“https://hub-mirror.c.163.com“,
“https://mirror.baidubce.com“,
“https://registry.aliyuncs.com“
]
交换分区关闭了又启动开了,导致集群起不来
swapoff -a 关闭了。只针对当前有效,重启后,还是会加载,
要删除对交换分区的配置加载,删除 /etc/fstab 文件中关于 swap was on /dev/sda5 during installation 下面的配置
可以用命令 swapon -v 查看是否存在交换分区
非root用户操作docker权限问题
这个问题也可以参考 Docker Docs:Manage Docker as a non-root user 的官方解释。
coredns CrashLoopBackOff
报错日志
文档说明及解决办法
https://coredns.io/plugins/loop/#troubleshooting
镜像问题
将镜像中的 k8s.gcr.io 或 gcr.io/google-containers 替换为 registry.aliyuncs.com/google_containers 或 googlecontainersmirror,例如:
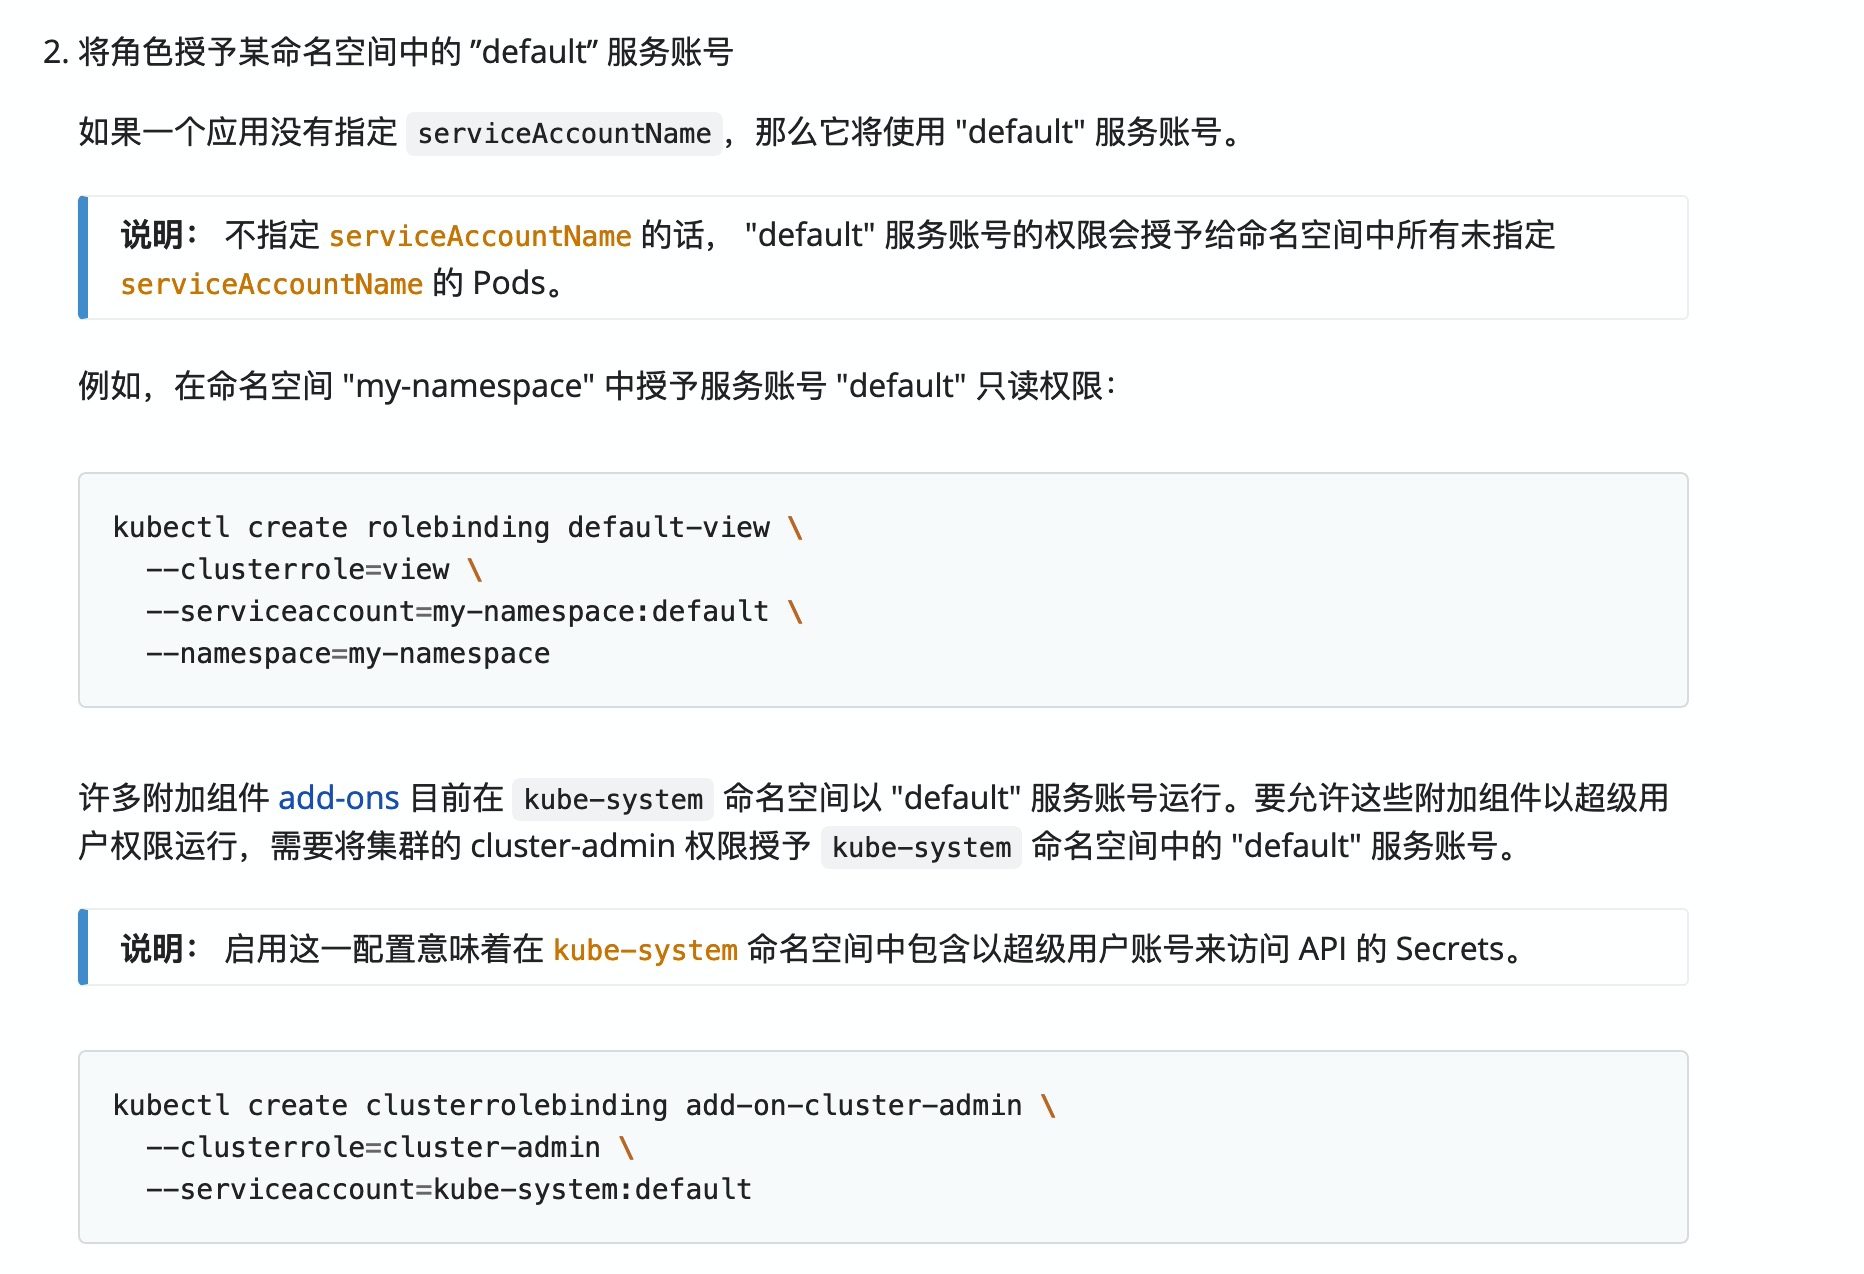
kube-system:default用户创建资源权限问题
类似:
User “system:serviceaccount:kube-system:default” cannot create resource “events” in API group “” in the namespace “default”‘ (will not retry!)
no service with name kube-system/default-http-backend found: services “default-http-backend” is forbidden: User “system:serviceaccount:kube-system:default” cannot get resource “services” in API group “” in the namespace “kube-system”
WARNING: kubeadm cannot validate component configs for API groups [kubelet.config.k8s.io kubeproxy.config.k8s.io]
[WARNING IsDockerSystemdCheck]: detected “cgroupfs” as the Docker cgroup driver. The recommended driver is “systemd”.
Please follow the guide at https://kubernetes.io/docs/setup/cri/
利用 iptables 打开端口
If you run a firewall, you may need to temporarily open this port. As
this is potentially dangerous it’s not done automatically. You can
open the port with e.g.:iptables -I INPUT -p tcp --dport 1022 -j ACCEPT
K8s - 重新生成token以及hash值(解决令牌过期的问题)
kubeadm token listkubeadm token create# 加入集群除了需要 token 外,还需要 Master 节点的 ca 证书 sha256 编码 hash 值,这个可以通过如下命令获取:openssl x509 -pubkey -in /etc/kubernetes/pki/ca.crt | openssl rsa -pubin -outform der 2>/dev/null | openssl dgst -sha256 -hex | sed 's/^.* //'
/etc/resolv.conf 配置的域名服务是本地IP
# Dynamic resolv.conf(5) file for glibc resolver(3) generated by resolvconf(8)# DO NOT EDIT THIS FILE BY HAND -- YOUR CHANGES WILL BE OVERWRITTEN# 127.0.0.53 is the systemd-resolved stub resolver.# run "systemd-resolve --status" to see details about the actual nameservers.nameserver 127.0.0.53
DNS解析问题: kubectl apply -f https://raw.githubusercontent.com/.../kube-flannel.yml 命令失败
当 curl wget 获取的时候也失败,但是其他文件是正常的
类似
curl https://raw.githubusercontent.com/coreos/flannel/master/Documentation/kube-flannel.yml curl: (7) Failed to connect to raw.githubusercontent.com port 443: Connection refused
有网友分享是因为github的域名解析被污染了,修改 hosts 文件,参考 https://github.com/hawtim/blog/issues/10
199.232.68.133 raw.githubusercontent.com199.232.68.133 user-images.githubusercontent.com199.232.68.133 avatars2.githubusercontent.com199.232.68.133 avatars1.githubusercontent.com
还有一些 类似域名解析到本地 ,比如当执行 nslookup xxx.com 时,走的是 127.0.0.0#53 类似这样, 可以看看文件 /etc/resolv.conf 或者 目录 /etc/resolvconf/resolv.conf.d 等处排查,也要留意 dnsmasq 软件的配置 /etc/dnsmasq.conf
安装网络插件 Flannel 时,从 1.17 开始 rbac.authorization.k8s.io/v1beta1 的接口已经是 GA 阶段了,应该直接v1
比如,执行这个命令时,会给出提示 v1beta1 接口 在 v1.22 之后就会不可用
$ kubectl apply -f https://raw.githubusercontent.com/coreos/flannel/master/Documentation/kube-flannel.yml
podsecuritypolicy.policy/psp.flannel.unprivileged created
Warning: rbac.authorization.k8s.io/v1beta1 ClusterRole is deprecated in v1.17+, unavailable in v1.22+; use rbac.authorization.k8s.io/v1 ClusterRole
clusterrole.rbac.authorization.k8s.io/flannel created
Warning: rbac.authorization.k8s.io/v1beta1 ClusterRoleBinding is deprecated in v1.17+, unavailable in v1.22+; use rbac.authorization.k8s.io/v1 ClusterRoleBinding
clusterrolebinding.rbac.authorization.k8s.io/flannel created
serviceaccount/flannel created
configmap/kube-flannel-cfg created
daemonset.apps/kube-flannel-ds-amd64 created
daemonset.apps/kube-flannel-ds-arm64 created
daemonset.apps/kube-flannel-ds-arm created
daemonset.apps/kube-flannel-ds-ppc64le created
daemonset.apps/kube-flannel-ds-s390x created
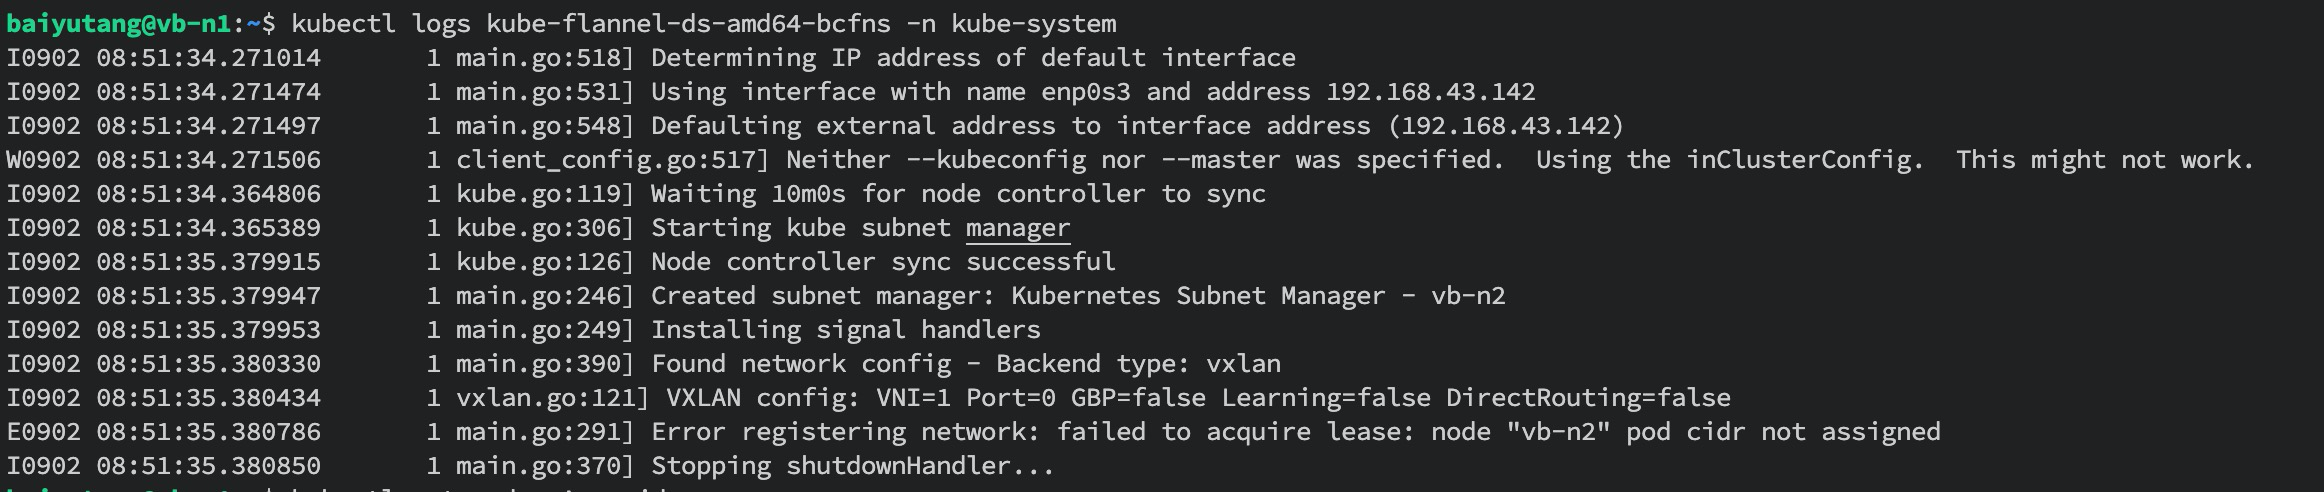
安装 Flannel 失败,错误日志提示 Error registering network: failed to acquire lease: node “vb-n2” pod cidr not assigned

参考资料说 集群定义的IP段 和 Flannel 定义的 地址段 可能有冲突,或者集群IP段未定义 https://www.cnblogs.com/caibao666/p/11664726.html
解决方案就是修改一致即可
同时,官方文档也有说明,如下
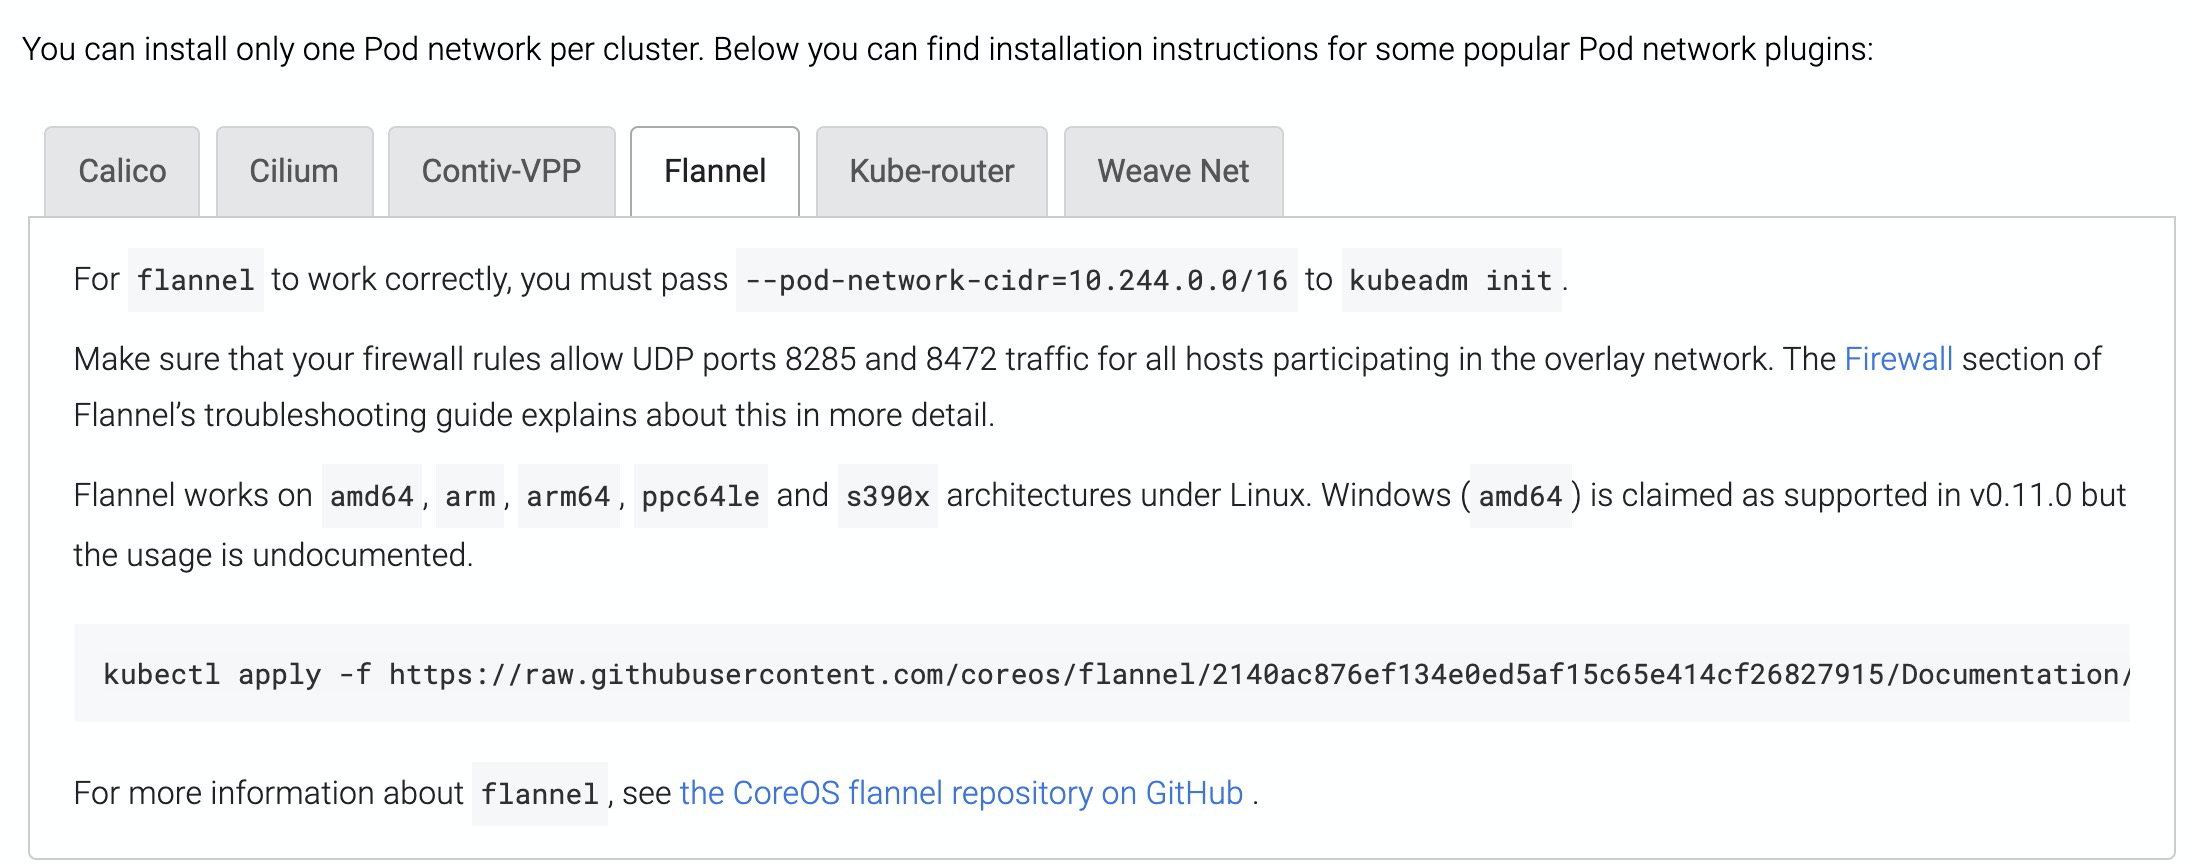
CIDR
解决办法
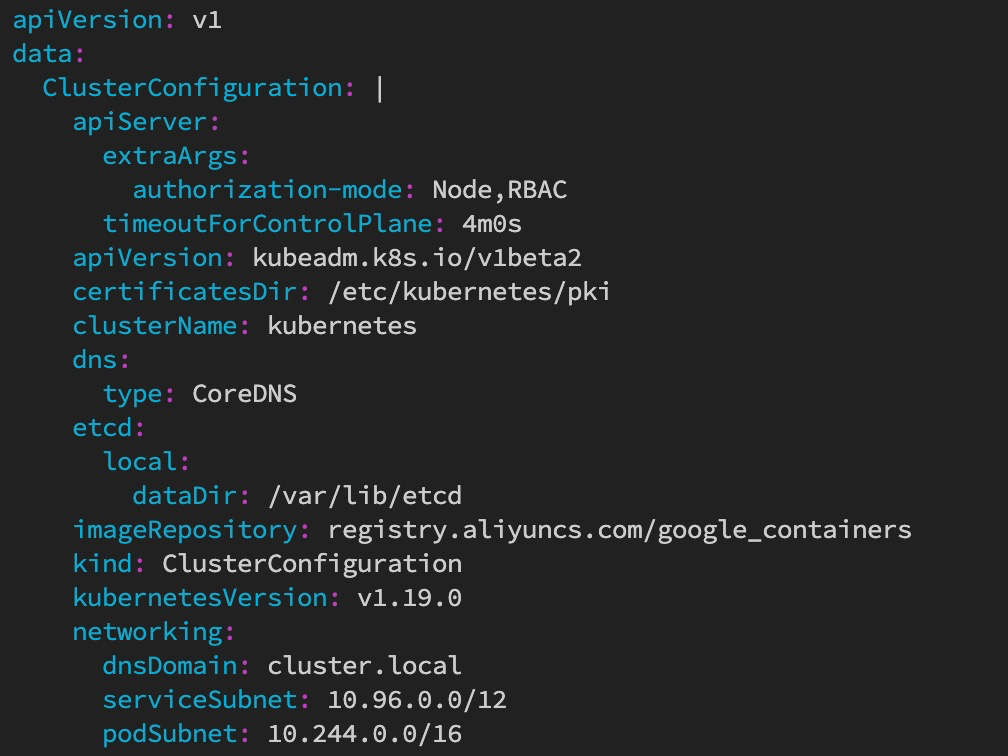
1、修改集群配置configmap,在 networking 下 增加 podSubnet: 10.244.0.0/16
kube edit cm kubeadm-config -n kube-system
2、修改 controller-manager 静态POD的启动参数,增加 --allocate-node-cidrs=true --cluster-cidr=10.244.0.0/16 两个参数
sudo vim /etc/kubernetes/manifests/kube-controller-manager.yaml
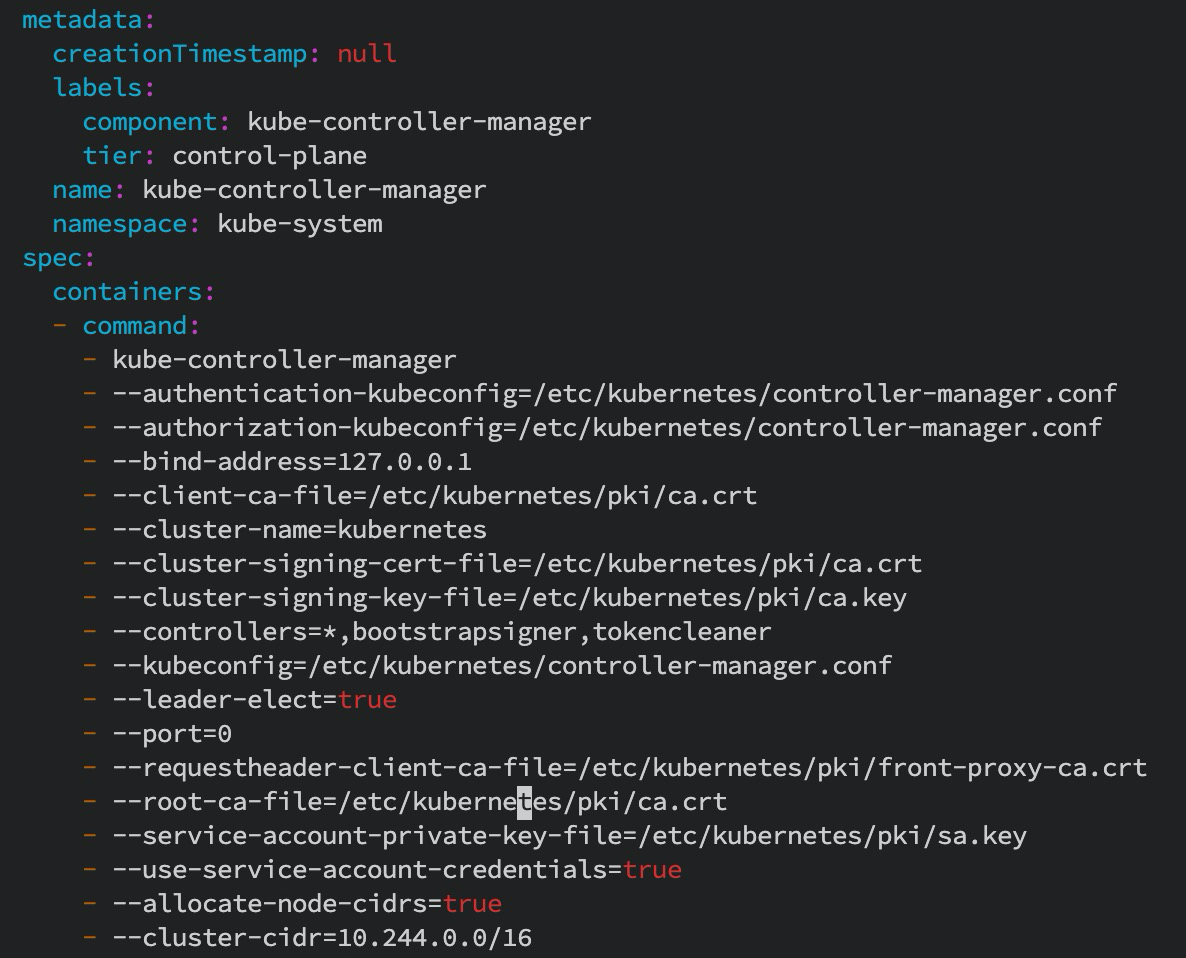
3、检查是否修改成功,如果更新慢,可以手动删除 kube-flannel-ds-amd64 相关pod ,如 使用 kubectl delete pod -n kube-system kube-flannel-ds-amd64-*
kubectl cluster-info dump | grep -m 1 cluster-cidr

参考
k8s 中如何修改 pod-network-cidr 地址范围,文中第二个修改是有问题的,见第二个参考文档
https://kubernetes.io/docs/reference/command-line-tools-reference/kube-controller-manager/#options,见 --cluster-cidr string CIDR Range for Pods in cluster. Requires —allocate-node-cidrs to be true
类似教程

若有收获,就点个赞吧
0 人点赞
