踩坑或疑难点
多应用模式开启(TP6)
框架版本:6
- 引入多应用模式的依赖
composer require topthink/think-multi-app - 调整目录的关键是删除 app/controller/ 目录,其他单独文件不要移动

同一语言包拆分多个文件(TP6)
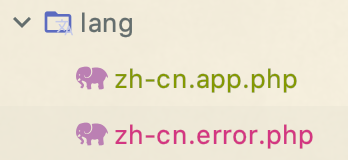
方式①: 在 lang 目录创建以语言标志为前缀的多个文件
- 关键点是一定要以点好
.分隔 - 优点是不需要额外配置直接生效可用
方式②:以语言标志名创建新目录,然后创建多个文件
- 创建目录及相关文件,示例如下
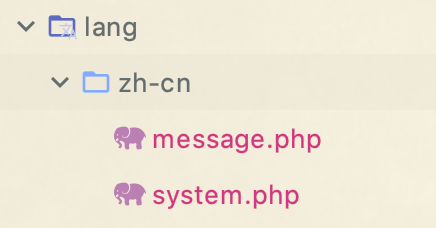
- 在
config/lang.php配置文件中的extend_list指定扩展文件的路径
['extend_list' => ['zh-cn' => [app()->getBasePath() . 'lang\zh-cn\message.php',app()->getBasePath() . 'lang\zh-cn\system.php',],]]
在原有文件系统中增加七牛云存储驱动,修改配置直接支持
参考连接 https://blog.csdn.net/augushong0/article/details/97612127
引入SDK
composer require overtrue/flysystem-qiniu
配置
在 config/filesystem.php 增加七牛云相关配置
return [
    'default' => Env::get('filesystem.driver', 'local'),
    'disks'   => [
        'local'  => [
            'type' => 'local',
            'root' => app()->getRuntimePath() . 'storage',
        ],
        'public' => [
            'type'       => 'local',
            'root'       => app()->getRootPath() . 'public/storage',
            'url'        => '/storage',
            'visibility' => 'public',
        ],
        //增加下面配置项
        'qiniu' =>[                        //完全可以自定义的名称
            'type'=>'qiniu',            //可以自定义,实际上是类名小写
            'access_key' => '555',        //七牛云的配置,accessKey
            'secret_key'=> '555',        //七牛云的配置,secretKey
            'bucket'=> 'cwh5app',        // 七牛云的配置,bucket空间名
            'domain'=> 'cwh5app.com'    // 七牛云的配置,domain,域名
        ]
    ],
];
封装七牛接口驱动
Tp6中对flysystem做了封装,主要是用工厂类调用和配置的调用,后面会介绍下原理,现在只需要这样做:
创建文件/extend/think/filesystem/driver/Qiniu.php
<?php
namespace think\filesystem\driver;

use League\Flysystem\AdapterInterface;
use think\filesystem\Driver;
use Overtrue\Flysystem\Qiniu\QiniuAdapter;

class Qiniu  extends Driver
{
   public function __construct(Cache $cache, array $config)
    {
               // $config 这里是读取配置文件的配置,如果要在此处单独修改配置应该,合并到这里
        $config = array_merge($config, $yourConfig);
        parent::__construct($cache, $config);
    }

    protected function createAdapter(): AdapterInterface
    {

        return new QiniuAdapter(
            $this->config['access_key'],
            $this->config['secret_key'],
            $this->config['bucket'],
            $this->config['domain']
        );
    }
}
用法
<?php

Filesystem::disk('qiniu')->putFile('data',$file);
队列
文档地址:https://github.com/top-think/think-queue
如果使用数据库作为队列驱动,要增加如下表
create table jobs
(
    id             int auto_increment primary key,
    queue          varchar(255)  not null comment '队列名',
    payload        text          not null comment '相关数据',
    attempts       int default 0 not null comment '尝试次数',
    reserve_time   int           null comment '备用时间',
    available_time int           null,
    create_time    int           null comment '队列生成时间'
) charset = utf8;

create index queue on tb_jobs (queue, attempts);
编写扩展类库
在 extend 目录下编写第三方扩展库,因为 extend 下的文件要遵循 psr0 自动加载规范,所以其命名空间要和目录结构保持一致。这一点可以参考 composer.json 文件。另,也可以单独requere一个自动加载文件来加载其文件,如 __autoload() 这样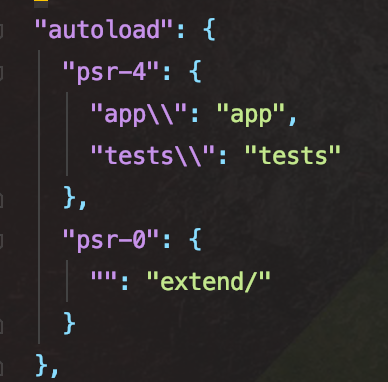
跨域请求
例子如下:
<?php

Route::get('new/:id', 'News/read')
    ->ext('html')
    ->allowCrossDomain([
        'Access-Control-Allow-Origin'        => 'thinkphp.cn',
        'Access-Control-Allow-Credentials'   => 'true'
    ]);
坑点是:
<?php

Route::get('new/:id', 'News/read')
    ->ext('html')
    ->allowCrossDomain([
        'Access-Control-Allow-Origin'        => 'thinkphp.cn',
        'Access-Control-Allow-Credentials'   => 'true'
    ])->middleware(['XXXMiddleware','vvvMiddleware']);
这种用法会让 allowCrossDomain 对应的 AllowCrossDomain::class 无效的。
正确的用法一,在同一个数组设置
<?php

Route::get('new/:id', 'News/read')
    ->ext('html')
    ->middleware([AllowCrossDomain::class,'XXXMiddleware','vvvMiddleware']);
正确用法二,以相同方式分开设置
<?php

Route::get('new/:id', 'News/read')
    ->ext('html')
    ->middleware(AllowCrossDomain::class)
      ->middleware('XXXMiddleware')
      ->middleware('vvvMiddleware');

若有收获,就点个赞吧
0 人点赞
