实验环境
mysql版本:Server version: 5.7.19-log MySQL Community Server (GPL)
MHA版本:mha4mysql-manager-0.57-0.el7
HAProxy:HA-Proxy version 1.7.11
系统版本:Linux 3.10.0-862.2.3.el7.x86_64
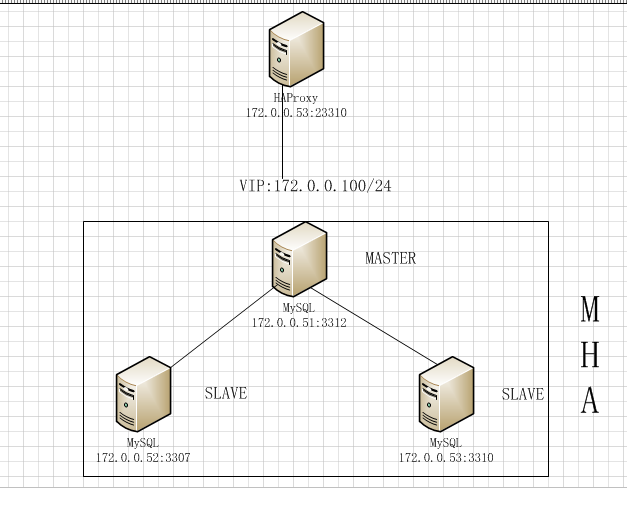
| mysql | 角色 | MHA | HAProxy | hostname |
|---|---|---|---|---|
| 172.0.0.51:3312 | master | masterha_manager | VIP bond:172.0.0.100/24 | zst2 |
| 172.0.0.52:3307 | slave | masterha_node | mysql-zst3 | |
| 172.0.0.53:3310 | slave | masterha_node | zst4 |
MySQL:环境
binog_format=row
gtid_mode=off
异步复制
实验思路
实验目的
使用HAProxy提供对外访问。MHA实现MySQL的高可用
实验架构
实验步骤
1.使用脚本访问172.0.0.100:23310对数据库进行操作。
2.操作中将master shutdown,通过MHA完成主从切换。由于此次中的MySQL的port 不同,也学习HAProxy对不同端口的MySQL的切换。
3.将原master172.0.0.51 恢复到主从复制中。
环境部署
mysql
这里不对一主两从的MySQL环境做复述
MHA
所需文件:
app1.conf :配置文件(我是讲global_conf 的内容写道了conf文件,因此并没有masterha_default.conf文件)
drop_vip.sh:删除VIP脚本
init_vip.sh:初始化绑定VIP
master_ip_failover:MHA 进行failover切换脚本
master_ip_online_change:在线(手动)切换脚本
app1.conf配置文件
[server default]#MySQL的用户和密码user=user1password=user1#系统ssh用户ssh_user=root#复制用户repl_user=replrepl_password=repl#监控ping_interval=3#shutdown_script=""#切换调用的脚本master_ip_failover_script= /etc/masterha/master_ip_failovermaster_ip_online_change_script= /etc/masterha/master_ip_online_change#secondary_check_script=masterha_secondary_check -slog_level=debug#mha manager工作目录manager_workdir = /data/mha/app1manager_log = /data/mha/app1/app1.logremote_workdir = /data/mha/app1[server1]hostname=zst2port=3312master_binlog_dir = /data/mysql/mysql3312/logscandidate_master = 1check_repl_delay = 0 #用防止master故障时,切换时slave有延迟,卡在那里切不过来。[server2]hostname=zst3port=3307master_binlog_dir = /data/mysql/mysql3307/logscandidate_master=1check_repl_delay=0[server3]hostname=zst4port=3310master_binlog_dir = /data/mysql/mysql3310/logscandidate_master=1check_repl_delay=0
drop_vip.sh文件
vip="172.0.0.100/24"
/sbin/ip addr del $vip dev ens32
init_vip.sh
vip="172.0.0.100/24"
/sbin/ip addr add $vip dev ens32
master_ip_failover 和master_ip_online_change:github下载即可,注意修改脚本中的user和ip
如下:两个脚本修改内容相同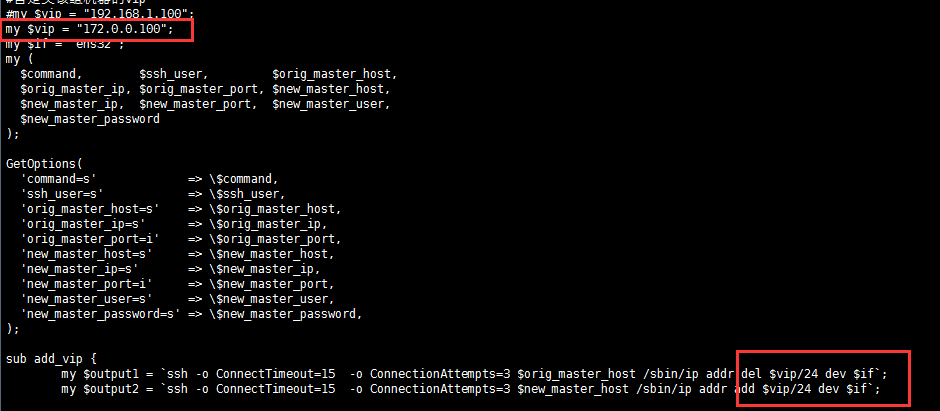
MHA安装
请查看高可用MHA的安装章节中有介绍MHA部署 链接
安装完成MHA后,进行校验
校验
校验ssh免密登录
[root@zst2 masterha]# masterha_check_ssh --conf=app1.conf
Wed Aug  1 01:51:56 2018 - [warning] Global configuration file /etc/masterha_default.cnf not found. Skipping.
Wed Aug  1 01:51:56 2018 - [info] Reading application default configuration from app1.conf..
Wed Aug  1 01:51:56 2018 - [info] Reading server configuration from app1.conf..
.
.
.
Wed Aug  1 01:52:00 2018 - [debug]   ok.
Wed Aug  1 01:52:01 2018 - [info] All SSH connection tests passed successfully
校验复制状态
[root@zst2 masterha]# masterha_check_repl --conf=app1.conf
Wed Aug  1 01:53:59 2018 - [warning] Global configuration file /etc/masterha_default.cnf not found. Skipping.
Wed Aug  1 01:53:59 2018 - [info] Reading application default configuration from app1.conf..
Wed Aug  1 01:53:59 2018 - [info] Reading server configuration from app1.conf..
Wed Aug  1 01:53:59 2018 - [info] MHA::MasterMonitor version 0.57.
。
。
。
Wed Aug  1 01:54:06 2018 - [warning] shutdown_script is not defined.
Wed Aug  1 01:54:06 2018 - [debug]  Disconnected from zst2(172.0.0.51:3312)
Wed Aug  1 01:54:06 2018 - [debug]  Disconnected from zst3(172.0.0.52:3307)
Wed Aug  1 01:54:06 2018 - [debug]  Disconnected from zst4(172.0.0.53:3310)
Wed Aug  1 01:54:06 2018 - [info] Got exit code 0 (Not master dead).
启动MHA
[root@zst2 masterha]# nohup masterha_manager --conf=app1.conf &
[root@zst2 masterha]# cat nohup.out
Tue Jul 31 21:50:37 2018 - [warning] Global configuration file /etc/masterha_default.cnf not found. Skipping.
Tue Jul 31 21:50:37 2018 - [info] Reading application default configuration from app1.conf..
Tue Jul 31 21:50:37 2018 - [info] Reading server configuration from app1.conf..
  Creating /data/mha/app1 if not exists..    ok.
  Checking output directory is accessible or not..
   ok.
  Binlog found at /data/mysql/mysql3307/logs, up to mysql-bin.000002
Tue Jul 31 21:53:39 2018 - [warning] Global configuration file /etc/masterha_default.cnf not found. Skipping.
Tue Jul 31 21:53:39 2018 - [info] Reading application default configuration from app1.conf..
Tue Jul 31 21:53:39 2018 - [info] Reading server configuration from app1.conf..
Wed Aug  1 01:57:40 2018 - [warning] Global configuration file /etc/masterha_default.cnf not found. Skipping.
Wed Aug  1 01:57:40 2018 - [info] Reading application default configuration from app1.conf..
Wed Aug  1 01:57:40 2018 - [info] Reading server configuration from app1.conf..
查看MHA日志
[root@zst2 app1]# pwd
/data/mha/app1
[root@zst2 app1]# ls
app1.log  app1.master_status.health
[root@zst2 app1]# tail -30 app1.log
Wed Aug  1 01:57:46 2018 - [info]   Executing command : apply_diff_relay_logs --command=test --slave_user='user1' --slave_host=zst4 --slave_ip=172.0.0.53 --slave_port=3310 --workdir=/data/mha/app1 --target_version=5.7.19-log --manager_version=0.57 --relay_dir=/data/mysql/mysql3310/data --current_relay_log=relay-bin.000002  --debug  --slave_pass=xxx
Wed Aug  1 01:57:46 2018 - [info]   Connecting to root@172.0.0.53(zst4:22)..
  Checking slave recovery environment settings..
    Relay log found at /data/mysql/mysql3310/data, up to relay-bin.000002
    Temporary relay log file is /data/mysql/mysql3310/data/relay-bin.000002
    Testing mysql connection and privileges..mysql: [Warning] Using a password on the command line interface can be insecure.
 done.
    Testing mysqlbinlog output.. done.
    Cleaning up test file(s).. done.
Wed Aug  1 01:57:46 2018 - [info] Slaves settings check done.
Wed Aug  1 01:57:46 2018 - [info]
zst2(172.0.0.51:3312) (current master)
 +--zst3(172.0.0.52:3307)
 +--zst4(172.0.0.53:3310)

Wed Aug  1 01:57:46 2018 - [info] Checking master_ip_failover_script status:
Wed Aug  1 01:57:46 2018 - [info]   /etc/masterha/master_ip_failover --command=status --ssh_user=root --orig_master_host=zst2 --orig_master_ip=172.0.0.51 --orig_master_port=3312
Wed Aug  1 01:57:46 2018 - [info]  OK.
Wed Aug  1 01:57:46 2018 - [warning] shutdown_script is not defined.
Wed Aug  1 01:57:46 2018 - [debug]  Disconnected from zst2(172.0.0.51:3312)
Wed Aug  1 01:57:46 2018 - [debug]  Disconnected from zst3(172.0.0.52:3307)
Wed Aug  1 01:57:46 2018 - [debug]  Disconnected from zst4(172.0.0.53:3310)
Wed Aug  1 01:57:46 2018 - [debug] SSH check command: save_binary_logs --command=test --start_pos=4 --binlog_dir=/data/mysql/mysql3312/logs --output_file=/data/mha/app1/save_binary_logs_test --manager_version=0.57 --binlog_prefix=mysql-bin --debug
Wed Aug  1 01:57:46 2018 - [info] Set master ping interval 3 seconds.
Wed Aug  1 01:57:46 2018 - [warning] secondary_check_script is not defined. It is highly recommended setting it to check master reachability from two or more routes.
Wed Aug  1 01:57:46 2018 - [info] Starting ping health check on zst2(172.0.0.51:3312)..
Wed Aug  1 01:57:46 2018 - [debug] Connected on master.
Wed Aug  1 01:57:46 2018 - [debug] Set short wait_timeout on master: 6 seconds
Wed Aug  1 01:57:46 2018 - [debug] Trying to get advisory lock..
Wed Aug  1 01:57:46 2018 - [info] Ping(SELECT) succeeded, waiting until MySQL doesn't respond..
HAProxy
安装
关于部署HAProxy本次不做较多复述,会在其他章节描述
下载地址:https://www.haproxy.org/download/
[root@haproxy-server-master src]# cd haproxy-1.7.11
[root@haproxy-server-master haproxy-1.7.11]# uname -r3.10.0-693.21.1.el7.x86_64
[root@haproxy-server-master haproxy-1.7.11]#
make TARGET=linux310 ARCH=x86_64 PREFIX=/usr/local/haproxy
[root@haproxy-server-master haproxy-1.7.11]# make install PREFIX=/usr/local/haproxy
参数说明:
TARGET=linux310,内核版本,使用uname -r查看内核,如:3.10.0-693.21.1.el7,此时该参数就为linux310;kernel 大于2.6.28的可以用:TARGET=linux2628;
ARCH=x86_64,系统位数;
PREFIX=/usr/local/haprpxy #/usr/local/haprpxy,为haprpxy安装路径
修改配置文件 haproxy.cfg
[root@zst4 haproxy]# cat haproxy.cfg
global

    log         127.0.0.1 local7 debug

    chroot      /usr/local/haproxy/
    pidfile     /var/run/haproxy.pid
    maxconn     4000
#    user        haproxy
#    group       haproxy

    daemon
    stats socket /usr/local/haproxy/stats

defaults
    mode                    tcp
    log                     global
    option                  dontlognull
    option                  redispatch
    retries                 3
    timeout http-request    10s
    timeout queue           1m
    timeout connect         10s
    timeout client          1m
    timeout server          1m
    timeout http-keep-alive 10s
    timeout check           10s
    maxconn                 600

listen stats
    mode http
    bind :6677
    stats enable
    stats hide-version
    stats uri     /stats   ip:port/stats
    stats realm   Haproxy\ Statistics
    stats auth    admin:admin           #登录账号密码
    stats admin if TRUE

#frontend mha_front
#     bind *:3310
#     mode tcp
#     default_backend             mha_back

backend mha_back
    mode tcp
    balance     leastconn
    server m1 172.0.0.100:3310 check port 3310 maxconn 300
    server m2 172.0.0.100:3307 check port 3307 maxconn 300
    server m3 172.0.0.100:3312 check port 3312 maxconn 300

listen proxy-mysql
       bind *:23310
       mode tcp
       balance source
       option tcplog
#       option mysql-check
       server mysql_51 172.0.0.100:3312 check port 3312 weight 1 maxconn 300
       server mysql_52 172.0.0.100:3307 check port 3307 weight 1 maxconn 300
       server mysql_53 172.0.0.100:3310 check port 3310 weight 1 maxconn 300
#       option tckpa
启动
[root@zst4 haproxy]#/usr/local/haproxy/sbin/haproxy -f /etc/haproxy/haproxy.cfg
查看HAProxy配置的连接状态
登录http://172.0.0.53:6677/stats
账号/密码:admin/admin
由于是使用HAProxy连接的VIP,因此连接状态只有的master才是up状态,在启动的时候可能会有报错
进行测试
[root@zst2 app1]# mysql -h 172.0.0.53 -P 23310 -uuser1 -puser1
mysql: [Warning] Using a password on the command line interface can be insecure.
Welcome to the MySQL monitor.  Commands end with ; or \g.
Your MySQL connection id is 93501
Server version: 5.7.19-log MySQL Community Server (GPL)

Copyright (c) 2009-2018 Percona LLC and/or its affiliates
Copyright (c) 2000, 2018, Oracle and/or its affiliates. All rights reserved.

Oracle is a registered trademark of Oracle Corporation and/or its
affiliates. Other names may be trademarks of their respective
owners.

Type 'help;' or '\h' for help. Type '\c' to clear the current input statement.

"user1@172.0.0.53:23310  [(none)]>system hostname;
zst2   #为现在master的hostname
FailOver测试
实验步骤
使用脚本连接 172.0.0.53: 23310 通过HAProxy访问master进行操作
将master进行shutdown
脚本持续执行
将原master恢复到复制中
观察点:
是否操作是否都成功
failover是否成功:MHA的failover,和HAProxy的切换
原master加到集群中是否有丢数据
测试脚本
[root@zst2 masterha]# cat /data/mysql/mysql3312/auto_delte_ha.sh
#!/bin/bash
for i in {1..100000}
do
baseid=1
rowid=$(($baseid*$i))
echo $rowid
mysql -h 172.0.0.53 -P 23310  -uuser1  -puser1 << EOF
begin;
delete from relay_test.t3   limit $baseid;
commit;
EOF
done
执行该脚本
nohup /data/mysql/mysql3312/auto_delte_ha.sh >nohup.out &
在master上进行shutdown
观察点:
查看MHA log :
tail -f /data/mha/app1/app1.log
再HAProxy观察再VIP切换成功后连接是否切换到新master的mysql上
恢复原master到复制中
在MHA manager主机上查看日志:
查找进行切换到新master的语句,找到master_log_pos , master_log_file
[root@zst2 log]# vi app1.log
搜关键字CHANGE
Tue Jul 31 10:49:54 2018 - [info]  All other slaves should start replication from here. Statement should be: CHANGE MASTER TO MASTER_HOST='zst2 or 172.0.0.51', MASTER_PORT=3312, MASTER_LOG_FILE='mysql-bin.000001', MASTER_LOG_POS=1356384,
MASTER_USER='repl', MASTER_PASSWORD='xxx';#这是通过MHA创建主从时利用完从原master上获取relay 后执行的最后的位置
Tue Jul 31 10:49:54 2018 - [info] Executing master IP activate script:
Tue Jul 31 10:49:54 2018 - [info]   /etc/masterha/master_ip_failover --command=start --ssh_user=root --orig_master_host=zst3 --orig_master_ip=172.0.0.52 --orig_master_port=3307 --new_master_host=zst2 --new_master_ip=172.0.0.51 --new_master_port=3312 --new_master_user='user1'   --new_master_password=xxx
Set read_only=0 on the new master.
Tue Jul 31 10:49:55 2018 - [info]  OK.
Tue Jul 31 10:49:55 2018 - [info] ** Finished master recovery successfully.
恢复原master后加入到主从复制中
CHANGE MASTER TO MASTER_HOST='172.0.0.51',
 MASTER_PORT=3312, MASTER_LOG_FILE='mysql-bin.000001',
 MASTER_LOG_POS=1356384, MASTER_USER='repl', MASTER_PASSWORD='xxx';
开启复制并检查数据,
start slave
show slave status;
也可以查看 auto_delte_ha.sh 脚本操作的表 relay_test.t3的数据是否一致

若有收获,就点个赞吧
0 人点赞
