本文目的
主要是在有日志情况下,学会通过利用relay-log的方式进行恢复数据
实验思路
具有一个实例的全备,还有日志,通过创建未master+relay 的方式通过sql_thread 重放日志达到数据恢复的目的
实验环境
gtid_mode = OFF
binlog_format=row
Server version: 5.7.19-log MySQL Community Server (GPL)
innobackupex version 2.4.11 Linux (x86_64) (revision id: b4e0db5)
实验步骤
本次实验是在原实例进行恢复,不单独为恢复创建一个新实例,该实例为3307
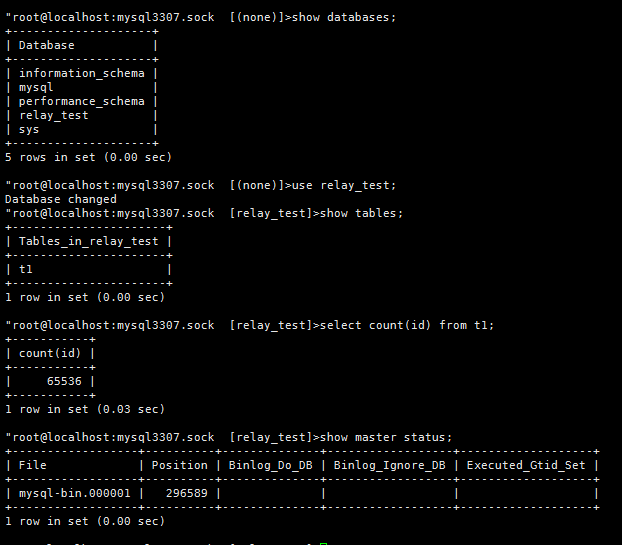
1数据库状态
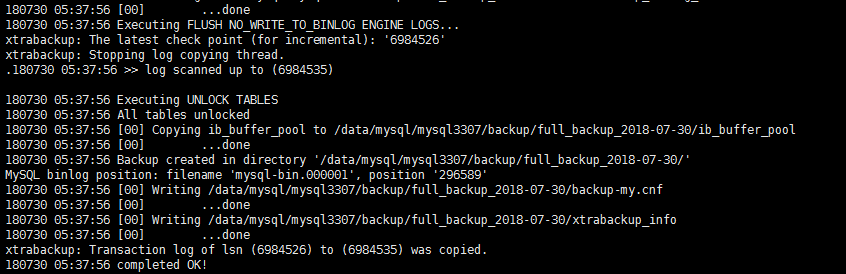
2进行备份
[root@mysql-zst3 mysql3307]# innobackupex --defaults-file=my3307.cnf -S mysql3307.sock -uroot -p123 --backup --no-timestamp ./backup/full_backup_`date +%F`
3制造增量数据

制造drop table
"root@localhost:mysql3307.sock [relay_test]>drop table t2;
Query OK, 0 rows affected (0.16 sec)
"root@localhost:mysql3307.sock [relay_test]>flush logs;
Query OK, 0 rows affected (0.12 sec)
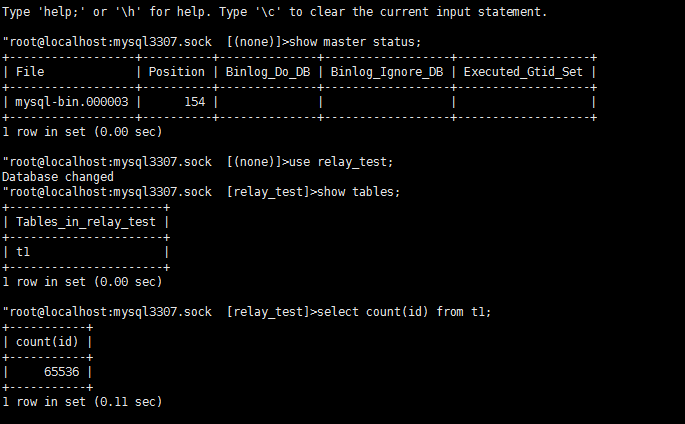
"root@localhost:mysql3307.sock [relay_test]>show tables;
+----------------------+
| Tables_in_relay_test |
+----------------------+
| t1 |
+----------------------+
1 row in set (0.00 sec)
"root@localhost:mysql3307.sock [relay_test]>show master status;
+------------------+----------+--------------+------------------+-------------------+
| File | Position | Binlog_Do_DB | Binlog_Ignore_DB | Executed_Gtid_Set |
+------------------+----------+--------------+------------------+-------------------+
| mysql-bin.000002 | 154 | | | |
+------------------+----------+--------------+------------------+-------------------+
1 row in set (0.00 sec)
4进行恢复数据
4.1 使用全备恢复
[root@mysql-zst3 mysql3307]# innobackupex --apply-log ./backup/full_backup_2018-07-30/
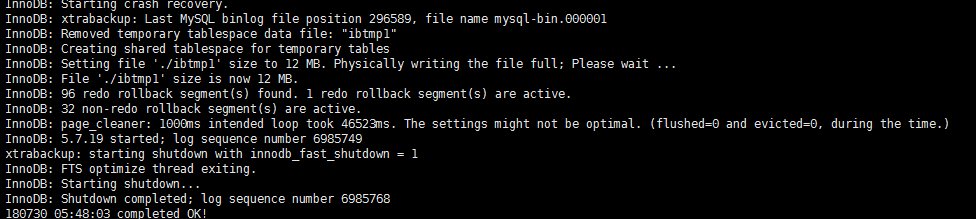
[root@mysql-zst3 mysql3307]# innobackupex --defaults-file=my3307.cnf --copy-back ./backup/full_backup_2018-07-30/
[root@mysql-zst3 mysql3307]# chown -R mysql.mysql *

4.2启动mysql 3307
[root@mysql-zst3 mysql3307]# mysqld --defaults-file=my3307.cnf &
这里有一个地方没处理好,因为这次恢复用的是本地原实例进行恢复,在恢复前没有把之前的binlog 迁移走,导致在实例恢复后binlog从mysql-bin.000003开始算起,把以前的也注册了进来,但是不影响数据的恢复,但是在其他情况下最好提前做好处理
4.3制造伪复制
创建relay-log信息
先查看relay log 信息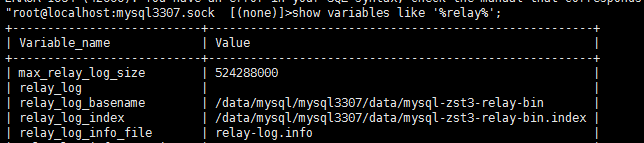
生成对应的index文件
将mysql-bin.000* 改为relay log的方法:
 for i in $(ls  mysql-bin.0*)
do
  ext=$(echo $i | cut -d'.' -f2);
 cp $i mysql-zst3-relay-bin.$ext;
done

将relay-log.00* 写到relay index中
[root@mysql-zst3 data]#ls ./mysql-zst3-relay-bin.00000* >  mysql-zst3-relay-bin.index

[root@mysql-zst3 data]# more mysql-zst3-relay-bin.index
./mysql-zst3-relay-bin.000001

修改权限
[root@mysql-zst3 data]# chown -R mysql.mysql *
找到change master to 的起始点
[root@mysql-zst3 data]# more xtrabackup_binlog_pos_innodb
mysql-bin.000001 296589
[root@mysql-zst3 data]# more xtrabackup_info
uuid = a8049b90-9377-11e8-9851-000c29f1c412
tool_version = 2.4.11
ibbackup_version = 2.4.11
server_version = 5.7.19-log
start_time = 2018-07-30 05:37:47
end_time = 2018-07-30 05:37:56
lock_time = 0
binlog_pos = filename ‘mysql-bin.000001’, position ‘296589’
change master to 语句
change master to
master_host='pp',
relay_log_file='mysql-zst3-relay-bin.000001',
relay_log_pos=296589;
查看复制信息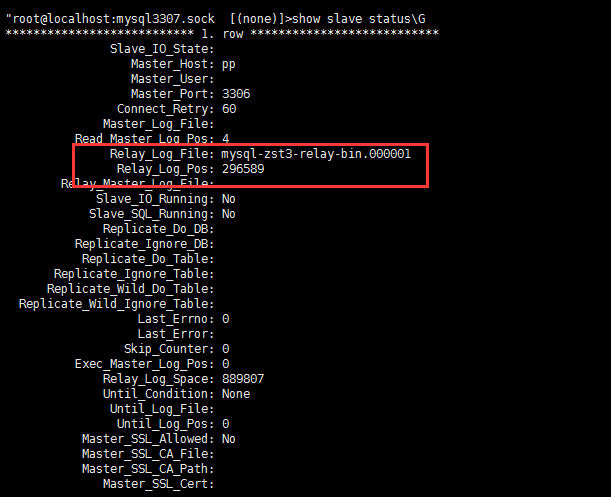
设置复制结束点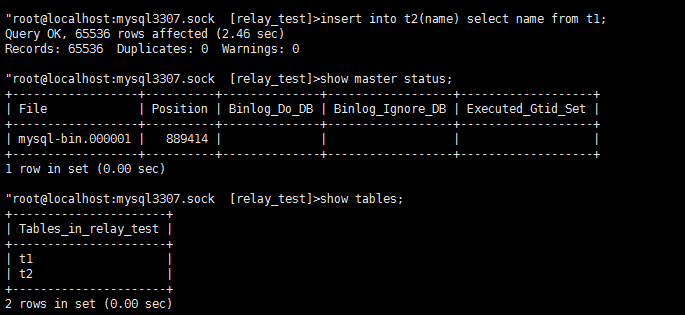
start slave sql_thread until relay_log_file='mysql-zst3-relay-bin.000001',relay_log_pos=889414;
检查
root@localhost:mysql3307.sock  [relay_test]>show slave status\G
*************************** 1. row ***************************
               Slave_IO_State:
                  Master_Host: pp
                  Master_User:
                  Master_Port: 3306
                Connect_Retry: 60
              Master_Log_File:
          Read_Master_Log_Pos: 4
               Relay_Log_File: mysql-zst3-relay-bin.000001
                Relay_Log_Pos: 592964
        Relay_Master_Log_File:
             Slave_IO_Running: No
            Slave_SQL_Running: No
              Replicate_Do_DB:
          Replicate_Ignore_DB:
           Replicate_Do_Table:
       Replicate_Ignore_Table:
      Replicate_Wild_Do_Table:
  Replicate_Wild_Ignore_Table:
                   Last_Errno: 0
                   Last_Error:
                 Skip_Counter: 0
          Exec_Master_Log_Pos: 592964
              Relay_Log_Space: 593310
              Until_Condition: Relay
               Until_Log_File: mysql-zst3-relay-bin.000001
                Until_Log_Pos: 592964
           Master_SSL_Allowed: No
           Master_SSL_CA_File:
           Master_SSL_CA_Path:
              Master_SSL_Cert:
            Master_SSL_Cipher:
               Master_SSL_Key:
        Seconds_Behind_Master: NULL
Master_SSL_Verify_Server_Cert: No
                Last_IO_Errno: 0
                Last_IO_Error:
               Last_SQL_Errno: 0
               Last_SQL_Error:
  Replicate_Ignore_Server_Ids:
             Master_Server_Id: 0
                  Master_UUID:
             Master_Info_File: /data/mysql/mysql3307/data/master.info
                    SQL_Delay: 0
          SQL_Remaining_Delay: NULL
      Slave_SQL_Running_State:
           Master_Retry_Count: 86400
                  Master_Bind:
      Last_IO_Error_Timestamp:
     Last_SQL_Error_Timestamp:
               Master_SSL_Crl:
           Master_SSL_Crlpath:
           Retrieved_Gtid_Set:
            Executed_Gtid_Set:
                Auto_Position: 0
         Replicate_Rewrite_DB:
                 Channel_Name:
           Master_TLS_Version:
1 row in set (0.00 sec)


ERROR 1064 (42000): You have an error in your SQL syntax; check the manual that corresponds to your MySQL server version for the right syntax to use near 'tabls' at line 1
"root@localhost:mysql3307.sock  [relay_test]>show tables;
+----------------------+
| Tables_in_relay_test |
+----------------------+
| t1                   |
| t2                   |
+----------------------+
2 rows in set (0.00 sec)

"root@localhost:mysql3307.sock  [relay_test]>select count(id) from t2l
    -> ^C
^C
"root@localhost:mysql3307.sock  [relay_test]>select count(id) from t2;
+-----------+
| count(id) |
+-----------+
|     65536 |
+-----------+
1 row in set (0.03 sec)

若有收获,就点个赞吧
0 人点赞
