一、基础
jsx
是一种JS和HTML混合的语法,将组件的结构、数据甚至样式都聚合在一起定义组件。
JSX是一种语法糖,最终会通过babeljs转译成createElement语法。
const hello = <h3>Hello JSX</h3>// 转译成==>var hello = React.createElement("h3", null, "Hello JSX");
生命周期
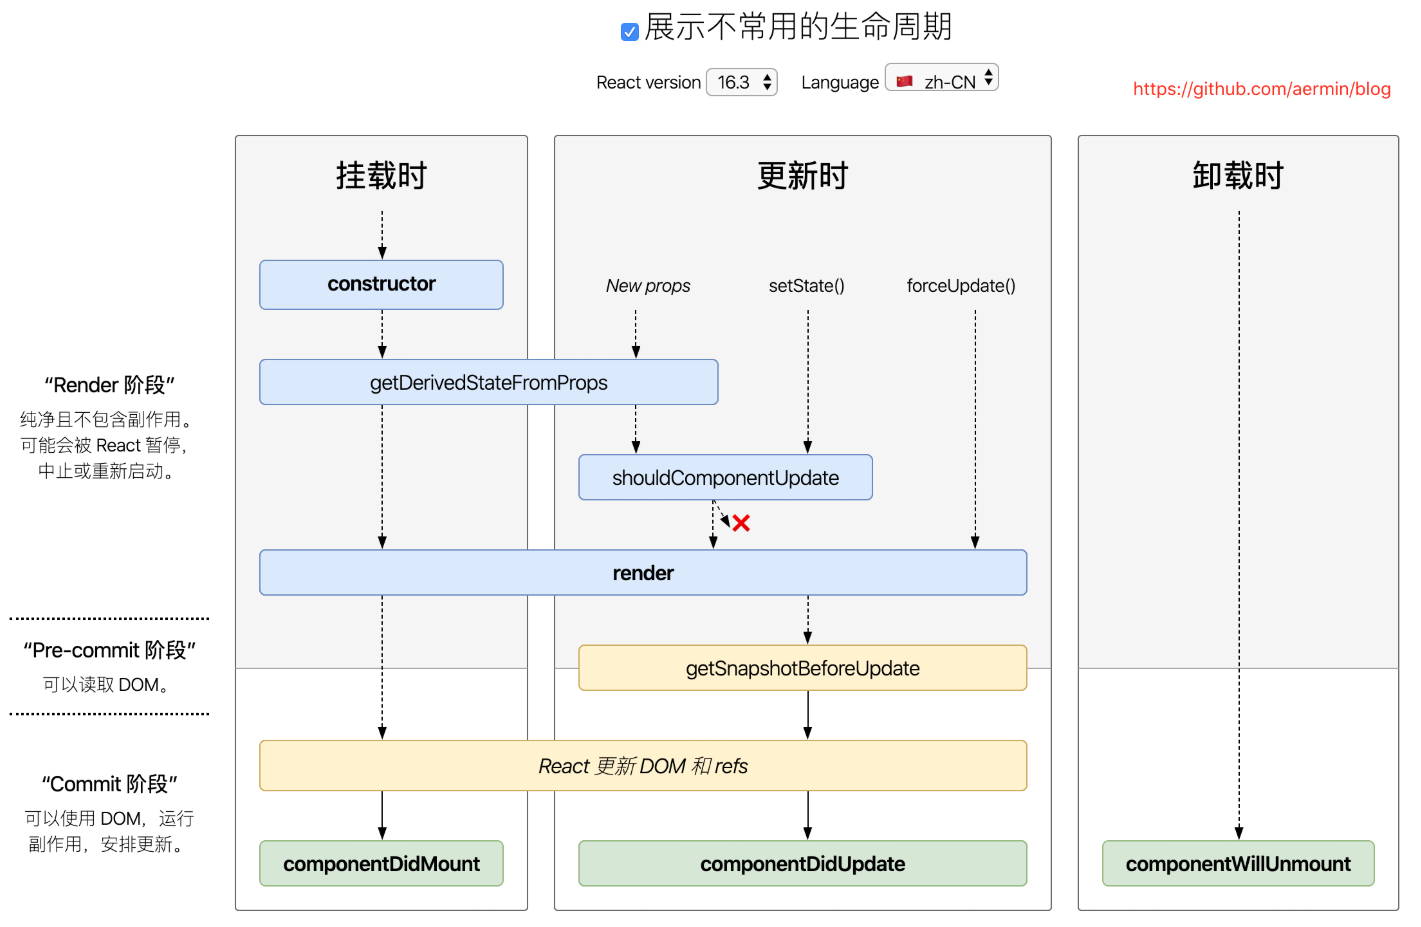
挂载:componentWillMount()
服务器端和客户端都只调用一次,在初始化渲染执行之前立刻调用。如果在这个方法内调用setState,render() 将会感知到更新后的state,将会执行仅一次,尽管 state 改变了。
react v16.3以后将逐步去掉此api
挂载:componentDidMount()
在初始化渲染执行之后立刻调用一次,仅客户端有效(服务器端不会调用)。在生命周期中的这个时间点,组件拥有一个DOM 展现,你可以通过 this.getDOMNode() 来获取相应 DOM 节点。
如果想和其它JavaScript 框架集成,使用 setTimeout 或者 setInterval 来设置定时器,或者发送 AJAX请求,可以在该方法中执行这些操作。
注意:为了兼容 v0.9,DOM节点作为最后一个参数传入。你依然可以通过this.getDOMNode() 获取 DOM 节点。
更新:componentWillReceiveProps()
componentWillReceiveProps(object nextProps)
在组件接收到新的props 的时候调用。在初始化渲染的时候,该方法不会调用。
用此函数可以作为react 在 prop 传入之后, render() 渲染之前更新 state 的机会。老的 props 可以通过 this.props 获取到。在该函数中调用 this.setState() 将不会引起第二次渲染。
react v16.3以后将逐步去掉此api
componentWillReceiveProps:function(nextProps){this.setState({likesIncreasing: nextProps.likeCount> this.props.likeCount});}
更新:shouldComponentUpdate()
boolean shouldComponentUpdate(object nextProps, object nextState)
在接收到新的props 或者 state,将要渲染之前调用。该方法在初始化渲染的时候不会调用,在使用 forceUpdate 方法的时候也不会。
如果确定新的props 和 state 不会导致组件更新,则此处应该 返回 false。
shouldComponentUpdate:function(nextProps,nextState) {return nextProps.id!== this.props.id;}
更新: componentWillUpdate
componentWillUpdate(object nextProps, object nextState)
在接收到新的props 或者 state 之前立刻调用。在初始化渲染的时候该方法不会被调用。
使用该方法做一些更新之前的准备工作。
注意:
- 你不能在此方法中使用 this.setState()。如果需要更新 state 来响应某个 prop 的改变,请使用 componentWillReceiveProps。
- react v16.3以后将逐步去掉此api
更新:componentDidUpdate()
componentDidUpdate(object prevProps, object prevState)
在组件的更新已经同步到DOM 中之后立刻被调用。该方法不会在初始化渲染的时候调用。
使用该方法可以在组件更新之后操作DOM 元素。
注意:为了兼容 v0.9,DOM节点会作为最后一个参数传入。如果使用这个方法,你仍然可以使用 this.getDOMNode() 来访问 DOM 节点。
卸载:componentWillUnmount()
getDerivedStateFromProps
react v16.3时新增的
getDerivedStateFromProps(nextProps, prevState)
- 每次接收新的props之后都会返回一个对象作为新的state,返回null则说明不需要更新state
- 配合componentDidUpdate,可以覆盖componentWillReceiveProps的所有用法
触发时间(v16.4修正):组件每次被rerender的时候,包括在组件构建之后(render之前最后执行),每次获取新的props或state之后。在v16.3版本时,组件state的更新不会触发该生命周期。
// prop更新时重新获取数据static getDerivedStateFromProps(nextProps, prevState) {// Store prevId in state so we can compare when props change.if (nextProps.id !== prevState.prevId) {return {externalData: null,prevId: nextProps.id,};}// No state update necessaryreturn null;}componentDidUpdate(prevProps, prevState) {if (this.state.externalData === null) {this._loadAsyncData(this.props.id);}}
getSnapshotBeforeUpdate
react v16.3时新增的
getSnapshotBeforeUpdate(prevProps, prevState)触发时间: update发生的时候,在render之后,在组件dom渲染之前。
- 返回一个值,作为componentDidUpdate的第三个参数。
- 配合componentDidUpdate, 可以覆盖componentWillUpdate的所有用法。
- componentDidUpdate(prevProps, prevState, snapshot)直接获得getSnapshotBeforeUpdate返回的dom属性值
- 在upate之前获取dom节点,getSnapshotBeforeUpdate(prevProps, prevState)代替componentWillUpdate(nextProps, nextState)
setState的用法
```javascript // 用法1 this.setState({ date: new Date() });
// 用法2 this.setState((prevState, props) => ({ counter: prevState.counter + props.increment }));
// 用法3 this.setState({ date: new Date() }, () => { // 成功设置了date后的回调 // dothing } });
这样定义方法,不会改变this指向,或者使用第二种也不会改变this指向,或者在constructor时改变this指向:```javascripthandleClick = () => {console.log('this is:', this);}<button onClick={(e) => this.deleteRow(id, e)}>Delete Row</button>this.handleClick = this.handleClick.bind(this);
事件对象,这里不是原生的事件对象了:
// 需要手动添加事件对象,
// 会隐式添加事件对象e到deleteRow最后面一个参数
元素位于map()方法内时需要设置键属性key。
setState同步用法:
// 方式一this.setState((nextState) => {return {counter: nextState.counter + 1,}})// 方式二setTimeout(() => {this.setState({connter: this.state.counter + 2})},0)// 方式三componentDidMount() {dom.addEventListener('click', () => {this.setState({counter: this.state.counter + 2})})}
总结:setState只有在合成事件和钩⼦子函数中是异步的,在原⽣生事件和setTimeout、setInterval中都是同步的
context
context 通过组件树提供了一个传递数据的方法,从而避免了在每一个层级手动的传递 props 属性
const ThemeContext = React.createContext('light');function ThemedButton(props) {// ThemedButton 组件从 context 接收 themereturn (<ThemeContext.Consumer>{theme => <Button {...props} theme={theme} />}</ThemeContext.Consumer>);}// 中间组件function Toolbar(props) {return (<div><ThemedButton /></div>);}class App extends React.Component {render() {return (<ThemeContext.Provider value="dark"><Toolbar /></ThemeContext.Provider>);}}
ref
- 使用React.createRef(),不能在函数式组件上使用 ref 属性,因为它们没有实例 ```javascript function MyFunctionalComponent() { return ; }
class Parent extends React.Component {
constructor(props) {
super(props);
this.textInput = React.createRef();
}
render() {
// 这将 不会 工作!
return (
2. 使用 ref 回调函数,在实例的属性中存储对 DOM 节点的引用```javascriptclass CustomTextInput extends React.Component {constructor(props) {super(props);this.textInput = null;this.setTextInputRef = element => {this.textInput = element;};this.focusTextInput = () => {// 直接使用原生 API 使 text 输入框获得焦点if (this.textInput) this.textInput.focus();};}componentDidMount() {// 渲染后文本框自动获得焦点this.focusTextInput();}render() {// 使用 `ref` 的回调将 text 输入框的 DOM 节点存储到 React// 实例上(比如 this.textInput)return (<div><inputtype="text"ref={this.setTextInputRef}/><inputtype="button"value="Focus the text input"onClick={this.focusTextInput}/></div>);}}
<Modalvisible={showFormData}width={'12.6rem'}onCancel={() => (this.refs.Step1Ele as any).onCancel()}footer={<div />}title={'基础信息'}wrapClassName="noFooter"className='popup-wrap'><Step1onErr={this.props.onErr}onOkFromStep2={this.getFormInfoOk}initData={baseInfo}ref="Step1Ele"onCancel={() => this.setState({ showFormData: false })}/></Modal>
defaultProps
// 方式一Greeting.defaultProps = {name: 'Mary'};// 方式二var Greeting = createReactClass({getDefaultProps: function() {return {name: 'Mary'};},
porps校验
import PropTypes from "prop-types";export default class StatefulTabSelect extends Component {static propTypes = {initialValue: PropTypes.string,value: PropTypes.string,options: PropTypes.array,onChange: PropTypes.func};state = { value: null };static defaultProps = {value: null,options: [],onChange: () => {}};}
createPortal
import ReactDOM from "react-dom";export default class PortalSample extends React.PureComponent {state = { visible: false };renderButton() {return (<Button type="primary" onClick={() => this.setState({ visible: true })}>打开对话框</Button>);}renderDialog() {return (<div className="portal-sample"><div>这是一个对话框!</div><br /><Buttontype="primary"onClick={() => this.setState({ visible: false })}>关闭对话框</Button></div>);}render() {if (!this.state.visible) return this.renderButton();return ReactDOM.createPortal(this.renderDialog(),document.getElementById("dialog-container"), // dialog-container为页面上任意位置的html元素);}}
二、进阶
suspense
利用 componentDidCatch 来实现同步形式的异步处理
功能:
- 手动控制shouldComponentUpdate是否渲染,返回true就重新渲染,false不重新渲染
- React.PureComponent做浅比较,不用写shouldComponentUpdate,遇到复杂数据时要使用不可突变的数据结构immutable.js
高阶组件
高阶组件就是一个函数,且该函数接受一个组件作为参数,并返回一个新的组件
const EnhancedComponent = higherOrderComponent(WrappedComponent);forceUpdate
this.$forceUpdate(callback). 里面调用了diff算法,比较新节点和旧节点;不相同时更新节点diff算法
diff比较原则:
- 同级节点比较。
- 节点元素不同时(如div和p),直接生成不同的树形结构。相同时,生成相识的树形结构。
- 对于同一级的一组子节点,通过唯一的key进行区分。
合成事件
jsx 上写的事件并没有绑定在对应的真实 DOM 上,而是通过事件代理的方式,将所有的事件都统一绑定在了document上。这样的方式不仅减少了内存消耗,还能在组件挂载销毁时统一订阅和移除事件。在 v17 改成了 app 容器上。这样更利于一个 html 下存在多个应用(微前端)。
- 冒泡阶段:开发者正常给 React 绑定的事件比如 onClick,onChange,默认会在模拟冒泡阶段执行。
捕获阶段:如果想要在捕获阶段执行可以将事件后面加上 Capture 后缀,比如 onClickCapture,onChangeCapture。
export default function Index(){const handleClick=()=>{ console.log('模拟冒泡阶段执行') }const handleClickCapture = ()=>{ console.log('模拟捕获阶段执行') }return <div><button onClick={ handleClick } onClickCapture={ handleClickCapture } >点击</button></div>}
绑定事件并不是一次性绑定所有事件,比如发现了 onClick 事件,就会绑定 click 事件,比如发现 onChange 事件,会绑定 [blur,change ,focus ,keydown,keyup] 多个事件。
- React 事件合成的概念:React 应用中,元素绑定的事件并不是原生事件,而是React 合成的事件,比如 onClick 是由 click 合成,onChange 是由 blur ,change ,focus 等多个事件合成。
另外冒泡到document上的事件也不是原生浏览器事件,而是 React 自己实现的合成事件(SyntheticEvent)。因此我们如果不想要事件冒泡的话,调用event.stopPropagation是无效的,而应该调用event.preventDefault。
优点:
- 合成事件首先抹平了浏览器之间的兼容问题,另外这是一个跨浏览器原生事件包装器,赋予了跨浏览器开发的能力
- 对于原生浏览器事件来说,浏览器会给监听器创建一个事件对象。如果你有很多的事件监听,那么就需要分配很多的事件对象,造成高额的内存分配问题。但是对于合成事件来说,有一个事件池专门来管理它们的创建和销毁,当事件需要被使用时,就会从池子中复用对象,事件回调结束后,就会销毁事件对象上的属性,从而便于下次复用事件对象。
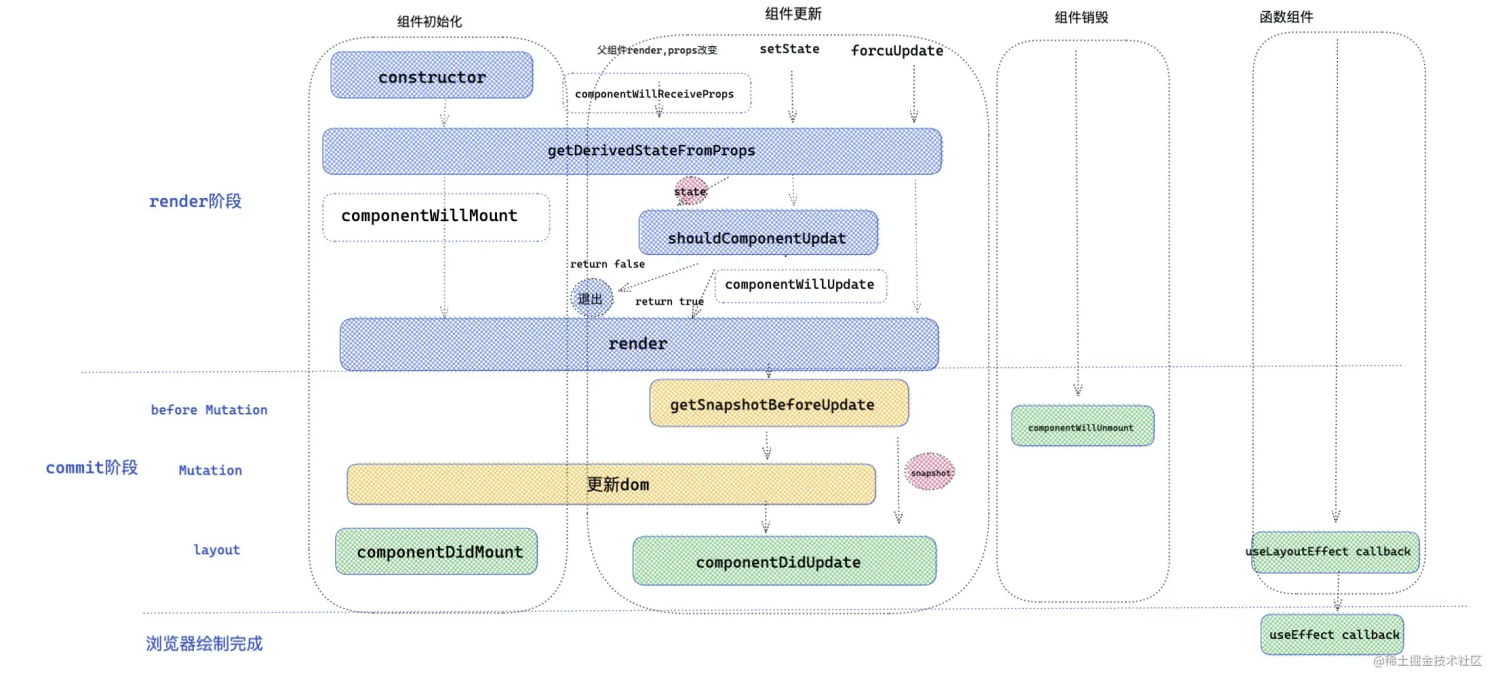
useEffect和useLayoutEffect的区别
useEffect和useLayoutEffect的执行时机不一样,前者被异步调度,当页面渲染完成后再去执行,不会阻塞页面渲染。 后者是在commit阶段新的DOM准备完成,但还未渲染到屏幕之前,同步执行。
https://www.neroht.com/article-detail/31userReducer模拟实现
function useReducer (reducer, initialState) {const [state, setState] = useState(initialState);function dispatch(action) {const nextState = reducer(state, action);setState(nextState)}return [state, dispatch];}
react-hooks和class的区别
设计模式来看:
- 类组件的根基是OOP(面向对象编程),有继承、属性、内部状态;
- 函数组件的根基是FP(函数式编程),能够更好的拆分组合,使关注点分离;
- 组合高于继承;
用法来看:
- 不用写class,
- 不用关心this指向
- 不用关心生命周期
- 状态共享
三、react周边
redux
用一个普通对象来描述应用的 state,当你想要更新 state 中的数据时,你需要发起一个 action 。
- action: 派发分发的意思;action 动作 描述一下你想干什么,动作是一个普通的JS对象,只有一个属性是必须的。type,其它属性随意
- dispatch: 接收新的动作后,通过 才状态 和新动作计算出新状态
connect
是一个高阶组件函数,
用法:connect(state=>state.counter,actions)(Counter)
let mapStateToProps = state=>state.counter; //把仓库中的状态树映射为当前组件的属性对象
把store的dispatch方法转换成一个当前组件的属性对象
let mapDispatchToProps = dispatch = ({increment:()=>dispatch(action.increment)})
直接把actionCreator放在这。这也是
let mapDispatchToProps = actions;<br />combineReducers() 将多个 reducer 合并成为一个reducer<br />**Reducer**<br />reducer是纯函数,永远不要在reducer里做这些操作:
- 修改传入的参数
- 执行有副作用的操作,如API请求和路由跳转
- 调用非纯函数,如Date.now()或Math.random()
react-router
1.1 React-router简介
react-router包含3个库,react-router、react-router-dom和react-router-native。react-router提供最
基本的路由功能,实际使用的时候我们不会直接安装react-router,而是根据应用运行的环境选择安装
react-router-dom(在浏览器中使用)或react-router-native(在rn中使用)。react-router-dom和
react-router-native都依赖react-router,所以在安装时,react-router也会自动安装,创建web应用,
使用yarn add react-router-dom1.2 React-router相关组件
React Router 的组件通常分为三种:
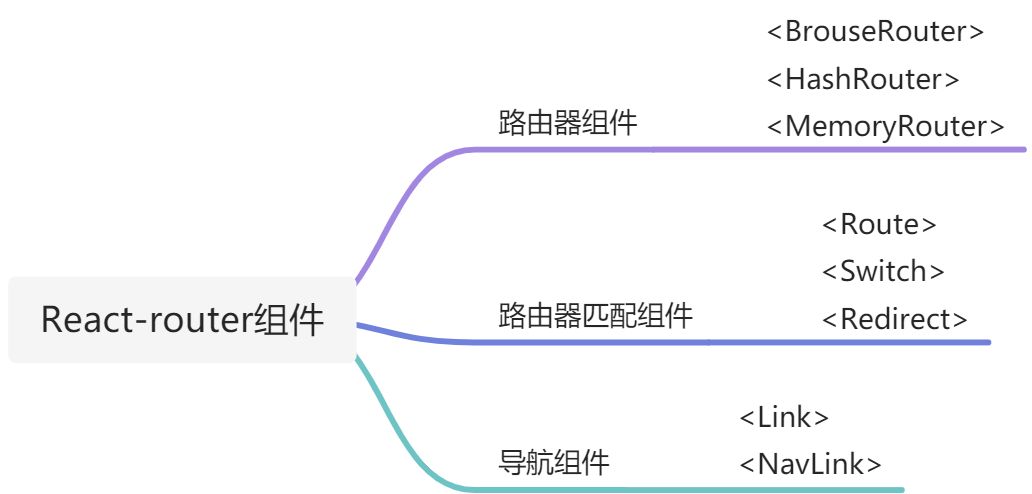
- 路由器组件:
- 路由匹配组件:
、 、 ,路由匹配组件通过匹配 path,渲染对应组件。 - 导航组件: 和
,导航组件起到类似 a 标签跳转页面的作用。
react-router中奉行一切皆组件的思想,路由器-Router、链接-Link、路由-Route、独占-Switch、重定向-Redirect都以组件形式存在
1.3 基本使用
import React, { Component } from "react";import { BrowserRouter, Link, Route } from "react-router-dom";import HomePage from "./HomePage";import UserPage from "./UserPage";export default class RouterPage extends Component {render() {return (<div><h1>RouterPage</h1><BrowserRouter><nav><Link to="/">首页</Link><Link to="/user">用户中心</Link></nav>{/* 根路由要添加exact,实现精确匹配 */}<Route exact path="/" component={HomePage} /><Route path="/user" component={UserPage} /></BrowserRouter></div>);}}
1.4 动态路由
// 定义路由<Route path="/product/:id" component={Product} />// 添加导航链接<Link to={"/product/123"}>搜索</Link>// 创建组件并获取参数function Product({location, match}) {console.log("match", match); //sy-logconst {id} = match.params;return <h1>Product-{id}</h1>;}
1.5 嵌套路由
Route组件嵌套在其他页面组件中就产生了嵌套关系
export default function App(props) {return (<div><Router><Link to="/">首页</Link><Link to="/product/123">搜索</Link><Switch><Route exact path="/" component={HomePage} /><Route path="/product/:id" component={Product} /><Route component={_404Page} /></Switch></Router></div>);}function Product({match}) {console.log("match", match); //sy-logconst {params, url} = match;const {id} = params;return (<div><h1>Search-{id}</h1><Link to={url + "/detail"}>详情</Link><Route path={url + "/detail"} component={Detail} /></div>);}function Detail({match}) {return (<div><h1>detail</h1></div>);}
1.6 路由拦截
@withRouterclass Product extends Component {constructor(props) {super(props);this.state = {confirm: true};}render() {console.log("Product", this.props); //sy-logreturn (<div><h3>Product</h3><Link to="/">go home</Link><Promptwhen={this.state.confirm}// message="Are you sure you want to leave?"message={location => {return "Are you sure you want to leave-fun";}}/></div>);}}
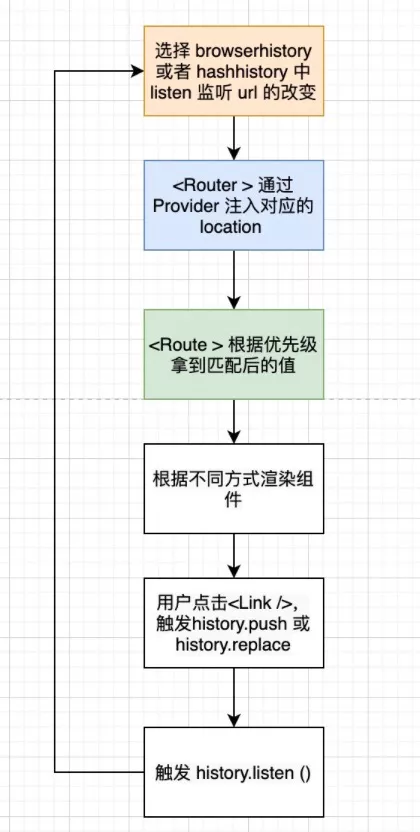
2.1 如何实现一个前端路由
前端路由要实现的两个功能:监听记录路由变化,匹配路由变化并渲染内容
2.2 Hash 实现
通过 hashChange 事件就能直接监听到路由 hash 的变化,并根据匹配到的 hash 的不同来渲染不同的内容。
<body><a href="#/home">Home</a><a href="#/user">User</a><a href="#/about">About</a><div id="view"></div></body><script>// onHashChange事件回调, 匹配路由的改变并渲染对应内容function onHashChange() {const view = document.getElementById('view')switch (location.hash) {case '#/home':view.innerHTML = 'Home';break;case '#/user':view.innerHTML = 'User';break;case '#/about':view.innerHTML = 'About';break;}}// 绑定hash变化事件,监听路由变化window.addEventListener('hashchange', onHashChange);</script>
2.3 History 实现
history 模式相较于 hash 最直接的区别就是跳转的路由不带 # 号,所以我们尝试直接拿掉 #号:
<body><a href="/home">Home</a><a href="/user">User</a><a href="/about">About</a><div id="view"></div></body>
点击 a 标签,会看到页面发生跳转,并提示找不到跳转页面,这也是意料之中的行为,因为 a 标签的默认行为就是跳转页面,我们在跳转的路径下没有对应的网页文件,就会提示错误。那么对于这种非 hash 的路由变化,我们应该怎么处理呢?大体上,我们可以通过以下三步来实现 history 模式下的路由:
1.拦截a标签 的点击事件,阻止它的默认跳转行为
2.使用 H5 的 history API 更新 URL
3.监听和匹配路由改变以更新页面
在开始写代码之前,我们有必要先了解一下 H5 的几个 history API 的基本用法。其实 window.history 这个全局对象在 HTML4 的时代就已经存在,只不过那时我们只能调用 back()、go()等几个方法来操作浏览器的前进后退等基础行为,而 H5 新引入的 pushState()和 replaceState()及 popstate事件 ,能够让我们在不刷新页面的前提下,修改 URL,并监听到 URL 的变化,为 history 路由的实现提供了基础能力。
// 几个 H5 history API 的用法History.pushState(state, title [, url])// 往历史堆栈的顶部添加一个状态,方法接收三个参数:一个状态对象, 一个标题, 和一个(可选的)URL// 简单来说,pushState能更新当前 url,并且不引起页面刷新History.replaceState(stateObj, title[, url]);// 修改当前历史记录实体,方法入参同上// 用法和 pushState类似,区别在于 pushState 是往页面栈顶新增一个记录,// 而 replaceState 则是修改当前记录window.onpopstate// 当活动历史记录条目更改时,将触发popstate事件// 需要注意的是,pushState 和 replaceState 对 url 的修改都不会触发onpopstate,// 它只会在浏览器某些行为下触发, 比如点击后退、前进按钮、a标签点击等
详细的参数介绍和用法读者们可以进一步查阅 MDN,这里只介绍和路由实现相关的要点以及基本用法。了解了这几个 API 以后,我们就能按照我们上面的三步来实现我们的 history 路由:
<body><a href="/home">Home</a><a href="/user">User</a><a href="/about">About</a><div id="view"></div></body><script>// 重写所有 a 标签事件const elements = document.querySelectorAll('a[href]')elements.forEach(el => el.addEventListener('click', (e) => {e.preventDefault() // 阻止默认点击事件const test = el.getAttribute('href')history.pushState(null, null, el.getAttribute('href'))// 修改当前url(前两个参数分别是 state 和 title,这里暂时不需要用到onPopState()// 由于pushState不会触发onpopstate事件, 所以我们需要手动触发事件}))// onpopstate事件回调, 匹配路由的改变并渲染对应内容, 和 hash 模式基本相同function onPopState() {const view = document.querySelector('#view')switch (location.pathname) {case '/home':view.innerHTML = 'Home';break;case '/user':view.innerHTML = 'User';break;case '/about':view.innerHTML = 'About';break;}}// 绑定onpopstate事件, 当页面路由发生更改时(如前进后退),将触发popstate事件window.addEventListener('popstate', onPopState);</script>
Tips:history 模式的代码无法通过直接打开 html 文件的形式在本地运行,在切换路由的时候,将会提示: Uncaught SecurityError: A history state object with URL ‘file://xxx.html’ cannot be created in a document with origin ‘null’. 这是由于 pushState 的 url 必须与当前的 url 同源,而 file:// 形式打开的页面没有 origin ,导致报错。如果想正常运行体验,可以使用http-server为文件启动一个本地服务。
History 模式的实现代码也比较简单,我们通过重写 a 标签的点击事件,阻止了默认的页面跳转行为,并通过 history API 无刷新地改变 url,最后渲染对应路由的内容。到这里,我们基本上了解了hash 和history 两种前端路由模式的区别和实现原理,总的来说,两者实现的原理虽然不同,但目标基本一致,都是在不刷新页面的前提下,监听和匹配路由的变化,并根据路由匹配渲染页面内容。既然我们能够如此简单地实现前端路由,那么 React Router 的优势又体现在哪,它的实现能给我们带来哪些启发和借鉴呢。
3.1 React Router 源码实现

若有收获,就点个赞吧
0 人点赞
