什么是IDE?
集成开发环境(IDE,Integrated Development Environment )是用于提供程序开发环境的应用程序,一般包括代码编辑器、编译器、调试器和图形用户界面等工具。
富文本编辑器的分类
相信很多人都使用过多种富文本编辑器
富文本编辑器常用于编辑博客、用户交互,富文本编辑器分为两种:
所见即所得、非所见即所得。当然,两种富文本编辑器的实现原理是不相同的。
所见即所得富文本编辑器
这种编辑器的实现原理很简单,用textarea元素就可以实现,假如要实现粗体、斜体、下划线、颜色字、图片的效果,只需在字的中间加上自定义标签即可。
例如:
[b]富文本编辑器[b] ,[img]src=”http://www.google.com.hk/intl/zh-CN/images/logo_cn.png”
[img]当然这些规则你得自己通过js进行定制,当POST提交后,再把这些标签转换为html标签。
非所见即所得富文本编辑器
前面提到的效果,我们无法在textarea中见到立竿见影的效果(所见即所得),而文本域本身也只是支持一些字符的输入,并不支持显示html。
富文本编辑器实现原理
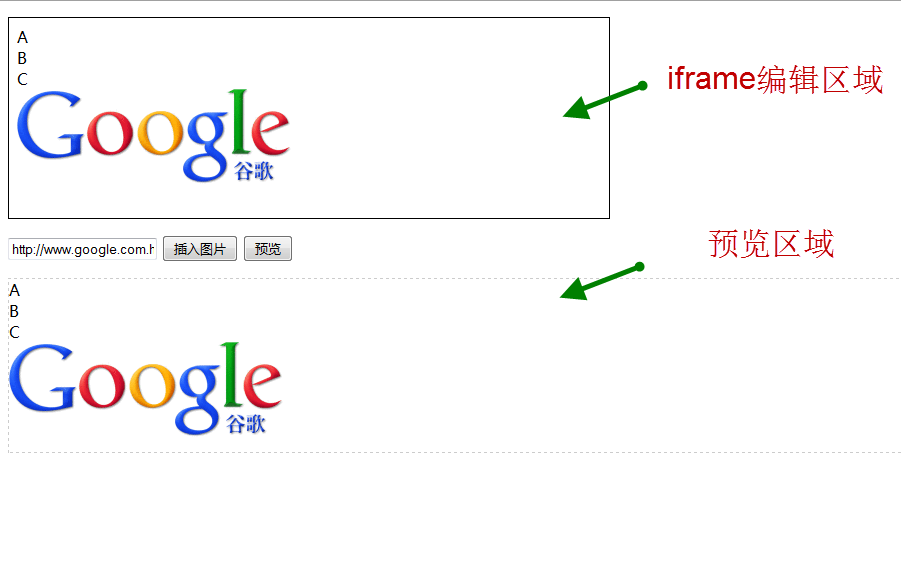
如何做到编辑像文本域,又能够即时所见呢?答案就是使用iframe作为内容编辑区域。iframe本身也是一个嵌套页面,它如何能够被编辑呢?这里有一些关键的属性,它们可以做到让iframe可以被编辑。
<!DOCTYPE HTML><html lang="en" xmlns="http://www.w3.org/1999/xhtml"><head><meta http-equiv="Content-Type" content="text/html; charset=utf-8" /><title>KF富文本编辑器</title><script type="text/javascript" src="jquery.min.js"></script><script type="text/javascript">$(function () {$d = $("#editor")[0].contentWindow.document; // IE、FF都兼容$d.designMode = "on";$d.contentEditable = true;$d.open();$d.close();$("body", $d).append("<div>A</div><div>B</div><div>C</div>");$('#insert_img').click(function () {// 在iframe中插入一张图片var img = '<img src="' + $('#path').val() + '" />';$("body", $d).append(img);});$('#preview').click(function () {// 获取iframe的body内容,用于显示或者插入到数据库alert($('#editor').contents().find('body').html());$('#preview_area').html($('#editor').contents().find('body').html());});});</script></head><body><p><iframe id="editor" width="600px" height="200px" style="border:solid 1px;"></iframe></p><input type="text" id="path" value="http://www.google.com.hk/intl/zh-CN/images/logo_cn.png" /><input type="button" id="insert_img" value="插入图片" /><input type="button" id="preview" value="预览" /><p style="border: 1px dashed #ccc;" id="preview_area"></p></body></html>
代码关键点:
- designMode属性为 “on”
- contentEditable属性为 “true”,让iframe可编辑
原型展示

功能介绍
Vue-Quill-Editor
🍡Quill editor component for Vue, support SPA and SSR.
- 基于 Quill
- 适用于 Vue 的富文本编辑器
- 支持服务端渲染
-
开发环境
Chrome
- Cmder
- Electron: 9.3.3
- Chrome: 83.0.4103.122
- Node.js: 12.14.1
- V8: 8.3.110.13-electron.0
- OS: Darwin x64 20.1.0
开发流程
下载vue-quill-editor
npm install vue-quill-editor --save
下载quill(vue-quill-editor所需依赖)
npm install quill --save
代码
<template><div class="edit_container"><quill-editorv-model="content"ref="myQuillEditor":options="editorOption"@blur="onEditorBlur($event)" @focus="onEditorFocus($event)"@change="onEditorChange($event)"></quill-editor></div></template><script>import { quillEditor } from "vue-quill-editor"; //调用编辑器import 'quill/dist/quill.core.css';import 'quill/dist/quill.snow.css';import 'quill/dist/quill.bubble.css';export default {components: {quillEditor},data() {return {content: `<p></p><p><br></p><ol><li><strong><em>Or drag/paste an image here.</em></strong></li><li><strong><em>rerew</em></strong></li><li><strong><em>rtrete</em></strong></li><li><strong><em>tytrytr</em></strong></li><li><strong><em>uytu</em></strong></li></ol>`,editorOption: {}}},methods: {onEditorReady(editor) { // 准备编辑器},onEditorBlur(){}, // 失去焦点事件onEditorFocus(){}, // 获得焦点事件onEditorChange(){}, // 内容改变事件},computed: {editor() {return this.$refs.myQuillEditor.quill;},}}</script>
自定义toolbar
{placeholder: "请在这里输入",modules:{toolbar:[['bold', 'italic', 'underline', 'strike'], //加粗,斜体,下划线,删除线['blockquote', 'code-block'], //引用,代码块[{ 'header': 1 }, { 'header': 2 }], // 标题,键值对的形式;1、2表示字体大小[{ 'list': 'ordered'}, { 'list': 'bullet' }], //列表[{ 'script': 'sub'}, { 'script': 'super' }], // 上下标[{ 'indent': '-1'}, { 'indent': '+1' }], // 缩进[{ 'direction': 'rtl' }], // 文本方向[{ 'size': ['small', false, 'large', 'huge'] }], // 字体大小[{ 'header': [1, 2, 3, 4, 5, 6, false] }], //几级标题[{ 'color': [] }, { 'background': [] }], // 字体颜色,字体背景颜色[{ 'font': [] }], //字体[{ 'align': [] }], //对齐方式['clean'], //清除字体样式['image','video'] //上传图片、上传视频]}}
存储编码
function escapeStringHTML(str) {str = str.replace(/</g,'<');str = str.replace(/>/g,'>');return str;}
技术点和解决方案
兼容
- ie10+
- chrome 22+
- safari 35+
-
性能
全局引入 ```javascript import Vue from ‘vue’ import VueQuillEditor from ‘vue-quill-editor’
// require styles import ‘quill/dist/quill.core.css’ import ‘quill/dist/quill.snow.css’ import ‘quill/dist/quill.bubble.css’
Vue.use(VueQuillEditor, / { default global options } /)
- 局部引入```javascriptimport 'quill/dist/quill.core.css'import 'quill/dist/quill.snow.css'import 'quill/dist/quill.bubble.css'import { quillEditor } from 'vue-quill-editor'export default {components: {quillEditor}}
- 按需加载
npm i --save babel-plugin-import
服务器渲染
根据环境配置SSR:
if (process.browser) {const VueQuillEditor = require('vue-quill-editor/dist/ssr')Vue.use(VueQuillEditor, /* { default global options } */)}
直接上代码:
<template><!-- bidirectional data binding(双向数据绑定) --><div class="quill-editor"v-model="content"v-quill:myQuillEditor="editorOption"></div><!-- Or manually control the data synchronization(手动控制数据流) --><div class="quill-editor":content="content"@change="onEditorChange($event)"v-quill:myQuillEditor="editorOption"></div></template><script>export default {data() {return {content: '<p>example content</p>',editorOption: { /* quill options */ }}},mounted() {console.log('this is current quill instance object', this.myQuillEditor)},methods: {onEditorChange(event) {console.log('onEditorChange')}},}</script>
总结

若有收获,就点个赞吧
0 人点赞
