TorchScript 中的动态并行性
原文:https://pytorch.org/tutorials/advanced/torch-script-parallelism.html
在本教程中,我们介绍在 TorchScript 中执行动态互操作并行化的语法。 此并行性具有以下属性:
- 动态-创建的并行任务的数量及其工作量可能取决于程序的控制流。
- 互操作-并行性与并行运行 TorchScript 程序片段有关。 这与运算内部并行化不同,后者涉及拆分单个运算符并并行运行运算符工作的子集。
基本语法
动态并行的两个重要 API 是:
torch.jit.fork(fn : Callable[..., T], *args, **kwargs) -> torch.jit.Future[T]torch.jit.wait(fut : torch.jit.Future[T]) -> T
通过示例来演示这些工作原理的好方法:
import torchdef foo(x):return torch.neg(x)@torch.jit.scriptdef example(x):# Call `foo` using parallelism:# First, we "fork" off a task. This task will run `foo` with argument `x`future = torch.jit.fork(foo, x)# Call `foo` normallyx_normal = foo(x)# Second, we "wait" on the task. Since the task may be running in# parallel, we have to "wait" for its result to become available.# Notice that by having lines of code between the "fork()" and "wait()"# call for a given Future, we can overlap computations so that they# run in parallel.x_parallel = torch.jit.wait(future)return x_normal, x_parallelprint(example(torch.ones(1))) # (-1., -1.)
fork()接受可调用fn以及该可调用args和kwargs的参数,并创建异步任务来执行fn。 fn可以是函数,方法或模块实例。 fork()返回对此执行结果的值的引用,称为Future。 因为fork在创建异步任务后立即返回,所以在执行fork()调用之后的代码行时可能尚未执行fn。 因此,wait()用于等待异步任务完成并返回值。
这些结构可用于重叠函数内语句的执行(如工作示例部分所示),或与其他语言结构(如循环)组合在一起:
import torchfrom typing import Listdef foo(x):return torch.neg(x)@torch.jit.scriptdef example(x):futures : List[torch.jit.Future[torch.Tensor]] = []for _ in range(100):futures.append(torch.jit.fork(foo, x))results = []for future in futures:results.append(torch.jit.wait(future))return torch.sum(torch.stack(results))print(example(torch.ones([])))
注意
当我们初始化一个空的期货列表时,我们需要在futures上添加一个显式类型注解。 在 TorchScript 中,空容器默认假定它们包含张量值,因此我们将列表构造器#注解为List[torch.jit.Future[torch.Tensor]]类型
本示例使用fork()启动函数foo的 100 个实例,等待 100 个任务完成,然后对结果求和,返回-100.0。
应用示例:双向 LSTM 的集成
让我们尝试将并行性应用于一个更现实的示例,看看我们可以从中获得什么样的性能。 首先,让我们定义基准模型:双向 LSTM 层的集合。
import torch, time# In RNN parlance, the dimensions we care about are:# # of time-steps (T)# Batch size (B)# Hidden size/number of "channels" (C)T, B, C = 50, 50, 1024# A module that defines a single "bidirectional LSTM". This is simply two# LSTMs applied to the same sequence, but one in reverseclass BidirectionalRecurrentLSTM(torch.nn.Module):def __init__(self):super().__init__()self.cell_f = torch.nn.LSTM(input_size=C, hidden_size=C)self.cell_b = torch.nn.LSTM(input_size=C, hidden_size=C)def forward(self, x : torch.Tensor) -> torch.Tensor:# Forward layeroutput_f, _ = self.cell_f(x)# Backward layer. Flip input in the time dimension (dim 0), apply the# layer, then flip the outputs in the time dimensionx_rev = torch.flip(x, dims=[0])output_b, _ = self.cell_b(torch.flip(x, dims=[0]))output_b_rev = torch.flip(output_b, dims=[0])return torch.cat((output_f, output_b_rev), dim=2)# An "ensemble" of `BidirectionalRecurrentLSTM` modules. The modules in the# ensemble are run one-by-one on the same input then their results are# stacked and summed together, returning the combined result.class LSTMEnsemble(torch.nn.Module):def __init__(self, n_models):super().__init__()self.n_models = n_modelsself.models = torch.nn.ModuleList([BidirectionalRecurrentLSTM() for _ in range(self.n_models)])def forward(self, x : torch.Tensor) -> torch.Tensor:results = []for model in self.models:results.append(model(x))return torch.stack(results).sum(dim=0)# For a head-to-head comparison to what we're going to do with fork/wait, let's# instantiate the model and compile it with TorchScriptens = torch.jit.script(LSTMEnsemble(n_models=4))# Normally you would pull this input out of an embedding table, but for the# purpose of this demo let's just use random data.x = torch.rand(T, B, C)# Let's run the model once to warm up things like the memory allocatorens(x)x = torch.rand(T, B, C)# Let's see how fast it runs!s = time.time()ens(x)print('Inference took', time.time() - s, ' seconds')
在我的机器上,该网络运行时间为2.05秒。 我们可以做得更好!
并行化前向和后向层
我们可以做的一个非常简单的事情是在BidirectionalRecurrentLSTM中并行化前进和后退层。 为此,计算结构是静态的,因此我们实际上甚至不需要任何循环。 像这样重写BidirectionalRecurrentLSTM的forward方法:
def forward(self, x : torch.Tensor) -> torch.Tensor:# Forward layer - fork() so this can run in parallel to the backward# layerfuture_f = torch.jit.fork(self.cell_f, x)# Backward layer. Flip input in the time dimension (dim 0), apply the# layer, then flip the outputs in the time dimensionx_rev = torch.flip(x, dims=[0])output_b, _ = self.cell_b(torch.flip(x, dims=[0]))output_b_rev = torch.flip(output_b, dims=[0])# Retrieve the output from the forward layer. Note this needs to happen# *after* the stuff we want to parallelize withoutput_f, _ = torch.jit.wait(future_f)return torch.cat((output_f, output_b_rev), dim=2)
在此示例中,forward()将cell_f的执行委派给另一个线程,而它继续执行cell_b。 这导致两个单元的执行彼此重叠。
通过简单的修改再次运行脚本会产生1.71秒的运行时间,从而改进了17%!
旁注:可视化并行性
我们还没有完成模型的优化,但是值得介绍一下用于可视化性能的工具。 一种重要的工具是 PyTorch 分析器。
让我们将分析器与 Chrome 跟踪导出功能一起使用,以可视化并行模型的性能:
with torch.autograd.profiler.profile() as prof:ens(x)prof.export_chrome_trace('parallel.json')
此代码段将写出名为parallel.json的文件。 如果您将 Google Chrome 浏览器导航到chrome://tracing,单击Load按钮,然后加载该 JSON 文件,则应该看到类似以下的时间轴:
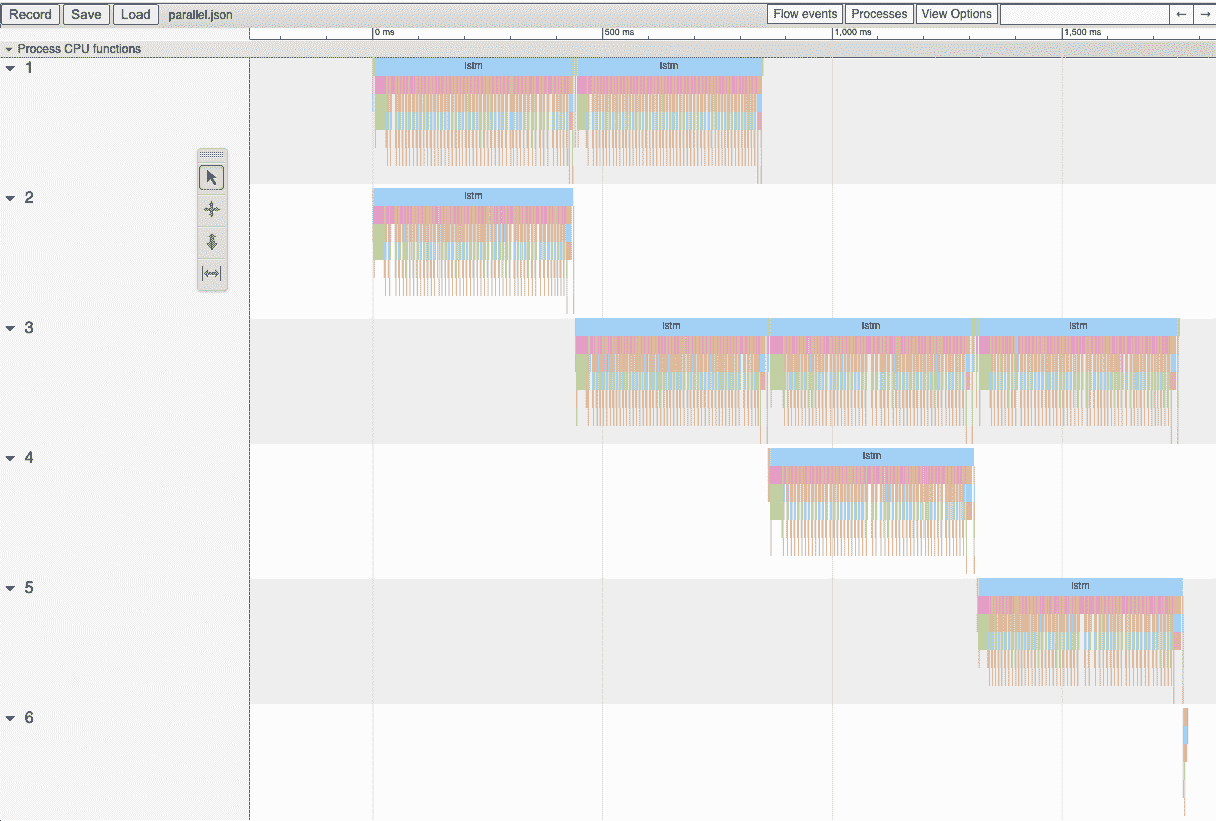
时间轴的横轴表示时间,纵轴表示执行线程。 如我们所见,我们一次运行两个lstm实例。 这是我们辛勤工作使双向层平行的结果!
集成中的并行化模型
您可能已经注意到,我们的代码中还有更多的并行化机会:我们还可以并行运行LSTMEnsemble中包含的模型。 做到这一点的方法很简单,这就是我们应该更改LSTMEnsemble的forward方法的方式:
def forward(self, x : torch.Tensor) -> torch.Tensor:# Launch tasks for each modelfutures : List[torch.jit.Future[torch.Tensor]] = []for model in self.models:futures.append(torch.jit.fork(model, x))# Collect the results from the launched tasksresults : List[torch.Tensor] = []for future in futures:results.append(torch.jit.wait(future))return torch.stack(results).sum(dim=0)
或者,如果您重视简洁性,我们可以使用列表推导:
def forward(self, x : torch.Tensor) -> torch.Tensor:futures = [torch.jit.fork(model, x) for model in self.models]results = [torch.jit.wait(fut) for fut in futures]return torch.stack(results).sum(dim=0)
如介绍中所述,我们使用循环为集合中的每个模型分派任务。 然后,我们使用了另一个循环来等待所有任务完成。 这提供了更多的计算重叠。
通过此小更新,脚本将在1.4秒内运行,总速度为32%! 两行代码相当不错。
我们还可以再次使用 Chrome 跟踪器来查看运行情况:
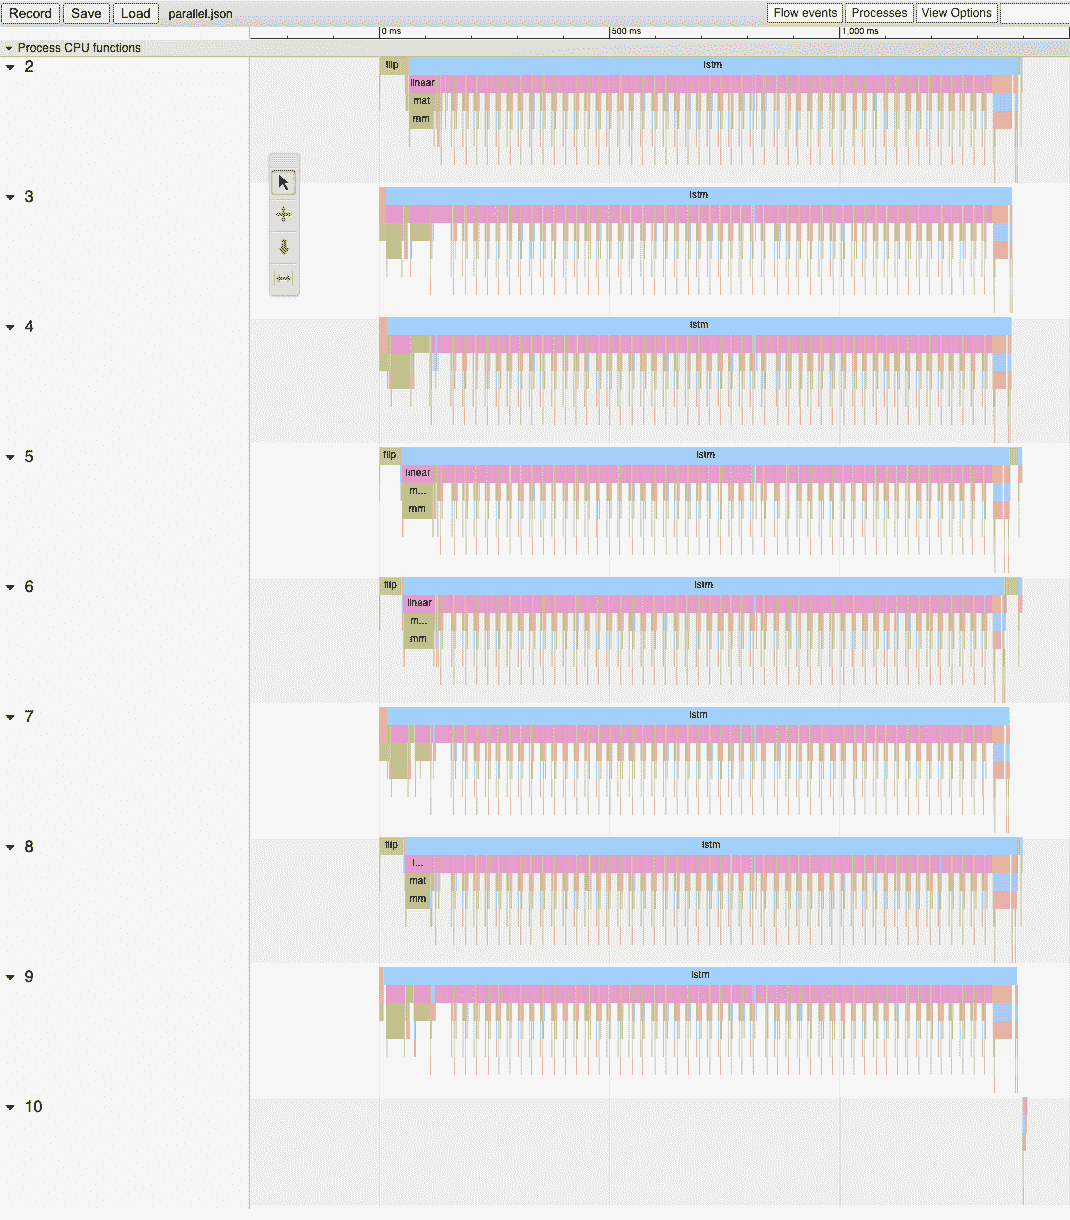
现在我们可以看到所有LSTM实例都在完全并行运行。
总结
在本教程中,我们学习了fork()和wait(),这是在 TorchScript 中执行动态,互操作并行的基本 API。 我们看到了一些典型的使用模式,这些模式使用这些函数并行执行 TorchScript 代码中的函数,方法或Modules的执行。 最后,我们通过一个使用该技术优化模型的示例进行了研究,并探索了 PyTorch 中可用的性能测量和可视化工具。

若有收获,就点个赞吧
0 人点赞
