1 安装MySQL
1.1 查询是否安装了mysql
rpm -qa|grep mysql
1.2 卸载mysql (下面是卸载mysql的库,防止产生冲突,mysql也是类似卸载方式)
rpm -e --nodeps mysql-libs-5.1.*卸载之后,记得:find / -name mysql删除查询出来的所有东西
1.3 安装mysql
yum install mysql-server
注意: centos 7这样安装不行, 详见文档底部
1.4 启动mysql
启动方式1:service mysql start启动方式2:/etc/init.d/mysql start启动方式3:service mysqld start启动方式4:/etc/init.d/mysqld start
1.5 root账户默认是没有密码的,修改root密码:
/usr/bin/mysqladmin -u root password 密码例如:/usr/bin/mysqladmin -u root password pwd 这样就将root密码设置成pwd了
1.6 重置root密码(忘记root密码找回)
1.6.1 停止MySQL服务命令:
/etc/init.d/mysqld stop/etc/init.d/mysql stop
1.6.2 输入绕过密码认证命令:
mysqld_safe --user=mysql --skip-grant-tables --skip-networking &
1.6.3 输入登录用户命令:
mysql -u root mysql
1.6.4 输入修改root密码SQL语句:
update user set Password=password ('123456') where user='root';
1.6.5 输入数据刷新命令:
FLUSH PRIVILEGES;
1.6.6 退出MySQL命令:
quit;
1.7 设置允许远程连接
grant all privileges on *.* to root@'%' identified by '123456789' with grant option;
1.8 开放端口3306,否则依然无法过远程
1.8.1 打开防火墙配置文件:
vi /etc/sysconfig/iptables
1.8.2 添加下面一行:
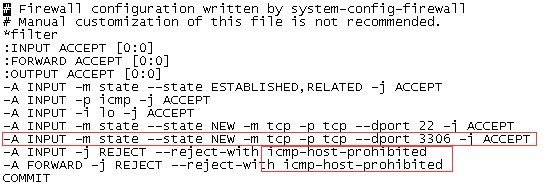
-A INPUT -m state --state NEW -m tcp -p tcp --dport 3306 -j ACCEPT
注意:开通3306 端口的行必须在icmp-host-prohibited前,否则无效:以下为配置结果图:
1.8.3 重启防火墙,使配置生效:
/etc/init.d/iptables restart
1.9 设置开机启动mysql:
1.9.1 查看MySQL服务是否自动开启命令
chkconfig --list | grep mysqldchkconfig --list | grep mysql
1.9.2 开启MySQL服务自动开启命令
chkconfig mysqld onchkconfig mysql on
1.10 将mysql默认引擎设置为InnoDB
1.10.1 修改MySQL配置文件my.cnf
cd /etcvi my.cnf
1.10.2 在[mysqld]一段加入
default-storage-engine=InnoDB
1.10.3 删除ib_logfile0、ib_logfile1两个文件
cd /var/lib/mysqlrm -rf ib_logfile*
1.10.4 重启mysql
1.11 开启mysql的日志(监控执行的sql语句)
1.11.1 命令:
set global general_log = on; // 打开set global general_log = off; // 关闭
1.11.2 参考文档:
http://blog.csdn.net/fdipzone/article/details/16995303
2 centos7安装mysql
wget http://dev.mysql.com/get/mysql-community-release-el7-5.noarch.rpm#rpm -ivh mysql-community-release-el7-5.noarch.rpm#yum install mysql-community-server成功安装之后重启mysql服务#service mysqld restart初次安装mysql是root账户是没有密码的设置密码的方法#mysql -urootmysql> set password for ‘root’@‘localhost’ = password('mypasswd');mysql> exit

