- 一、关于ResNet101
- 二、基于ResNet101的Faster R-CNN
- 三、Backbone(ResNet101)
- 四、Faster R-CNN的forward过程
- 1.Backbone的前向传播
- 2.RPN完整前向传播
- 3.RPN损失函数计算
- 4.通过RPN选取RoI (Proposal of interest)
- 5.对[batch_size,128,4]region proposal进行ROI Pooling
- 6.pooled_feat = self._head_to_tail(pooled_feat)
- 7.计算Fast R-CNN模型的损失函数
- 五、Faster R-CNN图示
- 六、重新梳理总结
一、关于ResNet101
这个博客讲的很好:https://blog.csdn.net/lanran2/article/details/79057994
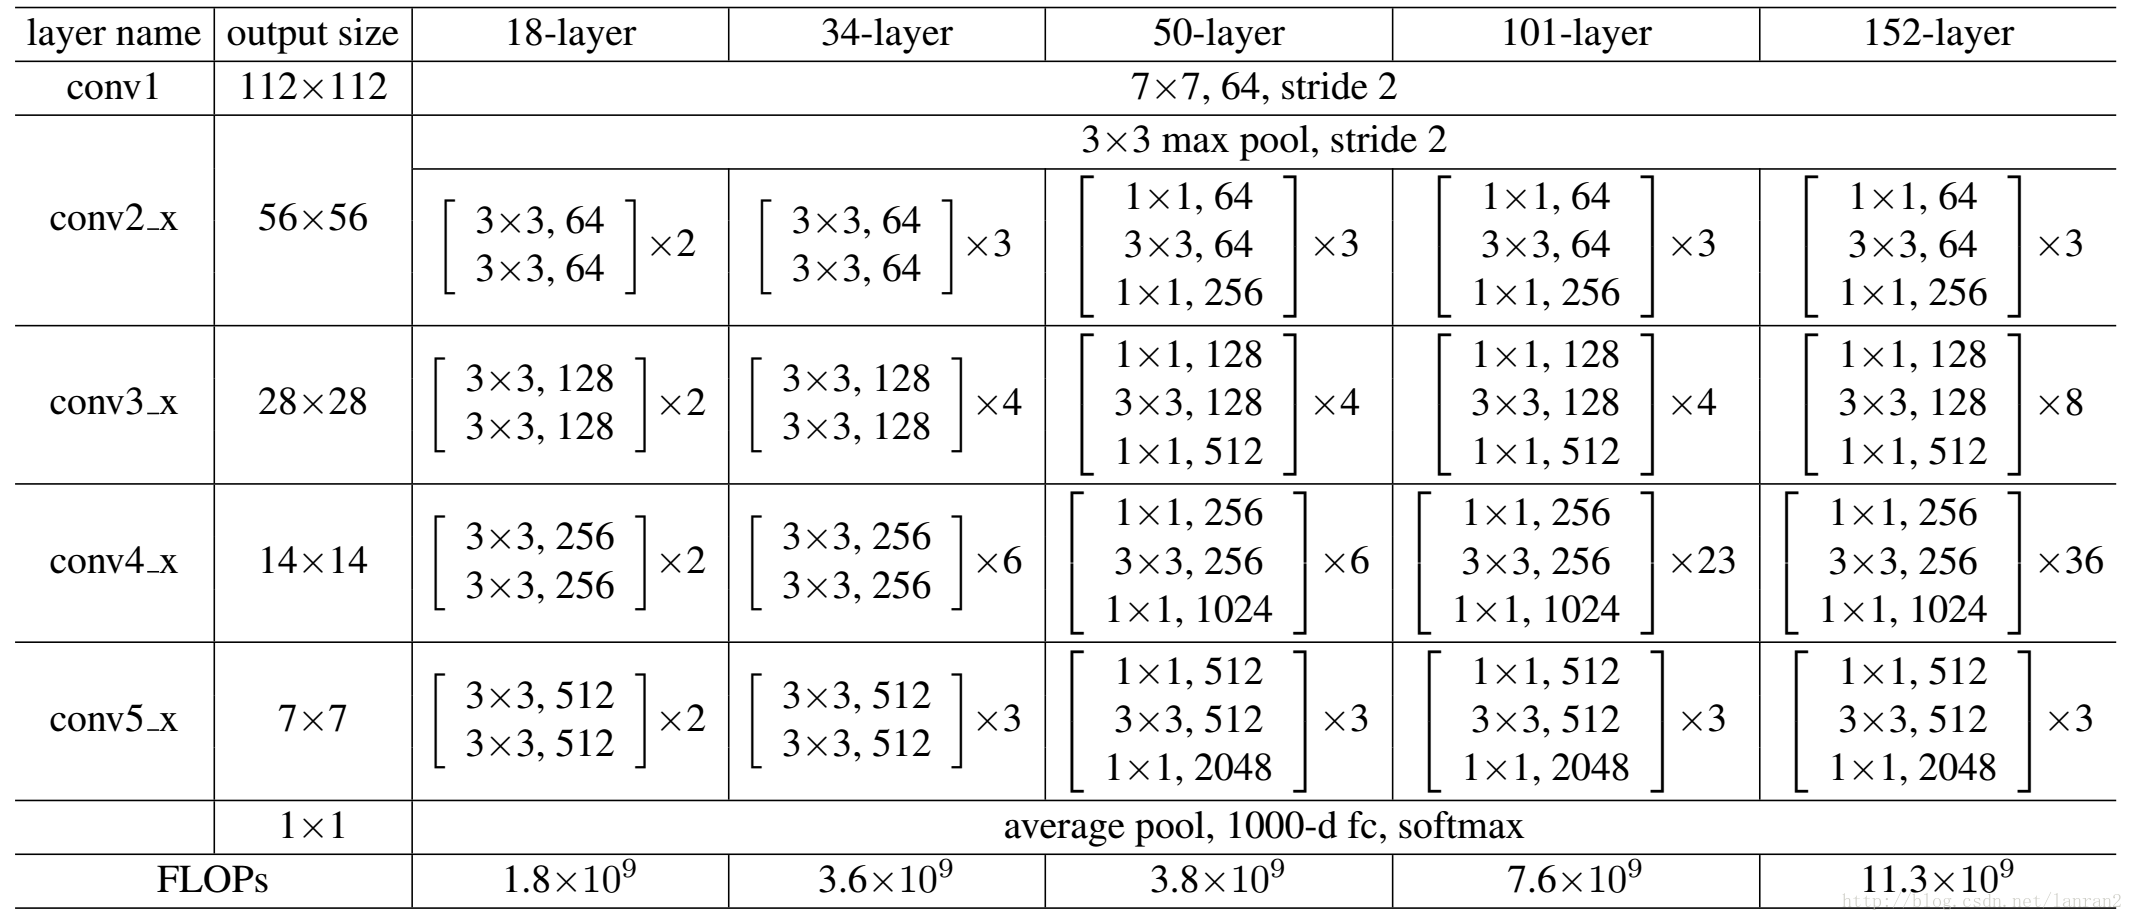
关于这个不同深度ResNet,分别有:18, 34, 50, 101, 152 ,它们所有的网络都分为5个部分,分别为: conv1,conv2_x,conv3_x,conv4_x,conv5_x。
以ResNet101为例,我们看看101-layer是哪些:首先有个输入7x7x64的卷积,然后经过3+4+23+3=33个building block,每一个block为3层,所以有33 x 3 = 99层,最后有一个全连接层用于分类,所以1 + 99 + 1 = 101,一共101层网络。
注意:101层网络仅仅是指卷积或者全连接层,而激活函数层或者Pooling层并没有计算在内。
二、基于ResNet101的Faster R-CNN
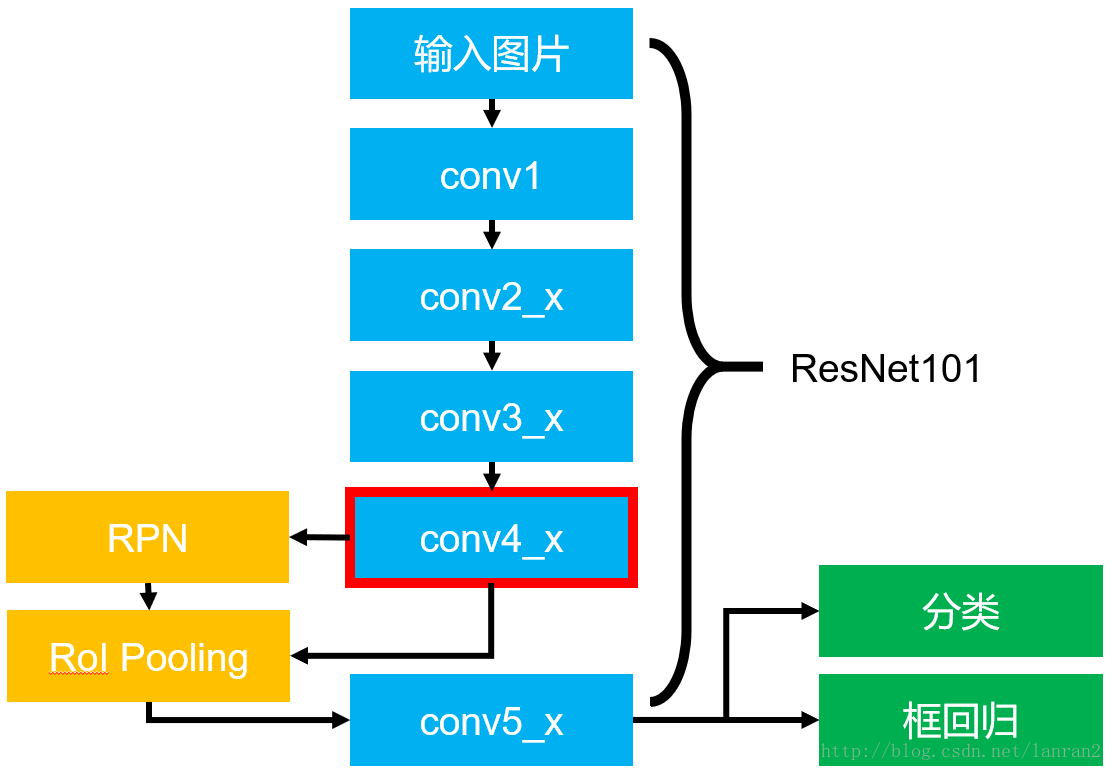
该图展示了整个Faster RCNN的架构,其中蓝色的部分为ResNet101,可以发现conv4_x的最后的输出为RPN和RoI Pooling共享的部分,而conv5_x(共9层网络)都作用于RoI Pooling之后的一堆特征图(14 x 14 x 1024),特征图的大小维度也刚好符合原本的ResNet101中conv5_x的输入。
最后大家一定要记得最后要接一个average pooling,得到2048维特征,分别用于分类和框回归。
三、Backbone(ResNet101)
我们先来看关于骨干网络(BackBone)的代码:
首先我们始终要记住:(3,4,23,3),相加再乘3,首尾一个卷积层一个fc层,共计101。
显示一个3x3的Conv层,因为比较常用所以单独分离出来:
def conv3x3(in_planes, out_planes, stride=1):"3x3 convolution with padding"return nn.Conv2d(in_planes, out_planes, kernel_size=3, stride=stride,padding=1, bias=False)
随后再定义两个类型的残差块类:
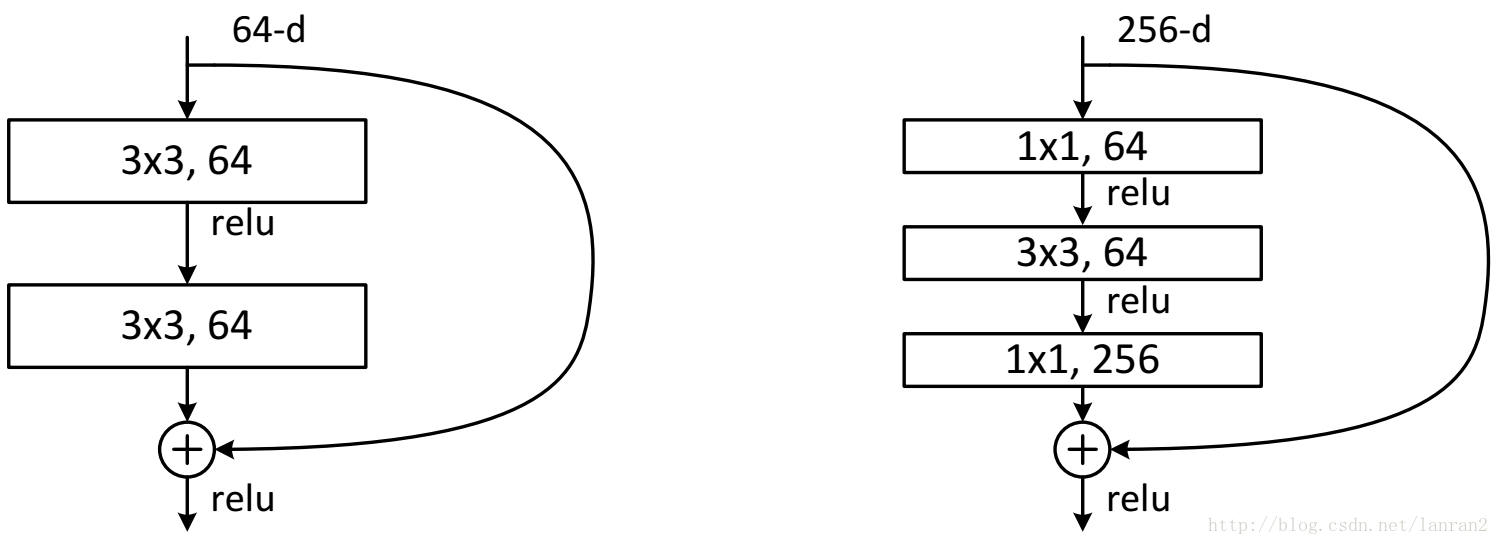
第一种类型的残差块是较少层数的ResNet网络:
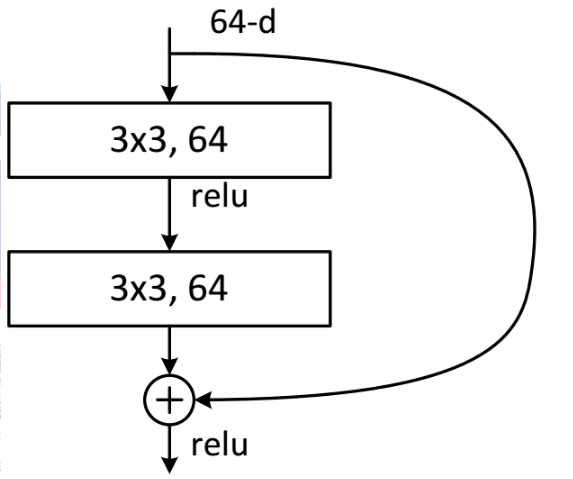
class BasicBlock(nn.Module):expansion = 1# 定义一个残差块def __init__(self, inplanes, planes, stride=1, downsample=None):super(BasicBlock, self).__init__()# 先来两层Conv3x3,后接bn,relu层self.conv1 = conv3x3(inplanes, planes, stride)self.bn1 = nn.BatchNorm2d(planes)self.relu = nn.ReLU(inplace=True)self.conv2 = conv3x3(planes, planes)self.bn2 = nn.BatchNorm2d(planes)# 节后后文来看,downsample也是一个卷积网络,不设置则默认为Noneself.downsample = downsampleself.stride = stridedef forward(self, x):residual = xout = self.conv1(x)out = self.bn1(out)out = self.relu(out)out = self.conv2(out)out = self.bn2(out)# 如果有下采样需求(stride>1,比如说2),就是把数据丢到downsample网络里跑一圈。# 就是当残差块中输入和输出的channel不一致是——需要进行 y=F(x)+Wx 操作# 跑出来的结果就是残差块里的残差if self.downsample is not None:residual = self.downsample(x)out += residualout = self.relu(out)return out
下面这种残差块适用于网络深度较深的ResNet网络中,比如ResNet101。
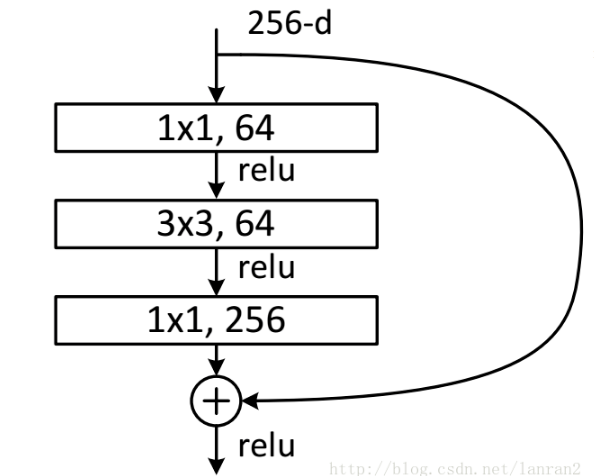
class Bottleneck(nn.Module):# 表示输出的channel的膨胀系数为4 64-->256expansion = 4# 使用BottleNeck的好处是减少参数量,大幅加快运算速度def __init__(self, inplanes, planes, stride=1, downsample=None):super(Bottleneck, self).__init__()'''下面分别是三个Conv层1x1, 3x3, 1x1,其中最后一层1x1完成planes*4的out_channel定型如果有下采样需求,在第一层的stride=stride中完成'''self.conv1 = nn.Conv2d(inplanes, planes, kernel_size=1, stride=stride,bias=False) # changeself.bn1 = nn.BatchNorm2d(planes)self.conv2 = nn.Conv2d(planes, planes, kernel_size=3, stride=1, # changepadding=1, bias=False)self.bn2 = nn.BatchNorm2d(planes)self.conv3 = nn.Conv2d(planes, planes * 4, kernel_size=1, bias=False)self.bn3 = nn.BatchNorm2d(planes * 4)self.relu = nn.ReLU(inplace=True)self.downsample = downsampleself.stride = stridedef forward(self, x):residual = xout = self.conv1(x)out = self.bn1(out)out = self.relu(out)out = self.conv2(out)out = self.bn2(out)out = self.relu(out)out = self.conv3(out)out = self.bn3(out)# 如果说残差块输入的channel和输出的channel不一致# 如果有下采样需求(stride>1,比如说为2),跑出来的结果就是残差块里的残差if self.downsample is not None:residual = self.downsample(x)out += residualout = self.relu(out)return out
以下才是ResNet的主体,根据传入的layers参数,像搭积木一样搭好ResNet,block是用户自己设计的残差块结构,即积木本身,由于我们选择了ResNet101,跟我一起背layers=[3,4,23,3],block要取BottleNeck,如果选择ResNet18,34就是BasicBlock。
class ResNet(nn.Module):def __init__(self, block, layers, num_classes=1000):self.inplanes = 64'''注意这个参数,默认为64,对应的是Conv1的out_channel=64,如果修改Conv1的out_channel,这里也要修改'''super(ResNet, self).__init__()self.conv1 = nn.Conv2d(3, 64, kernel_size=7, stride=2, padding=3,bias=False)self.bn1 = nn.BatchNorm2d(64)self.relu = nn.ReLU(inplace=True)'''ResNet101=1+[3,4,23,3]+1,共计101层Conv1就是最开始的第一层,负责把输入的RGB图像用7x7的卷积核卷积为 64out_channel的特征图同时使用stride=2,将特征图尺寸减半'''self.maxpool = nn.MaxPool2d(kernel_size=3, stride=2, padding=0, ceil_mode=True)'''这里把Maxpooling单独拿出来,又进行了一次feature map的放缩,其实是包含在Conv2_x中的maxpool层也是固定的,3x3pool,stride=2''''''下面根据我们的[3,4,23,3],搭建积木此处的block依然为我们传进来的残差块类——BottleNeck注意,layer234都有stride=2,此处feature map再除以2^3=8'''self.layer1 = self._make_layer(block, 64, layers[0])# layer1也就是Conv2_x,由于前面已经有个Maxpooling,所以stride=1self.layer2 = self._make_layer(block, 128, layers[1], stride=2)self.layer3 = self._make_layer(block, 256, layers[2], stride=2)self.layer4 = self._make_layer(block, 512, layers[3], stride=2)# it is slightly better whereas slower to set stride = 1# self.layer4 = self._make_layer(block, 512, layers[3], stride=1)self.avgpool = nn.AvgPool2d(7)self.fc = nn.Linear(512 * block.expansion, num_classes)for m in self.modules():if isinstance(m, nn.Conv2d):n = m.kernel_size[0] * m.kernel_size[1] * m.out_channelsm.weight.data.normal_(0, math.sqrt(2. / n))elif isinstance(m, nn.BatchNorm2d):m.weight.data.fill_(1)m.bias.data.zero_()def _make_layer(self, block, planes, blocks, stride=1):downsample = None'''先定义downsample如果stride>1说明要进行下采样,很明显需要在short cut路径中进行一次卷积操作或者 input_channel和out_channel不相等也需要经过1x1的卷积使之达到我们的要求'''if stride != 1 or self.inplanes != planes * block.expansion:downsample = nn.Sequential(nn.Conv2d(self.inplanes, planes * block.expansion,kernel_size=1, stride=stride, bias=False),nn.BatchNorm2d(planes * block.expansion),)'''关于BottleNeck的结构1x1,3x3,1x1的3次卷积,stride=2,feature map缩小在第一次1x1,expansion在最后一次1x1的卷积若有dowmsample就进行dowmsample操作(残差的卷积变化),然后再relu相加'''layers = []layers.append(block(self.inplanes, planes, stride, downsample))''''这一层layer的out,传入下一层layer的in再更新self.inplanes'''self.inplanes = planes * block.expansion'''blocks是指数量,对应我们传进来的[3,4,23,3]中的某一个数字比如第一次make layer3,进来的是layer[0]=3,意思是搭3块积木由于前面有一块带dowmsample的积木了,这里的range()从1开始,只需要再搭2块'''for i in range(1, blocks):'''以make layer1为例,要搭建3块积木。第一块在上面的appemd里,进去64,出来64*4,更新self.inplanes=64*4再进入for循环,第二块进去self.inplanes=64*4,出来planes*4=64*4注意:每一层残差块都只有刚进入是会使feature map缩放一般第三块也是进去self.inplanes=64*4,出来plane*4=64*4'''layers.append(block(self.inplanes, planes))return nn.Sequential(*layers)def forward(self, x):'''我们设传入(bs,3,H,W)的图片,bs表示batch size结束Conv1 得到 (bs,64,H/2,W/2)'''x = self.conv1(x)x = self.bn1(x)x = self.relu(x)# 结束Maxpooling,得到(bs,64,H/4,W/4)x = self.maxpool(x)#结束layer1后,得到(bs,64*expansion=64*4,H/4,W/4)x = self.layer1(x)#结束layer2后,得到(bs,128*expansion=128*4,H/8,W/8)x = self.layer2(x)#结束layer3后,得到(bs,256*expansion=256*4,H/16,W/16)x = self.layer3(x)#结束layer4后,得到(bs,512*expansion=512*4,H/32,W/32)x = self.layer4(x)'''avgpool的设置是kernelsize=7,stride=1如果令input=(bs,3,224,224),则layer4之后,shape=(bs,2048,7,7)再经过nn.Avgpool2d(7),得到shape=(bs,2048,1,1)'''x = self.avgpool(x)'''x.view之后,shape=(bs,2048)fc层再把512 * block.expansion=2048的数据,映射到num_classes上'''x = x.view(x.size(0), -1)x = self.fc(x)# 得到shape=(bs,num_classes)return x
这时,我们就把ResNet的大部分写完了,然后当我们要使用时,可以写一个接口来产生不同的ResNet网络结构:
def resnet18(pretrained=False):"""Constructs a ResNet-18 model.Args:pretrained (bool): If True, returns a model pre-trained on ImageNet"""model = ResNet(BasicBlock, [2, 2, 2, 2])if pretrained:model.load_state_dict(model_zoo.load_url(model_urls['resnet18']))return modeldef resnet34(pretrained=False):"""Constructs a ResNet-34 model.Args:pretrained (bool): If True, returns a model pre-trained on ImageNet"""model = ResNet(BasicBlock, [3, 4, 6, 3])if pretrained:model.load_state_dict(model_zoo.load_url(model_urls['resnet34']))return modeldef resnet50(pretrained=False):"""Constructs a ResNet-50 model.Args:pretrained (bool): If True, returns a model pre-trained on ImageNet"""model = ResNet(Bottleneck, [3, 4, 6, 3])if pretrained:model.load_state_dict(model_zoo.load_url(model_urls['resnet50']))return model# 这是我们要使用的网络骨干def resnet101(pretrained=False):"""Constructs a ResNet-101 model.Args:pretrained (bool): If True, returns a model pre-trained on ImageNet"""model = ResNet(Bottleneck, [3, 4, 23, 3])if pretrained:model.load_state_dict(model_zoo.load_url(model_urls['resnet101']))return modeldef resnet152(pretrained=False):"""Constructs a ResNet-152 model.Args:pretrained (bool): If True, returns a model pre-trained on ImageNet"""model = ResNet(Bottleneck, [3, 8, 36, 3])if pretrained:model.load_state_dict(model_zoo.load_url(model_urls['resnet152']))return model
四、Faster R-CNN的forward过程
注:如果感觉分部分来看会看了后面往前面,可以先看第六节,了解总体模型框架。
接下来让我们看一下源代码中是如何调用上面的接口,从而得到骨干网络的forward过程:
fasterRCNN = resnet(imdb.classes, 152, pretrained=True, class_agnostic=args.class_agnostic)
在主函数中定义的fasterRCNN是resnet类的实例化,而 class resnet(_fasterRCNN): resnet类是**_fasterRCNN类**的子类。
class _fasterRCNN(nn.Module):""" faster RCNN """def __init__(self, classes, class_agnostic):super(_fasterRCNN, self).__init__()self.classes = classesself.n_classes = len(classes)self.class_agnostic = class_agnostic# lossself.RCNN_loss_cls = 0self.RCNN_loss_bbox = 0# define rpnself.RCNN_rpn = _RPN(self.dout_base_model)self.RCNN_proposal_target = _ProposalTargetLayer(self.n_classes)'''imdb.classes tuple类型('__background__', 'specularity', 'saturation', 'artifact','blur', 'contrast', 'bubbles', 'instrument')self.class_agnostic False'''# self.RCNN_roi_pool = _RoIPooling(cfg.POOLING_SIZE, cfg.POOLING_SIZE, 1.0/16.0)# self.RCNN_roi_align = RoIAlignAvg(cfg.POOLING_SIZE, cfg.POOLING_SIZE, 1.0/16.0)self.RCNN_roi_pool = ROIPool((cfg.POOLING_SIZE,cfg.POOLING_SIZE), 1.0/16.0)self.RCNN_roi_align = ROIAlign((cfg.POOLING_SIZE,cfg.POOLING_SIZE), 1.0/16.0, 0)
在前面笔记中关于数据加载的部分中我们知道: 在一个step中加载一个batch size的训练数据,必须要保证对于不同文件名的输入图像,getitem()函数返回的每一项都具有相同的shape,才能进行批量的前向传播操作。
forward过程中传入的数据类型为:
iter for one step output
| 变量 | 类型 | value |
|---|---|---|
| data | torch.tensor |
[batch_size,3,H,W],只减去了均值 | 其中的数值范围仅仅是BGR图像减去3个通道的均值,并没有归一化到(-1,1)之间 | | im_info | torch.tensor
[batch_size,3] | 真正用于训练的图像高度,宽度,和对图像进行的尺度缩放倍数 | | gt_boxes | torch.tensor
[batch_size,20,5] | 对于当前训练图像的ground truth包围框,是在尺度变换和padding变换之后的图像上的坐标值,最后一列表示包围框的类别 |
| num_boxes | torch.tensor
[batch_size,] | gt包围框数量 |
1.Backbone的前向传播
base_feat = ``self``.RCNN_base(im_data)
# 在resnet.py中的resnet类中self.RCNN_base = nn.Sequential(resnet.conv1, resnet.bn1,resnet.relu,resnet.maxpool,resnet.layer1,resnet.layer2,resnet.layer3)# feed image data to base model to obtain base feature map
以上是把图像输入到ResNet101中,通过输入到ResNet的Conv4_x中进行卷积特征提取,此时特征图的out_put stride=16,将图像分辨率缩小了16倍。
2.RPN完整前向传播
rois, rpn_loss_cls, rpn_loss_bbox = self.RCNN_rpn(base_feat, im_info, gt_boxes, num_boxes)

self.dout_base_model = 1024是指经过第四个卷积层(layer3)时,feature map的通道数为1024.
我们进入rpn文件夹中找到rpn.py:
其中核心部分是:_RPN类,附属部分为:_ProposalLayer类 和 _AnchorTargetLayer类
class _RPN(nn.Module):""" region proposal network """def __init__(self, din):super(_RPN, self).__init__()'''RPN网络的depth,就是前面那个特征网络输出的channel=256*expansion=1024din ---> depth inget depth of input feature map, e.g., 512'''self.din = din'''超参数,定义在/model/utils/config.py中建议报错的话直接把cfg.* 换成注释内容'''self.anchor_scales = cfg.ANCHOR_SCALES # [8,16,32]self.anchor_ratios = cfg.ANCHOR_RATIOS # [0.5,1,2]self.feat_stride = cfg.FEAT_STRIDE[0] # [16,]'''define the convrelu layers processing input feature map预处理层:先进行一次3x3的卷积,处理上一级网络传过来的feature mapchannel:1024 ---> 512'''self.RPN_Conv = nn.Conv2d(self.din, 512, 3, 1, 1, bias=True)'''define bg/fg classifcation score layer分类层:这里开始定义frontground和background背景的一个binary分类器我们上面说的超参数,scale有3种,ratio有3种,所以一共9种anchor,又有前景背景2类,一共18种结果。这里的算法是,比如说第一种anchor落在前景的概率aa,落在背景的概率bb,所以要占2个格子。'''self.nc_score_out = len(self.anchor_scales) * len(self.anchor_ratios) * 2# 2(bg/fg) * 9 (anchors)# 这里做一次1x1的卷积,输出channel就是我们算出来的18个分数类别self.RPN_cls_score = nn.Conv2d(512, self.nc_score_out, 1, 1, 0)'''define anchor box offset prediction layer回归层:这里开始做anchor box的回归,使用1x1的卷积因为Bounding box的尺度是4,[x1,y1,x2,y2]九种anchor,每种有四个尺度可以调整,一共36种结果'''self.nc_bbox_out = len(self.anchor_scales) * len(self.anchor_ratios) * 4# 4(coords) * 9 (anchors)self.RPN_bbox_pred = nn.Conv2d(512, self.nc_bbox_out, 1, 1, 0)'''define proposal layer推荐层效果是处理掉回归之后不符合条件的anchor boxes如果回归后边界超越的,宽高过小的,得分太低的(使用NMS非极大值抑制)定义在/lib/model/rpn/proposal_layer.py'''self.RPN_proposal = _ProposalLayer(self.feat_stride,self.anchor_scales,self.anchor_ratios)'''define anchor target layer这个层和上面的推荐层的区别在于推荐层proposal是没有结合标注信息的,仅仅依赖于binary classification算class score,把超限的、得分低的排除。而target layer是结合了ground truth信息,计算的不是二分类probability,而是计算与标注框的重叠比例IoU,排除IoU太低的框。定义在/lib/model/rpn/anchor_target_layer.py'''self.RPN_anchor_target = _AnchorTargetLayer(self.feat_stride,self.anchor_scales,self.anchor_ratios)self.rpn_loss_cls = 0self.rpn_loss_box = 0# 这个装饰符表示实例函数,可以不实例化对象直接用类名.函数名()调用@staticmethoddef reshape(x, d):'''本函数需要传入一个4维的x,shape = [ , , , ]保持shape[0],shape[3]不变,将shape[1]替换成我们指定的int(d),shape[2]做相应变化'''input_shape = x.size()x = x.view(input_shape[0],int(d),int(float(input_shape[1] * input_shape[2]) / float(d)),input_shape[3])return xdef forward(self, base_feat, im_info, gt_boxes, num_boxes):'''base_feat是我们的ResNet101的layer3产生的feature mapshape=[bs, 256*expansion, H/16, W/16] = [bs, 1024, 14, 14]'''batch_size = base_feat.size(0)'''RPN的顺序是:预处理,分类,回归,推荐, target layer'''# return feature map after convrelu layer'''self.RPN_Conv是3x3卷积,预处理一下base_feature得到shape=(bs,512,14,14)'''rpn_conv1 = F.relu(self.RPN_Conv(base_feat), inplace=True)'''get rpn classification score分类score,shape=(bs,18,14,14)'''rpn_cls_score = self.RPN_cls_score(rpn_conv1)# 经过reshpe函数,得到shape=(bs,2,18*14/2,14)'''我们知道通过1x1卷积过后的feature map中每一个点都对应的是这些anchor包含的信息有positive和negative,这些信息都被保存在[W, H,9*2]的new feature map中我们知道这个feature map上每一个点对应这9个anchorz中每一个anchor都有2个得分---> positive score and negative score可以用来初步提取目标检测候选anchor box(positive)''''''reshape: [bs, 18, 14, 14]--->[bs, 2, 9*14, 14]channel : 18 ---> 2相当于把原feature map的前九个或者后九个channel拼接在height上变成了对channel=2的feature map进行positive or negative的分类'''rpn_cls_score_reshape = self.reshape(rpn_cls_score, 2)# 从softmax的dim=1可以看出是对height进行二分类rpn_cls_prob_reshape = F.softmax(rpn_cls_score_reshape, 1)# reshape回来,shape(bs,18,14,14)rpn_cls_prob = self.reshape(rpn_cls_prob_reshape, self.nc_score_out)# get rpn offsets to the anchor boxes'''回归。实际上是用卷积,得到36个维度上的bbox推荐偏移注意输入是Conv1,结果shape=(bs,36,14,14)'''rpn_bbox_pred = self.RPN_bbox_pred(rpn_conv1)# proposal layer# 推荐层,不加设置时,默认self.training=Truecfg_key = 'TRAIN' if self.training else 'TEST''''结合了回归偏移信息,把偏移后越界的,score太低的,都丢掉返回shape(bs,2000,5) ,2000是超参数,表示我们选出nms后得分最高的2000个proposal box'''rois = self.RPN_proposal((rpn_cls_prob.data, rpn_bbox_pred.data,im_info, cfg_key))self.rpn_loss_cls = 0self.rpn_loss_box = 0# generating training labels and build the rpn loss# 生成训练标签并计算RPN的lossif self.training:assert gt_boxes is not Nonerpn_data = self.RPN_anchor_target((rpn_cls_score.data, gt_boxes,im_info, num_boxes))# compute frontground/background classification loss'''permute之后,shape=(bs,14,14,18),contiguous()解决permute后遗症不用管view之后变成(bs,1764,2)'''rpn_cls_score = rpn_cls_score_reshape.permute(0, 2, 3, 1).contiguous().view(batch_size, -1, 2)rpn_label = rpn_data[0].view(batch_size, -1)rpn_keep = Variable(rpn_label.view(-1).ne(-1).nonzero().view(-1))rpn_cls_score = torch.index_select(rpn_cls_score.view(-1,2), 0, rpn_keep)rpn_label = torch.index_select(rpn_label.view(-1), 0, rpn_keep.data)rpn_label = Variable(rpn_label.long())self.rpn_loss_cls = F.cross_entropy(rpn_cls_score, rpn_label)fg_cnt = torch.sum(rpn_label.data.ne(0))rpn_bbox_targets, rpn_bbox_inside_weights, rpn_bbox_outside_weights = rpn_data[1:]# compute bbox regression lossrpn_bbox_inside_weights = Variable(rpn_bbox_inside_weights)rpn_bbox_outside_weights = Variable(rpn_bbox_outside_weights)rpn_bbox_targets = Variable(rpn_bbox_targets)self.rpn_loss_box = _smooth_l1_loss(rpn_bbox_pred, rpn_bbox_targets,rpn_bbox_inside_weights,rpn_bbox_outside_weights,sigma=3, dim=[1,2,3])return rois, self.rpn_loss_cls, self.rpn_loss_box
关于RPN网络的整体构架我们已经说完了,现在我们再来看看其中的一些附属类,在RPN网络中要使用的。
1).rois = self.RPN_proposal((rpn_cls_prob.data, rpn_bbox_pred.data, im_info, cfg_key))
'''结合了回归偏移信息,把偏移后越界的,score太低的,都丢掉返回shape(bs,2000,5) ,2000是超参数,表示我们选出nms后得分最高的2000个proposal box'''rois = self.RPN_proposal((rpn_cls_prob.data, rpn_bbox_pred.data,im_info, cfg_key))'''rpn_cls_prob torch.tensor shape [batch_size,18,(H/16),(W/16)]rpn_bbox_pred torch.tensor shape [batch_size,36,(H/16),(W/16)]im_info torch.tensor shape [batch_size,3]cfg_key = 'TRAIN''''
包括generate anchor和proposal layer:
self.RPN_proposal = _ProposalLayer(self.feat_stride, self.anchor_scales, self.anchor_ratios)
其中的参数为:self.feat_stride=cfg.FEAT_STRIDE[0]#__C.FEAT_STRIDE = [16, ]
self.anchor_scales = cfg.ANCHOR_SCALES #[8,16,32]
self.anchor_ratios = cfg.ANCHOR_RATIOS #[0.5,1,2]
class _ProposalLayer(nn.Module):"""Outputs object detection proposals by applying estimated bounding-boxtransformations to a set of regular boxes (called "anchors")."""def __init__(self, feat_stride, scales, ratios):super(_ProposalLayer, self).__init__()self._feat_stride = feat_strideself._anchors = torch.from_numpy(generate_anchors(scales=np.array(scales),ratios=np.array(ratios))).float()# _anchors: shape:(9,4)self._num_anchors = self._anchors.size(0)# _num_anchors = 9
①.self._anchors = torch.from_numpy(generate_anchors(scales=np.array(scales), ratios=np.array(ratios))).float()
generate_anchors(scales=np.array(scales), ratios=np.array(ratios))
这一步骤并没有在特征图上的每个像素点上都生成3*3=9个anchor boxes坐标,而是只会在特征图上第(0,0)个位置的像素点上生成9个anchor位置坐标(位置坐标是在参与训练的输入图像分辨率上的坐标,是对数据集中原始图像经过尺度变换和padding之后的图像)。
进入/lib/model/rpn/generate_anchors.py 文件:该文件的作用主要用于生成规则的anchor boxes.
该函数的具体实现如下:
**
def generate_anchors(base_size=16, ratios=[0.5, 1, 2],scales=2**np.arange(3, 6)):# ** 代表幂次, 所以 scales = [2^3, 2^4, 2^5] = [8,16,32]"""Generate anchor (reference) windows by enumerating aspect ratios Xscales wrt a reference (0, 0, 15, 15) window."""base_anchor = np.array([1, 1, base_size, base_size]) - 1# base_anchor 的大小为 16×16的, 其坐标为(0,0,15,15)'''# _ratio_enum 为本文件内定义的函数,作用为相对于每一个anchor枚举所有可能ratios的anchor box.(注意, base_anchor的size只是作用一个过渡使用, 后面的语句会利用scales参数将其覆盖)'''ratio_anchors = _ratio_enum(base_anchor, ratios)# 在给定anchor下, 根据scale的值枚举所有可能的anchor boxanchors = np.vstack([_scale_enum(ratio_anchors[i, :], scales)for i in xrange(ratio_anchors.shape[0])])return anchors
whctrs 函数:返回一个anchor的宽, 高, 以及中心点的(x,y)坐标值
**
# # ./lib/model/rpn/generate_anchors.pydef _whctrs(anchor):"""Return width, height, x center, and y center for an anchor (window).返回一个anchor的宽, 高, 以及中心点的(x,y)坐标值"""w = anchor[2] - anchor[0] + 1h = anchor[3] - anchor[1] + 1x_ctr = anchor[0] + 0.5 * (w - 1)y_ctr = anchor[1] + 0.5 * (h - 1)return w, h, x_ctr, y_ctr
mkanchors 函数:给定一组围绕中心点(x_ctr, y_ctr) 的 widths(ws) 和 heights(hs) 序列, 输出对应的 anchors
def _mkanchors(ws, hs, x_ctr, y_ctr):"""Given a vector of widths (ws) and heights (hs) around a center(x_ctr, y_ctr), output a set of anchors (windows)."""ws = ws[:, np.newaxis]hs = hs[:, np.newaxis]# anchors里面的坐标分别对应着左上角的坐标和右下角的坐标# 将两个数组按列放到一起anchors = np.hstack((x_ctr - 0.5 * (ws - 1),y_ctr - 0.5 * (hs - 1),x_ctr + 0.5 * (ws - 1),y_ctr + 0.5 * (hs - 1)))return anchors
ratio_enum 函数:相对于每一个anchor, 遍历其所有可能ratios对应的anchors
def _ratio_enum(anchor, ratios):"""Enumerate a set of anchors for each aspect ratio wrt an anchor."""w, h, x_ctr, y_ctr = _whctrs(anchor)size = w * hsize_ratios = size / ratiosws = np.round(np.sqrt(size_ratios))hs = np.round(ws * ratios)anchors = _mkanchors(ws, hs, x_ctr, y_ctr)return anchors
scale_enum() 函数:根据给定的anchor(box), 枚举其所有可能scales的anchors(boxes)
def _scale_enum(anchor, scales):"""Enumerate a set of anchors for each scale wrt an anchor.根据给定的anchor(box), 枚举其所有可能scales的anchors(boxes)"""w, h, x_ctr, y_ctr = _whctrs(anchor)ws = w * scaleshs = h * scalesanchors = _mkanchors(ws, hs, x_ctr, y_ctr)return anchors
经过以上函数操作后,得到的是以[0,0,15,15]为base anchor的不同ration和不同scale的anchor的坐标。
返回的anchors为一个(9,4)的数组,分别是:**
# 我们将anchor输出anchors = generate_anchors(base_size=16, ratios=[0.5, 1, 2],scales=2**np.arange(3, 6))Output:array([[ -84., -40., 99., 55.],[-176., -88., 191., 103.],[-360., -184., 375., 199.],[ -56., -56., 71., 71.],[-120., -120., 135., 135.],[-248., -248., 263., 263.],[ -36., -80., 51., 95.],[ -80., -168., 95., 183.],[-168., -344., 183., 359.]])# 我们在输出这些anchors的长宽,和中心点,以及长宽比(ration),缩放大小(scale)for anchor in anchors:w,h,x_ctr,y_ctr = _whctrs(anchor)print([w,h,x_ctr,y_ctr], [np.round(w/h)], [int(np.sqrt((w*h)/(16*16)))])Output:[184.0, 96.0, 7.5, 7.5] [2.0] [8][368.0, 192.0, 7.5, 7.5] [2.0] [16][736.0, 384.0, 7.5, 7.5] [2.0] [33][128.0, 128.0, 7.5, 7.5] [1.0] [8][256.0, 256.0, 7.5, 7.5] [1.0] [16][512.0, 512.0, 7.5, 7.5] [1.0] [32][88.0, 176.0, 7.5, 7.5] [0.0] [7][176.0, 352.0, 7.5, 7.5] [0.0] [15][352.0, 704.0, 7.5, 7.5] [0.0] [31]
②.对RPN预测的anchor位置偏移量进行解码
forward方法中的RPN层的输入:
'''结合了回归偏移信息,把偏移后越界的,score太低的,都丢掉返回shape(bs,2000,5) ,2000是超参数,表示我们选出nms后得分最高的2000个proposal box'''rois = self.RPN_proposal((rpn_cls_prob.data, rpn_bbox_pred.data,im_info, cfg_key))'''rpn_cls_prob torch.tensor shape [batch_size,18,(H/16),(W/16)]rpn_bbox_pred torch.tensor shape [batch_size,36,(H/16),(W/16)]im_info torch.tensor shape [batch_size,3]cfg_key = 'TRAIN'
进入/lib/model/rpn/proposal_layer.py文件中看到了_ProposalLayer方法:
class _ProposalLayer(nn.Module):"""Outputs object detection proposals by applying estimated bounding-boxtransformations to a set of regular boxes (called "anchors")."""def __init__(self, feat_stride, scales, ratios):super(_ProposalLayer, self).__init__()self._feat_stride = feat_strideself._anchors = torch.from_numpy(generate_anchors(scales=np.array(scales),ratios=np.array(ratios))).float()'''上面的函数实现了对anchor的生成,但只是以(0,0,15,15)为base_anchor的anchors-->shape: (9,4)在后面会通过迭代产生不同中心位置的这9个anchor'''self._num_anchors = self._anchors.size(0)# _num_anchors = 9
接下来看forward方法:
def forward(self, input):# Algorithm:## for each (H, W) location i# generate A anchor boxes centered on cell i# apply predicted bbox deltas at cell i to each of the A anchors# clip predicted boxes to image# remove predicted boxes with either height or width < threshold# sort all (proposal, score) pairs by score from highest to lowest# take top pre_nms_topN proposals before NMS# apply NMS with threshold 0.7 to remaining proposals# take after_nms_topN proposals after NMS# return the top proposals (-> RoIs top, scores top)# the first set of _num_anchors channels are bg probs# the second set are the fg probs'''rpn_cls_prob torch.tensor shape [batch_size,18,(H/16),(W/16)]第1个维度上的通道数为18,设定前0~8个通道表示的是在该像素点上的9个anchor boxes是背景(background)的概率设定从9~17个通道表示的是在该像素点上的9个anchor boxes是前景(foreground)的概率input[0][:,0:8,:,:] 是背景概率(background posibility)input[0][:,9:17,:,:] 是前景概率(foreground posibility)'''scores = input[0][:, self._num_anchors:, :, :]'''bbox_deltas就是9种anchor在4个方向上的偏移(offset),shape(bs,36,14,14)'''bbox_deltas = input[1]#im_info是高宽信息im_info = input[2]#cfg_key='TRAIN' or 'TEST'cfg_key = input[3]#预定义为12000,表示在nms前选出得分最高的12000个框#是根据RPN输出坐标偏移量进行坐标调整之后的坐标pre_nms_topN = cfg[cfg_key].RPN_PRE_NMS_TOP_N#预定义为2000,表示nms后,选出得分最高的2000个框'''将所有经过位置调整之后的anchor boxes经过前滤波,阈值为0.7的NMS算法之后,再在剩下的所有位置调整之后的anchor boxes中根据score选择前2000个作为region proposal传入到后面的fast R-CNN网络'''post_nms_topN = cfg[cfg_key].RPN_POST_NMS_TOP_N#预定义为0.7,nms时会抛弃小于0.7的框nms_thresh = cfg[cfg_key].RPN_NMS_THRESH#预定义为16,框框被映射到原图上的高和宽都要大于这个数值min_size = cfg[cfg_key].RPN_MIN_SIZEbatch_size = bbox_deltas.size(0)#再次说明RPN位置预测的是anchor 的偏移量#height=14,width=14,the width heigth of feature map#用于训练的输入图像是数据集中原始的图像经过尺度缩放和padding后的feat_height, feat_width = scores.size(2), scores.size(3)'''下面这个过程,是把 14x14的网格,分别映射回原图,即乘以_feat_stride,x16在原图上形成 feat_width*feat_height这么多个(16,16)的网格shift_x ,shift_y ------> [0, 16, 16*2, ......, 16*14]'''shift_x = np.arange(0, feat_width) * self._feat_strideshift_y = np.arange(0, feat_height) * self._feat_stride#下面的shift_x变成14行,每行都是上面这个shift_x的复制#下面的shift_y变成14列,每列都是上面这个shift_y的复制shift_x, shift_y = np.meshgrid(shift_x, shift_y)'''ravel表示把(14,14)的矩阵shift_x,y展成一维向量(196,)vstack表示垂直方向上拼接,得到4行,shape=(4,196)transpose之后得到shape=(196,4)'''shifts = torch.from_numpy(np.vstack((shift_x.ravel(), shift_y.ravel(),shift_x.ravel(), shift_y.ravel())).transpose())shifts = shifts.contiguous().type_as(scores).float()A = self._num_anchors # A = 9K = shifts.size(0) # K = feat_height*feat_width = 14*14# self._anchor shape:(9,4)self._anchors = self._anchors.type_as(scores)'''运用Brodcast(广播)的性质,进行相加得到不同中心坐标的9中anchors结果就是以这些14x14=196个网格点offset(7.5,7.5)为center,每个center画9种框坐标形式[xmin,ymin,xmax,ymax]在用于训练的输入图像分辨率上的坐标总结:获取anchor boxes坐标的过程(代码实现)非常巧妙并不是一次性产生对于特征图上所有像素点处的9个anchor boxes而是首先在特征图第(0,0)位置上的像素点产生9个anchor boxes的位置相对坐标(这里的相对坐标是指相对于(0,0,16,16)这个网格的坐标),然后再利用类似于sliding window的思想直接将第(0,0)位置的9个anchor boxes坐标加到特征图分辨率上的所有像素点处'''anchors = self._anchors.view(1, A, 4) + shifts.view(K, 1, 4)# shifts : shape=(196,9,4) self._anchors : shape=(1,9,4) 符合广播性质的要求anchors = anchors.view(1, K * A, 4).expand(batch_size, K * A, 4)# view成(1,1764,4),然后自我复制batch_size份,变成(bs,1764,4)# Transpose and reshape predicted bbox transformations to get them# into the same order as the anchors:bbox_deltas = bbox_deltas.permute(0, 2, 3, 1).contiguous()'''(bs,36,14,14) permute-> (bs,14,14,36)(bs,14,14,36) view-> (bs,1764,4)'''bbox_deltas = bbox_deltas.view(batch_size, -1, 4)'''Same story for the scores:对scores做相同处理(bs,9,14,14) permute-> (bs,14,14,9) view - > (bs,1764,1)'''scores = scores.permute(0, 2, 3, 1).contiguous()scores = scores.view(batch_size, -1)'''总结:bbox_deltas里面存有dx,dy,dw,dhx += dx*width, y+= dy*width, w*= exp(dw),h*= exp(dh)这样就得到了 加上偏移修正的proposl anchors,shape =[bs,1764,4]'''# Convert anchors into proposals via bbox transformations'''根据anchors和RPN所预测的位置偏移量,对于RPN预测坐标值进行解码得到RPN预测值在(实际上输入网络的)训练图像分辨率上的绝对坐标值返回的proposals是RPN对于所有anchor boxes的预测坐标值 [xmin,ymin,xmax,ymax]形式shape (batch_size,(H/16)*(W/16)*9, 4)'''proposals = bbox_transform_inv(anchors, bbox_deltas, batch_size)'''2. clip predicted boxes to imageim_info是输入图像的高宽信息对于batch size中的每一张图像,将RPN预测出的region proposals解码到输入图像的分辨率上,并将解码后的候选框坐标限制在输入图像分辨率内把超出图片边界的anchor都修剪到图片内,例如(-1,-1,2,2)修剪成(0,0,2,2)'''proposals = clip_boxes(proposals, im_info, batch_size)
现在我们要知道:proposal = bbox_transform_inv(anchors, bbox_deltas, batch_size)proposals = clip_boxes(proposals, im_info, batch_size)
进入 \faster-rcnn-pytorch-master\lib\model\rpn\bbox_transform.py,摘取这两个函数:
def bbox_transform_inv(boxes, deltas, batch_size):widths = boxes[:, :, 2] - boxes[:, :, 0] + 1.0heights = boxes[:, :, 3] - boxes[:, :, 1] + 1.0ctr_x = boxes[:, :, 0] + 0.5 * widthsctr_y = boxes[:, :, 1] + 0.5 * heightsdx = deltas[:, :, 0::4]dy = deltas[:, :, 1::4]dw = deltas[:, :, 2::4]dh = deltas[:, :, 3::4]pred_ctr_x = dx * widths.unsqueeze(2) + ctr_x.unsqueeze(2)pred_ctr_y = dy * heights.unsqueeze(2) + ctr_y.unsqueeze(2)pred_w = torch.exp(dw) * widths.unsqueeze(2)pred_h = torch.exp(dh) * heights.unsqueeze(2)pred_boxes = deltas.clone()# x1pred_boxes[:, :, 0::4] = pred_ctr_x - 0.5 * pred_w# y1pred_boxes[:, :, 1::4] = pred_ctr_y - 0.5 * pred_h# x2pred_boxes[:, :, 2::4] = pred_ctr_x + 0.5 * pred_w# y2pred_boxes[:, :, 3::4] = pred_ctr_y + 0.5 * pred_hreturn pred_boxesdef clip_boxes(boxes, im_shape, batch_size):for i in range(batch_size):boxes[i,:,0::4].clamp_(0, im_shape[i, 1]-1)boxes[i,:,1::4].clamp_(0, im_shape[i, 0]-1)boxes[i,:,2::4].clamp_(0, im_shape[i, 1]-1)boxes[i,:,3::4].clamp_(0, im_shape[i, 0]-1)return boxes
③.根据RPN预测的scores和bbox_deltas,选择出2000个region proposal用于输入到后面的Fast R-CNN模型中用于后续训练
这里想解释一下anchor、region proposal和bounding boxes名词的区别,虽然从表面上看他们都是矩形包围框,但是作为物体检测中的重要术语,十分有必要区分开。
| 名词 | 含义 | |
|---|---|---|
anchor | 翻译为锚框/预选框,生成anchor boxes的过程只需要(特征图分辨率,anchor_scale,anchor_ratio)信息,它的坐标信息完全不是由神经网络前向传播预测得到的,只是作为最原始的预选框,是诸如RPN,SSD(以及YOLO等one-stage method)等密集检测(dense detection)模型中最先需要生成的,因为网络模型预测的输出值是在anchor坐标上的偏移量 | | |
region proposal | 翻译为候选框/ROI/candidate boxes,通常在two stage detector中出现,它指的是经过一定的经验知识(将图像输入到selective search算法中)或者是根据网络学习到的知识预测(RPN输出,对于原始的anchor boxes进行位置调整之后的框)得到的可能是前景区域的矩形框,这些框也被称为candidate boxes/ROI,是因为已经根据一些先验知识或者网络学习提取到一些特征,可以有一定根据说这些框是前景框,而对于RPN输出,则对于每个region proposal都附加一个概率值,表示proposal是前景框的概率
简言之,region proposal是将RPN网络输出预测偏移量对于事先设定好的anchor boxes进行解码之后的在输入图像分辨率上的候选框 | |
|
bounding boxes | 翻译为包围框,它指的是最终网络输出的transformed bounding boxes,就是整个网络最终的输出,在测试阶段就是用来计算mAP的框。比如描述ground truth包围框的时候,通常会说ground truth bounding boxes | |
下面代码摘自 \faster-rcnn-pytorch-master\lib\model\rpn\proposal_layer.py def forward()方法,接上面的代码:
'''scores_keep : shape --> (bs, 1764,1)proposals_keep: shape --> (bs,1764,4)先对RPN输出的对于anchor boxes预测偏移量进行解码得到proposal,再将proposal的坐标范围限制在输入图像分辨率上,得到proposals_keep'''scores_keep = scoresproposals_keep = proposals'''对于batch size中的每一张输入图像,对于(H/16)*(W/16)*9个region proposal按照RPN预测的foreground分数进行降序排列,返回的第一个参数是降序排列后的分数数值,第二个参数是降序排列的位置索引编号order shape [batch_size,(H/16)*(W/16)*9,1]True表示降序,[bs,1764,1]'''_, order = torch.sort(scores_keep, 1, True)output = scores.new(batch_size, post_nms_topN, 5).zero_()'''output shape [batch_size, post_nms_topN, 5]torch.new() method 产生与当前torch.tensor具有相同datatype的 new tensorpost_nms_topN=2000,表示传送到后面Faster R-CNN模型的候选框(region proposal)2000个这就很明显可以看出RPN所起到的作用就是R-CNN模型和Fast R-CNN模型中的selective search算法的功能只不过selective search算法不需要学习训练的过程,而RPN是通过对网络进行训练得到region proposalselective search算法也是为后面的检测器提供后续框这也更能体现出Fater R-CNN的End2End的思想'''for i in range(batch_size):# # 3. remove predicted boxes with either height or width < threshold# # (NOTE: convert min_size to input image scale stored in im_info[2])proposals_single = proposals_keep[i] #[1764,4]scores_single = scores_keep[i] #[1764,1]# # 4. sort all (proposal, score) pairs by score from highest to lowest# # 5. take top pre_nms_topN (e.g. 6000)order_single = order[i] # #[1764,1]if pre_nms_topN > 0 and pre_nms_topN < scores_keep.numel():order_single = order_single[:pre_nms_topN]proposals_single = proposals_single[order_single, :]scores_single = scores_single[order_single].view(-1,1)# 6. apply nms (e.g. threshold = 0.7)# 7. take after_nms_topN (e.g. 300)# 8. return the top proposals (-> RoIs top)keep_idx_i = nms(proposals_single, scores_single.squeeze(1), nms_thresh)keep_idx_i = keep_idx_i.long().view(-1)if post_nms_topN > 0:keep_idx_i = keep_idx_i[:post_nms_topN]proposals_single = proposals_single[keep_idx_i, :]scores_single = scores_single[keep_idx_i, :]# padding 0 at the end.num_proposal = proposals_single.size(0)output[i,:,0] = ioutput[i,:num_proposal,1:] = proposals_singlereturn output
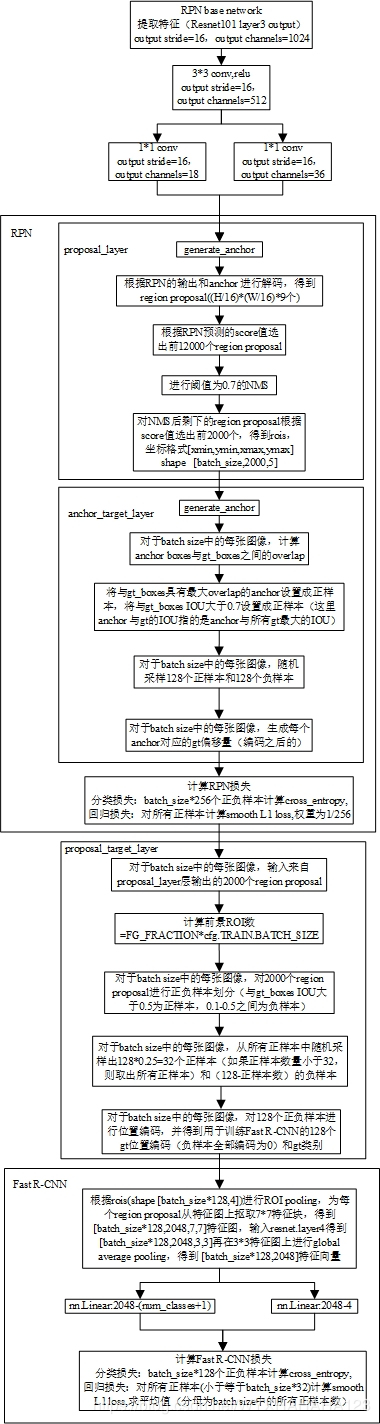
现在再来总结一下目前前向传播到现在为止的过程:
【1】.Step 1 —— RPN network forward
- 先通过RPN_base_network产生对于RPN的分类网络网络和回归网络的shared feature map共享特征图,是通过代码中的layer3输出的特征图——output stride=16,output channel=1024再进行3x3卷积进一步提取语义信息特征得到的共享特征图——output stride=16,output channel=512。
- 然后在共享特征图上分别应用1*1,output channels=18的卷积操作得到RPN对于foreground和background前景背景类别分数预测 rpn_cls_prob shape(经过对于每个anchor boxes的两个通道上进行softmax操作之后的) [batch_size,18,H/16,W/16]
- 再应用1*1,output channels=36的卷积操作得到RPN对于特征图上每个像素点上的9个anchor boxes的位置偏移量的预测,rpn_bbox_pred shape [batch_size,36,H/16,W/16]。
【2】.Step 2 —— generate_anchor
通过RPN的generate_anchor.py生成对于特征图上第(0,0)位置像素点上的9个anchor boxes,shape [9,4]
scales: self.anchor_scales = cfg.ANCHOR_SCALES#[8,16,32]
ratios: self.anchor_ratios = cfg.ANCHOR_RATIOS#[0.5,1,2]
【3】. Step 3 —— proposal_layer.py
proposal layer 是 nn.Module 的子类,接在RPN网络的输出之后。
其输入为对于图像设定的一系列密集候选框(anchor boxes),可认为是通过sliding window策略得到的dense candidate region,现在还是在输入图像分辨率上的[xmin,ymin,xmax,ymax]的格式。
1.根据RPN的输出和anchor 进行解码,得到RPN生成的映射到输入图像上面的预测bounding boxes
对于region proposal network的输出,将网络对于每个anchor boxes的预测值进行解码
解码成为(transformed anchor boxes),即:
输入:
RPN_bounding boxes_prediction(预测的当然是经过normalization编码之后的数值)
anchors(generate layers生成的,在输入图像像素分辨率空间中)
输出:
RPN网络输出的,解码之后,映射到输入图像分辨率上面的region proposal,这里可以暴力地对于所有(H/16)(W/16)9个anchor解码
解码之后的region proposal是映射到输入图像上面的(并将坐标值限定在 600800像素范围内,但并不改变bounding boxes个数)
解码后region proposal格式 xmin ymin xmax ymax [batch_size,(H/16)(W/16)*9, 4]
2.这一步主要是为了从RPN输出的 (H/16)(W/16)9个region proposal(已经转换成输入图像分辨率上)中挑选出一部分用于对后续 Fast R-CNN 的训练,首先根据RPN网络预测出对于每个anchor boxes是前景概率值scores进行排序,选择出 top M,引入超参数 RPN_PRE_NMS_TOP_N 12000 表示进行NMS算法之前,挑选出top N个 transformed bounding boxes,然后将这N个transformed bounding boxes进行NMS算法。
引入超参数:NMS_THRESH 0.7 RPN_POST_NMS_TOP_N = 2000
最后从NMS算法输出的bounding boxes中挑选出 top N 2000 个bounding boxes,返回 top N 的ROI scores 和ROI regions。
proposal layer 返回值 rois 返回值rois并不用于对于RPN的训练和损失函数计算,而是用后续对于Fast R-CNN的训练。
最终返回的rois的类型为:
shape : [bs, 2000, 5]在第3个维度上,第0列表示当前的region proposal属于batch size 中的哪一张图像的编号第1~4列表示region proposal在经过变换之后的输入图像分辨率上的坐标 [xmin,ymin,xmax,ymax]
2). rpn_data = self.RPN_anchor_target((rpn_cls_score.data, gt_boxes, im_info, num_boxes))
self.RPN_anchor_target = _AnchorTargetLayer(self.feat_stride,self.anchor_scales,self.anchor_ratios)
anchor_target_layer的作用:
- 将anchor boxes(没有经过任何操作的,没有经过网络模型预测值的)与ground truth boxes对比。
- 对于每个anchor boxes,都计算出它和ground truth boxes之间的IOU值,得到overlap。
- 对于每个anchor boxes,都遍历所有的ground trith,找到它与所有ground truth最大的overlap值,得到 max_overlap —-> shape: [# anchor boxes]。
选择出所有正样本:
- 对于每个ground truth boxes,与它具有最大的overlap的anchor boxes是正样本
- 对于每个anchor boxes,只要它与任意的ground truth boxes之间的IOU值大于0.7
选择出正样本后,对所有前景正样本进行坐标编码(generate good bounding boxes regression coefficients)。实际上代码实现的时候,是对图像中的每个anchor boxes都分配了ground truth boxes值,无论最后anchor boxes被分为正样本还是负样本,anchor boxes与哪个gt boxes的overlap最大,就认为它是哪个gt boxes 的正样本,然后进行位置编码。
选择出所有负样本:
- 所有overlap小于0.3的anchor记为负样本。
anchor_target_layers.py是用来对于每个anchor boxes区分正负样本,并计算出所有正样本编码后的数值计算出每个anchor boxes与每个ground truth boxes之间的overlap值,并对于每个anchor boxes找到与它具有最大IOU 的ground truth boxes,并指保留住这个overlap值。
如果overlap值大于0.7 则anchor 是正样本
如果overlap值小于0.3 则anchor 是负样本
以下代码摘自:faster-rcnn-pytorch-master\lib\model\rpn\anchor_target_layer.py的forward方法
class _AnchorTargetLayer(nn.Module):"""Assign anchors to ground-truth targets. Produces anchor classificationlabels and bounding-box regression targets."""def __init__(self, feat_stride, scales, ratios):super(_AnchorTargetLayer, self).__init__()self._feat_stride = feat_strideself._scales = scalesanchor_scales = scalesself._anchors = torch.from_numpy(generate_anchors(scales=np.array(anchor_scales), ratios=np.array(ratios))).float()self._num_anchors = self._anchors.size(0)# allow boxes to sit over the edge by a small amountself._allowed_border = 0 # default is 0def forward(self, input):# Algorithm:## for each (H, W) location i# generate 9 anchor boxes centered on cell i# apply predicted bbox deltas at cell i to each of the 9 anchors# filter out-of-image anchorsrpn_cls_score = input[0]gt_boxes = input[1]im_info = input[2]num_boxes = input[3]# map of shape (..., H, W)height, width = rpn_cls_score.size(2), rpn_cls_score.size(3)batch_size = gt_boxes.size(0)feat_height, feat_width = rpn_cls_score.size(2), rpn_cls_score.size(3)shift_x = np.arange(0, feat_width) * self._feat_strideshift_y = np.arange(0, feat_height) * self._feat_strideshift_x, shift_y = np.meshgrid(shift_x, shift_y)shifts = torch.from_numpy(np.vstack((shift_x.ravel(), shift_y.ravel(),shift_x.ravel(), shift_y.ravel())).transpose())shifts = shifts.contiguous().type_as(rpn_cls_score).float()'''计算出所有anchor boxes坐标 [xmin, ymin, xmax, ymax]还是需要先进行base_anchor的生成,借助generate_anchor.py'''A = self._num_anchorsK = shifts.size(0)self._anchors = self._anchors.type_as(gt_boxes) # move to specific gpu.all_anchors = self._anchors.view(1, A, 4) + shifts.view(K, 1, 4)all_anchors = all_anchors.view(K * A, 4)#shape [(H/16)*(W/16)*9,4]total_anchors = int(K * A) #当前分辨率图像上anchor的总数keep = ((all_anchors[:, 0] >= -self._allowed_border) &(all_anchors[:, 1] >= -self._allowed_border) &(all_anchors[:, 2] < long(im_info[0][1]) + self._allowed_border) &(all_anchors[:, 3] < long(im_info[0][0]) + self._allowed_border))# 除去所有越过图像边界的anchorsinds_inside = torch.nonzero(keep).view(-1)# keep only inside anchors 除去所有越过图像边界的anchorsanchors = all_anchors[inds_inside, :]# label: 1 is positive, 0 is negative, -1 is dont carelabels = gt_boxes.new(batch_size, inds_inside.size(0)).fill_(-1)'''labels shape (batch_size, inds_inside.size(0))虽然同一个batch size中每张训练图像的ground truth bounding boxes信息不相同,但是由于一个batch size中的训练图像具有完全相同的空间分辨率,则它们的anchor boxes数以及在图像边界之内的anchor boxes数量及位置信息都相同'''bbox_inside_weights = gt_boxes.new(batch_size, inds_inside.size(0)).zero_()bbox_outside_weights = gt_boxes.new(batch_size, inds_inside.size(0)).zero_()overlaps = bbox_overlaps_batch(anchors, gt_boxes)'''现在先可以简单理解为anchors shape [inds_inside,4]gt_boxes shape [batch_size,20,5]overlaps shape [batch_size,num_anchors, num_max_gt] num_max_gt=20表示每一张训练图像,每一个anchor boxes与每一个ground truth boxes框之间的overlap'''max_overlaps, argmax_overlaps = torch.max(overlaps, 2)'''max_overlaps shape [batch_size,num_anchors]anchor boxes与所有gt boxes之间最大的IOU值 range (0,1)argmax_overlaps shape [batch_size,num_anchors]anchor boxes与哪个gt boxes的IOU最大,位置索引 range (0,num_max_gt-1)表示对于batch size中的每一张图像,对于每个anchor boxes,遍历所有的gt_boxes找到当前的anchor boxes与哪一个gt_boxes 之间的overlap最大,就认为这个anchor boxes与ground truth boxes之间的IOU是多少'''gt_max_overlaps, _ = torch.max(overlaps, 1)'''gt_max_overlaps shape [batch_size,num_max_gt]表示对于batch size中的每一张图像,对于每个gt_boxes,遍历所有的anchor boxes,找到与当前的gt_boxes具有最大IOU的anchor boxes 记录这个overlap'''if not cfg.TRAIN.RPN_CLOBBER_POSITIVES: #RPN_CLOBBER_POSITIVES=Falselabels[max_overlaps < cfg.TRAIN.RPN_NEGATIVE_OVERLAP] = 0'''IOU < thresh: negative example__C.TRAIN.RPN_NEGATIVE_OVERLAP = 0.3对于一个batch size中的每个训练图像的每个anchor boxes,计算anchor boxes 与当前训练图像的所有gt_boxes的overlap如果最大的overlap值都小于所设定的 RPN负样本IOU阈值,则当前anchor boxes就是负样本这里的labels shape [batch_size,num_keep_anchors]max_overlaps shape [batch_size,num_anchors]使用torch.tensor的element wise operation以避免使用for循环将IOU小于0.3的anchor boxes设置成负样本'''gt_max_overlaps[gt_max_overlaps==0] = 1e-5keep = torch.sum(overlaps.eq(gt_max_overlaps.view(batch_size,1,-1).expand_as(overlaps)), 2)#将与ground truth boxes具有最大overlap的anchor设置为正样本if torch.sum(keep) > 0:labels[keep>0] = 1# fg label: above threshold IOU# IOU > thresh: positive example #RPN_POSITIVE_OVERLAP=0.7labels[max_overlaps >= cfg.TRAIN.RPN_POSITIVE_OVERLAP] = 1if cfg.TRAIN.RPN_CLOBBER_POSITIVES:labels[max_overlaps < cfg.TRAIN.RPN_NEGATIVE_OVERLAP] = 0num_fg = int(cfg.TRAIN.RPN_FG_FRACTION * cfg.TRAIN.RPN_BATCHSIZE)'''__C.TRAIN.RPN_FG_FRACTION = 0.5 前景样本比例# Total number of examples__C.TRAIN.RPN_BATCHSIZE = 256训练RPN的batch size=256表示计算RPN损失函数时前景/背景或正/负样本共计算256个anchor boxes的损失值这个batch size并不体现在任何前向传播的操作中,只是表示RPN选择多少个样本计算损失就是说,对于image_batch_size数量的输入图像前向传播到了RPN,对于同一batch size的每一张图像都会生成相同数量,相同坐标的anchor boxes对于每一张图像就选择256个样本计算损失并不是在一个batch size 的anchor boxes中一起进行选择的'''sum_fg = torch.sum((labels == 1).int(), 1)'''labels shape [batch_size,num_keep_anchors]sum_fg shape [batch_size,] 一个batch size中每张图像中的正样本总数'''sum_bg = torch.sum((labels == 0).int(), 1)for i in range(batch_size):# subsample positive labels if we have too many'''对于batch size中的每一张图像,如果正样本数量大于128,则对当前图像的所有正样本anchor 下采样'''if sum_fg[i] > num_fg:fg_inds = torch.nonzero(labels[i] == 1).view(-1)'''shape [num_positive_anchors,] 为当前图像中正样本anchor数labels[i] == 1 前景正样本anchor为1,背景负样本为0fg_inds 表示在所有留下来的anchor boxes中,正样本的索引序号'''rand_num = torch.from_numpy(np.random.permutation(fg_inds.size(0))).type_as(gt_boxes).long()'''numpy.random.permutation(x)If x is an integer, randomly permute np.arange(x).随机打乱permutation = list(np.random.permutation(10))[5, 1, 7, 6, 8, 9, 4, 0, 2, 3]rand_num 对当前训练图像中num_positive_anchors个正样本索引序号进行随机打乱''''''所有overlap小于0.3的是负样本,overlap大于0.7的为正样本然后对于batch size中的每张训练图像,随机采样出128个正样本和128个负样本'''disable_inds = fg_inds[rand_num[:fg_inds.size(0)-num_fg]]#取出前 (所有正样本数-128)个 不作为正样本考虑labels[i][disable_inds] = -1'''至此,一定能够保证,正样本数量小于或者等于128'''# num_bg = cfg.TRAIN.RPN_BATCHSIZE - sum_fg[i]num_bg = cfg.TRAIN.RPN_BATCHSIZE - torch.sum((labels == 1).int(), 1)[i]#负样本的数量可能大于或等于128# subsample negative labels if we have too manyif sum_bg[i] > num_bg:bg_inds = torch.nonzero(labels[i] == 0).view(-1)#rand_num = torch.randperm(bg_inds.size(0)).type_as(gt_boxes).long()rand_num = torch.from_numpy(np.random.permutation(bg_inds.size(0))).type_as(gt_boxes).long()disable_inds = bg_inds[rand_num[:bg_inds.size(0)-num_bg]]labels[i][disable_inds] = -1offset = torch.arange(0, batch_size)*gt_boxes.size(1)argmax_overlaps = argmax_overlaps + offset.view(batch_size, 1).type_as(argmax_overlaps)'''argmax_overlaps shape [batch_size,num_anchors]anchor boxes与哪个gt boxes的IOU最大,位置索引 range (0,num_max_gt-1)argmax_overlaps [batch_size,num_anchors]'''bbox_targets = _compute_targets_batch(anchors,gt_boxes.view(-1,5)[argmax_overlaps.view(-1), :].view(batch_size, -1, 5))'''anchors shape [num_keep_anchors,4]gt_boxes shape [batch_size*num_max_gt,5]gt_boxes.view(-1,5)[argmax_overlaps.view(-1), :]第二个参数 shape (batch_size, num_keep_anchors, 5)意思是根据之前所计算出的在每张训练图像中的anchor boxes与对应的ground truth bounding boxes之间的最大overlap值给每个anchor boxes分配一个ground truth boxes(这个时候先并不对anchor boxes进行正负样本的区分,而是对于坐标范围在当前图像空间分辨率范围内的所有anchor boxes,看看它跟图像中的哪个gt_boxes的overlap最大,就认为这个anchor boxes所对应的gt是对应的ground truth boxes——这时候anchor所对应的gt是原始的训练图像上的位置坐标,并没有经过编码)就是对于batch size中的每张图像所有anchor boxes进行编码(认为anchor boxes对应的gt boxes是所有gt_boxes中与它具有最大overlap的gt_boxes)bbox_targets shape (batch_size, num_keep_anchors, 4)对于anchor 的gt编码后的位置坐标[targets_dx,targets_dy,targets_dw,targets_dh]格式'''# use a single value instead of 4 values for easy index.bbox_inside_weights[labels==1] = cfg.TRAIN.RPN_BBOX_INSIDE_WEIGHTS[0]'''bbox_inside_weights shape [batch_size, inds_inside.size(0)]inds_inside.size(0)=num_keep_anchors__C.TRAIN.RPN_BBOX_INSIDE_WEIGHTS = (1.0, 1.0, 1.0, 1.0)Give the positive RPN examples weight of p * 1 / {num positives}and give negatives a weight of (1 - p)这时候在labels中batch size中每张训练图像所对应的正负样本anchor已经被挑选出来了(对于每张图像共256个anchor,正样本数小于等于128,负样本数大于等于128)labels shape [batch_size,num_keep_anchors]'''if cfg.TRAIN.RPN_POSITIVE_WEIGHT < 0: # -1num_examples = torch.sum(labels[i] >= 0) # 256positive_weights = 1.0 / num_examples.item() # 1/256negative_weights = 1.0 / num_examples.item()else:assert ((cfg.TRAIN.RPN_POSITIVE_WEIGHT > 0) &(cfg.TRAIN.RPN_POSITIVE_WEIGHT < 1))bbox_outside_weights[labels == 1] = positive_weights#正样本计算损失时的权重 1/256bbox_outside_weights[labels == 0] = negative_weights#负样本计算损失时的权重labels = _unmap(labels, total_anchors, inds_inside, batch_size, fill=-1)bbox_targets = _unmap(bbox_targets, total_anchors, inds_inside,batch_size, fill=0)bbox_inside_weights = _unmap(bbox_inside_weights, total_anchors,inds_inside, batch_size, fill=0)bbox_outside_weights = _unmap(bbox_outside_weights, total_anchors,inds_inside, batch_size, fill=0)'''因为前面的操作中是将所有在输入图像空间分辨率范围之内的anchor boxes进行操作,现在希望重新将num_keep_anchors的信息映射回 (H/16)*(W/16)*9 即所有的anchor boxes中bbox_inside_weights 所有正样本anchor boxes为1 其他都为0bbox_outside_weights 所有正样本和负样本anchor boxes为1/256 其他都为0'''outputs = []labels = labels.view(batch_size,height, width, A).permute(0,3,1,2).contiguous()'''labels.shape [batch_size,(H/16)*(W/16)*9]------->>>>>labels.shape [batch_size,9,(H/16),(W/16)]'''labels = labels.view(batch_size, 1, A * height, width)outputs.append(labels)#labels.shape [batch_size,1,9*(H/16),(W/16)]bbox_targets = bbox_targets.view(batch_size, height, width, A*4).permute(0,3,1,2).contiguous()outputs.append(bbox_targets)#bbox_targets shape [batch_size,36,(H/16),(W/16)]anchors_count = bbox_inside_weights.size(1)bbox_inside_weights = bbox_inside_weights.view(batch_size,anchors_count,1)\.expand(batch_size, anchors_count, 4)bbox_inside_weights = bbox_inside_weights.contiguous()\.view(batch_size, height, width, 4*A)\.permute(0,3,1,2).contiguous()#bbox_inside_weights shape [batch_size,36, height, width]outputs.append(bbox_inside_weights)bbox_outside_weights = bbox_outside_weights.view(batch_size,anchors_count,1).expand(batch_size, anchors_count, 4)bbox_outside_weights = bbox_outside_weights.contiguous().view(batch_size, height, width, 4*A)\.permute(0,3,1,2).contiguous()outputs.append(bbox_outside_weights)#bbox_outside_weights shape [batch_size,36, height, width]return outputs
Outputs:
| name | shape | mean |
|---|---|---|
| labels | [batch_size,1,9*(H/16),(W/16)] | 正样本为1 负样本为0 不计算损失为-1 batch size中每张图像共256个正负样本 |
| bbox_targets | [batch_size,36,(H/16),(W/16)] | 每个anchor boxes所对应的gt位置偏移量(对于anchor编码后的gt值,也就是希望RPN网络模型的输出值) |
| bbox_inside_weights | [batch_size,36, height, width] | 所有正样本anchor boxes为1 其他都为0 |
| bbox_outside_weights | [batch_size,36, height, width] | 所有正样本和负样本anchor boxes为1/256 其他都为0 |
3.RPN损失函数计算
return rois, self.rpn_loss_cls, self.rpn_loss_box
rois:是batch size中的每张图像产生的2000个region proposal(由proposal layer层产生)。
[batch_size,2000,5] 的第3个维度上,第0列表示当前的region proposal属于batch size中的哪一张图像编号的,第1~4列表示region proposal在经过变换之后的输入图像分辨率上的坐标[xmin,ymin,xmax,ymax]。
分类损失:self.rpn_loss_cls = F.cross_entropy(rpn_cls_score, rpn_label):
rpn_loss_cls RPN分类损失 对于batch size张图像,计算了batch size*256(RPN的batch size)个正样本anchor和负样本anchor的分类损失,使用的是cross entropy。
注意:pytorch中的F.cross_entropy函数同时预测了softmax和nllloss操作,故而rpn_cls_score可以只进行卷积操作预测分数,并不需要进行softmax操作。
一个batch size中共有batch_size256个anchor boxes(加上正样本和负样本一共256个,前景样本比例0.5)参与了分类损失的计算,则分类损失的分母部分会自动是 batch_size256 的权值进行平均。
位置回归损失:
self.rpn_loss_box = _smooth_l1_loss(rpn_bbox_pred, rpn_bbox_targets,rpn_bbox_inside_weights,rpn_bbox_outside_weights,sigma=3, dim=[1,2,3])
rpn_loss_box RPN位置回归损失,对于batch size张图像,对于所有正样本(每张图像的正样本小于等于128)一起计算smooth L1回归损失,乘以权值1/256之后再还要取平均值。
4.通过RPN选取RoI (Proposal of interest)
roi_data = self.RCNN_proposal_target(rois, gt_boxes, num_boxes)
self.RCNN_proposal_target = _ProposalTargetLayer(self.n_classes)
faster-rcnn-pytorch-master\lib\model\rpn\proposal_target_layer_cascade.py
class _ProposalTargetLayer(nn.Module):"""Assign object detection proposals to ground-truth targets. Produces proposalclassification labels and bounding-box regression targets."""def __init__(self, nclasses):super(_ProposalTargetLayer, self).__init__()self._num_classes = nclassesself.BBOX_NORMALIZE_MEANS = torch.FloatTensor(cfg.TRAIN.BBOX_NORMALIZE_MEANS)# (0.0, 0.0, 0.0, 0.0)self.BBOX_NORMALIZE_STDS = torch.FloatTensor(cfg.TRAIN.BBOX_NORMALIZE_STDS)#(0.1, 0.1, 0.2, 0.2)self.BBOX_INSIDE_WEIGHTS = torch.FloatTensor(cfg.TRAIN.BBOX_INSIDE_WEIGHTS)#(1.0, 1.0, 1.0, 1.0)def forward(self, all_rois, gt_boxes, num_boxes):''':param all_rois:是proposal layer层输出,表示将RPN视作为selective search算法,生成2000个region proposal具体的生成过程是:对于RPN产生的(H/16)*(W/16)*9个位置偏移量预测,与对应的anchor boxes信息对RPN产生的位置预测值进行解码,解码出在输入图像分辨率(就是对输入图像进行缩放)的位置坐标然后首先根据RPN网络模型预测出来的对于所有anchor boxes的前景类别分数,挑选出前12000个region proposal;再进行阈值为0.7的NMS算法,然后再在NMS算法后留下的所有region proposal中找出前2000个,作为训练,Fast R-CNN模型的输入 [batch_size,2000,5]:param gt_boxes:torch.tensor [batch_size,20,5] 从annotation.txt文件中读取出来的坐标信息,经过尺度变换后:param num_boxes:torch.tensor [batch_size,] batch size中每张训练图像中有多少个gt boxes其中all_rois是RPN模型的proposal layer层的输出gt_boxes和num_boxes参数是整个Faster R-CNN模型的输入(从trainval_net.py中的dataloader数据加载其中读取得到)'''self.BBOX_NORMALIZE_MEANS = self.BBOX_NORMALIZE_MEANS.type_as(gt_boxes)# (0.0, 0.0, 0.0, 0.0)self.BBOX_NORMALIZE_STDS = self.BBOX_NORMALIZE_STDS.type_as(gt_boxes)# (0.1, 0.1, 0.2, 0.2)self.BBOX_INSIDE_WEIGHTS = self.BBOX_INSIDE_WEIGHTS.type_as(gt_boxes)# (1.0, 1.0, 1.0, 1.0)gt_boxes_append = gt_boxes.new(gt_boxes.size()).zero_()gt_boxes_append[:,:,1:5] = gt_boxes[:,:,:4]# Include ground-truth boxes in the set of candidate roisall_rois = torch.cat([all_rois, gt_boxes_append], 1)'''torch.cat操作前 all_rois shape [batch_size,2000,5]gt_boxes_append shape [batch_size,20,5]操作后 all_rois shape [batch_size,2020,5]2020=num_region_proposal+num_max_gt'''num_images = 1rois_per_image = int(cfg.TRAIN.BATCH_SIZE / num_images)'''Minibatch size (number of regions of interest [ROIs])__C.TRAIN.BATCH_SIZE = 128Fraction of minibatch that is labeled foreground (i.e. class > 0)__C.TRAIN.FG_FRACTION = 0.25'''fg_rois_per_image = int(np.round(cfg.TRAIN.FG_FRACTION * rois_per_image))fg_rois_per_image = 1 if fg_rois_per_image == 0 else fg_rois_per_image'''对于batch size中的每张训练图像,虽然会传给Fast R-CNN模型2000个region proposal但是每张图像中,Fast R-CNN模型只会训练128个正样本,其中包括小于等于32个正样本和大于等于96个负样本,再根据rois和gt_boxes对每张图像中所有的2000个region proposal进行正负样本的划分,对于batch size中的每张训练图像,从所有正样本region proposal中随机挑选出小于等于32个(如果region proposal中正样本的数量大于32,则随机挑选出32个,否则就把所有的正样本进行训练),然后在batch size中的每张图像从所有负样本中随机挑选出(128-对于当前图像所挑选出的正样本数)作为负样本,这里所指的正负样本是用于训练Fast R-CNN模型的region proposal,对于每张图像界定region proposal的正负样本的标准\要依赖于当前训练图像的ground truth bounding boxes信息在训练RPN阶段是需要在anchor boxes预选框的基础上进行位置调整,网络需要预测的也是相对于anchor boxes的坐标偏移量,根据当前图像gt_boxes信息对anchor boxes进行正负样本的划分计算RPN的分类损失和回归损失在训练Fast R-CNN阶段是需要在RPN输出的2000个region proposal基础上进行位置调整和预测坐标偏移量,根据当前图像gt_boxes信息对region proposal进行正负样本的划分'''labels, rois,bbox_targets,bbox_inside_weights = self._sample_rois_pytorch(all_rois, gt_boxes, fg_rois_per_image,rois_per_image, self._num_classes)bbox_outside_weights = (bbox_inside_weights > 0).float()'''rois (4, 128, 5)labels (4, 128)bbox_targets (4, 128, 4)bbox_inside_weights (4, 128, 4)bbox_outside_weights (4, 128, 4)'''return rois, labels, bbox_targets, bbox_inside_weights, bbox_outside_weights
接下来我们来看以下是如何实现的:
labels, rois,bbox_targets,bbox_inside_weights = self._sample_rois_pytorch(all_rois, gt_boxes, fg_rois_per_image,rois_per_image, self._num_classes)
def backward(self, top, propagate_down, bottom):"""This layer does not propagate gradients."""passdef reshape(self, bottom, top):"""Reshaping happens during the call to forward."""passdef _get_bbox_regression_labels_pytorch(self, bbox_target_data, labels_batch, num_classes):"""Bounding-box regression targets (bbox_target_data) are stored in acompact form b x N x (class, tx, ty, tw, th)This function expands those targets into the 4-of-4*K representation usedby the network (i.e. only one class has non-zero targets).Returns:bbox_target (ndarray): b x N x 4K blob of regression targetsbbox_inside_weights (ndarray): b x N x 4K blob of loss weights"""batch_size = labels_batch.size(0)rois_per_image = labels_batch.size(1)clss = labels_batchbbox_targets = bbox_target_data.new(batch_size, rois_per_image, 4).zero_()bbox_inside_weights = bbox_target_data.new(bbox_targets.size()).zero_()for b in range(batch_size):# assert clss[b].sum() > 0if clss[b].sum() == 0:continueinds = torch.nonzero(clss[b] > 0).view(-1)for i in range(inds.numel()):ind = inds[i]bbox_targets[b, ind, :] = bbox_target_data[b, ind, :]bbox_inside_weights[b, ind, :] = self.BBOX_INSIDE_WEIGHTSreturn bbox_targets, bbox_inside_weightsdef _compute_targets_pytorch(self, ex_rois, gt_rois):"""Compute bounding-box regression targets for an image."""assert ex_rois.size(1) == gt_rois.size(1)assert ex_rois.size(2) == 4assert gt_rois.size(2) == 4batch_size = ex_rois.size(0)rois_per_image = ex_rois.size(1)targets = bbox_transform_batch(ex_rois, gt_rois)if cfg.TRAIN.BBOX_NORMALIZE_TARGETS_PRECOMPUTED:# Optionally normalize targets by a precomputed mean and stdevtargets = ((targets - self.BBOX_NORMALIZE_MEANS.expand_as(targets))/ self.BBOX_NORMALIZE_STDS.expand_as(targets))return targetsdef _sample_rois_pytorch(self, all_rois, gt_boxes, fg_rois_per_image, rois_per_image, num_classes):"""Generate a random sample of RoIs comprising foreground and backgroundexamples.:param all_rois : shape [batch_size, 2020, 5]2020=num_region_proposal+num_max_gt:param gt_boxes : shape torch.tensor [batch_size,20,5]从annotation.txt文件中读取出来的坐标信息,经过尺度变换后:param fg_rois_per_image: 128*0.25=32:param rois_per_image: 128:param num_classes:"""# overlaps: (rois x gt_boxes)overlaps = bbox_overlaps_batch(all_rois, gt_boxes)'''计算batch size中所有训练图像的region proposal与gt_boxes之间的overlapoverlaps shape [batch_size,2020,20]2020=num_region_proposal+num_max_gt'''max_overlaps, gt_assignment = torch.max(overlaps, 2)'''对于batch size中的每张图像,RPN所给定的每个region proposal,遍历所有的gt_boxes得到当前region proposal与哪个gt_boxes的overlap最大,就认为当前的region proposal与gt_boxes的overlap是多少,region proposal的ground truth类别也与之对应'''batch_size = overlaps.size(0)num_proposal = overlaps.size(1)num_boxes_per_img = overlaps.size(2)offset = torch.arange(0, batch_size)*gt_boxes.size(1)offset = offset.view(-1, 1).type_as(gt_assignment) + gt_assignment# changed indexing way for pytorch 1.0labels = gt_boxes[:,:,4].contiguous().view(-1)[(offset.view(-1),)].view(batch_size, -1)labels_batch = labels.new(batch_size, rois_per_image).zero_()rois_batch = all_rois.new(batch_size, rois_per_image, 5).zero_()gt_rois_batch = all_rois.new(batch_size, rois_per_image, 5).zero_()# Guard against the case when an image has fewer than max_fg_rois_per_image# foreground RoIsfor i in range(batch_size):fg_inds = torch.nonzero(max_overlaps[i] >= cfg.TRAIN.FG_THRESH).view(-1)fg_num_rois = fg_inds.numel()# Select background RoIs as those within [BG_THRESH_LO, BG_THRESH_HI)bg_inds = torch.nonzero((max_overlaps[i] < cfg.TRAIN.BG_THRESH_HI) &(max_overlaps[i] >= cfg.TRAIN.BG_THRESH_LO)).view(-1)bg_num_rois = bg_inds.numel()if fg_num_rois > 0 and bg_num_rois > 0:# sampling fgfg_rois_per_this_image = min(fg_rois_per_image, fg_num_rois)'''对于batch size中的每张图像,从所有正样本region proposal挑选出128*0.25=32个正样本,(如果正样本的数量小于32)则将所有的正样本ROI都训练'''rand_num = torch.from_numpy(np.random.permutation(fg_num_rois)).type_as(gt_boxes).long()fg_inds = fg_inds[rand_num[:fg_rois_per_this_image]]# sampling bgbg_rois_per_this_image = rois_per_image - fg_rois_per_this_image# Seems torch.rand has a bug, it will generate very large number and make an error.# We use numpy rand instead.#rand_num = (torch.rand(bg_rois_per_this_image) * bg_num_rois).long().cuda()rand_num = np.floor(np.random.rand(bg_rois_per_this_image) * bg_num_rois)rand_num = torch.from_numpy(rand_num).type_as(gt_boxes).long()bg_inds = bg_inds[rand_num]elif fg_num_rois > 0 and bg_num_rois == 0:# sampling fg#rand_num = torch.floor(torch.rand(rois_per_image) * fg_num_rois).long().cuda()rand_num = np.floor(np.random.rand(rois_per_image) * fg_num_rois)rand_num = torch.from_numpy(rand_num).type_as(gt_boxes).long()fg_inds = fg_inds[rand_num]fg_rois_per_this_image = rois_per_imagebg_rois_per_this_image = 0elif bg_num_rois > 0 and fg_num_rois == 0:# sampling bg#rand_num = torch.floor(torch.rand(rois_per_image) * bg_num_rois).long().cuda()rand_num = np.floor(np.random.rand(rois_per_image) * bg_num_rois)rand_num = torch.from_numpy(rand_num).type_as(gt_boxes).long()bg_inds = bg_inds[rand_num]bg_rois_per_this_image = rois_per_imagefg_rois_per_this_image = 0else:raise ValueError("bg_num_rois = 0 and fg_num_rois = 0, this should not happen!")# The indices that we're selecting (both fg and bg)keep_inds = torch.cat([fg_inds, bg_inds], 0)# Select sampled values from various arrays:labels_batch[i].copy_(labels[i][keep_inds])# Clamp labels for the background RoIs to 0if fg_rois_per_this_image < rois_per_image:labels_batch[i][fg_rois_per_this_image:] = 0rois_batch[i] = all_rois[i][keep_inds]rois_batch[i,:,0] = igt_rois_batch[i] = gt_boxes[i][gt_assignment[i][keep_inds]]'''(1)rois_batch.shape,(batch_size, 128, 5),用于对Fast R-CNN训练的rois,对于batch size中的每张训练图像随机选出了128个正负样本(比例1:3)region proposal其中5列的第一列表示当前的region proposal是属于batch size中哪张图像的图像索引编号后面4列表示所挑选出来的region proposal在输入图像空间分辨率上的位置坐标值这128个rois就是用于训练Fast R-CNN的,其中既有正样本也有负样本,但是在Fast R-CNN,是认为RPN所传送给它的2000个region proposal都是很好的(考虑过一定信息的)区域候选框(2)labels_batch.shape,(batch_size, 128),用于对Fast R-CNN训练的rois,对于batch size中的每张训练图像的128个region proposal的ground truth类别range (0,num_classes-1)(3)gt_rois_batch.shape,(batch_size, 128, 5)用于对Fast R-CNN训练的rois,对于batch size中的每张训练图像的128个region proposal的坐标值ground truth(编码之前)注意前四列表示每个region proposal对应的ground truth boxes坐标值[xmin,ymin,xmax,ymax]还是在经过尺度变换的输入图像的空间分辨率上最后一列表示rois对应的ground truth类别标签 0代表背景,'''bbox_target_data = self._compute_targets_pytorch(rois_batch[:,:,1:5], gt_rois_batch[:,:,:4])'''bbox_target_data才是对于rois_batch[batch_size,128,4]原始的在输入图像空间分辨率上面的region proposal与在输入图像空间分辨率上面的gt_rois_batch进行编码,注意编码后的位置偏移量是相当于认为现在的region proposal为anchor的编码方式而与之前RPN anchor 的空间分辨率没有任何关系现在得到的编码偏移量是gt_boxes相对于region proposal的偏移量这时的bbox_target_data是对于batch*128个region proposal全部进行位置编码,无论region proposal是正样本还是负样本如果region proposal是负样本,则认为它对应的gt_boxes 是在当前输入图像中与它具有最大overlap的gt_boxes,然后对region proposal进行编码'''bbox_targets, bbox_inside_weights = \self._get_bbox_regression_labels_pytorch(bbox_target_data,labels_batch,num_classes)'''(1)bbox_targets : shape [batch_size,128,4]正样本的target偏移量不为0 负样本的target偏移量为0(2)bbox_inside_weights : shape [batch_size,128,4]表示batch size的当前图像中,128个region proposal中哪些region proposal是正样本,哪些region proposal是负样本正样本为1 负样本为0[1., 1., 1., 1.],[1., 1., 1., 1.],[1., 1., 1., 1.],[1., 1., 1., 1.],[1., 1., 1., 1.],[1., 1., 1., 1.],[1., 1., 1., 1.],[1., 1., 1., 1.],[1., 1., 1., 1.],[1., 1., 1., 1.],[0., 0., 0., 0.],[0., 0., 0., 0.],[0., 0., 0., 0.],[0., 0., 0., 0.],[0., 0., 0., 0.],……'''return labels_batch, rois_batch, bbox_targets, bbox_inside_weights
proposal_target_layer的输出
| labels_batch | (batch_size, 128) | 用于对Fast R-CNN训练的rois,对于batch size中的每张训练图像的128个region proposal的ground truth类别 range (0,num_classes-1) |
|---|---|---|
| rois_batch | (batch_size, 128, 5) | 用于对Fast R-CNN训练的rois,对于batch size中的每张训练图像随机选出了128个正负样本(比例1:3)region proposal,其中5列的第一列表示当前的region proposal是属于batch size中哪张图像的图像索引编号,后面4列表示所挑选出来的region proposal在输入图像空间分辨率上的位置坐标值 |
| bbox_targets | (batch_size, 128, 4) | 正样本的target偏移量不为0 负样本的target偏移量为0,这里的编码偏移量是gt_boxes相对于region proposal的偏移量 |
| bbox_inside_weights | (batch_size, 128, 4) | 表示batch size的当前图像中,128个region proposal中,哪些region proposal是正样本,哪些region proposal是负样本 正样本为1 负样本为0 |
| bbox_outside_weights | (batch_size, 128, 4) | bbox_outside_weights = (bbox_inside_weights > 0).float() 其中数值与bbox_inside_weights相同,只是将其变为浮点数格式 |
5.对[batch_size,128,4]region proposal进行ROI Pooling
pooled_feat = self.RCNN_roi_pool(base_feat, rois.view(-1,5))
输出的pooled_feat shape [batch_size*128,1024,7,7]
对于batch size中的每张图像,对于128个region proposal,根据它在rois_batch即输入图像空间分辨率上的位置坐标信息先映射到resnet.layer3输出的特征图上(output stride=16,output channels=1024),然后再从特征图上扣取出相应特征块(对于不同的region proposal,特征块的分辨率可能不同),然后统一变到77,通道数还是1024,对于batch size中的每张图像需要抠取128个77的特征块。
6.pooled_feat = self._head_to_tail(pooled_feat)
将从RPN和Fast R-CNN模型的shared feature map上抠取下来的特征块pooled_feat(shape:[batch_size128,1024,7,7])送入resnet.layer4进一步提取特征,得到shape为[batch_size,128,2048,3,3],然后再在这个33特征块上进行global average pooling,得到shape [batch_size128,2048],即对于batch size每张图像中的128个正负样本region proposal,得到2048维度的特征向量。
然后将这个特征向量分别送入两个全连接层:classifier 从2048->num_classes(数据集中的类别数+1个背景),regression:从2048->4,分别输出[batch_size128,num_classes]的类别概率预测值和[batch_size128,4]的位置偏移量预测值。
bbox_pred = self.RCNN_bbox_pred(pooled_feat)
cls_score = self.RCNN_cls_score(pooled_feat)
其中trainval_net.py中的class_agnostic参数设置成store_true,表示如果在python命令行中出现了—cag,就说明args.class_agnostic=True,如果命令行中没出现,则代表args.class_agnostic=Fasle。
def _head_to_tail(self, pool5):fc7 = self.RCNN_top(pool5).mean(3).mean(2)return fc7'''self.RCNN_top = nn.Sequential(resnet.layer4)'''
7.计算Fast R-CNN模型的损失函数
RCNN_loss_cls = F.cross_entropy(cls_score, rois_label)
RCNN_loss_bbox = _smooth_l1_loss(bbox_pred, rois_target,rois_inside_ws, rois_outside_ws)
分类同样使用交叉熵损失函数,会对batch size*128个region proposal分类结果进行平均
回归也是对于所有正样本进行计算回归损失,但是进行平均的时候还是将分母设置成batch size*128进行平均,再不像RPN那样继续加权值。
def _smooth_l1_loss(bbox_pred, bbox_targets,bbox_inside_weights, bbox_outside_weights,sigma=1.0, dim=[1]):sigma_2 = sigma ** 2box_diff = bbox_pred - bbox_targetsin_box_diff = bbox_inside_weights * box_diffabs_in_box_diff = torch.abs(in_box_diff)smoothL1_sign = (abs_in_box_diff < 1. / sigma_2).detach().float()in_loss_box = torch.pow(in_box_diff, 2) * (sigma_2 / 2.) * smoothL1_sign \+ (abs_in_box_diff - (0.5 / sigma_2)) * (1. - smoothL1_sign)out_loss_box = bbox_outside_weights * in_loss_boxloss_box = out_loss_boxfor i in sorted(dim, reverse=True):loss_box = loss_box.sum(i)loss_box = loss_box.mean()return loss_box
以上,我们就把Faster R-CNN前向传播的所有过程都看过一遍了。
五、Faster R-CNN图示
六、重新梳理总结
上面的讲解中,我们是把Faster R-CNN的骨干网络分成几部来讲解,下面我们重新阅读梳理一遍它的核心代码:
#---对应jwyang项目/lib/model/faster_rcnn/faster_rcnn.py'''搭建Faster_rcnn骨架1)RCNN_base,就是我们说的backbone,只约定名字,由子类实现。2)RCNN_rpn,分两部分,一为上面写好的_RPN类,二为_ProposalTargetLayer类3)RCNN_roi_pool/RCNN_roi_align4)_head_to_tail,只约定名字,由子类实现。5)RCNN_bbox_pred,只约定名字,由子类实现。6)RCNN_cls_score,只约定名字,由子类实现。7)init_modules,只约定名字,由子类实现,因为我们不知道子类具体会采用什么backbone。8)_init_weights,初始化网络里的参数,因为约定好了各部分名字,所以可以在这里通过名字提取参数。'''import randomimport torchimport torch.nn as nnimport torch.nn.functional as Ffrom torch.autograd import Variableimport torchvision.models as modelsfrom torch.autograd import Variableimport numpy as npfrom model.utils.config import cfgfrom model.rpn.rpn import _RPNfrom model.roi_layers import ROIAlign, ROIPool# from model.roi_pooling.modules.roi_pool import _RoIPooling# from model.roi_align.modules.roi_align import RoIAlignAvgfrom model.rpn.proposal_target_layer_cascade import _ProposalTargetLayerimport timeimport pdbfrom model.utils.net_utils import _smooth_l1_loss, _crop_pool_layer, _affine_grid_gen, _affine_thetaclass _fasterRCNN(nn.Module):""" faster RCNN """def __init__(self, classes, class_agnostic):super(_fasterRCNN, self).__init__()self.classes = classesself.n_classes = len(classes)self.class_agnostic = class_agnostic'''class_agnostic控制bbox的回归方式,与之对应的是class_specific很好理解,agnostic的话就是不管啥类别,把bbox调整到有东西(类别非0)即可specific的话,必须要调整到确定的class一般我们推荐使用class_agnostic,一模型(代码)简单,二参数数量少内存开销小运行速度快,三对结果而言没什么太大影响.'''# lossself.RCNN_loss_cls = 0self.RCNN_loss_bbox = 0# define rpnself.RCNN_rpn = _RPN(self.dout_base_model)self.RCNN_proposal_target = _ProposalTargetLayer(self.n_classes)# self.RCNN_roi_pool = _RoIPooling(cfg.POOLING_SIZE, cfg.POOLING_SIZE, 1.0/16.0)# self.RCNN_roi_align = RoIAlignAvg(cfg.POOLING_SIZE, cfg.POOLING_SIZE, 1.0/16.0)self.RCNN_roi_pool = ROIPool((cfg.POOLING_SIZE, cfg.POOLING_SIZE), 1.0/16.0)self.RCNN_roi_align = ROIAlign((cfg.POOLING_SIZE, cfg.POOLING_SIZE), 1.0/16.0, 0)def forward(self, im_data, im_info, gt_boxes, num_boxes):'''input param:param im_data: data shape: [batch_size,3,H,w]:param im_info: im_info shape: [batch_size,3] 3: 用于训练的高宽,缩放比:param gt_boxes: gt_boxes shape: [batch_size,20,5]:param num_boxes: num_boxes shape : [batch_size, up to data ]:return:'''batch_size = im_data.size(0)im_info = im_info.datagt_boxes = gt_boxes.datanum_boxes = num_boxes.data# feed image data to base model to obtain base feature map'''1.RCNN_base只声明名称,定义由子类实现此处我们选用ResNet101的Layer1~3产出base feature map,shape=(bs,256*expansion,H/16,w/16)= (bs,1024,14,14)'''base_feat = self.RCNN_base(im_data)# feed base feature map tp RPN to obtain rois'''2.1 RPN网络,rois shape:[batch_size,2000,5],nms后的前2000个框[i,x1,y1,x2,y2]'''rois, rpn_loss_cls, rpn_loss_bbox = self.RCNN_rpn(base_feat, im_info, gt_boxes, num_boxes)# if it is training phrase, then use ground trubut bboxes for refiningif self.training:# 2.2 RCNN_proposal_target'''RCNN_proposal_targetroi_data includes :rois --> rois_batch: shape [batch_size,128,5]128: positive examples : negative examples = 1: 35 : [i,x1,y1,x2,y2] i:index of imagerois_label --> label_batch: shape [batch_size,128]128 : 128 examples'classes range-->[0,num_classes-1]rois_target --> bbox_target : shape [batch_size, 128, 4]4 : offset --> positive example offset isn't 0,negative isrois_inside_ws --> bbox_inside_weights : shape [batch_size,128,4]4 : positive example is [1,1,1,1],negative example is [0,0,0,0]rois_ioutside_ws --> bbox_outside_weights :shape [batch_size,128,4]4: bbox_outside_weights = (bbox_inside_weights > 0).float()'''roi_data = self.RCNN_proposal_target(rois, gt_boxes, num_boxes)rois, rois_label, rois_target, rois_inside_ws, rois_outside_ws = roi_datarois_label = Variable(rois_label.view(-1).long())rois_target = Variable(rois_target.view(-1, rois_target.size(2)))rois_inside_ws = Variable(rois_inside_ws.view(-1, rois_inside_ws.size(2)))rois_outside_ws = Variable(rois_outside_ws.view(-1, rois_outside_ws.size(2)))else:rois_label = Nonerois_target = Nonerois_inside_ws = Nonerois_outside_ws = Nonerpn_loss_cls = 0rpn_loss_bbox = 0rois = Variable(rois)# do roi pooling based on predicted rois# 3.ROI POOLING层if cfg.POOLING_MODE == 'align':pooled_feat = self.RCNN_roi_align(base_feat, rois.view(-1, 5))elif cfg.POOLING_MODE == 'pool':pooled_feat = self.RCNN_roi_pool(base_feat, rois.view(-1,5))# feed pooled features to top model# 4._head_to_tail'''将pooled features 输入到top model中本例中top model为ResNet Layer4,在子类中定义,先返回(bs,512*expansion, /2,/2)再经过mean(3),mean(2),得到 pooled_feat,shape=(bs,512*4)'''pooled_feat = self._head_to_tail(pooled_feat)# compute bbox offset'''5.RCNN_bbox_pred ,利用pooled_feat计算bbox offset。定义在子类中。本例中,RCNN_bbox_pred是一个全连接层。开启class_agnostic的情况下,把(bs,512*4)映射到(bs,4)上'''bbox_pred = self.RCNN_bbox_pred(pooled_feat)if self.training and not self.class_agnostic:# select the corresponding columns according to roi labelsbbox_pred_view = bbox_pred.view(bbox_pred.size(0), int(bbox_pred.size(1) / 4), 4)bbox_pred_select = torch.gather(bbox_pred_view, 1, rois_label.view(rois_label.size(0), 1, 1).expand(rois_label.size(0), 1, 4))bbox_pred = bbox_pred_select.squeeze(1)# compute object classification probability'''6.利用pooled_feat计算分类概率RCNN_cls_score本例中是一个全连接层,将512*4映射到n_classes维上得到 shape=(bs,n_classes)'''cls_score = self.RCNN_cls_score(pooled_feat)cls_prob = F.softmax(cls_score, 1)RCNN_loss_cls = 0RCNN_loss_bbox = 0if self.training:# classification lossRCNN_loss_cls = F.cross_entropy(cls_score, rois_label)# bounding box regression L1 lossRCNN_loss_bbox = _smooth_l1_loss(bbox_pred, rois_target, rois_inside_ws, rois_outside_ws)cls_prob = cls_prob.view(batch_size, rois.size(1), -1)bbox_pred = bbox_pred.view(batch_size, rois.size(1), -1)return rois, cls_prob, bbox_pred, rpn_loss_cls, rpn_loss_bbox, RCNN_loss_cls, RCNN_loss_bbox, rois_labeldef _init_weights(self):def normal_init(m, mean, stddev, truncated=False):"""weight initalizer: truncated normal and random normal."""# x is a parameterif truncated:m.weight.data.normal_().fmod_(2).mul_(stddev).add_(mean) # not a perfect approximationelse:m.weight.data.normal_(mean, stddev)m.bias.data.zero_()normal_init(self.RCNN_rpn.RPN_Conv, 0, 0.01, cfg.TRAIN.TRUNCATED)normal_init(self.RCNN_rpn.RPN_cls_score, 0, 0.01, cfg.TRAIN.TRUNCATED)normal_init(self.RCNN_rpn.RPN_bbox_pred, 0, 0.01, cfg.TRAIN.TRUNCATED)normal_init(self.RCNN_cls_score, 0, 0.01, cfg.TRAIN.TRUNCATED)normal_init(self.RCNN_bbox_pred, 0, 0.001, cfg.TRAIN.TRUNCATED)def create_architecture(self):self._init_modules()self._init_weights()

若有收获,就点个赞吧
0 人点赞
