1. load方法的调用时机?
在load_images函数中
add_class_to_loadable_list:将所有主类的load方法,收集到一张主类load方法表add_category_to_loadable_list:将所有分类的load方法,收集到一张分类load方法表call_class_loads:先循环调用主类的load方法call_category_loads:再循环调用分类的load方法

1.1 add_class_to_loadable_list
void add_class_to_loadable_list(Class cls){IMP method;loadMethodLock.assertLocked();method = cls->getLoadMethod();if (!method) return; // Don't bother if cls has no +load methodif (PrintLoading) {_objc_inform("LOAD: class '%s' scheduled for +load",cls->nameForLogging());}if (loadable_classes_used == loadable_classes_allocated) {loadable_classes_allocated = loadable_classes_allocated*2 + 16;loadable_classes = (struct loadable_class *)realloc(loadable_classes,loadable_classes_allocated *sizeof(struct loadable_class));}loadable_classes[loadable_classes_used].cls = cls;loadable_classes[loadable_classes_used].method = method;loadable_classes_used++;}
- 将所有主类的
load方法,收集到一张主类load方法表
1.2 add_category_to_loadable_list
void add_category_to_loadable_list(Category cat){IMP method;loadMethodLock.assertLocked();method = _category_getLoadMethod(cat);// Don't bother if cat has no +load methodif (!method) return;if (PrintLoading) {_objc_inform("LOAD: category '%s(%s)' scheduled for +load",_category_getClassName(cat), _category_getName(cat));}if (loadable_categories_used == loadable_categories_allocated) {loadable_categories_allocated = loadable_categories_allocated*2 + 16;loadable_categories = (struct loadable_category *)realloc(loadable_categories,loadable_categories_allocated *sizeof(struct loadable_category));}loadable_categories[loadable_categories_used].cat = cat;loadable_categories[loadable_categories_used].method = method;loadable_categories_used++;}
add_category_to_loadable_list:将所有分类的load方法,收集到一张分类load方法表
1.3 call_class_loads
static void call_class_loads(void){int i;// Detach current loadable list.struct loadable_class *classes = loadable_classes;int used = loadable_classes_used;loadable_classes = nil;loadable_classes_allocated = 0;loadable_classes_used = 0;// Call all +loads for the detached list.for (i = 0; i < used; i++) {Class cls = classes[i].cls;load_method_t load_method = (load_method_t)classes[i].method;if (!cls) continue;if (PrintLoading) {_objc_inform("LOAD: +[%s load]\n", cls->nameForLogging());}(*load_method)(cls, @selector(load));}// Destroy the detached list.if (classes) free(classes);}
call_class_loads:先循环调用主类的load方法
1.4 call_category_loads
static bool call_category_loads(void){int i, shift;bool new_categories_added = NO;// Detach current loadable list.struct loadable_category *cats = loadable_categories;int used = loadable_categories_used;int allocated = loadable_categories_allocated;loadable_categories = nil;loadable_categories_allocated = 0;loadable_categories_used = 0;// Call all +loads for the detached list.for (i = 0; i < used; i++) {Category cat = cats[i].cat;load_method_t load_method = (load_method_t)cats[i].method;Class cls;if (!cat) continue;cls = _category_getClass(cat);if (cls && cls->isLoadable()) {if (PrintLoading) {_objc_inform("LOAD: +[%s(%s) load]\n",cls->nameForLogging(),_category_getName(cat));}(*load_method)(cls, @selector(load));cats[i].cat = nil;}}// Compact detached list (order-preserving)shift = 0;for (i = 0; i < used; i++) {if (cats[i].cat) {cats[i-shift] = cats[i];} else {shift++;}}used -= shift;// Copy any new +load candidates from the new list to the detached list.new_categories_added = (loadable_categories_used > 0);for (i = 0; i < loadable_categories_used; i++) {if (used == allocated) {allocated = allocated*2 + 16;cats = (struct loadable_category *)realloc(cats, allocated *sizeof(struct loadable_category));}cats[used++] = loadable_categories[i];}// Destroy the new list.if (loadable_categories) free(loadable_categories);// Reattach the (now augmented) detached list.// But if there's nothing left to load, destroy the list.if (used) {loadable_categories = cats;loadable_categories_used = used;loadable_categories_allocated = allocated;} else {if (cats) free(cats);loadable_categories = nil;loadable_categories_used = 0;loadable_categories_allocated = 0;}if (PrintLoading) {if (loadable_categories_used != 0) {_objc_inform("LOAD: %d categories still waiting for +load\n",loadable_categories_used);}}return new_categories_added;}
call_category_loads:再循环调用分类的load方法
2. 主类方法和分类方法的调用顺序?
2.1 普通方法
普通方法,包括initialize,优先分类中的方法调用
因为分类的方法是在类realize之后attach进去的,所以插在前面
2.2 load方法
load方法,优先主类,然后分类
因为类的初始化,优先主类,读取ro。然后分类初始化,读取rwe
2.3 多分类
多个分类之间,看文件的编译顺序。load方法,先编译的分类先执行。同名方法,最后编译的分类中的方法会被执行
3. load、initialize、cxx的调用顺序?
load方法和cxx函数,在程序启动时自动调用
调用顺序:load→cxx→main
对于相同镜像文件,load方法一定在cxx函数之前
不同镜像文件的调用顺序:系统库优先→动态库→主程序
initialize方法,属于懒加载方法,在对象首次消息发送时调用
objc中的cxx函数,它会在_objc_init函数中,调用static_init函数,执行C++静态构造函数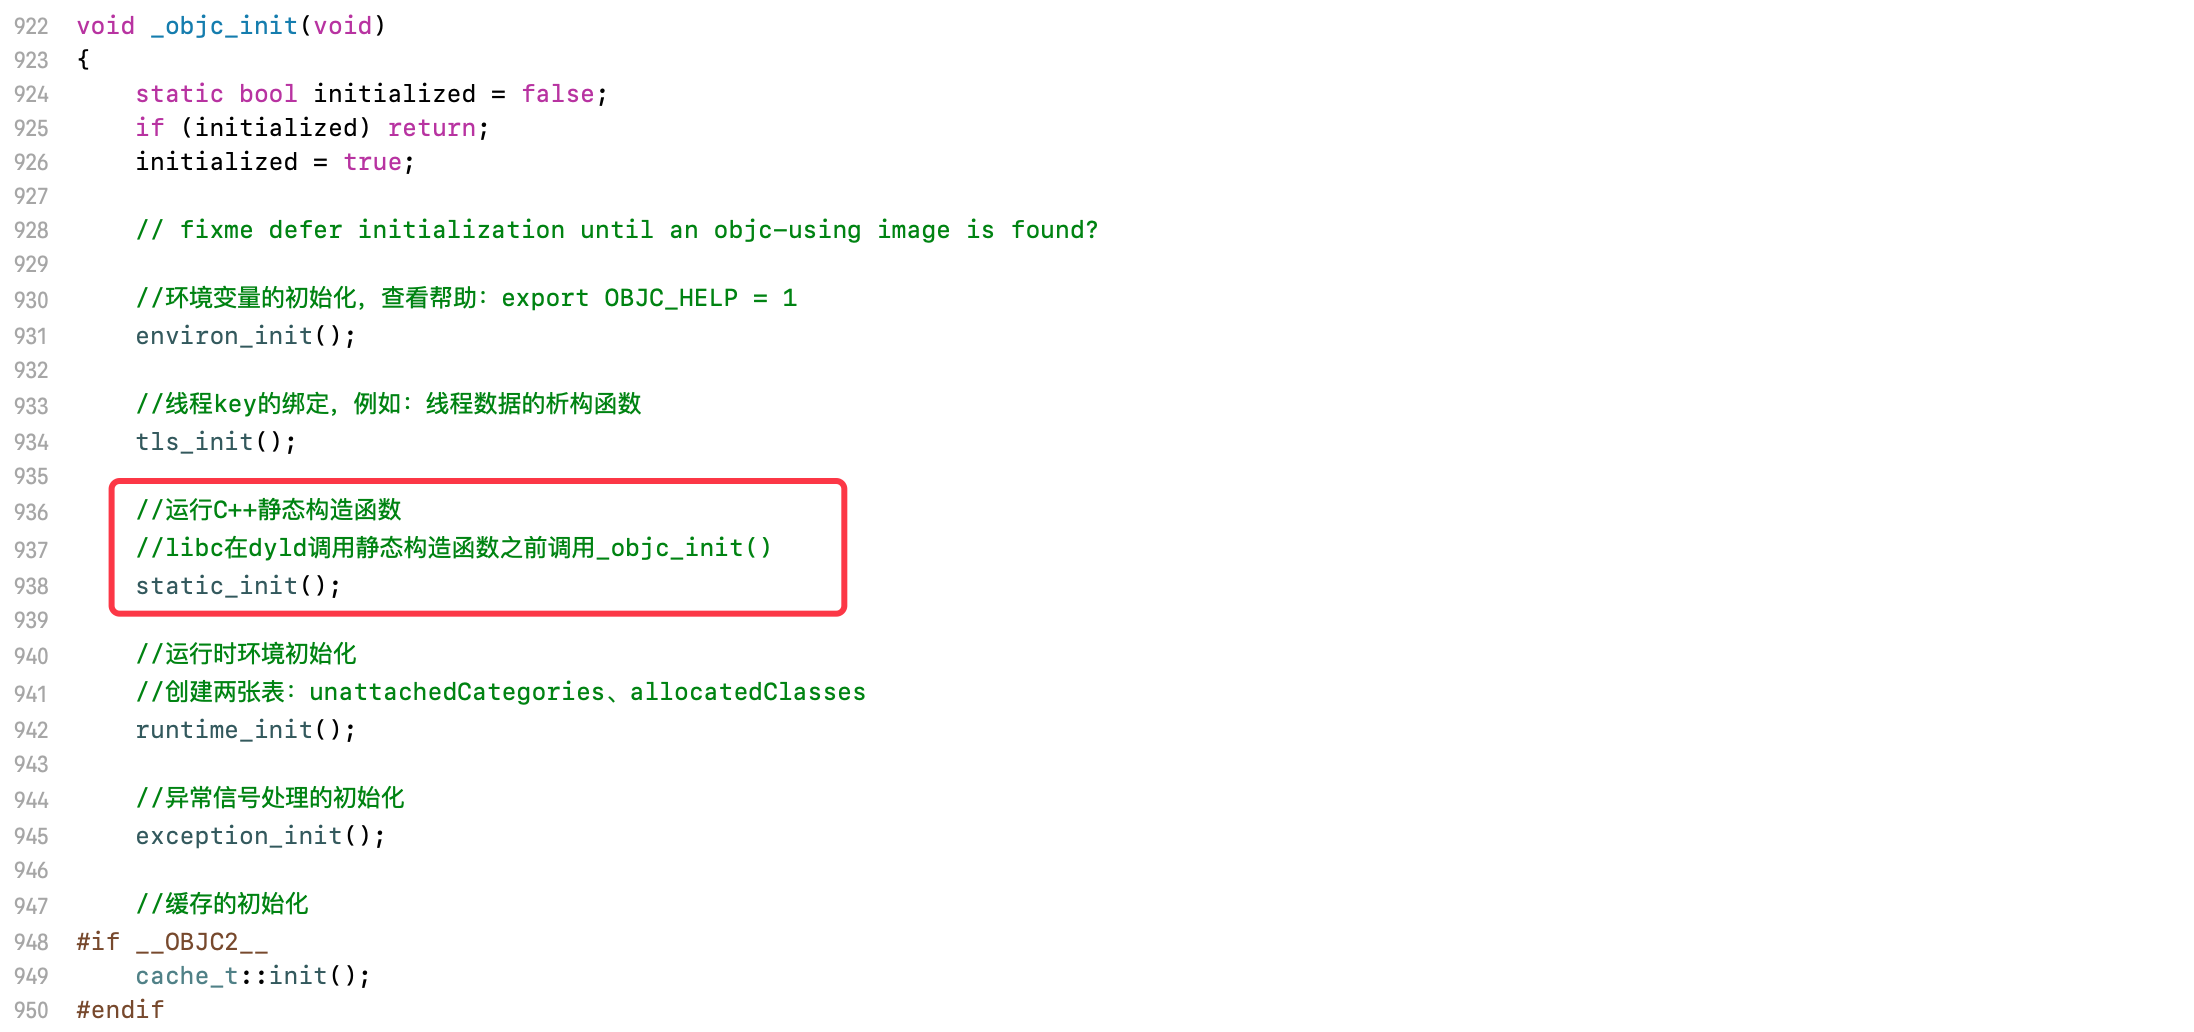
4. Runtime是什么?
Runtime是由C、C++、汇编实现的一套API,为OC语言增加面向对象及运行时的功能
Runtime是指将数据类型的确定从编译时推迟到运行时
例如:类扩展(Extension)和分类(Category)的区别
Runtime机制对于AOP面向切面编程提供良好的支持
平时编写的OC代码,最终都会转换成Runtime的C语言代码,Runtime是Object-C的幕后工作者
5. 方法的本质是什么?
方法的本质是消息发送,消息发送的流程:
- 消息快速查找,由汇编代码实现的
objc_msgSend - 消息慢速查找,遍历当前类和父类,由
C++代码实现的lookUpImpOrForward函数 - 方法动态决议,
resolveInstanceMethod - 消息快速转发,
forwardingTargetForSelector - 消息慢速转发,
methodSignatureForSelector、forwardInvocation - 挽救失败,由
doesNotRecognizeSelector:报出异常
5.1 sel和imp
sel:方法编号,在read_images时就读取到了内存imp:函数地址,消息发送就是sel找imp的过程
5.2 二者的关系
sel为方法编号,imp为sel对应的函数地址,通过imp函数地址才能找到真正的函数实现
例如
sel相当于一本书的目录imp相当于页码,通过imp才能找到函数的实现代码
查找某个函数的过程,相当于找到这本书中某个章节的具体内存
- 首先知道要找的是什么,
sel - 找到对应的页面,
imp - 将书翻到指定页,找到具体内容
6. 能否在运行时对编译后的类添加实例变量?
不能,因为编译后的实例变量存储在ro中,⼀旦编译完成,内存结构就完全确定了,⽆法修改。可以对编译后的类添加属性和⽅法
7、能否对运⾏时创建的类添加实例变量?
可以,使用objc_allocateClassPair创建类,只要在objc_registerClassPair注册之前,可添加实例变量。一旦注册后,无法添加实例变量
使用class_addIvar添加实例变量,添加前进行flags & RW_CONSTRUCTING的条件判断
BOOLclass_addIvar(Class cls, const char *name, size_t size,uint8_t alignment, const char *type){...// No class variablesif (cls->isMetaClass()) {return NO;}// Can only add ivars to in-construction classes.if (!(cls->data()->flags & RW_CONSTRUCTING)) {return NO;}...}
调用objc_registerClassPair函数,会对flags进行标记
void objc_registerClassPair(Class cls){...// Clear "under construction" bit, set "done constructing" bitcls->ISA()->changeInfo(RW_CONSTRUCTED, RW_CONSTRUCTING | RW_REALIZING);cls->changeInfo(RW_CONSTRUCTED, RW_CONSTRUCTING | RW_REALIZING);...}
8. [self class]和[super class]的区别?
[self class]:其中self为参数名,本质调用objc_msgSend,消息接收者为self,方法编号为class
[super class]:其中super为关键字,本质调用objc_msgSendSuper,消息接收者为self,方法编号为class。运行时,查看汇编代码,实际上调用的objc_msgSendSuper2
8.1 案例分析
#import <Foundation/Foundation.h>@interface LGPerson : NSObject@end@implementation LGPerson- (instancetype)init {self = [super init];if (self) {NSLog(@"init:%@ - %@",[self class],[super class]);}return self;}@end-------------------------init:LGPerson - LGPerson
[self class]和[super class],二者的打印结果都是LGPerson
因为二者的消息接收者都是当前self,而方法编号都是class
而二者的区别,self调用objc_msgSend,super调用objc_msgSendSuper
它们最终调用的都是NSObject中的class方法,消息接收者都是self当前实例对象,只是objc_msgSendSuper直接查找父类方法,比使用objc_msgSend更快
8.2 [self class]的本质
(Class (*)(id, SEL))(void *)objc_msgSend)((id)self, sel_registerName("class"))
8.3 [super class]的本质
((Class (*)(__rw_objc_super *, SEL))(void *)objc_msgSendSuper)((__rw_objc_super){(id)self, (id)class_getSuperclass(objc_getClass("LGPerson"))}, sel_registerName("class"))
8.4 __rw_objc_super结构体
struct __rw_objc_super {struct objc_object *object;struct objc_object *superClass;__rw_objc_super(struct objc_object *o, struct objc_object *s) : object(o), superClass(s) {}};
8.5 objc_msgSendSuper2
在objc源码中,打开objc-msg-arm64.s文件
ENTRY _objc_msgSendSuperUNWIND _objc_msgSendSuper, NoFrameldp p0, p16, [x0] // p0 = real receiver, p16 = classb L_objc_msgSendSuper2_bodyEND_ENTRY _objc_msgSendSuper
运行时,实际调用的是objc_msgSendSuper2,目的是objc_msgSendSuper升级后的过度
9. 实例方法的调用?
9.1 实例方法的两种调用方式
创建LGPerson
#import <Foundation/Foundation.h>@interface LGPerson : NSObject@property (nonatomic, copy) NSString *lgName;- (void)say1;@end@implementation LGPerson- (void)say1{NSLog(@"%@ : %s",self,__func__);}@end
在viewDidLoad方法中,使用两种不同方式,对其进行调用
- (void)viewDidLoad {[super viewDidLoad];//方式一LGPerson *p = [[LGPerson alloc] init];[p say1];//方式二Class cls = [LGPerson class];void *ptr = &cls;[(__bridge id)ptr say1];}-------------------------<LGPerson: 0x281e546d0> : -[LGPerson say1]<LGPerson: 0x16b141aa0> : -[LGPerson say1]
两种方式全部调用成功
方式一,常规写法,调用实例对象的say1方法,进入objc_msgSend流程,拿到实例对象所属isa,然后进行方法查找
方式二,将类对象地址,赋值给ptr指针,然后将其桥接成OC的id类型,进行say1方法的调用。ptr指针等同于实例对象所属isa,然后进行方法查找,所以也能调用成功
9.2 实例方法中打印属性
修改say1方法
- (void)say1{NSLog(@"%@ : %s : %@",self,__func__,self.lgName);}
在main函数中,使用两种不同方式,对其进行调用
int main(int argc, const char * argv[]) {@autoreleasepool {//方式一LGPerson *p = [[LGPerson alloc] init];[p say1];//方式二Class cls = [LGPerson class];void *ptr = &cls;[(__bridge id)ptr say1];}return 0;}-------------------------<LGPerson: 0x281e546d0> : -[LGPerson say1] : (null)<LGPerson: 0x16b141aa0> : -[LGPerson say1] : <LGPerson: 0x281e546d0>
两种方式,打印出lgName的属性值各不相同。实例对象与类对象最大的区别,实例对象使用malloc开辟内存空间,结构中包含isa + 成员变量。所以实例对象使用首地址 + 偏移值的方式,在自己开辟的堆空间中,偏移isa指针的8字节,即可找到lgName属性并对其打印
方式一,由于lgName没有赋值,打印结果为null
方式二,ptr为类对象的指针,在viewDidLoad的函数调用栈中,所以ptr使用首地址 + 偏移值的方式,只能找到函数调用栈中ptr的上一个元素,即:LGPerson的实例对象p
9.3 为什么上一个元素是LGPerson的实例对象?
栈:是一种具有特殊的访问方式的存储空间,具有后进先出的特性(Last In Out Firt,LIFO)
在ARM64中,栈的开口方向是向下的,由高地址到低地址。对栈的操作是16字节对齐
打印函数调用栈中的全部元素
void *fp = (void *)&self;void *sp = ptr;long count = (fp - sp) / 0x8;for (long i = 0; i <= count; i++) {void *address = fp - i * 0x8;if(i==1){NSLog(@"%p : %s",address, *(char **)address);continue;}NSLog(@"%p : %@",address, *(void **)address);}-------------------------0x16dd5dac8 : <ViewController: 0x102607340>0x16dd5dac0 : viewDidLoad0x16dd5dab8 : ViewController0x16dd5dab0 : <ViewController: 0x102607340>0x16dd5daa8 : <LGPerson: 0x282808ca0>0x16dd5daa0 : LGPerson
允许压栈进来的对象,包含方法的参数,
viewDidLoad方法的两个隐式参数self和_cmd调用
[super viewDidLoad]方法,需要在当前函数调用栈中,创建__rw_objc_super结构体的临时变量,然后传入super方法。结构体的成员变量,分别包含object和superClass方法中定义的局部变量,例如:
LGPerson的实例变量p,LGPerson类对象的ptr指针
从栈底到栈顶,每8字节打印一个元素。最后一个元素ptr指针,使用ptr + 8字节偏移,找到的是LGPerson的实例对象p
9.4 为什么superClass传入的是ViewController?
查看[super viewDidLoad]方法的汇编代码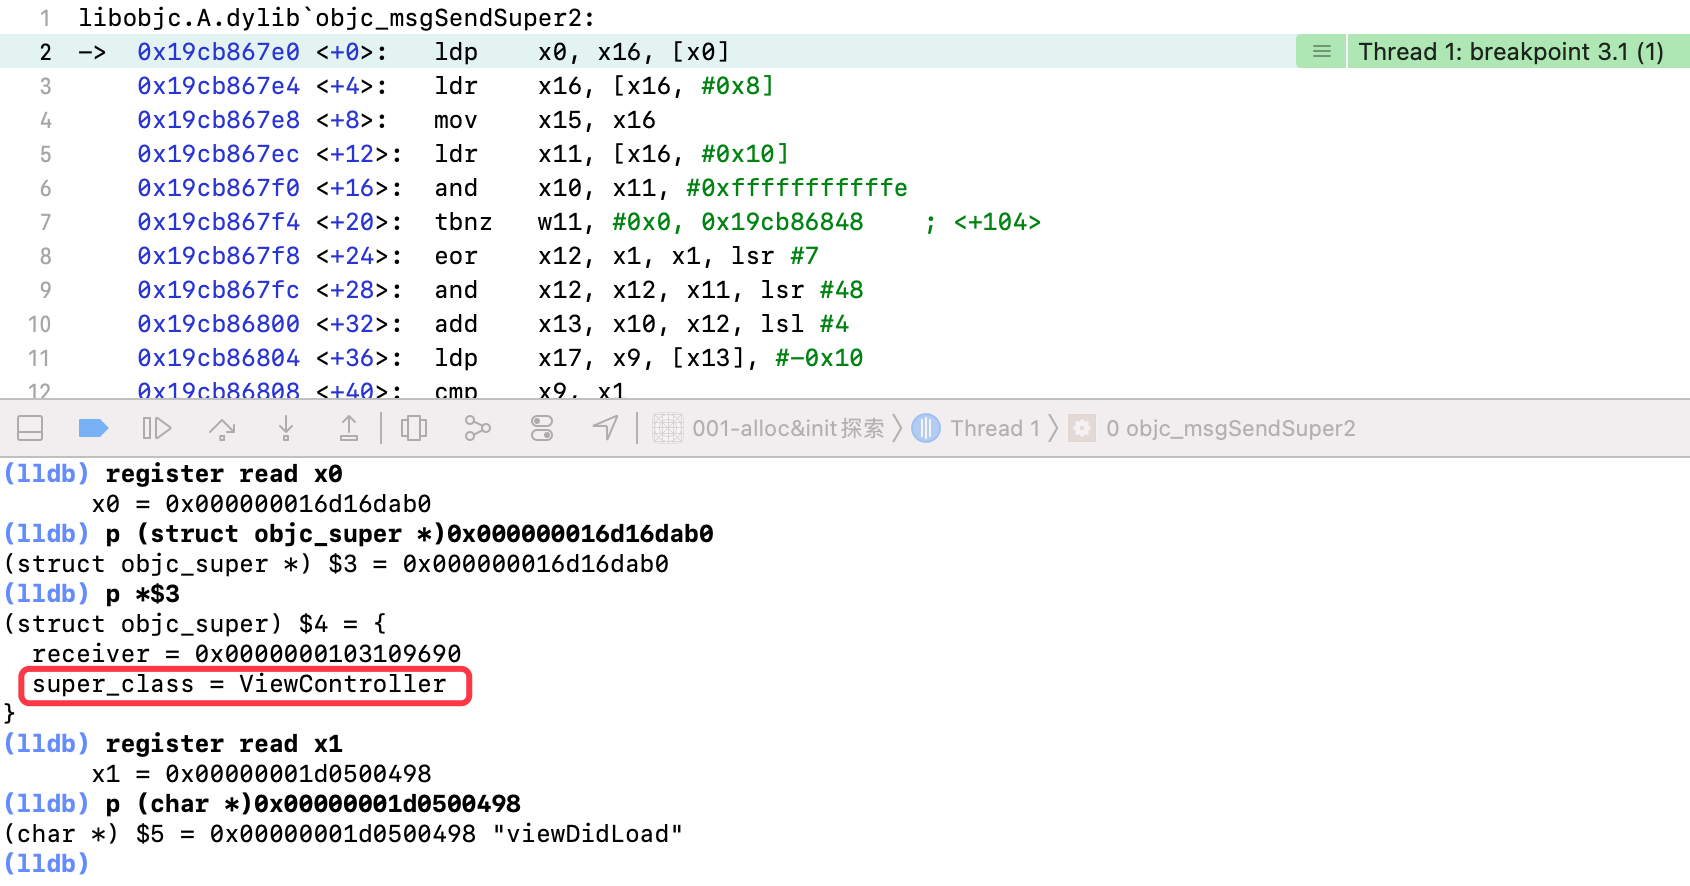
x0寄存器中存储结构体,其中super_class成员变量,存储的不是父类UIViewController,而是当前类对象ViewController
在objc源码中,搜索objc_msgSendSuper2
#if __OBJC2__// objc_msgSendSuper2() takes the current search class, not its superclass.OBJC_EXPORT id _Nullableobjc_msgSendSuper2(struct objc_super * _Nonnull super, SEL _Nonnull op, ...)OBJC_AVAILABLE(10.6, 2.0, 9.0, 1.0, 2.0);
- 注释:接受当前的搜索类,而不是它的父类
查看汇编的源码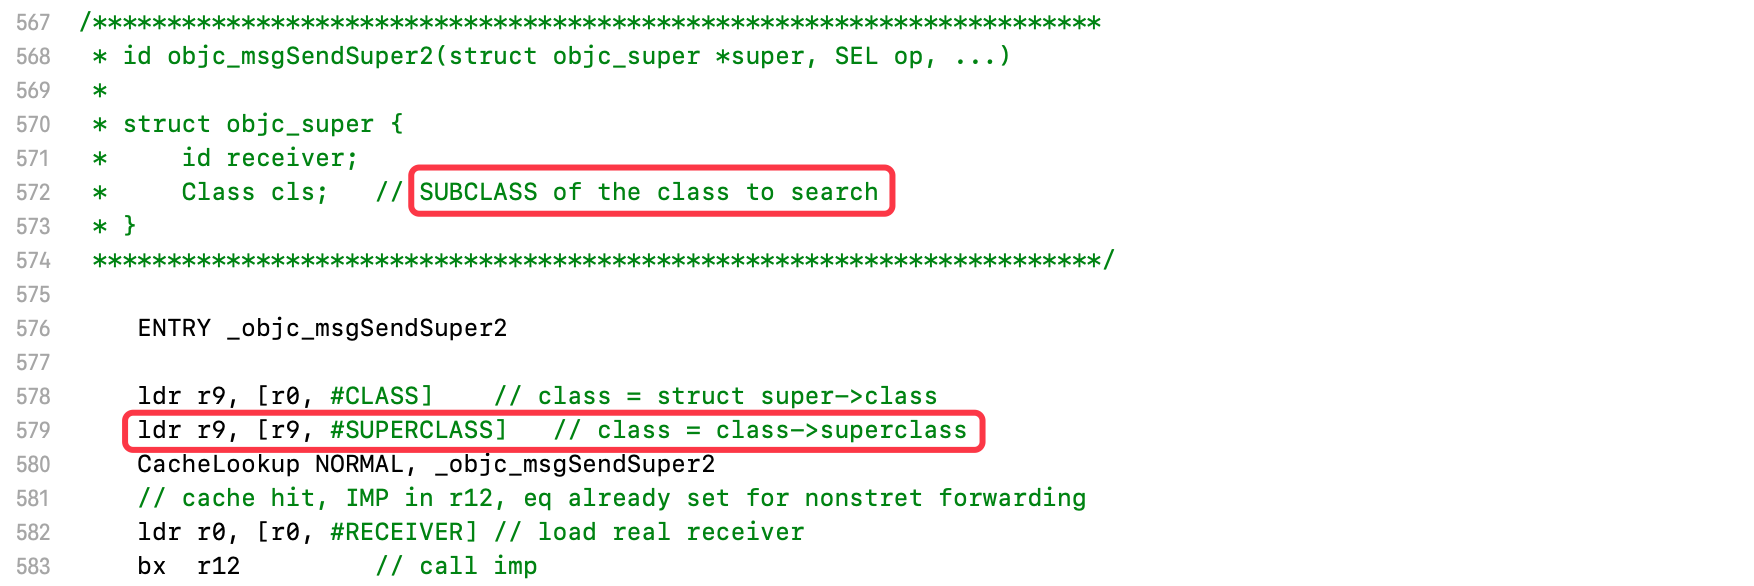
cls为要搜索的类的子类
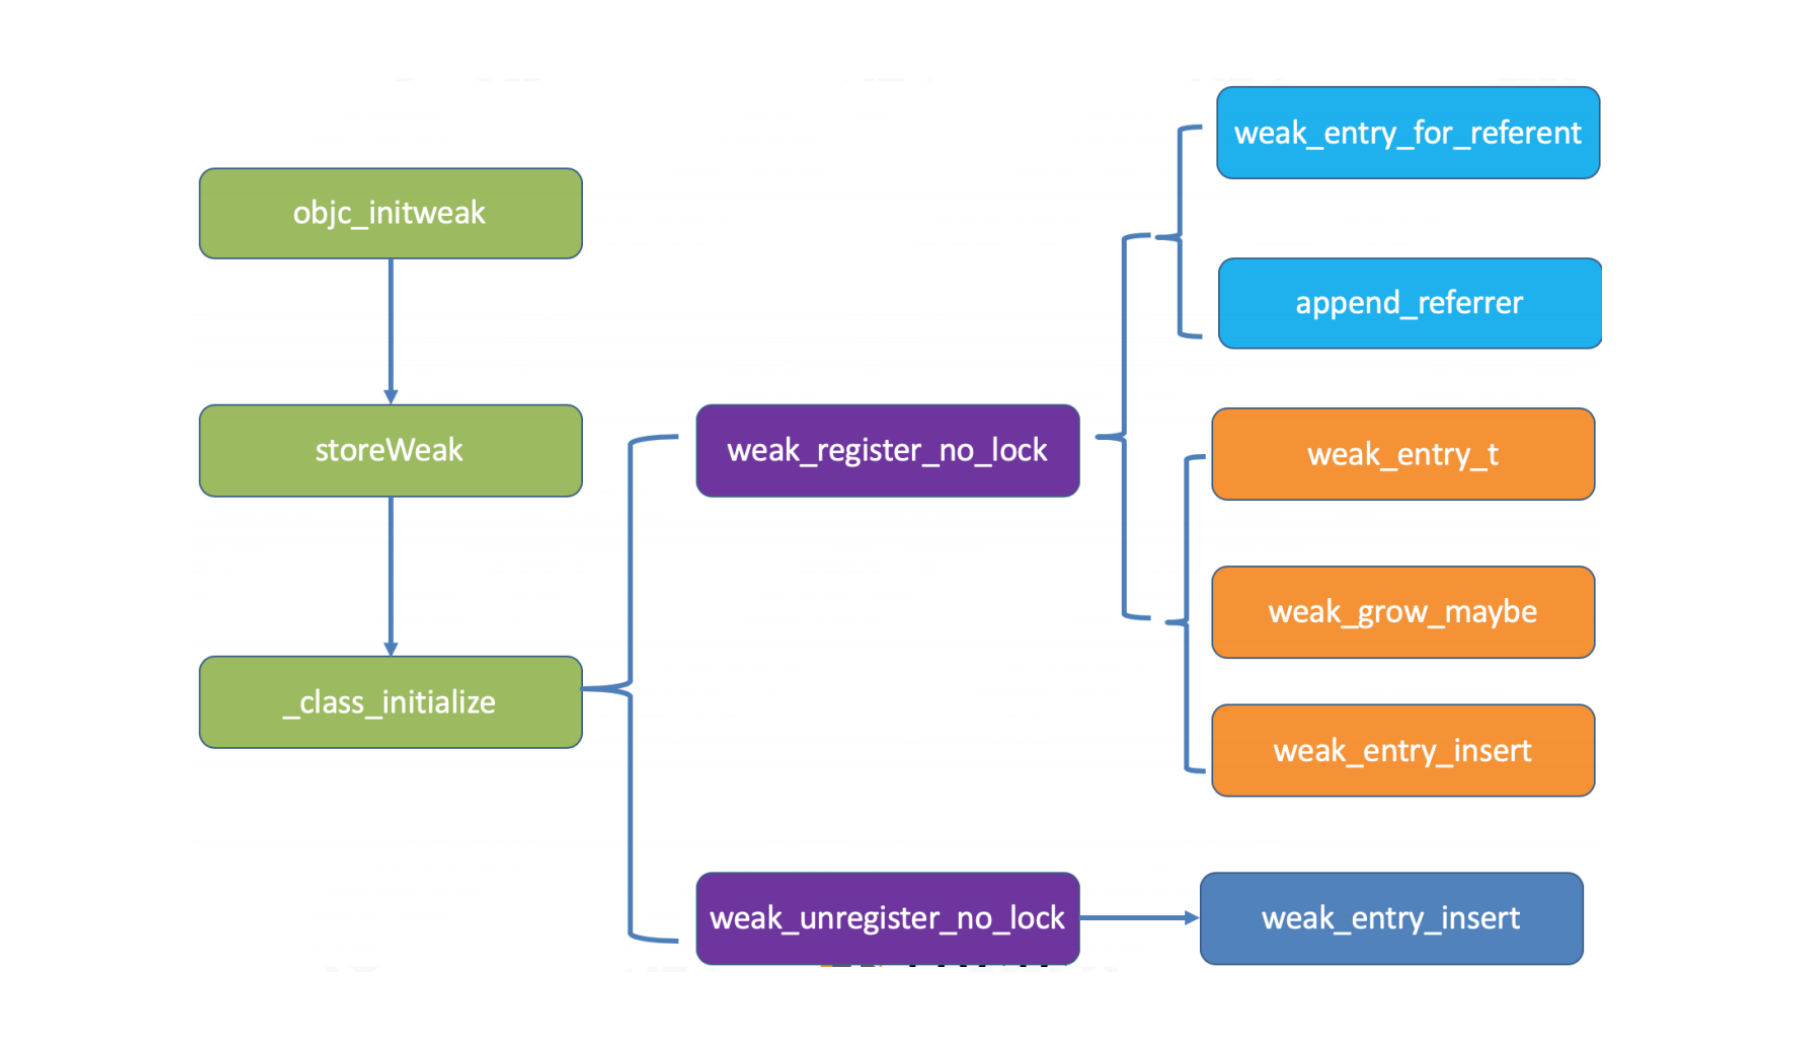
10. Runtime是如何实现weak的,为什么可以⾃动置nil?
- 通过
SideTable找到我们的weak_table weak_table根据referent找到或者创建weak_entry_t- 然后
append_referrer(entry, referrer)将我的新弱引⽤的对象加进去entry - 最后
weak_entry_insert把entry加⼊到我们的weak_table

若有收获,就点个赞吧
0 人点赞
