1. 初探
组件化可以将一个庞大的项目,按功能拆分成独立组件,多组件之间特定方式通讯,从而使模块之间解耦,提高团队协作开发效率
每一个组件都是独立的,可独立运行。一些底层的组件可重复利用,提高可重用性
1.1 使用组件化的优势
模块间解耦
模块复用
提高团队协作开发效率
单元测试
1.2 不建议使用组件化的项目
使用组件化,理论上会使项目变复杂
设计模块的分离和相互之间的通讯,常用控件和功能的封装,对宏定义及分类文件、底层组件的下沉,都会让你的代码变得更庞大
所以,当项目或团队具备以下特性时,不建议使用组件化
项目较小,模块间交互简单,耦合少
模块没有被多个外部模块引用,只是一个单独的小模块
模块不需要重用,代码也很少被修改
团队规模很小
1.3 组件化分层
一般项目的组件化分为业务层、通用层、基础层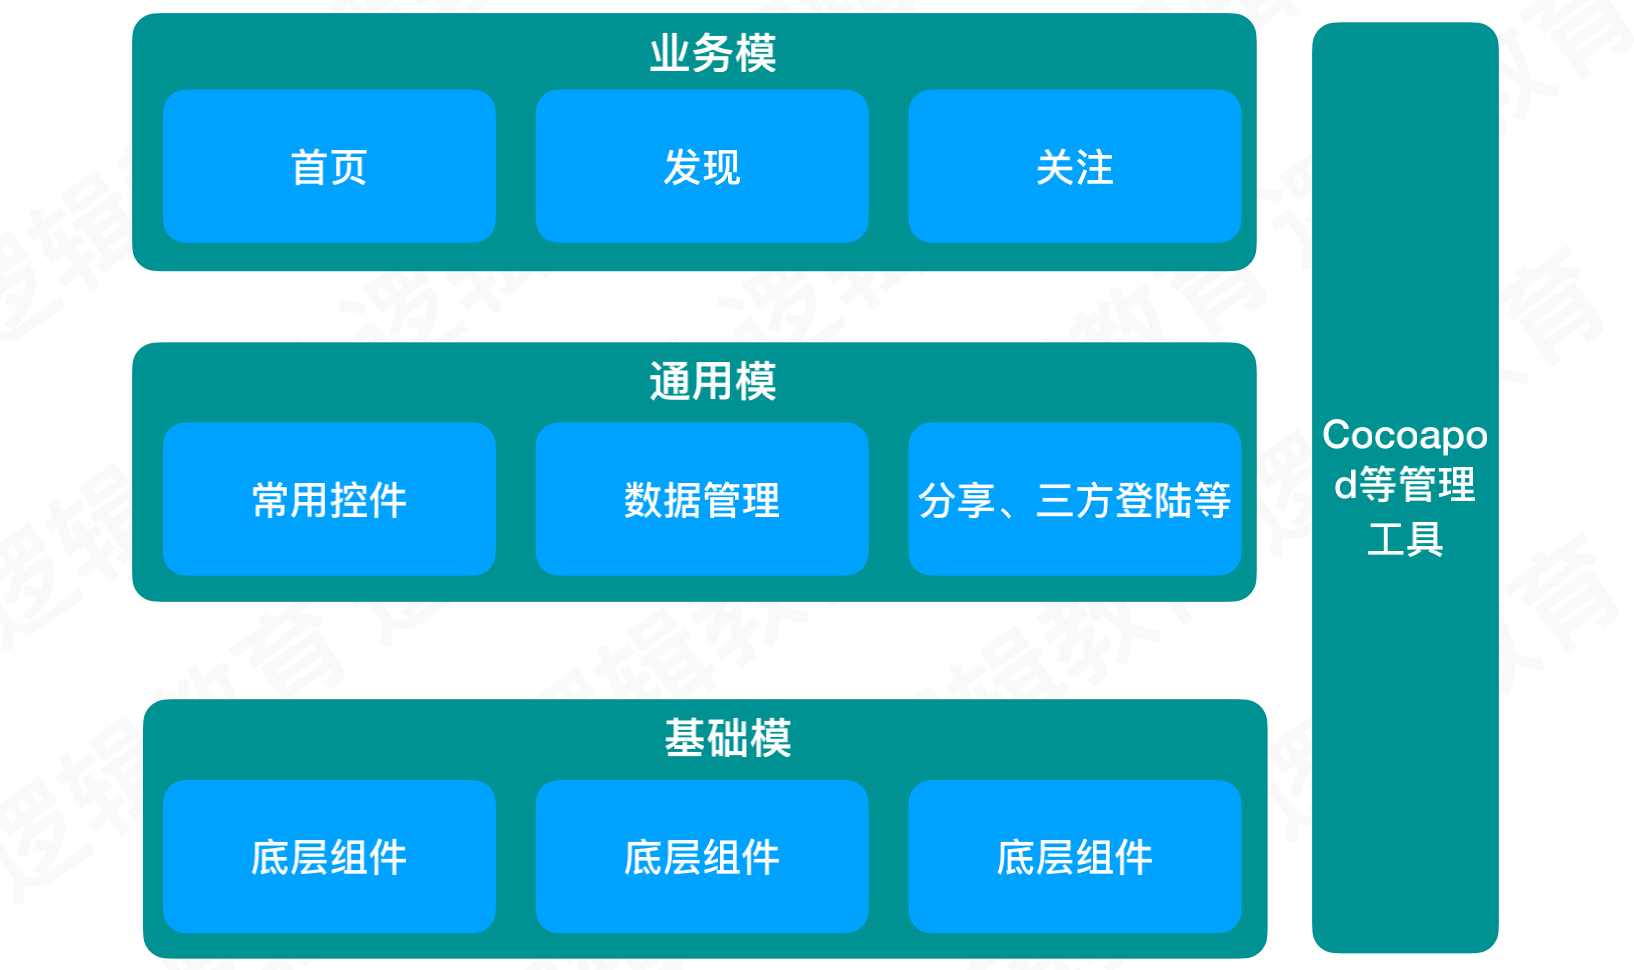
- 只允许上层对下层的依赖,不允许下层依赖上层
- 横向模块之间不能依赖,同级模块之间的通讯进行下沉
- 将通用组件、宏定义、分类文件、公共资源进行下沉,使其具备独立性和复用性
- 开发中,对于层次的构建,由下至上。避免因下层代码的改动,导致上层代码大量修改
例如: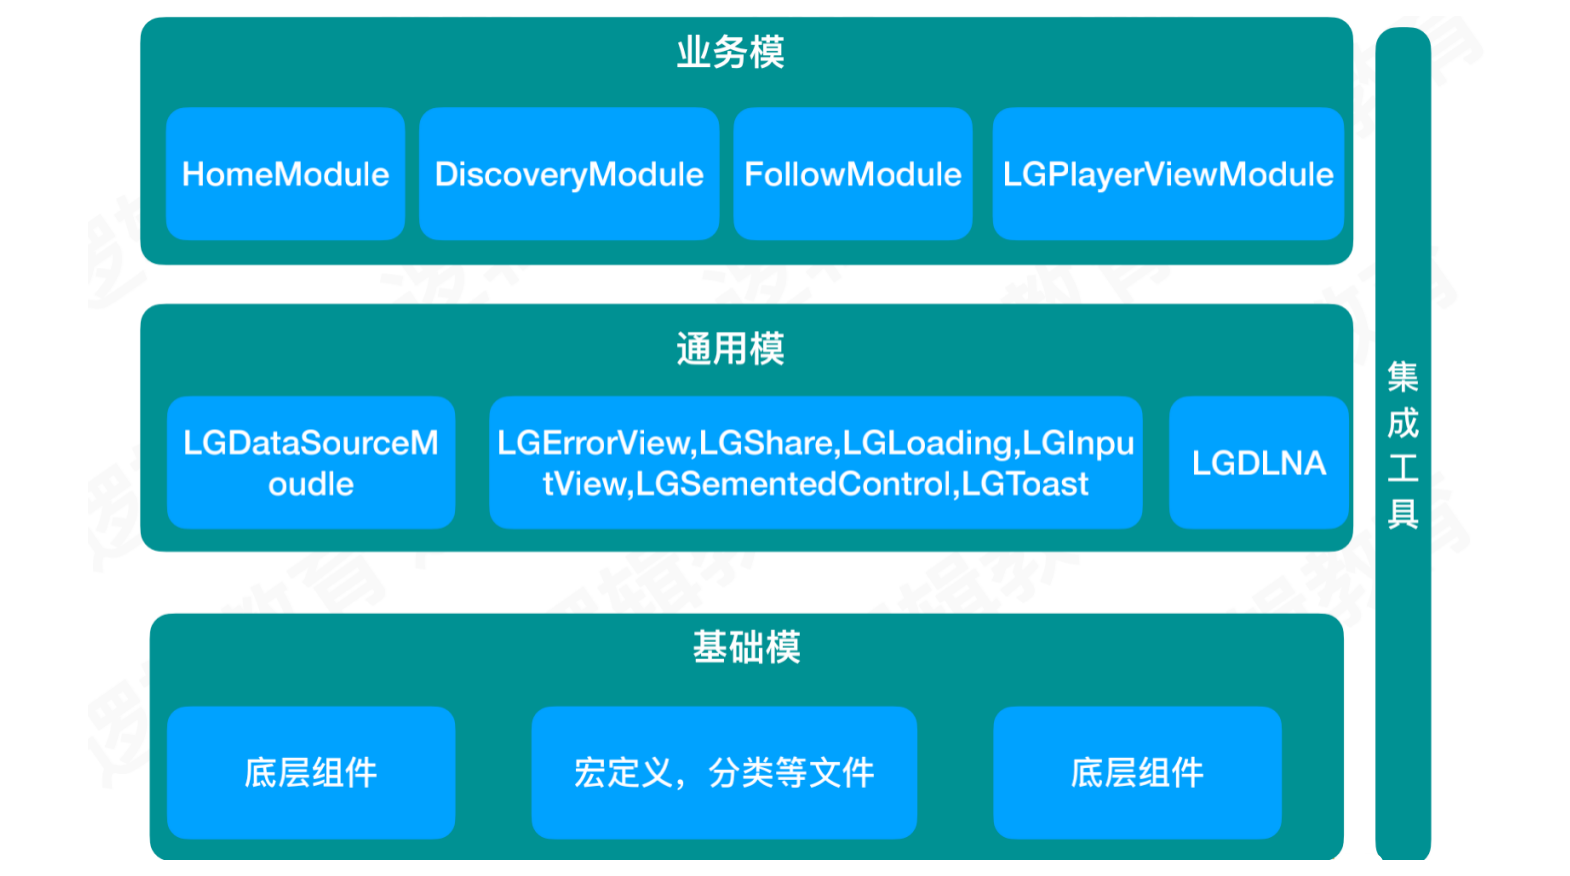
2. CocoaPods
CocoaPods是专门为iOS工程提供第三方依赖库的管理工具,通过CocoaPods,我们可以更方便地管理每个第三方库的版本,而且不需要我们做太多的配置,就可以直观、集中和自动化地管理我们项目的第三方库
日常开发中,我们经常使用CocoaPods进行代码提交,也经常会拉取第三方提供的优秀框架使用
使用CocoaPods必须对其进行安装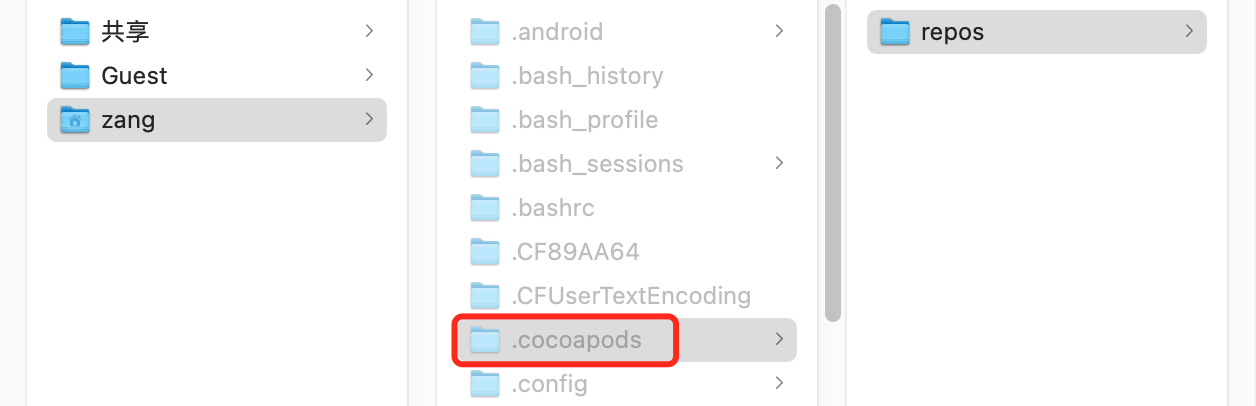
导入一个三方框架时,会在本地CocoaPods的索引库中进行查找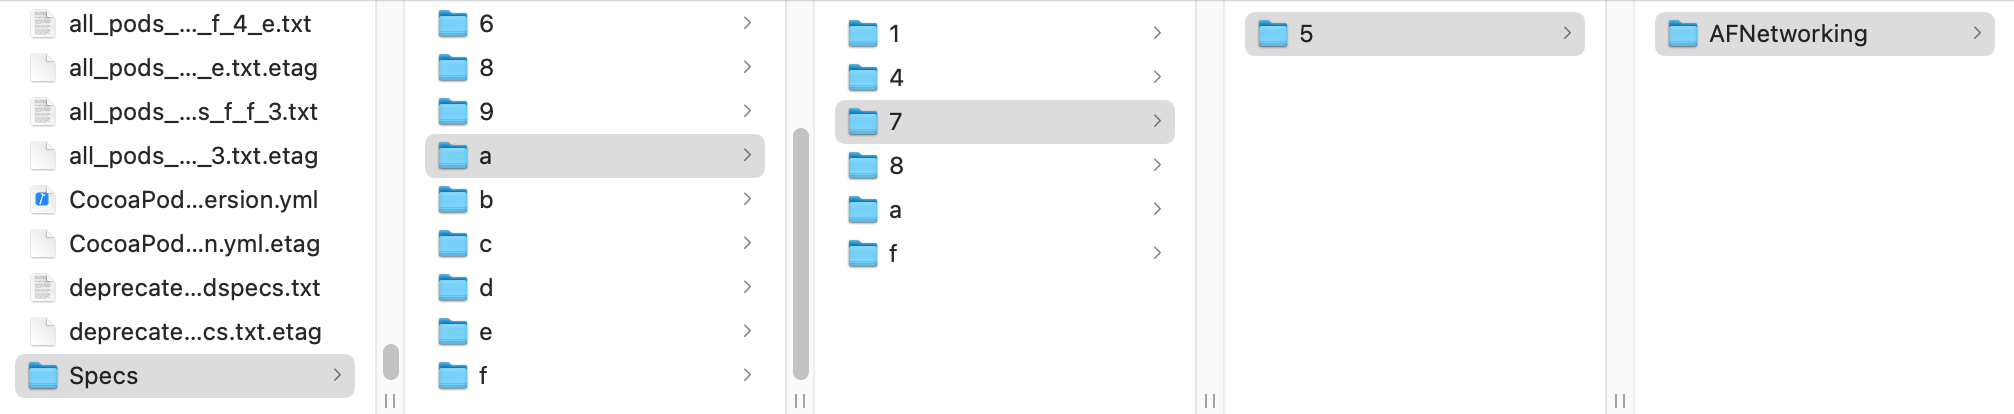
在.podspec.json文件中,找到该框架在远程仓库的下载地址,从远程仓库将其导入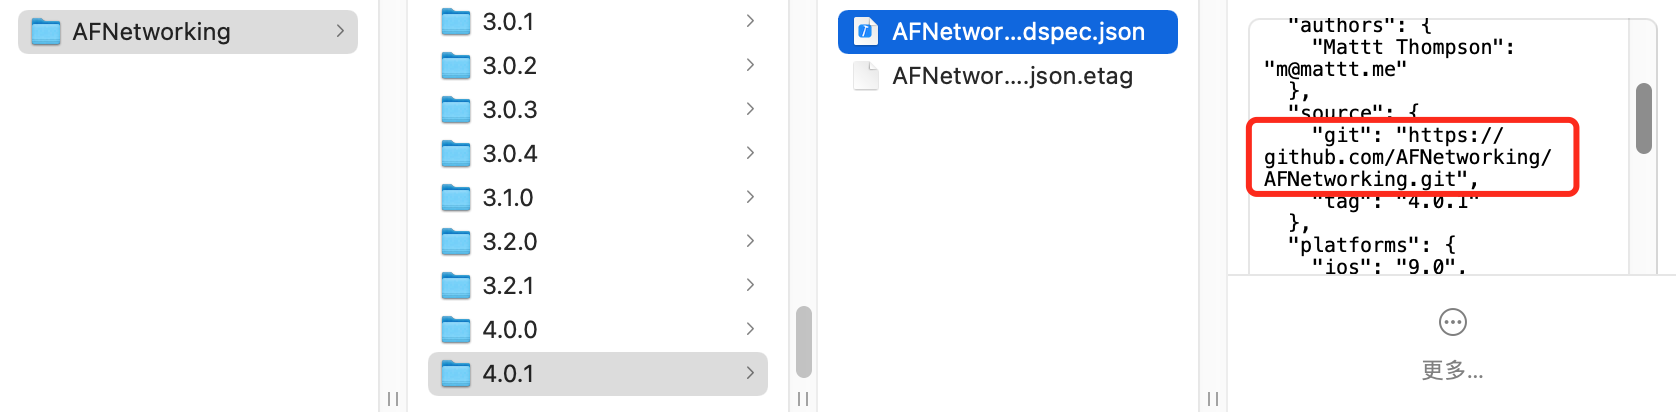
CocoaPods流程图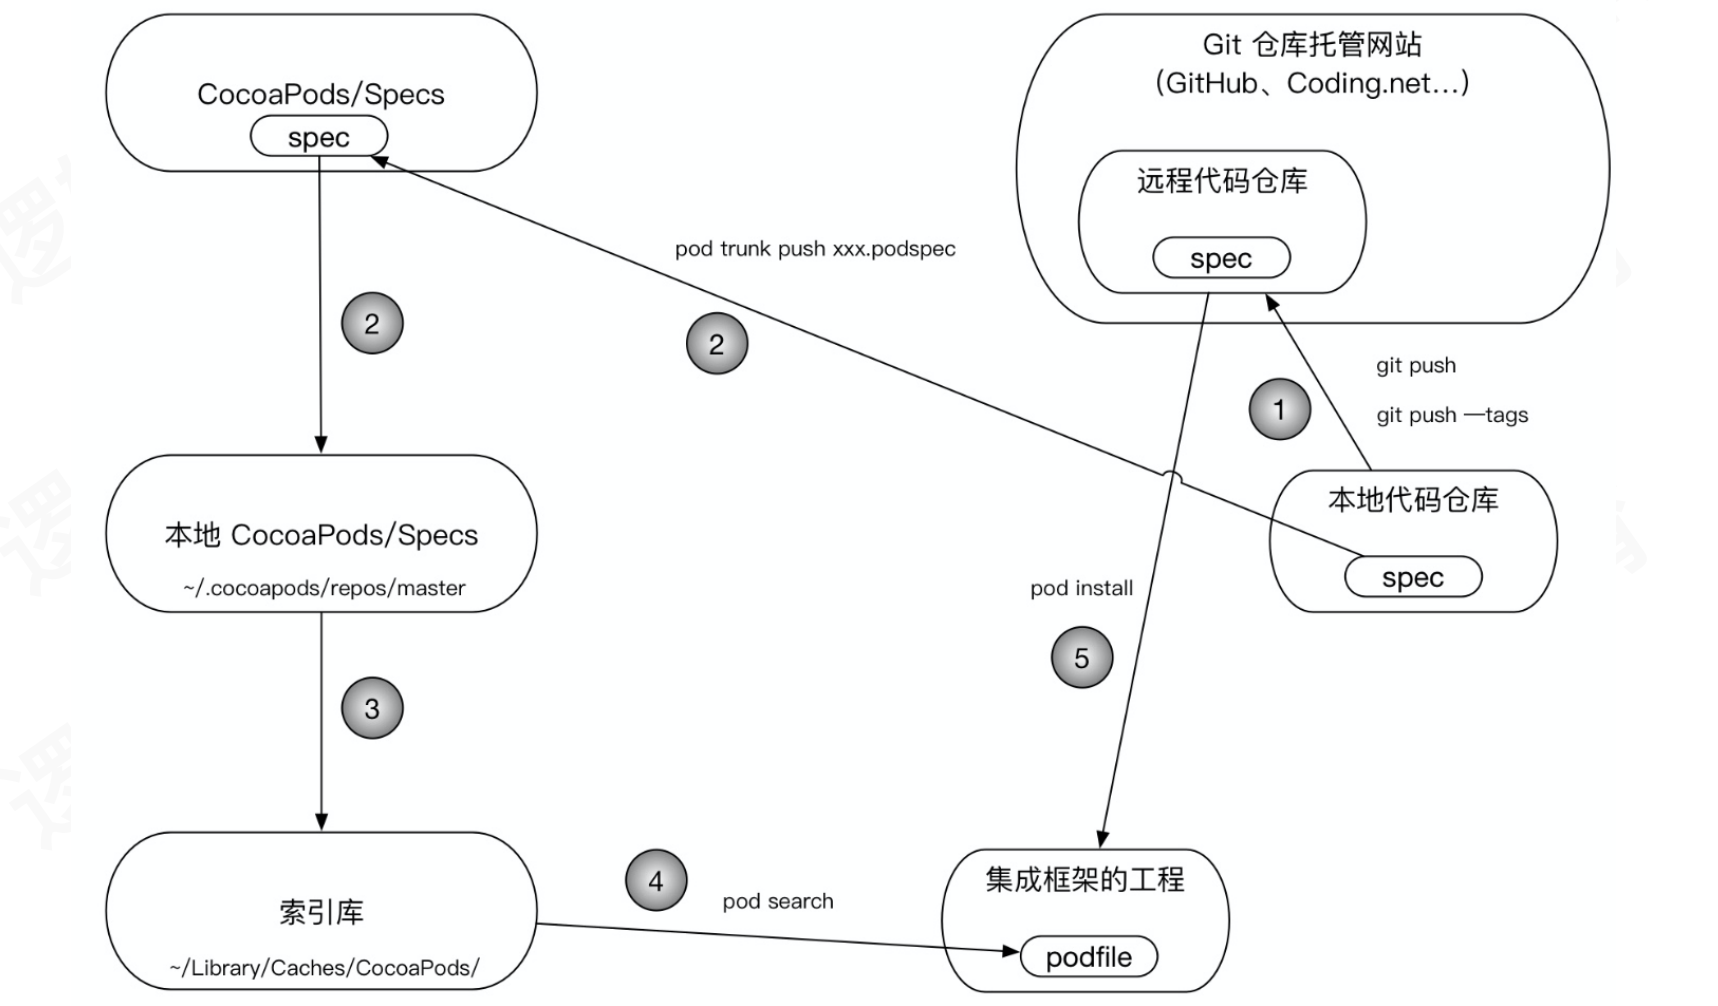
3. 创建组件
使用CocoaPods,可分为本地和远程两种方式搭建组件化工程
本地:通过项目中创建模块,利用
CocoaPods的workspec进行本地管理,不需要将项目上传git,而是在项目的Podfile中指定目录远程:利用
CocoaPods进行模块的远程管理,需要将项目上传git。对公司项目而言,一般使用私有库
下面我们以本地方式为例,搭建一个组件化工程
创建LGHomeModule模块
pod lib create LGHomeModule-------------------------//对模块进行以下配置://工程类型What platform do you want to use?? [ iOS / macOS ]> iOS//开发语言What language do you want to use?? [ Swift / ObjC ]> objc//创建App测试项目Would you like to include a demo application with your library? [ Yes / No ]> yes//提供frameworks的测试Which testing frameworks will you use? [ Specta / Kiwi / None ]> none//提供测试文件Would you like to do view based testing? [ Yes / No ]> no//设置前缀What is your class prefix?> LG
配置完成后,生成以下工程: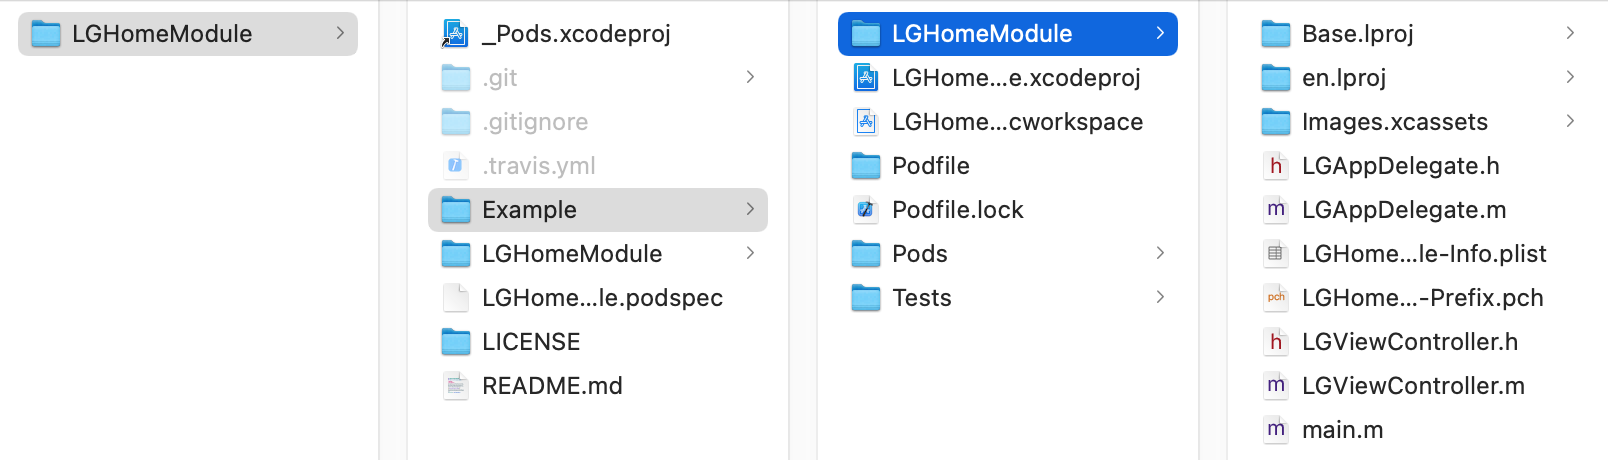
进行组件的开发,真正的代码目录在Pods项目的LGHomeModule中,而LGHomeModule是对组件进行测试使用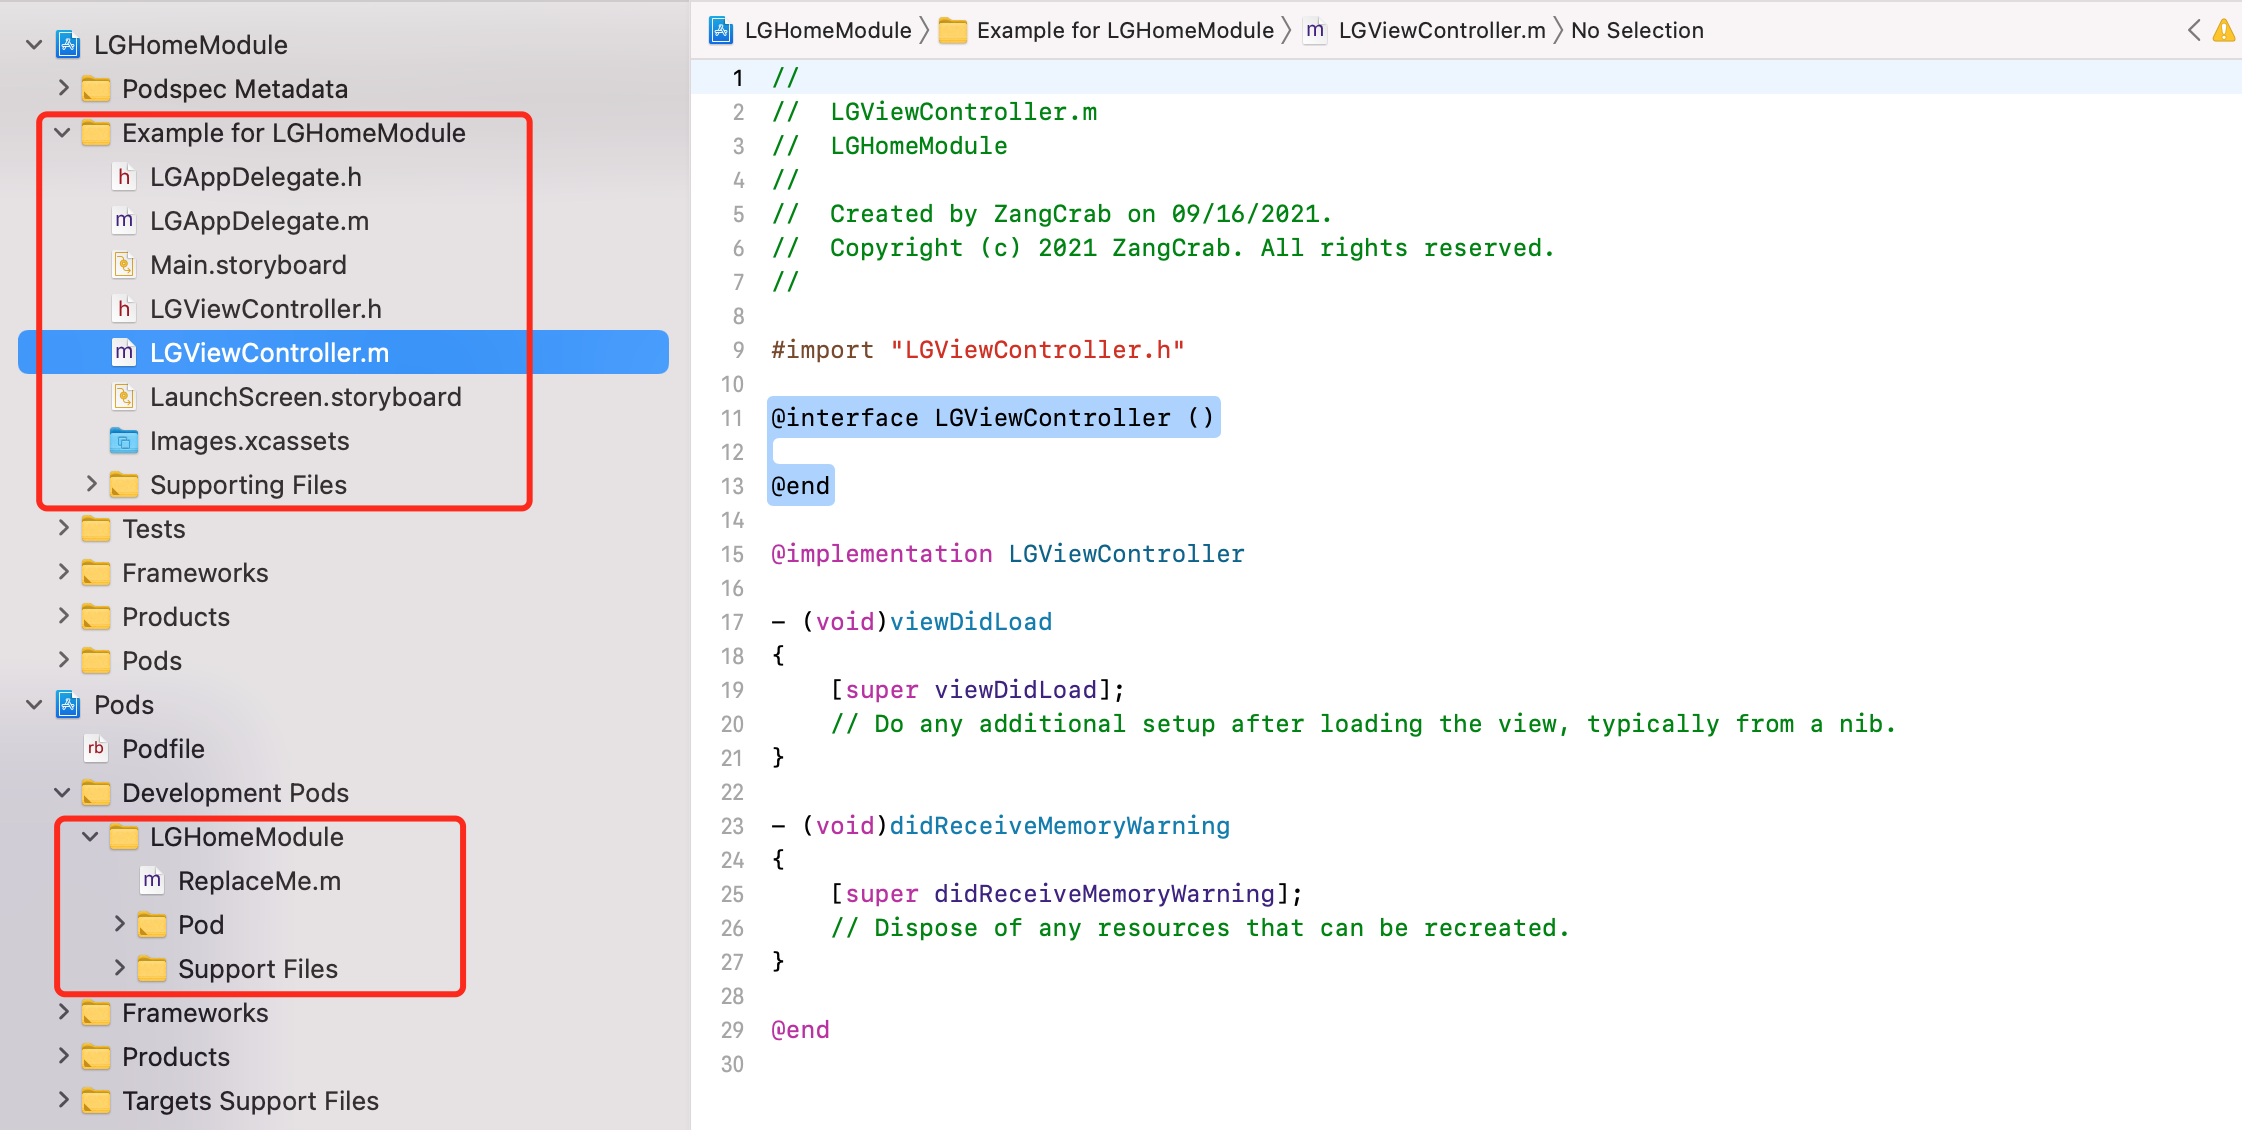
在组件中完成Home模块的业务代码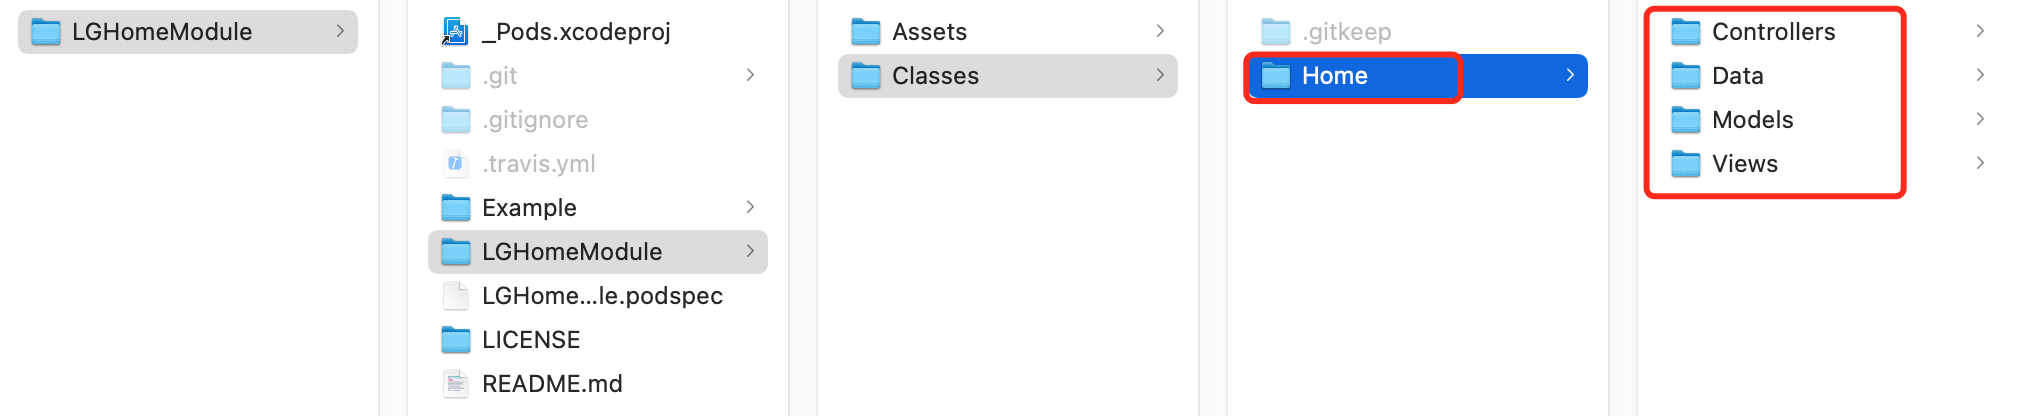
在测试工程Example目录下,执行pod install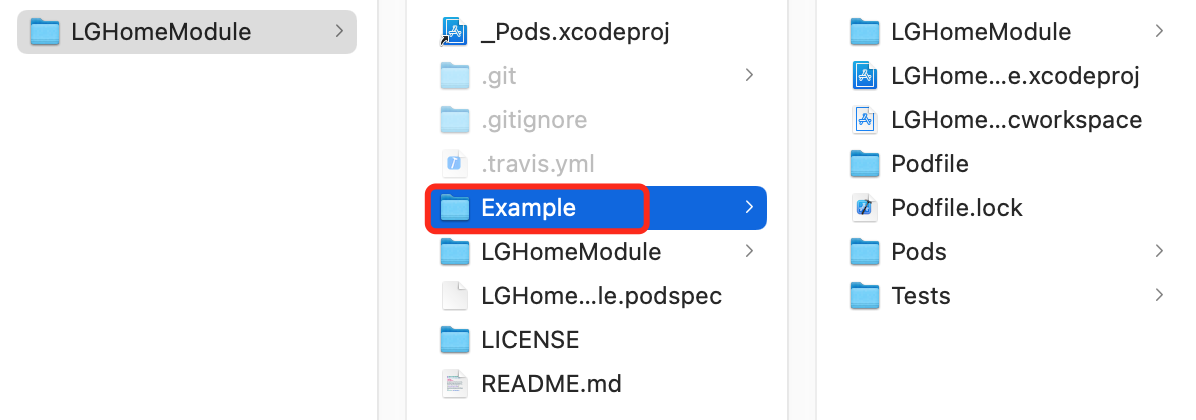
打开工程,组件成功导入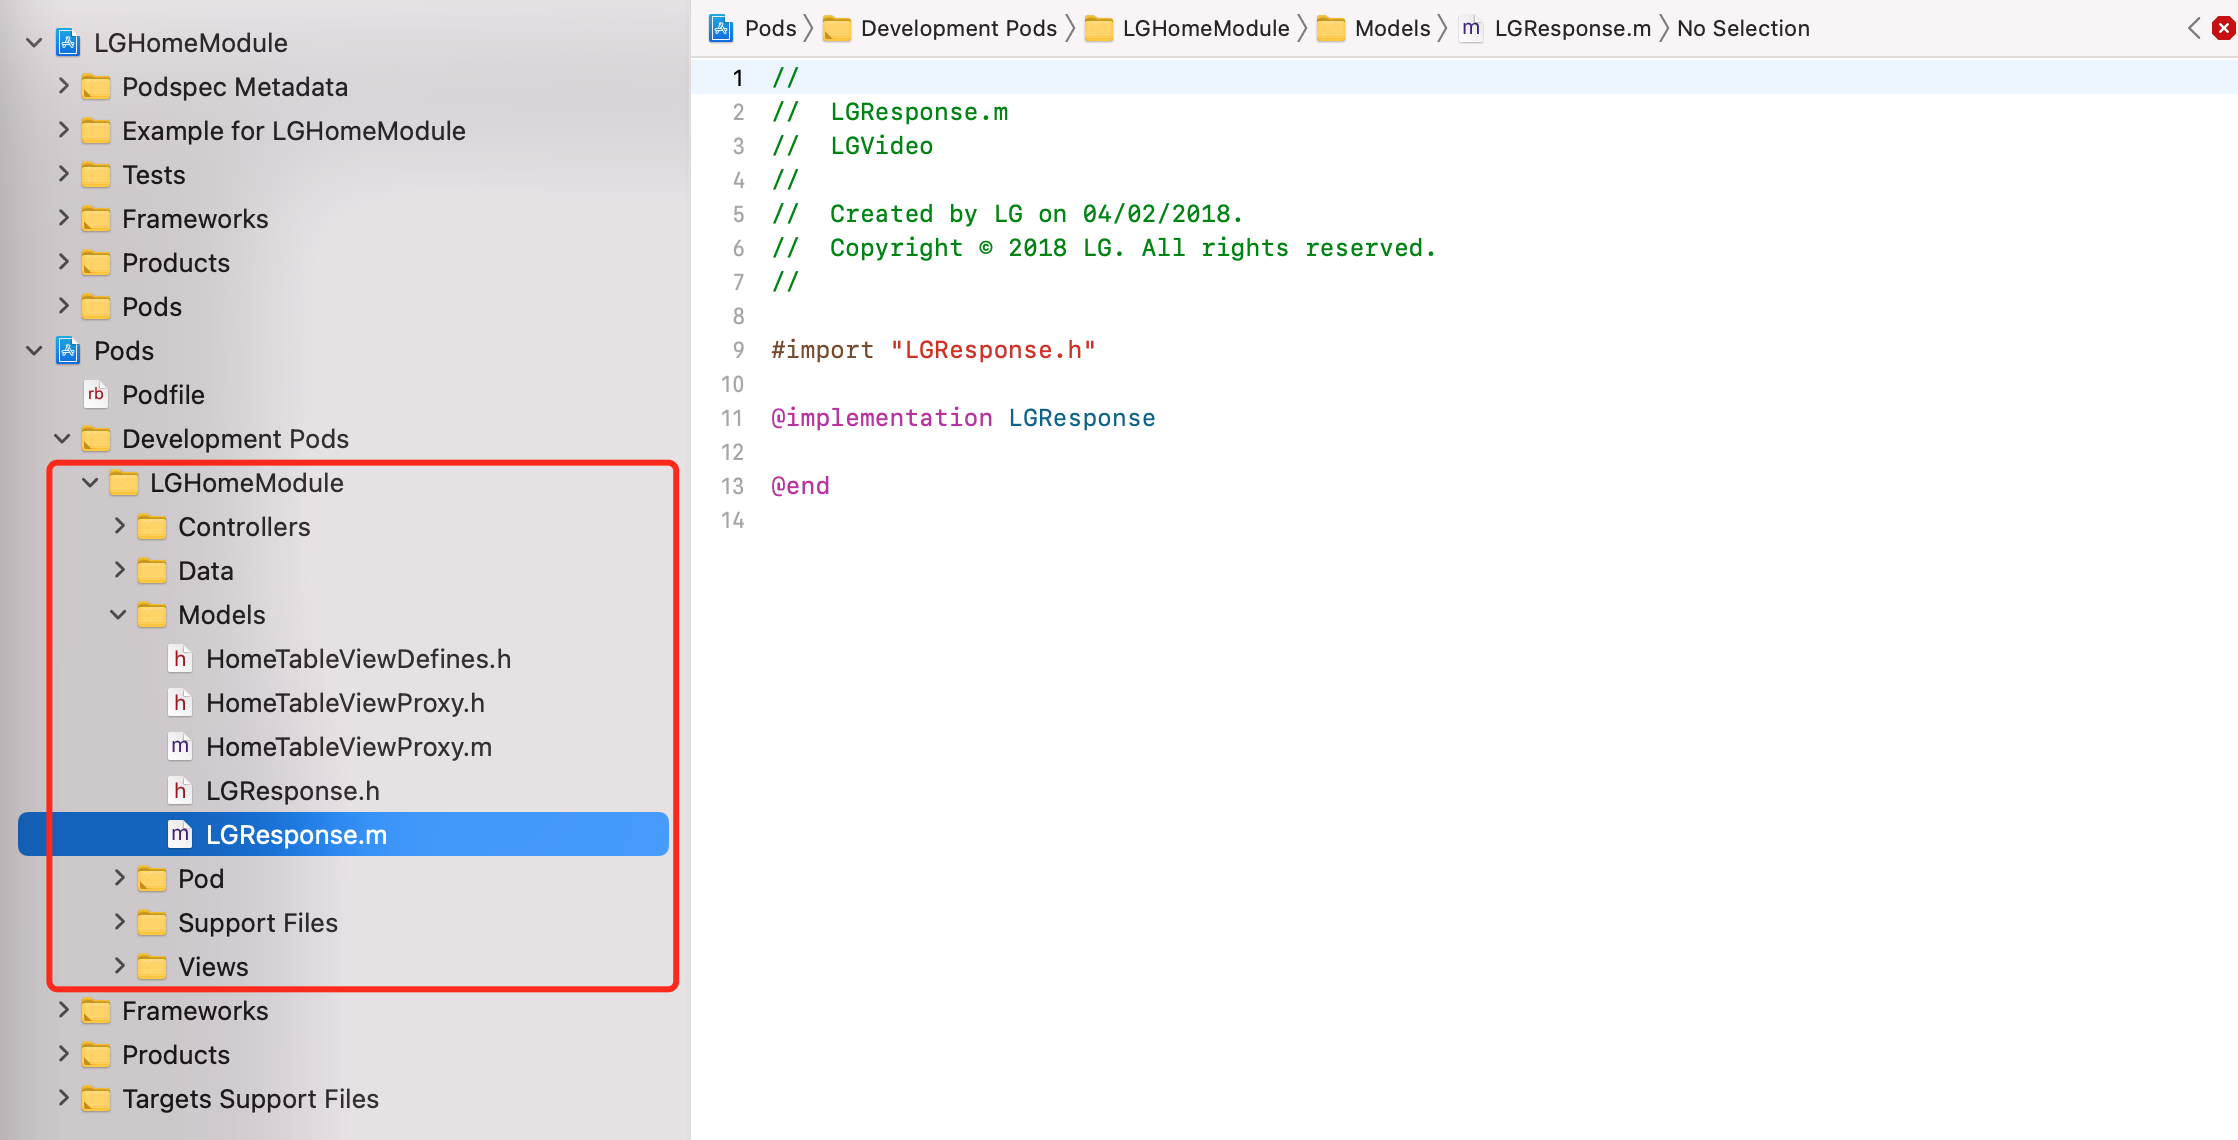
4. 三方和本地组件的依赖
4.1 三方框架
日常我们开发的组件,有些功能会依赖于其他三方框架,此时我们需要对其进行额外的配置
创建通用UI组件LGCommonUIModule
pod lib create LGCommonUIModule
完成组件的业务代码,部分功能依赖于AFNetworking、Masonry框架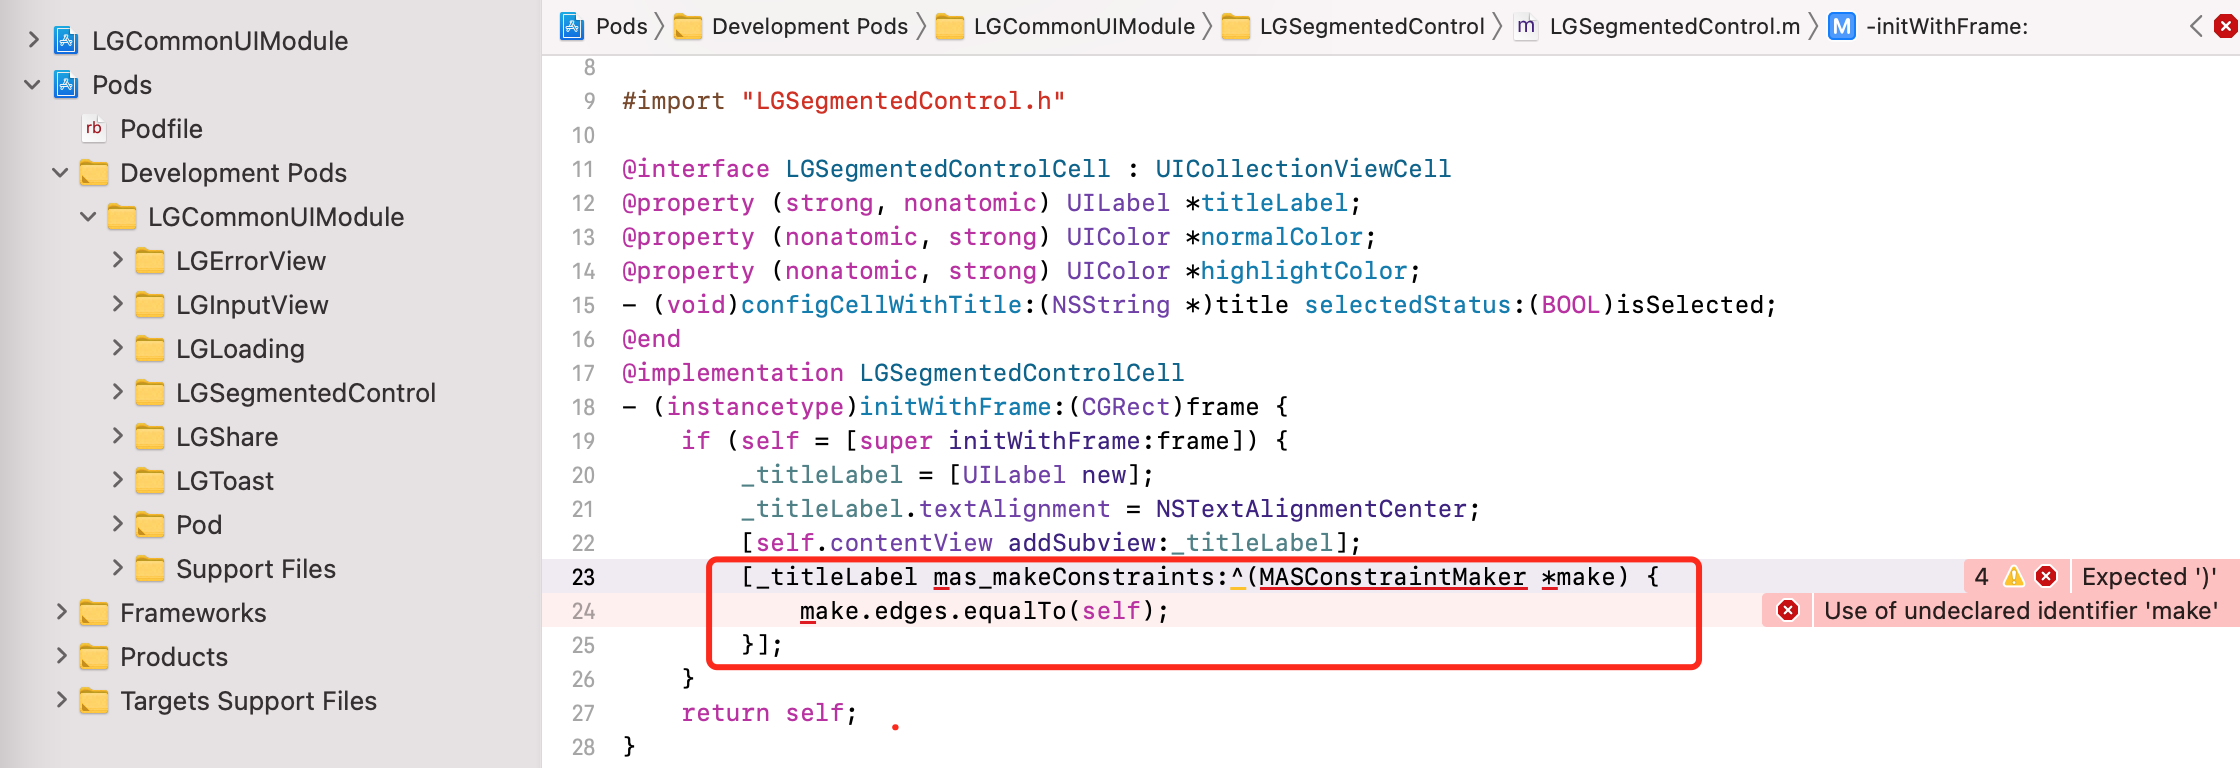
配置组件的Pod文件,写入对三方框架的依赖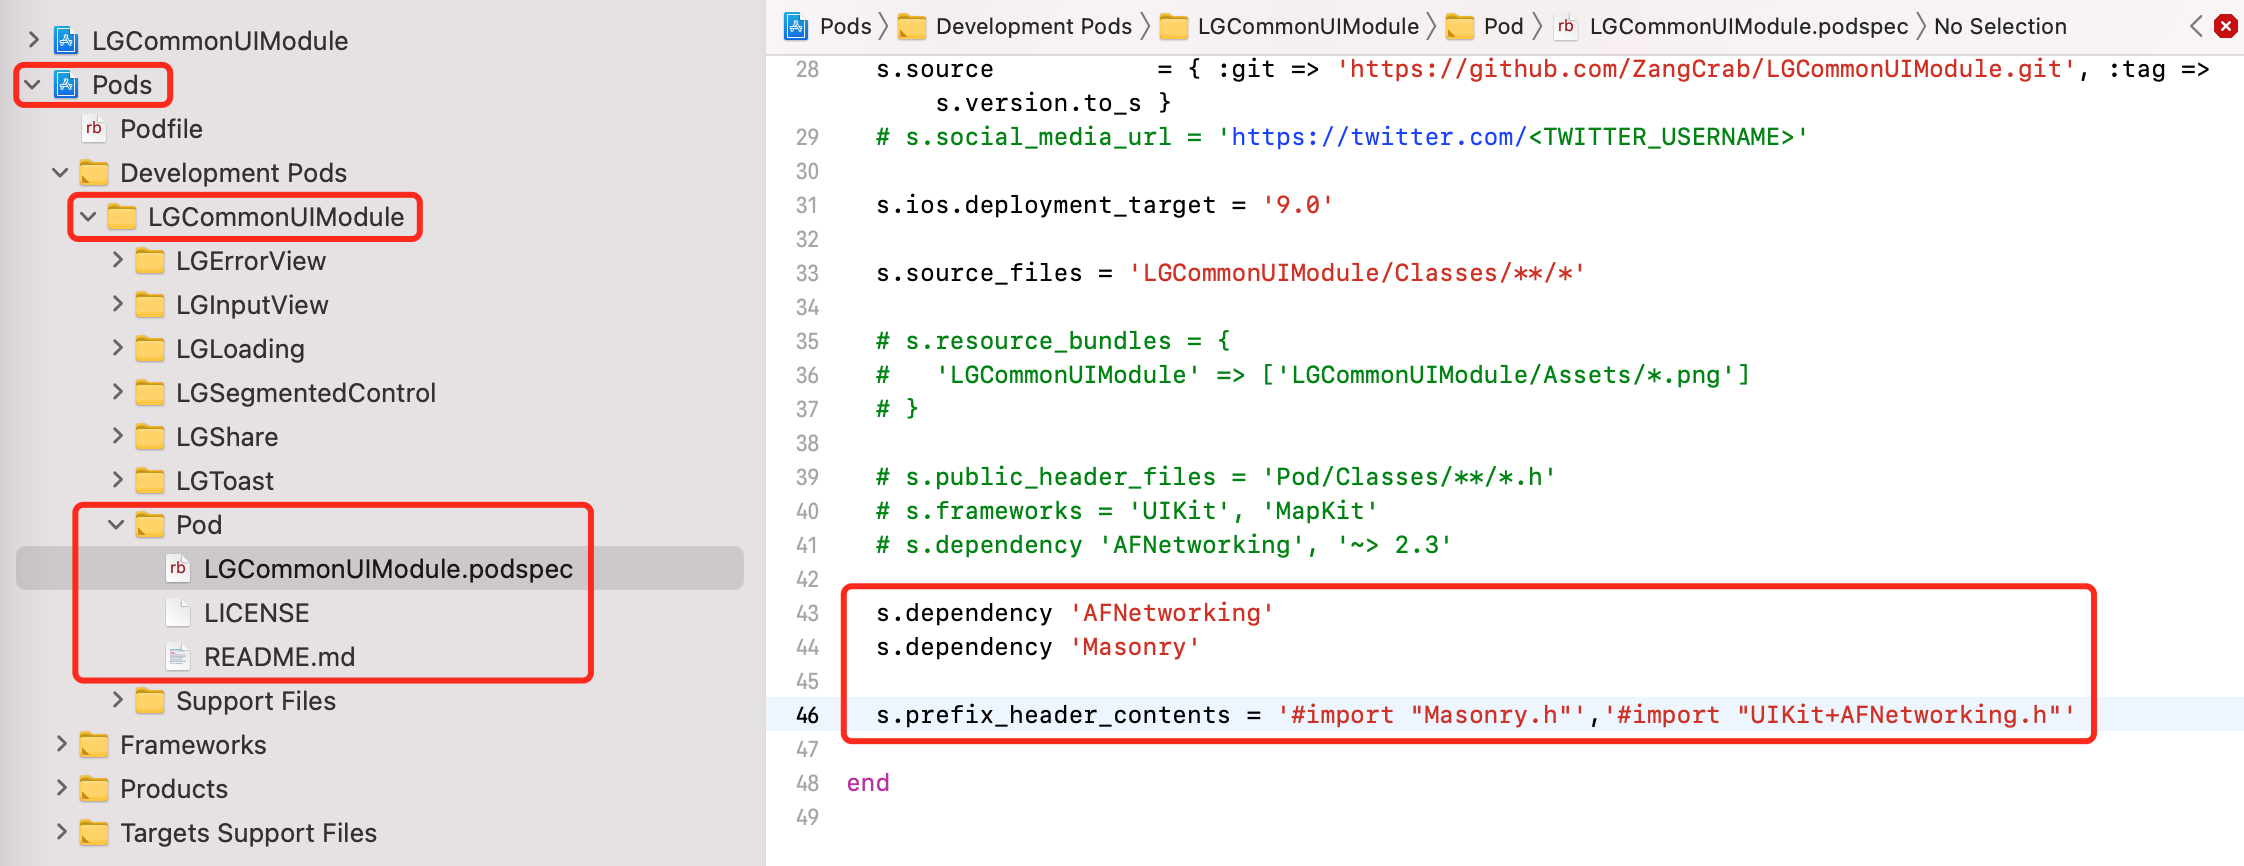
在测试工程Example目录下,执行pod install,解决三方框架的依赖问题
4.2 本地组件
除了三方框架的依赖,我们的组件也会对下层的本地组件进行依赖,例如:分类和宏定义等
在LGCommonUIModule插件中,对下层的公共组件LGMacroAndCategoryModule进行依赖,并且代码中使用到插件中的分类和宏
在Pod文件中,按照三方库的导入方式
s.dependency 'AFNetworking's.dependency 'Masonry's.dependency 'LGMacroAndCategoryModule's.prefix_header_contents = '#import "Masonry.h"','#import "UIKit+AFNetworking.h"','#import "LGMacros.h"'
- 如果公共组件在云端,当然不会有任何问题。但案例中,使用本地组件,这种导入方式一定会报错
导入本地组件,除了上述的配置之外,还需要在Pods项目中的Podfile文件中,对公共组件的本地路径进行配置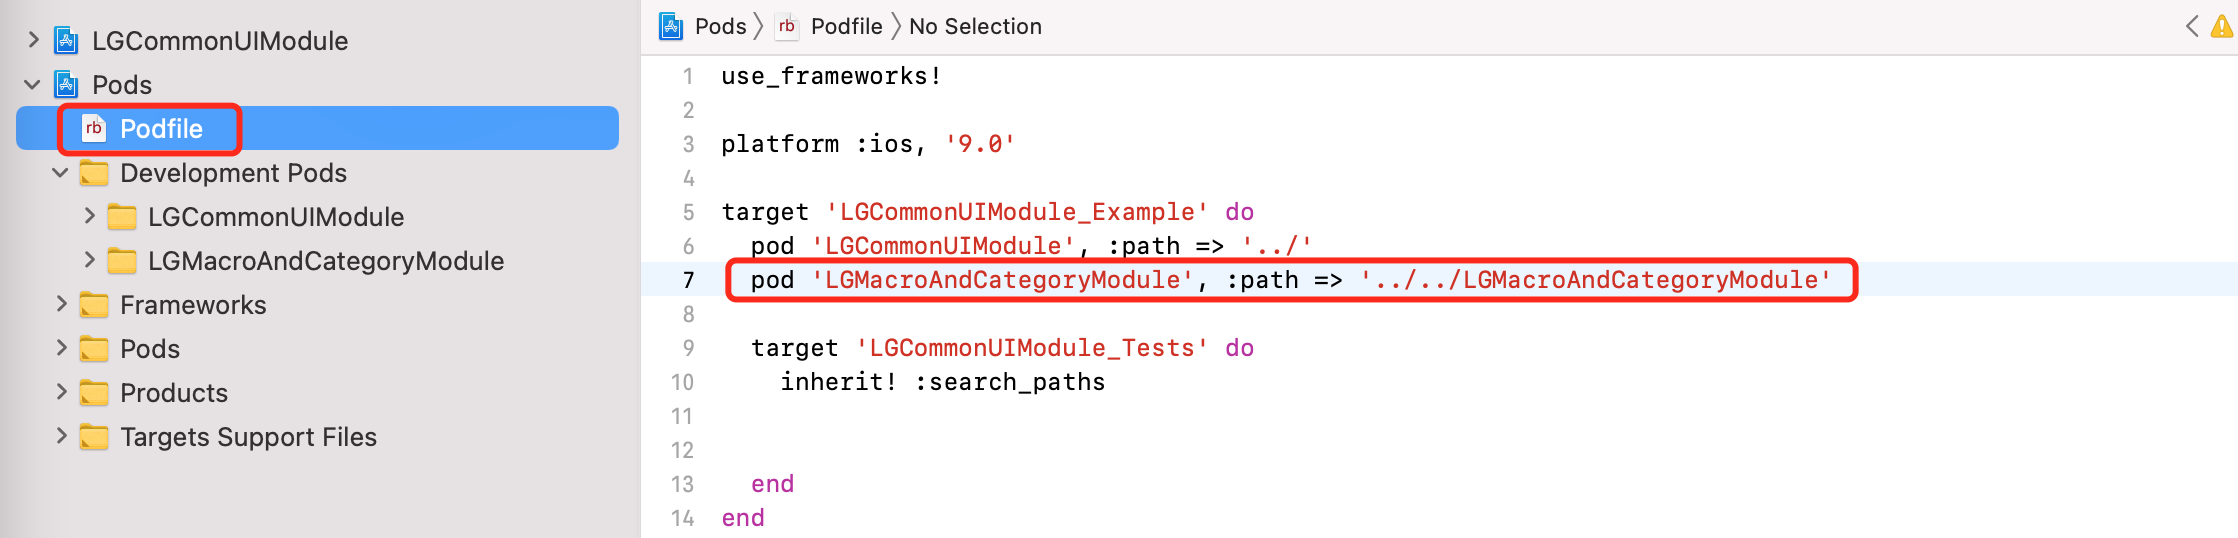
以当前的Podfile文件路径为基础,向上两层,找到LGMacroAndCategoryModule本地组件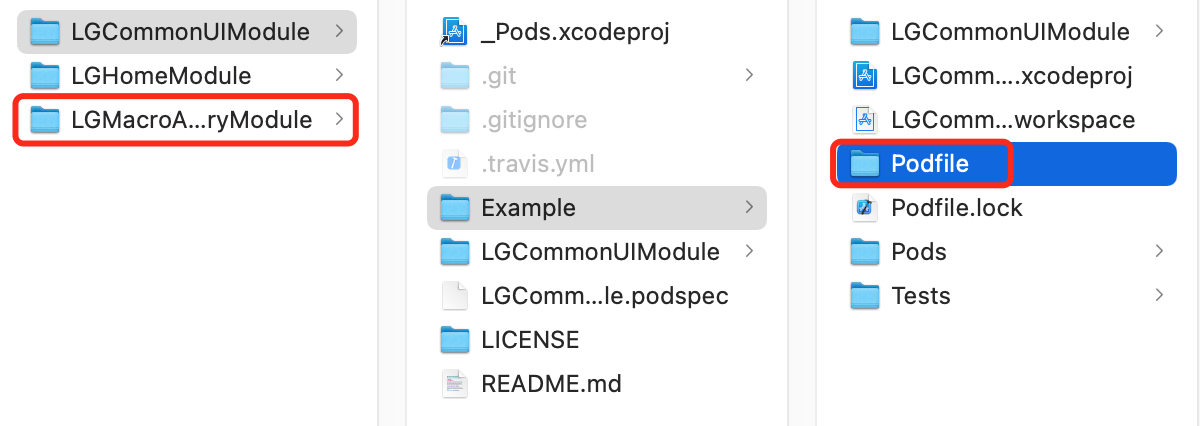
在测试工程Example目录下,执行pod install,解决本地组件的依赖问题
5. 资源文件的加载
5.1 图片资源
日常开发中,使用图片资源文件,都会用到UIImage的imageNamed方法
self.imageView.image = [UIImage imageNamed:@"share_wechat"];
- 但使用的图片在组件项目中,使用这种方式是访问不到的
组件内的图片资源存储位置,在组件/Assets目录下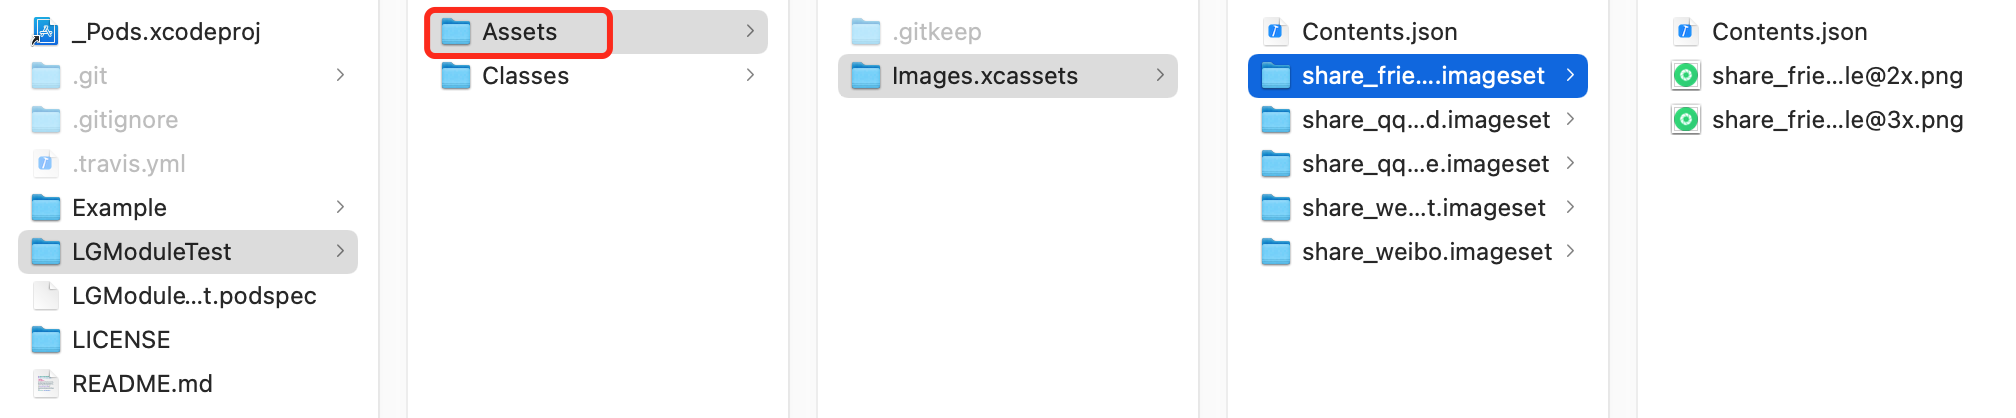
配置组件的Pod文件,写入资源的Bundle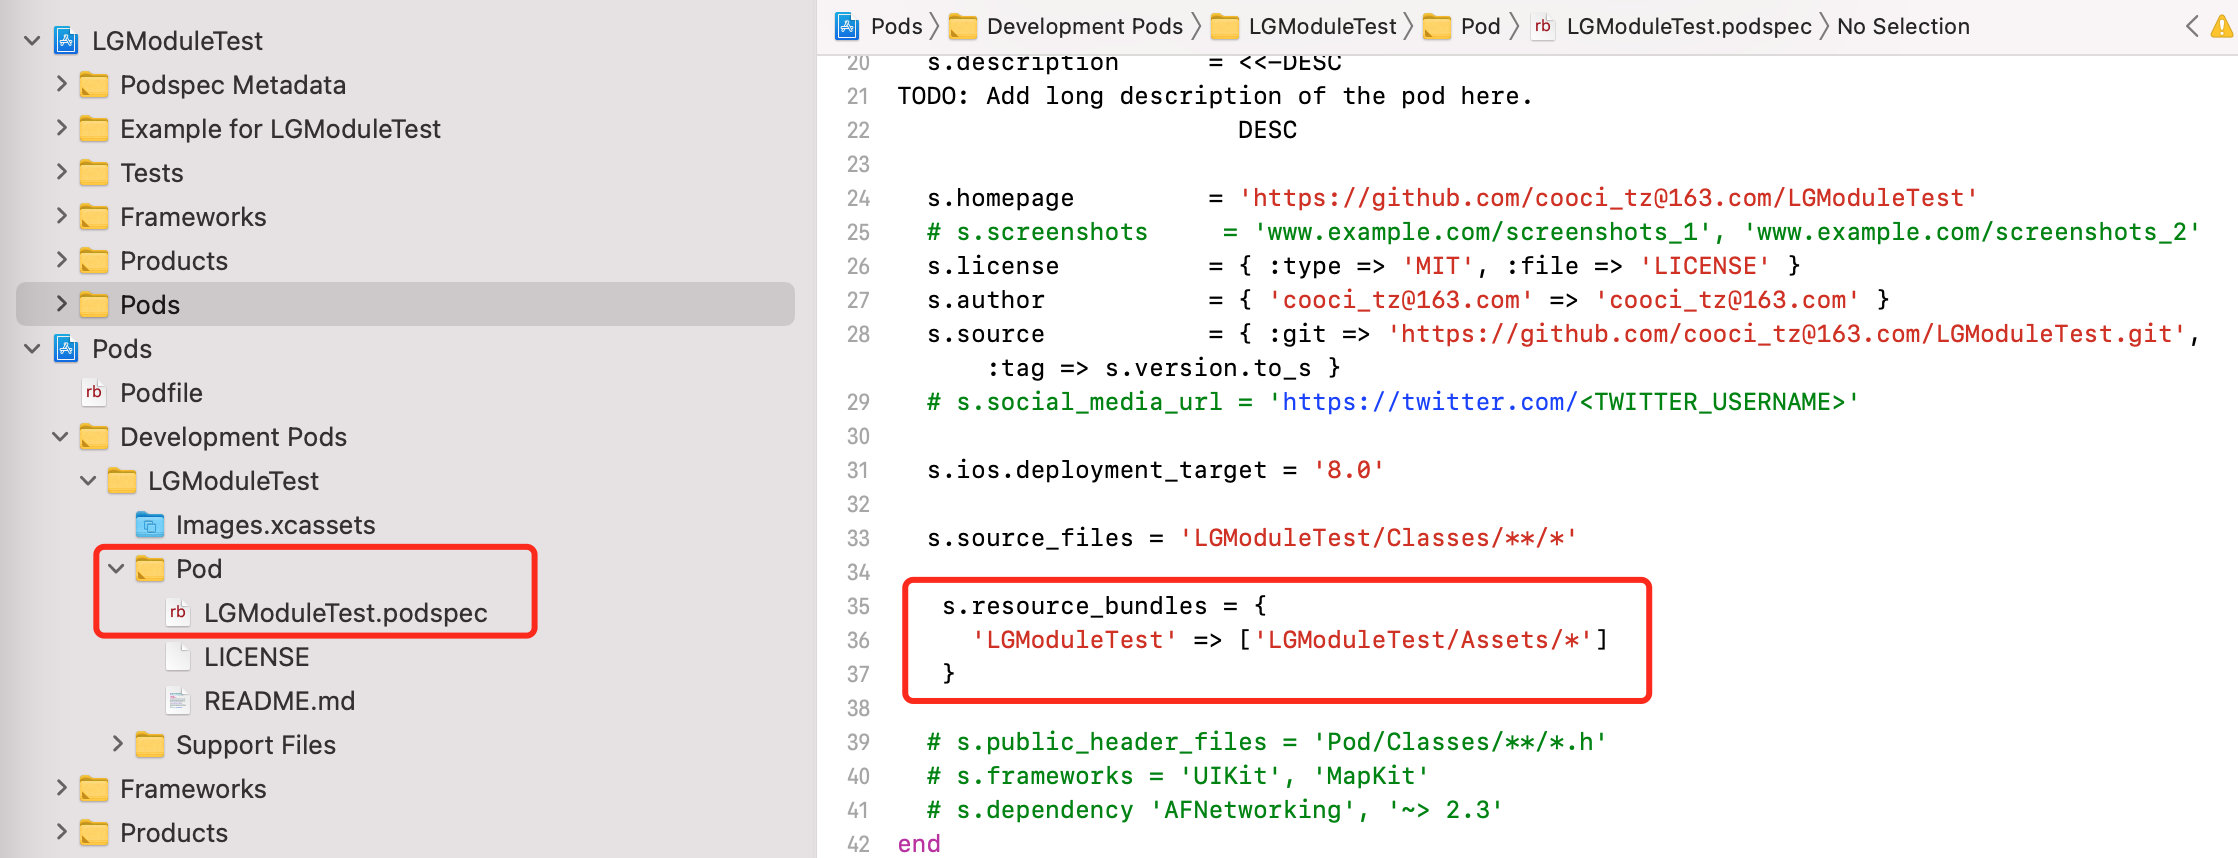
在测试工程Example目录下,执行pod install
在测试工程中,通过指定Bundle访问组件内的图片资源
NSString *bundlePath = [[NSBundle bundleForClass:[self class]].resourcePath stringByAppendingPathComponent:@"/LGModuleTest.bundle"];NSBundle *resoure_bundle = [NSBundle bundleWithPath:bundlePath];self.imageView.image = [UIImage imageNamed:@"share_wechat" inBundle:resoure_bundle compatibleWithTraitCollection:nil];
5.2 json文件
组件内封装HomeViewController,读取组件内的json文件
json文件的配置路径,在组件/Assets目录下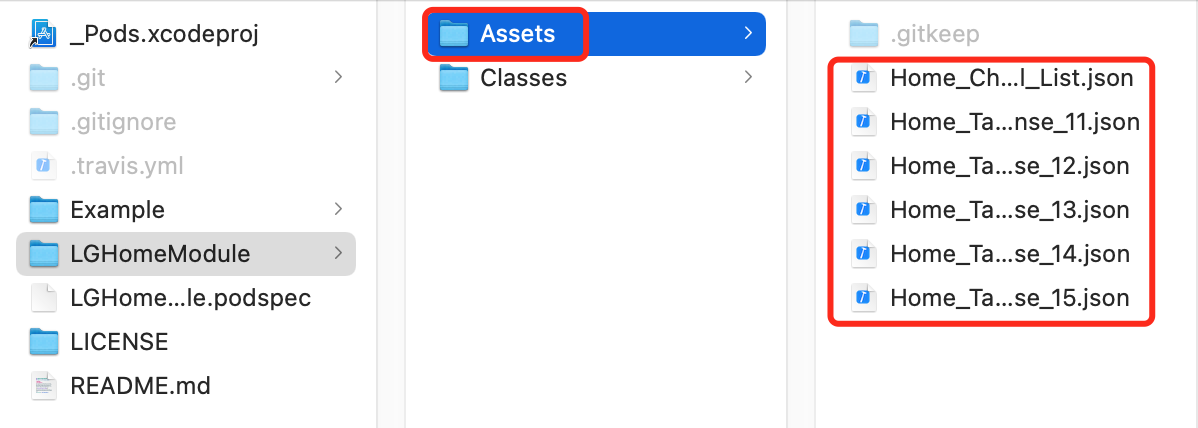
配置组件的Pod文件,写入资源的Bundle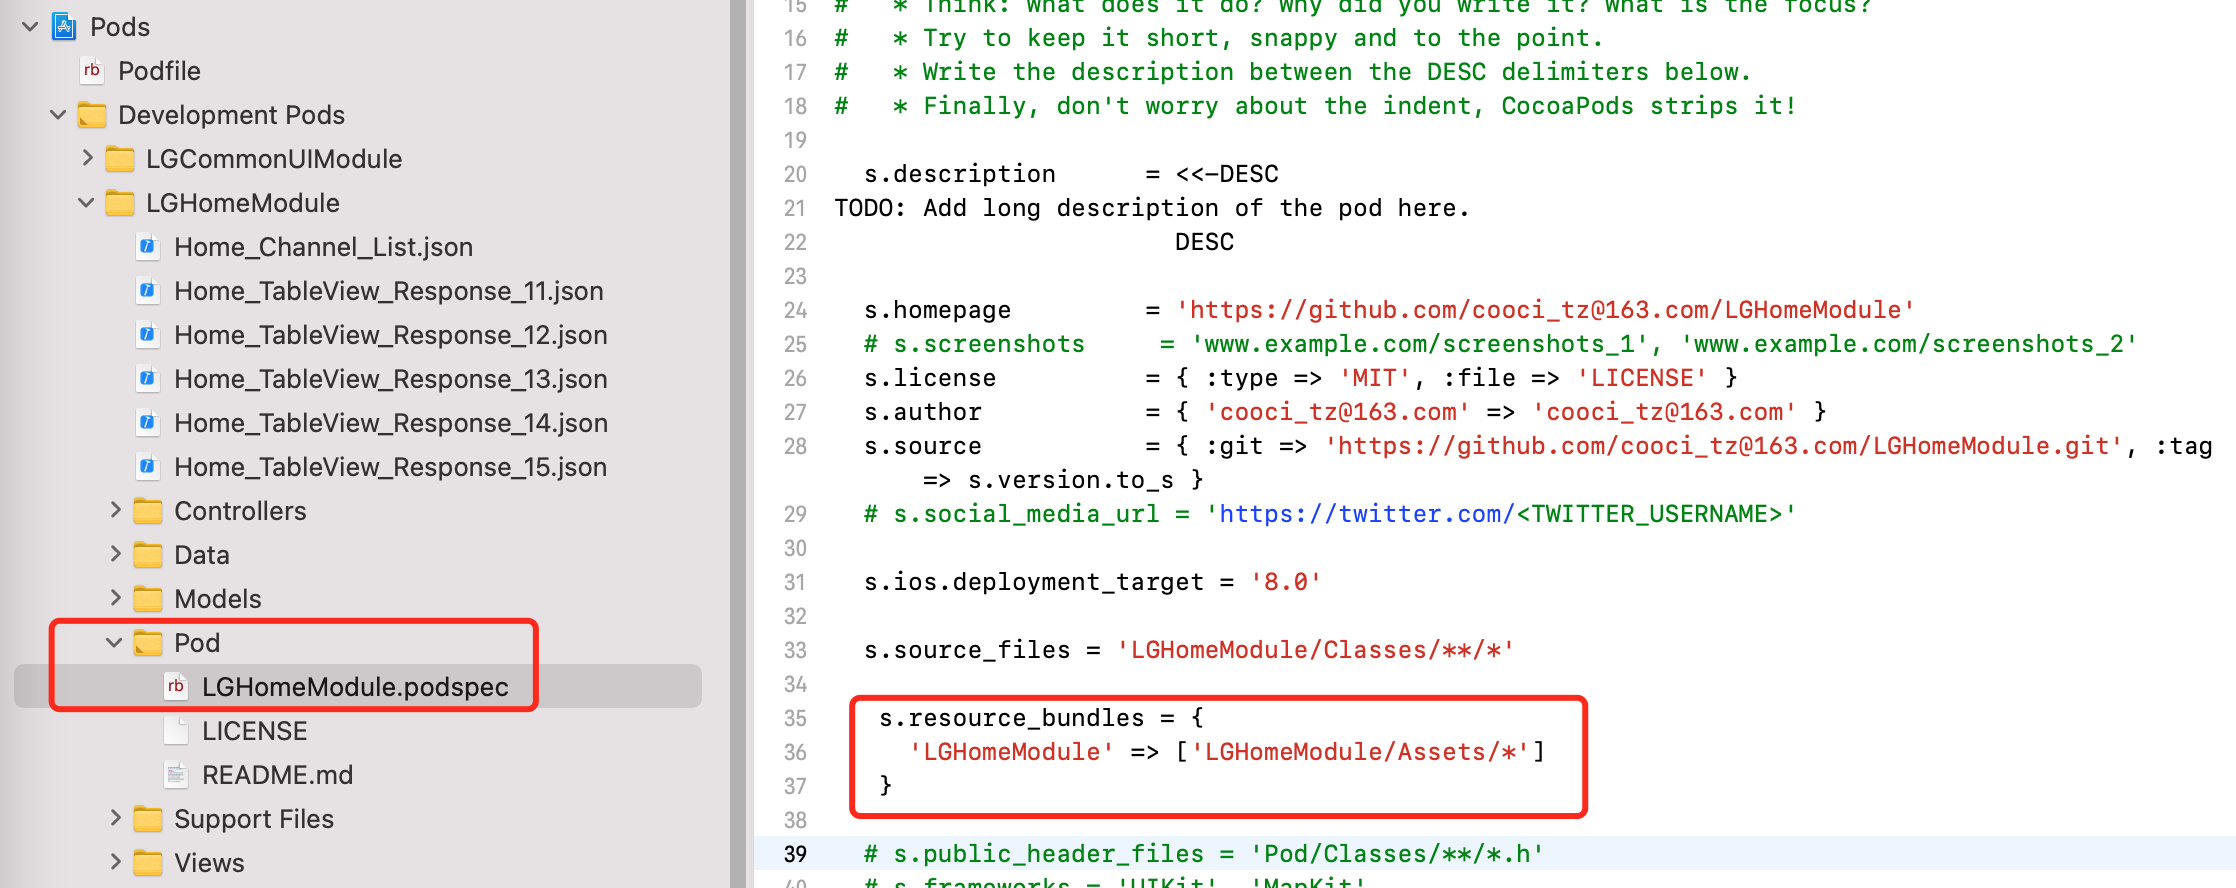
在测试工程Example目录下,执行pod install
读取方式,指定LGHomeModule.bundle
NSString *bundlePath = [[NSBundle bundleForClass:[self class]].resourcePath stringByAppendingPathComponent:@"/LGHomeModule.bundle"];NSString *path = [[NSBundle bundleWithPath:bundlePath] pathForResource:[NSString stringWithFormat:@"Home_TableView_Response_%@", channelId] ofType:@"json"];NSData *data = [NSData dataWithContentsOfFile:path];
5.3 xib文件
还有一种资源文件,和图片很相似,就是我们开发中经常用到的xib文件
访问组件内的xib文件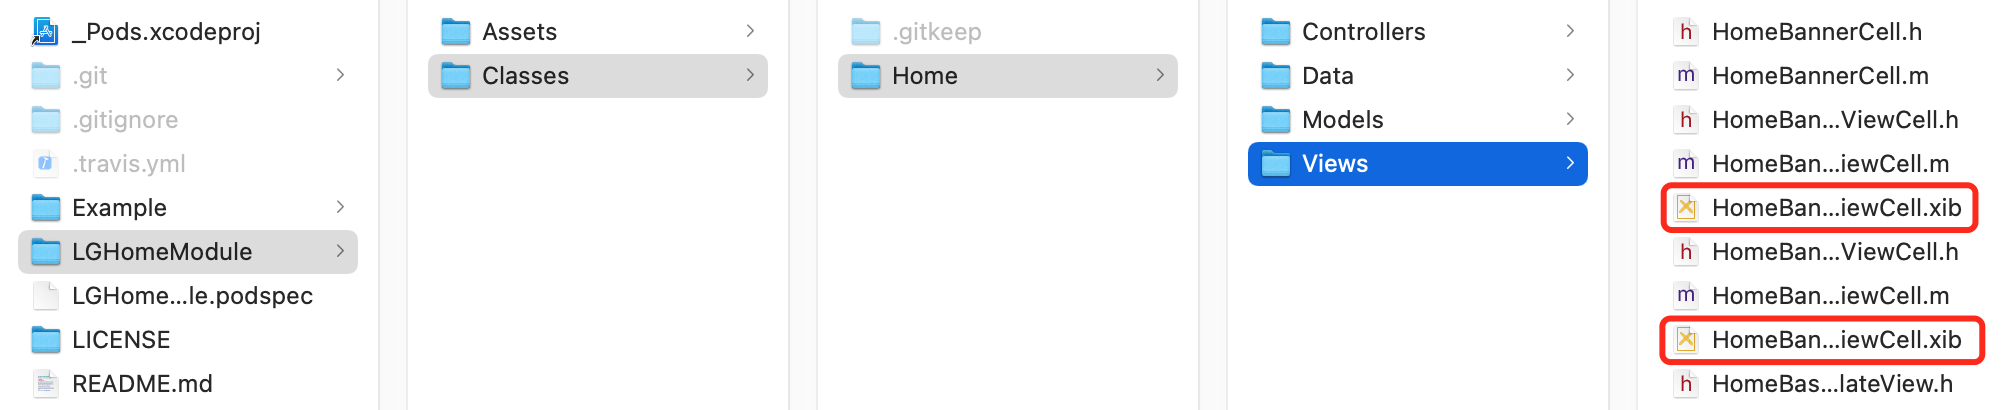
读取方式,指定Bundle
for (NSString *className in HomeTableViewCellIdentifiers.allValues) {NSString *bundlePath = [NSBundle bundleForClass:[self class]].resourcePath;[self.tableView registerNib:[UINib nibWithNibName:className bundle:[NSBundle bundleWithPath:bundlePath]] forCellReuseIdentifier:className];}
6. 通讯解耦
同一层级的模块之间相互通讯,会导致通讯代码错综复杂。你中有我,我中有你。单一模块的修改,很可能牵扯其他模块的报错,不利于项目的维护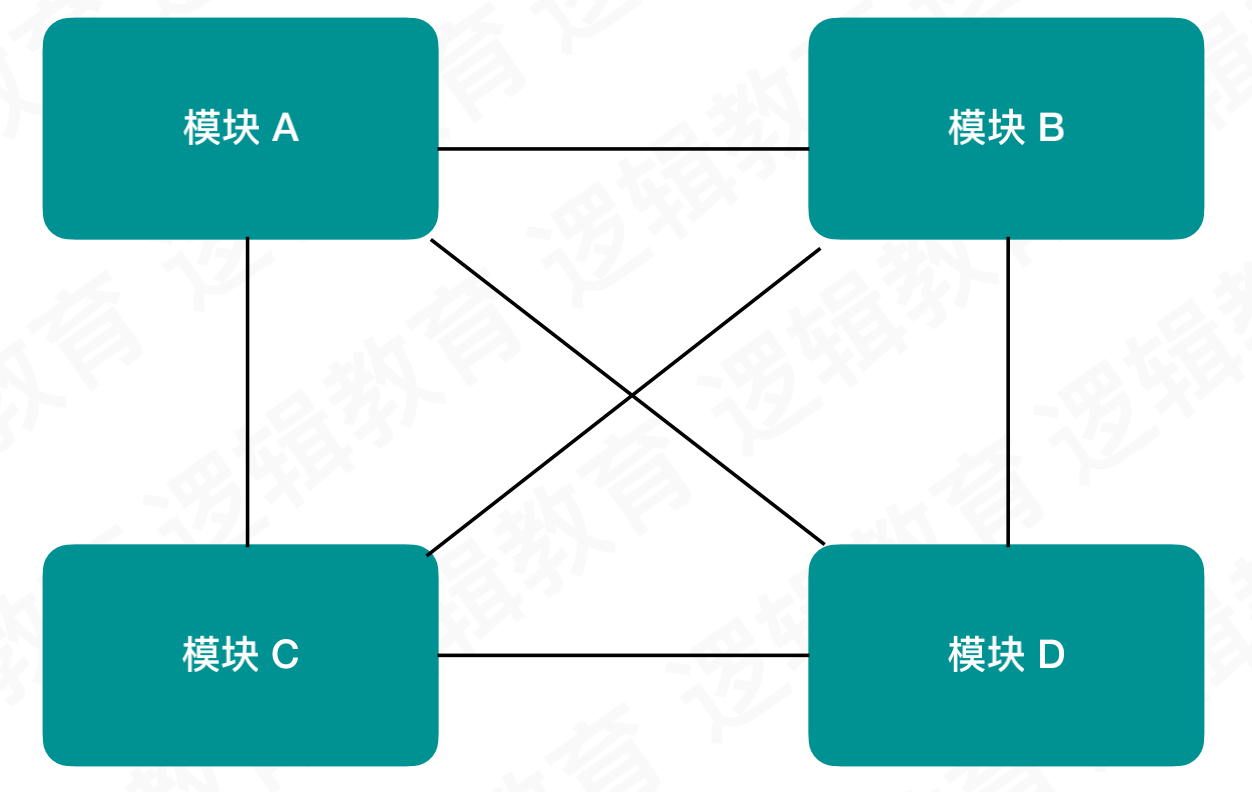
此时应该将模块之间的通讯进行下沉,抽取出一个公用的下层组件,使模块之间解耦,代码相互独立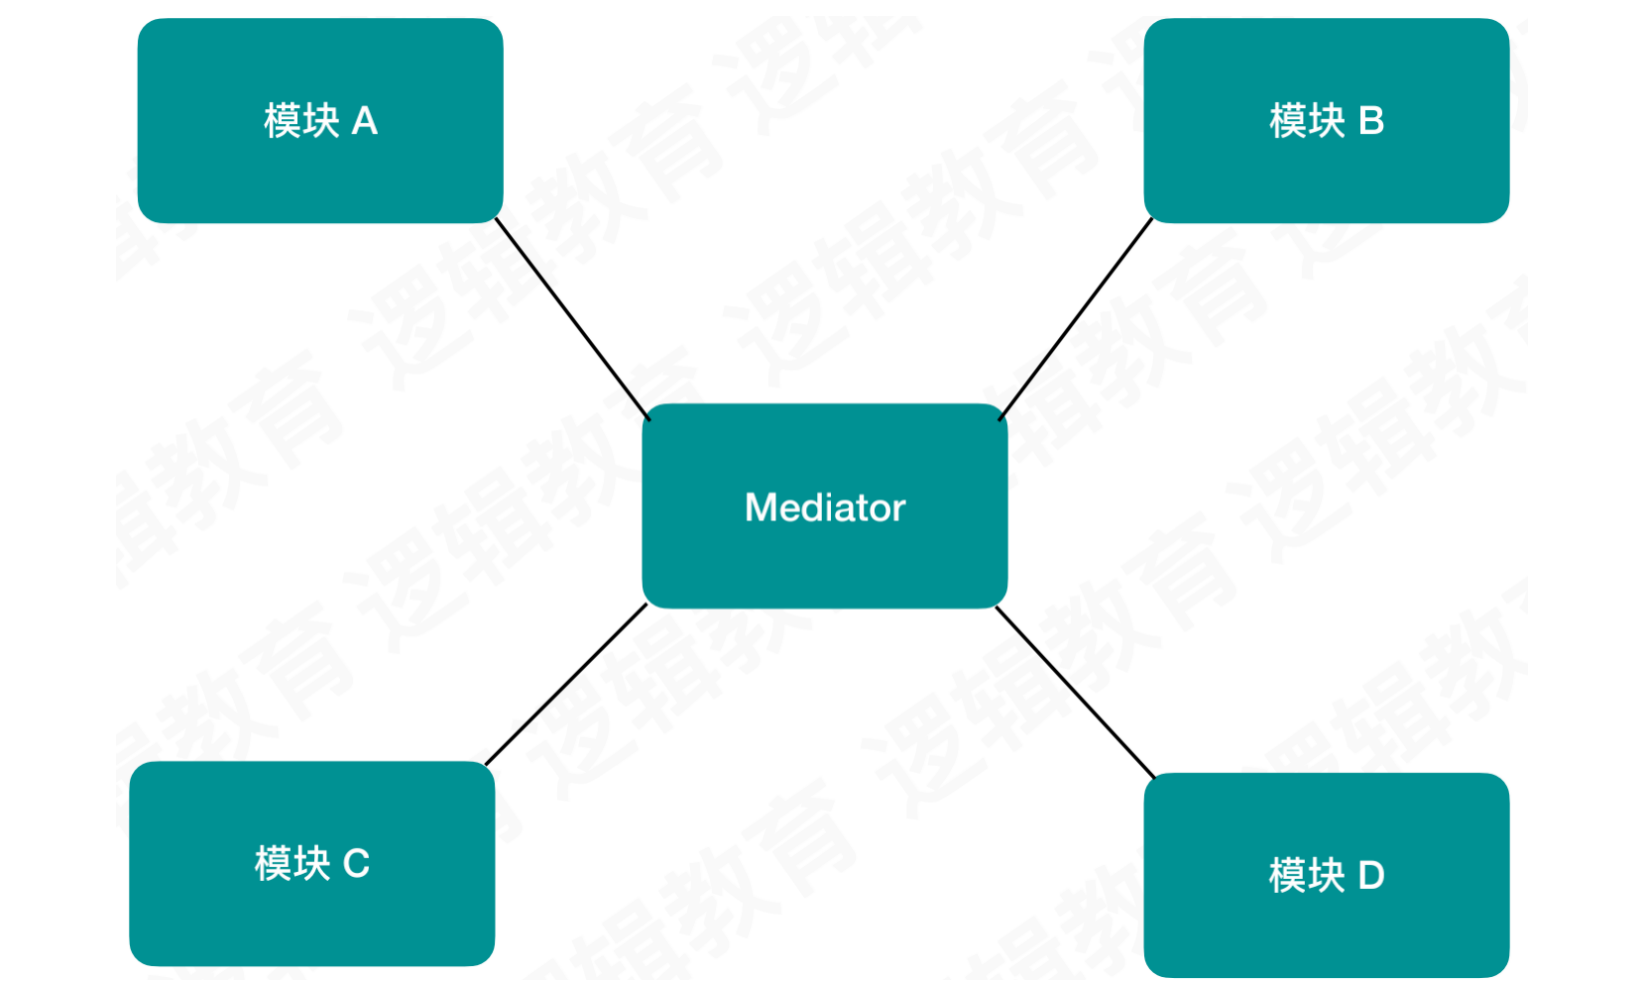
针对上述的通讯解耦需求,主流解决方案可分为三种:
URL路由target-actionprotocol
6.1 URL路由
URL路由的方案相对简单,基于URL匹配,双方进行命名约定,使用Runtime方法进行动态调用
方案的代表框架:MGJRouter
最基本的使用
[MGJRouter registerURLPattern:@"mgj://foo/bar" toHandler:^(NSDictionary *routerParameters) {NSLog(@"routerParameterUserInfo:%@", routerParameters[MGJRouterParameterUserInfo]);}];[MGJRouter openURL:@"mgj://foo/bar"];
当匹配到URL后,routerParameters会自带几个key
extern NSString *const MGJRouterParameterURL;extern NSString *const MGJRouterParameterCompletion;extern NSString *const MGJRouterParameterUserInfo;
方案的思路:
App启动时实例化各组件模块,这些组件向ModuleManager注册URL。不需要实例化的组件,可使用Class进行注册当
组件A调用组件B时,向ModuleManager传递URL,可携带参数。使用封装的openURL方法,由ModuleManager负责组件B的调度
优点:
动态性高,适合页面和参数自由度较高的电商类
App多平台的路由规则可统一管理
适用于
URL Scheme
缺点:
使用字符串传递,安全性和稳健性难以保证,被使用的模块不一定存在
对于字符串的管理成本较高
不支持
storyboard一旦使用该方案,很难被替换。对于整个工程来说,重构难度加大
6.2 target-action
基于OC的Runtime和Category特性动态获取模块
通过
NSClassFromString获取类并创建实例通过
performSelector + NSInvocation动态调用方法
方案的代表框架:CTMediator
最基本的使用
//1、创建CTMediator的分类,完成对外的接口@implementation CTMediator (CTMediatorModuleAActions)- (void)CTMediator_presentImage:(UIImage *)image{[self performTarget:@"A"action:@"nativePresentImage"params:@{@"image":image}shouldCacheTarget:NO];}@end//2、添加Action,完成具体的业务@implementation Target_A- (id)Action_nativePresentImage:(NSDictionary *)params{DemoModuleADetailViewController *viewController = [[DemoModuleADetailViewController alloc] init];viewController.valueLabel.text = @"this is image";viewController.imageView.image = params[@"image"];[[UIApplication sharedApplication].keyWindow.rootViewController presentViewController:viewController animated:YES completion:nil];return nil;}@end//3、外部调用[[CTMediator sharedInstance] CTMediator_presentImage:[UIImage imageNamed:@"image"]];
方案的思路:
组件的核心
CTMediator类,使用字符串按照指定规则,拿到真实的target和action的名称通过方法签名,判断返回值类型,如果是非
id类型,使用NSInvocation进行消息转发传入
target、selector、argument使用
getReturnValue方法将其返回
否则,返回值
id类型,直接使用performSelector进行方法调用
优点:
利用分类将接口按业务拆分,去中心化
框架核心代码短小精悍,实现方式轻量
缺点:
每一个接口都需要中间方法,有些繁琐
用字符串传递,被使用的模块不一定存在
业务越复杂,创建的分类和
target-action中间类就会越多
模块之间的通讯流程: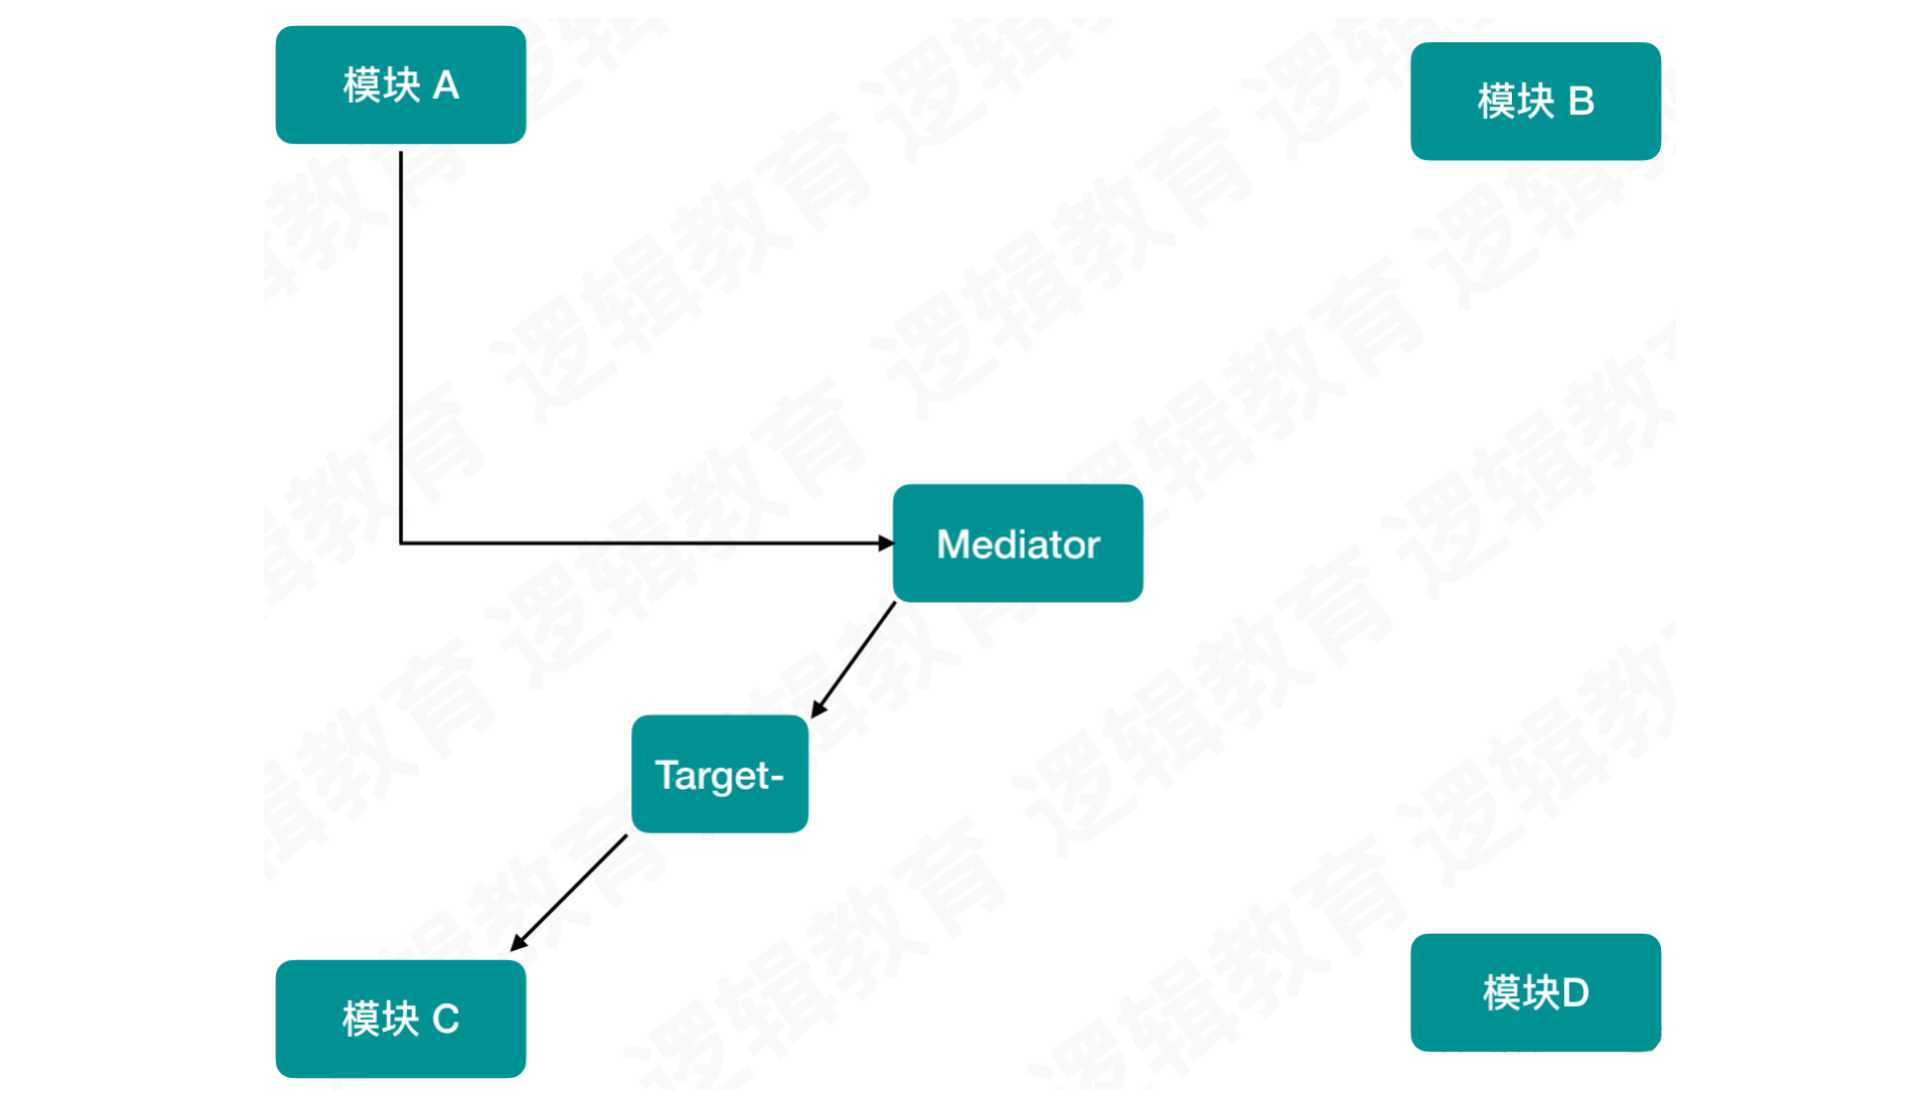
6.3 protocol
将protocol和对class进行匹配,过用protocol获取class,动态创建实例
方案的代表框架:BeeHive
最基本的使用
//1、创建Protocol#import <Foundation/Foundation.h>#import "BHServiceProtocol.h"@protocol TradeServiceProtocol <NSObject, BHServiceProtocol>@property(nonatomic, strong) NSString *itemId;@end//2、动态创建Module,将protocol和对class进行匹配@interface TradeModule()<BHModuleProtocol>@end@implementation TradeModule+ (void)load{[BeeHive registerDynamicModule:[self class]];}- (id)init{if (self = [super init]){NSLog(@"TradeModule init");}return self;}-(void)modInit:(BHContext *)context{NSLog(@"模块初始化中");NSLog(@"%@",context.moduleConfigName);id<TradeServiceProtocol> service = [[BeeHive shareInstance] createService:@protocol(TradeServiceProtocol)];service.itemId = @"我是单例";}- (void)modSetUp:(BHContext *)context{[[BeeHive shareInstance] registerService:@protocol(TradeServiceProtocol) service:[BHTradeViewController class]];NSLog(@"TradeModule setup");}- (void)basicModuleLevel{}@end//3、外部调用-(void)click:(UIButton *)btn{id<TradeServiceProtocol> obj = [[BeeHive shareInstance] createService:@protocol(TradeServiceProtocol)];if ([obj isKindOfClass:[UIViewController class]]) {obj.itemId = @"12313231231";[self.navigationController pushViewController:(UIViewController *)obj animated:YES];}}
方案的思路: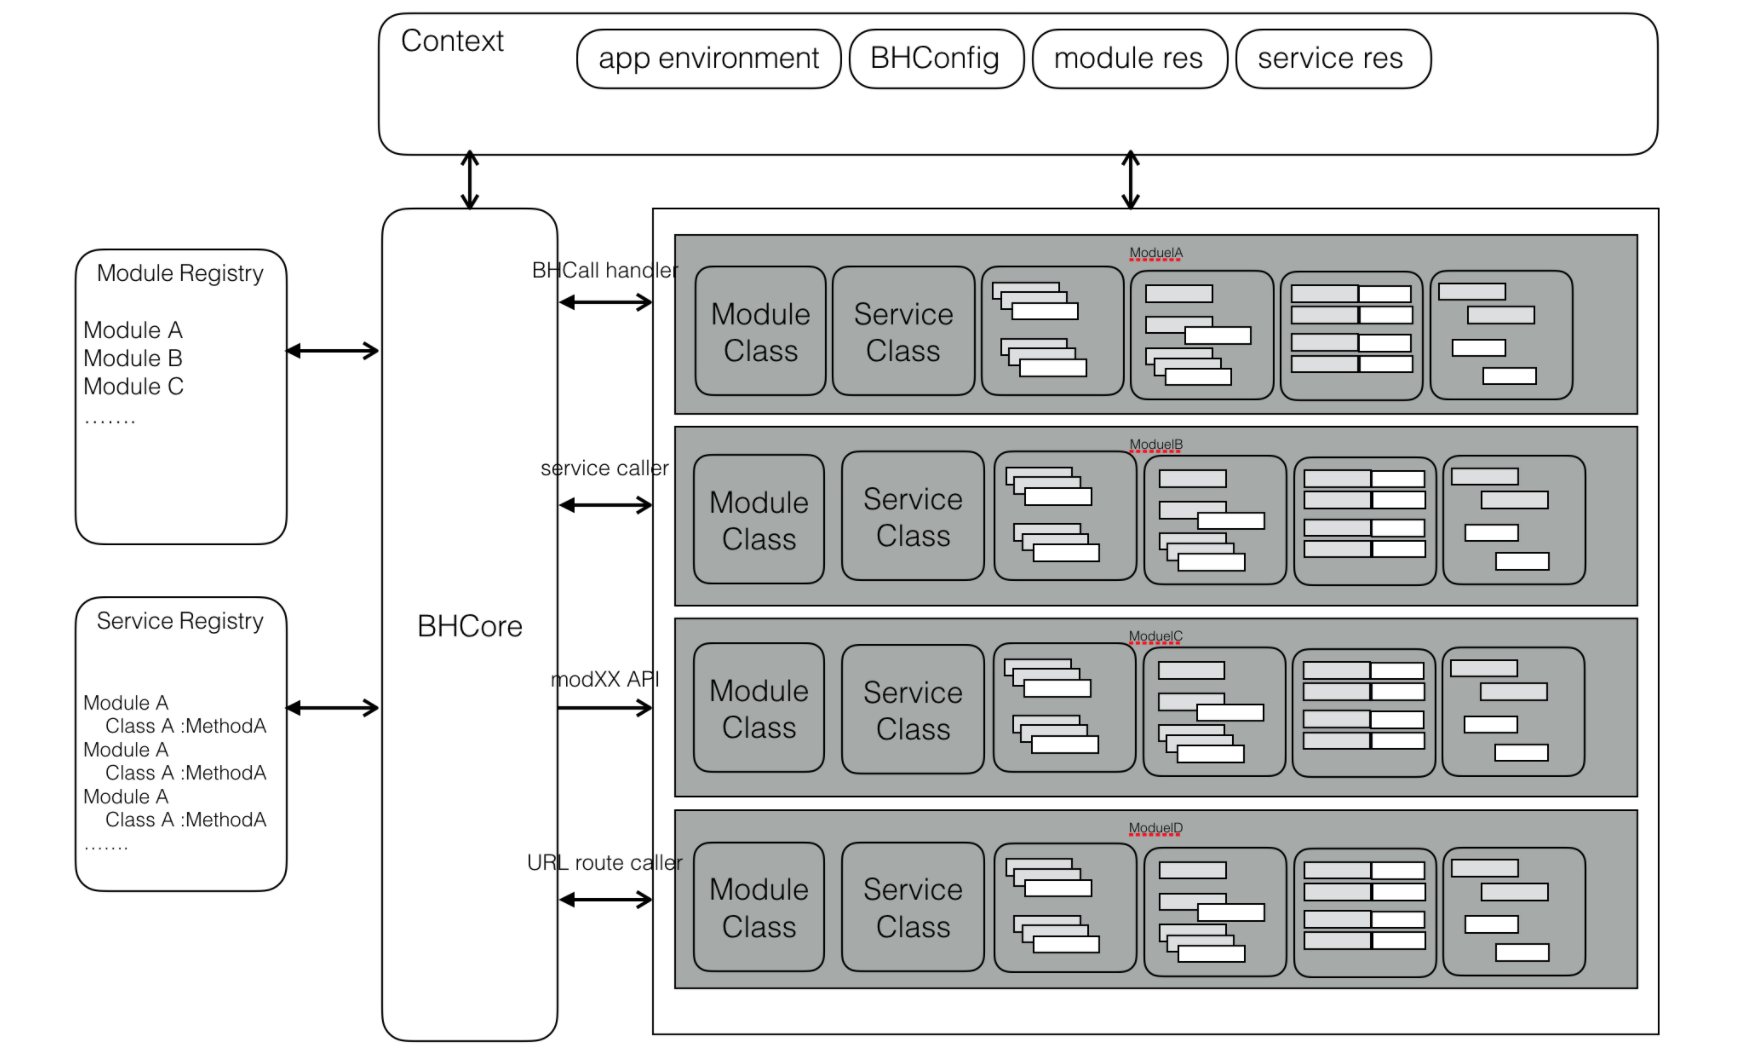
- 模块:模块被不同的功能分开,每个模块都可以通过自己的服务与其他模块进行通信
- 服务:服务是特定模块的接口
6.3.1 系统事件
系统事件通常是应用程序生命周期事件,如DidBecomeActive、WillEnterBackground等
系统事件基本工作流程如下: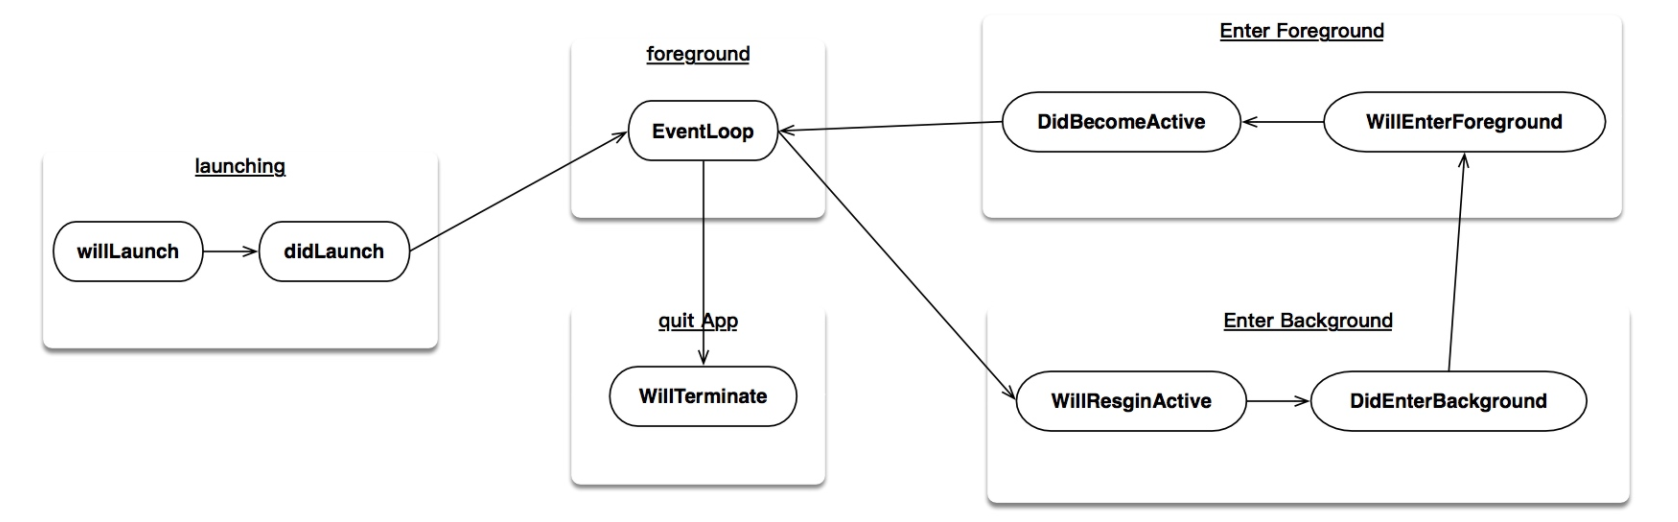
使用自定义AppDelegate继承于BHAppDelegate,代替系统AppDelegate
@interface TestAppDelegate : BHAppDelegate <UIApplicationDelegate>
6.3.2 通用事件
在系统事件的基础上扩展通用应用程序事件,如modSetup、modInit等,可用于编码每个插件模块的初始化设置
扩展常见事件如下:
6.3.3 业务自定义事件
如果觉得系统事件,事件还不能满足一般需求,我们将事件简化打包成BHAppdelgate,可以通过继承BHAppdelegate扩展自己的事件,同时BHContext里的modulesByName访问每个模块入口类,增加触发点通过
[[BHModuleManager sharedManager] triggerEvent:BHMSetupEvent];
6.3.4 模块注册
模块的注册有两种方式:
静态注册
动态注册
静态注册方式:
在AppDelegate应用启动时,初始化module和service的plist文件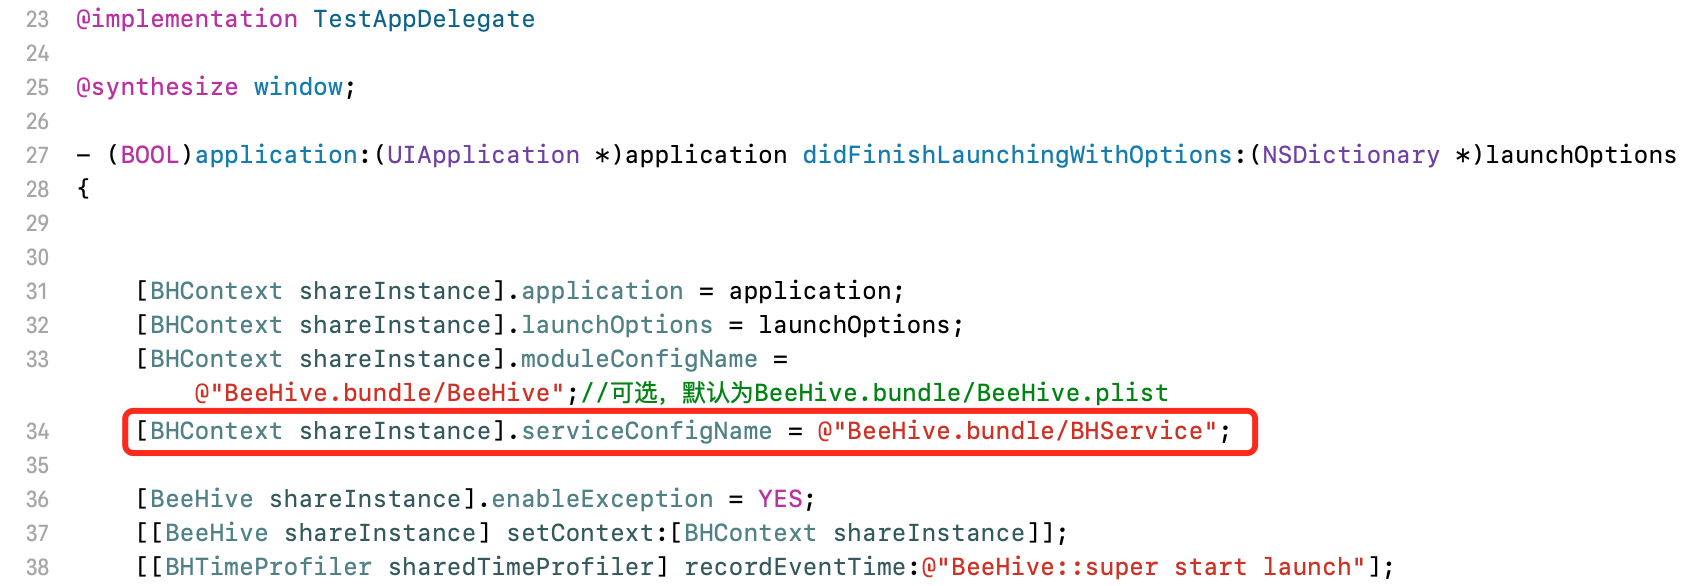
打开BHService.plist,以字典方式将protocol和class对应,需要手动维护
动态注册方式:
使用注解方式,注册protocol和class的对应关系
@BeeHiveService(UserTrackServiceProtocol,BHUserTrackViewController)#define BeeHiveService(servicename,impl) \class BeeHive; char * k##servicename##_service BeeHiveDATA(BeehiveServices) = "{ \""#servicename"\" : \""#impl"\"}";#define BeeHiveDATA(sectname) __attribute((used, section("__DATA,"#sectname" ")))
- 通过对
section的操作,将名字写入到__DATA段
对数据段的读取时机
__attribute__((constructor))void initProphet() {_dyld_register_func_for_add_image(dyld_callback);}
- 在
dyld注册函数添加到image的时候,调用dyld_callback回调函数
进入dyld_callback函数
static void dyld_callback(const struct mach_header *mhp, intptr_t vmaddr_slide){NSArray *mods = BHReadConfiguration(BeehiveModSectName, mhp);for (NSString *modName in mods) {Class cls;if (modName) {cls = NSClassFromString(modName);if (cls) {[[BHModuleManager sharedManager] registerDynamicModule:cls];}}}//register servicesNSArray<NSString *> *services = BHReadConfiguration(BeehiveServiceSectName,mhp);for (NSString *map in services) {NSData *jsonData = [map dataUsingEncoding:NSUTF8StringEncoding];NSError *error = nil;id json = [NSJSONSerialization JSONObjectWithData:jsonData options:0 error:&error];if (!error) {if ([json isKindOfClass:[NSDictionary class]] && [json allKeys].count) {NSString *protocol = [json allKeys][0];NSString *clsName = [json allValues][0];if (protocol && clsName) {[[BHServiceManager sharedManager] registerService:NSProtocolFromString(protocol) implClass:NSClassFromString(clsName)];}}}}}
- 读取该表头下的所有数据,循环注册模块和服务
代码注册服务:
使用registerService方法,注册protocol和class的对应关系:
- (void)modSetUp:(BHContext *)context{[[BeeHive shareInstance] registerService:@protocol(TradeServiceProtocol) service:[BHTradeViewController class]];NSLog(@"TradeModule setup");}
异步加载:
如果模块设置为export BH_EXPORT_MODULE(YES),会初始化异步执行模块,可以优化后启动前第一屏显示内容启动耗时
6.3.5 服务调用
通过protocol获取class
-(void)click:(UIButton *)btn{id<TradeServiceProtocol> obj = [[BeeHive shareInstance] createService:@protocol(TradeServiceProtocol)];if ([obj isKindOfClass:[UIViewController class]]) {obj.itemId = @"12313231231";[self.navigationController pushViewController:(UIViewController *)obj animated:YES];}}
进入createService方法
- (id)createService:(Protocol *)proto;{return [[BHServiceManager sharedManager] createService:proto];}- (id)createService:(Protocol *)service{return [self createService:service withServiceName:nil];}- (id)createService:(Protocol *)service withServiceName:(NSString *)serviceName {return [self createService:service withServiceName:serviceName shouldCache:YES];}- (id)createService:(Protocol *)service withServiceName:(NSString *)serviceName shouldCache:(BOOL)shouldCache {if (!serviceName.length) {serviceName = NSStringFromProtocol(service);}id implInstance = nil;if (![self checkValidService:service]) {if (self.enableException) {@throw [NSException exceptionWithName:NSInternalInconsistencyException reason:[NSString stringWithFormat:@"%@ protocol does not been registed", NSStringFromProtocol(service)] userInfo:nil];}}NSString *serviceStr = serviceName;if (shouldCache) {id protocolImpl = [[BHContext shareInstance] getServiceInstanceFromServiceName:serviceStr];if (protocolImpl) {return protocolImpl;}}// 问题: app -> VC// serivceProtocol : 普通 绑定在类// mudleProtocol -> 一点对多的事件 applegate 生命广播不知道Class implClass = [self serviceImplClass:service];if ([[implClass class] respondsToSelector:@selector(singleton)]) {if ([[implClass class] singleton]) {if ([[implClass class] respondsToSelector:@selector(shareInstance)])implInstance = [[implClass class] shareInstance];elseimplInstance = [[implClass alloc] init];if (shouldCache) {[[BHContext shareInstance] addServiceWithImplInstance:implInstance serviceName:serviceStr];return implInstance;} else {return implInstance;}}}return [[implClass alloc] init];}
总结
初探:
组件化可以将一个庞大的项目,按功能拆分成独立组件,多组件之间特定方式通讯,从而使模块之间解耦,提高团队协作开发效率
每一个组件都是独立的,可独立运行。一些底层的组件可重复利用,提高可重用性
使用组件化的优势:
模块间解耦
模块复用
提高团队协作开发效率
单元测试
不建议使用组件化的项目:
项目较小,模块间交互简单,耦合少
模块没有被多个外部模块引用,只是一个单独的小模块
模块不需要重用,代码也很少被修改
团队规模很小
组件化分层:
组件化分为业务层、通用层、基础层
只允许上层对下层的依赖,不允许下层依赖上层
横向模块之间不能依赖,同级模块之间的通讯进行下沉
将通用组件、宏定义、分类文件、公共资源进行下沉,使其具备独立性和复用性
开发中,对于层次的构建,由下至上。避免因下层代码的改动,导致上层代码大量修改

若有收获,就点个赞吧
0 人点赞
