1. 卡顿原理
界面的显示: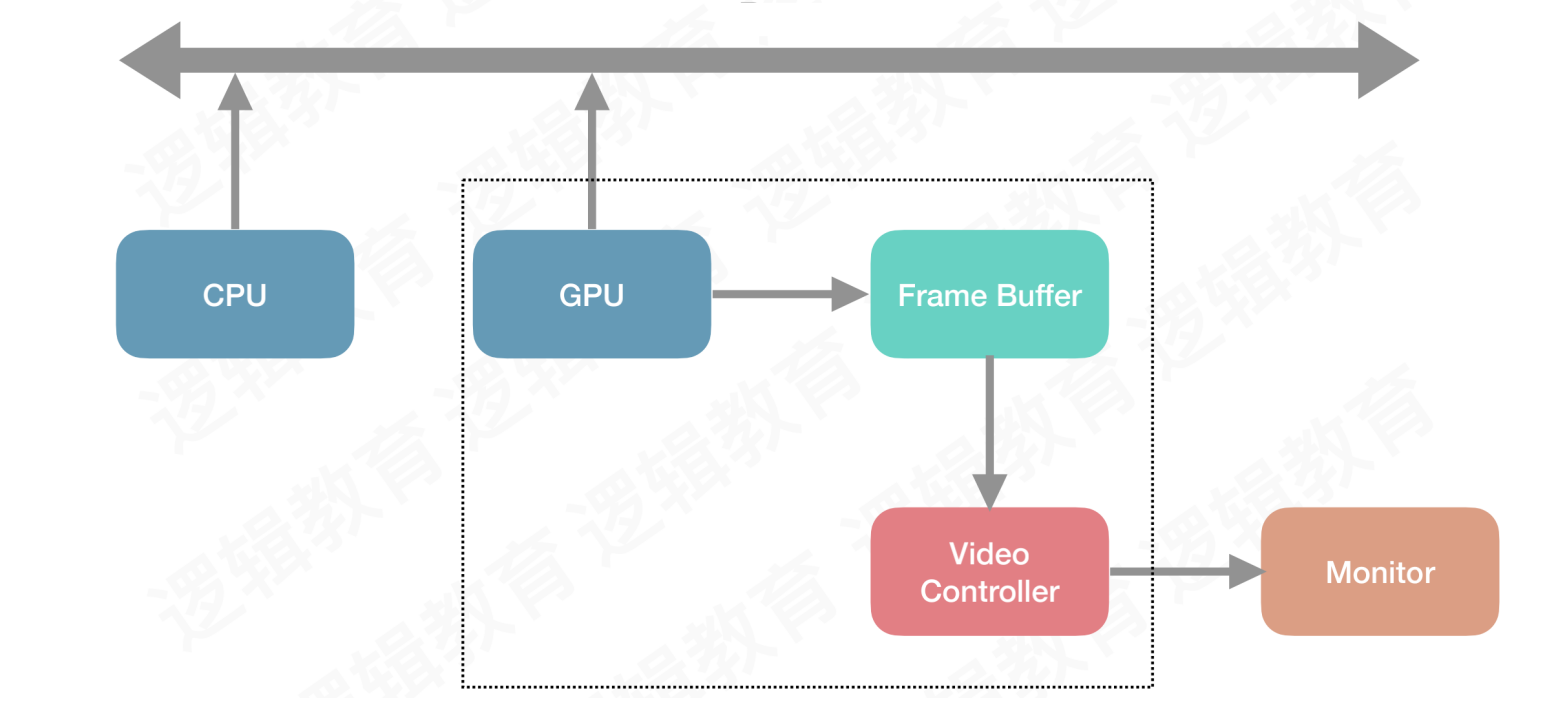
CPU:用于计算,将结果提交GPUGPU:用于渲染,将结果放入FrameBuffer(帧缓冲)Video Controller(视频控制器)会根据Vsync(垂直同步)信号,逐行读取FrameBuffer中的数据经过数模转换传递给
Monitor(显示器)进行显示
1.1 屏幕撕裂
界面图像的展示,会不断从帧缓冲区读取一帧一帧的数据进行显示
当遇到耗时的计算或渲染情况,导致从帧缓冲区获取的下一帧数据还没有准备好
此时显示的还是旧数据,但显示过程中,下一帧数据准备完毕,导致部分显示的又是新数据,这样就会造成屏幕撕裂
1.2 界面卡顿
为了解决这种问题,苹果使用双缓冲机制 + 垂直同步信号,使用两个帧缓冲区存储GPU处理结果,当屏幕显示其中一个缓存区内容时,另一个缓冲区继续等待下一个缓冲结果,两个缓冲区依次进行交替
这样的优化可以解决屏幕撕裂,但也出现了新的问题,掉帧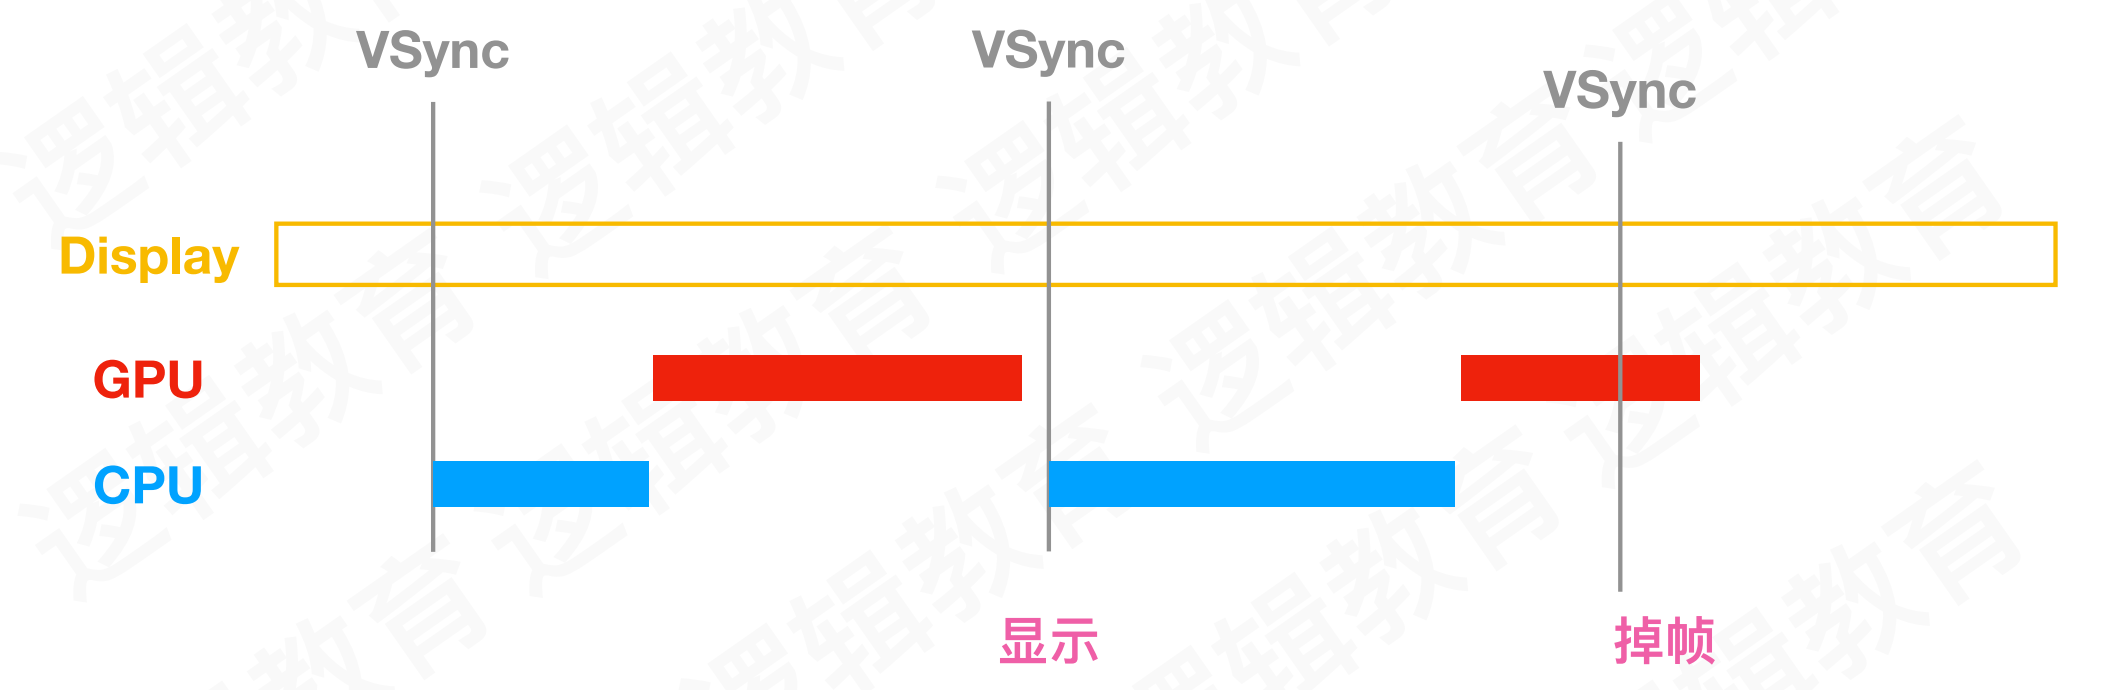
- 当屏幕重复显示同一帧数据就是掉帧,我们看到的效果就是界面卡顿
产生掉帧的情况:收到垂直信号后,CPU和GPU还没有将下一帧数据放到对应的帧缓冲区。导致屏幕显示的仍是当前画面
2. 卡顿检测
2.1 YYFPSLabel
YYKit框架中,提供了一个检测刷新频率的YYFPSLabel控件
#import "YYFPSLabel.h"#import "YYKit.h"#define kSize CGSizeMake(55, 20)@implementation YYFPSLabel {CADisplayLink *_link;NSUInteger _count;NSTimeInterval _lastTime;UIFont *_font;UIFont *_subFont;NSTimeInterval _llll;}- (instancetype)initWithFrame:(CGRect)frame {if (frame.size.width == 0 && frame.size.height == 0) {frame.size = kSize;}self = [super initWithFrame:frame];self.layer.cornerRadius = 5;self.clipsToBounds = YES;self.textAlignment = NSTextAlignmentCenter;self.userInteractionEnabled = NO;self.backgroundColor = [UIColor colorWithWhite:0.000 alpha:0.700];_font = [UIFont fontWithName:@"Menlo" size:14];if (_font) {_subFont = [UIFont fontWithName:@"Menlo" size:4];} else {_font = [UIFont fontWithName:@"Courier" size:14];_subFont = [UIFont fontWithName:@"Courier" size:4];}_link = [CADisplayLink displayLinkWithTarget:[YYWeakProxy proxyWithTarget:self] selector:@selector(tick:)];[_link addToRunLoop:[NSRunLoop mainRunLoop] forMode:NSRunLoopCommonModes];return self;}- (void)dealloc {[_link invalidate];}- (CGSize)sizeThatFits:(CGSize)size {return kSize;}// 60 vs 16.67ms// 1/60 * 1000- (void)tick:(CADisplayLink *)link {if (_lastTime == 0) {_lastTime = link.timestamp;return;}_count++;NSTimeInterval delta = link.timestamp - _lastTime;if (delta < 1) return;_lastTime = link.timestamp;float fps = _count / delta;_count = 0;CGFloat progress = fps / 60.0;UIColor *color = [UIColor colorWithHue:0.27 * (progress - 0.2) saturation:1 brightness:0.9 alpha:1];NSMutableAttributedString *text = [[NSMutableAttributedString alloc] initWithString:[NSString stringWithFormat:@"%d FPS",(int)round(fps)]];[text setColor:color range:NSMakeRange(0, text.length - 3)];[text setColor:[UIColor whiteColor] range:NSMakeRange(text.length - 3, 3)];text.font = _font;[text setFont:_subFont range:NSMakeRange(text.length - 4, 1)];self.attributedText = text;}@end
使用
CADisplayLink同步屏幕刷新频率的计时器通过
刷新次数 / 时间差,计算出刷新频率刷新频率一般每秒刷新
60次,平均每16.67ms刷新一次。以此监听是否出现掉帧的情况
2.2 RunLoop卡顿检测
通过监听主RunLoop的事务变化进行卡顿检测
#import "LGBlockMonitor.h"@interface LGBlockMonitor (){CFRunLoopActivity activity;}@property (nonatomic, strong) dispatch_semaphore_t semaphore;@property (nonatomic, assign) NSUInteger timeoutCount;@end@implementation LGBlockMonitor+ (instancetype)sharedInstance {static id instance = nil;static dispatch_once_t onceToken;dispatch_once(&onceToken, ^{instance = [[self alloc] init];});return instance;}- (void)start{[self registerObserver];[self startMonitor];}static void CallBack(CFRunLoopObserverRef observer, CFRunLoopActivity activity, void *info){LGBlockMonitor *monitor = (__bridge LGBlockMonitor *)info;monitor->activity = activity;// 发送信号dispatch_semaphore_t semaphore = monitor->_semaphore;dispatch_semaphore_signal(semaphore);}- (void)registerObserver{CFRunLoopObserverContext context = {0, (__bridge void*)self, NULL, NULL};//NSIntegerMax : 优先级最小CFRunLoopObserverRef observer = CFRunLoopObserverCreate(kCFAllocatorDefault,kCFRunLoopAllActivities,YES,NSIntegerMax,&CallBack,&context);CFRunLoopAddObserver(CFRunLoopGetMain(), observer, kCFRunLoopCommonModes);}- (void)startMonitor{// 创建信号_semaphore = dispatch_semaphore_create(0);// 在子线程监控时长dispatch_async(dispatch_get_global_queue(0, 0), ^{while (YES){// 超时时间是 1 秒,没有等到信号量,st 就不等于 0, RunLoop 所有的任务long st = dispatch_semaphore_wait(self->_semaphore, dispatch_time(DISPATCH_TIME_NOW, 1 * NSEC_PER_SEC));if (st != 0){if (self->activity == kCFRunLoopBeforeSources || self->activity == kCFRunLoopAfterWaiting){if (++self->_timeoutCount < 2){NSLog(@"timeoutCount==%lu",(unsigned long)self->_timeoutCount);continue;}// 一秒左右的衡量尺度 很大可能性连续来 避免大规模打印!NSLog(@"检测到超过两次连续卡顿");}}self->_timeoutCount = 0;}});}@end
定义信号量,在全局并发队列中,加入异步函数,创建
while死循环,内部让信号量进入休眠状态,定义一秒的超时时间监听主
RunLoop的所有事务,在回调方法中,对信号量发送释放的通知如果信号量时间,检查
Observer的状态。如果是处理Sources或处于唤醒状态,证明还在做事情,将超时次数+1如果连续两次,视为卡顿
2.3 Matrix
一款微信研发并日常使用的应用性能接入框架,支持iOS, macOS和Android
通过接入各种性能监控方案,对性能监控项的异常数据进行采集和分析,输出相应的问题分析、定位与优化建议,从而帮助开发者开发出更高质量的应用
监控范围包括:崩溃卡顿和内存监控
WCCrashBlockMonitorPlugin:基于KSCrash框架开发,具有业界领先的卡顿堆栈捕获能力,同时兼备崩溃捕获能力WCMemoryStatPlugin:一款性能优化到极致的爆内存监控工具,能够全面捕获应用爆内存时的内存分配以及调用堆栈情况
核心原理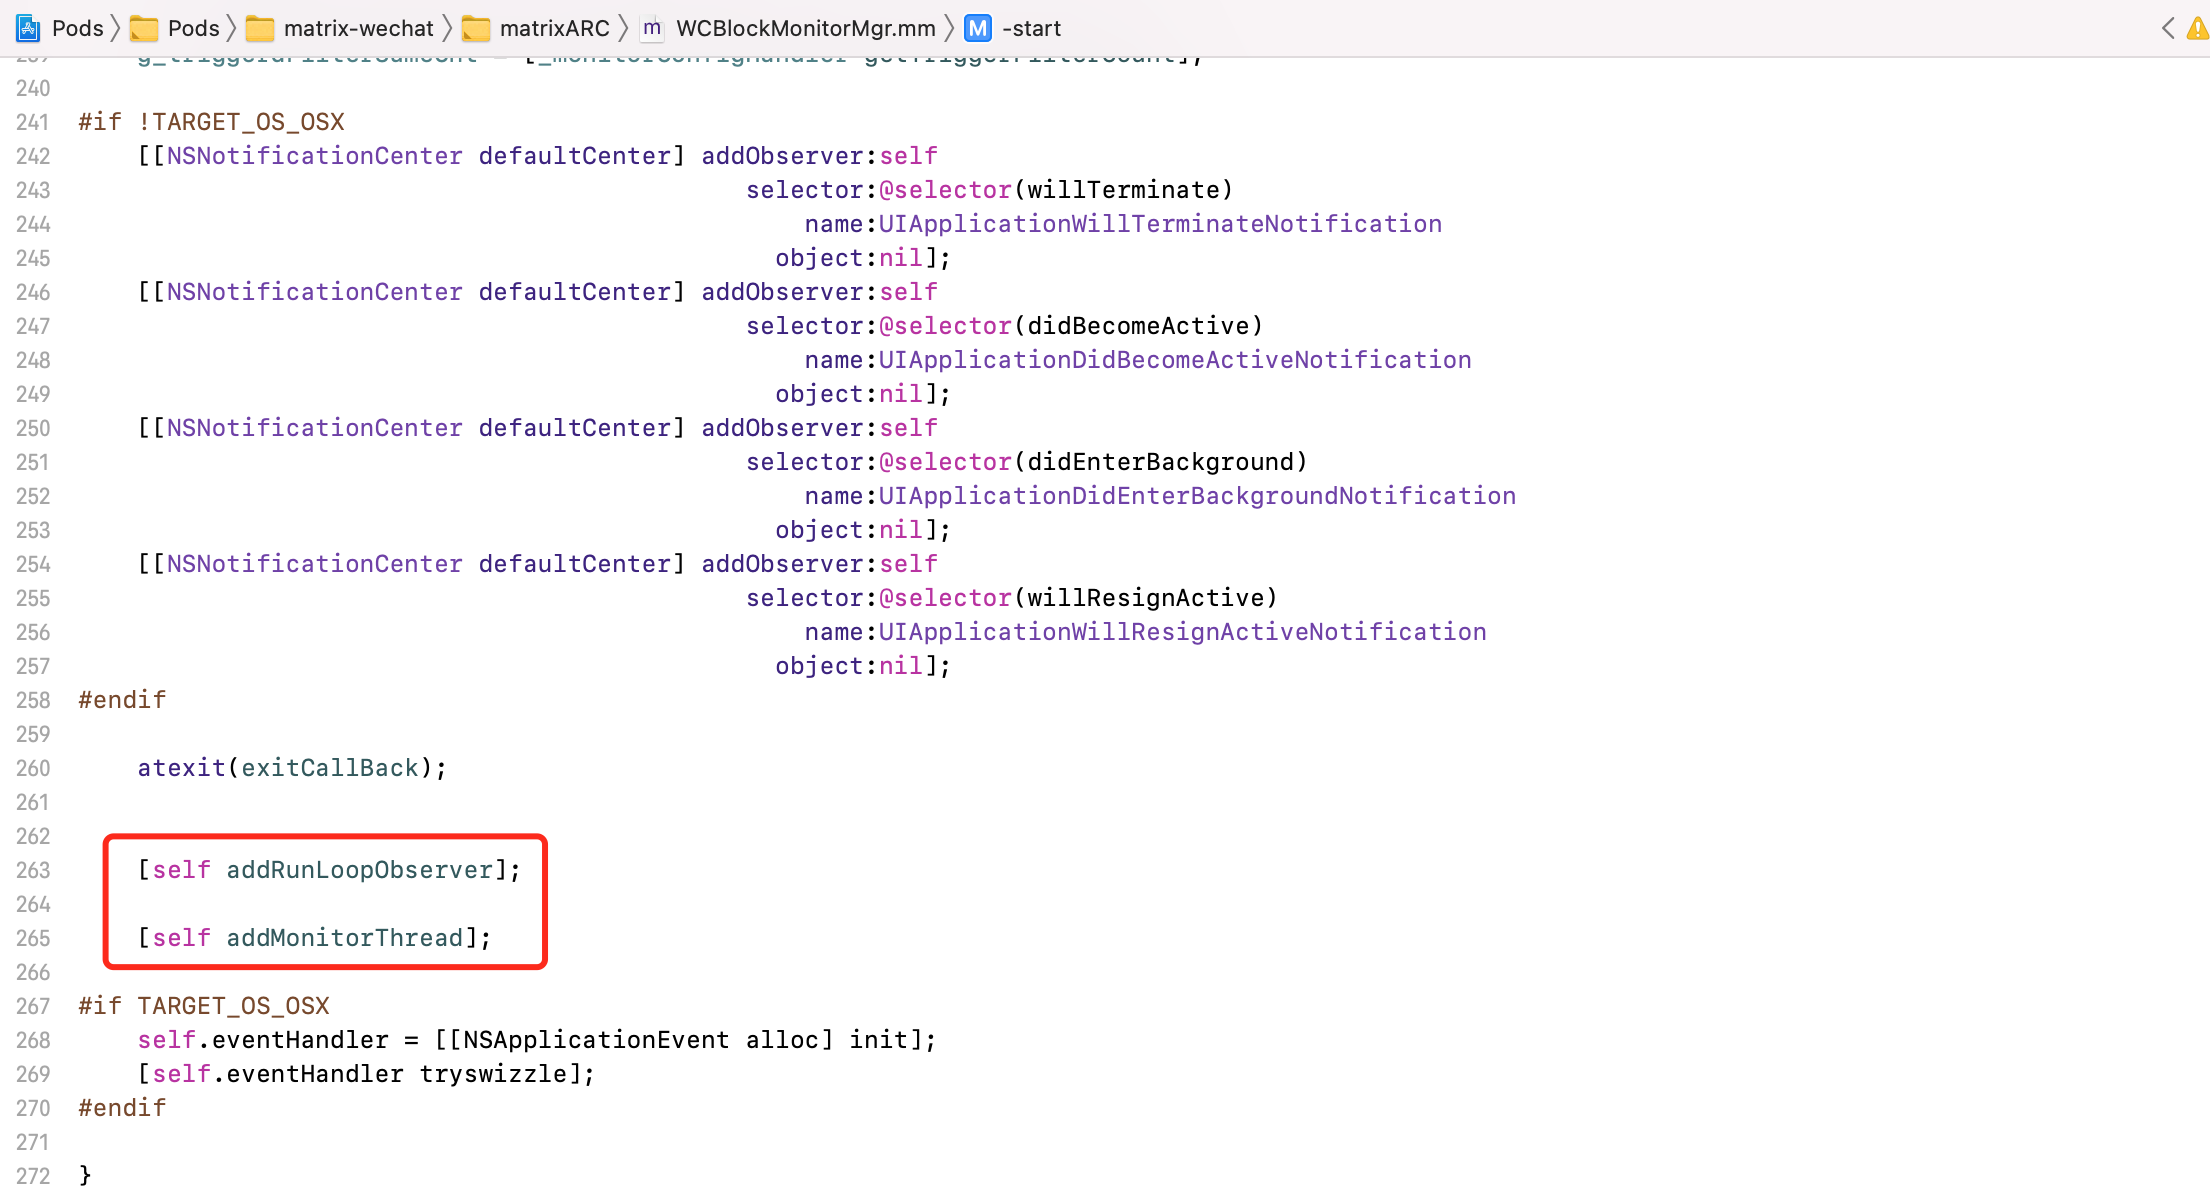
- 添加主
RunLoop的监听,创建子线程,监听卡顿
2.4 DoraemonKit
DoKit是一款面向泛前端产品研发全生命周期的效率平台,包含常用工具、性能检测、视觉工具
其中性能检测可以对帧率、CPU、内存、流量监控、卡顿等信息进行监控
DoKit对于卡顿的监控方案,自定义DoraemonPingThread,重写线程的main方法
- (void)main {//判断是否需要上报__weak typeof(self) weakSelf = self;void (^ verifyReport)(void) = ^() {__strong typeof(weakSelf) strongSelf = weakSelf;if (strongSelf.reportInfo.length > 0) {if (strongSelf.handler) {double responseTimeValue = [[NSDate date] timeIntervalSince1970];double duration = (responseTimeValue - strongSelf.startTimeValue)*1000;strongSelf.handler(@{@"title": [DoraemonUtil dateFormatNow].length > 0 ? [DoraemonUtil dateFormatNow] : @"",@"duration": [NSString stringWithFormat:@"%.0f",duration],//单位ms@"content": strongSelf.reportInfo});}strongSelf.reportInfo = @"";}};while (!self.cancelled) {if (_isApplicationInActive) {self.mainThreadBlock = YES;self.reportInfo = @"";self.startTimeValue = [[NSDate date] timeIntervalSince1970];dispatch_async(dispatch_get_main_queue(), ^{self.mainThreadBlock = NO;verifyReport();dispatch_semaphore_signal(self.semaphore);});[NSThread sleepForTimeInterval:self.threshold];if (self.isMainThreadBlock) {self.reportInfo = [DoraemonBacktraceLogger doraemon_backtraceOfMainThread];}dispatch_semaphore_wait(self.semaphore, dispatch_time(DISPATCH_TIME_NOW, 5.0 * NSEC_PER_SEC));{//卡顿超时情况;verifyReport();}} else {[NSThread sleepForTimeInterval:self.threshold];}}}
- 间隔一段时间去主线程执行任务,类似于心跳监听
3. 优化方案
我们除了一些常规方案之外
避免离屏渲染
避免使用透明
UIView尽量使用
PNG图片
还可以尝试以下几种更见效的方案
3.1 预排版
预排版的目的,避免在UITableView的heightForRowAtIndexPath方法中进行高度的计算
当网络请求拿到数据源时,使用异步任务将数据转换为Model,同时按照业务需求,提前将Cell的高度计算出来
案例:
- (void)loadData{//外面的异步线程:网络请求的线程dispatch_async(dispatch_get_global_queue(0, 0), ^{//加载`JSON 文件`NSString *path = [[NSBundle mainBundle] pathForResource:@"timeLine" ofType:@"json"];NSData *data = [[NSData alloc] initWithContentsOfFile:path];NSDictionary *dicJson=[NSJSONSerialization JSONObjectWithData:data options:NSJSONReadingMutableContainers error:nil];//数据转换为Modelfor (id json in dicJson[@"data"]) {LGTimeLineModel *timeLineModel = [LGTimeLineModel yy_modelWithJSON:json];[self.timeLineModels addObject:timeLineModel];}//预排版for (LGTimeLineModel *timeLineModel in self.timeLineModels) {LGTimeLineCellLayout *cellLayout = [[LGTimeLineCellLayout alloc] initWithModel:timeLineModel];[self.layouts addObject:cellLayout];}dispatch_async(dispatch_get_main_queue(), ^{[self.timeLineTableView reloadData];});});}
3.2 预解码
程序中加载来自云端的图片,最长用的就是SDWebImage框架。该框架除了使用便捷之外,还对图片加载进行了预解码等优化
日常开发中遇到的UIImage,并不是真正的图片,而是一个模型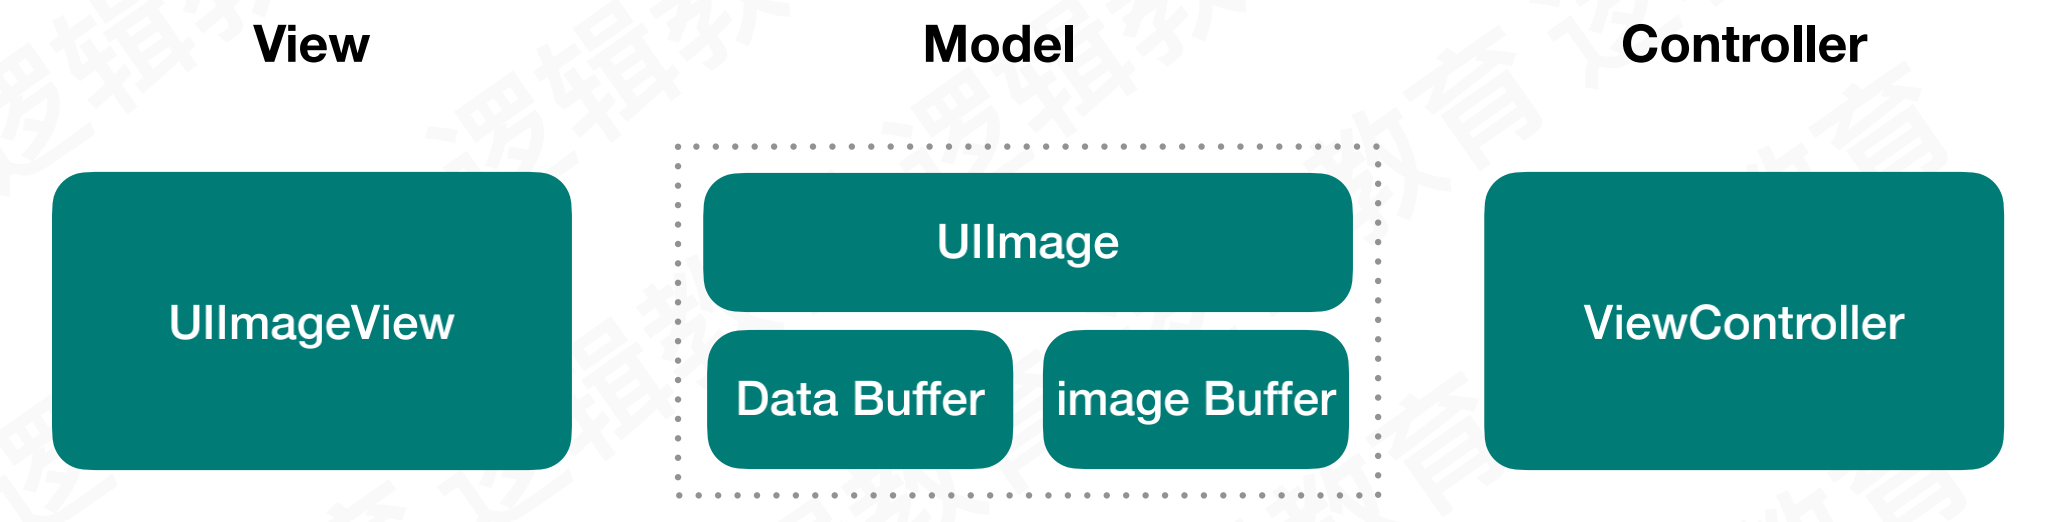
UIImage的二进制流存储在DataBuffer中,经过decode解码,加载到imageBuffer中,最终进入FrameBuffer才能被渲染
当使用UIImage或CGImageSource的方法创建图片时,图片的数据不会立即解码,而是在设置UIImageView.image时解码
将图片设置到UIImageView/CALayer.contents中,然后在CALayer提交至GPU渲染前,CGImage中的数据才进行解码
如果任由系统处理,这一步则无法避免,并且会发生在主线程中。如果想避免这个机制,在子线程先将图片绘制到CGBitmapContext,然后从Bitmap中创建图片
而SDWebImage框架中对图片的预解码处理,就是优化了这个系统机制
打开SDWebImageDownloaderOperation.m文件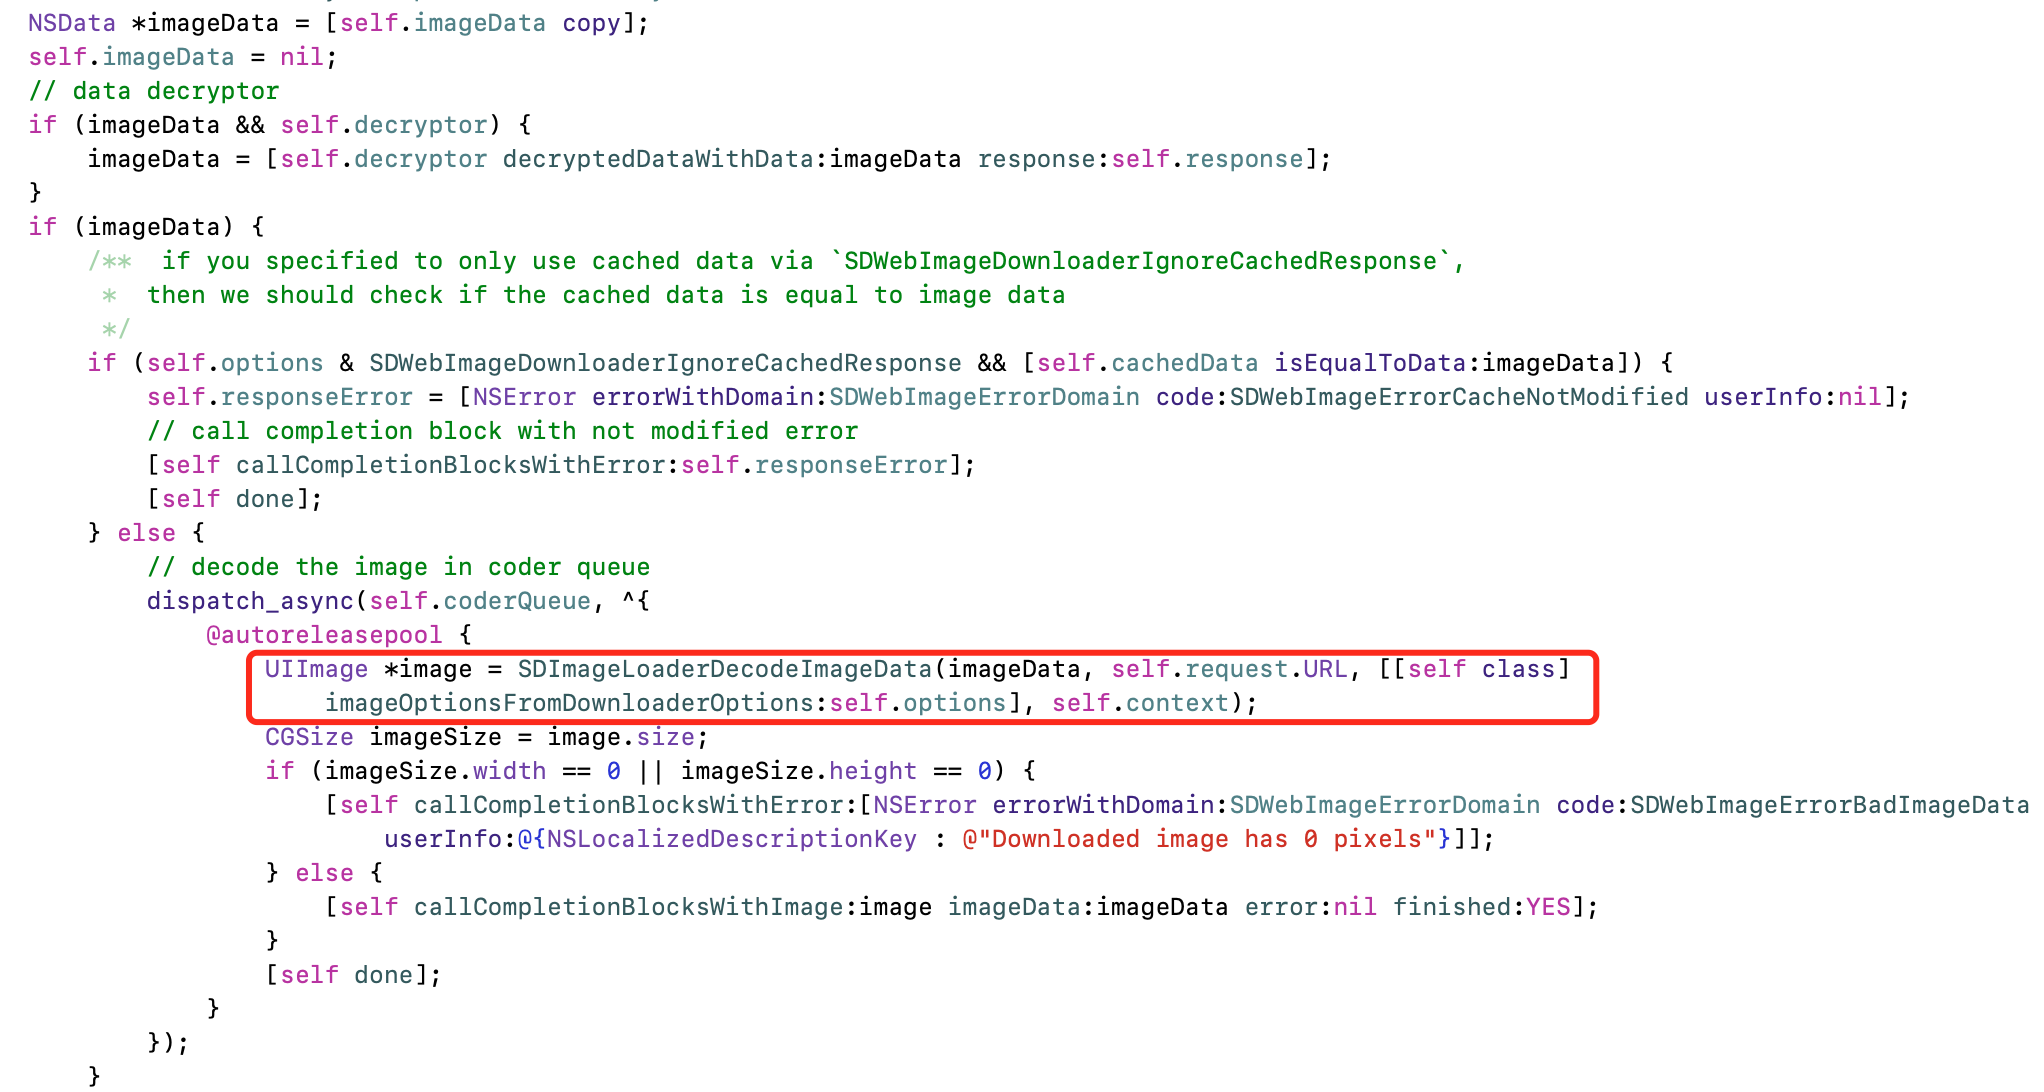
- 使用异步任务,加入到自定义串行队列中,对图片进行预解码处理
将二进制流转为CGImageSourceRef
CGImageSourceRef source = CGImageSourceCreateWithData((__bridge CFDataRef)data, NULL);
从CGImageSourceRef中,读取图片宽高,Exif等信息,生成CGImageRef格式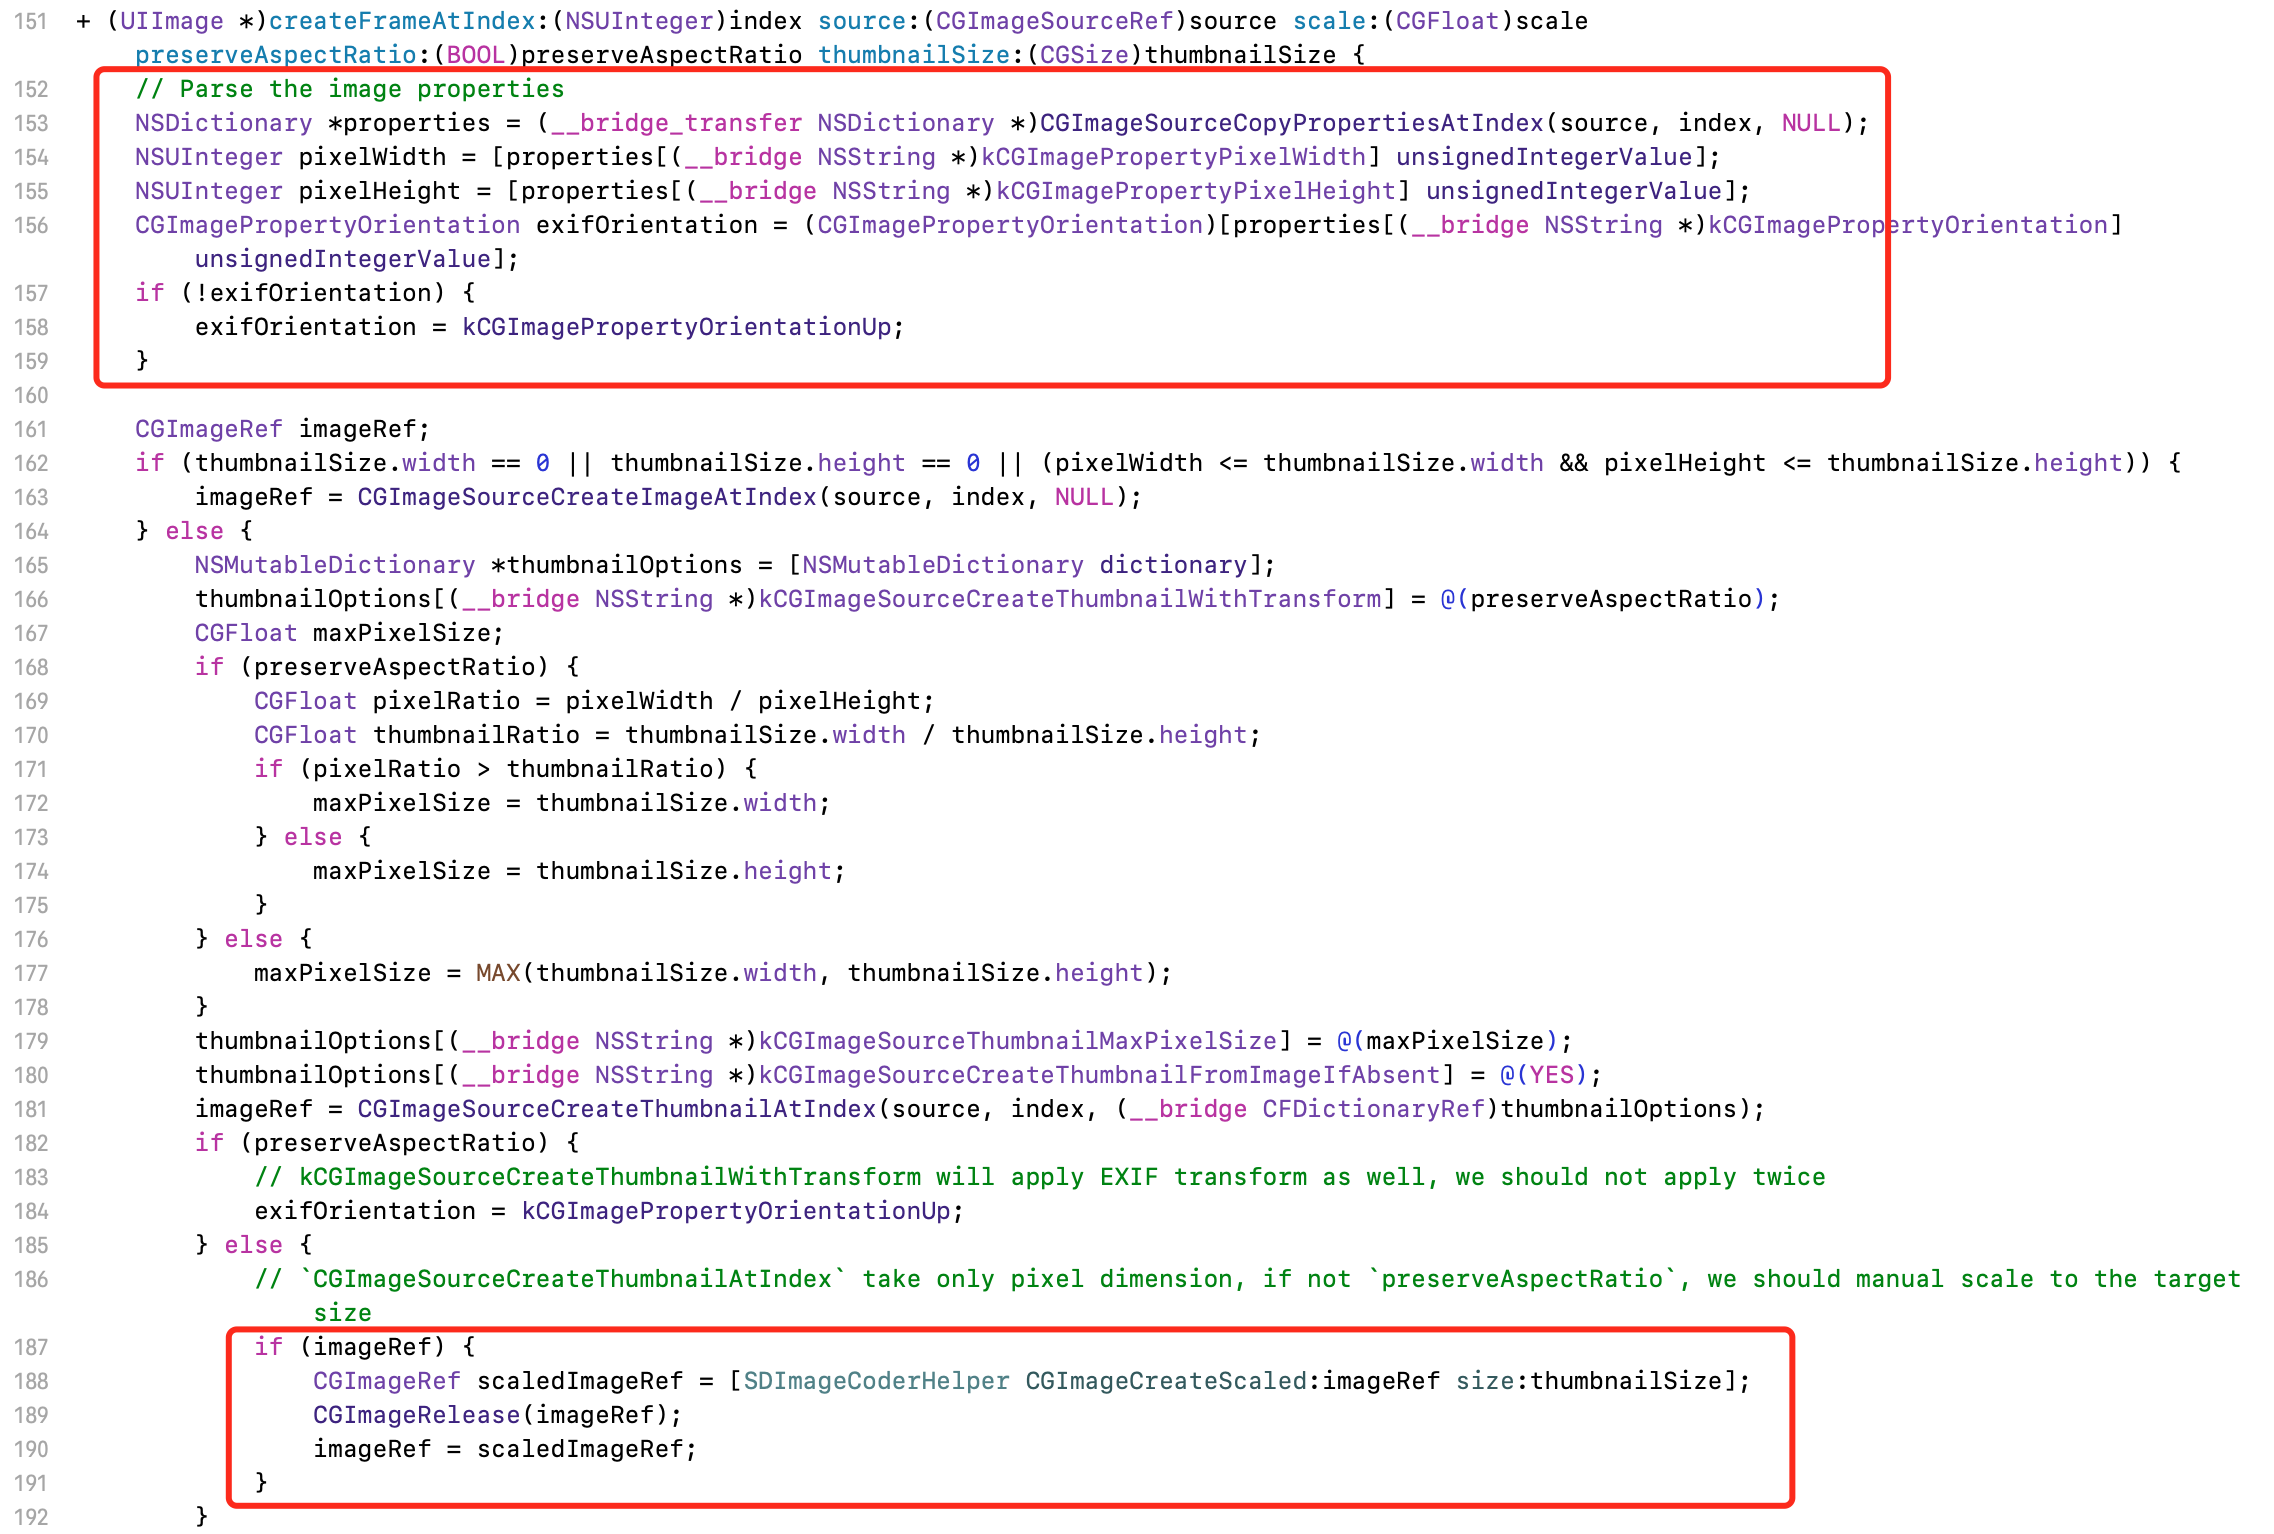
3.3 按需加载
如果目标行与当前行相差超过指定行数,只在目标滚动范围的前后指定3行加载
- (void)scrollViewWillBeginDragging:(UIScrollView *)scrollView{[needLoadArr removeAllObjects];}- (void)scrollViewWillEndDragging:(UIScrollView *)scrollView withVelocity:(CGPoint)velocity targetContentOffset:(inout CGPoint *)targetContentOffset{NSIndexPath *ip = [self indexPathForRowAtPoint:CGPointMake(0, targetContentOffset->y)];NSIndexPath *cip = [[self indexPathsForVisibleRows] firstObject];NSInteger skipCount = 8;if (labs(cip.row-ip.row)>skipCount) {NSArray *temp = [self indexPathsForRowsInRect:CGRectMake(0, targetContentOffset->y, self.width, self.height)];NSMutableArray *arr = [NSMutableArray arrayWithArray:temp];if (velocity.y<0) {NSIndexPath *indexPath = [temp lastObject];if (indexPath.row+3<datas.count) {[arr addObject:[NSIndexPath indexPathForRow:indexPath.row+1 inSection:0]];[arr addObject:[NSIndexPath indexPathForRow:indexPath.row+2 inSection:0]];[arr addObject:[NSIndexPath indexPathForRow:indexPath.row+3 inSection:0]];}} else {NSIndexPath *indexPath = [temp firstObject];if (indexPath.row>3) {[arr addObject:[NSIndexPath indexPathForRow:indexPath.row-3 inSection:0]];[arr addObject:[NSIndexPath indexPathForRow:indexPath.row-2 inSection:0]];[arr addObject:[NSIndexPath indexPathForRow:indexPath.row-1 inSection:0]];}}[needLoadArr addObjectsFromArray:arr];}}
在滑动结束时进行Cell的渲染
- (BOOL)scrollViewShouldScrollToTop:(UIScrollView *)scrollView{scrollToToping = YES;return YES;}- (void)scrollViewDidEndScrollingAnimation:(UIScrollView *)scrollView{scrollToToping = NO;[self loadContent];}- (void)scrollViewDidScrollToTop:(UIScrollView *)scrollView{scrollToToping = NO;[self loadContent];}//用户触摸时第一时间加载内容- (UIView *)hitTest:(CGPoint)point withEvent:(UIEvent *)event{if (!scrollToToping) {[needLoadArr removeAllObjects];[self loadContent];}return [super hitTest:point withEvent:event];}- (void)loadContent{if (scrollToToping) {return;}if (self.indexPathsForVisibleRows.count<=0) {return;}if (self.visibleCells && self.visibleCells.count>0) {for (id temp in [self.visibleCells copy]) {VVeboTableViewCell *cell = (VVeboTableViewCell *)temp;[cell draw];}}}
处理方式要根据需求自行处理,毕竟这种方式会影响体验,大部分仅针对滑动时的图片加载进行优化
3.4 异步渲染
让UIView和CALayer各负其职:
UIViewUIView基于UIKit框架负责界面布局和子视图的管理
可以处理用户触摸事件
负责绘制图形和动画操作
CALayerCALayer基于CoreAnimation只负责显示,且显示的是位图
不能处理用户的触摸事件
可用于iOS平台的
UIKit框架,也可用于Mac OSX系统下的APPKit框架
UIView和CALayer的关系:
UIView基于UIKit框架,可以处理用户触摸事件,并管理子视图CALayer基于CoreAnimation,而CoreAnimation是基于QuartzCode的。所以CALayer只负责显示,不能处理用户的触摸事件CALayer继承于NSObject,而UIView继承于UIResponder,所以UIVIew相比CALayer多了事件处理功能从底层来说,
UIView属于UIKit的组件,而UIKit的组件到最后都会被分解成layer,存储到图层树中在应用层面来说,需要与用户交互时,使用
UIView,不需要交互时,使用两者都可以
CALayer基于CoreAnimation,其中CoreAnimationg是一个复合引擎,主要的职责包括渲染、构建和动画实现
CoreAnimation的渲染流程: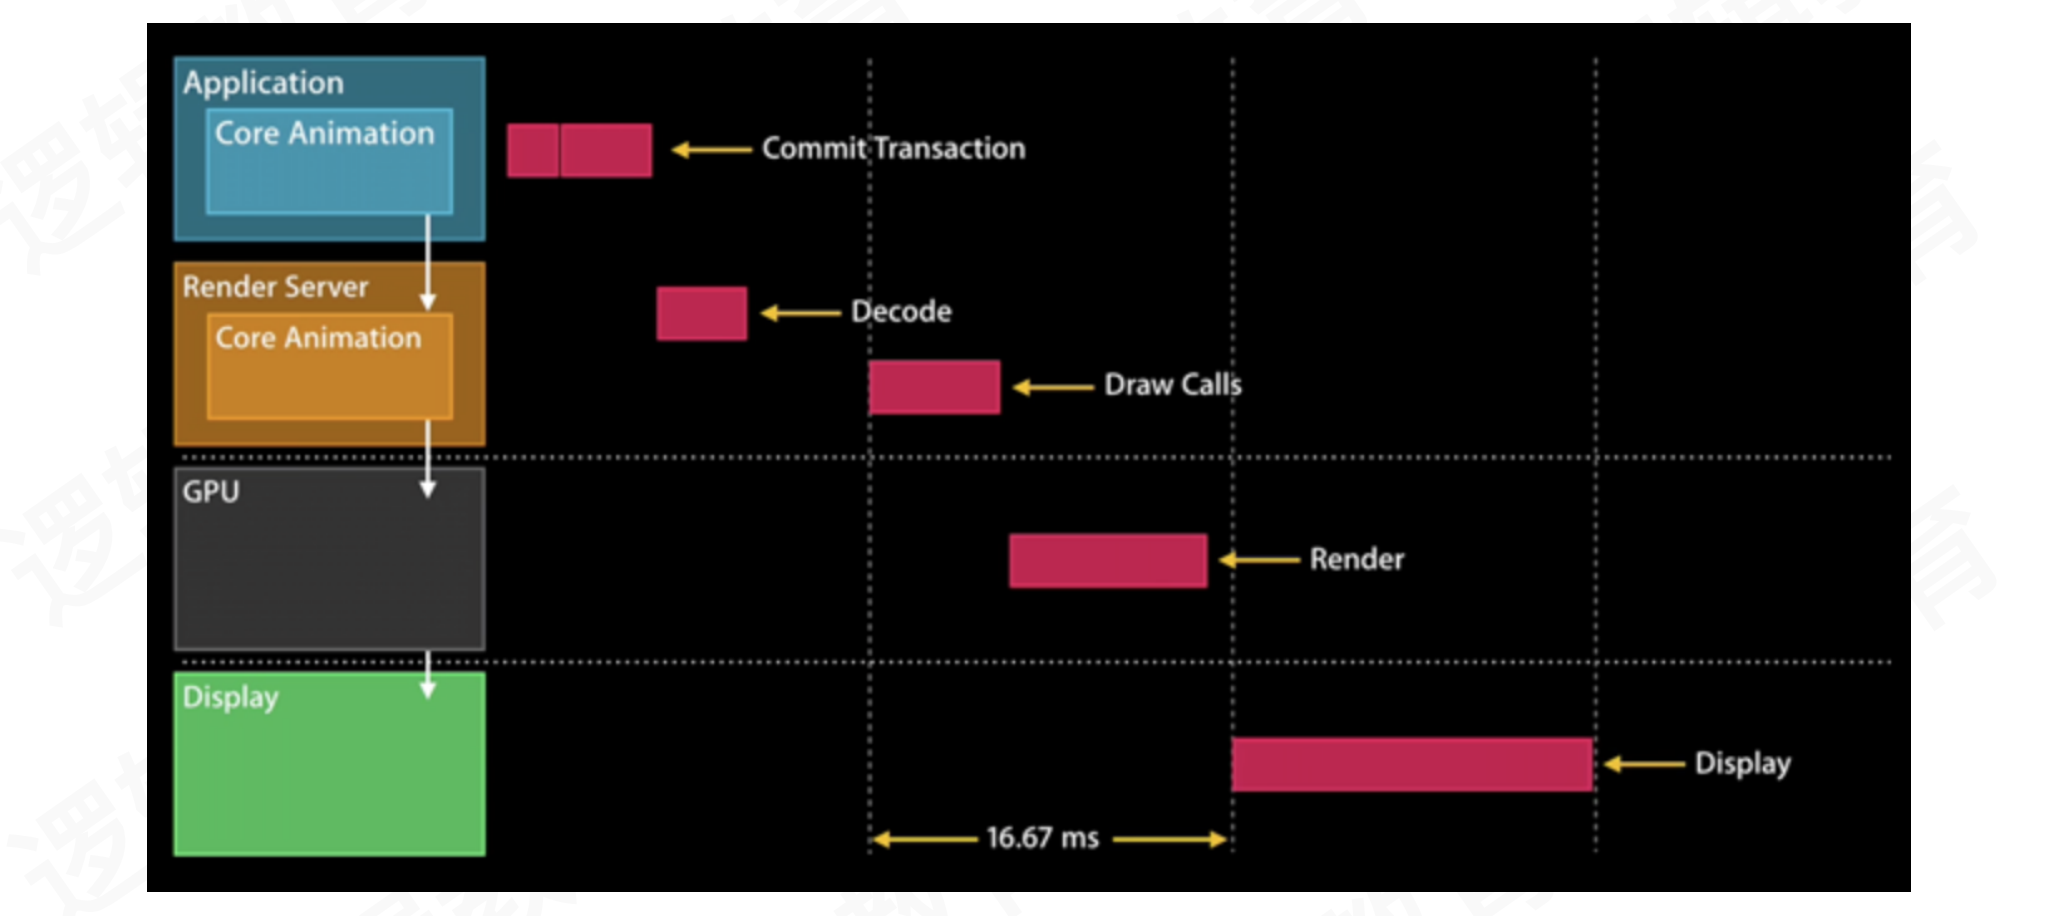
案例:
自定义LGView,继承于UIView
#import <UIKit/UIKit.h>#import "LGLayer.h"@interface LGView : UIView- (CGContextRef)createContext;- (void)closeContext;@end@implementation LGView// Only override drawRect: if you perform custom drawing.// An empty implementation adversely affects performance during animation.- (void)drawRect:(CGRect)rect {// Drawing code, 绘制的操作, BackingStore(额外的存储区域产于的) -- GPU}// 这一个操作分解// 1: view layer////子视图的布局//- (void)layoutSubviews{// [super layoutSubviews];//}+ (Class)layerClass{return [LGLayer class];}- (void)layoutSublayersOfLayer:(CALayer *)layer{[super layoutSublayersOfLayer:layer];[self layoutSubviews];}- (CGContextRef)createContext{UIGraphicsBeginImageContextWithOptions(self.bounds.size, self.layer.opaque, self.layer.contentsScale);CGContextRef context = UIGraphicsGetCurrentContext();return context;}- (void)layerWillDraw:(CALayer *)layer{//绘制的准备工作,do nontihing//}//////绘制的操作- (void)drawLayer:(CALayer *)layer inContext:(CGContextRef)ctx{[super drawLayer:layer inContext:ctx];[[UIColor redColor] set];//Core GraphicsUIBezierPath *path = [UIBezierPath bezierPathWithRect:CGRectMake(self.bounds.size.width / 2- 20, self.bounds.size.height / 2- 20, 40, 40)];CGContextAddPath(ctx, path.CGPath);CGContextFillPath(ctx);}//////layer.contents = (位图)- (void)displayLayer:(CALayer *)layer{UIImage *image = UIGraphicsGetImageFromCurrentImageContext();dispatch_async(dispatch_get_main_queue(), ^{layer.contents = (__bridge id)(image.CGImage);});}- (void)closeContext{UIGraphicsEndImageContext();}@end
自定义LGLayer,继承于CALayer
#import <QuartzCore/QuartzCore.h>@interface LGLayer : CALayer@end@implementation LGLayer//前面断点调用写下的代码- (void)layoutSublayers{if (self.delegate && [self.delegate respondsToSelector:@selector(layoutSublayersOfLayer:)]) {//UIView[self.delegate layoutSublayersOfLayer:self];}else{[super layoutSublayers];}}//绘制流程的发起函数- (void)display{// Graver 实现思路CGContextRef context = (__bridge CGContextRef)([self.delegate performSelector:@selector(createContext)]);[self.delegate layerWillDraw:self];[self drawInContext:context];[self.delegate displayLayer:self];[self.delegate performSelector:@selector(closeContext)];}@end
所有的渲染流程都可以放在子线程异步执行,最终显示layer.contents = (__bridge id)(image.CGImage)切换到主线程执行即可
异步渲染的框架推荐:Graver
一款高效的UI渲染框架,它以更低的资源消耗来构建十分流畅的UI界面。渲染整个过程除画板视图外完全没有使用UIKit控件,最终产出的结果是一张位图(Bitmap),视图层级、数量大幅降低
Graver的渲染流程: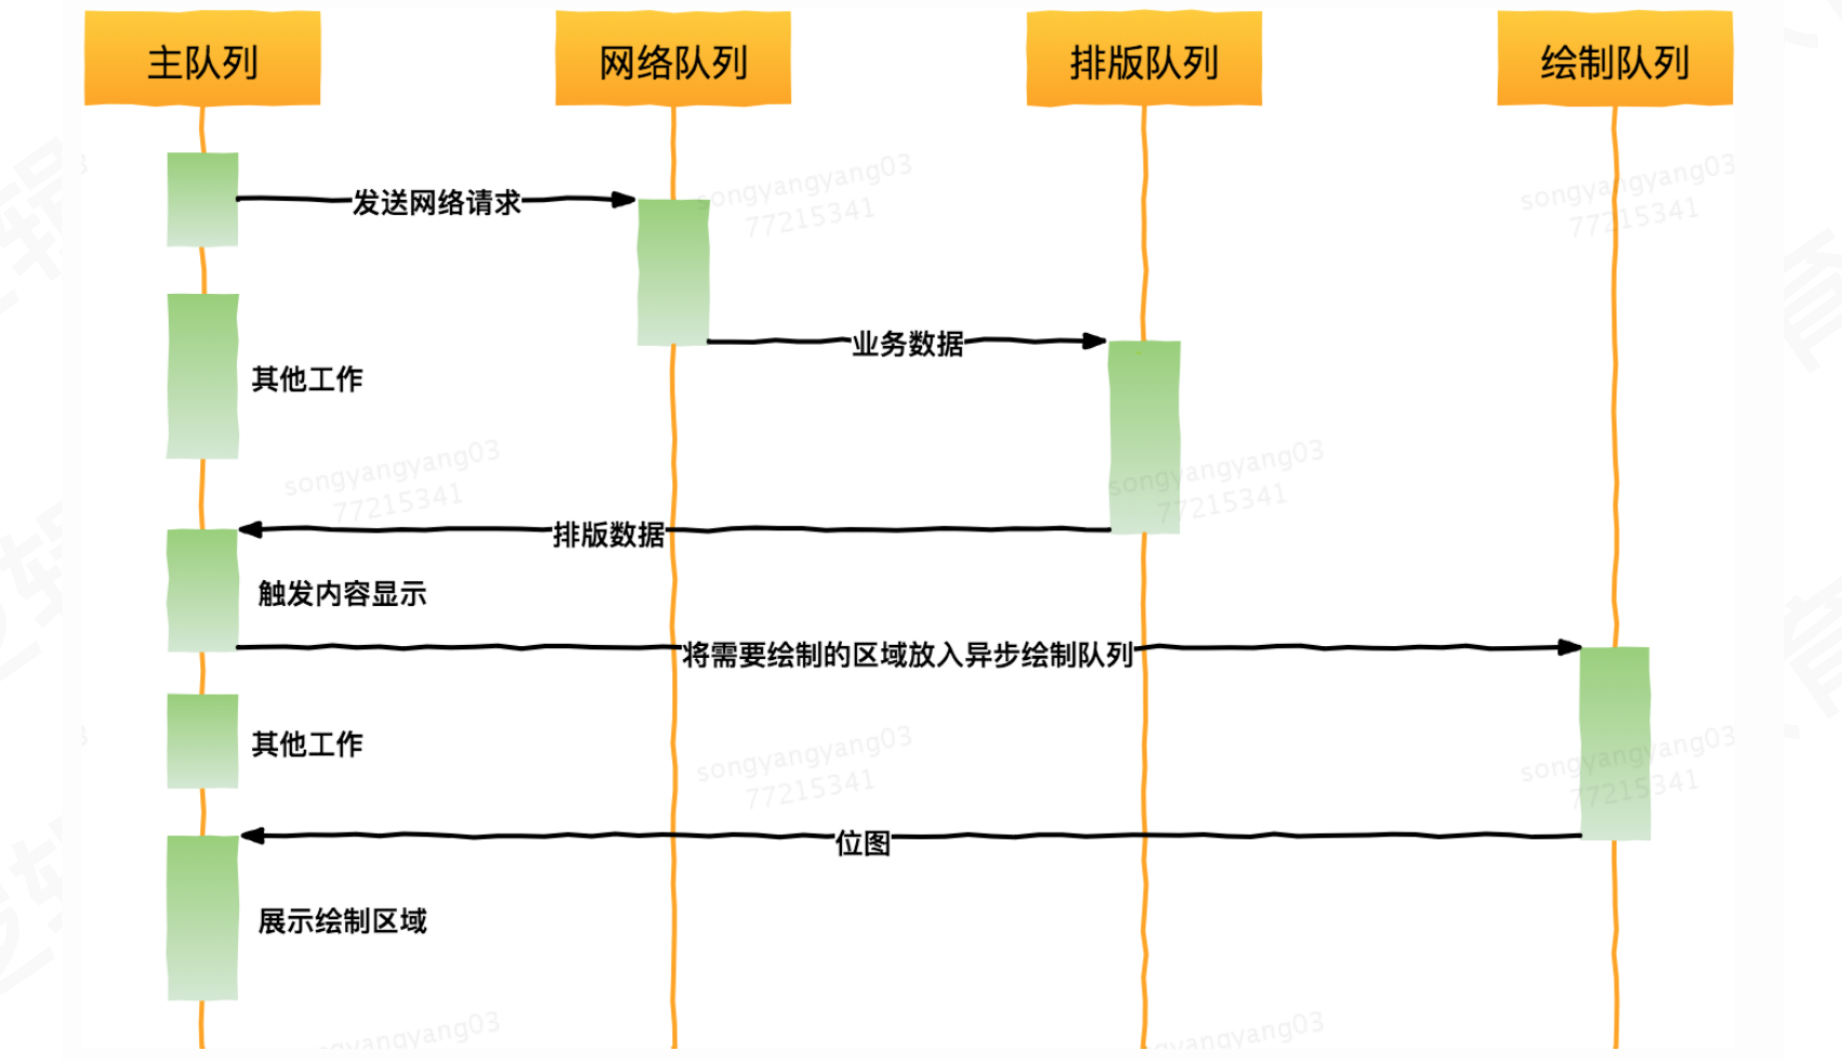
最终呈现效果:
总结
界面的显示:
CPU:用于计算,将结果提交GPUGPU:用于渲染,将结果放入FrameBuffer(帧缓冲)Video Controller(视频控制器)会根据Vsync(垂直同步)信号,逐行读取FrameBuffer中的数据经过数模转换传递给
Monitor(显示器)进行显示
屏幕撕裂:
界面图像的展示,会不断从帧缓冲区读取一帧一帧的数据进行显示
当遇到耗时的计算或渲染情况,导致从帧缓冲区获取的下一帧数据还没有准备好
此时显示的还是旧数据,但显示过程中,下一帧数据准备完毕,导致部分显示的又是新数据,这样就会造成屏幕撕裂
界面卡顿:
苹果使用双缓冲机制 + 垂直同步信号,使用两个帧缓冲区存储
GPU处理结果,当屏幕显示其中一个缓存区内容时,另一个缓冲区继续等待下一个缓冲结果,两个缓冲区依次进行交替产生掉帧的情况:收到垂直信号后,
CPU和GPU还没有将下一帧数据放到对应的帧缓冲区。导致屏幕显示的仍是当前画面当屏幕重复显示同一帧数据就是掉帧,我们看到的效果就是界面卡顿
卡顿检测:
YYFPSLabel:检测刷新频率RunLoop卡顿检测:通过监听主RunLoop的事务变化进行卡顿检测Matrix:一款微信研发并日常使用的应用性能接入框架,监控范围包括崩溃卡顿和内存监控DoraemonKit:一款面向泛前端产品研发全生命周期的效率平台,包含常用工具、性能检测、视觉工具
优化方案
预排版:避免在
UITableView的heightForRowAtIndexPath方法中进行高度的计算预解码:提前对图片进行解码操作
按需加载:处理方式要根据需求自行处理,毕竟这种方式会影响体验,大部分仅针对滑动时的图片加载进行优化
异步渲染:让
UIView和CALayer各负其职,渲染流程都可以放在子线程异步执行,最终显示CGImage切换到主线程执行即可Graver异步渲染框架:渲染整个过程除画板视图外完全没有使用UIKit控件,最终产出的结果是一张位图(Bitmap),视图层级、数量大幅降低

若有收获,就点个赞吧
0 人点赞
