一、初识docker debug模式
作为运维工程师,大家都十分熟悉,当服务运行出问题时,可以通过docker logs 或者是docker attach 来查看应用的日志,这个给了管理员以很大的便利,但是,当docker引擎出问题时,如何去查看docker 引擎的日志呢?
1、查看docker 引擎的日志
docker引擎日志查看还是比较方便的,特别是在linux引入了systemd后,可以通过journalctl -u docker.service来进行查看
[root@VM-0-13-centos ~]# journalctl -u docker.service-- Logs begin at Thu 2020-08-20 10:39:51 CST, end at Wed 2020-09-09 21:20:01 CST. --Sep 09 20:52:42 VM-0-13-centos systemd[1]: Starting Docker Application Container Engine...Sep 09 20:52:42 VM-0-13-centos dockerd[2892]: time="2020-09-09T20:52:42.628747216+08:00" level=info msg="Starting up"Sep 09 20:52:42 VM-0-13-centos dockerd[2892]: time="2020-09-09T20:52:42.629590473+08:00" level=info msg="parsed scheme: \"unix\"" module=grpcSep 09 20:52:42 VM-0-13-centos dockerd[2892]: time="2020-09-09T20:52:42.629606252+08:00" level=info msg="scheme \"unix\" not registered, fallback to default scheme" moduleSep 09 20:52:42 VM-0-13-centos dockerd[2892]: time="2020-09-09T20:52:42.629625959+08:00" level=info msg="ccResolverWrapper: sending update to cc: {[{unix:///run/containerdSep 09 20:52:42 VM-0-13-centos dockerd[2892]: time="2020-09-09T20:52:42.629646468+08:00" level=info msg="ClientConn switching balancer to \"pick_first\"" module=grpcSep 09 20:52:42 VM-0-13-centos dockerd[2892]: time="2020-09-09T20:52:42.657116313+08:00" level=info msg="parsed scheme: \"unix\"" module=grpcSep 09 20:52:42 VM-0-13-centos dockerd[2892]: time="2020-09-09T20:52:42.657133475+08:00" level=info msg="scheme \"unix\" not registered, fallback to default scheme" moduleSep 09 20:52:42 VM-0-13-centos dockerd[2892]: time="2020-09-09T20:52:42.657154884+08:00" level=info msg="ccResolverWrapper: sending update to cc: {[{unix:///run/containerdSep 09 20:52:42 VM-0-13-centos dockerd[2892]: time="2020-09-09T20:52:42.657164342+08:00" level=info msg="ClientConn switching balancer to \"pick_first\"" module=grpcSep 09 20:52:42 VM-0-13-centos dockerd[2892]: time="2020-09-09T20:52:42.732941928+08:00" level=info msg="Loading containers: start."Sep 09 20:52:43 VM-0-13-centos dockerd[2892]: time="2020-09-09T20:52:43.188311195+08:00" level=info msg="Default bridge (docker0) is assigned with an IP address 172.17.0.0Sep 09 20:52:43 VM-0-13-centos dockerd[2892]: time="2020-09-09T20:52:43.272636641+08:00" level=info msg="Loading containers: done."Sep 09 20:52:43 VM-0-13-centos dockerd[2892]: time="2020-09-09T20:52:43.302885191+08:00" level=info msg="Docker daemon" commit=48a66213fe graphdriver(s)=overlay2 version=1Sep 09 20:52:43 VM-0-13-centos dockerd[2892]: time="2020-09-09T20:52:43.302965921+08:00" level=info msg="Daemon has completed initialization"Sep 09 20:52:43 VM-0-13-centos dockerd[2892]: time="2020-09-09T20:52:43.351340496+08:00" level=info msg="API listen on /var/run/docker.sock"Sep 09 20:52:43 VM-0-13-centos systemd[1]: Started Docker Application Container Engine.Sep 09 21:07:00 VM-0-13-centos dockerd[2892]: time="2020-09-09T21:07:00.395367002+08:00" level=info msg="Processing signal 'terminated'"Sep 09 21:07:00 VM-0-13-centos dockerd[2892]: time="2020-09-09T21:07:00.396811522+08:00" level=info msg="Daemon shutdown complete"
2、dockerd的日志
当然了,除了docker引擎外,docker的守护进程dockerd的日志也是很重要的,这个日志可以在/var/log/message下看到
[root@VM-0-13-centos ~]# cat /var/log/messages  | grep docker
Aug 31 11:37:59 VM-0-13-centos java: #033[2m2020-08-31 11:37:59.147#033[0;39m #033[31mERROR#033[0;39m #033[35m15222#033[0;39m #033[2m---#033[0;39m #033[2m[  XNIO-1 task-9]#033[0;39m #033[36mio.undertow.request                     #033[0;39m #033[2m:#033[0;39m UT005023: Exception handling request to /docker/.env
Sep  5 23:14:52 VM-0-13-centos java: #033[2m2020-09-05 23:14:52.814#033[0;39m #033[32m INFO#033[0;39m #033[35m15222#033[0;39m #033[2m---#033[0;39m #033[2m[ XNIO-1 task-12]#033[0;39m #033[36mr.h.app.handler.file.LocalFileHandler   #033[0;39m #033[2m:#033[0;39m Uploading file: [docker.jpg]to directory: [/root/.halo/upload/2020/09/docker-dfacc9d2b0444275b22298504b7f87b0.jpg]
Sep  5 23:14:52 VM-0-13-centos java: #033[2m2020-09-05 23:14:52.906#033[0;39m #033[32m INFO#033[0;39m #033[35m15222#033[0;39m #033[2m---#033[0;39m #033[2m[ XNIO-1 task-12]#033[0;39m #033[36mr.h.app.handler.file.LocalFileHandler   #033[0;39m #033[2m:#033[0;39m Uploaded file: [docker.jpg] to directory: [/root/.halo/upload/2020/09/docker-dfacc9d2b0444275b22298504b7f87b0.jpg] successfully
Sep  9 20:51:36 VM-0-13-centos yum[2561]: Installed: 1:docker-ce-cli-19.03.12-3.el7.x86_64
Sep  9 20:51:55 VM-0-13-centos yum[2561]: Installed: 3:docker-ce-19.03.12-3.el7.x86_64
Sep  9 20:52:42 VM-0-13-centos dockerd: time="2020-09-09T20:52:42.628747216+08:00" level=info msg="Starting up"
Sep  9 20:52:42 VM-0-13-centos dockerd: time="2020-09-09T20:52:42.629590473+08:00" level=info msg="parsed scheme: \"unix\"" module=grpc
Sep  9 20:52:42 VM-0-13-centos dockerd: time="2020-09-09T20:52:42.629606252+08:00" level=info msg="scheme \"unix\" not registered, fallback to default scheme" module=grpc
Sep  9 20:52:42 VM-0-13-centos dockerd: time="2020-09-09T20:52:42.629625959+08:00" level=info msg="ccResolverWrapper: sending update to cc: {[{unix:///run/containerd/containerd.sock 0  <nil>}] <nil>}" module=grpc
Sep  9 20:52:42 VM-0-13-centos dockerd: time="2020-09-09T20:52:42.629646468+08:00" level=info msg="ClientConn switching balancer to \"pick_first\"" module=grpc
Sep  9 20:52:42 VM-0-13-centos dockerd: time="2020-09-09T20:52:42.657116313+08:00" level=info msg="parsed scheme: \"unix\"" module=grpc
Sep  9 20:52:42 VM-0-13-centos dockerd: time="2020-09-09T20:52:42.657133475+08:00" level=info msg="scheme \"unix\" not registered, fallback to default scheme" module=grpc
Sep  9 20:52:42 VM-0-13-centos dockerd: time="2020-09-09T20:52:42.657154884+08:00" level=info msg="ccResolverWrapper: sending update to cc: {[{unix:///run/containerd/containerd.sock 0  <nil>}] <nil>}" module=grpc
Sep  9 20:52:42 VM-0-13-centos dockerd: time="2020-09-09T20:52:42.657164342+08:00" level=info msg="ClientConn switching balancer to \"pick_first\"" module=grpc
Sep  9 20:52:42 VM-0-13-centos dockerd: time="2020-09-09T20:52:42.732941928+08:00" level=info msg="Loading containers: start."
Sep  9 20:52:43 VM-0-13-centos dockerd: time="2020-09-09T20:52:43.188311195+08:00" level=info msg="Default bridge (docker0) is assigned with an IP address 172.17.0.0/16. Daemon option --bip can be used to set a preferred IP address"
Sep  9 20:52:43 VM-0-13-centos kernel: IPv6: ADDRCONF(NETDEV_UP): docker0: link is not ready
Sep  9 20:52:43 VM-0-13-centos dockerd: time="2020-09-09T20:52:43.272636641+08:00" level=info msg="Loading containers: done."
Sep  9 20:52:43 VM-0-13-centos dockerd: time="2020-09-09T20:52:43.302885191+08:00" level=info msg="Docker daemon" commit=48a66213fe graphdriver(s)=overlay2 version=19.03.12
但是这里的日志仅有info级别的日志,那么当出现故障时,info日志所能提供的信息不足以定位问题,那么我们还有什么方案吗?
3、开启debug模式
所幸docker提供了debug模式,我们可以通过以下方案开启docker debug’模式
[root@VM-0-13-centos ~]# vim /etc/docker/daemon.json

{
  "debug": true
}
[root@VM-0-13-centos ~]# systemctl restart docker
[root@VM-0-13-centos ~]# cat /var/log/messages  | grep docker
...
Sep  9 21:07:00 VM-0-13-centos dockerd: time="2020-09-09T21:07:00.601081289+08:00" level=debug msg="/usr/sbin/iptables, [--wait -t nat -C DOCKER -i docker0 -j RETURN]"
Sep  9 21:07:00 VM-0-13-centos dockerd: time="2020-09-09T21:07:00.601999104+08:00" level=debug msg="/usr/sbin/iptables, [--wait -t nat -I DOCKER -i docker0 -j RETURN]"
Sep  9 21:07:00 VM-0-13-centos dockerd: time="2020-09-09T21:07:00.603158551+08:00" level=debug msg="/usr/sbin/iptables, [--wait -D FORWARD -i docker0 -o docker0 -j DROP]"
Sep  9 21:07:00 VM-0-13-centos dockerd: time="2020-09-09T21:07:00.604079844+08:00" level=debug msg="/usr/sbin/iptables, [--wait -t filter -C FORWARD -i docker0 -o docker0 -j ACCEPT]"
Sep  9 21:07:00 VM-0-13-centos dockerd: time="2020-09-09T21:07:00.604982732+08:00" level=debug msg="/usr/sbin/iptables, [--wait -I FORWARD -i docker0 -o docker0 -j ACCEPT]"
Sep  9 21:07:00 VM-0-13-centos dockerd: time="2020-09-09T21:07:00.606151257+08:00" level=debug msg="/usr/sbin/iptables, [--wait -t filter -C FORWARD -i docker0 ! -o docker0 -j ACCEPT]"
Sep  9 21:07:00 VM-0-13-centos dockerd: time="2020-09-09T21:07:00.607341592+08:00" level=debug msg="/usr/sbin/iptables, [--wait -I FORWARD -i docker0 ! -o docker0 -j ACCEPT]"
Sep  9 21:07:00 VM-0-13-centos dockerd: time="2020-09-09T21:07:00.608580297+08:00" level=debug msg="/usr/sbin/iptables, [--wait -t nat -C PREROUTING -m addrtype --dst-type LOCAL -j DOCKER]"
Sep  9 21:07:00 VM-0-13-centos dockerd: time="2020-09-09T21:07:00.609383619+08:00" level=debug msg="/usr/sbin/iptables, [--wait -t nat -C PREROUTING -m addrtype --dst-type LOCAL -j DOCKER]"
Sep  9 21:07:00 VM-0-13-centos dockerd: time="2020-09-09T21:07:00.610942203+08:00" level=debug msg="/usr/sbin/iptables, [--wait -t nat -C OUTPUT -m addrtype --dst-type LOCAL -j DOCKER ! --dst 127.0.0.0/8]"
Sep  9 21:07:00 VM-0-13-centos dockerd: time="2020-09-09T21:07:00.612121918+08:00" level=debug msg="/usr/sbin/iptables, [--wait -t nat -C OUTPUT -m addrtype --dst-type LOCAL -j DOCKER ! --dst 127.0.0.0/8]"
Sep  9 21:07:00 VM-0-13-centos dockerd: time="2020-09-09T21:07:00.613059021+08:00" level=debug msg="/usr/sbin/iptables, [--wait -t filter -C FORWARD -o docker0 -j DOCKER]"
Sep  9 21:07:00 VM-0-13-centos dockerd: time="2020-09-09T21:07:00.613950006+08:00" level=debug msg="/usr/sbin/iptables, [--wait -I FORWARD -o docker0 -j DOCKER]"
Sep  9 21:07:00 VM-0-13-centos dockerd: time="2020-09-09T21:07:00.614886437+08:00" level=debug msg="/usr/sbin/iptables, [--wait -t filter -C FORWARD -o docker0 -m conntrack --ctstate RELATED,ESTABLISHED -j ACCEPT]"
Sep  9 21:07:00 VM-0-13-centos dockerd: time="2020-09-09T21:07:00.615944175+08:00" level=debug msg="/usr/sbin/iptables, [--wait -I FORWARD -o docker0 -m conntrack --ctstate RELATED,ESTABLISHED -j ACCEPT]"
Sep  9 21:07:00 VM-0-13-centos dockerd: time="2020-09-09T21:07:00.617012611+08:00" level=debug msg="/usr/sbin/iptables, [--wait -t filter -C FORWARD -j DOCKER-ISOLATION-STAGE-1]"
...
可以看到debug模式下,iptables规则创建是非常清晰的,当然了,开启debug的方式还是有很多的
1、修改日志级别为debug,这个方式不可以和开启debug模式并存,会导致启动失败 vim /etc/docker/daemon.json { “log-level”: “debug” } 2、先停止docker,再执行如下命令 dockerd —log-level debug dockerd -l debug
可以说这是一个处理docker异常的利器,也帮助过我解决了很多的棘手问题。
二、docker一些高级命令的使用
1、docker系统状态
1.1、docker system df
在上一篇章里,我们认识了image,同时也认识了UnionFS这一文件系统,这也带来一个问题,通过docker images无法真正认识到image使用了多少存储空间
[root@VM-0-13-centos ~]# docker images
REPOSITORY          TAG                 IMAGE ID            CREATED             SIZE
nginx               test                b2ead77fc9af        16 seconds ago      141MB nginx               latest              4bb46517cac3        3 weeks ago         133MB
通过nginx:latest镜像创建nginx:test镜像,通过docker images查看到的镜像所占空间总和为141+133 也就是274M,但事实真的如此吗?我们可以看一下文件系统overlay2的空间,可以认为这个空间使用量近乎为images实际使用空间大小
[root@VM-0-13-centos docker]# du -sh overlay2/
149M    overlay2/
可以看到,仅有149M。而docker提供了docker system df命令可以看到docker的磁盘占用
[root@VM-0-13-centos docker]# docker system df
TYPE                TOTAL               ACTIVE              SIZE                RECLAIMABLE
Images  2                   1                   141MB               141MB (100%)
Containers          1                   0                   1.114kB             1.114kB (100%)
Local Volumes       0                   0                   0B                  0B
Build Cache         0                   0                   0B                  0B
这里清晰地展示了,空间使用为141M,这也为清理空间提供了度量的标准。
1.2、docker system events
除此之外,docker system还可以获得docker的实时事件,我们打开两个终端,并在一个终端内操作,而另一个终端内查看实时事件
[root@VM-0-13-centos docker]# docker run -d nginx 7
042ffd3c291150a0180e3879d9632ee82145d50662d581891ae21e2fcc67bf9
[root@VM-0-13-centos docker]# docker  ps -a
CONTAINER ID        IMAGE               COMMAND                  CREATED             STATUS                      PORTS               NAMES
7042ffd3c291        nginx               "/docker-entrypoint.…"   37 seconds ago      Up 36 seconds               80/tcp              serene_villani
14476a7ee535        nginx               "/docker-entrypoint.…"   49 minutes ago      Exited (0) 31 minutes ago                       relaxed_bohr
[root@VM-0-13-centos docker]# docker rm
14476a7ee535  14476a7ee535
[root@VM-0-13-centos docker]# docker stop 7042ffd3c291 7042ffd3c291
[root@VM-0-13-centos docker]# docker rm 7042ffd3c291 7042ffd3c291
[root@VM-0-13-centos ~]# docker system events
2020-09-09T22:03:33.971697001+08:00 container create 7042ffd3c291150a0180e3879d9632ee82145d50662d581891ae21e2fcc67bf9 (image=nginx, maintainer=NGINX Docker Maintainers <docker-maint@nginx.com>, name=serene_villani)
2020-09-09T22:03:34.000975395+08:00 network connect 1ac84996ba0384fba699dda0592047fcb66c1c2ca595fce3c21bc770e6bb50ef (container=7042ffd3c291150a0180e3879d9632ee82145d50662d581891ae21e2fcc67bf9, name=bridge, type=bridge)
2020-09-09T22:03:34.201250017+08:00 container start 7042ffd3c291150a0180e3879d9632ee82145d50662d581891ae21e2fcc67bf9 (image=nginx, maintainer=NGINX Docker Maintainers <docker-maint@nginx.com>, name=serene_villani)
2020-09-09T22:04:28.694443162+08:00 container destroy 14476a7ee53502db003352d92acad1ba6646d2d8bbadd0651d8bc32e4421f687 (image=nginx, maintainer=NGINX Docker Maintainers <docker-maint@nginx.com>, name=relaxed_bohr)
2020-09-09T22:06:03.281628948+08:00 container kill 7042ffd3c291150a0180e3879d9632ee82145d50662d581891ae21e2fcc67bf9 (image=nginx, maintainer=NGINX Docker Maintainers <docker-maint@nginx.com>, name=serene_villani, signal=15)
2020-09-09T22:06:03.333752851+08:00 container die 7042ffd3c291150a0180e3879d9632ee82145d50662d581891ae21e2fcc67bf9 (exitCode=0, image=nginx, maintainer=NGINX Docker Maintainers <docker-maint@nginx.com>, name=serene_villani)
2020-09-09T22:06:03.364630265+08:00 network disconnect 1ac84996ba0384fba699dda0592047fcb66c1c2ca595fce3c21bc770e6bb50ef (container=7042ffd3c291150a0180e3879d9632ee82145d50662d581891ae21e2fcc67bf9, name=bridge, type=bridge)
2020-09-09T22:06:03.404858530+08:00 container stop 7042ffd3c291150a0180e3879d9632ee82145d50662d581891ae21e2fcc67bf9 (image=nginx, maintainer=NGINX Docker Maintainers <docker-maint@nginx.com>, name=serene_villani)
2020-09-09T22:06:09.933835238+08:00 container destroy 7042ffd3c291150a0180e3879d9632ee82145d50662d581891ae21e2fcc67bf9 (image=nginx, maintainer=NGINX Docker Maintainers <docker-maint@nginx.com>, name=serene_villani)
当创建容器时,第一个事件为创建容器7042ffd3c291150a,第二个事件为链接网络到容器7042ffd3c291150a,第三个事件为启动容器7042ffd3c291150a,第四个事件为删除容器14476a7ee53502db00,第五个事件为停止容器7042ffd3c291150a,第七个事件为容器死亡(用的die来描述),第八个事件为断开7042ffd3c291150a的网络连接,第九个事件为停止容器7042ffd3c291150a,第十个事件为删除容器7042ffd3c291150a,这个命令可以获取每一个,对于学习容器的业务逻辑,以及定位问题也是有着巨大的帮助的。
1.3、docker system prune
在上一篇章,我们通过docker images -f “dangling=true” 或者docker images prune -a来清理无用的镜像,docker 还提供了docker system prune命令,我们可以看一下效果
[root@VM-0-13-centos docker]# docker system prune
WARNING! This will remove:
  - all stopped containers
  - all networks not used by at least one container
  - all dangling images
  - all dangling build cache
可以看到清理的十分彻底,包括停止的容器,未使用的网络,dangling镜像,还有dangling镜像的缓存。不过这也代表命令很危险,特别是对于容器,谨慎使用,避免误删误停止的容器。
1.4 、docker system info
这个和docker info相同,展示docker配置的信息
2、关于内核参数
在使用linux时,调优内核参数是我们经常做的事情,但是容器适合宿主机共享内核参数,这个就导致无法在容器内修改内核参数,针对这一问题,只能是通过启动参数来进行修改
[root@VM-0-13-centos ~]# docker run --help ... --sysctl map Sysctl options (default map[]) --ulimit ulimit Ulimit options (default []) ...
之前就遇到过nginx的镜像句柄数不够,导致的访问异常的慢,最终通过修改nginx启动参数,优化句柄数后解决了此问题。
3、关于资源限值
容器在使用中有一个很重要的点,就是cgroup实现的资源隔离,将资源进行限制,实现资源利用最大化,docker在这个方面提供了丰富的参数供管理员使用
[root@VM-0-13-centos ~]# docker run --help
...
--cpu-period int                 Limit CPU CFS (Completely Fair Scheduler) period
--cpu-quota int                  Limit CPU CFS (Completely Fair Scheduler) quota
--cpu-rt-period int              Limit CPU real-time period in microseconds
--cpu-rt-runtime int             Limit CPU real-time runtime in microseconds
--device-read-bps list           Limit read rate (bytes per second) from a device (default [])
--device-read-iops list          Limit read rate (IO per second) from a device (default [])
--device-write-bps list          Limit write rate (bytes per second) to a device (default [])
--device-write-iops list         Limit write rate (IO per second) to a device (default [])
--memory bytes                   Memory limit --memory-reservation bytes       Memory soft limit
--memory-swap bytes              Swap limit equal to memory plus swap: '-1' to enable unlimited swap
...
资源限制在容器化内是十分重要的,首先避免某个容器因为死循环或其他原因导致资源使用率飙高,导致资源血崩,而使整个节点挂掉,使服务中断。
4、关于镜像仓库
镜像作为docker的部署包,给用户带来了便利,我们可以从docker hub或者是各大云厂商的镜像仓库拉取我们需要的镜像,但是出于项目的保密性,私有仓库成为了各个公司所需求的一个工具,那么私有仓库又有哪些呢?
4.1、Docker Registry
Docker Registry是docker提供的一个镜像仓库,这个镜像仓库也是通过docker run的方式启动。这一仓库作为docker原生的Registry,继承了容器这一轻量级的理念,整个镜像仅有26.2MB,同时作为原生仓库,将数据目录打包后,可以在任何环境下部署此仓库,为项目迁移带来了极大的便利。但与此同时,Registry也牺牲了很多功能,存在巨大的劣势,那就是,没有ui,仅可以通过调用接口来进行操作,导致Registry在使用上存在巨大的门槛。
4.2、harbor
harbor 是vmware公司开源出来的镜像仓库,也是当前最为流行的私有仓库,并且在2018年加入了CNCF成为孵化项目。harbor自身集成Core Service 、Job Service 、Admin Service 可以实现认证,仓库管理,镜像管理,项目管理,定时任务配置等等功能,还集成了镜像扫描,镜像同步,开源版高可用等诸多优势,借助于mysql,redis,公共存储等,也可以实现harbor无状态应用化,从而增强harbor集群的高并发能力。
4.3、nexus
nexus作为一个制品管理工具,支持docker镜像管理,但是由于开源版不支持高可用,同时nexus又会集成maven私服,node私服等,导致nexus服务压力过大,所以不太推荐。
4.4、jfrog
jfrog也是一个专门管理制品的工具,这一工具的优势是支持全语言制品管理,但是不足在于需要购买商业版,开源版所能使用的功能太少,所以也不太推荐。
4.5、harbor高可用架构
4.5.1、方案一
架构图如下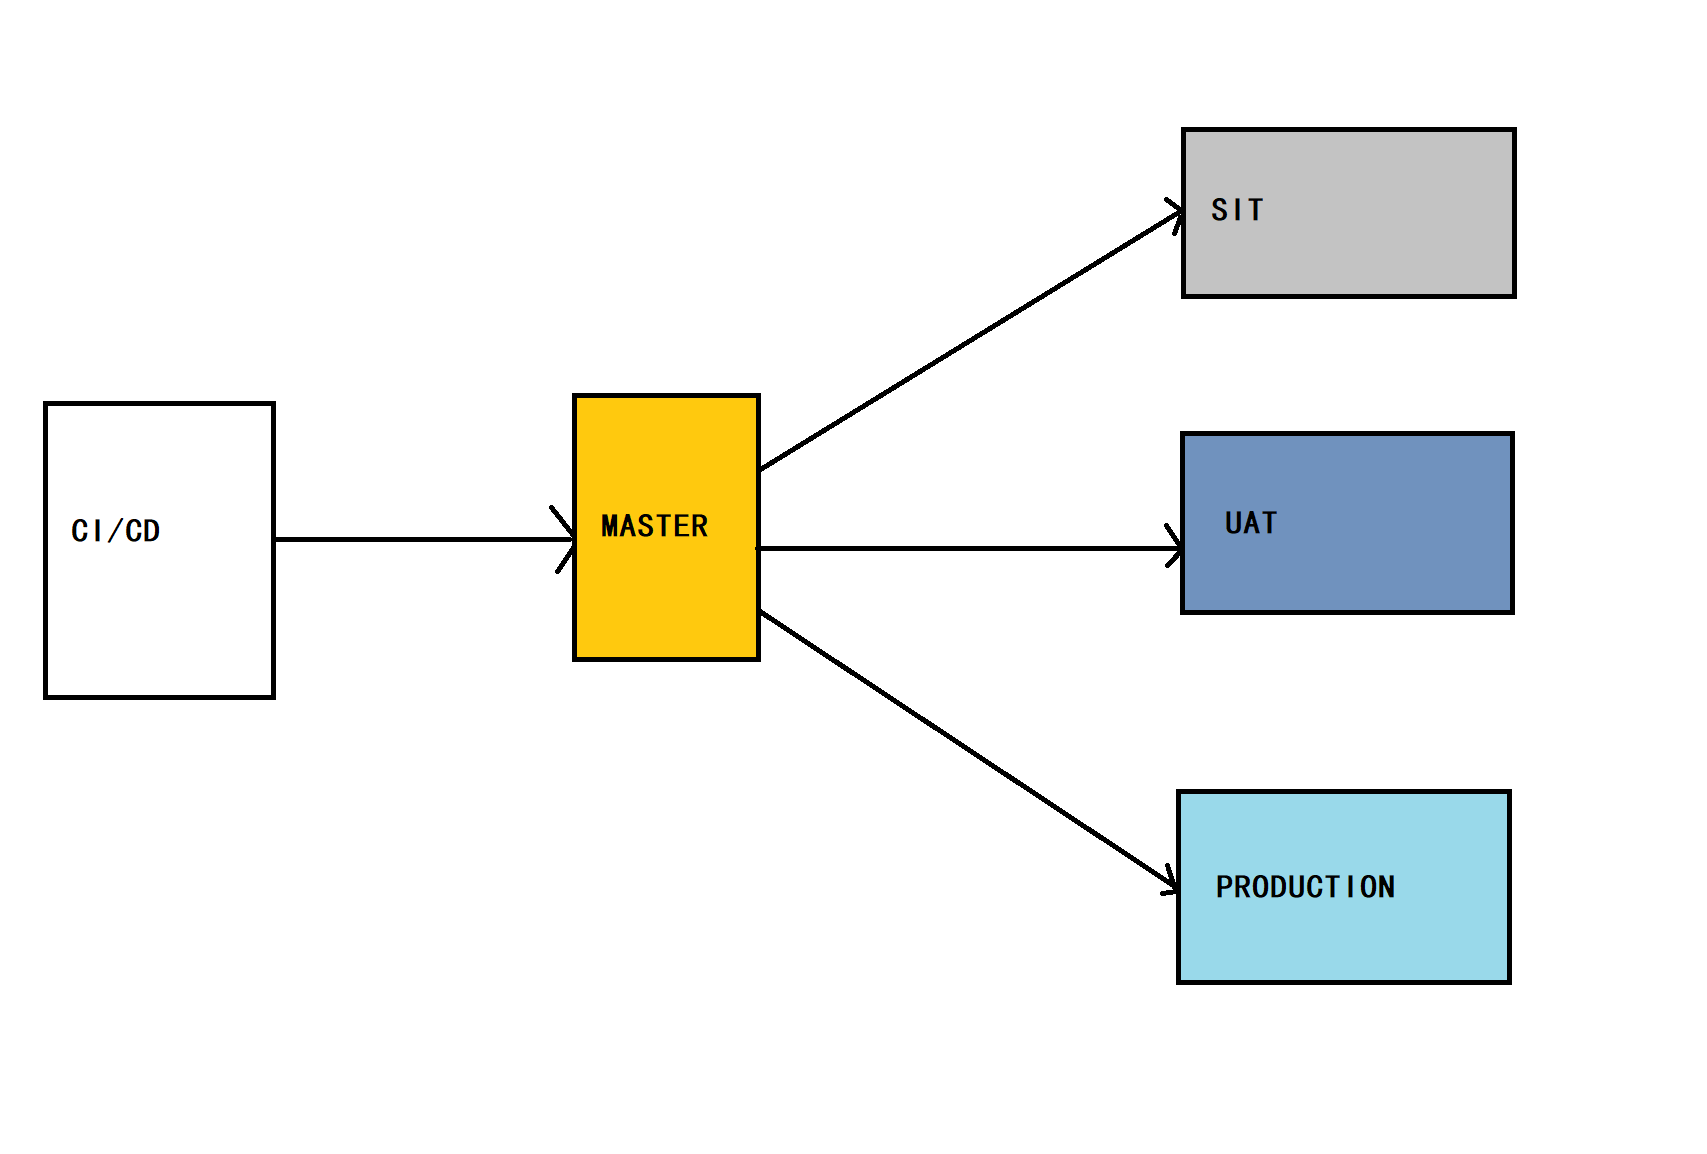
当镜像构建完毕推送到harbor 的master节点后,可通过事件,将tag为SIT环境的镜像同步到harbor的SIT节点上,实现为sit环境供给镜像,当通过测试后,可触发事件,调用API将tag为UAT的镜像推送到harbor的UAT节点上,为UAT节点供给镜像,当通过UAT测试后,可通过调用API将tag为production的镜像推送到harbor的PRODUCTION节点(此节点做好为集群,以应对大规模集群)上,为生产环境供给镜像。
2.5.2、方案二
架构图如下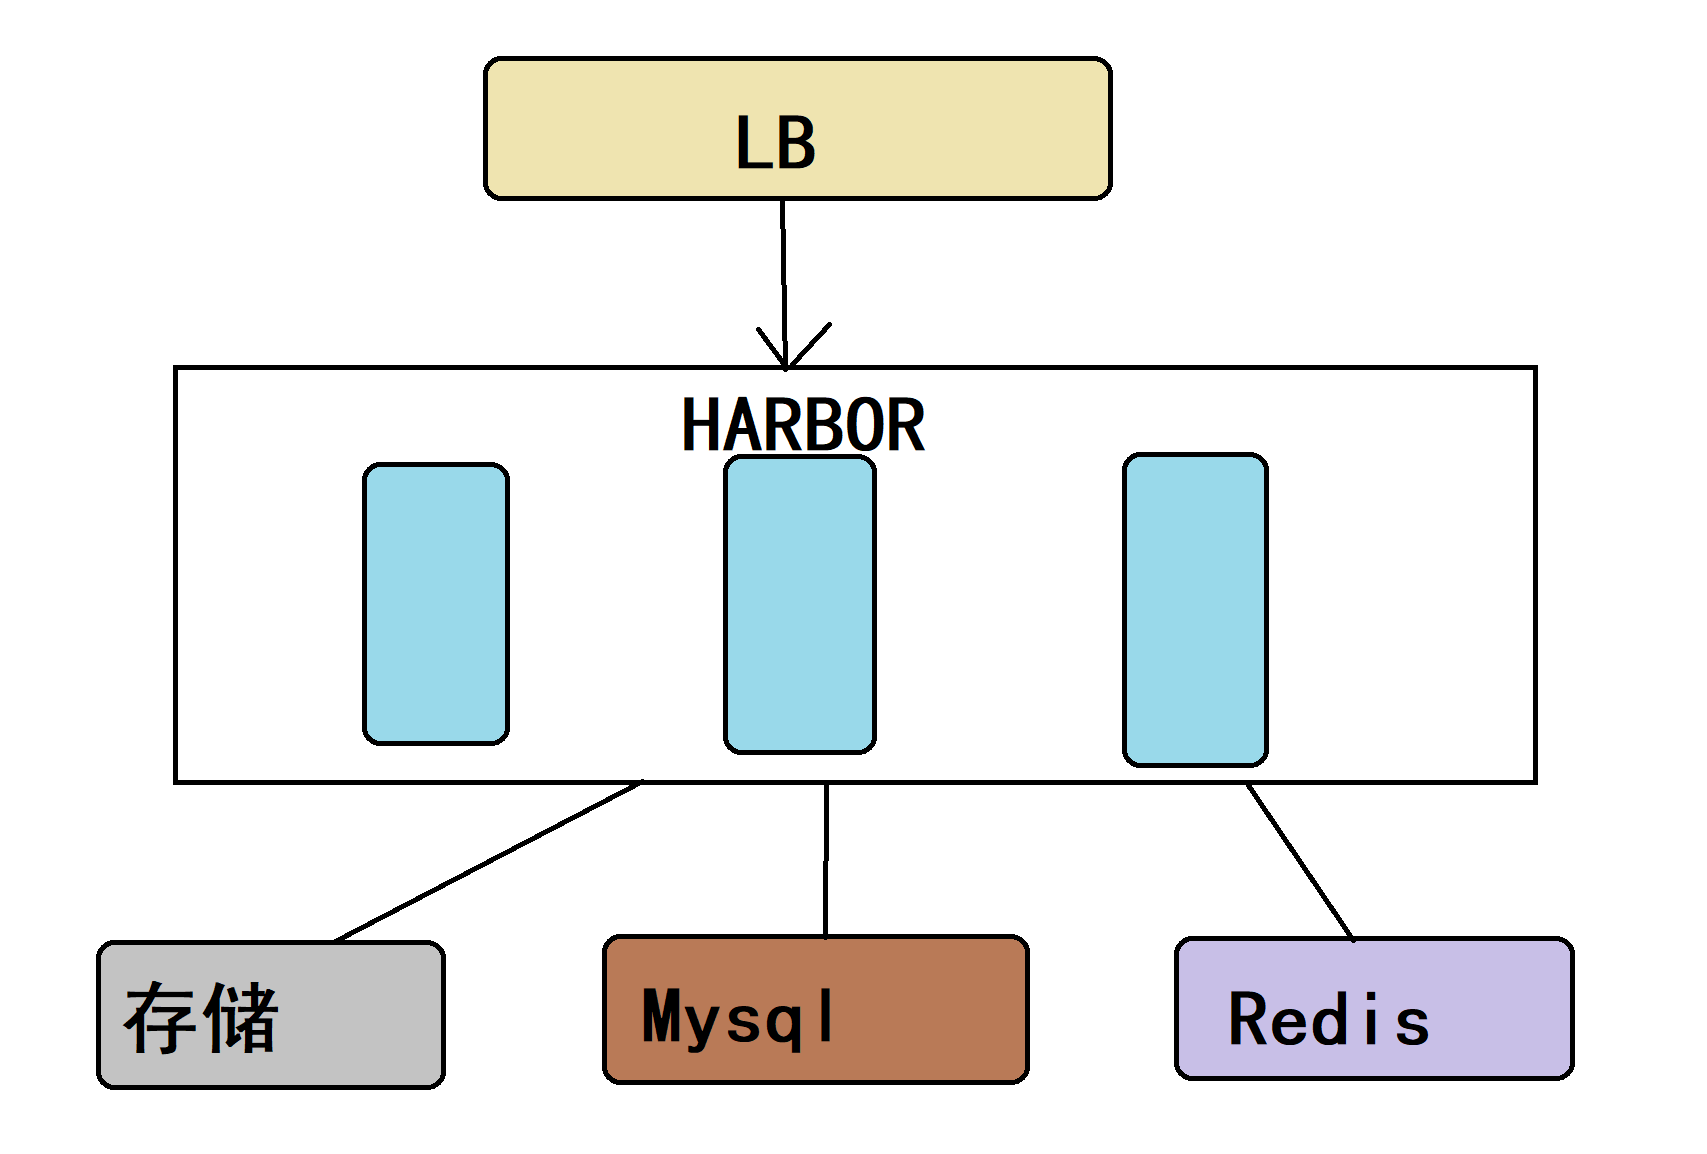
原理是通过本地仓库的API获取镜像的元数据mainfest,拿到分层hash,之后校验镜像分层是否已经上传到远端仓库,如果不存在,则推送到到远端仓库进行保存。

若有收获,就点个赞吧
0 人点赞
