- Videos operation guide
- Software related
- 001_how to check the software version and firmware version?
- 002_how to change the default settings for the official material
- Description
- 003_How to fix the dimension while import the DXF drawing from AI software to laserbox software
- 004_How to keep the size of the svg image imported into the laserbox software
- 005_How to check the firmware version of laserbox by laserbox debug page?
- Hardware related
- 001 How to switch the high and low voltage of the laser power (110V/220V)?
- 002_How to upgrade firmware for laserbox with SD card?
- 003_Upgrade firmware for Laserbox machine with special firmware upgrading tool
- 004_How to do the laser lauch by pressing the button on laser power?
- 005_How to do the laser lauch with laserbox software?
- 006_How to adjust the sensitivity of water level sensor?
- 007_How to replace the Clamp lifting seat
- 008_Operation of testing missing step issue
- 009_How to measure the supply voltage for smoke purifier motor?
- 010_How to do backlash test and how to judge whether the test result pass?
- Calibration
- Offline processing
- Machine Connection
- Filter Related
Videos operation guide
Please visit video operation guide in this link.
Software related
001_how to check the software version and firmware version?
Steps of checking software version
Open Laserbox software->Menu->Help->Check for Updates. Please refer to picture below: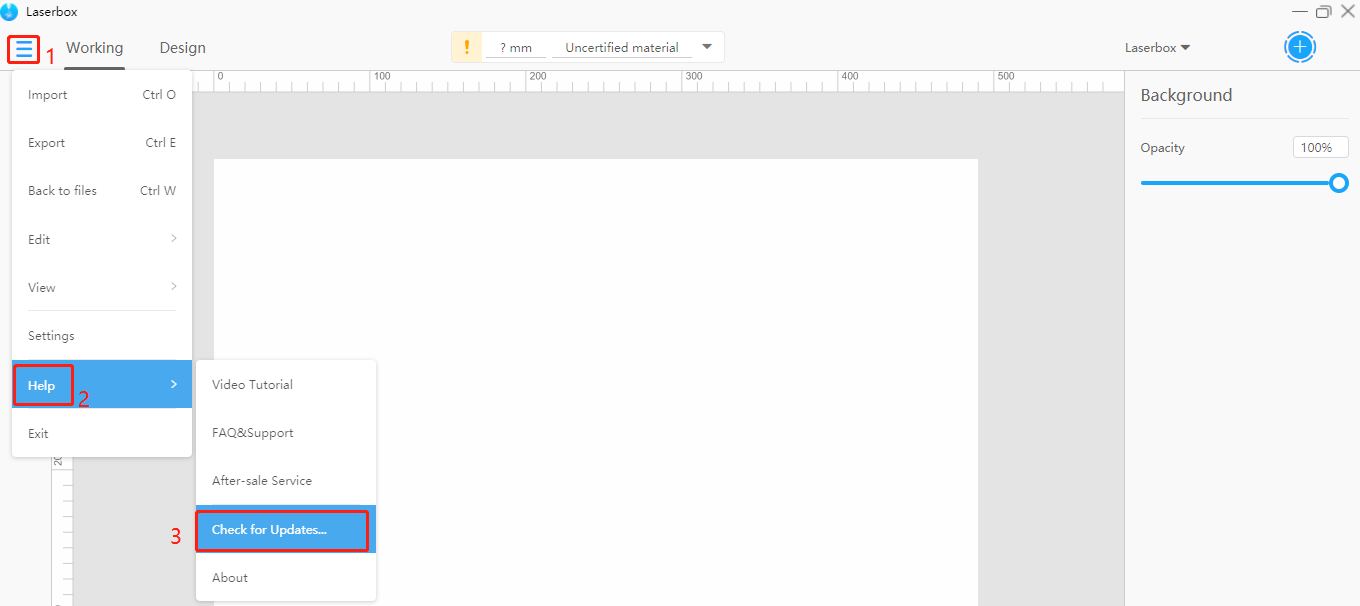
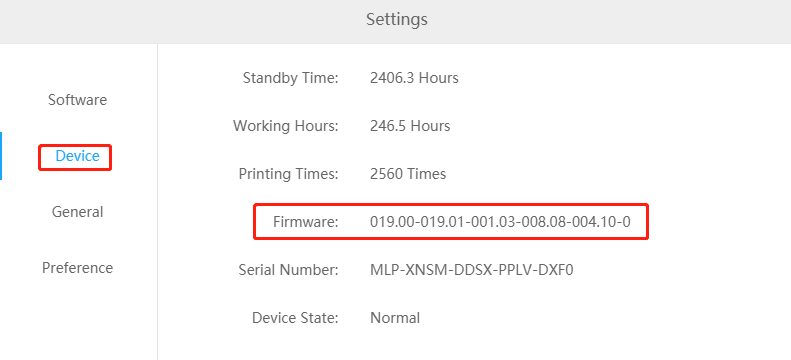
Steps of checking firmware version
Open Laserbox software and connect to Laserbox machine->Menu->Settings->Device. Please refer to pictures below: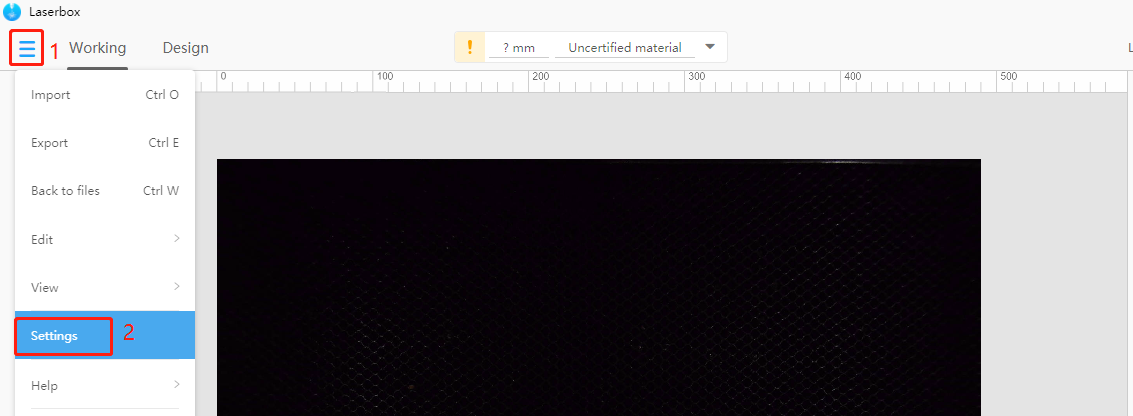
002_how to change the default settings for the official material
Description
With the natural aging of the laser tube, the power of the laser tube will decrease, which will lead to the official material can’t be cut through or engraved with the same effect as previously with the default settings. In this case, need to adjust the settings like increase the power value or decrease the speed value. Once figured out the best settings after several tests, you can change the default settings for the official material refer to steps below:
Operation Step
Step 1: Open the laserbox software and enter a new project page, then you will see the material selecting list on the top.
Step 2: Click on the lower triangle and click on the edit symbel for the particular material you want to modify the settings. Here I take “3mm basswood” as example: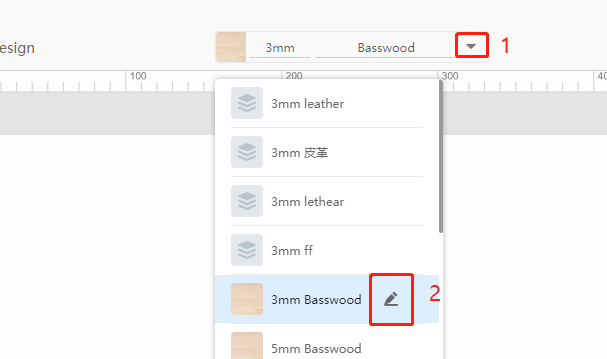
Step 3: Set appropriate parameters (power and speed) under engraving and cutting area respectively.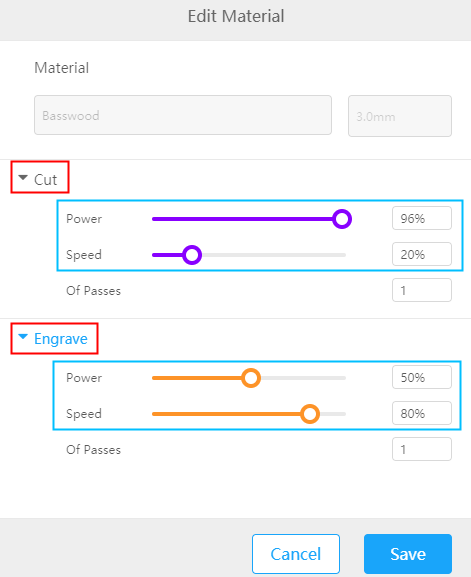
Step 4: Parameter Update: connect Laserbox to your computer and go to Menu > Settings > General, and click Update after Parameter Update.
Explaination for “Parameter Update”
Laserbox boasts multiple offline features, which empower it to identify Makeblock materials and set parameters when the laser cutter is offline. Parameter Update synchronizes the material list and processing parameters in the software into Laserbox, allowing the laser cutter to apply new parameter settings when used offline.
003_How to fix the dimension while import the DXF drawing from AI software to laserbox software
Step 1:
Select the file which you want to import to laserbox software,and Go to “File-Export-Export As” to set scaling size.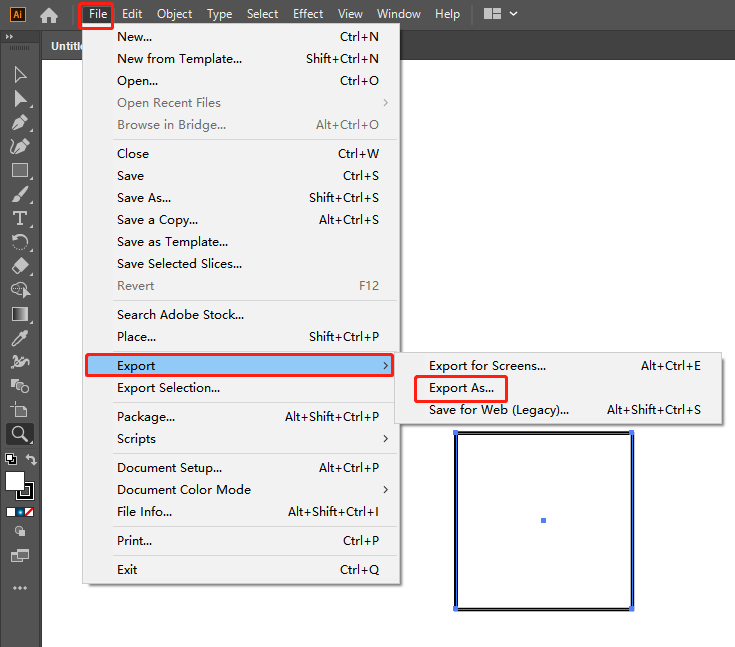
Step 2:
After pop-up below frame then select DXF format and click “Export” to set scaling size to 25.4mm for the drawing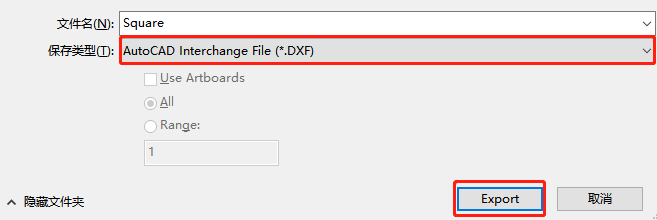
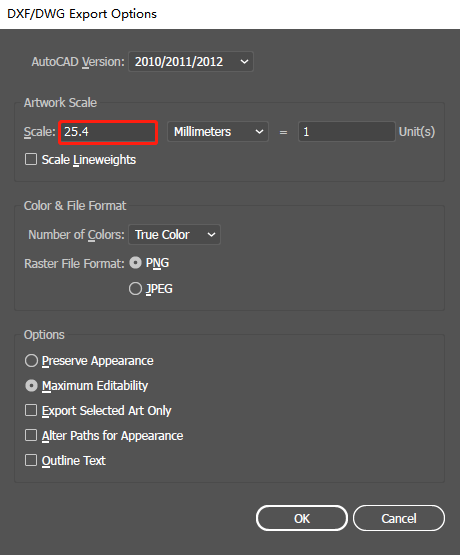
Step 3:
Select “Imperial” option while you import the file to laserbox software,then your file will be same size as your original dimension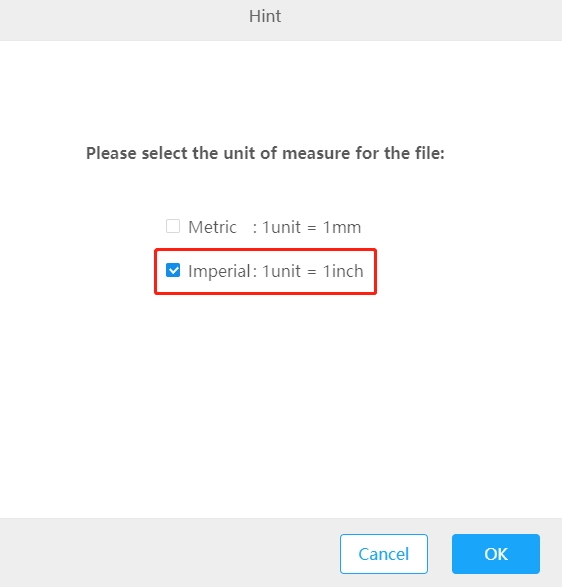
004_How to keep the size of the svg image imported into the laserbox software
Step 1: Record the size of the svg file you will use.
Step 2: Open the svg file with software ScaleSvg to mandatory fix size of the svg file by inputting its size and clicking on Mandatory set the size.ScaleSvg.rar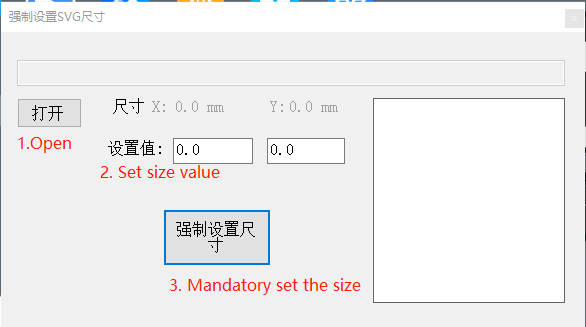
Step3: Import the svg file to the laserbox software and you will find the size won’t change.
005_How to check the firmware version of laserbox by laserbox debug page?
Descriptions
Sometime, the laserbox machine firmware version is blank when check by going to menu->settings->device page (it is blank after firmware version on this page). We can use the following way to check the device actual firmware version.
Steps
Step 1: Connect Laserbox machine to laserbox software.
Step 2: Open laserbox software debug page by pressing CTRL+F1 or CTRL+F1+Fn (Command + F1 for Mac) on windows computer.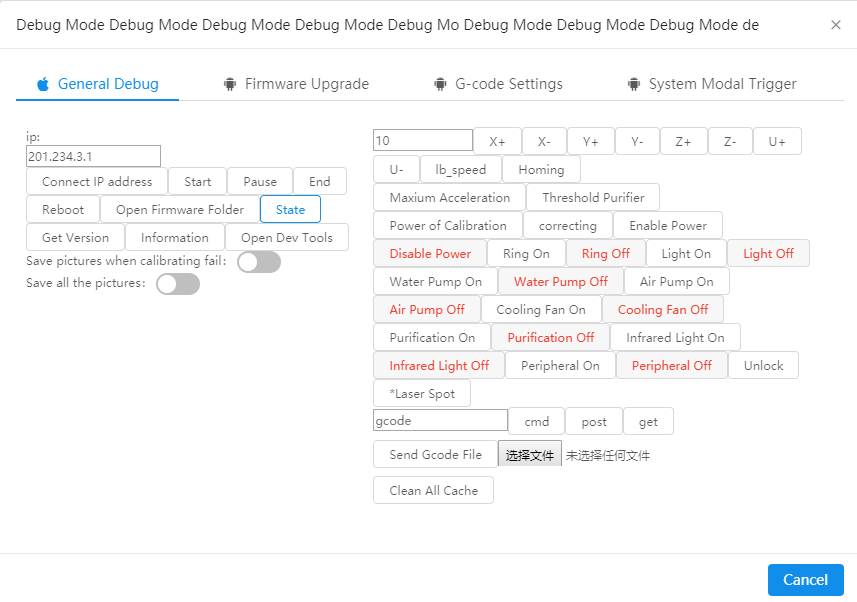
Step 3: Click on Get Version under “General”, several version numbers will appear and you can find the laserbox machine firmware version refer to annotations on picture below: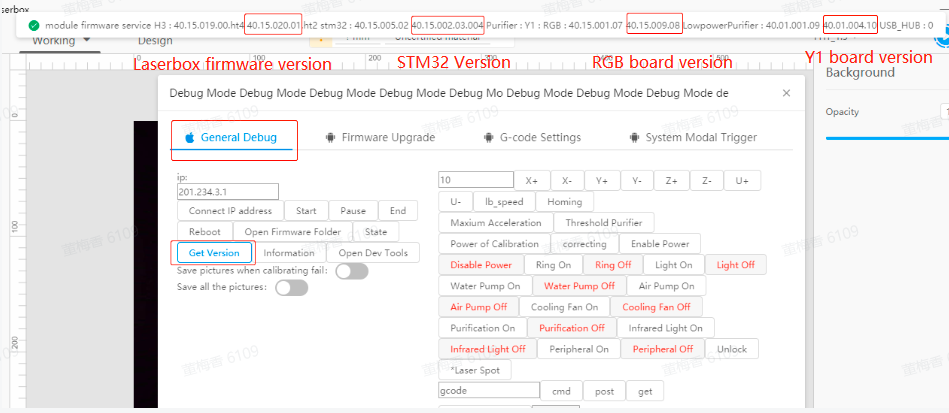
Hardware related
001 How to switch the high and low voltage of the laser power (110V/220V)?
Step 1: Make sure not power on the machine.
Step 2: Open the right shell of the machine refer to this video (only require watching from 0:00~1:44).
Step 3: The high and low voltage modes can be switched by adjusting the switch of the laser power, please refer to the following animation (The number 115 represents 110V voltage, 230 represents 220V voltage). If the local voltage is 220v, need pull the switch from 115 side to 230 side, vice versa.
【Note: the switch must be pulled to the correct power according to the local power, otherwise, it may cause damage on laser power or mainboard. Normally, there is no need to switch it since the machine was switched to correct power before sending out to corresponding country.】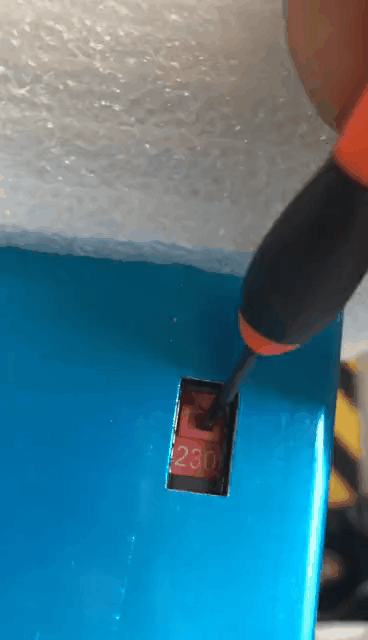
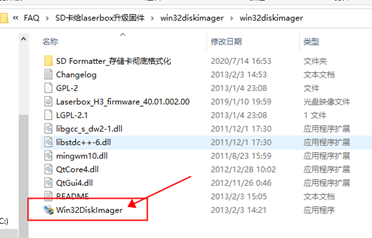
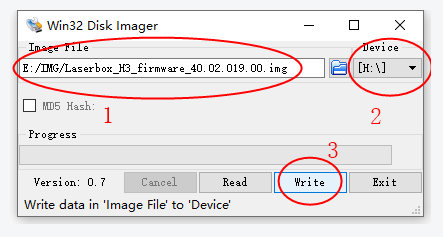
002_How to upgrade firmware for laserbox with SD card?
Note: Here take the firmware version 019 as example
Step1: Download and save the firmware “Laserbox_H3_firmware_40.02.019.00“ on the computer; Download and save the software tool “Diskmager“ on the computer.
Step 2: Insert the SD card to the card reader;
Step 3: Plug the card reader to the computer;
Step 4: Open the software tool “diskimager”, then write the firmware according to the picture guides below:
After the firmware was written to the SD card successfully, please follow the steps below to upgrade the firmware:
1. Insert the SD card into the Laserbox (Here I share a video to you how and where you can insert the SD card);
2. Close the cover and power on the Laserbox machine;
3. Wait for 10 minutes, the firmware will upgrade automatically;
4. Power off the machine;
5. Take out the SD card and assemble the parts on Laserbox.
003_Upgrade firmware for Laserbox machine with special firmware upgrading tool
Description
When you meet the problem that laserbox firmware upgrade failed leading to the machine unable to connect laserbox software with USB cable. In this case, we can try this way to upgrade laserbox firmware to fix the issue.
Steps
- Close the Laserbox software, then connect Laserbox mahine to computer with USB cable;
Open this link on the computer: http://201.234.3.1:8087/upgrade_version?machine_type=MLP&sub_version=V1&version=xxxxx
Please check if the picture below appears?, If you can see the message result:ok, then go to next step.

Download the file “Laserbox firmware upgrading tool“.
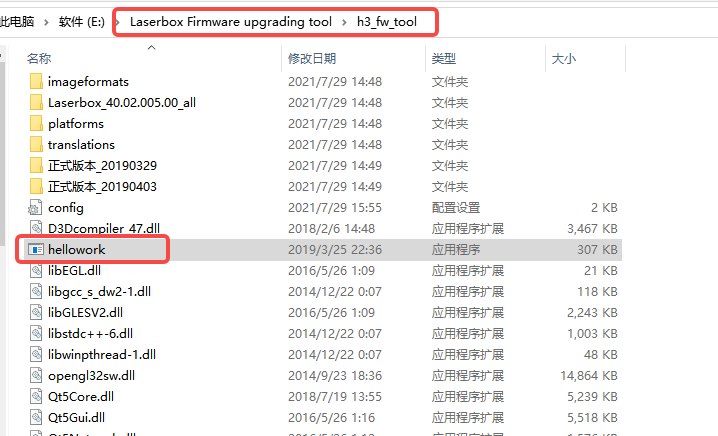
- Unzip the file and run the applicaiton “hellowork” under file h3_fw_tool;
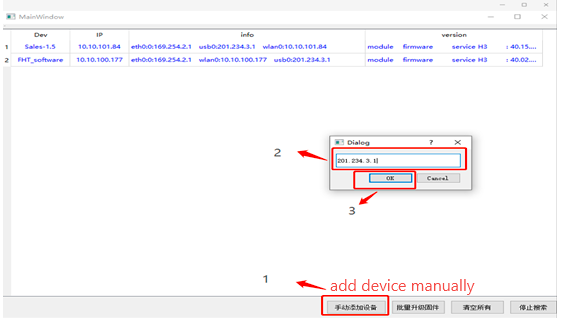
- Click on “add the device manually” and input the IP address “201.234.3.1 “, then click “okay”;
- Right click on the IP address and select “upgrading firmware zip package”;

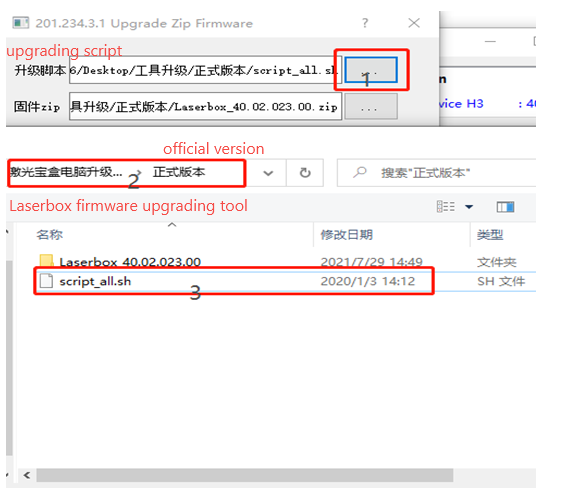
- Click on browse icon behind the “Upgrading Script” and return to previous folder. Then go to file Official Version and select “script_all”.
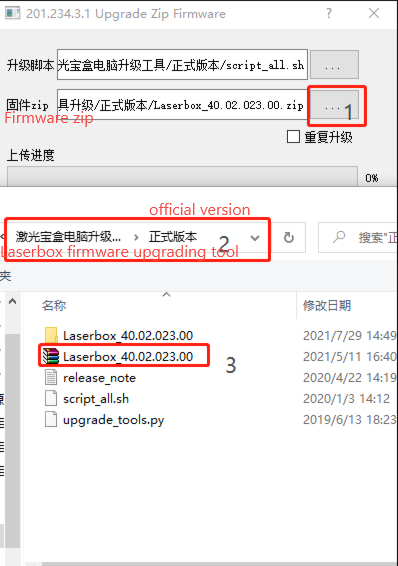
- Select the firmware: click on browse icon behind “Firmware Zip” and select the firmware file.
- Click on “Firmware Upgrading”, wait until it says “upgrade failed….” and actually it updates ok.
Note: 1. It will take some time during firmware updating, please wait patiently; 2. Notice the status of RGB circle led and see if it changs during firmware updating. If it does change, the firmware updating is normal.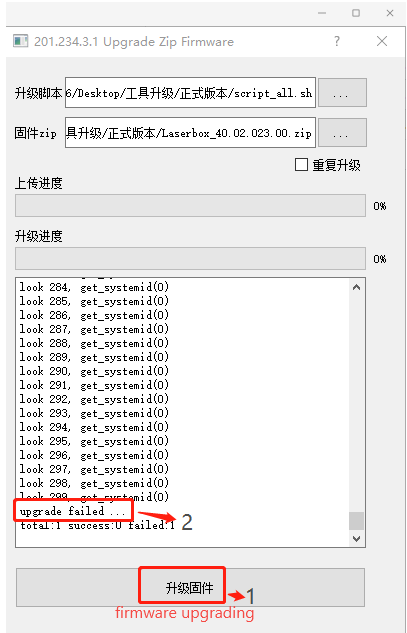
004_How to do the laser lauch by pressing the button on laser power?
Step1: Power off the machine and remove the power cord.
Step 2: Disassemble the right shells (only need remove two layers of the shells) of the Laserbox machine. Here is a video (only need watch the part from 0:00~1:41) showing how to disassemble the right shells.
Step 3: Please remove the control cable between the laser power (the blue one) and mainboard.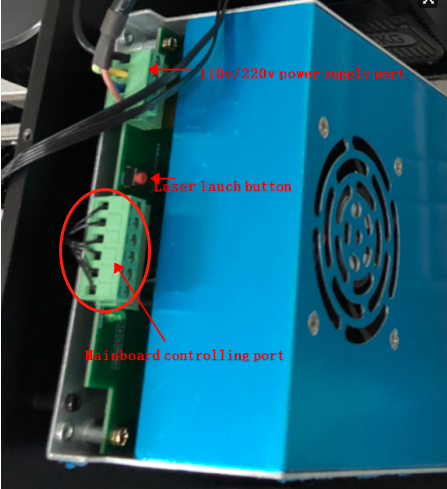
Step 4: Connect the power cord and power on the machine.
Note: please be very careful and don’t touch the cover of the laser power to ensure safty.
Step 5: Press the laser lauch button, then release the button immediately.
Note: please just short press the button to avide burning too much during laser lauch testing.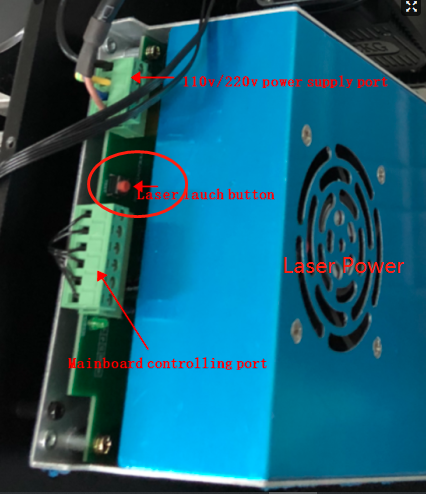
Step 6: Check if there is black dot on the masking tape and if it is in the center position.
Here is the video showing the steps of laser lauching by pressing the button.
Note: please connect all the cables back and assemble the shells of the machine after finished testing the laser path.
005_How to do the laser lauch with laserbox software?
Step 1: Open the laserbox software on the computer and connect laserbox machine on Laserbox machine.
Step2: Open the debug page of laserbox software by pressing CTRL+F1 or CTRL+Fn+F1 (for windows computer) and Command + F1 or Command + Fn+F1 (for Mac).
Step3: Move the laser head to right side alone the x axis by keeping pressing on X+ for a while.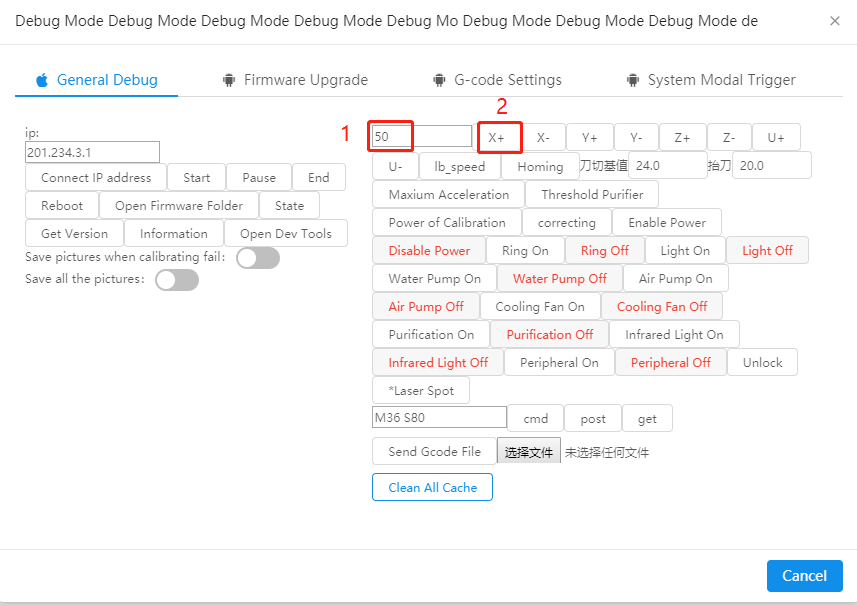
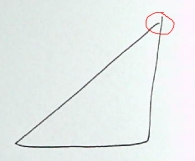
Step4: Paste a piece of crepe paper on the round hole of the metal shell on the right side of the laser head, and mark the position of the round hole and the X and Y coordinates on the crepe paper with a pen.
Step5: Do laser launch through the laserbox debug page refer to these steps:
1.Input the command M36 S80
2.Click on Peripheral On
3.Click on cmd
4.wait for 1 second and click on Peripheral off
Note:M36 is the gcode to open the laser, S80 is to set the power of the laser .The value range of the laser head power is between 0 and 1000. If the M36 S80 does not penetrate a point on the crepe paper, please increase the S value, such as M36 S150, M36 S180. If the punched point on the crepe paper is very big like a hole, please lower the S value, such as M36 S50, M36 S70. 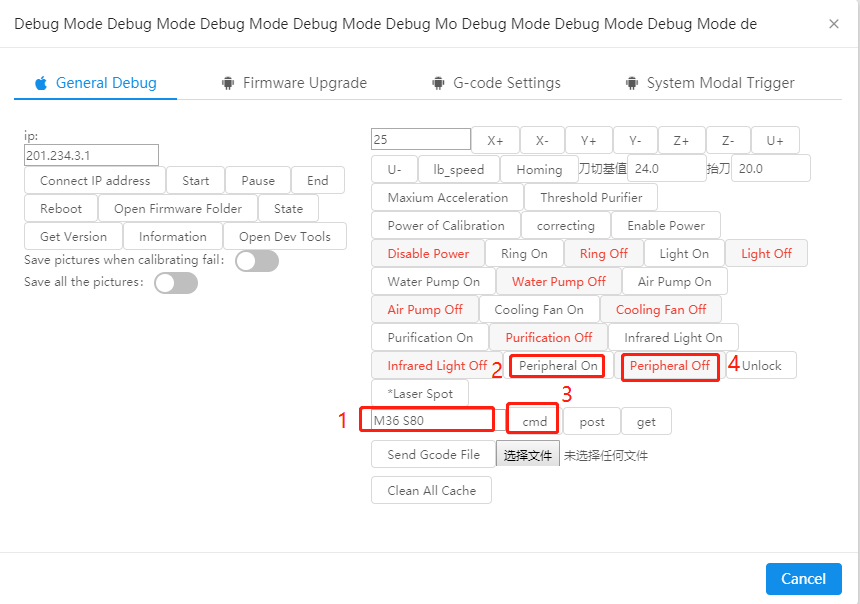
Step6: Check if there is black mark on the crepe paper. If there is, please check if the black dot is in the center position of the hole.
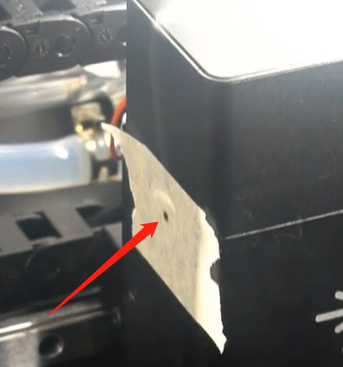
Note:If the black dot printed with [Debug Mode] deviates from the center of the circle, please adjust the light path. Please click the link to watch the optical path debugging video (no need to watch from the beginning, the video progress bar starts to watch from 12:51). The software used in the video is used to make black points, you can use [Debug Mode] to make black points.
006_How to adjust the sensitivity of water level sensor?
Step 1: Disassemble the left side shells of the laserbox machine.
Step 2: Rotate counterclockwise 1~2 turns (don’t more than 3 turns) to adjust the sensitivity of the water level sensor.
007_How to replace the Clamp lifting seat
Here is the picture to show the laser tube clamp, clamp lifting seat, basic part. Normally, the broken one is the clamp lifting seat.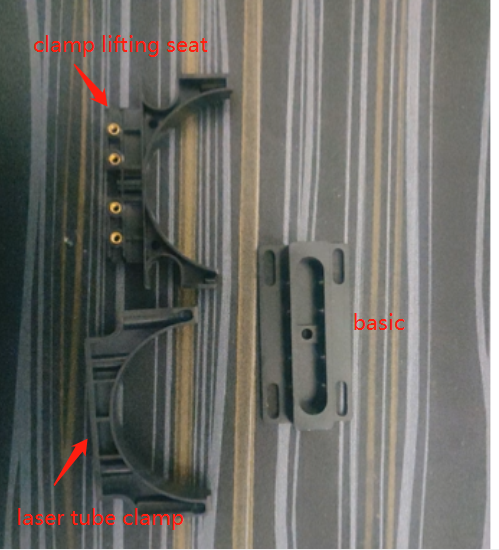
Step 1: Disassemble the cover of the lasertube and remove the laser tube clamp refer to part (only watch from 0:00~2:18) of the video in this link.
Step 2: Replace the Clamp lifting seat one by one.
You can gently lift one end of the laser tube (require someone else help do this), then loose the screw for the clamp lifting seat and replace the broken clamp lifting seat. And then replace the broken one on the other end by the same way.
Note: please make sure gently lift the lasertube a little to prevent the laser path deviation.
Step 3: After replace the broken clamp lifting seat, please make sure place the lasertube propery, fix the wires and lasertube with a ribbon, then refer to part (just watch from 20:16~23:29) of the same video to assemble everything back properly.
Note1: Please make sure the direction of the lasertube clamp when install it back.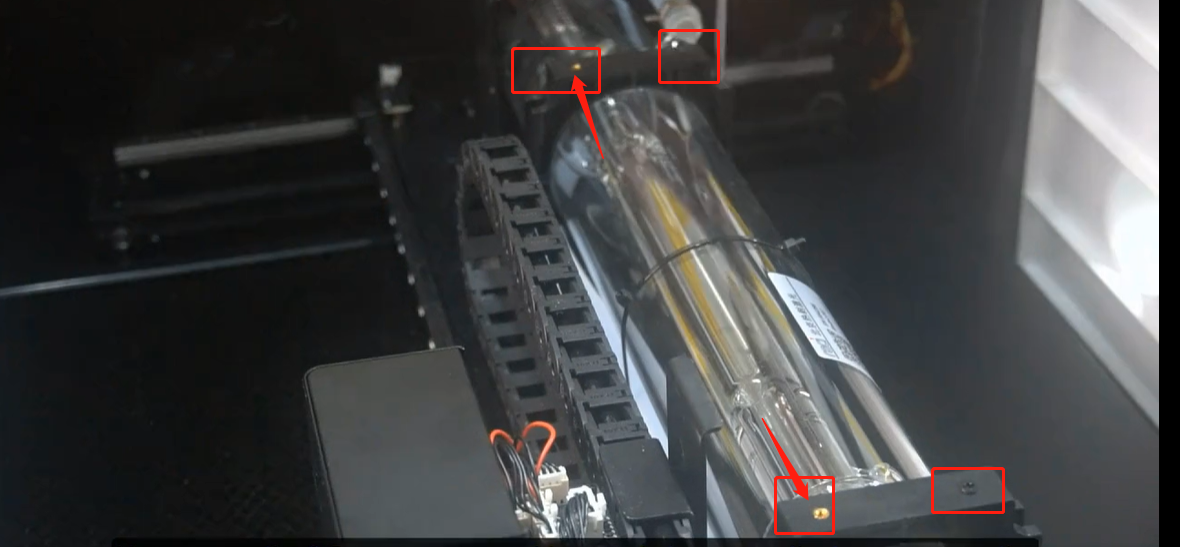
Note 2: Please make sure the lasertube clamp is not fixed too tight, which may broken the lasertube. As long as you are still able to rotating the lasertube by hand after fixing the lasertube clamp, it should be okay.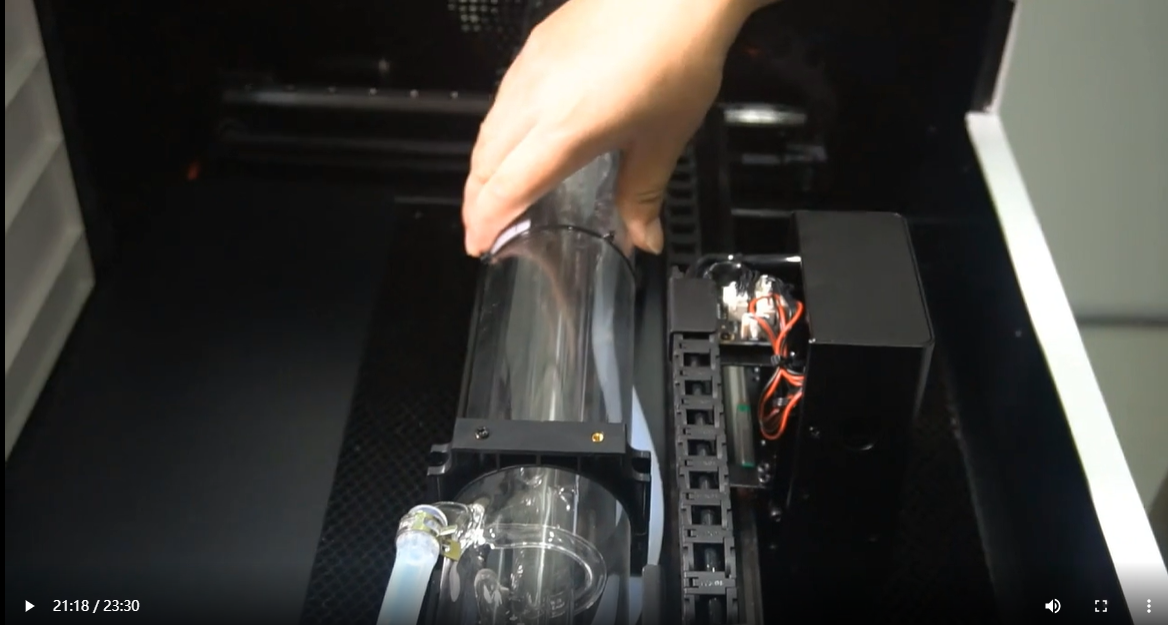
At last, after finished replacing and assembly, please check if the machine engraves properly. If the laser power is not enough, there may be required to test the laser path and adjust it refer to 11:39~20:16 in the same video.
008_Operation of testing missing step issue
Step1: Open laserbox software and connect to laserbox machine.
Step2: Place an official 3mm basswood in laserbox machine as this way showing on picture (note the direction of the material placement) below: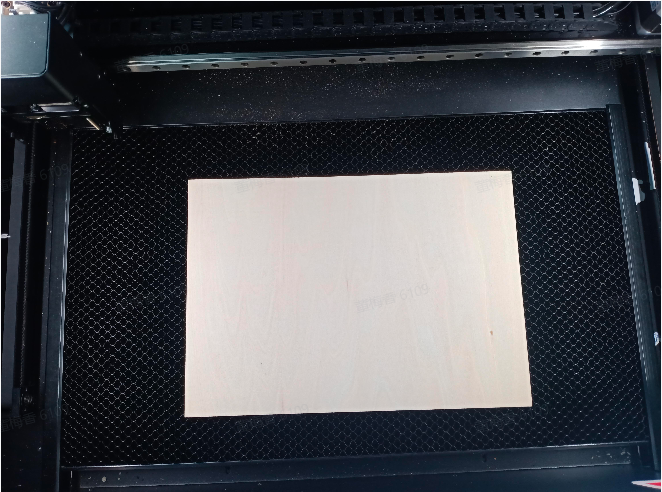
Step3: Go to the laserbox software debug page by pressing CTRL+F1 or CTRL+F1+Fn (Command + F1 for Mac) on windows computer.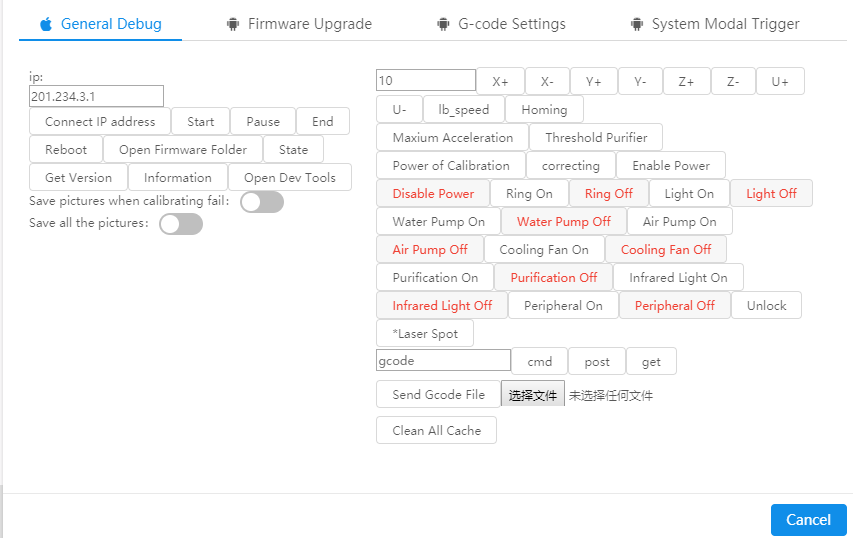
Step 4: Select and send a gcode test file “reverse“ to laserbox machine refer to pictures below:
Please download the reverse file from this link and save it on your desktop.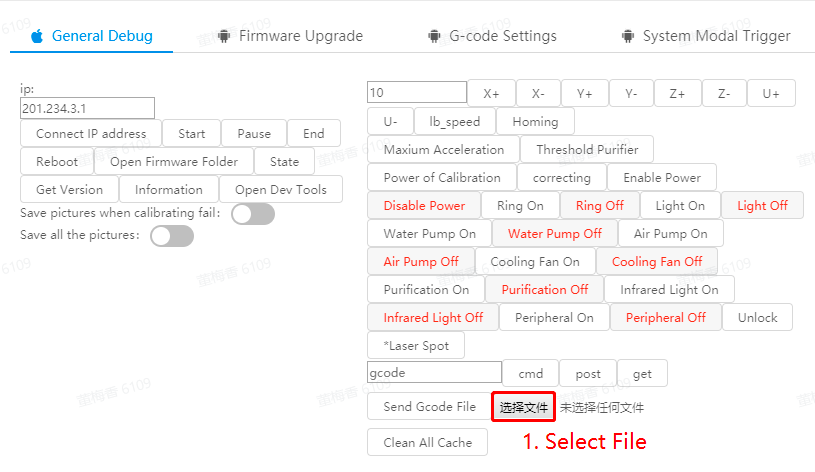
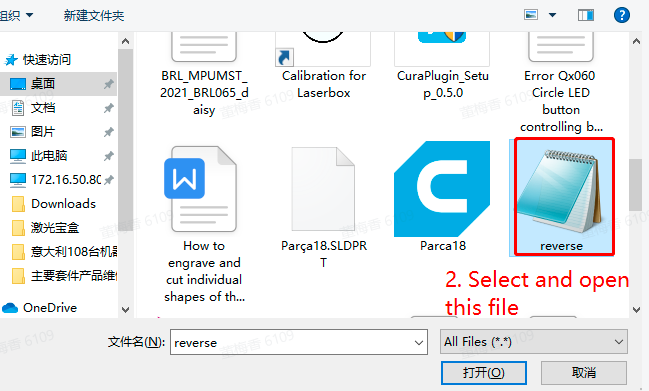
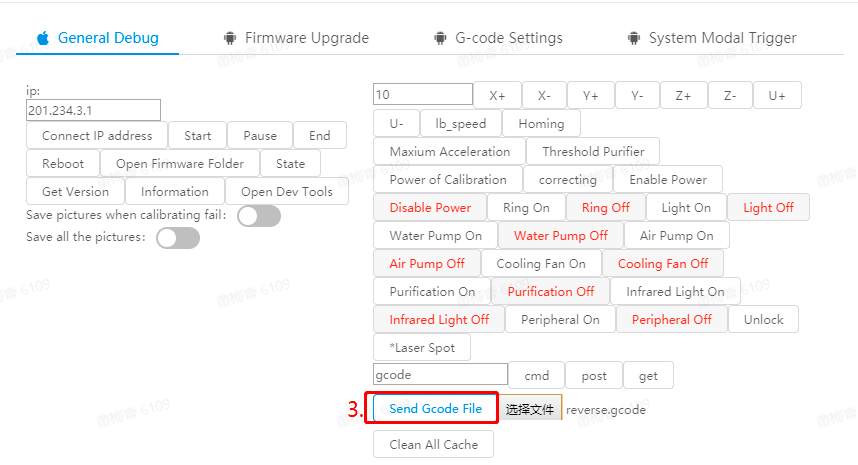
After sending the Gcode File, please remember to press the circle button on laserbox machine and it will start the processing.
Step 5: Measure the size of the four lines separately, then mark the value near to each line (refer to the picture below) and take a clear picture it, then share it to us for analyzing.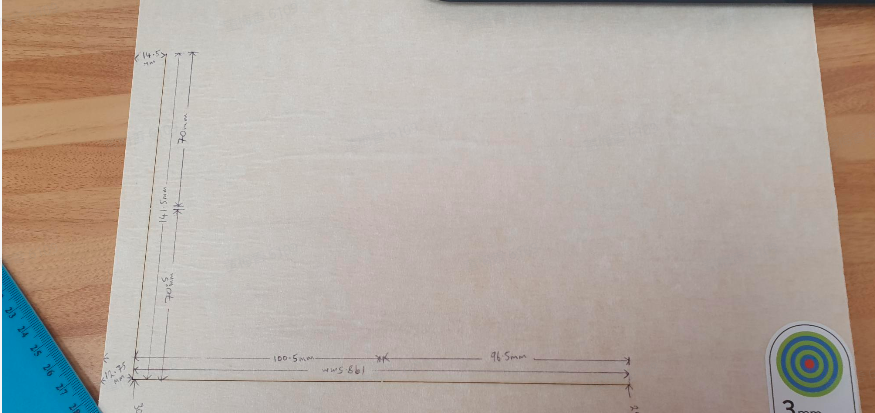
009_How to measure the supply voltage for smoke purifier motor?
Step 1: Since the supply voltage for smoke purifier is from Y1 board, so need to open the left side shell of the main machine to make the Y1 board is visible. Please refer to the video “Disassemble and Assemble Y1 board“ to find the Y1 board.
Step 2: Since smoke purifier works automatically only during machine processing (cutting or engrave ), please test cut or engrave an image. During machine processing, measure the AC voltage at the red and black lines (set the multimeter to AC voltage position). If the voltage is in 12.5V~15.5V, means the Y1 board provids normal voltage to smoke purifier motor.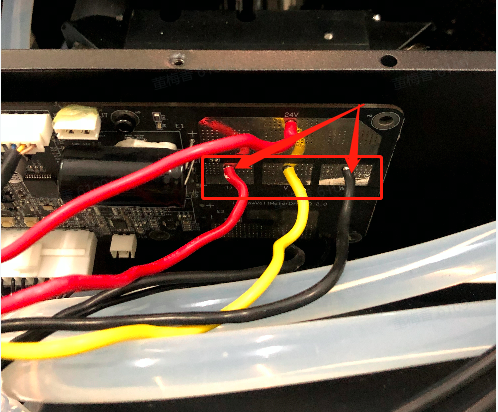
010_How to do backlash test and how to judge whether the test result pass?
Steps
Step 1: Connect the machine to the laserbox software.
Step 2: On laserbox software, please go to Menu->Settings->General. Find Backlash and click “Test“ behinds it.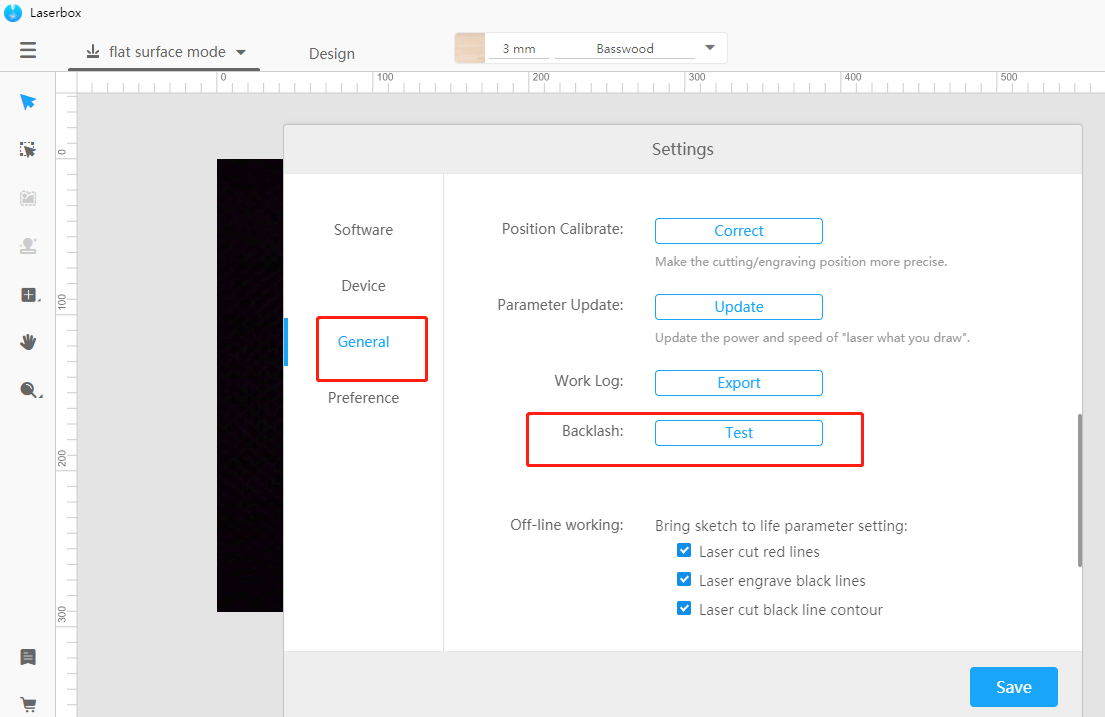
Step 3: Follow the hint to place a 3mm basswood in machine in correct way (vertical placement) please refer to pictures below: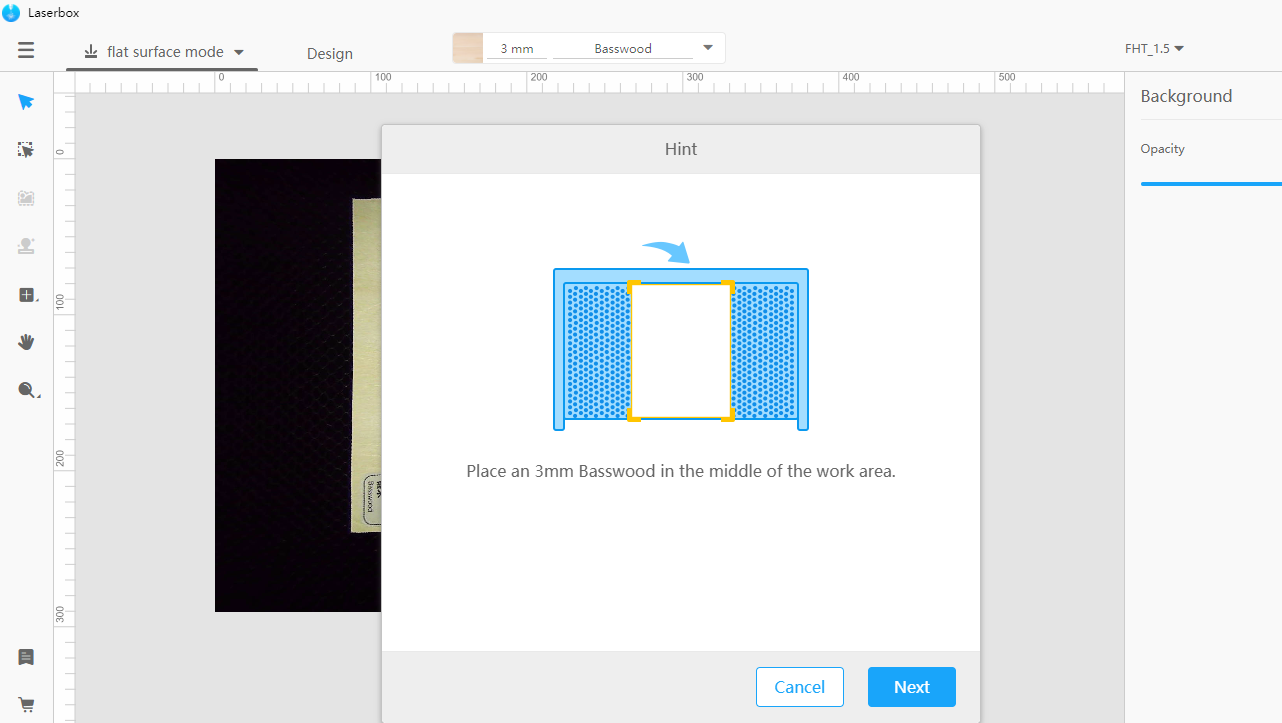
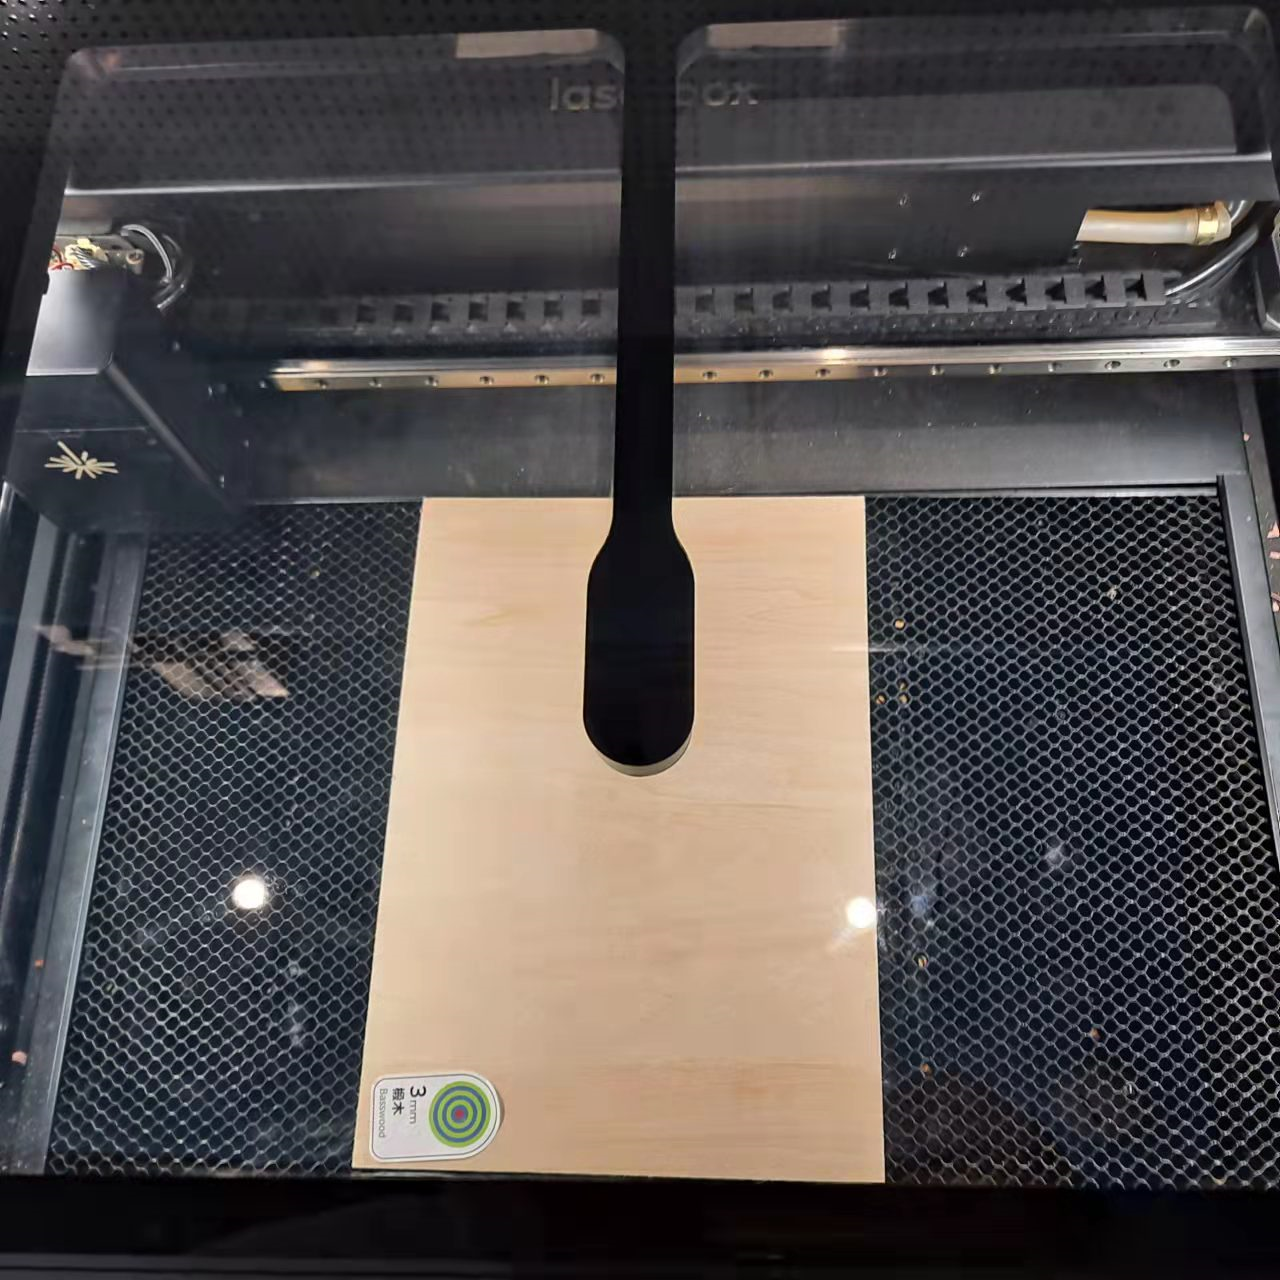
Step 4: Press the circle button on laserbox machine to start the backlash test. Analyze the result after machine finishing processing.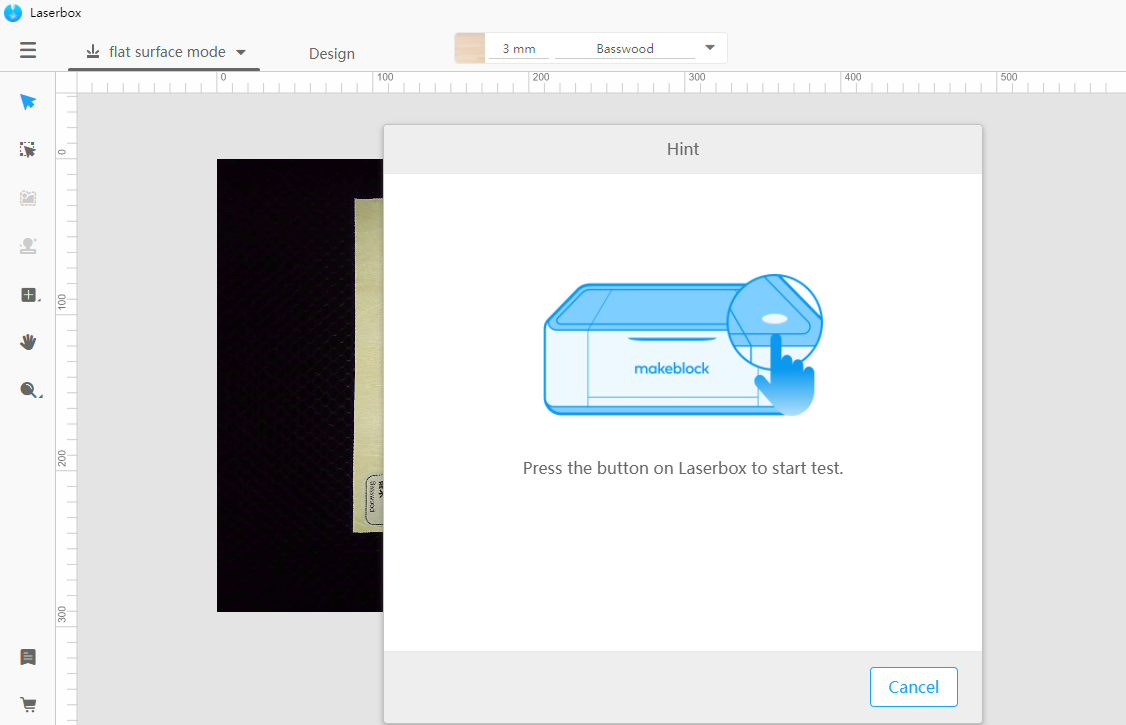
Analysis
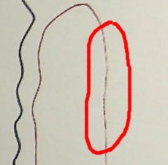
After the processing, you will see three vertical lines and three horizontal lines, each row of vertical line is made up of two vertical lines and each row of horizontal line is made up of two horizontal lines.
If the two lines in each row in the vertical direction can be joined together in the horizontal direction, means the X-axis is okay, doesn’t miss step. While, if the two lines in each row can’t be joined together in the horizontal direction, means the x axis miss step, then need follow this instruction to solve the issue on the machine.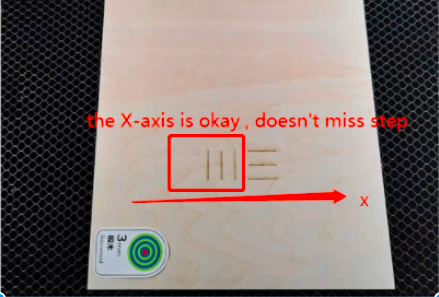

Similarly, if the two lines in each row in the horizontal direction can be joined together in the vertical direction, means the Y-axis is okay, doesn’t miss step. Otherwise, means Y axis miss step and need solution to fix the issue.
Calibration
001_How to do first calibration with new version first correct software.
First, download and unzip the first correct GUI file attached. FirstCorrect_GUI_20201230 (1).rar
Secondly, open the software FirstCorrectGUI.exe.
Thirdly, Place the 3mm steel plate and a big white paper (80g 530x380mm) one by one in the machine.
_Note: make sure all spot could show on papers completely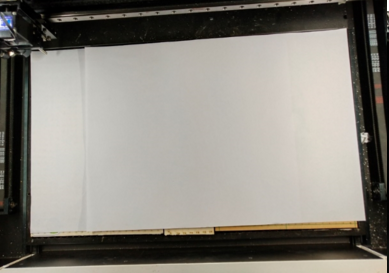
Fourthly, please do the first calibration follow the order below: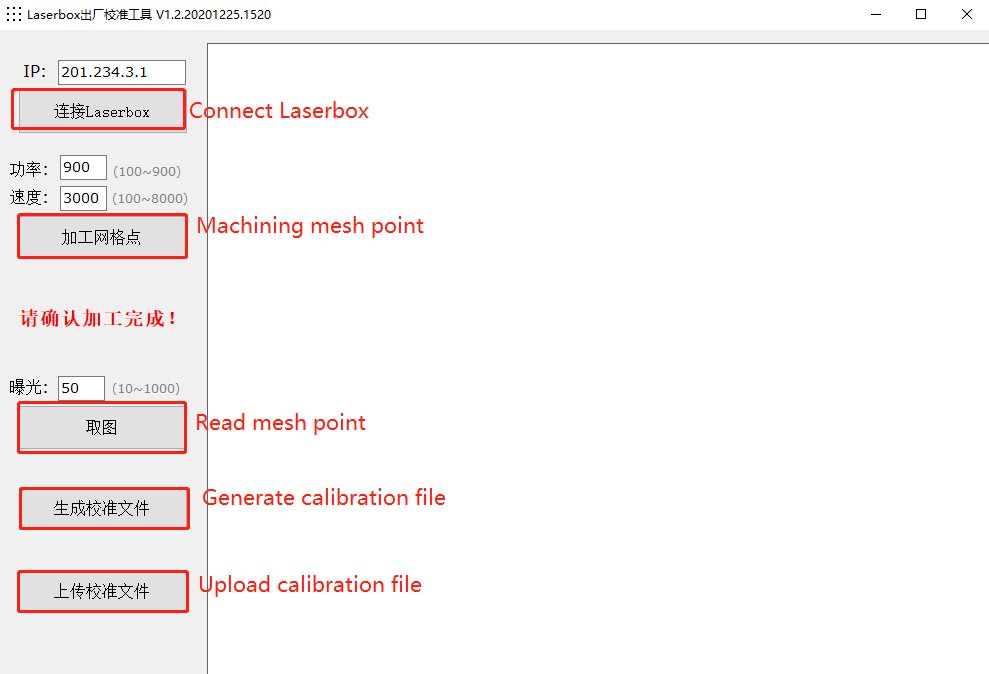
- Connect to the machine by clicking on Connect Laserbox.
- Click on Machining mesh point. Then the machine will start processing, please wait until it done.
Note: please keep the default setting on the software.
- Click on Read mesh point.
- Click on Generate calibration file.
- Click on Upload calibration file.
Note: If the icon of each step on left side turn green, means the step is successful.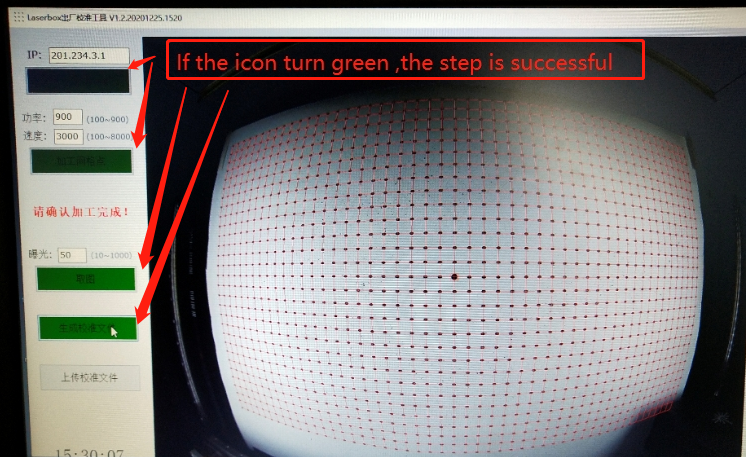
Fifthly, after finishing the first calibration, please do second calibration again with the laserbox software.
Offline processing
001_Must-see tips for offline processing
Offline processing function is fully automatic processing method of laserbox, using adaptive parameter configuration system, and has certain requirements for the environment,If you want to get the idea offline processing works,Please read the following instructions carefully .
1.Description of processing mode
Offline processing include three mode, ‘Laser what you draw’, ‘laser what you draw Pro’ and ‘laser what you pick’, The basic requirement of processing refer to below pictures.
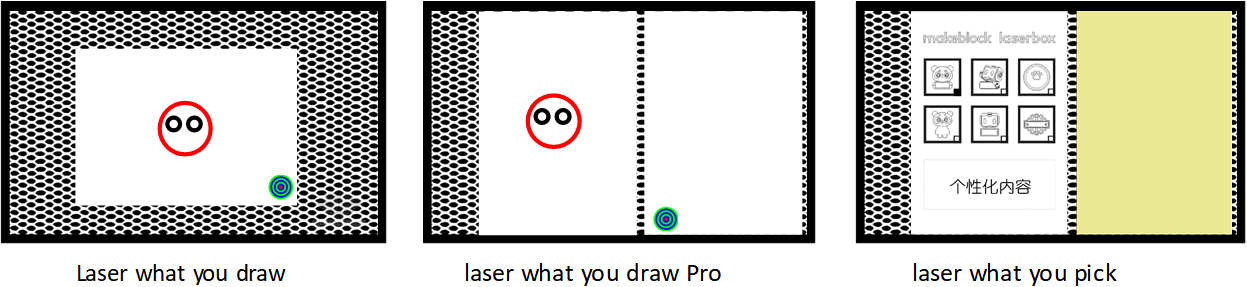
(Caution:The laserbox Pro has all three functions above, the laserbox startup only has the laser what you draw pro function )
2.Precautions
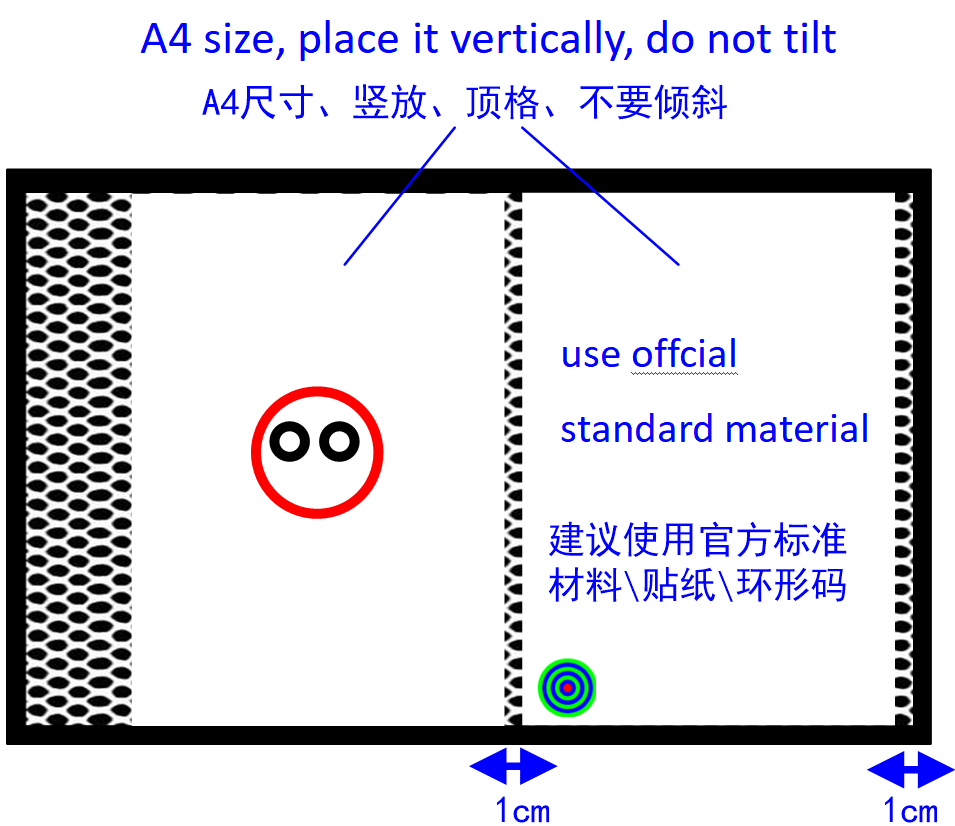
(1) please ensure that the size of drawing board is the same with A4 paper (210mm*297mm),and please place it as below pictures.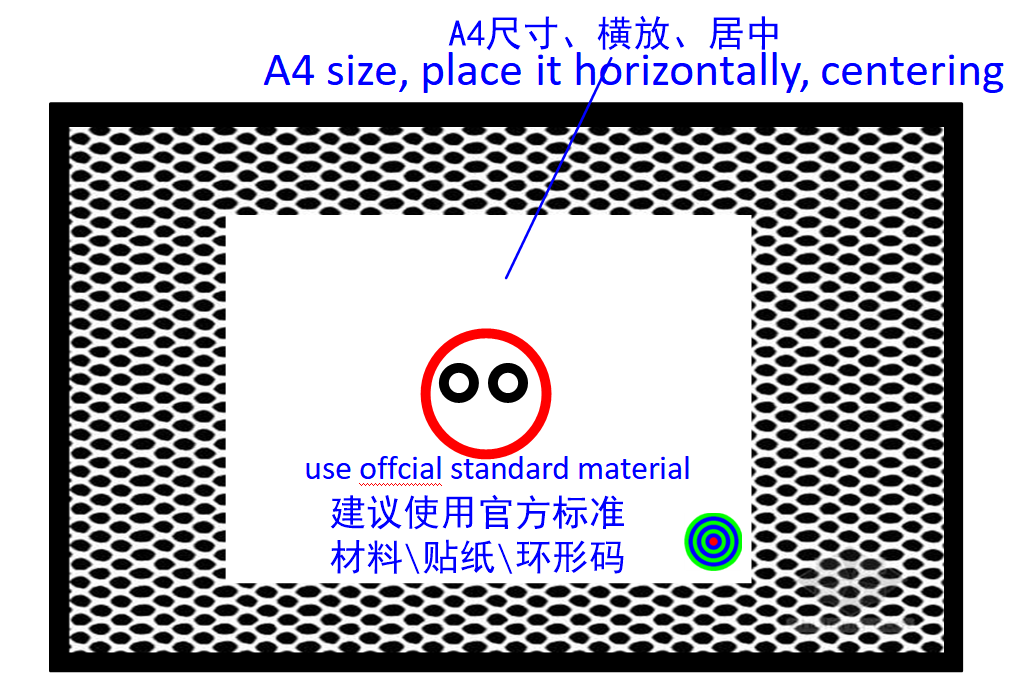

(2) Please use the official recommended drawing board,avoid using materials that reflect light as draw bard; reflective material interfere with recognition of the drawing board, the red pen and the black pen.
(3)Please use the official recommended brand of markers to writing and drawing, avoid offline processing out by ordinary printers; The ink of ordinary printers will produce reflections, which interfere with the recognition of red and black pens.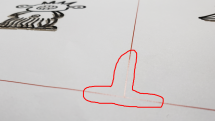
(4) Please avoid using darker background or textured material as drawing board, This will affect recognition of the red pen and black pen and the automatic position selection function.


(5) Please take care to avoid the sudden changes in brightness in the drawing board, such as: shadows,creases,impurities,etc. Stronger sudden changes in brightness may interfere the recognition of the draw board ,red pen ,black pen and the automatic position selection function.


(6)Do not process object that are too small ,too fine he too small object may be considered noise and rejected, the detail of fine structure will be lost, The effective object size for processing should be no less than 4mm*4mm.
(7)When drawing, please note that when there are problem such as broken strokes and uneven strokes, need to making up stokes (or changing strokes).
(8)Please use a pen with a width greater than 2mm for drawing, finer brushes may produce broken stokes.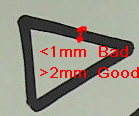
(9)Please keep a distance of more than 2mm when using red and black pen drawings.
(10)Please do not close the ring code when drawing; drawing close to the ring code may be rejected as noise.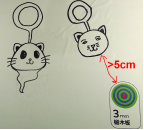
(11)Do not draw close to the border of material, The range of 1cm inward from the material border is the basis of automatic recognition of the drawing board, So please keep it clean and tidy.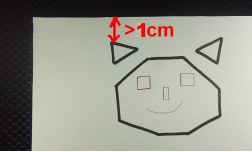
(12)When Perform ‘laser what you draw Pro’ and ‘laser what you pick’ mode, ensure that the processed area (which is required to be avoided by laserbox when selecting the position )need the line width greater than 2mm.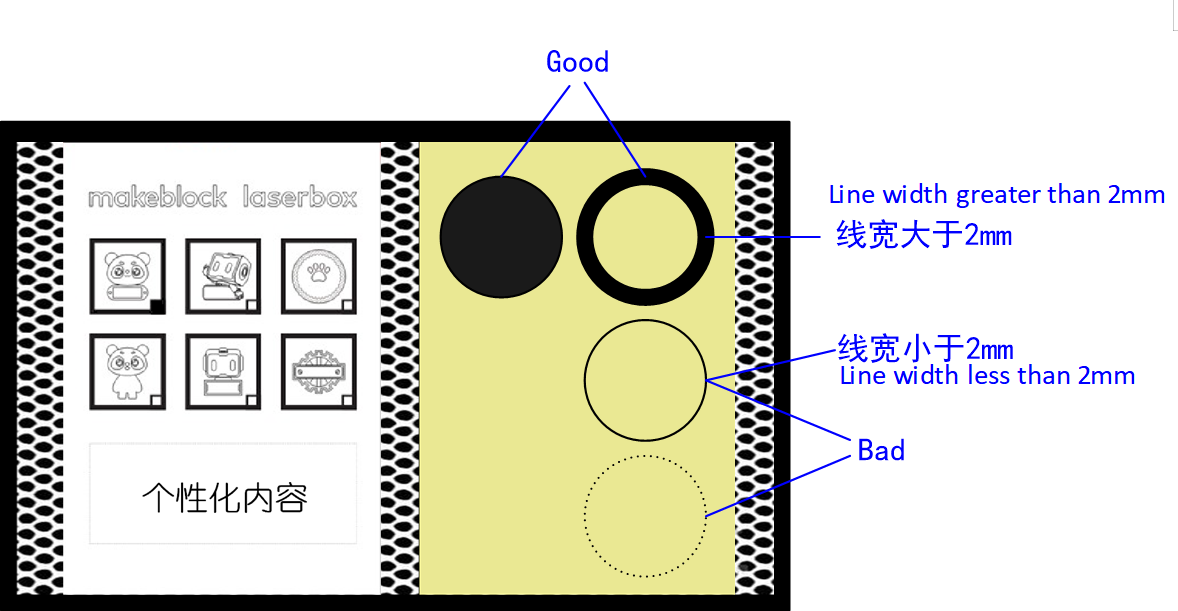
3.Frequently Asked Questions
3.1 Why is offline processing not executed?
Please double check all the above notes, other common cases are as follows.
(1)The corresponding processing mode is not selected under Settings->Preferences of the Laserbox software.
(2) No ring code is attached to the board .
(3)The processing area does not have a enough blank area .
3.2 What should I do if the drawing-as-you-go processing location is offset from the actual drawing location when try the function ‘laser what you draw’?
Please place the drawing content as far as possible directly below the camera.
We will continue to improve the accuracy to reduce the offset, in the current version of LaserBox, if the offset is less than 2mm, it is normal, if the offset is greater than 2mm, please try to perform a secondary calibration.
3.3 Can I use other colors of pens to write and draw?
Please do not use pens of colors other than black or red, as the possible results are not defined.
4.Secrets
(1) For the drawing-as-you-draw mode, how can I avoid reworking the processed area?
Please connect the processed area to the edge of the drawing board with a thick black pen (larger than 2mm) as shown in the picture, and it will not be processed again.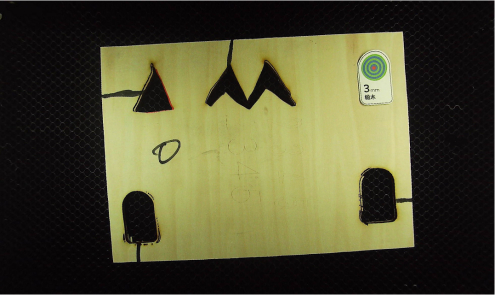
Machine Connection
001_How to configure the wifi connection for Laserbox machine
First, requiring connect the Laserbox machine to a PC with USB/Ethernet cable to configure the wifi connection. Once the wifi connection is configured, the other computers can connect to the Laserbox through wifi as well.
Here is a video (just watch from 1:30~2:15)sharing the wifi configuration on laserbox machine and the connection step to you for reference.
Simple explaination for the steps of wifi configuration:
1. Connect the machine to windows with USB cable or Ethernet cable;
2. Connfigure the laserbox machine to make it connect successfully to the home wifi.
3. Remove the USB cable or Ethernet cable and you will be able to connect the computer (connected to the same local wifi network) to laserbox machine wireless.
002_How to check Mac address of Laserbox machine
Please refer to the following two methods to check mac address of Laserbox machine:
Method 1: connect laserbox to a router with Ethernet cable, and then you can check the mac address of the laserbox through the router.
Method 2: Connect laserbox to computer with USB cable and then open this link to check its mac address.
Note: the machine must has the firmware version 019 or above, latest firmware is 020
Filter Related
001_How to Use Filter in Correct Way Avoiding Reducing Its Lifetime.
- Make sure the smoke pipes are not prolonged and also not placed higher than the position of the smoke purifier (that’s means the window should be at the horizontal position with the smoke purifier).
- The filter should been placed in the smoke purifier in correct direction according to the tips on purifier.
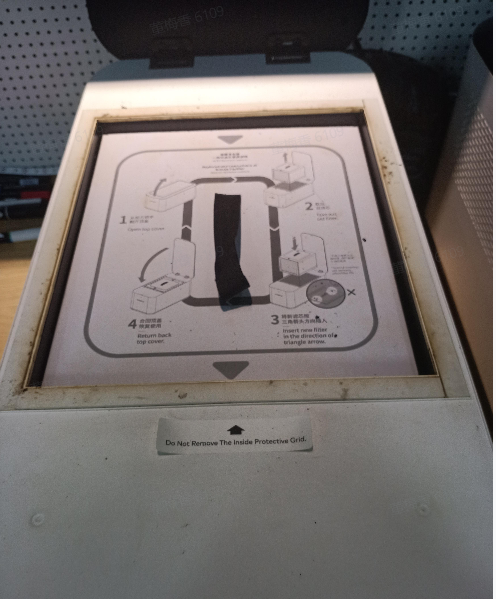
- When it always says “Filter has been used out” but actually a brand new filter, please move the filter a little forward inside the purifier have a try.

若有收获,就点个赞吧
0 人点赞
