关于flannel
- udp
- vxlan
- host-gw
- ipip
默认的是vxlan
体验一下udp先:
wget https://raw.githubusercontent.com/coreos/flannel/master/Documentation/kube-flannel.ymlcp kube-flannel.yaml kube-flannel-udp.yaml
测试的话就仅仅修改了Type对应的模式 vxlan修改为udp,如下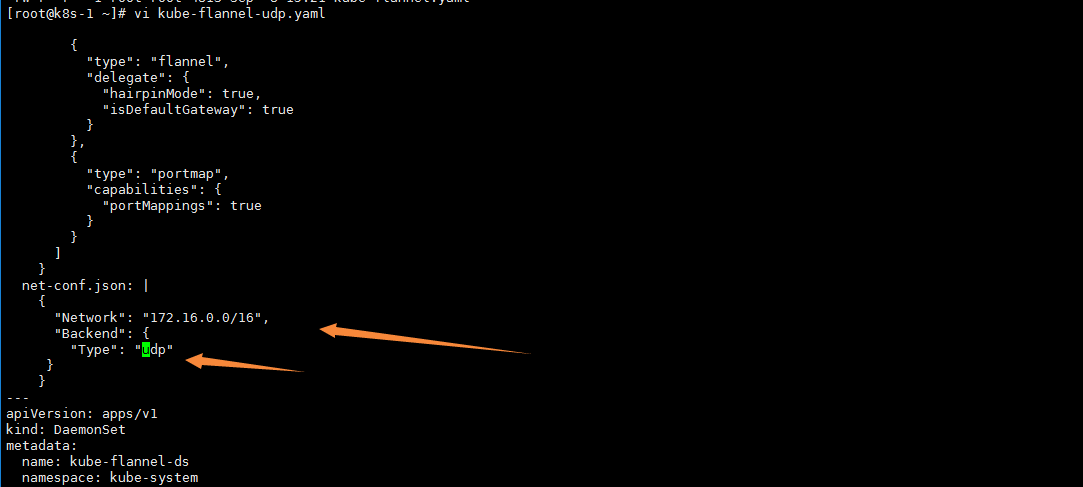
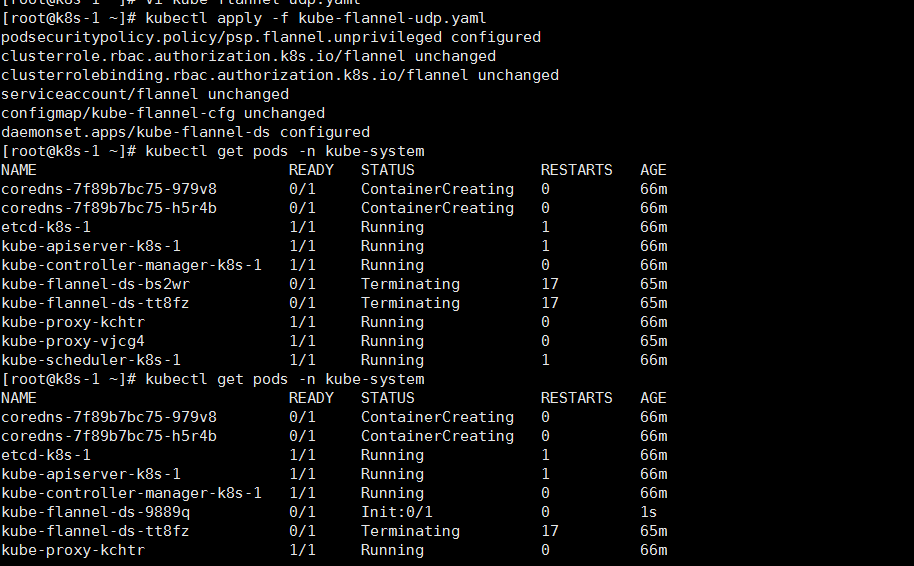
然后 apply and查看pod创建是否成功:
kubectl apply -f kube-flannel-udp.yaml
kubectl get pods -n kube-system
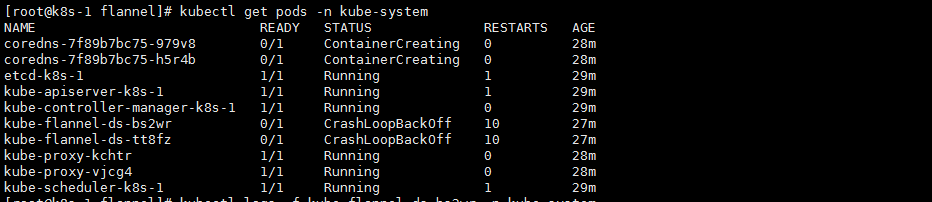
flannel服务CrashLoopBackOff。coredns服务不能正常创建!查看一眼对应日志:
kubectl describe pods coredns-7f89b7bc75-979v8 -n kube-system
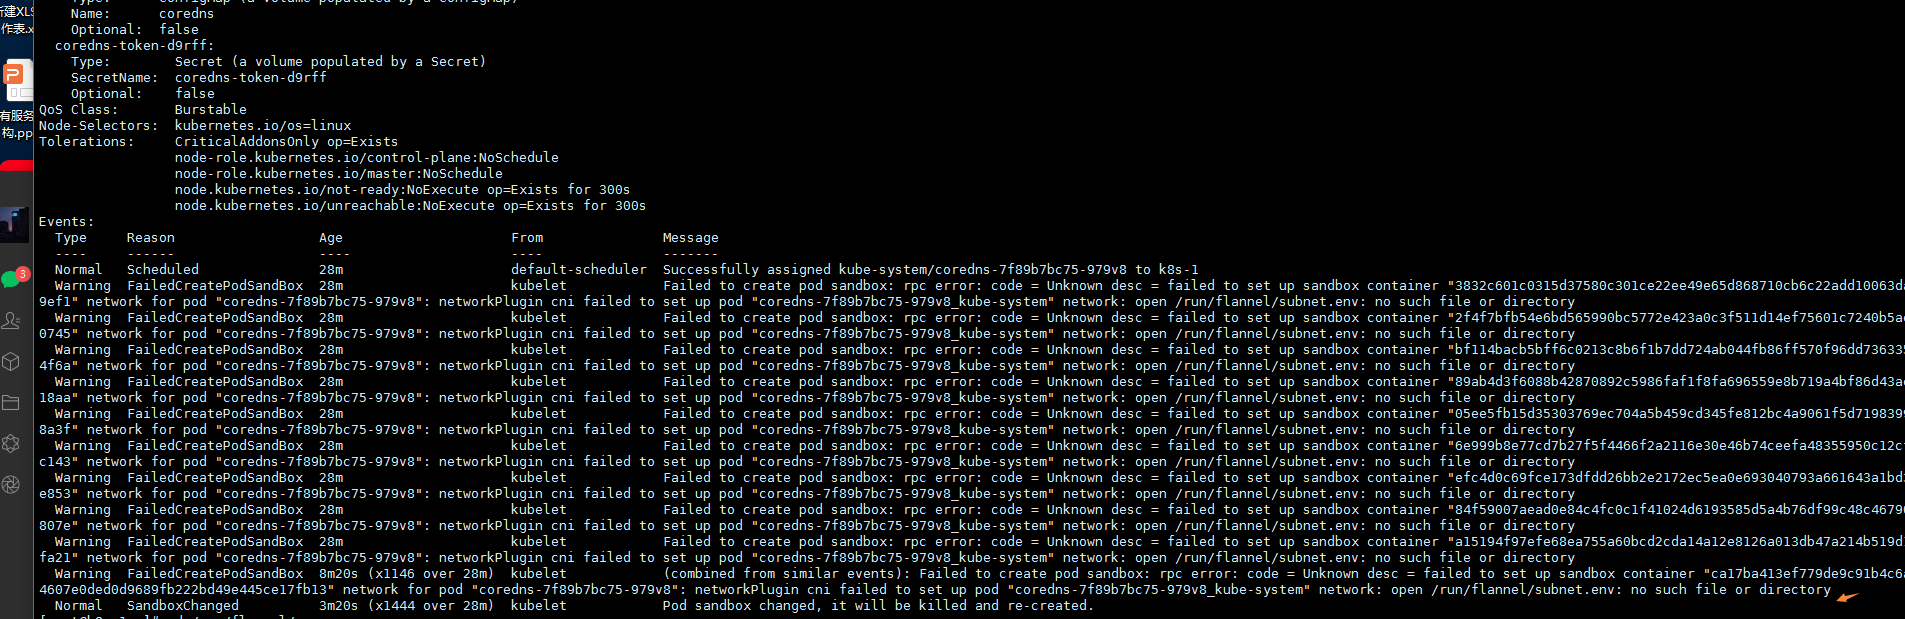
networkPlugin cni failed to set up pod "coredns-7f89b7bc75-979v8_kube-system" network: open /run/flannel/subnet.env: no such file or directory
networkPlugin cni failed 还是仔细看一眼flannel的日志吧!
kubectl logs -f kube-flannel-ds-bs2wr -n kube-system

failed to open TUN device: open /dev/net/tun: no such file or directory
failed to open TUN device: open /dev/net/tun: no such file or directory ?百度没有找到什么有用的,googgle搜一下:https://github.com/flannel-io/flannel/issues/1267
原来要开特权模式!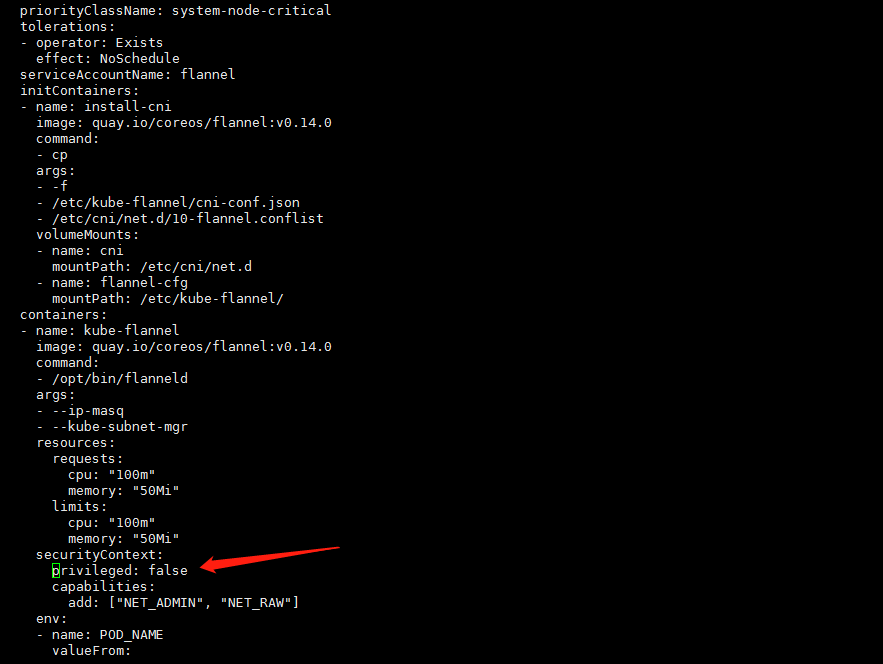
修改:privileged: false为privileged: true。apply yaml文件:
kubectl apply -f kube-flannel-udp.yaml
kubectl get pods -n kube-system
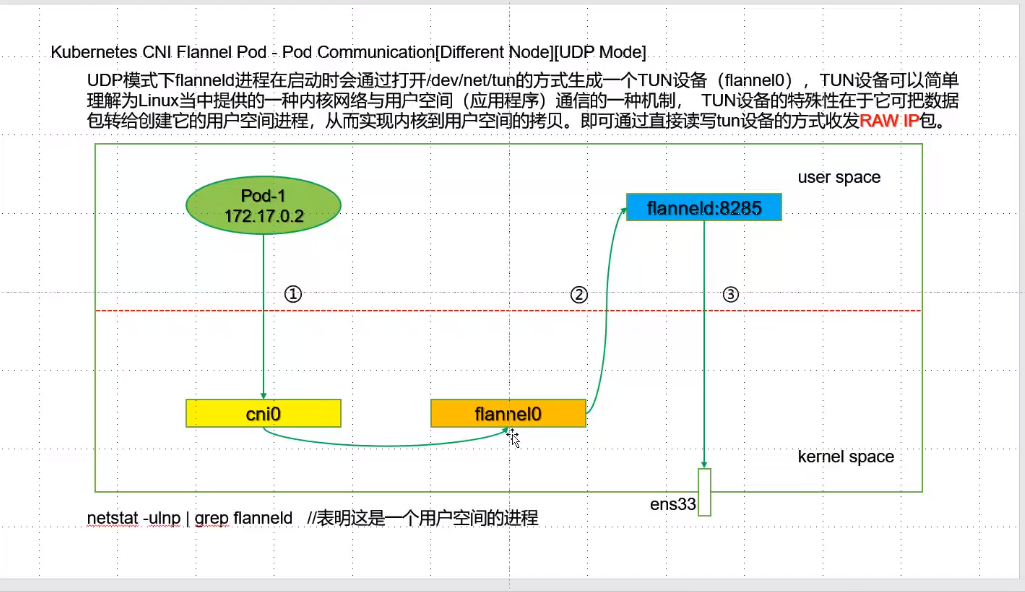
ok flannel总算启动了,见识一下最早的udp方式flannel0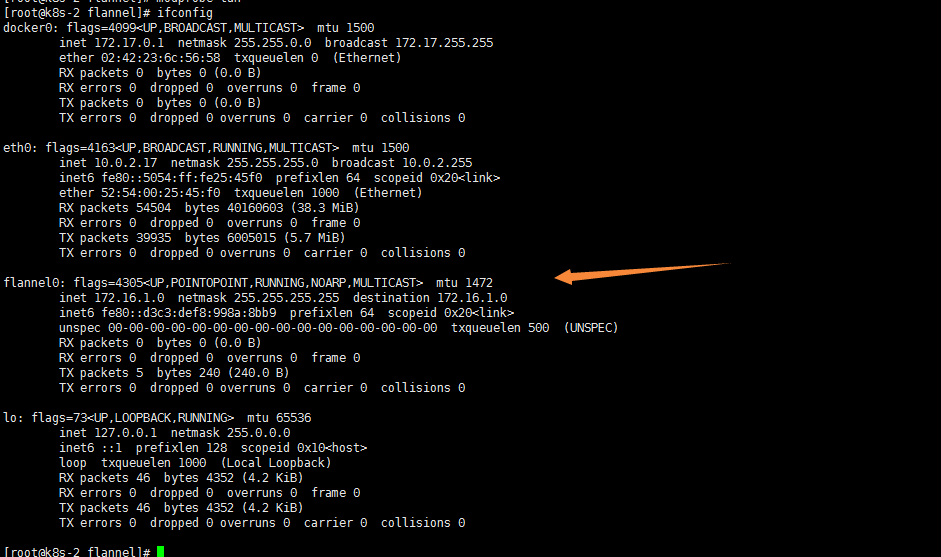
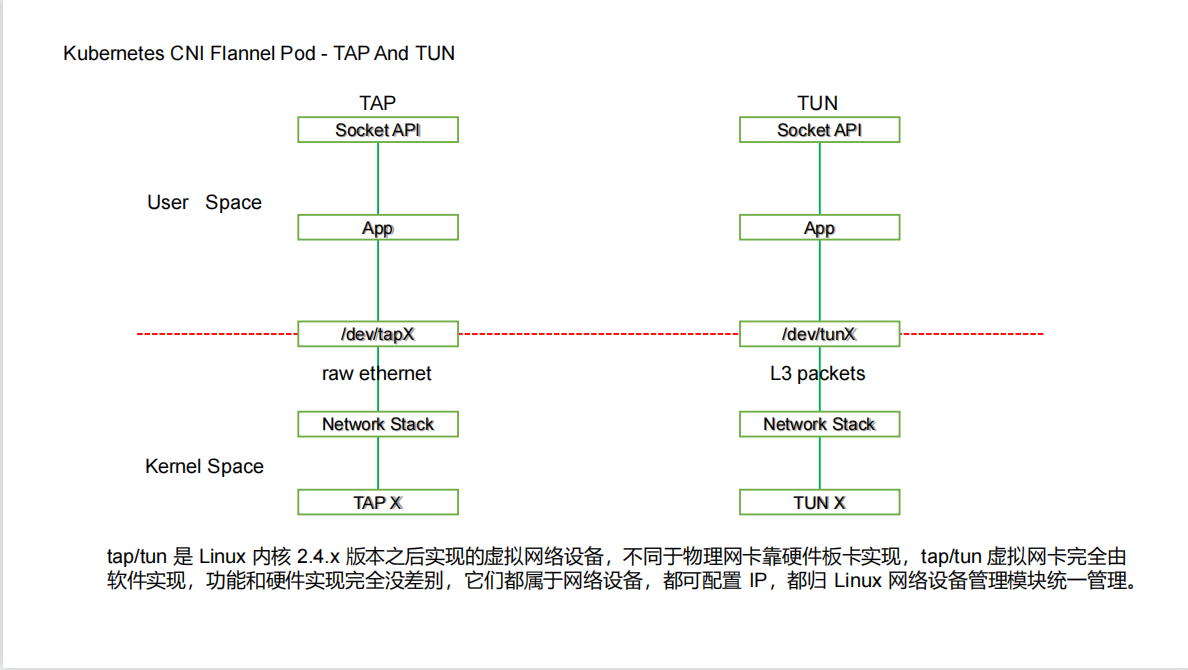
如何判断运行与内核空间还是用户空间
用户空间
netstat -ulnp|grep flanneld

tun设备
网络复用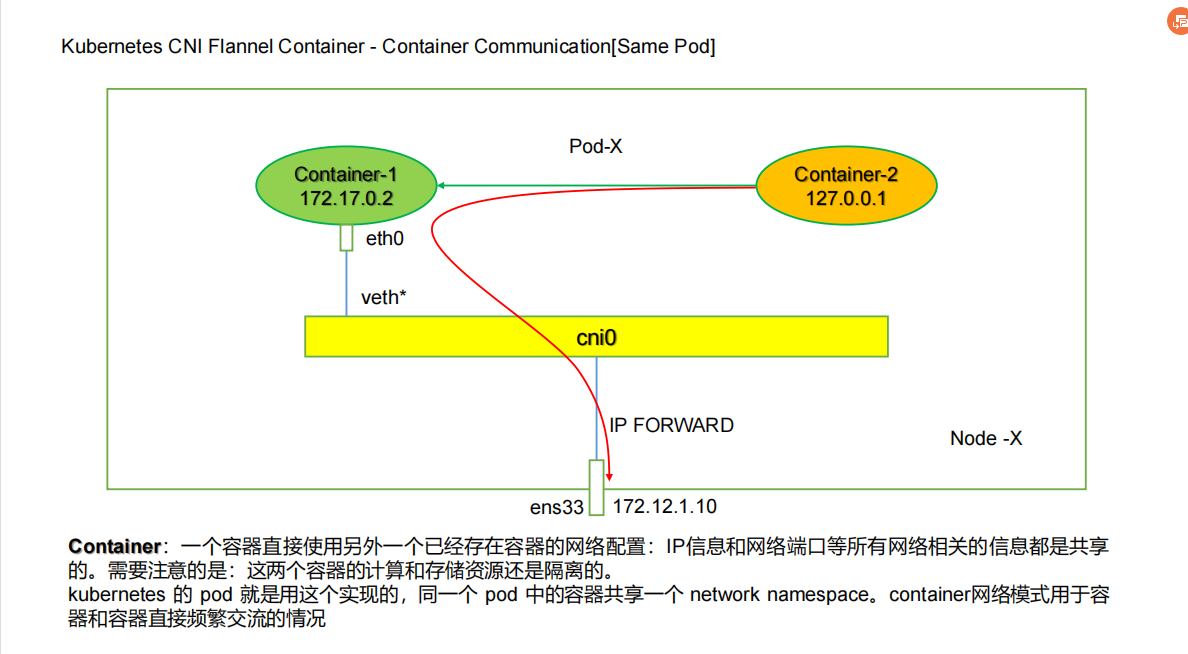
linux bridge
veth pair 接口对
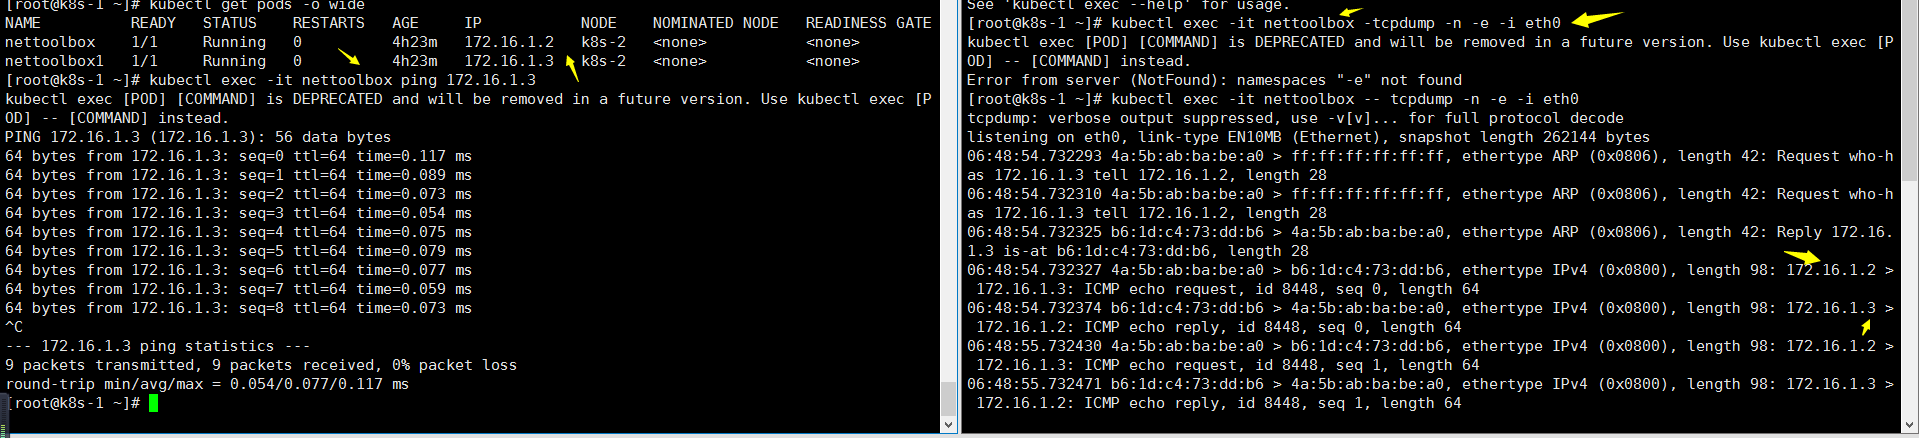
[root@k8s-1 ~]# kubectl run nettoolbox --image=burlyluo/nettoolbox --restart=Never
pod/nettoolbox created
[root@k8s-1 ~]# kubectl run nettoolbox1 --image=burlyluo/nettoolbox --restart=Never
pod/nettoolbox1 created
[root@k8s-1 ~]# kubectl get pods -o wide
NAME          READY   STATUS    RESTARTS   AGE     IP           NODE    NOMINATED NODE   READINESS GATES
nettoolbox    1/1     Running   0          3m54s   172.16.1.2   k8s-2   <none>           <none>
nettoolbox1   1/1     Running   0          3m49s   172.16.1.3   k8s-2   <none>           <none>
[root@k8s-1 ~]# kubectl exec -it nettoolbox bash
kubectl exec [POD] [COMMAND] is DEPRECATED and will be removed in a future version. Use kubectl exec [POD] -- [COMMAND] instead.
bash-5.1# ifconfig
eth0      Link encap:Ethernet  HWaddr 4A:5B:AB:BA:BE:A0
          inet addr:172.16.1.2  Bcast:172.16.1.255  Mask:255.255.255.0
          UP BROADCAST RUNNING MULTICAST  MTU:1472  Metric:1
          RX packets:13 errors:0 dropped:0 overruns:0 frame:0
          TX packets:1 errors:0 dropped:0 overruns:0 carrier:0
          collisions:0 txqueuelen:0
          RX bytes:1066 (1.0 KiB)  TX bytes:42 (42.0 B)

lo        Link encap:Local Loopback
          inet addr:127.0.0.1  Mask:255.0.0.0
          UP LOOPBACK RUNNING  MTU:65536  Metric:1
          RX packets:0 errors:0 dropped:0 overruns:0 frame:0
          TX packets:0 errors:0 dropped:0 overruns:0 carrier:0
          collisions:0 txqueuelen:1000
          RX bytes:0 (0.0 B)  TX bytes:0 (0.0 B)
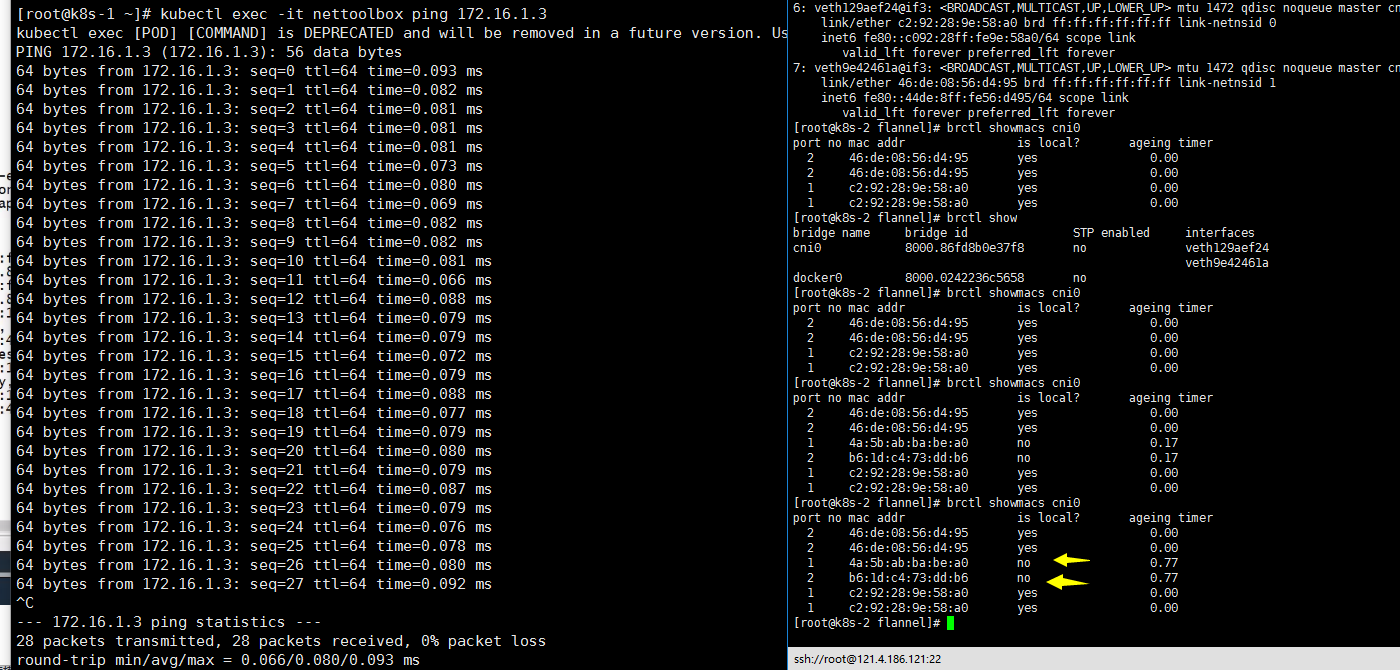
nettoolbox nettoolbox1 pod在k8s-2节点上,切换到k8s-2节点:
[root@k8s-2 flannel]# brctl show
bridge name    bridge id        STP enabled    interfaces
cni0        8000.86fd8b0e37f8    no        veth129aef24
                            veth9e42461a
docker0        8000.0242236c5658    no
注:前提yum -y install bridge-utils bridge-utils安装
ip a

[root@k8s-1 ~]# kubectl exec -it nettoolbox bash
bash-5.1# ethtool -S eth0
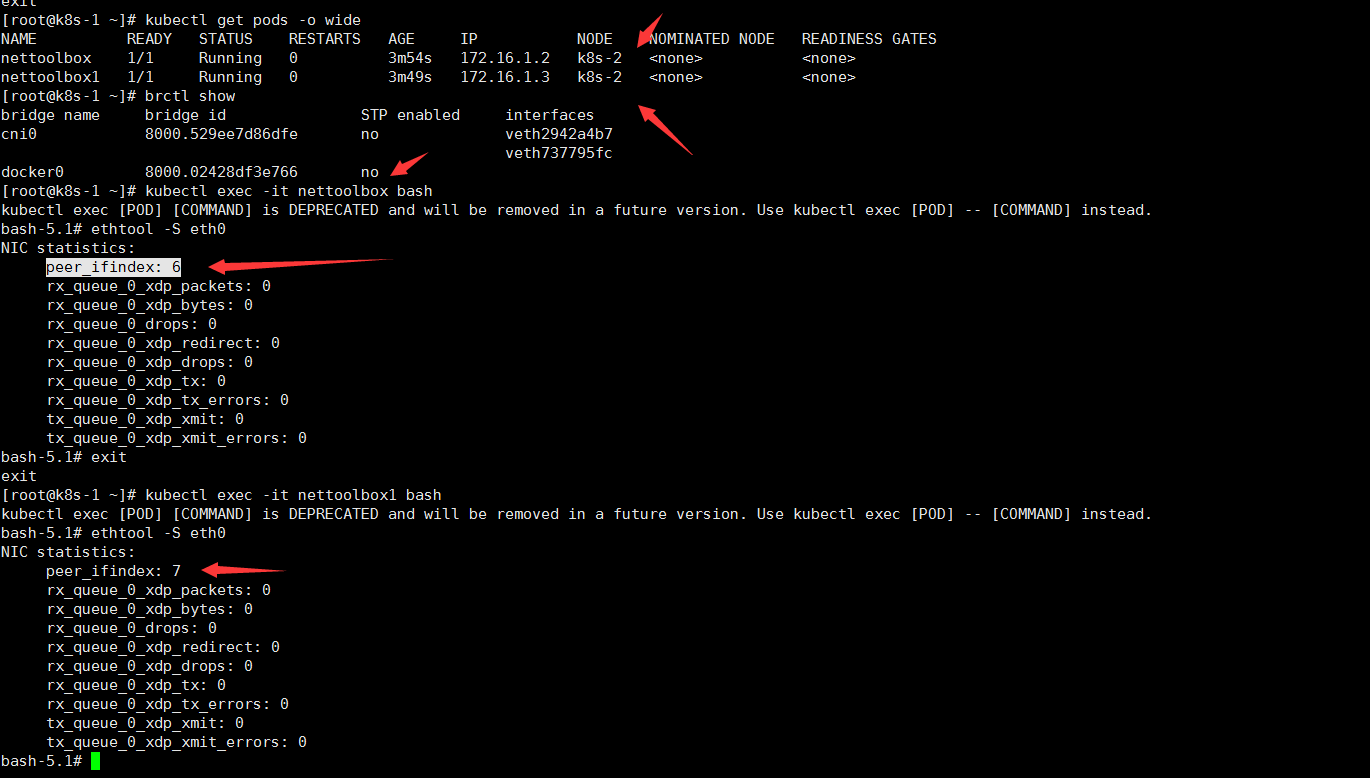
peer_ifindex: 6
nettoolbox 的eth0对应k8s-2节点上的索引为6的veth129aef24 接口对
nettoolbox1 的eth0对应k8s-2节点上的索引为6的veth9e42461a接口对
其他更直观的看 抓包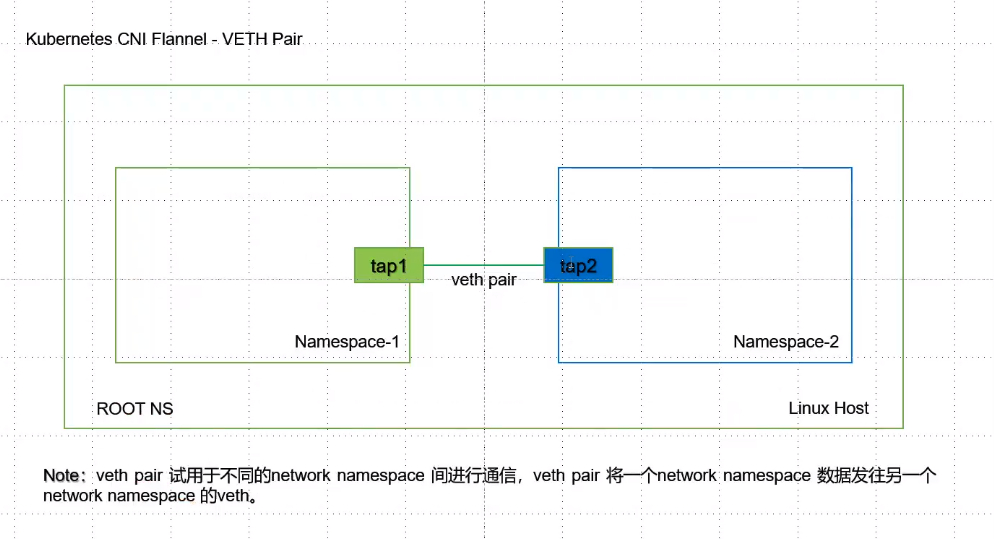

VETH Pair
创建 namespace
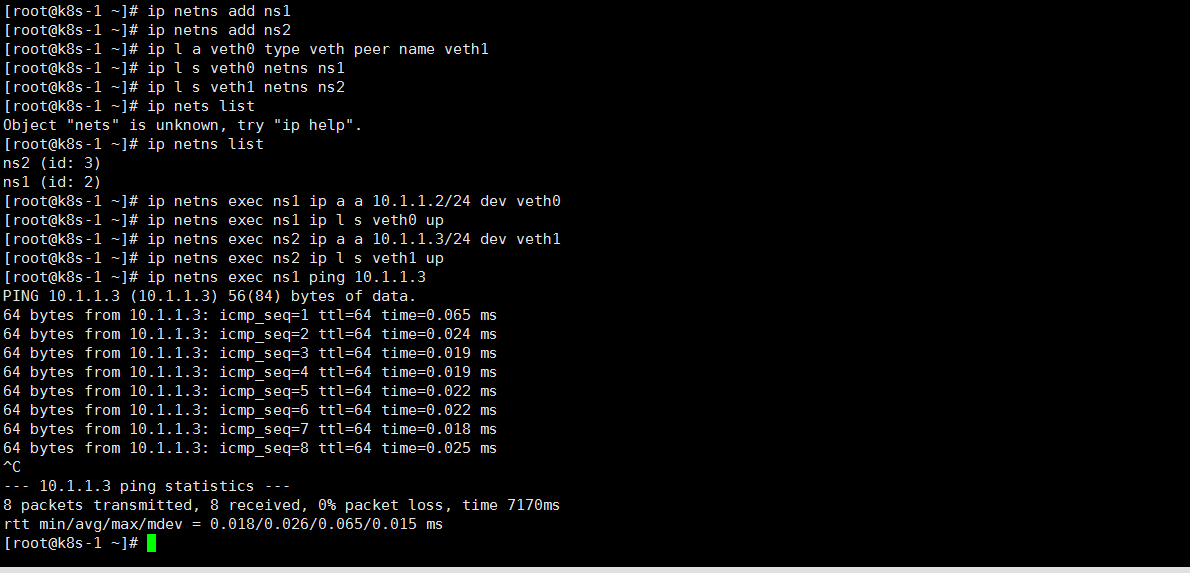
ip netns add ns1
ip netns add ns2
创建一对 veth-pair veth0 veth1
ip link add veth0 type veth peer name veth1
将 veth0 veth1 分别加入两个 ns
ip link set veth0 netns ns1
ip link sset veth1 netns ns2
给两个 veth0 veth1 配上 IP 并启用
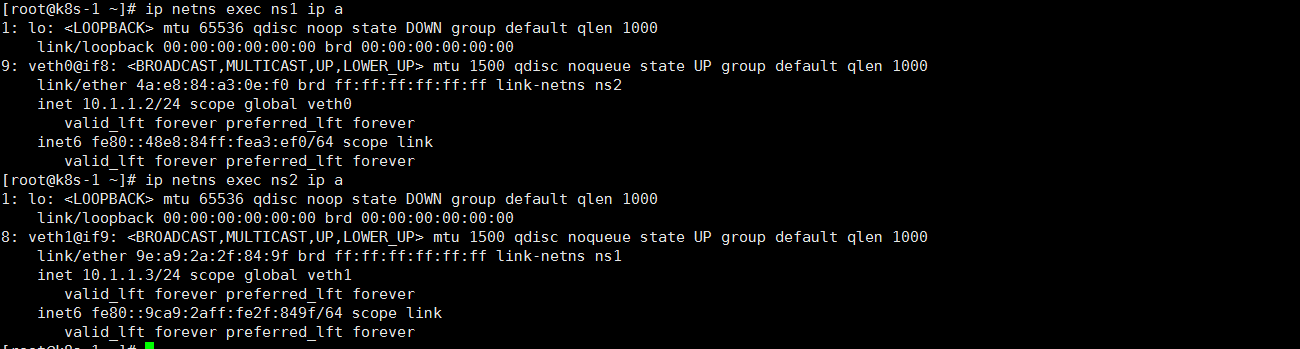
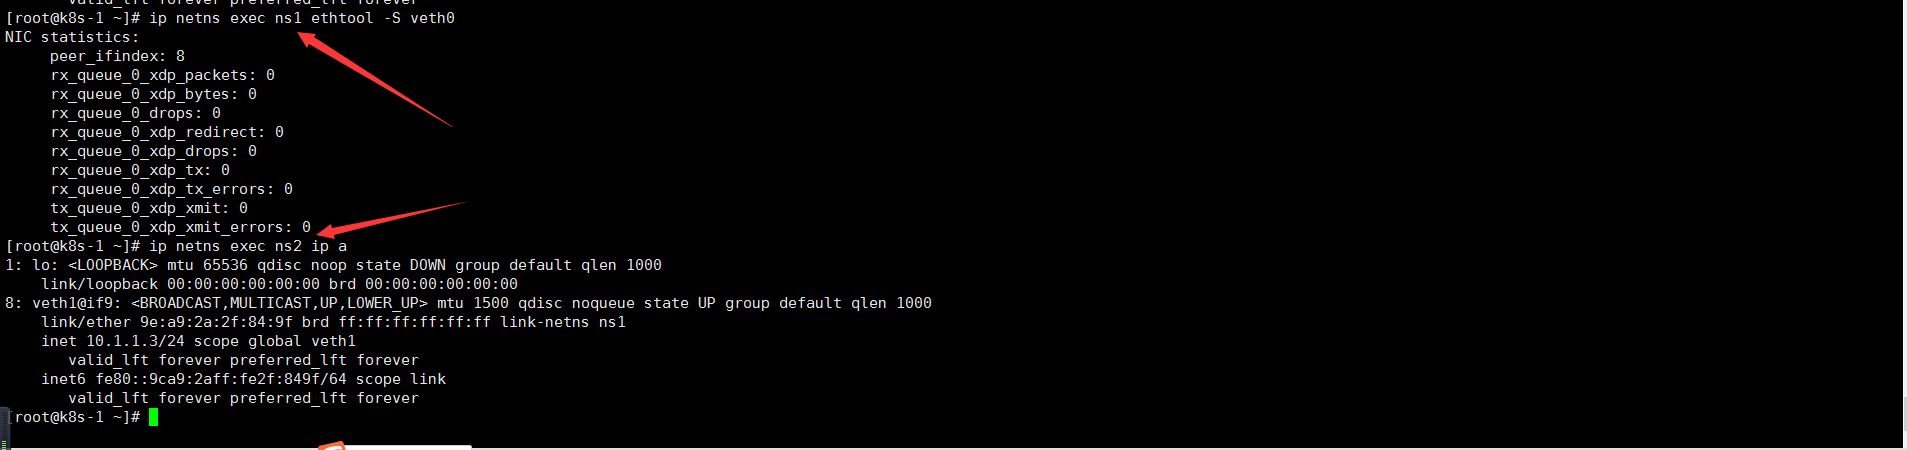
ip netns exec ns1 ip a a 10.1.1.2/24 dev veth0
ip netns exec ns1 ip l s veth0 up
ip netns exec ns2 ip a a 10.1.1.3/24 dev veth1
ip netns exec ns2 ip l s veth1 up
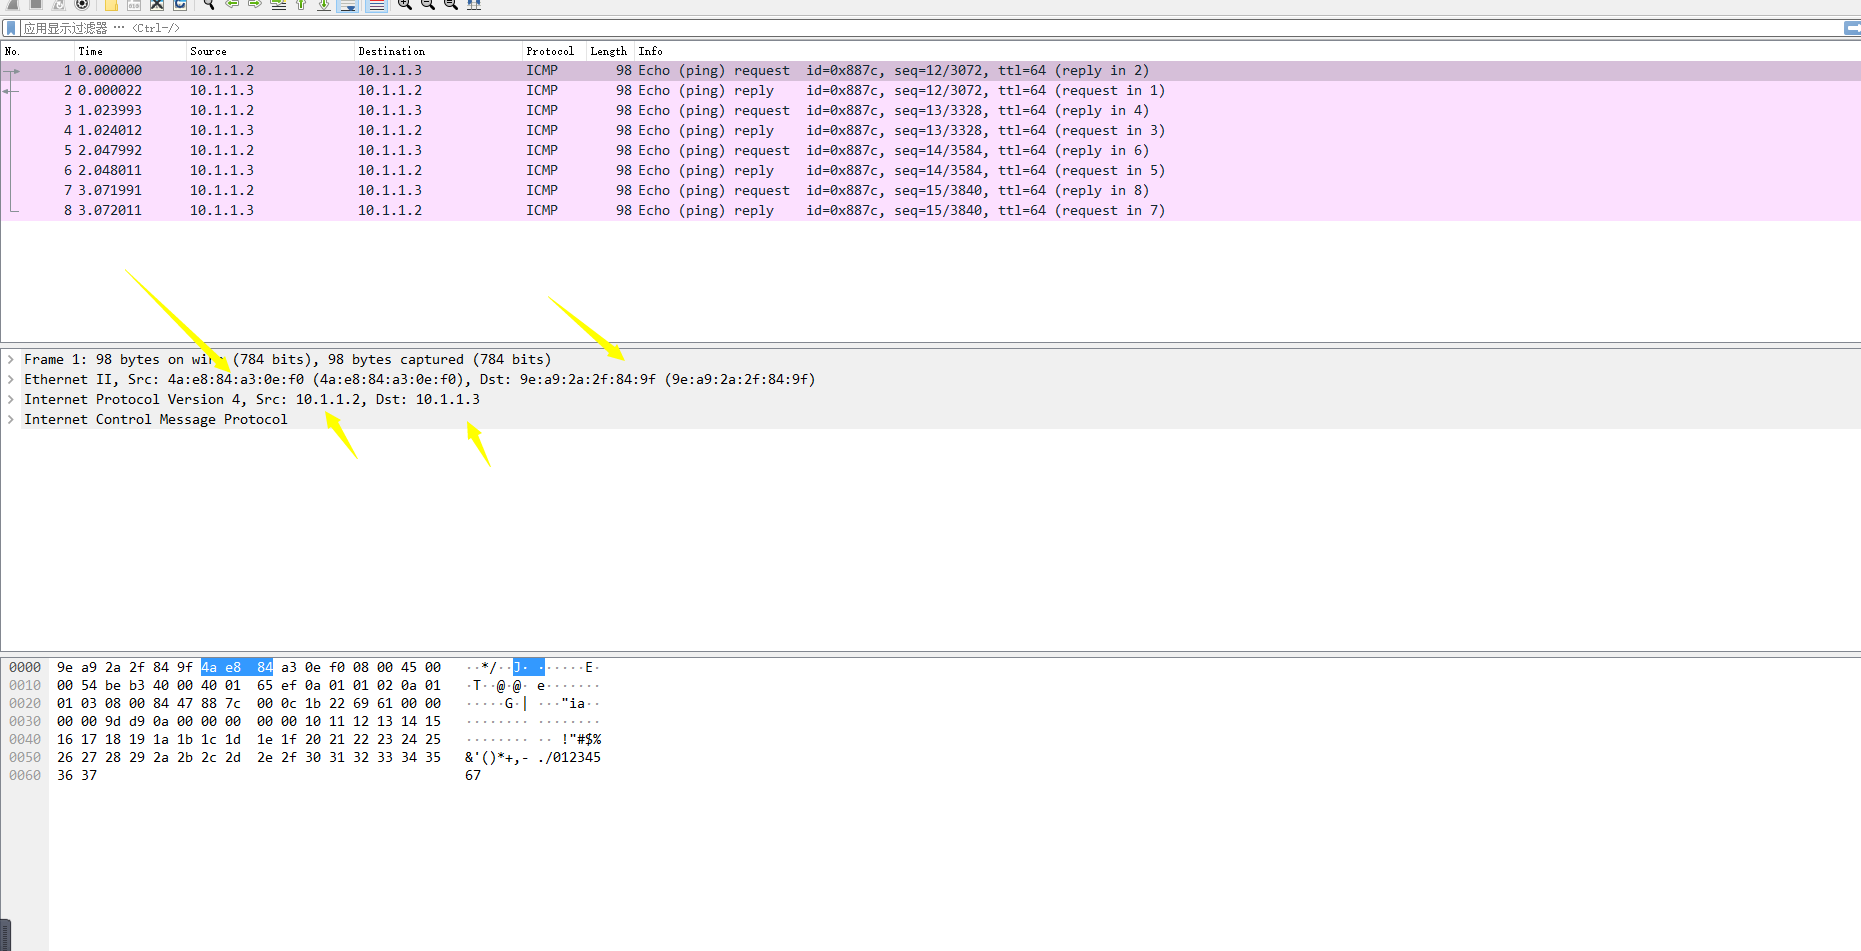
# veth0 ping veth1 [root@k8s-1 ~]# ip netns exec ns1 ping 10.1.1.3
PING 10.1.1.3 (10.1.1.3) 56(84) bytes of data.
64 bytes from 10.1.1.3: icmp_seq=1 ttl=64 time=0.060 ms
[root@k8s-1 ~]# ip netns exec ns1 tcpdump -i veth0
[root@k8s-1 ~]# ip netns exec ns1 tcpdump -n -e -i veth0
再开一个窗口:
[root@k8s-1 ~]# ip netns exec ns1 ping 10.1.1.3

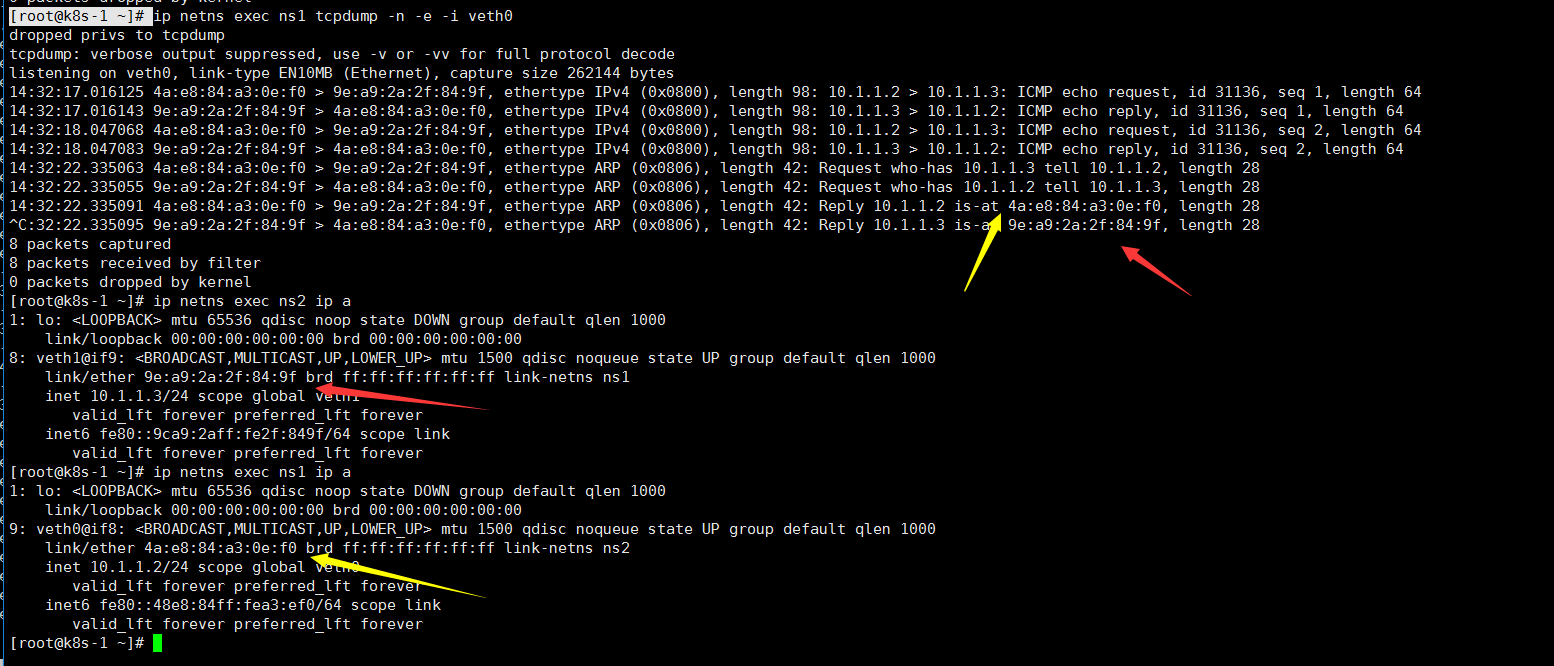
注: 抓包是在内核空间抓包 用户空间是抓不到的 tcpdump CBPF应用
[root@k8s-1 ~]# ip netns exec ns1 tcpdump -n -e -i veth0 -w veth0.cap
brctl showmacs cni0
linux bridge ovs
https://www.cnblogs.com/JCpeng/p/15072855.html

[root@k8s-1 ~]# netstat -aulnp|grep flanneld
udp        0      0 10.0.2.6:8285           0.0.0.0:*                           913864/flanneld
[root@k8s-1 ~]# ip -d link show
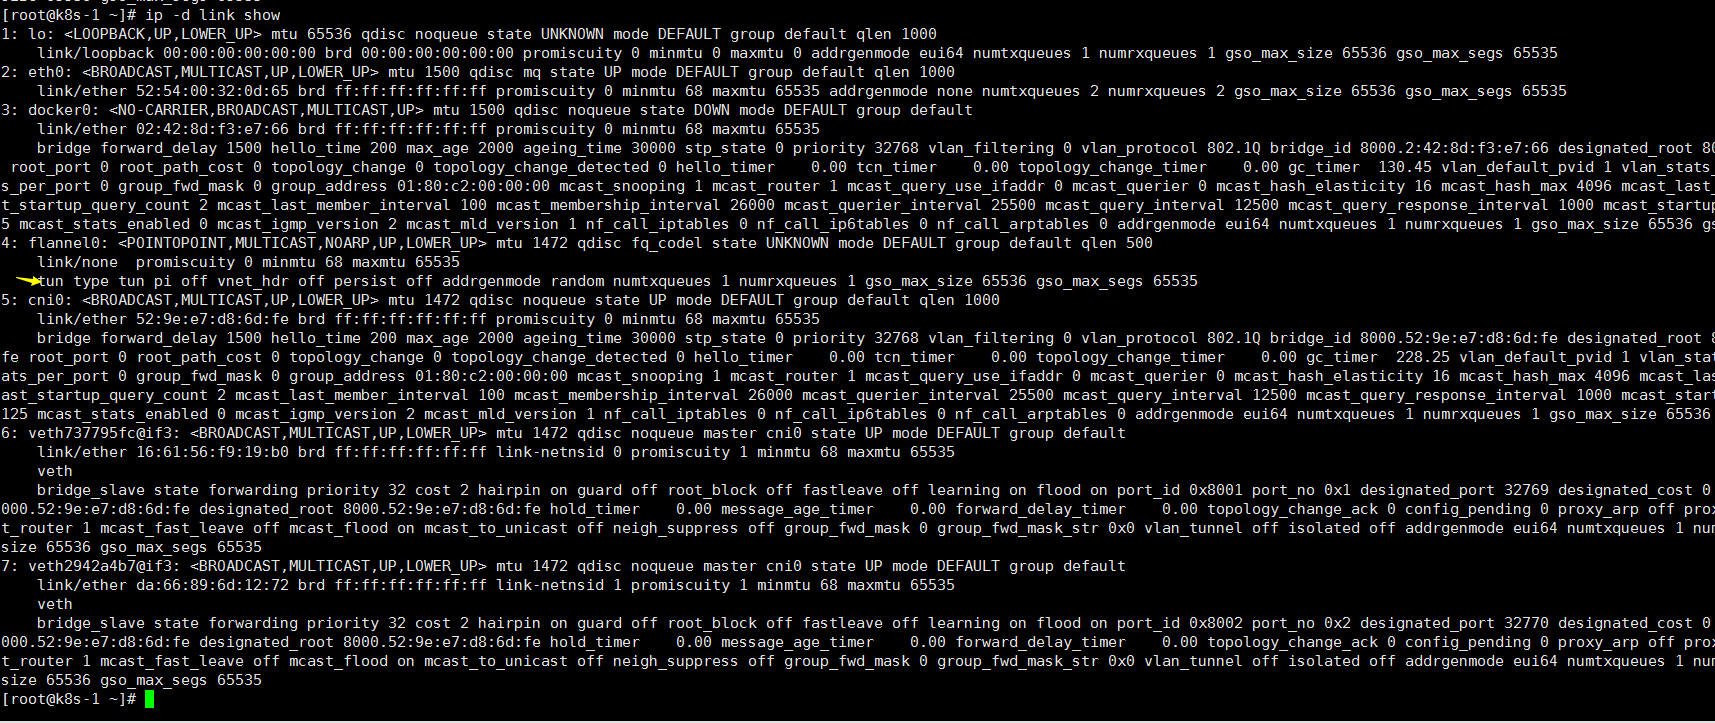
mtu 正常1500 ov2 1472
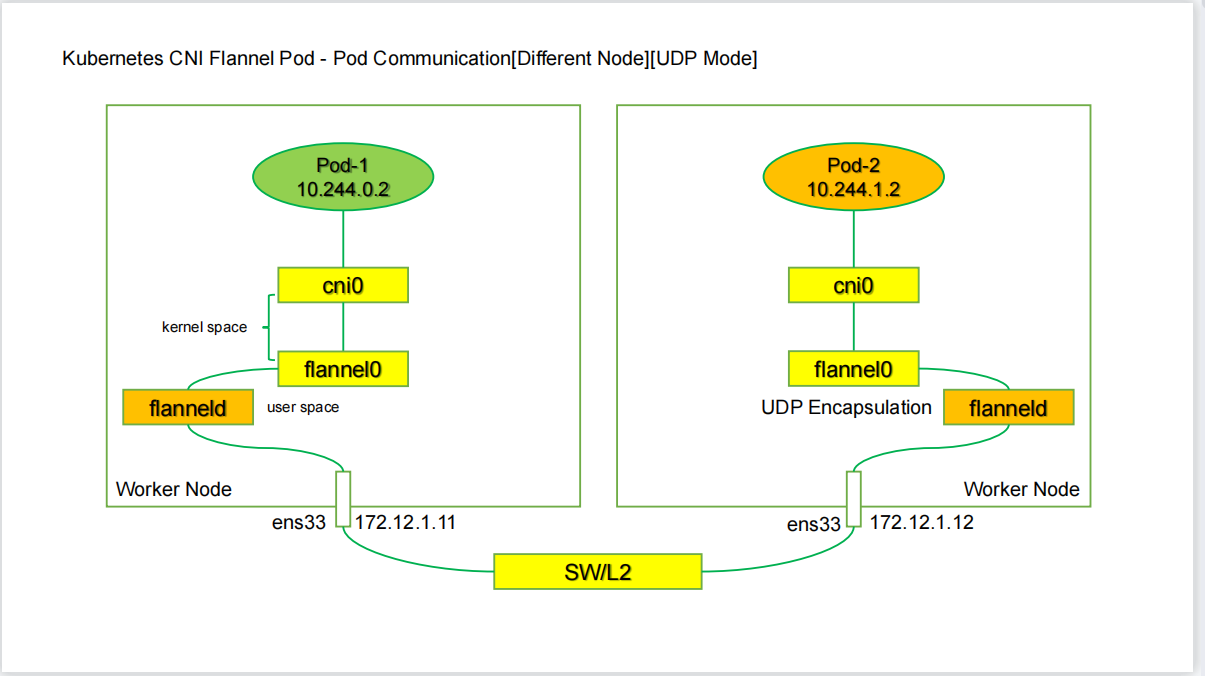
flannel0 与flanneld cni0

若有收获,就点个赞吧
0 人点赞
