- MHA(Master High Availability)【只提供master高可用】
- MHA工作原理
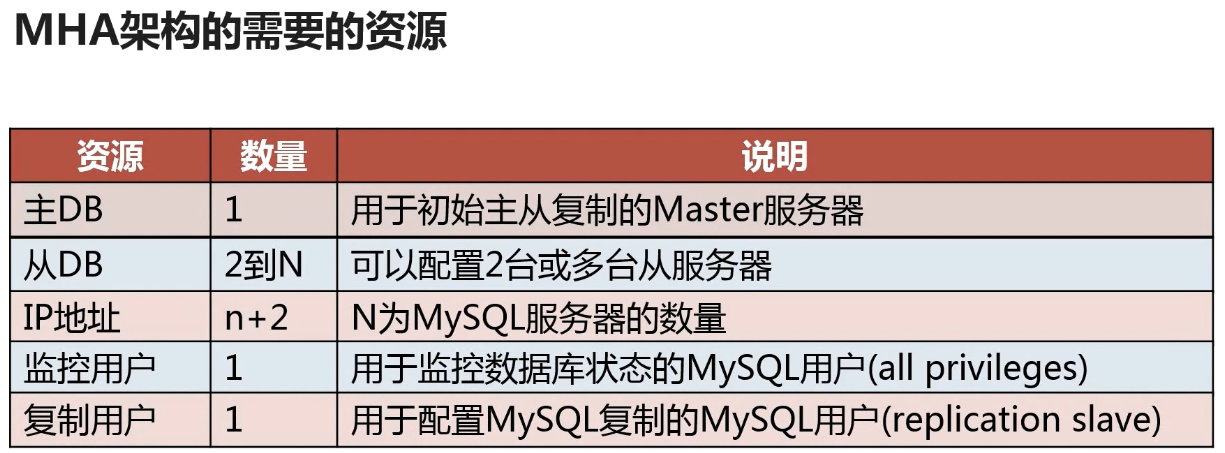
- 安装mha
- 下载地址:
- 注意,所有节点都需要安装MHA node
- 1、先安装相关依赖:
- 2、安装mha:
- 下载地址
- 下载好了之后,先安装依赖
- 如果有些依赖没有,就重新安装epel包
- 下载manager包之后安装
- 离线安装epel-release
- rpm -Uvh epel-release*rpm
- 离线安装perl-Config-Tiny perl-Time-HiRes perl-Parallel-ForkManager perl-Log-Dispatch perl-DBD-MySQL ncftp
- 配置mha
- mha访问数据库的账号与密码
- 指定mha的工作目录
- manager_workdir=/
- 指定管理日志路径
- 指定master节点存放binlog的日志文件的目录 log_bin=mysql_bin默认是在/var/lib/mysql
- 指定mha在远程节点上的工作目录
- remote_workdir=/data1/mysql_mha
- ssh连接的用户名密码
- 指定检测间隔时间
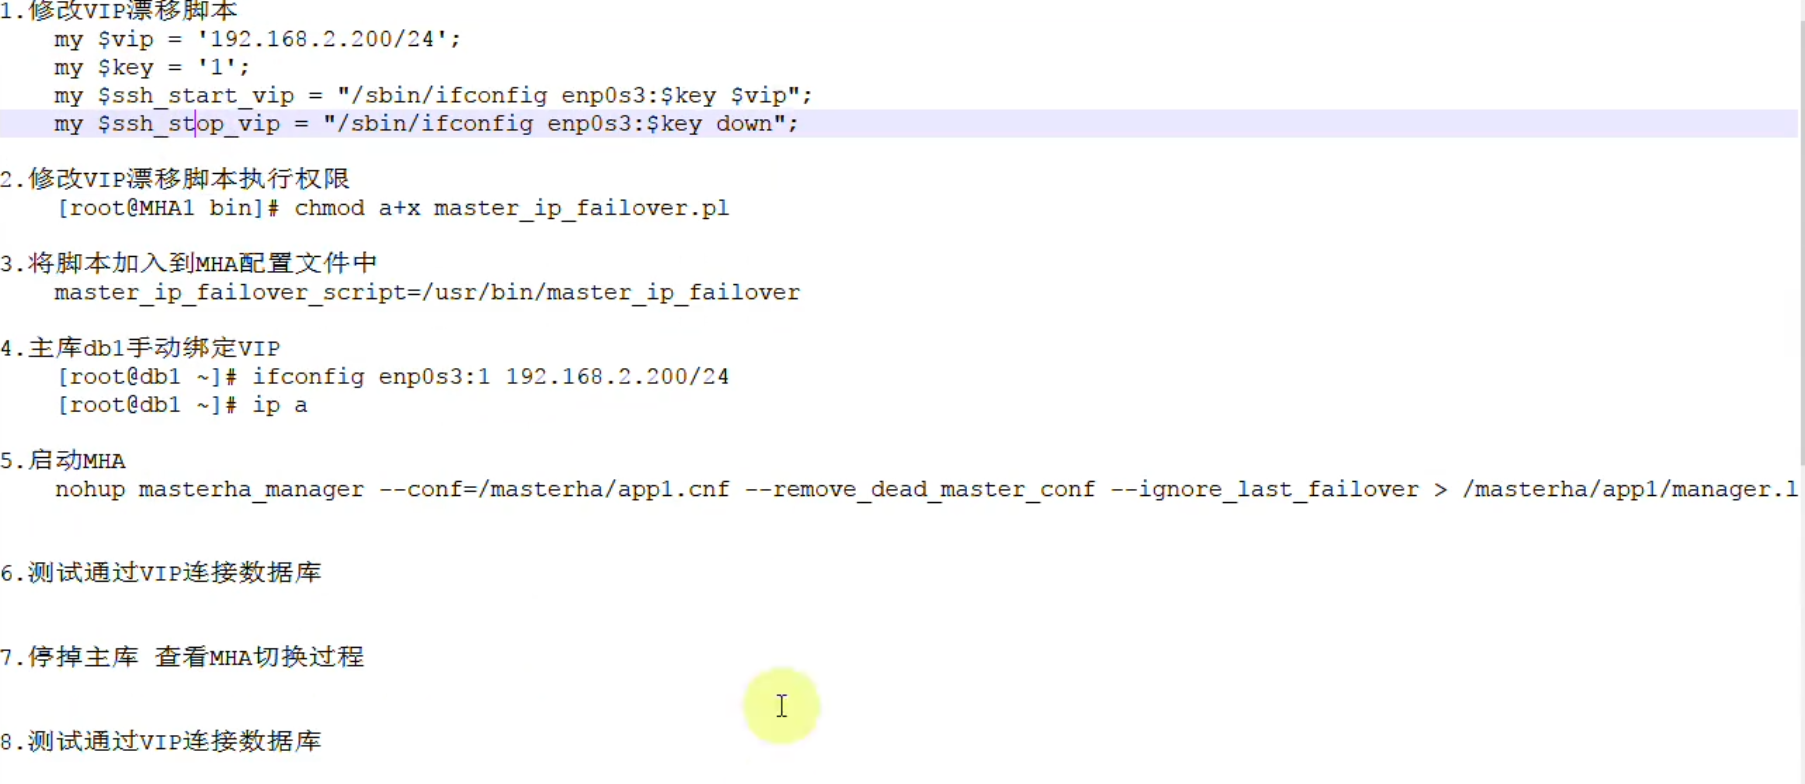
- 指定一个脚本,该脚本实现了在主从切换之后,将虚拟ip漂移到新的master上
- master_ip_failover_script=/data1/mysql_mha/master_ip_failover
- 指定用于二次检查节点状态的节点,这里不要配置主节点的ip,否则主节点网络断掉或者机器断电就无法切换
- secondary_check_script=/usr/bin/masterha_secondary_check -s 10.8.40.68 -s 10.6.119.241
- 用于故障切换的时候发送邮件提醒
- report_script=/data1/mysql_mha/send_mail
- candidate_master=1
- check_repl_delay=0
- candidate_master=1
- check_repl_delay=0
- 启动
- 问题
- binlog server配置
- 虚拟ip
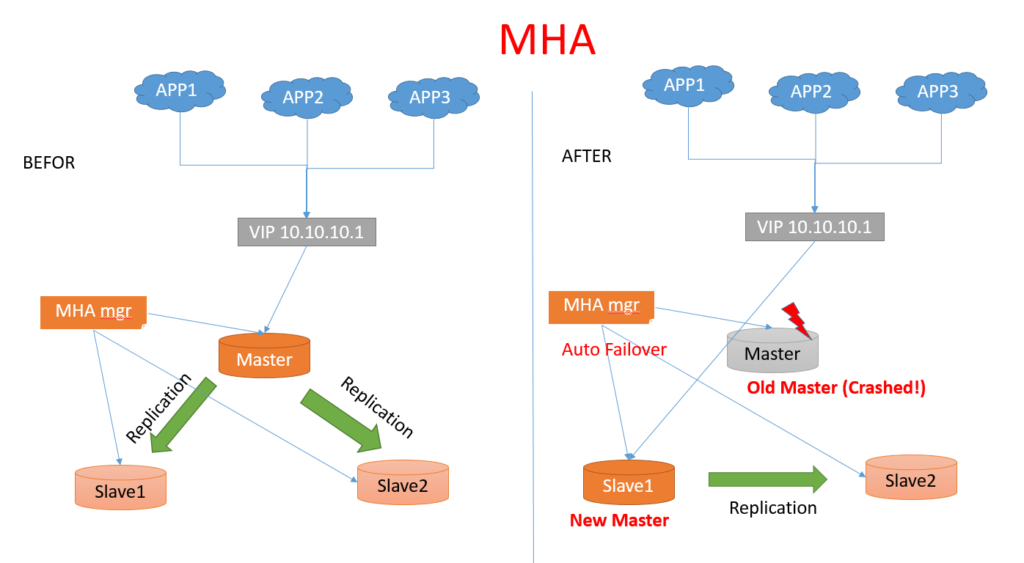
MHA(Master High Availability)【只提供master高可用】
不同于MMM的主-备切换,MHA是主从切换。
**
MySQL高可用方案:Master High Active(MHA) (一)
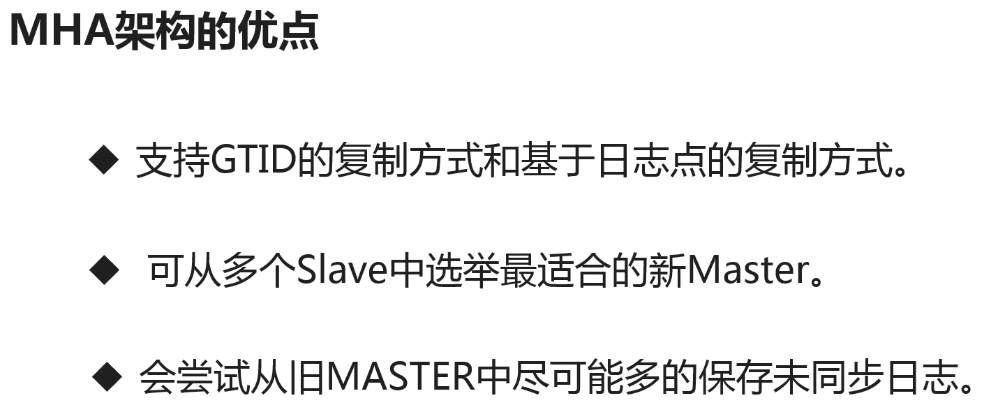
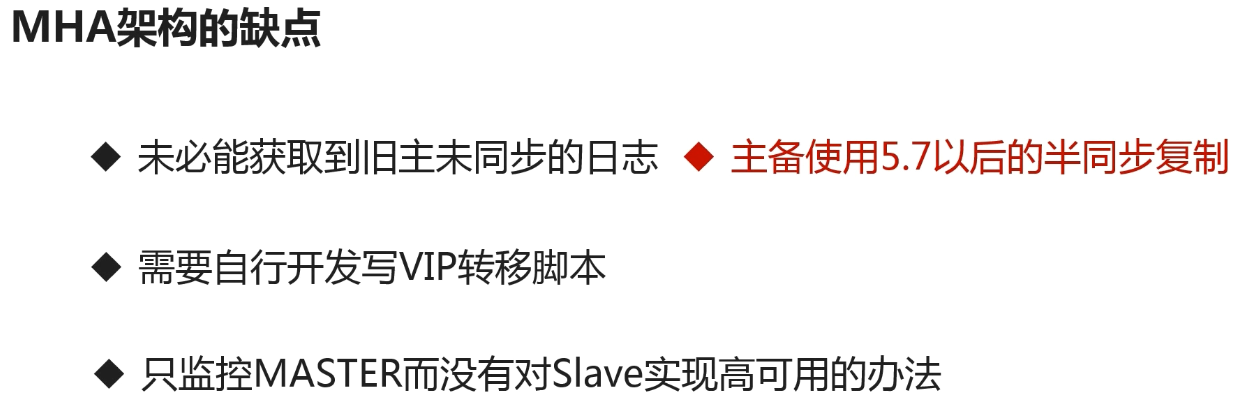
MHA优缺点
兼容Mysql8.0
如果使用以前的较老的客户端, 与MySQL8连接时, 会出现无法连接情况
将#注释掉的:default-authentication-plugin=mysql_native_password打开, 重启MySQL即可.
默认>=8.0.4的MySQL使用的default-authentication-plugin=caching_sha2_password.
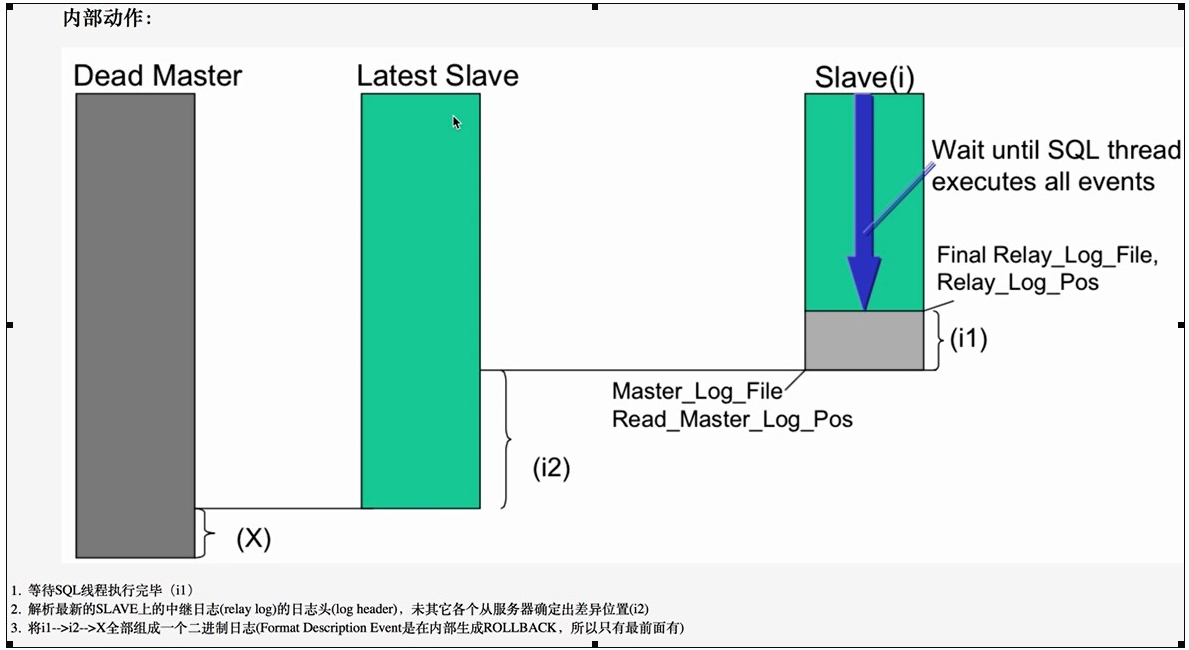
MHA工作原理

安装mha
- relay_log_purge=0 #关掉定期清除relaylog MySQL relay_log_purge=0 时的风险 - yuyue2014 - 博客园
- 搭建一主二从
创建MHA用户,用于MHA管理
create user ‘mha’@’%’ identified WITH mysql_native_password by ‘123456’; grant all privileges on . to ‘mha’@’%’ with grant option; flush privileges;、
配置ssh
所有节点安装node
下载地址:
[https://github.com/yoshinorim/mha4mysql-node/releases/tag/v0.58](https://github.com/yoshinorim/mha4mysql-node/releases/tag/v0.58)
注意,所有节点都需要安装MHA node
1、先安装相关依赖:
yum -y install epel-releaseyum -y install perl-DBD-MySQL perl-DBI ncftp
2、安装mha:
rpm -ivh mha4mysql-node-0.58-0.el7.centos.noarch.rpm
mha节点安装manager
下载地址
[https://github.com/yoshinorim/mha4mysql-manager/releases/download/v0.58/mha4mysql-manager-0.58-0.el7.centos.noarch.rpm](https://github.com/yoshinorim/mha4mysql-manager/releases/download/v0.58/mha4mysql-manager-0.58-0.el7.centos.noarch.rpm)
下载好了之后,先安装依赖
yum -y install epel-release yum -y install perl-Config-Tiny perl-Time-HiRes perl-Parallel-ForkManager perl-Log-Dispatch perl-DBD-MySQL ncftp
如果有些依赖没有,就重新安装epel包
yum -y remove epel-release yum -y install epel-release
下载manager包之后安装
rpm -ivh mha4mysql-manager-0.58-0.el7.centos.noarch.rpm
#
离线安装epel-release
Download the latest epel-release rpm from http://dl.fedoraproject.org/pub/epel/7/x86_64/Packages/e/,下载rpm文件 Install epel-release rpm:
rpm -Uvh epel-release*rpm
离线安装perl-Config-Tiny perl-Time-HiRes perl-Parallel-ForkManager perl-Log-Dispatch perl-DBD-MySQL ncftp
Download the latest epel-release rpm from http://dl.fedoraproject.org/pub/epel/7/x86_64/Packages/p/,下载rpm文件
Mysql8 MHA高可用搭建_尚天竹的博客-CSDN博客_mysql8高可用
配置mha
mkdir -p /masterha/manager
vim /etc/masterha_default.cnf manager_workdir=/masterha/manager remote_workdir=/tmp
mkdir -p /masterha/cluster1
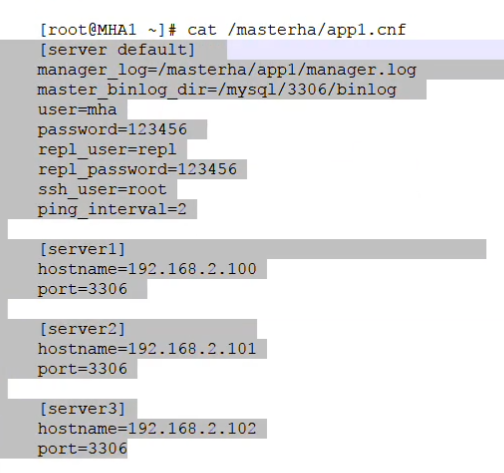
vim /masterha/cluster1.cnf
[server default]
mha访问数据库的账号与密码
user=mha password=123456 port=3306
指定mha的工作目录
manager_workdir=/
指定管理日志路径
manager_log=/masterha/cluster1/manager.log
指定master节点存放binlog的日志文件的目录 log_bin=mysql_bin默认是在/var/lib/mysql
master_binlog_dir=/var/lib/mysql
指定mha在远程节点上的工作目录
remote_workdir=/data1/mysql_mha
ssh连接的用户名密码
repl_user=root repl_password=vagrant
指定检测间隔时间
ping_interval=2
指定一个脚本,该脚本实现了在主从切换之后,将虚拟ip漂移到新的master上
master_ip_failover_script=/data1/mysql_mha/master_ip_failover
指定用于二次检查节点状态的节点,这里不要配置主节点的ip,否则主节点网络断掉或者机器断电就无法切换
secondary_check_script=/usr/bin/masterha_secondary_check -s 10.8.40.68 -s 10.6.119.241
用于故障切换的时候发送邮件提醒
report_script=/data1/mysql_mha/send_mail
ssh_user=root
[server1] hostname=192.168.137.111 port=3306
candidate_master=1
check_repl_delay=0
[server2] hostname=192.168.137.112 port=3306
candidate_master=1
check_repl_delay=0
[server3] hostname=192.168.137.113 port=3306
测试
masterha_check_ssh —conf=/masterha/cluster1.cnf
masterha_check_repl —conf=/masterha/cluster1.cnf
启动
nohup masterha_manager —conf=/masterha/cluster1.cnf > /masterha/cluster1/manager.log 2>&1 —ignore_last_failover & 需要添加ingore否则
检查状态
[root@node1 masterha]# masterha_check_status —conf=/masterha/cluster1.cnf cluster1 (pid:11596) is running(0:PING_OK), master:192.168.137.111
masterha_manager 自动切换
masterha_master_switch手动切换
手动切换
需要先停掉 masterha_stop —conf=/masterha/cluster1.cnf
masterha_master_switch —conf=/masterha/cluster1.cnf —master_state=alive —new_master_host=192.168.137.112 —orig_master_is_new_slave —running_updates_limit=10000 —interactive=0
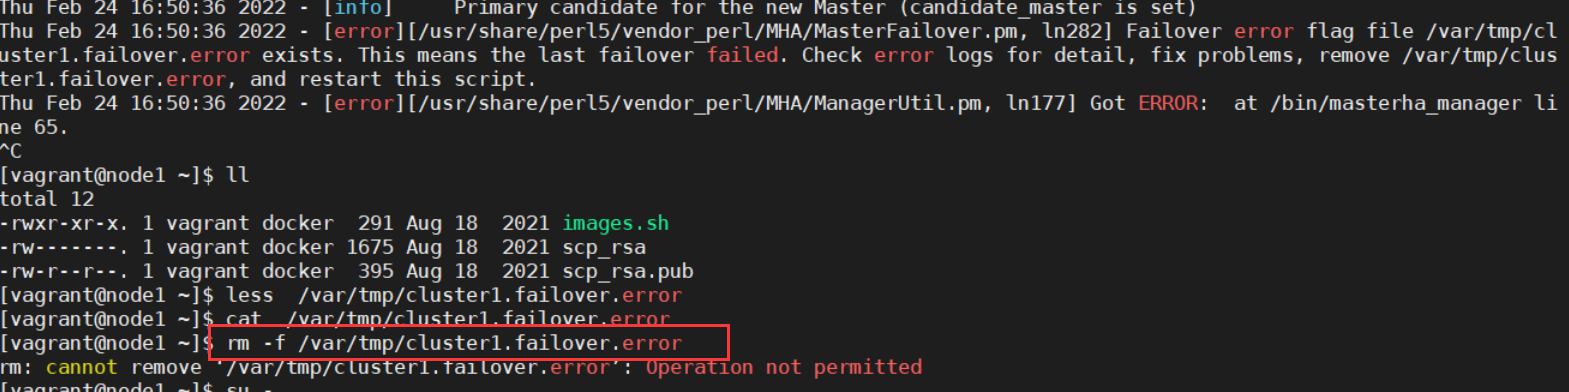
问题
masterha显示成功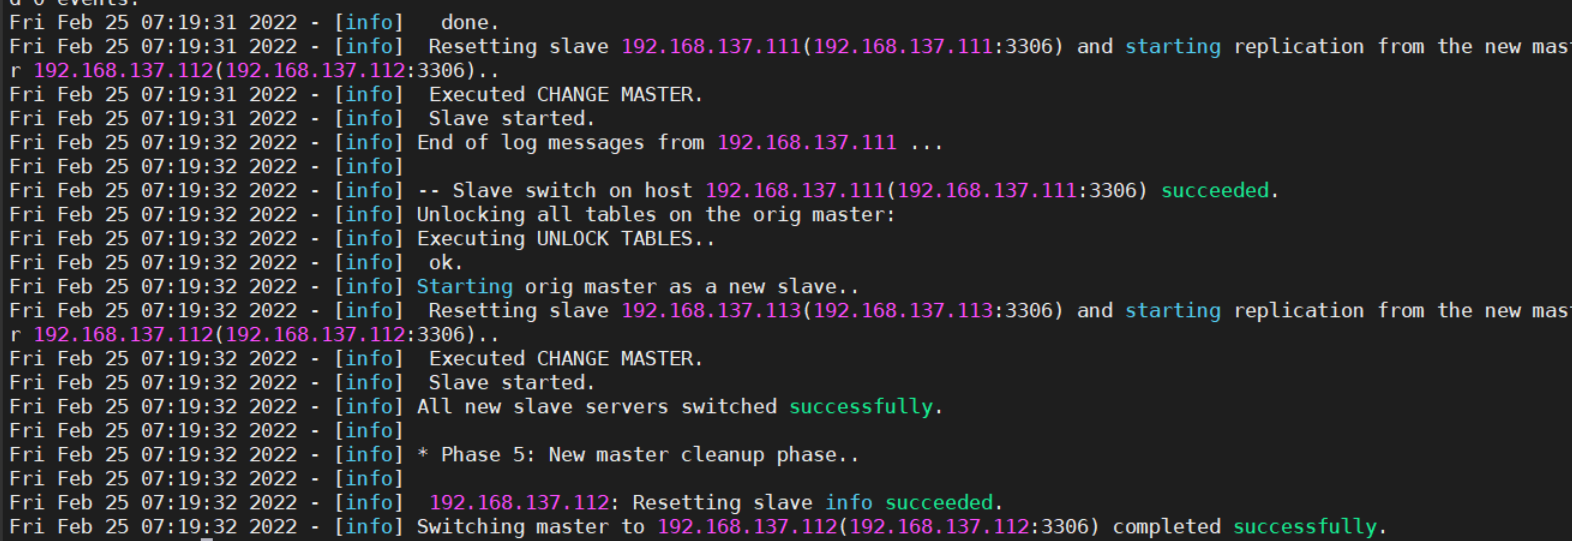
slave连接新master失败
全部数据删了,全部reset master;reset slave all;
问题
GTID模式不会去原master上读binlog恢复到slave上。(导致切换后数据丢失)
从binlog server上获取binlog。
解决方法:
- 配置binlog server
- 手动获取binlog

binlog server配置

虚拟ip
- 可以使用keepalived
- 可以使用mha脚本

若有收获,就点个赞吧
0 人点赞
