原文: https://howtodoinjava.com/spring5/webmvc/spring-dispatcherservlet-tutorial/
了解 Spring 的DispatcherServlet类,其职责以及如何使用示例进行配置。
1. 什么是 Spring DispatcherServlet
DispatcherServlet充当基于 Spring 的 Web 应用程序的前控制器。 它提供了一种用于请求处理的机制,其中实际工作由可配置的委托组件执行。 它继承自javax.servlet.http.HttpServlet,通常在web.xml文件中进行配置。
Web 应用程序可以定义任意数量的DispatcherServlet实例。 每个 servlet 将在其自己的名称空间中运行,并使用映射,处理器等加载其自己的应用程序上下文。只有ContextLoaderListener加载的根应用程序上下文(如果有)将被共享。 在大多数情况下,应用程序仅具有上下文根 URL (/)的单个DispatcherServlet,即,到达该域的所有请求都将由该域处理。
DispatcherServlet使用 Spring 配置类发现请求映射,视图解析,异常处理等所需的委托组件。
2. 如何使用WebApplicationContext
让我们了解调度程序 servlet 在内部如何工作? 在基于 Spring 的应用程序中,我们的应用程序对象位于对象容器中。 该容器创建对象和对象之间的关联,并管理它们的完整生命周期。 这些容器对象称为 Spring 管理的 Bean(或简称为 Bean),在 Spring 世界中,该容器称为应用程序上下文(通过类ApplicationContext)。
WebApplicationContext是普通ApplicationContext的扩展。 它是网络感知的ApplicationContext,即它具有 Servlet 上下文信息。 加载DispatcherServlet后,它将查找WebApplicationContext的 bean 配置文件并对其进行初始化。
通过访问 Servlet 上下文,任何实现ServletConextAware接口的 spring bean – 都可以访问ServletContext实例并用它做很多事情。 例如,它可以获取上下文初始化参数,获取上下文根信息以及获取 Web 应用程序文件夹内的资源位置。
3. DispatcherServlet XML 配置
让我们看看典型的DispatcherServlet声明和初始化的样子。
web.xml
<web-app><listener><listener-class>org.springframework.web.context.ContextLoaderListener</listener-class></listener><context-param><param-name>contextConfigLocation</param-name><param-value>/WEB-INF/dispatcher-servlet-context.xml</param-value></context-param><servlet><servlet-name>dispatcher-servlet</servlet-name><servlet-class>org.springframework.web.servlet.DispatcherServlet</servlet-class><init-param><param-name>contextConfigLocation</param-name><param-value></param-value></init-param><load-on-startup>1</load-on-startup></servlet><servlet-mapping><servlet-name>dispatcher-servlet</servlet-name><url-pattern>/*</url-pattern></servlet-mapping></web-app>
在上面的代码中,dispatcher-servlet-context.xml文件将包含所有可用于DispatcherServlet的 bean 定义和关联。 这些 bean 定义将覆盖在全局范围内用相同名称定义的任何 bean 的定义。 例如
applicationContext.xml
<beans xmlns="http://www.springframework.org/schema/beans"xmlns:xsi="http://www.w3.org/2001/XMLSchema-instance"xsi:schemaLocation="http://www.springframework.org/schema/beanshttp://www.springframework.org/schema/beans/spring-beans-2.5.xsd"><bean id="viewResolver"class="org.springframework.web.servlet.view.InternalResourceViewResolver" ><property name="prefix"><value>/WEB-INF/views/</value></property><property name="suffix"><value>.jsp</value></property></bean></beans>
4. DispatcherServlet Java 配置
从 Servlet 3.0 开始,除了web.xml文件中的声明性配置外,还可以通过实现或扩展 Spring 提供的这三个支持类之一来以编程方式配置DispatcherServlet:
WebAppInitializer界面AbstractDispatcherServletInitializer抽象类AbstractAnnotationConfigDispatcherServletInitializer抽象类
4.1. WebAppInitializer示例
在下面的类中,WebApplicationInitializer确保SpringServletContainerInitializer检测到类ApplicationInitializer(它本身会自动运行),并用于初始化任何 Servlet 3 容器。
spring boot DispatcherServlet映射的示例。
ApplicationInitializer.java
public class ApplicationInitializer implements WebApplicationInitializer{@Overridepublic void onStartup(ServletContext servletContext) throws ServletException{XmlWebApplicationContext appContext = new XmlWebApplicationContext();appContext.setConfigLocation("/WEB-INF/dispatcher-servlet-context.xml");ServletRegistration.Dynamic registration = servletContext.addServlet("rootDispatcher", new DispatcherServlet(appContext));registration.setLoadOnStartup(1);registration.addMapping("/");}}
4.2. 完整的基于 Java 的初始化
ApplicationInitializer.java
public class ApplicationInitializer implements WebApplicationInitializer{@Overridepublic void onStartup(ServletContext container){// Create the 'root' Spring application contextAnnotationConfigWebApplicationContext rootContext = new AnnotationConfigWebApplicationContext();rootContext.register(AppConfig.class);// Manage the lifecycle of the root application contextcontainer.addListener(new ContextLoaderListener(rootContext));// Create the dispatcher servlet's Spring application contextAnnotationConfigWebApplicationContext dispatcherContext = new AnnotationConfigWebApplicationContext();dispatcherContext.register(DispatcherConfig.class);ServletRegistration.Dynamic dispatcher = container.addServlet("dispatcher",new DispatcherServlet(dispatcherContext));dispatcher.setLoadOnStartup(1);dispatcher.addMapping("/");}}
在上面的代码中,AppConfig和DispatcherConfig类定义将在 Web 应用程序上下文中的 spring 托管 bean。
4.3. AbstractDispatcherServletInitializer示例
这是在 Servlet 上下文中注册DispatcherServlet的WebApplicationInitializer实现的基类。
ApplicationInitializer.java
public class ApplicationInitializer extends AbstractDispatcherServletInitializer {@Overrideprotected WebApplicationContext createRootApplicationContext() {return null;}@Overrideprotected WebApplicationContext createServletApplicationContext() {XmlWebApplicationContext cxt = new XmlWebApplicationContext();cxt.setConfigLocation("/WEB-INF/dispatcher-servlet-context.xml");return cxt;}@Overrideprotected String[] getServletMappings() {return new String[] { "/" };}//Register filters@Overrideprotected Filter[] getServletFilters() {return new Filter[] { new HiddenHttpMethodFilter(), new CharacterEncodingFilter() };}}
请注意,如果您需要自定义DispatcherServlet,则可以覆盖createDispatcherServlet()方法。
4.4. AbstractAnnotationConfigDispatcherServletInitializer示例
该类扩展了AbstractDispatcherServletInitializer并隐式地执行了一些操作,否则您可能会自己做。 另一个优点是,您现在可以使用 Spring 提供的便利类,而不必手动配置DispatcherServlet和/或ContextLoaderListener。
对于使用基于 Java 的 Spring 配置的应用程序,这是首选方法。 它使您能够启动 servlet 应用程序上下文以及根应用程序上下文。
AppInitializer.java
public class AppInitializer extends AbstractAnnotationConfigDispatcherServletInitializer {@Overrideprotected Class<?>[] getRootConfigClasses() {return new Class[] { RootConfig.class };}@Overrideprotected Class<?>[] getServletConfigClasses() {return new Class[] { WebMvcConfig.class };}@Overrideprotected String[] getServletMappings() {return new String[] { "/" };}}
这里RootConfig和WebMvcConfig类用于在 root 和 servlet 上下文范围内配置 bean。
阅读更多: Spring 5 MVC 示例
5. 支持DispatcherServlet的 Bean
收到网络请求后,DispatcherServlet将执行一组操作以进行请求处理。 为此,它使用了一组支持 bean。 下表列出了这些默认配置的 Bean 及其职责:
| Bean | 职责范围 |
|---|---|
HandlerMapping |
将传入的 Web 请求映射到处理器以及预处理器和后处理器 |
HandlerAdapter |
调用用于解析参数和依赖项的处理器,例如用于 URL 映射的控制器方法端点的带注解的参数 |
HandlerExceptionResolver |
允许以编程方式处理异常并将异常映射到视图 |
ViewResolver |
解析逻辑视图名称以查看实例 |
LocaleResolver |
解决客户的语言环境以实现国际化 |
LocaleContextResolver |
LocaleResolver的更扩展,带有时区信息 |
ThemeResolver |
解决了在您的应用中配置的主题,以增强用户体验 |
MultipartResolver |
处理多部分文件上传作为 HTTP 请求的一部分 |
FlashMapManager |
管理FlashMap实例,这些实例在彼此重定向的请求之间存储临时 Flash 属性 |
如果要更改任何 bean 的任何特定行为,则需要覆盖它。
6. Spring DispatcherServlet示例
为了演示DispatcherServlet的使用,我编写了一个非常简单的应用程序,该应用程序仅配置了调度程序 servlet 并覆盖了视图解析程序 bean。
6.1. 项目结构
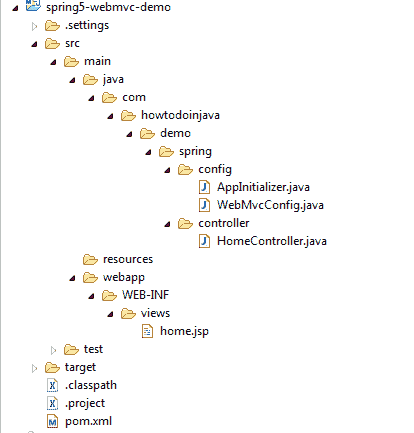
Spring5 MVC 项目结构
6.2. AppInitializer.java
AppInitializer.java
package com.howtodoinjava.demo.spring.config;public class AppInitializer extendsAbstractAnnotationConfigDispatcherServletInitializer {@Overrideprotected Class<?>[] getRootConfigClasses() {return new Class[] { };}@Overrideprotected Class<?>[] getServletConfigClasses() {return new Class[] { WebMvcConfig.class };}@Overrideprotected String[] getServletMappings() {return new String[] { "/" };}}
6.3. WebMvcConfig.java
WebMvcConfig.java
@Configuration@EnableWebMvc@ComponentScan(basePackages = { "com.howtodoinjava.demo.spring"})public class WebMvcConfig implements WebMvcConfigurer {@Beanpublic InternalResourceViewResolver resolver() {InternalResourceViewResolver resolver = new InternalResourceViewResolver();resolver.setViewClass(JstlView.class);resolver.setPrefix("/WEB-INF/views/");resolver.setSuffix(".jsp");return resolver;}}
6.4. HomeController.java
HomeController.java
@Controllerpublic class HomeController{@GetMapping("/")public String homeInit(Locale locale, Model model) {return "home";}}
home.jsp
home.jsp
<html><head><title>Spring 5 Web MVC Example</title></head><body><h1>HowToDoInJava.com</h1><h2>Spring 5 Web MVC DispatcherServlet Example</h2></body></html>
6.5. pom.xml
pom.xml
<project xmlns="http://maven.apache.org/POM/4.0.0" xmlns:xsi="http://www.w3.org/2001/XMLSchema-instance"xsi:schemaLocation="http://maven.apache.org/POM/4.0.0 http://maven.apache.org/xsd/maven-4.0.0.xsd;<modelVersion>4.0.0</modelVersion><groupId>com.howtodoinjava.spring5.mvc</groupId><artifactId>spring5-webmvc-demo</artifactId><packaging>war</packaging><version>0.0.1-SNAPSHOT</version><name>spring5-webmvc-demo Maven Webapp</name><url>http://maven.apache.org</url><properties><failOnMissingWebXml>false</failOnMissingWebXml><spring.version>5.2.0.RELEASE</spring.version><jstl.version>1.2.1</jstl.version><tld.version>1.1.2</tld.version><servlets.version>3.1.0</servlets.version><jsp.version>2.3.1</jsp.version></properties><dependencies><!-- Spring MVC Dependency --><dependency><groupId>org.springframework</groupId><artifactId>spring-webmvc</artifactId><version>${spring.version}</version></dependency><!-- JSTL Dependency --><dependency><groupId>javax.servlet.jsp.jstl</groupId><artifactId>javax.servlet.jsp.jstl-api</artifactId><version>${jstl.version}</version></dependency><dependency><groupId>taglibs</groupId><artifactId>standard</artifactId><version>${tld.version}</version></dependency><!-- Servlet Dependency --><dependency><groupId>javax.servlet</groupId><artifactId>javax.servlet-api</artifactId><version>${servlets.version}</version><scope>provided</scope></dependency><!-- JSP Dependency --><dependency><groupId>javax.servlet.jsp</groupId><artifactId>javax.servlet.jsp-api</artifactId><version>${jsp.version}</version><scope>provided</scope></dependency></dependencies><build><sourceDirectory>src/main/java</sourceDirectory><resources><resource><directory>src/main/resources</directory></resource></resources><plugins><plugin><artifactId>maven-compiler-plugin</artifactId><version>3.5.1</version><configuration><source>1.8</source><target>1.8</target></configuration></plugin><plugin><groupId>org.apache.tomcat.maven</groupId><artifactId>tomcat7-maven-plugin</artifactId><version>2.2</version><configuration><path>/</path></configuration></plugin></plugins></build></project>
6.6. 运行应用程序
要运行应用程序,请执行 maven 目标:tomcat7:run。 现在在浏览器中打开http://localhost:8080。
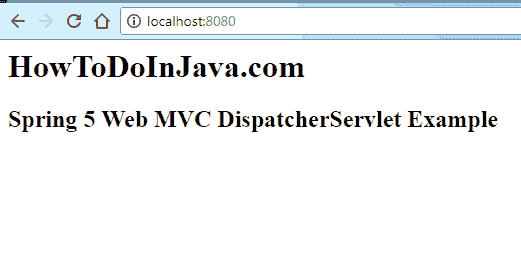
Spring DispatcherServlet示例截图
将我的问题放在评论部分。
学习愉快!

若有收获,就点个赞吧
0 人点赞
