原文: https://howtodoinjava.com/spring-boot/spring-soap-client-webservicetemplate/
学习使用 Spring Boot Soap 客户端使用 SOAP Web 服务以及使用 JAXB maven 插件自动生成客户端代理类。 创建 SOAP Web 服务不在本教程的讨论范围内,但是您可以在中学习它。
先决条件
在运行此示例之前,我们需要准备好一个 SOAP 服务,该服务将从该客户端代码中调用。 为此,您可以下载附件的 maven 项目(在文章结尾),然后在本地工作区中运行它并使用它。
运行此 SOAP 服务器项目后,您将从http://localhost:8080/service/studentDetailsWsdl.wsdl获取 WSDL。 将 WSDL 下载为studentDetailsWsdl.wsdl,稍后将其放置在客户端项目的resources/wsdl文件夹中,该文件夹将在下一步创建以生成客户端代理代码。
Spring Boot Soap 客户端的技术栈
- JDK 1.8,Eclipse,Maven – 开发环境
- SpringBoot – 基础应用程序框架
maven-jaxb2-plugin插件 – 用于生成 JAXB 存根- SpringBoot
CommandLineRunner– 测试客户端代码
项目结构
为该演示创建的类和文件如下所示。
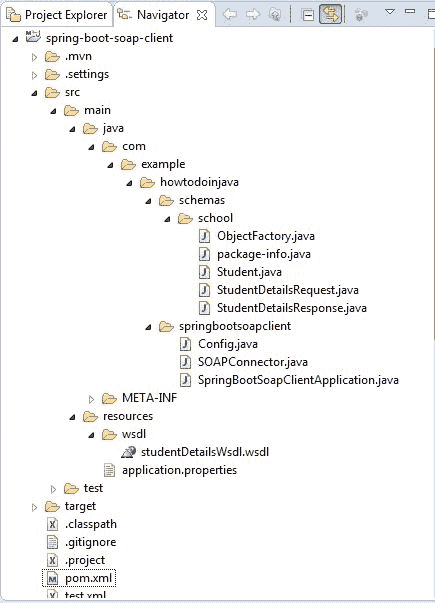
SOAP 客户端项目结构
使用WebServiceTemplate创建 Spring 客户端
创建启动项目
仅从具有Web Services依赖关系的 SPRING 初始化器站点创建一个 spring boot 项目。 选择依赖项并提供适当的 Maven GAV 坐标后,以压缩格式下载项目。 解压缩,然后将 eclipse 中的项目导入为 maven 项目。
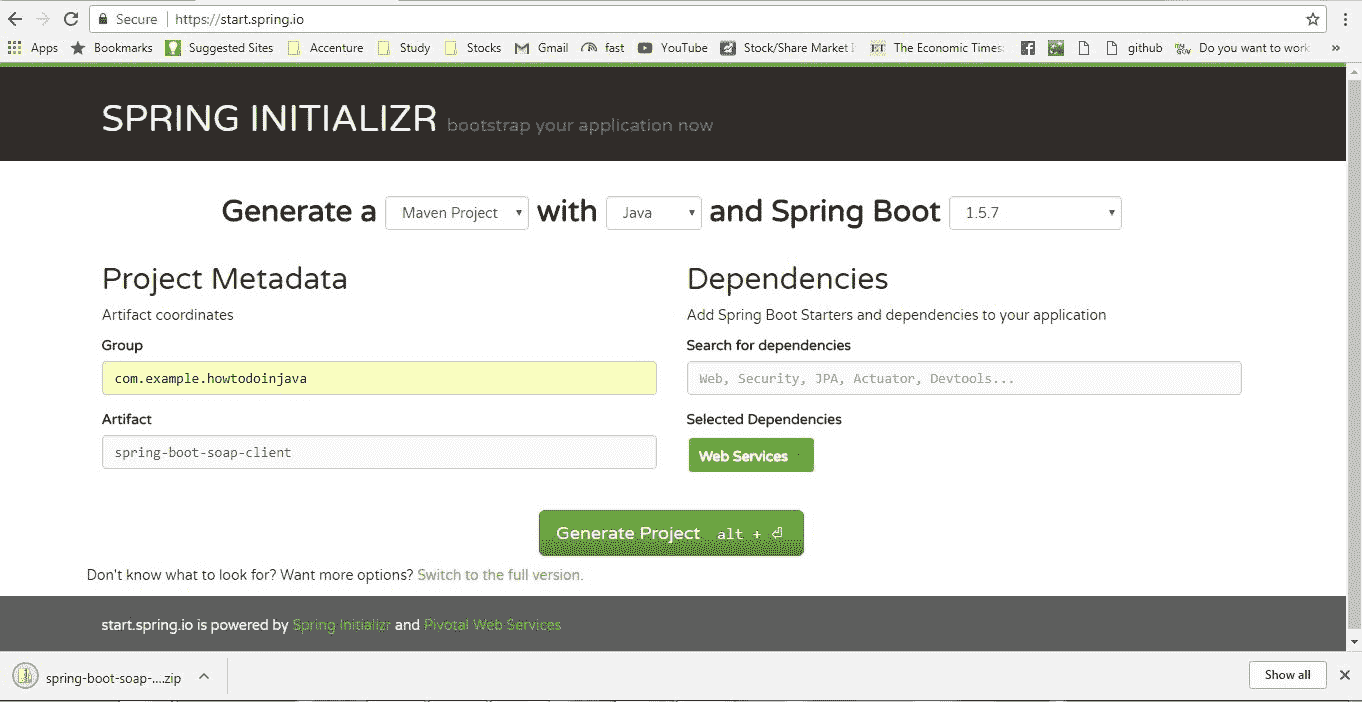
Spring boot 项目生成
生成 SOAP 域类
现在使用maven-jaxb2-plugin maven 插件生成 JAXB 注解的存根类。 为此,将此 maven 插件添加到项目的pom.xml中。
pom.xml
<plugin><groupId>org.jvnet.jaxb2.maven2</groupId><artifactId>maven-jaxb2-plugin</artifactId><version>0.13.2</version><executions><execution><goals><goal>generate</goal></goals></execution></executions><configuration><generatePackage>com.example.howtodoinjava.schemas.school</generatePackage><generateDirectory>${project.basedir}/src/main/java</generateDirectory><schemaDirectory>${project.basedir}/src/main/resources/wsdl</schemaDirectory><schemaIncludes><include>*.wsdl</include></schemaIncludes></configuration></plugin>
此插件将在项目的src目录的com.example.howtodoinjava.springbootsoapclient包中生成类,并且此插件将检查类的生成时间戳,以便仅在WSDL中发生任何更改时才生成这些类。
使用WebServiceTemplate创建 SOAP 客户端
创建一个名为SOAPConnector.java的类,该类将充当对 Web 服务的所有请求的通用 Web 服务客户端。
SOAPConnector.java
package com.example.howtodoinjava.springbootsoapclient;import org.springframework.ws.client.core.support.WebServiceGatewaySupport;public class SOAPConnector extends WebServiceGatewaySupport {public Object callWebService(String url, Object request){return getWebServiceTemplate().marshalSendAndReceive(url, request);}}
SOAPConnector类是对WebServiceGatewaySupport的扩展,它基本上是通过getWebServiceTemplate()方法提供的WebServiceTemplate内部实现注入一个接口。- 我们将使用此
WebServiceTemplate来调用 SOAP 服务。 - 该类还期望注入一个名为
Marshaller和Unmarshaller的 spring bean,它们将由配置类提供,我们将在下面看到。
Spring bean 配置
现在,我们需要创建一个用@Configuration注解的配置类,该类将具有SOAPConnector所需的必需的 bean 定义,以使其正常工作。
Config.java
package com.example.howtodoinjava.springbootsoapclient;import org.springframework.context.annotation.Bean;import org.springframework.context.annotation.Configuration;import org.springframework.oxm.jaxb.Jaxb2Marshaller;@Configurationpublic class Config {@Beanpublic Jaxb2Marshaller marshaller() {Jaxb2Marshaller marshaller = new Jaxb2Marshaller();// this is the package name specified in the <generatePackage> specified in// pom.xmlmarshaller.setContextPath("com.example.howtodoinjava.schemas.school");return marshaller;}@Beanpublic SOAPConnector soapConnector(Jaxb2Marshaller marshaller) {SOAPConnector client = new SOAPConnector();client.setDefaultUri("http://localhost:8080/service/student-details");client.setMarshaller(marshaller);client.setUnmarshaller(marshaller);return client;}}
WebServiceGatewaySupport需要Marshaller和Unmarshaller,它们是Jaxb2Marshaller类的实例。- 它使用
com.example.howtodoinjava.schemas.school作为 JAXB 类的基本包。 它将使用此包创建 JAXB 上下文。 - 我们将使用此
Jaxb2Marshallerbean 作为SOAPConnectorbean 的Marshaller/Unmarshaller。
使用CommandLineRunner测试
为简单起见,我们将创建一个 Spring Boot 命令行运行程序,该加载程序将加载 spring 上下文并调用处理器方法,并将命令行参数传递给该方法。 实时地,我们需要用一些其他代码替换此命令行运行程序,这些代码将更适合企业。
我们需要在SpringBootApplication类中添加此命令行运行器 bean,如下。
SpringBootSoapClientApplication.java
package com.example.howtodoinjava.springbootsoapclient;import org.springframework.boot.CommandLineRunner;import org.springframework.boot.SpringApplication;import org.springframework.boot.autoconfigure.SpringBootApplication;import org.springframework.context.annotation.Bean;import com.example.howtodoinjava.schemas.school.StudentDetailsRequest;import com.example.howtodoinjava.schemas.school.StudentDetailsResponse;@SpringBootApplicationpublic class SpringBootSoapClientApplication {public static void main(String[] args) {SpringApplication.run(SpringBootSoapClientApplication.class, args);}@BeanCommandLineRunner lookup(SOAPConnector soapConnector) {return args -> {String name = "Sajal";//Default Nameif(args.length>0){name = args[0];}StudentDetailsRequest request = new StudentDetailsRequest();request.setName(name);StudentDetailsResponse response =(StudentDetailsResponse) soapConnector.callWebService("http://localhost:8080/service/student-details", request);System.out.println("Got Response As below ========= : ");System.out.println("Name : "+response.getStudent().getName());System.out.println("Standard : "+response.getStudent().getStandard());System.out.println("Address : "+response.getStudent().getAddress());};}}
在这里,我们从命令行获取搜索参数,并创建StudentDetailsRequest对象,并使用SOAPConnector调用 SOAP Web 服务。
一些可选配置
打开application.properties并添加以下配置
application.properties
server.port = 9090logging.level.org.springframework.ws=TRACE
在这里,我们用server.port = 9090将默认端口覆盖为9090,因为您已经注意到我们的示例 SOAP 服务在默认端口8080中运行,因为两个 Java 进程不能在同一端口中运行。
另外,我们正在通过logging.level.org.springframework.ws=TRACE为org.springframework.ws软件包启用TRACE日志记录。 这将在控制台中打印 SOAP 负载。
这就是我们使用 Spring Boot 消费 SOAP 服务所需要做的一切,现在是时候进行测试了。
示例
现在使用 maven 命令mvn clean install来构建应用程序。 我们可以从命令提示符下通过命令java -jar target\spring-boot-soap-client-0.0.1-SNAPSHOT.jar Lokesh调用命令行运行程序。
请注意,我们在此处传递了一个命令行参数Lokesh,该参数将在CommandLineRunner bean 的查找方法中使用。 如果没有传递任何名称,我们将在该方法中传递一个默认名称。
调用命令行运行程序后,我们应该看到 SOAP 服务输出,并且响应已正确解组到 JAXB 对象StudentDetailsResponse。 同样,我们可以在 TRACE 日志中看到完整的 SOAP 请求/响应,如下所示。
输出
2017-10-09 23:20:45.548 TRACE 9204 --- [ main] o.s.ws.client.MessageTracing.received : Received response [<SOAP-ENV:Envelope xmlns:SOAP-ENV="http://schemas.xmlsoap.org/soap/envelope/"><SOAP-ENV:Header/><SOAP-ENV:Body><ns2:StudentDetailsResponse xmlns:ns2="https://www.howtodoinjava.com/xml/school"><ns2:Student><ns2:name>Sajal</ns2:name><ns2:standard>5</ns2:standard><ns2:address>Pune</ns2:address></ns2:Student></ns2:StudentDetailsResponse></SOAP-ENV:Body></SOAP-ENV:Envelope>] for request [<SOAP-ENV:Envelope xmlns:SOAP-ENV="http://schemas.xmlsoap.org/soap/envelope/"><SOAP-ENV:Header/><SOAP-ENV:Body><ns2:StudentDetailsRequest xmlns:ns2="https://www.howtodoinjava.com/xml/school"><ns2:name>Sajal</ns2:name></ns2:StudentDetailsRequest></SOAP-ENV:Body></SOAP-ENV:Envelope>]Got Response As below ========= :Name : LokeshStandard : 6Address : Delhi
总结
在本 SOAP 教程中,我们学习了如何轻松地从 Spring Boot Soap 客户端中使用来使用 SOAP 服务。 每当需要使用任何此类 SOAP 服务时,都可以使用此方法。 希望这对您有用。
请在评论部分添加您的反馈。
学习愉快!

若有收获,就点个赞吧
0 人点赞
