原文: https://howtodoinjava.com/vaadin/vaadin-spring-security-basicauth-example/
在本教程中,我们将学习在 spring security 模块提供的基本认证安全性之后保护 vaadin 应用的安全。
我正在使用 Spring 安全配置更新 vaadin helloworld 应用源代码,因此,如果您已经有任何 vaadin 应用,则可以直接查看 Spring 安全性部分。
Table of ContentsDevelopment environmentSpring Security BasicAuth ConfigurationVaadin UI ConfigurationMaven DependenciesRun the application
开发环境
本示例使用以下工具和框架来构建演示 vaadin 应用,该应用在 spring 的基本认证安全性的保护下得到保护。
Spring Security BasicAuth 配置
要配置 spring basicauth 安全性,您需要在类路径中添加applicationContext.xml文件(如果尚不存在),然后需要配置安全性设置,例如,安全的 URL 模式,哪些角色可以访问哪些 URL 等。
applicationContext.xml
<?xml version="1.0" encoding="UTF-8"?><beans:beans xmlns="http://www.springframework.org/schema/security"xmlns:beans="http://www.springframework.org/schema/beans"xmlns:xsi="http://www.w3.org/2001/XMLSchema-instance"xsi:schemaLocation="http://www.springframework.org/schema/beanshttp://www.springframework.org/schema/beans/spring-beans-4.1.xsdhttp://www.springframework.org/schema/securityhttp://www.springframework.org/schema/security/spring-security-4.1.xsd"><http auto-config="true"><intercept-url pattern="/vaadinServlet/**" access="hasRole('ROLE_EDITOR')" /><intercept-url pattern="/vaadinServlet/*.*" access="hasRole('ROLE_EDITOR')" /><intercept-url pattern="/**" access="hasRole('ROLE_EDITOR')" /><http-basic /><csrf disabled="true"/></http><authentication-manager><authentication-provider><user-service><user name="howtodoinjava" password="password" authorities="ROLE_EDITOR" /></user-service></authentication-provider></authentication-manager></beans:beans>
现在,您需要在web.xml文件中配置springSecurityFilterChain,以便将安全性添加到应用中。 另外,如果您添加了新的applicationContext.xml文件,则还需要注册ContextLoaderListener。
web.xml
<?xml version="1.0" encoding="UTF-8"?><web-app id="WebApp_ID" version="2.4"xmlns="http://java.sun.com/xml/ns/j2ee" xmlns:xsi="http://www.w3.org/2001/XMLSchema-instance"xsi:schemaLocation="http://java.sun.com/xml/ns/j2eehttp://java.sun.com/xml/ns/j2ee/web-app_2_4.xsd"><filter><filter-name>springSecurityFilterChain</filter-name><filter-class>org.springframework.web.filter.DelegatingFilterProxy</filter-class></filter><filter-mapping><filter-name>springSecurityFilterChain</filter-name><url-pattern>/*</url-pattern></filter-mapping><listener><listener-class>org.springframework.web.context.ContextLoaderListener</listener-class></listener>//Other configuration will be added here</web-app>
Spring 基本认证配置已完成。 现在,您可以根据应用的要求修改各个部分。 例如。 您可能要从数据库中获取用户名/密码详细信息,然后可以在applicationContext.xml文件的authentication-provider中使用jdbc-user-service 。
Vaadin UI 配置
正如我已经提到的,我正在修改 vaadin helloworld 应用,它具有非常基本的功能。 只需在web.xml文件和带有标签的主页屏幕中进行VaadinServlet配置,以在认证成功的情况下显示成功消息。
web.xml
<?xml version="1.0" encoding="UTF-8"?><web-app id="WebApp_ID" version="2.4"xmlns="http://java.sun.com/xml/ns/j2ee" xmlns:xsi="http://www.w3.org/2001/XMLSchema-instance"xsi:schemaLocation="http://java.sun.com/xml/ns/j2eehttp://java.sun.com/xml/ns/j2ee/web-app_2_4.xsd">//Spring security configuration as mentioned in above section<context-param><description>Vaadin production mode</description><param-name>productionMode</param-name><param-value>false</param-value></context-param><servlet><servlet-name>vaadinServlet</servlet-name><servlet-class>com.vaadin.server.VaadinServlet</servlet-class><init-param><param-name>UI</param-name><param-value>com.howtodoinjava.vaadin.demo.AppUI</param-value></init-param></servlet><servlet-mapping><servlet-name>vaadinServlet</servlet-name><url-pattern>/*</url-pattern></servlet-mapping></web-app>
AppUI.java
package com.howtodoinjava.vaadin.demo;import com.vaadin.annotations.Theme;import com.vaadin.server.VaadinRequest;import com.vaadin.ui.Label;import com.vaadin.ui.UI;import com.vaadin.ui.VerticalLayout;@Theme("mytheme")public class AppUI extends UI {private static final long serialVersionUID = 1387172685749279538L;@Overrideprotected void init(VaadinRequest vaadinRequest) {final VerticalLayout layout = new VerticalLayout();Label label = new Label("Welcome to BasicAuth Secured Vaadin Application");layout.addComponent(label);layout.setMargin(true);layout.setSpacing(true);setContent(layout);}}
Maven 依赖
应用非常重要的一部分是收集和配置运行时依赖项。 当我们使用 maven 时,我已将以下依赖项添加到现有的pom.xml文件中。
pom.xml
<!-- Spring Security --><dependency><groupId>org.springframework.security</groupId><artifactId>spring-security-core</artifactId><version>${org.springframework.version}</version></dependency><dependency><groupId>org.springframework.security</groupId><artifactId>spring-security-web</artifactId><version>${org.springframework.version}</version></dependency><dependency><groupId>org.springframework.security</groupId><artifactId>spring-security-config</artifactId><version>${org.springframework.version}</version></dependency><!-- Commons Logging is required with Spring4.x --><dependency><groupId>commons-logging</groupId><artifactId>commons-logging</artifactId><version>1.2</version></dependency>
运行应用
现在,该应用已配置完毕,可以进行测试了。 在浏览器中点击应用 URL。
您将在浏览器弹出窗口中输入您的用户名和密码。
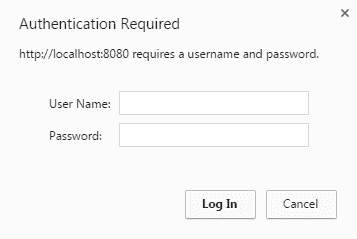
Vaadin Spring Security BasicAuth 窗口
弹出字段将被清除,并再次询问用户名/密码。
应用的主页将显示成功消息。
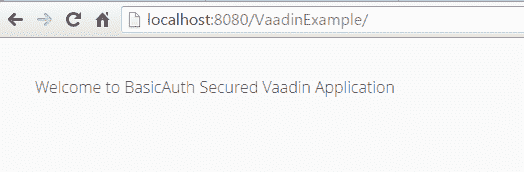
Vaadin Spring Security BasicAuth 成功
将我的问题放在评论部分。
资源:

若有收获,就点个赞吧
0 人点赞
