1. ActiveMQ 是什么?
- ActiveMQ 是 Apache 出品,最流行的,能力强劲的开源消息总线。
- ActiveMQ 是一个完全支持 JMS1.1 和 J2EE 1.4 规范的 JMS Provider 实现,尽管 JMS 规范出台已经是很久的事情了,但是 JMS 在当今的 J2EE 应用中仍然扮演着特殊的地位。
2. JMS 规范
概述
- Java 消息服务(Java Message Service,即 JMS)应用程序接口是一个 Java 平台中关于面向消息中间件(MOM)的 API,用于在两个应用程序中间,或分布式系统中发送消息,进行异步通信。Java 消息服务是一个与具体平台无关的 API。
JMS 的对象模型
| 对象 | 描述 |
|---|---|
| ConnectionFactory | 连接工厂 |
| Connection | 连接 |
| Session | 会话 |
| Destination | 目的 |
| MessageProducer | 生产者 |
| MessageConsumer | 消费者 |
| Message | 消息 |
| Broker | 消息中间件的实例(ActiveMQ) |
JMS 的消息类型
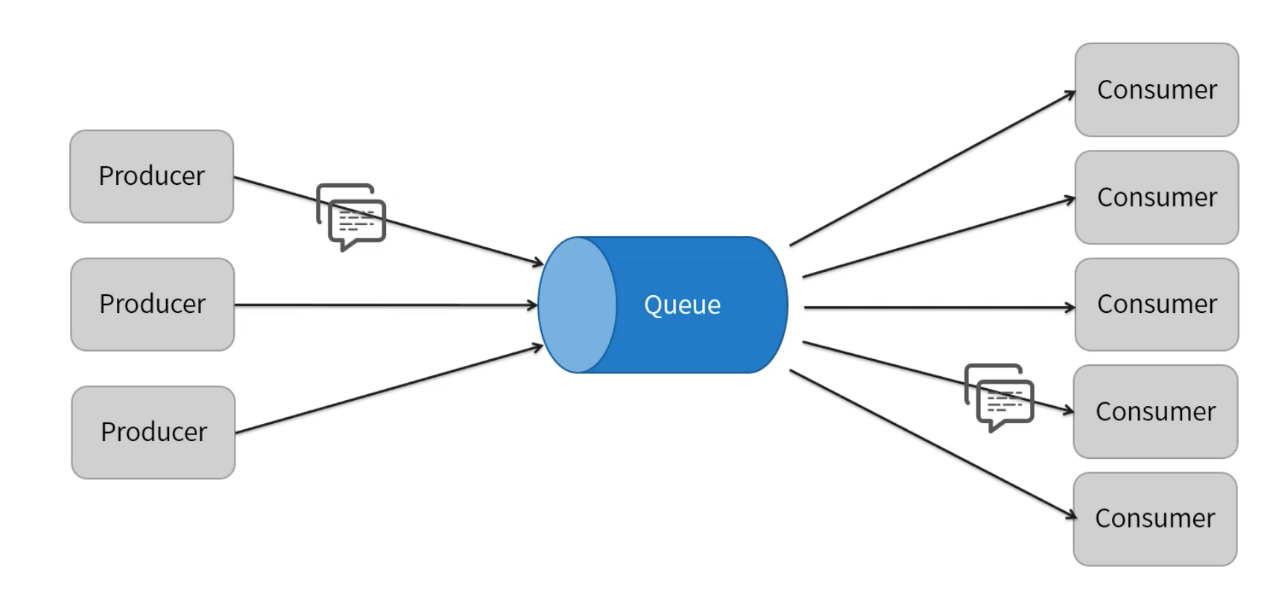
- Point-to-Point(P2P)/点对点
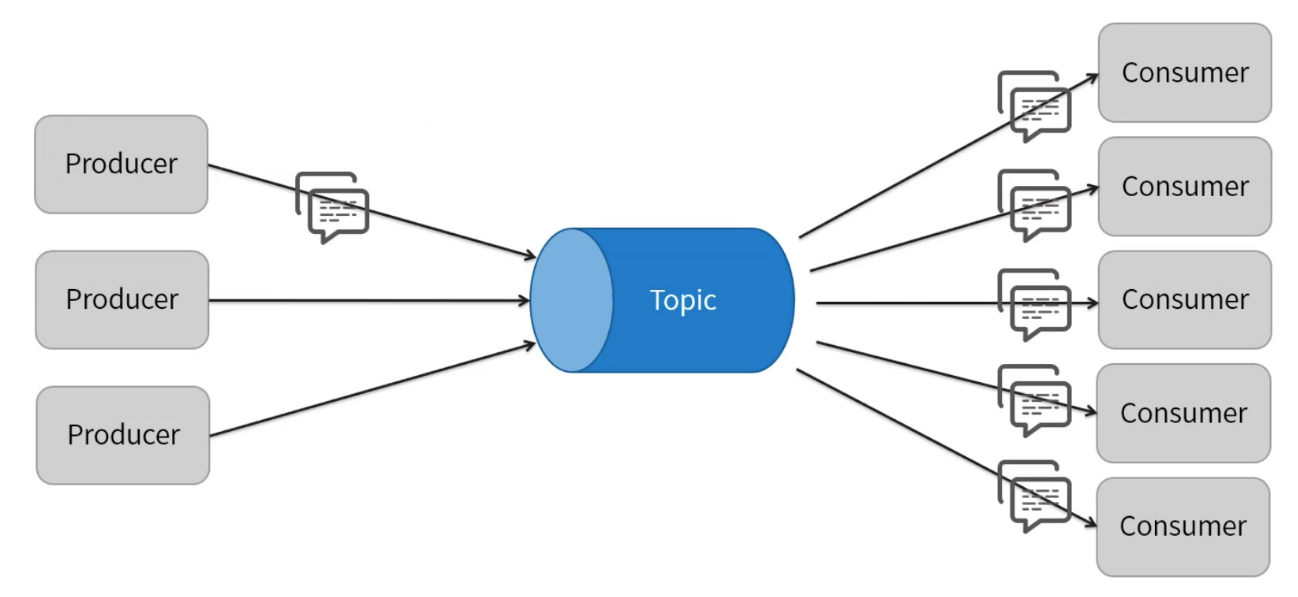
- Publish/Subscribe(Pub/Sub)/主题(发布订阅)
JMS 的消息结构
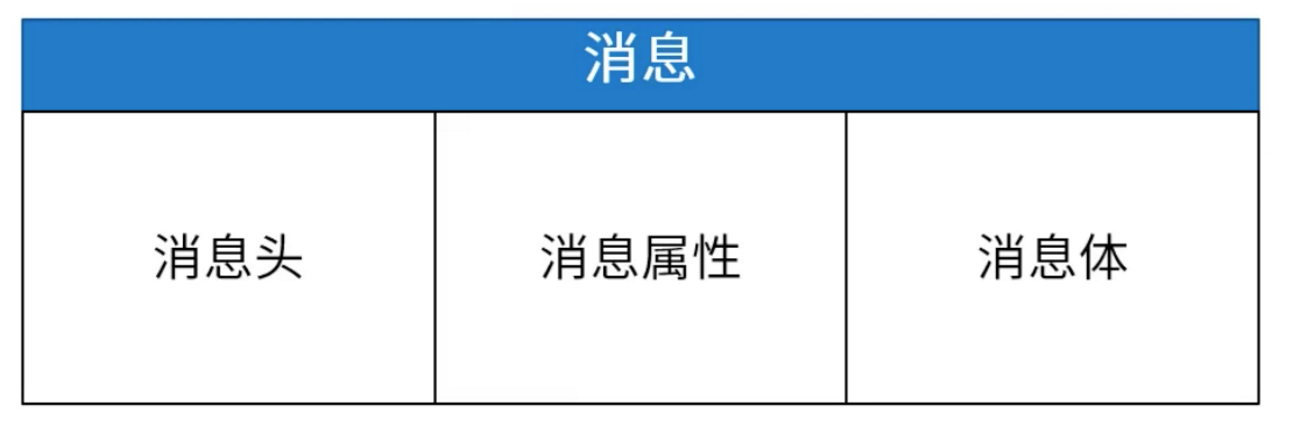
消息头 | 对象 | 描述 | | —- | —- | | JMSDestination | 消息的目的地,Topic 或者 Queue | | JMSDeliveryMode | 消息的发送模式 | | JMSTimestamp | 消息传递给 Broker 的时间戳,它不是实际发送的时间 | | JMSExpiration | 消息的有效期,在有效期内,消息消费者才可以消费这个消息 | | JMSPriority | 消息的优先级。0-4 为正常的优先级,5-9 为高优先级 | | JMSMessageID | 一个字符串用来唯一标识一个消息 | | JMSReplyTo | 有时消息生产者希望消费者回复一个消息,JMSReplyTo 为一个 Destination,表示需要回复的目的地 | | JMSCorrelationID | 通常用来关联多个 Message | | JMSType | 表示消息体的结构,和 JMS 提供者有关 | | JMSRedelivered | 如果这个值为 true,表示消息是被重新发送了 |
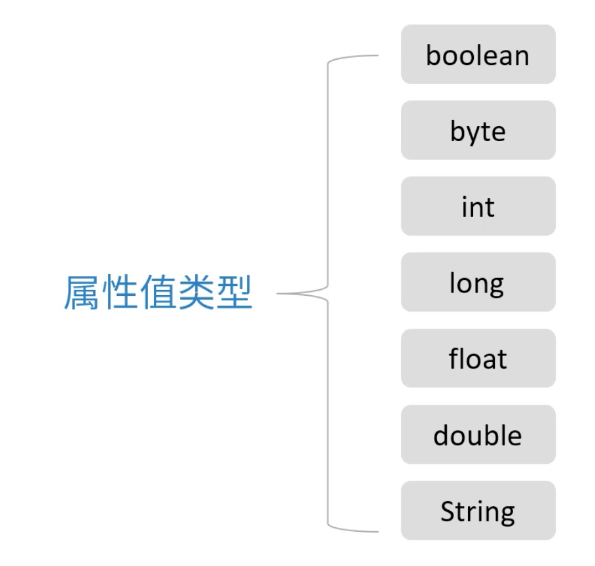
消息属性
- 消息属性可以理解为消息的附加消息头,属性名可以自定义。
- 消息体类型 | 类型 | 描述 | | —- | —- | | BytesMessage | 用来传递字节消息 | | MapMessage | 用来传递键值对消息 | | ObjectMessage | 用来传递序列化对象 | | StreamMessage | 用来传递文件等 | | TextMessage | 用来传递字符串 |
3. ActiveMQ 特性
- 支持多种编程语言
- 支持多种传输协议
- 有多种持久化方式
4. ActiveMQ 如何安装
1. 下载 ActiveMQ
进入 /tmp 目录
cd /tmp
使用 wget 下载文档
wget -c https://mirrors.tuna.tsinghua.edu.cn/apache//activemq/5.15.10/apache-activemq-5.15.10-bin.tar.gz
2. 安装 ActiveMQ
提取文档
tar -zxvf apache-activemq-5.15.10-bin.tar.gz -C /var
修改 ActiveMQ 的目录名
mv /var/apache-activemq-5.15.10/ /var/activemq/
3. 启动 ActiveMQ
- 作为进程后台启动 ActiveMQ
./bin/activemq start
4. ActiveMQ 服务
前面使用命令行运行 ActiveMQ,但最好的方式是将 ActiveMQ 作为服务启动,使用 system 服务将可以确保 ActiveMQ 能在系统启动时自动启动。
创建 ActiveMQ 服务
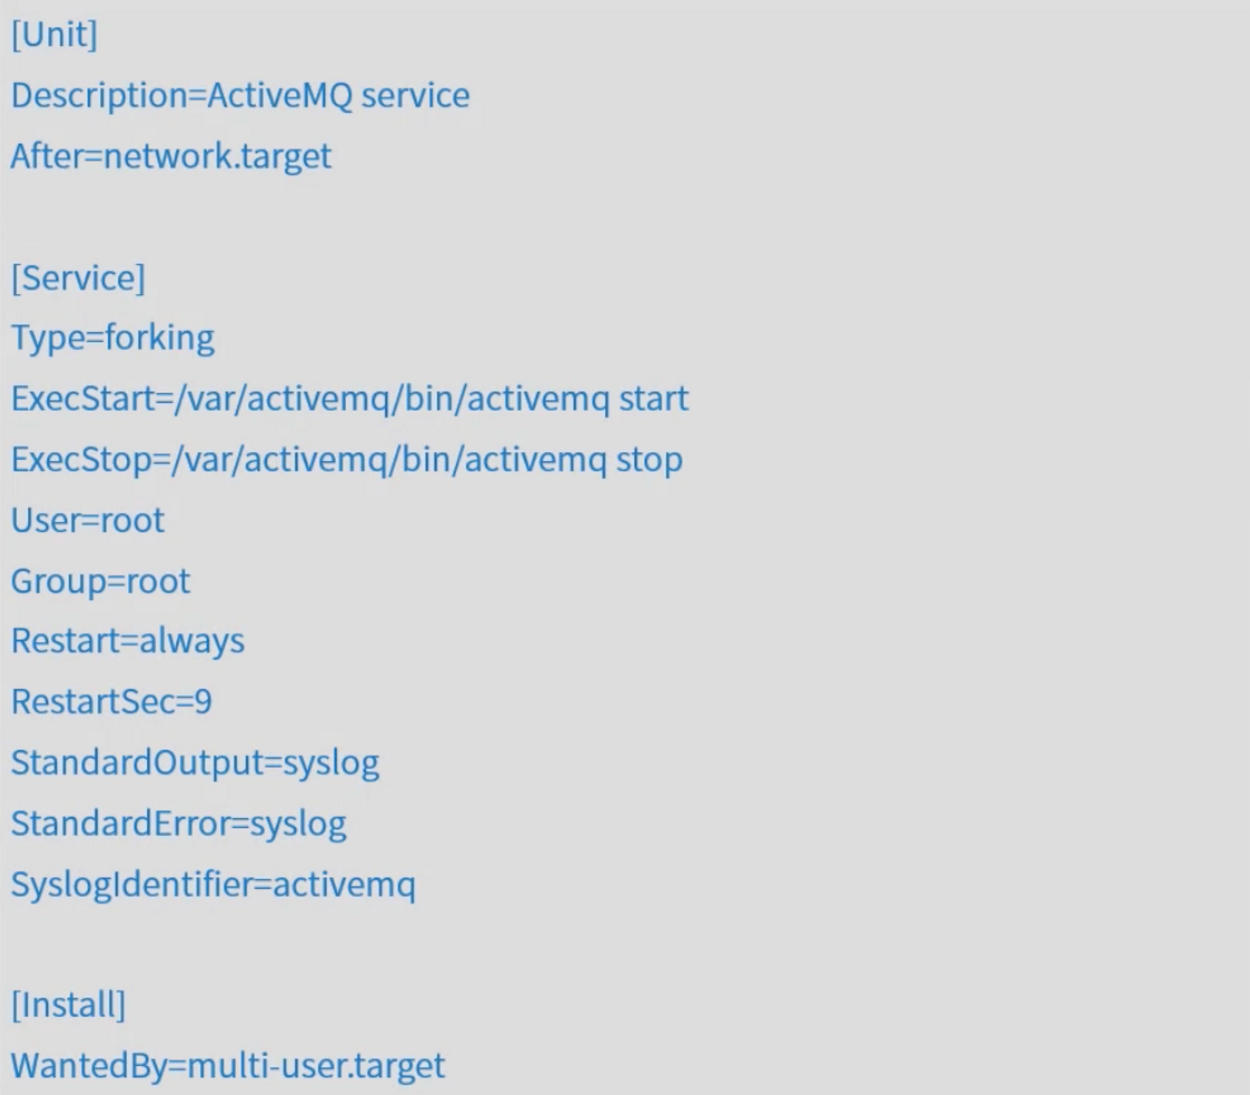
使用 vim 创建一个 systemd 服务文件
vim /usr/lib/systemd/system/activemq.service
内容如下
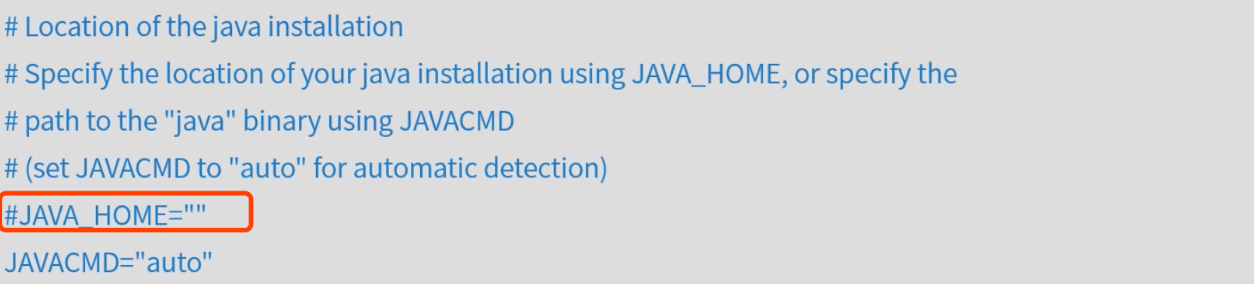
- 修改
/var/activemq/bin/env配置,修改 JAVA_HOME
ActiveMQ 服务操作
启动 ActiveMQ 服务
systemctl start activemq
查看服务状态
systemctl status activemq设置开机自启动
ln -s /usr/lib/systemd/system/activemq.service /etc/systemd/system/multi-user.target.wants/activemq.service
systemctl enable activemq
5. 防火墙添加 ActiveMQ 的端口
ActiveMQ 启动后,外部还无法访问,还需要在防火墙配置中添加 ActiveMQ 的 Web 管理端口和通讯端口。
添加端口
# Web 管理端口默认为 8161,通讯端口默认为 61616
firewall-cmd --zone=public --add-port=8161/tcp --permanent
firewall-cmd --zone=public --add-port=61616/tcp --permanent
重启防火墙
systemctl restart firewalld.service
5. ActiveMQ 如何使用
1. 使用 ActiveMQ 的 Web 管理平台
- ActiveMQ 自带有 Web 管理平台,在浏览器访问
http://服务IP:8161/admin即可进入。 默认开启了身份校验:
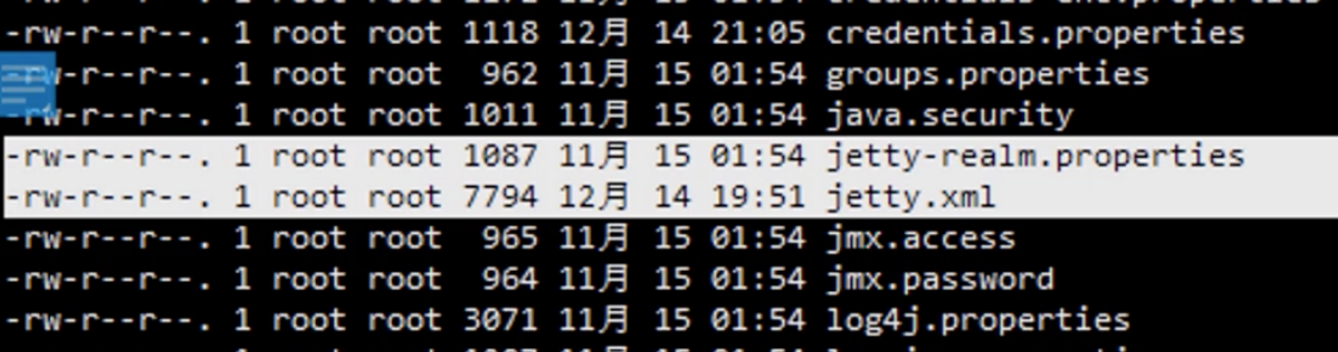
ActiveMQ 的 Web 管理平台是基于 jetty 运行,因此在
/var/activemq/conf目录可以看到 jetty 的配置文件。
修改 Web 管理平台的默认端口,在
/var/activemq/conf/jetty.xml中。<bean id="jettyPort" class="org.apache.activemq.web.WebConsolePort" init-method="start"> <!-- the default port number for the web console --> <property name="host" value="0.0.0.0"/> <property name="port" value="8161"/> </bean>删除登录密码,在
/var/activemq/conf/jetty.xml中。<bean id="securityConstraint" class="org.eclipse.jetty.util.security.Constraint"> <property name="name" value="BASIC" /> <property name="roles" value="user,admin" /> <!-- set authenticate=false to disable login --> <property name="authenticate" value="true" /> </bean>也可通过修改
/var/activemq/conf/jetty-realm.properties文件进行配置。
3. 在 Java 中使用 ActiveMQ
- 使用 Jar 包
- 在 ActiveMQ 的根目录有
activemq-all-xxx.jar包,将其直接复制到工程即可。
- 在 ActiveMQ 的根目录有
- Maven 依赖
<dependency>
  <groupId>org.apache.activemq</groupId>
  <artifactId>activemq-all</artifactId>
  <version>xxx</version>
</dependency>
4. 在 Spring 中使用 ActiveMQ
- Spring 官方教程
6. 简单示例
Producer
public class Producer {
    public static void main(String[] args) throws JMSException {
        ActiveMQConnectionFactory connectionFactory;
        Connection conn = null;
        Session session = null;
        MessageProducer producer = null;

        try {
            // 1. 创建连接工厂
            connectionFactory = new ActiveMQConnectionFactory("admin", "admin", "tcp://127.0.0.1:61616");

            // 2. 创建连接对象
            conn = connectionFactory.createConnection();
            conn.start();

            // todo ...
            // 3. 创建会话
            // 第一个参数,是否支持实务,如果为 true,则会忽略第二个参数,被 jms 服务器设置为 SESSION_TRANSACTED
            session = conn.createSession(false, Session.AUTO_ACKNOWLEDGE);

            // 4. 创建点对点发送的目标
            Destination destination = session.createQueue("queue1");
            // 创建发布的目标
//            Destination destination = session.createTopic("topic1");

            // 5. 创建生产者消息
            producer = session.createProducer(destination);
            // 设置生产者模式,有两种可选:
            // DeliveryMode.PERSISTENT 当 activemq 关闭的时候,队列数据将会被保存
            // DeliveryMode.NON_PERSISTENT 当 activemq 关闭的时候,队列数据将会被清空
            producer.setDeliveryMode(DeliveryMode.NON_PERSISTENT);

            // 6. 创建一条消息
            String text = "Hello World!";
            TextMessage message = session.createTextMessage(text);

            // 7. 发送消息
            producer.send(message);
        } catch (JMSException e) {
            e.printStackTrace();
        } finally {
            if (producer != null) {
                producer.close();
            }
            if (session != null) {
                session.close();
            }
            if (conn != null) {
                conn.close();
            }
        }
    }
}
Consumer
public class Consumer {
    public static void main(String[] args) throws JMSException {
        ActiveMQConnectionFactory connectionFactory;
        Connection conn = null;
        Session session = null;
        MessageConsumer consumer = null;

        try {
            // 1. 创建连接工厂
            connectionFactory = new ActiveMQConnectionFactory("admin", "admin", "tcp://127.0.0.1:61616");

            // 2. 创建连接对象
            conn = connectionFactory.createConnection();
            conn.start();

            // 3. 创建会话
            // 第一个参数:是否支持事务,如果为 true,则会忽略第二个参数,被 jms 服务器设置为 SESSION_TRANSACTED
            // 第一个参数为 false 时,第二个参数的值可为 Session.AUTO_ACKNOWLEDGE,Session.CLIENT_ACKNOWLEDGE,DUPS_OK_ACKNOWLEDGE 其中一个。
            // Session.AUTO_ACKNOWLEDGE 为自动确认,客户端发送和接收消息不需要做额外的工作。哪怕是接收端发生异常,也会被当作正常发送成功。
            // Session.CLIENT_ACKNOWLEDGE 为客户端确认。客户端接收到消息后,必须调用javax.jms.Message的acknowledge方法。jms服务器才会当作发送成功,并删除消息。
            // DUPS_OK_ACKNOWLEDGE 允许副本的确认模式。一旦接收方应用程序的方法调用从处理消息处返回,会话对象就会确认消息的接收;而且允许重复确认。
            session = conn.createSession(false, Session.AUTO_ACKNOWLEDGE);

            // 4. 创建点对点接收的目标
            Destination destination = session.createQueue("queue1");
            // 创建订阅的目标
//            Destination destination = session.createTopic("topic1");

            // 5. 创建消费者信息
            consumer = session.createConsumer(destination);

            // 6. 接收消息
            Message message = consumer.receive(1000);
            if (message instanceof TextMessage) {
                System.out.println("收到文本消息:" + ((TextMessage) message).getText());
            } else {
                System.out.println(message);
            }
        } finally {
            if (consumer != null) {
                consumer.close();
            }
            if (session != null) {
                session.close();
            }
            if (conn != null) {
                conn.close();
            }
        }
    }
}
7. SpringBoot + ActiveMQ
依赖包
<dependencies>
    <!--直接使用spring-boot-starter-activemq-->
    <dependency>
        <groupId>org.springframework.boot</groupId>
        <artifactId>spring-boot-starter-activemq</artifactId>
    </dependency>
    <!-- MQTT -->
    <dependency>
        <groupId>org.springframework.integration</groupId>
        <artifactId>spring-integration-mqtt</artifactId>
    </dependency>
</dependencies>
application.properties
spring.activemq.broker-url=tcp:/127.0.0.1:61616
spring.activemq.user=admin
spring.activemq.password=admin
Producer
@SpringBootApplication
public class Producer {

    @Autowired
    private JmsTemplate jmsTemplate;

    @PostConstruct
    public void init() {
        jmsTemplate.convertAndSend("queue1", "Hello Spring 3");
    }

    public static void main(String[] args) {
        SpringApplication.run(Producer.class);
    }

}
Consumer
@SpringBootApplication
@EnableJms
public class Consumer {

    @JmsListener(destination = "queue1")
    public void receive(String message) {
        System.out.println("收到消息:" + message);
    }

    public static void main(String[] args) {
        SpringApplication.run(Consumer.class);
    }

}
8. SpringBoot + ActiveMQ 配置类,双模式使用
JmsConfiguration
@Configuration
@EnableJms
public class JmsConfiguration {

    /**
     * 连接工厂
     */
    @Bean
    public ConnectionFactory connectionFactory(@Value("${spring.activemq.broker-url}") String brokerUrl,
                                               @Value("${spring.activemq.user}") String userName,
                                               @Value("${spring.activemq.password}") String password) {
        return new ActiveMQConnectionFactory(userName, password, brokerUrl);
    }

    /**
     * 队列模式的监听容器
     */
    @Bean
    public JmsListenerContainerFactory<?> jmsListenerContainerFactoryQueue(ConnectionFactory connectionFactory) {
        DefaultJmsListenerContainerFactory bean = new DefaultJmsListenerContainerFactory();
        bean.setConnectionFactory(connectionFactory);
        return bean;
    }

    /**
     * topic 监听
     */
    @Bean
    public JmsListenerContainerFactory<?> jmsListenerContainerFactoryTopic(ConnectionFactory connectionFactory) {
        DefaultJmsListenerContainerFactory bean = new DefaultJmsListenerContainerFactory();
        bean.setConnectionFactory(connectionFactory);
        bean.setPubSubDomain(true);
        return bean;
    }

    /**
     * 队列模板
     */
    @Bean
    public JmsTemplate jmsTemplateQueue(ConnectionFactory connectionFactory) {
        return new JmsTemplate(connectionFactory);
    }

    /**
     * 发布订阅模板
     */
    @Bean
    public JmsTemplate jmsTemplatePublish(ConnectionFactory connectionFactory) {
        JmsTemplate jmsTemplate = new JmsTemplate(connectionFactory);
        jmsTemplate.setPubSubDomain(true);
        return jmsTemplate;
    }

}
Producer
@SpringBootApplication
public class Producer {

    @Autowired
    private JmsTemplate jmsTemplatePublish;

    @Autowired
    private JmsTemplate jmsTemplateQueue;

    @PostConstruct
    public void send() {
        // 队列模式发送
        jmsTemplateQueue.convertAndSend("queue1", "Hello Spring queue 1");

        // 发布订阅模式发送
        jmsTemplatePublish.send("topic1", new MessageCreator() {
            @Override
            public Message createMessage(Session session) throws JMSException {
                MapMessage message = session.createMapMessage();
                message.setString("msg", "Hello Spring xxx");
                return message;
            }
        });
    }

    public static void main(String[] args) {
        SpringApplication.run(Producer.class);
    }
}
Consumer
@SpringBootApplication
public class Consumer {
    @JmsListener(destination = "queue1", containerFactory = "jmsListenerContainerFactoryQueue")
    public void receiveQueue(Message message) throws JMSException {
        if (message instanceof TextMessage) {
            System.out.println("收到文本消息:" + ((TextMessage) message).getText());
        } else if (message instanceof ActiveMQMapMessage) {
            System.out.println("收到Map消息:" + ((ActiveMQMapMessage) message).getContentMap());
        } else {
            System.out.println(message);
        }
    }

    @JmsListener(destination = "topic1", containerFactory = "jmsListenerContainerFactoryTopic")
    public void receiveTopic(Message message) throws JMSException {
        System.out.println("收到的消息:" + message.toString());
        if (message instanceof MapMessage) {
            System.out.println("收到订阅消息:" + ((MapMessage) message).getMapNames());
        }
    }

    public static void main(String[] args) {
        SpringApplication.run(Consumer.class);
    }
}
9. 其他资料
- 消息属性
- activemq内部消息
- 大文件大对象
- 延时消息
- 发送java对象
- 发送java集合

若有收获,就点个赞吧
0 人点赞
