简介
SkyWalking 是一个应用性能监控系统,特别为微服务、云原生和基于容器(Docker, Kubernetes, Mesos)体系结构而设计。除了应用指标监控以外,它还能对分布式调用链路进行追踪。类似功能的组件还有:Zipkin、Pinpoint、CAT等。
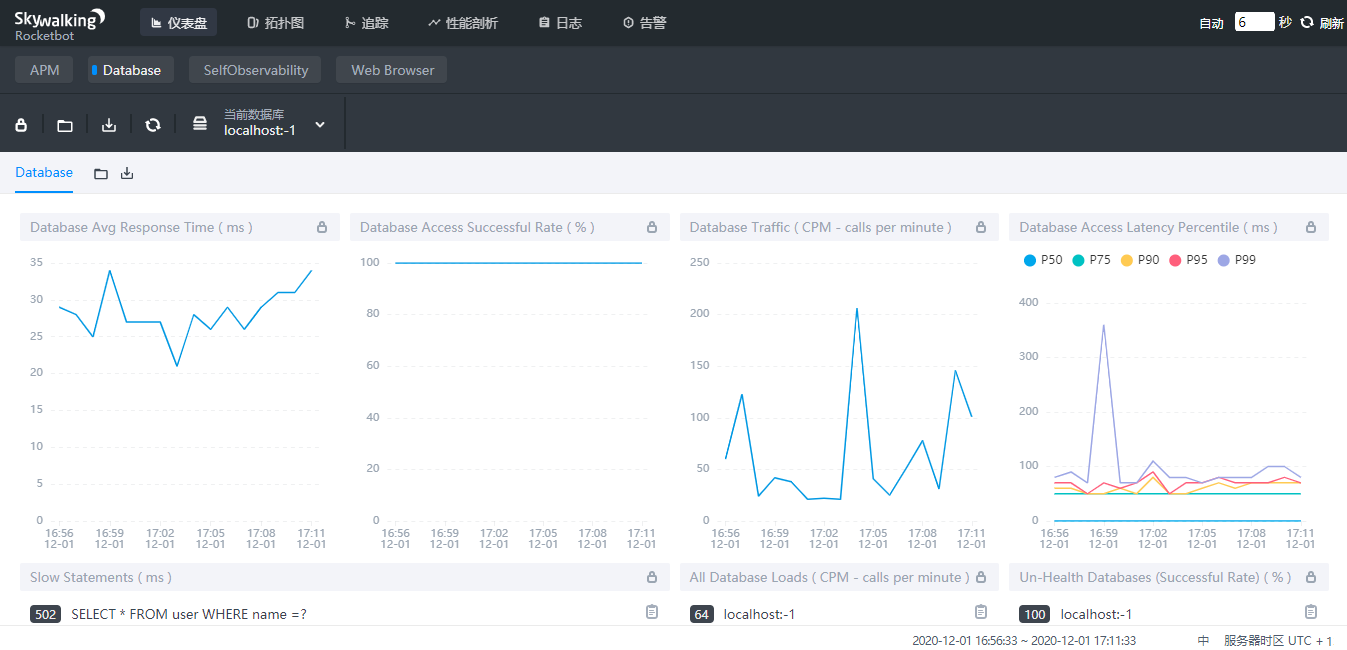
架构图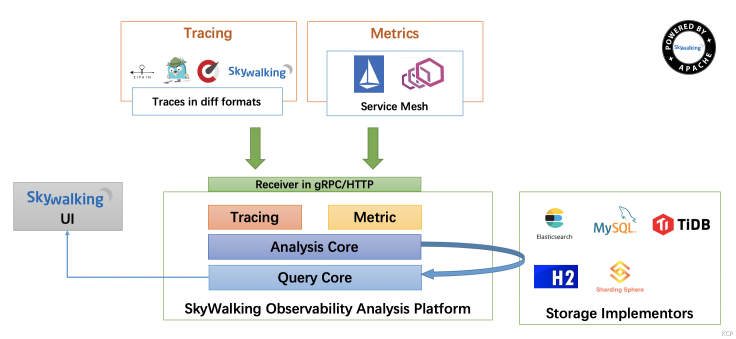
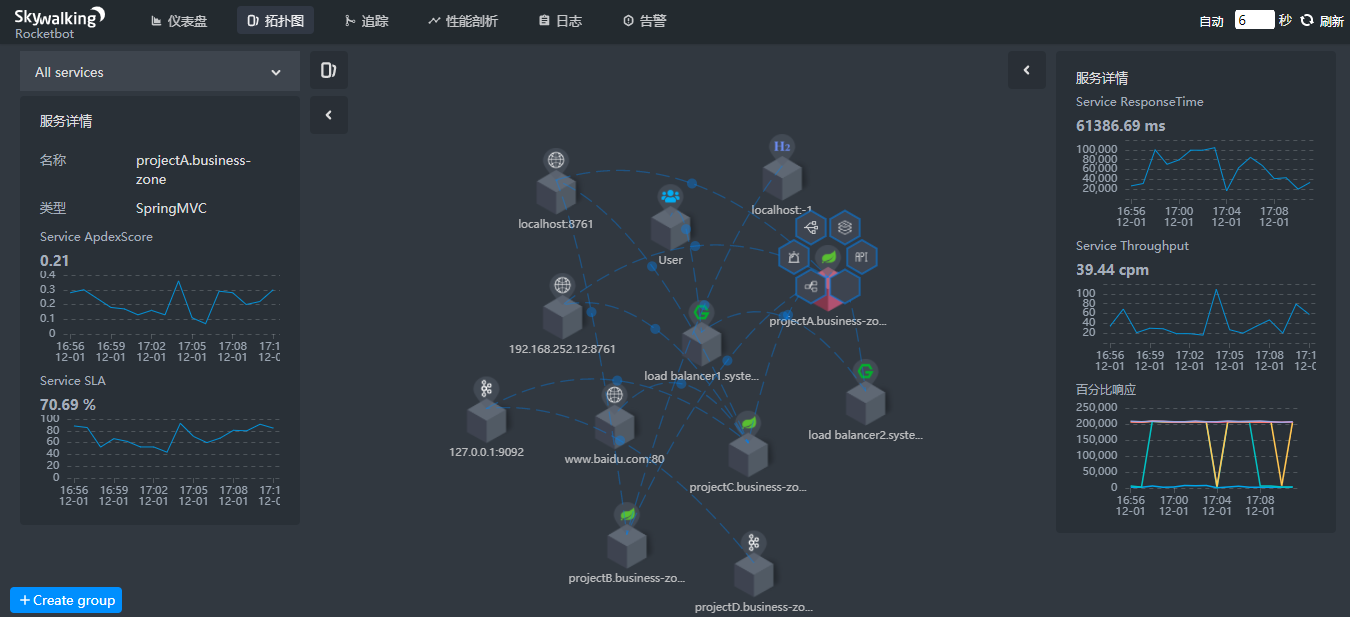
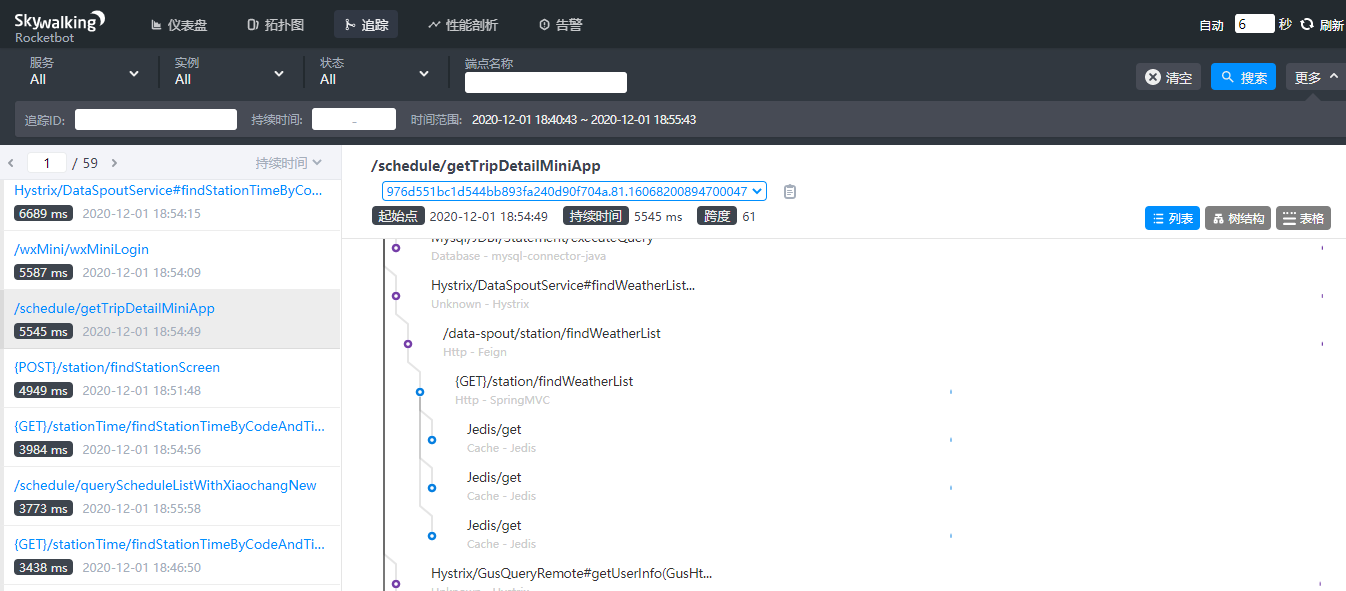
上几张图,看看效果,然后再一步一步搭建并使用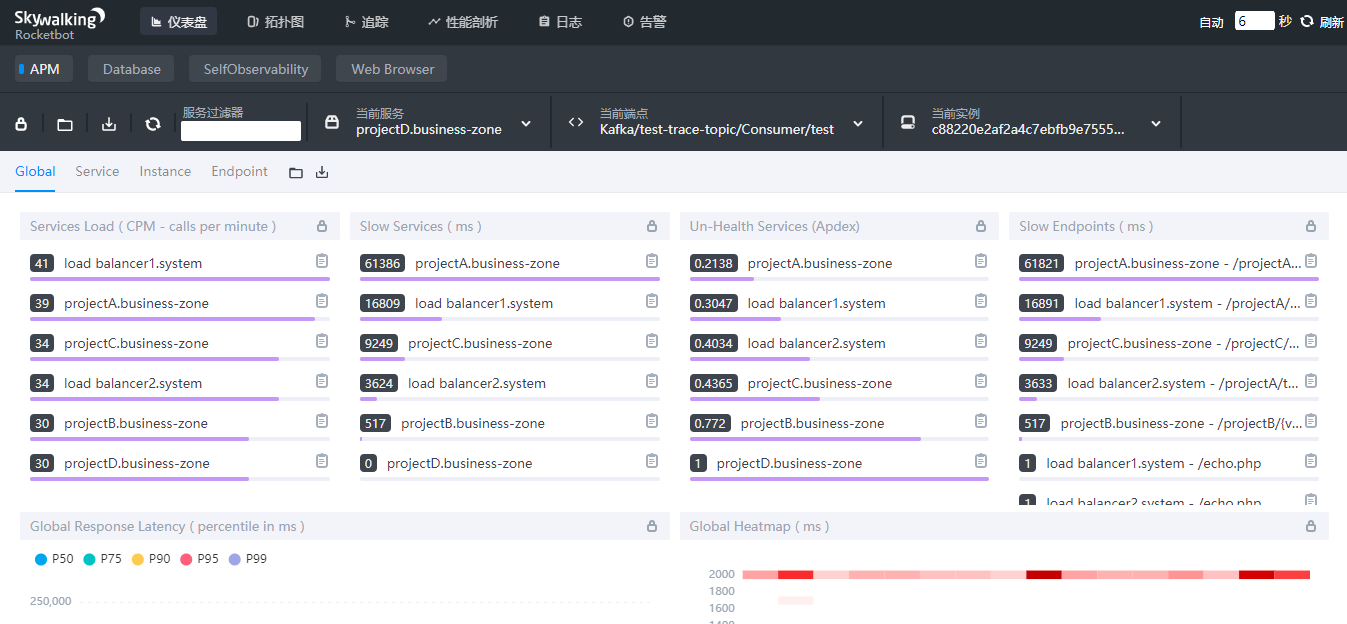
1. 概念与架构
SkyWalking是一个开源监控平台,用于从服务和云原生基础设施收集、分析、聚合和可视化数据。SkyWalking提供了一种简单的方法来维护分布式系统的清晰视图,甚至可以跨云查看。它是一种现代APM,专门为云原生、基于容器的分布式系统设计。
SkyWalking从三个维度对应用进行监视:service(服务), service instance(实例), endpoint(端点)
服务和实例就不多说了,端点是服务中的某个路径或者说URI
SkyWalking allows users to understand the topology relationship between Services and Endpoints, to view the metrics of every Service/Service Instance/Endpoint and to set alarm rules.
SkyWalking允许用户了解服务和端点之间的拓扑关系,查看每个服务/服务实例/端点的度量,并设置警报规则。
1.1. 架构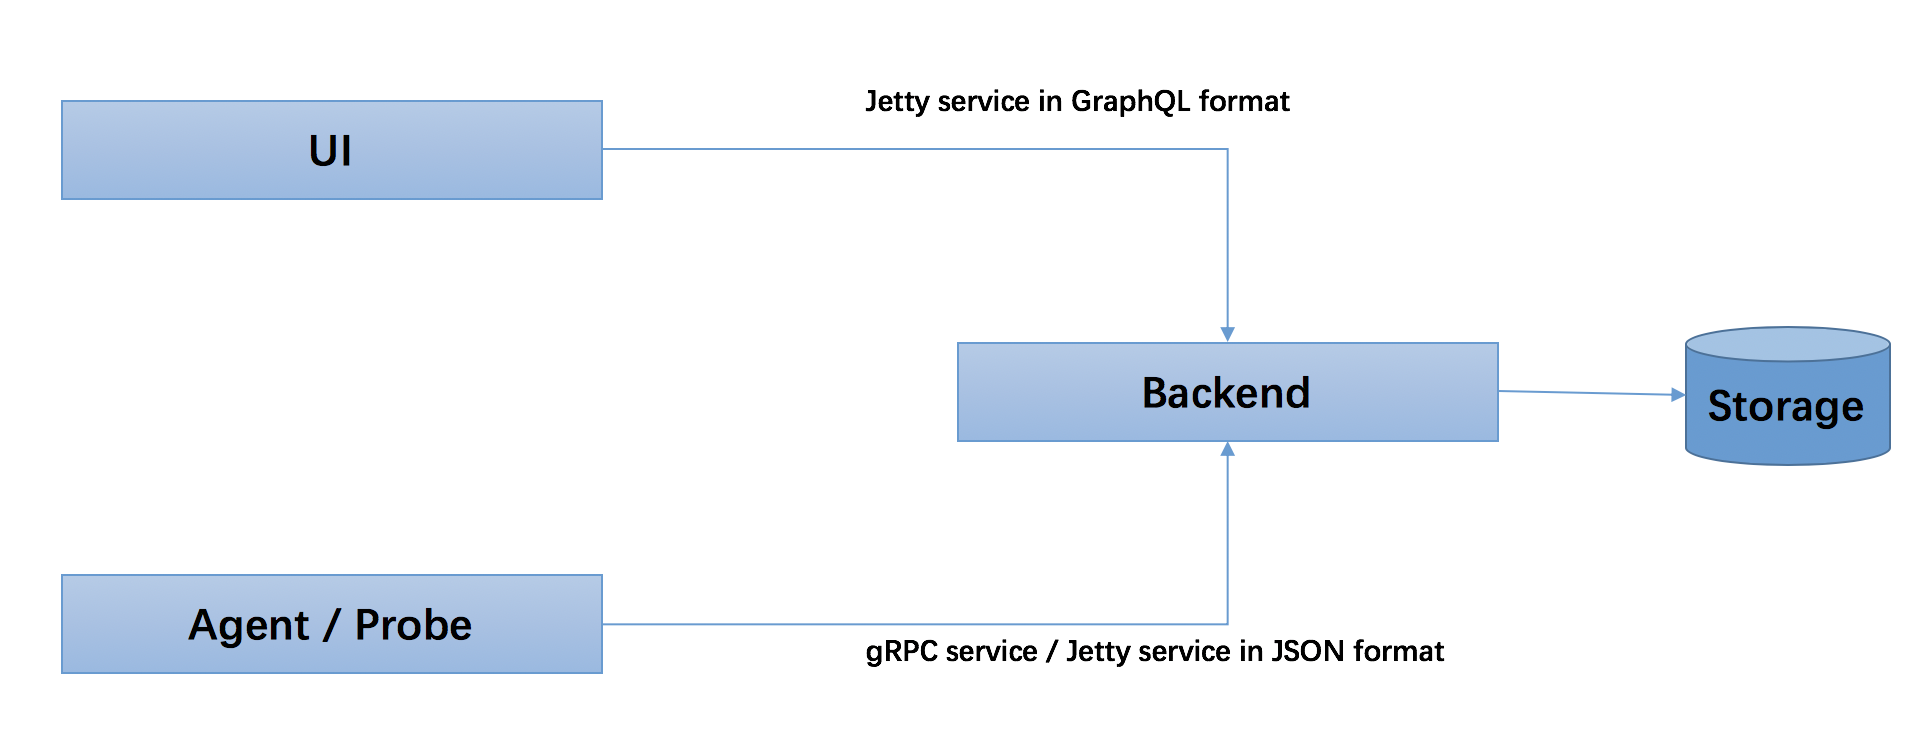
SkyWalking逻辑上分为四个部分:
- Probes(探针),
- Platform backend(平台后端),
- Storage(存储),
- UI
这个结构就很清晰了,探针就是Agent负责采集数据并上报给服务端,服务端对数据进行处理和存储,UI负责展示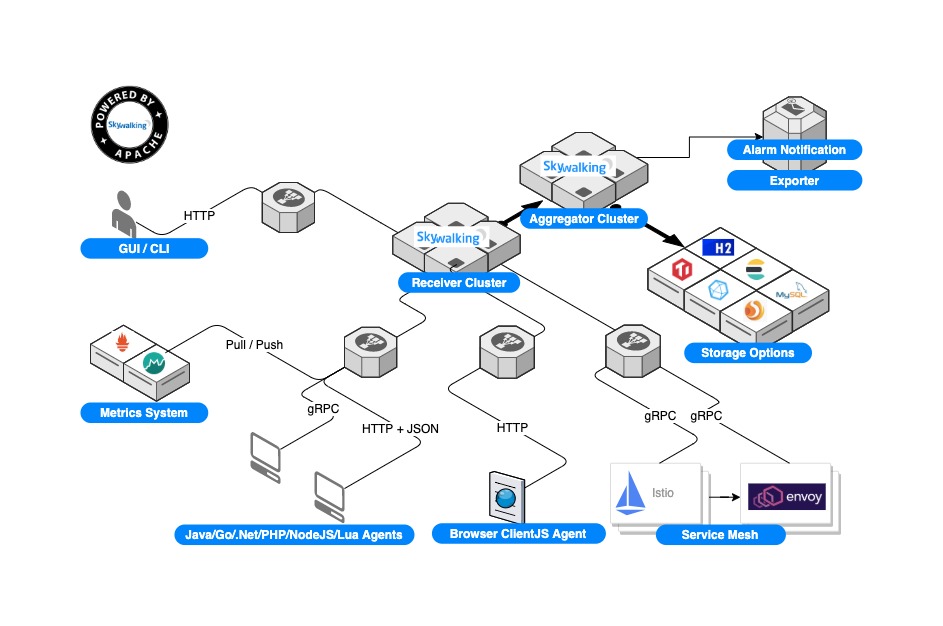
2. 下载与安装
SkyWalking有两中版本,ES版本和非ES版。如果我们决定采用ElasticSearch作为存储,那么就下载es版本。
https://skywalking.apache.org/downloads/
https://archive.apache.org/dist/skywalking/
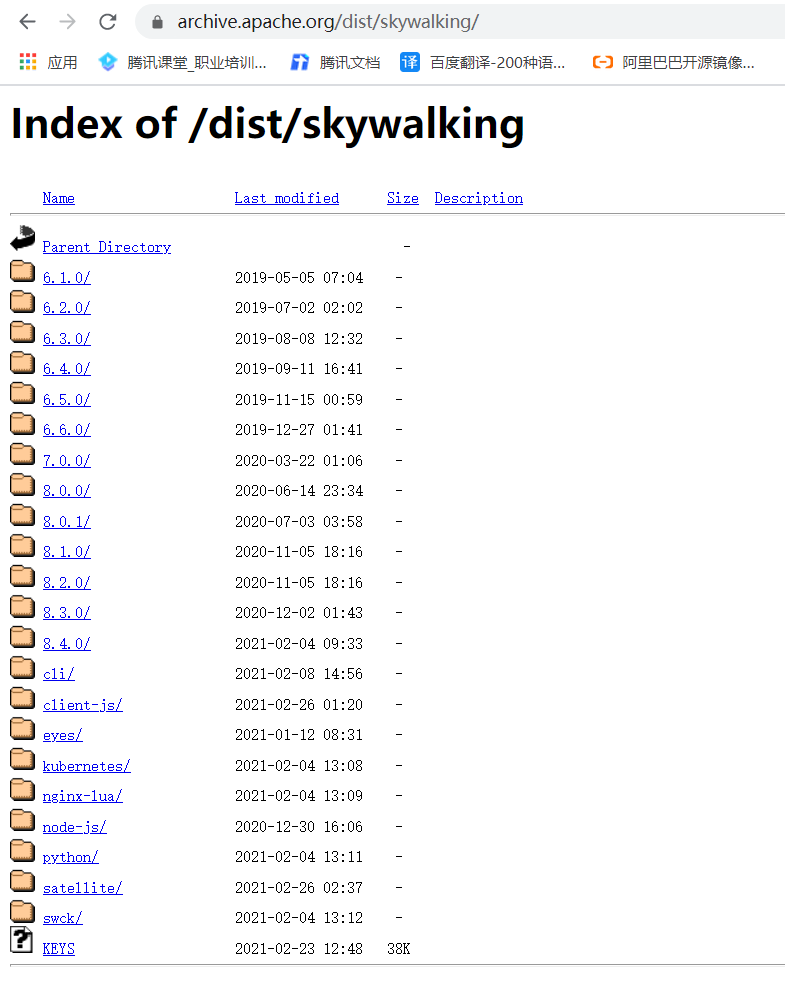
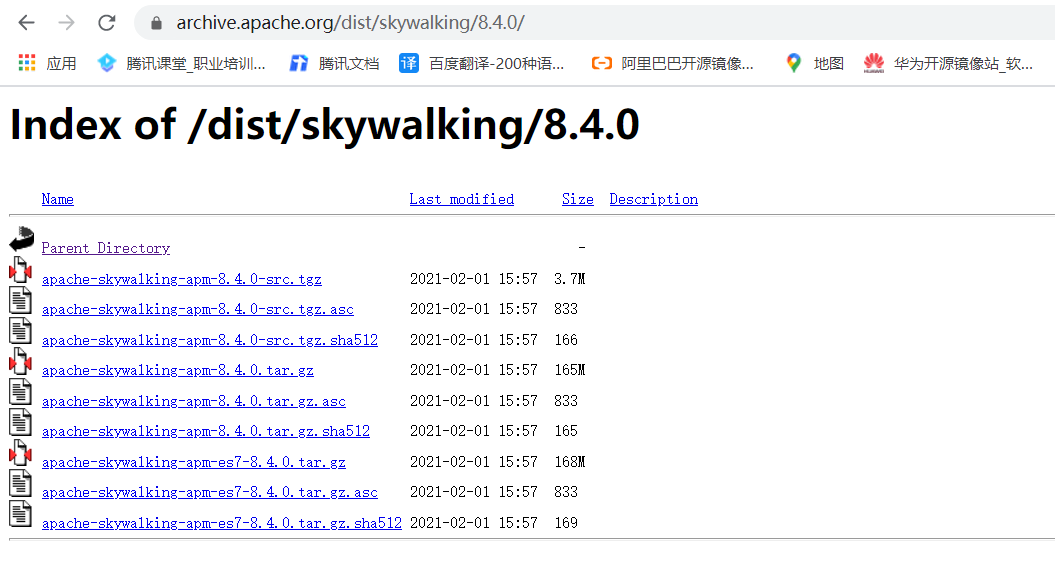
# 下载[root@centos7 ~]# cd /data/[root@centos7 data]# wget https://archive.apache.org/dist/skywalking/8.4.0/apache-skywalking-apm-8.4.0.tar.gz[root@centos7 data]# wget https://archive.apache.org/dist/skywalking/8.4.0/apache-skywalking-apm-es7-8.4.0.tar.gz[root@centos7 data]# tar xf apache-skywalking-apm-es7-8.4.0.tar.gz[root@centos7 data]# lsapache-skywalking-apm-8.4.0.tar.gz apache-skywalking-apm-es7-8.4.0.tar.gzapache-skywalking-apm-bin-es7 wget-log[root@centos7 data]# cd apache-skywalking-apm-bin-es7/[root@centos7 apache-skywalking-apm-bin-es7]# lsagent config licenses oap-libs toolsbin LICENSE NOTICE README.txt webapp[root@centos7 apache-skywalking-apm-bin-es7]# ls bin/oapService.bat oapServiceNoInit.bat startup.bat webappService.shoapServiceInit.bat oapServiceNoInit.sh startup.shoapServiceInit.sh oapService.sh webappService.bat
agent目录将来要拷贝到各服务所在机器上用作探针
bin目录是服务启动脚本
config目录是配置文件
oap-libs目录是oap服务运行所需的jar包
webapp目录是web服务运行所需的jar包
接下来,要选择存储了,支持的存储有:
- H2
- ElasticSearch 6, 7
- MySQL
- TiDB
- InfluxDB
作为监控系统,首先排除H2和MySQL,这里推荐InfluxDB,它本身就是时序数据库,非常适合这种场景
但是InfluxDB我不是很熟悉,所以这里先用ElasticSearch7
https://github.com/apache/skywalking/blob/master/docs/en/setup/backend/backend-storage.md
2.1. 安装ElasticSearch
https://www.elastic.co/guide/en/elasticsearch/reference/7.10/targz.html
官网下载地址:https://www.elastic.co/cn/downloads/elasticsearch
华为镜像站下载地址:https://mirrors.huaweicloud.com/elasticsearch/
[root@centos7 data]# wget https://mirrors.huaweicloud.com/elasticsearch/7.10.0/elasticsearch-7.10.0-linux-x86_64.tar.gz[root@centos7 data]# tar xf elasticsearch-7.10.0-linux-x86_64.tar.gz[root@centos7 data]# cd elasticsearch-7.10.0[root@centos7 elasticsearch-7.10.0]# lsbin jdk LICENSE.txt modules pluginsconfig lib logs NOTICE.txt README.asciidoc# 启动[root@centos7 elasticsearch-7.10.0]# ./bin/elasticsearch -d -p pid# 停止
如果启动过程中会报以下三个错误:
[1]: max file descriptors [4096] for elasticsearch process is too low, increase to at least [65535] [2]: max virtual memory areas vm.max_map_count [65530] is too low, increase to at least [262144]
[3]: the default discovery settings are unsuitable for production use; at least one of [discovery.seed_hosts, discovery.seed_providers, cluster.initial_master_nodes] must be configured
解决方法:
在 /etc/security/limits.conf 文件中追加以下内容:
cat >>/etc/security/limits.conf <<EOF* soft nofile 65536* hard nofile 65536* soft nproc 4096* hard nproc 4096EOF
可通过以下四个命令查看修改结果:
ulimit -Hnulimit -Snulimit -Huulimit -Su
修改 /etc/sysctl.conf 文件,追加以下内容:
vm.max_map_count=262144
修改es配置文件 elasticsearch.yml 取消注释,保留一个节点
[root@centos7 elasticsearch-7.10.0]# vim config/elasticsearch.yml....# cluster.initial_master_nodes: ["node-1", "node-2"]cluster.initial_master_nodes: ["node-1"]
为了能够ip:port方式访问,还需修改网络配置
# network.host: 192.168.0.1network.host: 0.0.0.0...#http.port: 9200http.port: 9200

至此,ElasticSearch算是启动成功了
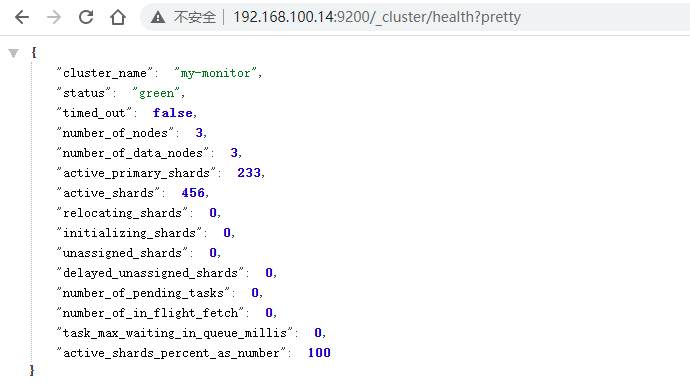
一个节点还不够,这里用三个节点搭建一个集群
192.168.100.14 config/elasticsearch.yml
cluster.name: my-monitor
node.name: node-1
network.host: 192.168.100.14
http.port: 9200
discovery.seed_hosts: [“192.168.100.14:9300”, “192.168.100.15:9300”, “192.168.100.19:9300”]
cluster.initial_master_nodes: [“node-1”]
192.168.100.15 config/elasticsearch.yml
cluster.name: my-monitor
node.name: node-2
network.host: 192.168.100.15
http.port: 9200
discovery.seed_hosts: [“192.168.100.14:9300”, “192.168.100.15:9300”, “192.168.100.19:9300”]
cluster.initial_master_nodes: [“node-1”]
192.168.100.19 config/elasticsearch.yml
cluster.name: my-monitor
node.name: node-3
network.host: 192.168.100.19
http.port: 9200
discovery.seed_hosts: [“192.168.100.14:9300”, “192.168.100.15:9300”, “192.168.100.19:9300”]
cluster.initial_master_nodes: [“node-1”]
同时,建议修改三个节点config/jvm.options
-Xms2g
-Xmx2g
依次启动三个节点
pkill -F pid
./bin/elasticsearch -d -p pid
接下来,修改skywalking下config/application.yml 中配置es地址即可
storage:
selector: ${SW_STORAGE:elasticsearch7}
elasticsearch7:
nameSpace: ${SW_NAMESPACE:””}
clusterNodes: ${SW_STORAGE_ES_CLUSTER_NODES:192.168.100.14:9200,192.168.100.15:9200,192.168.100.19:9200}
2.2. 安装Agent
https://github.com/apache/skywalking/blob/v8.2.0/docs/en/setup/service-agent/java-agent/README.md
将agent目录拷贝至各服务所在的机器上
scp -r ./agent chengjs@192.168.100.12:~/
这里,我将它拷贝至各个服务目录下
plugins是探针用到各种插件,SkyWalking插件都是即插即用的,可以把optional-plugins中的插件放到plugins中
修改 agent/config/agent.config 配置文件,也可以通过命令行参数指定
主要是配置服务名称和后端服务地址
agent.service_name=${SW_AGENT_NAME:user-center}
collector.backend_service=${SW_AGENT_COLLECTOR_BACKEND_SERVICES:192.168.100.17:11800}
当然,也可以通过环境变量或系统属性的方式来设置,例如:
export SW_AGENT_COLLECTOR_BACKEND_SERVICES=127.0.0.1:11800
最后,在服务启动的时候用命令行参数 -javaagent 来指定探针
java -javaagent:/path/to/skywalking-agent/skywalking-agent.jar -jar yourApp.jar
例如:
java -javaagent:./agent/skywalking-agent.jar -Dspring.profiles.active=dev -Xms512m -Xmx1024m -jar demo-0.0.1-SNAPSHOT.jar
3. 启动服务
修改 webapp/webapp.yml 文件,更改端口号及后端服务地址
server:
port: 9000
collector:
path: /graphql
ribbon:
ReadTimeout: 10000
# Point to all backend’s restHost:restPort, split by ,
listOfServers: 127.0.0.1:12800
启动服务
bin/startup.sh
或者分别依次启动
bin/oapService.sh
bin/webappService.sh
查看logs目录下的日志文件,看是否启动成功
浏览器访问 http://127.0.0.1:9000
4. 告警
编辑 alarm-settings.yml 设置告警规则和通知
https://github.com/apache/skywalking/blob/v8.2.0/docs/en/setup/backend/backend-alarm.md
重点说下告警通知
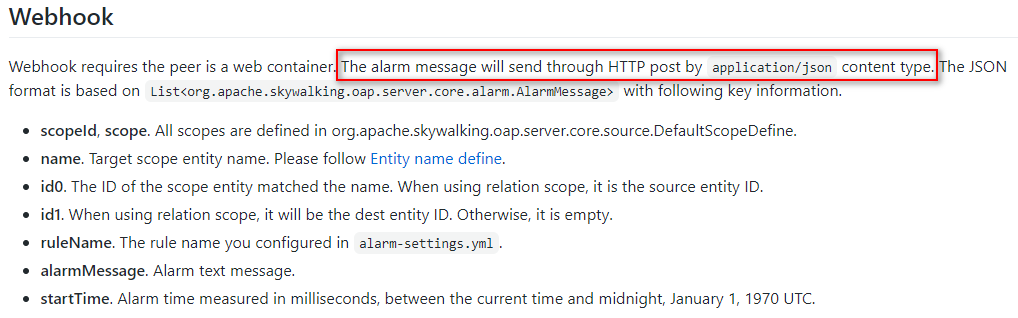
为了使用钉钉机器人通知,接下来,新建一个项目
<?xml version=”1.0” encoding=”UTF-8”?>
<properties><br /> <java.version>1.8</java.version><br /> </properties><dependencies><br /> <dependency><br /> <groupId>org.springframework.boot</groupId><br /> <artifactId>spring-boot-starter-web</artifactId><br /> </dependency><dependency><br /> <groupId>com.aliyun</groupId><br /> <artifactId>alibaba-dingtalk-service-sdk</artifactId><br /> <version>1.0.1</version><br /> </dependency><dependency><br /> <groupId>commons-codec</groupId><br /> <artifactId>commons-codec</artifactId><br /> <version>1.15</version><br /> </dependency><dependency><br /> <groupId>com.alibaba</groupId><br /> <artifactId>fastjson</artifactId><br /> <version>1.2.75</version><br /> </dependency><dependency><br /> <groupId>org.projectlombok</groupId><br /> <artifactId>lombok</artifactId><br /> <optional>true</optional><br /> </dependency><br /> </dependencies><build><br /> <plugins><br /> <plugin><br /> <groupId>org.springframework.boot</groupId><br /> <artifactId>spring-boot-maven-plugin</artifactId><br /> </plugin><br /> </plugins><br /> </build>

可选依赖(不建议引入)
定义告警消息实体类
package com.wt.monitor.skywalking.alarm.domain;
import lombok.Data;
import java.io.Serializable;
/*
@author ChengJianSheng
@date 2020/12/1
/
@Data
public class AlarmMessageDTO implements Serializable {
private int scopeId;private String scope;/**<br /> * Target scope entity name<br /> */<br /> private String name;private String id0;private String id1;private String ruleName;/**<br /> * Alarm text message<br /> */<br /> private String alarmMessage;/**<br /> * Alarm time measured in milliseconds<br /> */<br /> private long startTime;
}
发送钉钉机器人消息
package com.wt.monitor.skywalking.alarm.service;
import com.dingtalk.api.DefaultDingTalkClient;
import com.dingtalk.api.DingTalkClient;
import com.dingtalk.api.request.OapiRobotSendRequest;
import com.taobao.api.ApiException;
import lombok.extern.slf4j.Slf4j;
import org.apache.commons.codec.binary.Base64;
import org.springframework.beans.factory.annotation.Value;
import org.springframework.stereotype.Service;
import javax.crypto.Mac;
import javax.crypto.spec.SecretKeySpec;
import java.io.UnsupportedEncodingException;
import java.net.URLEncoder;
import java.security.InvalidKeyException;
import java.security.NoSuchAlgorithmException;
/*
https://ding-doc.dingtalk.com/doc#/serverapi2/qf2nxq
@author ChengJianSheng
@data 2020/12/1
*/
@Slf4j
@Service
public class DingTalkAlarmService {
@Value("${dingtalk.webhook}")<br /> private String webhook;<br /> @Value("${dingtalk.secret}")<br /> private String secret;public void sendMessage(String content) {<br /> try {<br /> Long timestamp = System.currentTimeMillis();<br /> String stringToSign = timestamp + "\n" + secret;<br /> Mac mac = Mac.getInstance("HmacSHA256");<br /> mac.init(new SecretKeySpec(secret.getBytes("UTF-8"), "HmacSHA256"));<br /> byte[] signData = mac.doFinal(stringToSign.getBytes("UTF-8"));<br /> String sign = URLEncoder.encode(new String(Base64.encodeBase64(signData)),"UTF-8");String serverUrl = webhook + "×tamp=" + timestamp + "&sign=" + sign;<br /> DingTalkClient client = new DefaultDingTalkClient(serverUrl);<br /> OapiRobotSendRequest request = new OapiRobotSendRequest();<br /> request.setMsgtype("text");<br /> OapiRobotSendRequest.Text text = new OapiRobotSendRequest.Text();<br /> text.setContent(content);<br /> request.setText(text);client.execute(request);<br /> } catch (ApiException e) {<br /> e.printStackTrace();<br /> log.error(e.getMessage(), e);<br /> } catch (NoSuchAlgorithmException e) {<br /> e.printStackTrace();<br /> log.error(e.getMessage(), e);<br /> } catch (UnsupportedEncodingException e) {<br /> e.printStackTrace();<br /> log.error(e.getMessage(), e);<br /> } catch (InvalidKeyException e) {<br /> e.printStackTrace();<br /> log.error(e.getMessage(), e);<br /> }<br /> }<br />}<br /><br />AlarmController.java<br /><br />package com.wt.monitor.skywalking.alarm.controller;
import com.alibaba.fastjson.JSON;
import com.wt.monitor.skywalking.alarm.domain.AlarmMessageDTO;
import com.wt.monitor.skywalking.alarm.service.DingTalkAlarmService;
import lombok.extern.slf4j.Slf4j;
import org.springframework.beans.factory.annotation.Autowired;
import org.springframework.web.bind.annotation.PostMapping;
import org.springframework.web.bind.annotation.RequestBody;
import org.springframework.web.bind.annotation.RequestMapping;
import org.springframework.web.bind.annotation.RestController;
import java.text.MessageFormat;
import java.util.List;
/*
@author ChengJianSheng
@date 2020/12/1
/
@Slf4j
@RestController
@RequestMapping(“/skywalking”)
public class AlarmController {
@Autowired<br /> private DingTalkAlarmService dingTalkAlarmService;@PostMapping("/alarm")<br /> public void alarm(@RequestBody List<AlarmMessageDTO> alarmMessageDTOList) {<br /> log.info("收到告警信息: {}", JSON.toJSONString(alarmMessageDTOList));<br /> if (null != alarmMessageDTOList) {<br /> alarmMessageDTOList.forEach(e->dingTalkAlarmService.sendMessage(MessageFormat.format("-----来自SkyWalking的告警-----\n【名称】: {0}\n【消息】: {1}\n", e.getName(), e.getAlarmMessage())));<br /> }<br /> }<br />}<br /><br />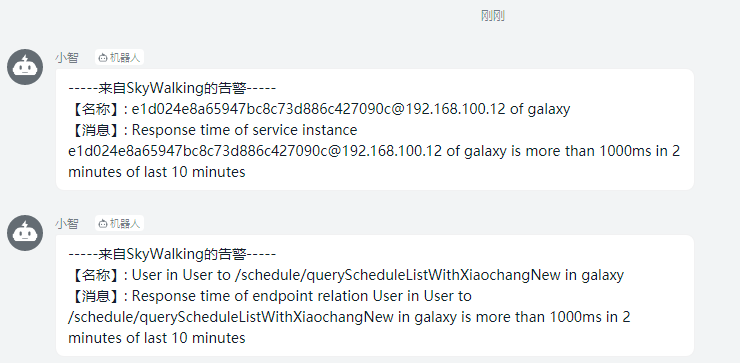<br />5. 文档<br />[https://skywalking.apache.org/](https://skywalking.apache.org/)<br />[https://skywalking.apache.org/zh/](https://skywalking.apache.org/zh/) <br />[https://github.com/apache/skywalking/tree/v8.2.0/docs](https://github.com/apache/skywalking/tree/v8.2.0/docs)<br />[https://archive.apache.org/dist/](https://archive.apache.org/dist/)<br />[https://www.elastic.co/guide/en/elasticsearch/reference/master/index.html](https://www.elastic.co/guide/en/elasticsearch/reference/master/index.html)<br />[https://www.elastic.co/guide/en/elasticsearch/reference/7.10/modules-discovery-bootstrap-cluster.html](https://www.elastic.co/guide/en/elasticsearch/reference/7.10/modules-discovery-bootstrap-cluster.html)<br />[https://www.elastic.co/guide/en/elasticsearch/reference/7.10/modules-discovery-hosts-providers.html](https://www.elastic.co/guide/en/elasticsearch/reference/7.10/modules-discovery-hosts-providers.html)

若有收获,就点个赞吧
0 人点赞
