一、Spring入门
1.1、微服务阶段
javase:oop
mysql:jdbc 持久化
HTML+ css + jquery + 框架:视图,框架不熟练,css不好
javaweb :独立开发MVC三层架构网站原始
ssm:框架:简化了我们的开发流程,配置也开始较为复杂
war:tomcat运行
spring在简化:SpringBoot -jar:内嵌Tomcat;微服务架构!
服务越来越多:spring cloud;
1.2、第一个SpringBoot程序
简化开发,约定大于配置(maven,spring,springMVC,springBoot,,,)
jdk1.8
maven 3.6.1
springboot :最新版
IDEA
可以在官网直接下载后,导入idea
直接使用idea创建一个springboot项目 new - spring init
问题:
网站连接不稳定
settings —> HTTP Proxy —->https://start.spring.io/ http://start.spring.io http://start.springboot.io/
练习:
写一个controller
打成jar包 maven - package - target - show in explorer
命令行:doc cmd — java -jar 。。。。
shell: 按住shift 右键 打开shell java -jar。。。。
更改端口号application.properties
server.port=8081
- springboot banner
banner.txt
1.3、原理初探
自动配置:
pom.xml
- spring-bootdependencies:核心依赖在父工程中!
- 我们在写或者引入一些springboot依赖的时候,不需要指定版本,父类依赖版本库管理
启动器
<dependency><groupId>org.springframework.boot</groupId><artifactId>spring-boot-starter-web</artifactId></dependency>
- 启动器:就是springboot的启动场景
- 比如spring- boot - start-web,他就会自动帮我们导入依赖
- springboot会将所有的功能场景,变成一个个的启动器
- 使用什么功能只需要找到对应的启动器
1.4、主程序
@SpringBootApplicationpublic class SpringbootApplication {public static void main(String[] args) {//将springboot应用启动SpringApplication.run(SpringbootApplication.class, args);}}
注解
- ```java @SpringBootConfiguration:springboot的配置 @Configuration:spring配置类 @Component:说明这也是一个spring的注解
@EnableAutoConfiguration:自动配置 @AutoConfigurationPackage:自动配置包 @Import({Registrar.class}):导入选择器 包注册 @Import({AutoConfigurationImportSelector.class}):自动导入选择
<a name="0a2f02c5"></a>## 1.5、SpringBoot配置```xml<parent><groupId>org.springframework.boot</groupId><artifactId>spring-boot-starter-parent</artifactId><!-- SpringBoot的版本号 --><version>2.4.5</version><relativePath/> <!-- lookup parent from repository --></parent><groupId>com.zmy</groupId><artifactId>springboot-web</artifactId><version>0.0.1-SNAPSHOT</version><name>springboot-web</name><description>Demo project for Spring Boot</description><properties><java.version>1.8</java.version></properties><dependencies><dependency><groupId>org.springframework.boot</groupId><artifactId>spring-boot-starter-web</artifactId></dependency><dependency><groupId>org.springframework.boot</groupId><artifactId>spring-boot-starter-test</artifactId><scope>test</scope></dependency><dependency><groupId>org.springframework.boot</groupId><artifactId>spring-boot-starter-thymeleaf</artifactId></dependency></dependencies><build><plugins><plugin><groupId>org.springframework.boot</groupId><artifactId>spring-boot-maven-plugin</artifactId></plugin></plugins></build>
二、SpringBoot Web开发
springboot帮我们配置了什么?能不能修改?能修改哪些东西?能不能扩展?
- xxxAutoConfiguration 向容器中自动装配组件
- xxxProperties :自动配置类,装配文件的自定义的一些内容
2.1、步骤
要解决的问题:
- 导入静态资源
- 首页
- jsp,模板引擎Thymeleaf
- 装配扩展SpringMVC
- 增删改查
- 拦截器
- 国际化,,,,
2.2、静态资源
- 源码未读
总结:
在springboot,我们可以使用一下方式处理静态资源
- webjars
localhost:8080/webjars/ - public,static,/**,resource
localhost:8080/
- webjars
优先级 :resource>static(默认)>public(读底层源码了解的)
templies的包需要导入thymeleaf模板依赖才可以用(Controller控制的templies)
controller的路径是否会覆盖静态资源的是因为注解RestController和Controller的区别https://www.cnblogs.com/shuaifing/p/8119664.html@RestMapping("/index.html")public String index(){//如果index.html没有加载进来那么index就变成了字符串return "index"}
2.3、首页
首页配置:是所有页面的静态资源都需要使用thymeleafjieguan ; @{}
2.4、模板引擎
前端交给我们的页面,是html页面。如果是我们以前开发,我们需要把他们转成jsp页面,jsp好处就是当我们查出一些数据转发到JSP页面以后,我们可以用jsp轻松实现数据的显示,及交互等。
jsp支持非常强大的功能,包括能写Java代码,但是呢,我们现在的这种情况,SpringBoot这个项目首先是以jar的方式,不是war,像第二,我们用的还是嵌入式的Tomcat,所以呢,他现在默认是不支持jsp的。
那不支持jsp,如果我们直接用纯静态页面的方式,那给我们开发会带来非常大的麻烦,那怎么办呢?
SpringBoot推荐你可以来使用模板引擎:
模板引擎,我们其实大家听到很多,其实jsp就是一个模板引擎,还有用的比较多的freemarker,包括SpringBoot给我们推荐的Thymeleaf,模板引擎有非常多,但再多的模板引擎,他们的思想都是一样的,什么样一个思想呢我们来看一下这张图:
模板引擎的作用就是我们来写一个页面模板,比如有些值呢,是动态的,我们写一些表达式。而这些值,从哪来呢,就是我们在后台封装一些数据。然后把这个模板和这个数据交给我们模板引擎,模板引擎按照我们这个数据帮你把这表达式解析、填充到我们指定的位置,然后把这个数据最终生成一个我们想要的内容给我们写出去,这就是我们这个模板引擎,不管是jsp还是其他模板引擎,都是这个思想。只不过呢,就是说不同模板引擎之间,他们可能这个语法有点不一样。其他的我就不介绍了,我主要来介绍一下SpringBoot给我们推荐的Thymeleaf模板引擎,这模板引擎呢,是一个高级语言的模板引擎,他的这个语法更简单。而且呢,功能更强大
2.4.1、引入Thymeleaf
怎么引入呢,对于springboot来说,什么事情不都是一个start的事情嘛,我们去在项目中引入一下。给大家三个网址:
- hymeleaf 官网:https://www.thymeleaf.org/
- Thymeleaf 在Github 的主页:https://github.com/thymeleaf/thymeleaf
- Spring官方文档:找到我们对应的版本:https://docs.spring.io/spring-boot/docs/2.2.5.RELEASE/reference/htmlsingle/#using-boot-starter
找到对应的pom依赖:可以适当点进源码看下本来的包!
<dependency><groupId>org.springframework.boot</groupId><artifactId>spring-boot-starter-thymeleaf</artifactId></dependency>
2.4.2、语法学习
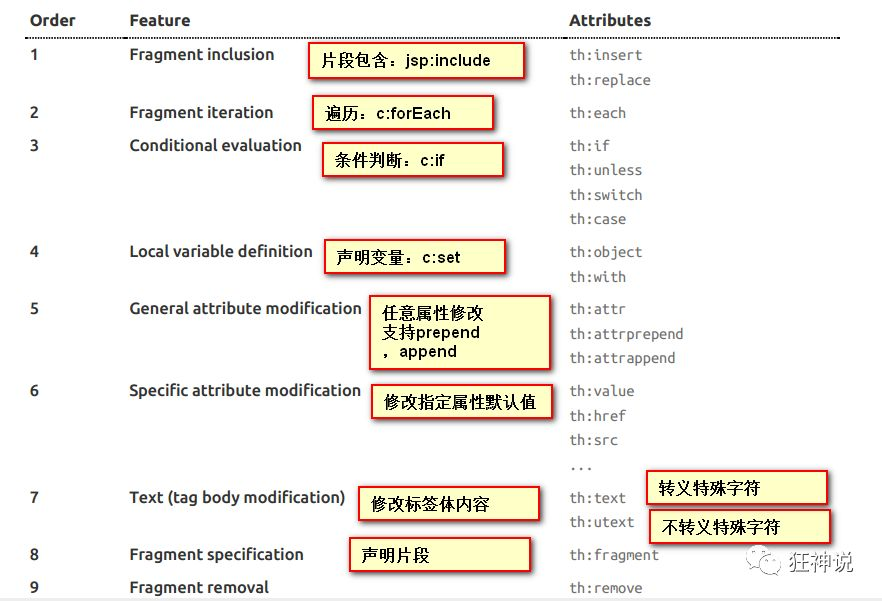
- 使用thymeleaf,需要在HTML文件中导入命名空间的约束,方便提示
xmlns:th="http://www.thymeleaf.org"
- 我们可以使用任意的 th:attr 来替换Html中原生属性的值!


